
The Open Mesh A60 is one of the two wireless access points that have been recently released by the American manufacturer (the other being the Open Mesh A40) and each of these devices come as the natural evolution over the extremely popular OM series (the first to introduce us to the proprietary cloud-based controller called CloudTrax – which was and remains free).
| Open Mesh A60 | |
|---|---|
| Open Mesh | Check Offer |
| Amazon.com | Check Offer |
I actually had a look at one access point from the aforementioned series, namely the OM2P-HS, which had some interesting qualities, such as the ability to cover a large area with WiFi and the easy deployment, but the most important aspect was the implementation of the mesh technology (which was quite ahead of its time – only towards the end of the last year did we saw an increasing interest towards the mesh properties with the emergence of the mesh WiFi systems).
UPDATE 08.22.2018: It’s been close to a year since I last tested and reviewed the Open Mesh A60, so it’s time to retest the wireless access point and see how it stands today after some significant firmware upgrades.

The A series retains pretty much every element that made the OM series great, but it also comes as an improvement in many respects: the access points can be used both indoors and outdoors (being able to survive extreme weather), they’re able to cover a larger area with WiFi, can handle a larger number of clients and do take advantage of the PoE 802.3af standard (while before, only the 12-24v passive PoE was supported). As always, Open Mesh remains the go-to manufacturer when it comes to reliable and reasonably-priced high-end access points, so let’s have a closer look at what makes the A60 a great WiFi solution for both home use (especially, if you have a larger property) and for small or medium businesses (special thanks to Open Mesh for providing a review sample).
Design and Hardware Installation
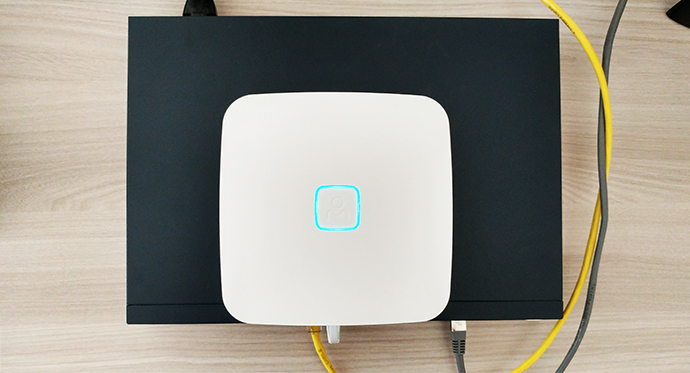
While the OM series is well-known for its small form-factor devices that could be easily deployed in large numbers anywhere in the house (but needed an enclosure if mounted outside), the A60 went a different road altogether from the design point of view, featuring a white rectangular case with rounded corners covered by a matte finish (it won’t retain any fingerprints).
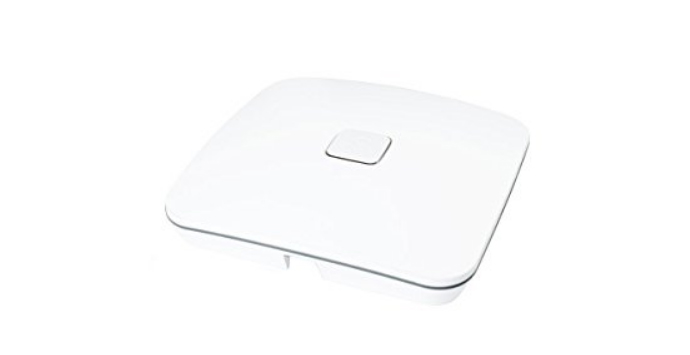
The body of the A60 is significantly larger than that of the OM2P-HS and on the middle, there is a carved square with the Open Mesh logo (similarly to the previous instalments, the A60 can be rebranded by resellers). So, the A60 has a bit more personality even if it kept a minimalistic design approach, managing to resemble a flush mount ceiling light (or a smoke detector, such as the Nest Protect), something that will be appreciated if the access point will be mounted on the ceiling or on the wall.
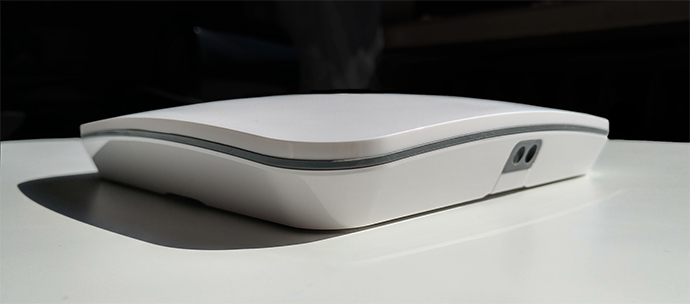
Even if the new series has grown in size, considering that the A60 is a 3×3 access point with 6 internal antennas, it is surprisingly compact (measuring 6.5 x 6.5 x 1.2 inches) and it is reasonably lightweight (it weighs 0.99 pounds). But, if you decide to position it on a desk, the case has four rubber feet that are slightly elevated which will prevent the access point from budging (it is actually ridiculously resilient to movement). If you want to use the A60 in a business environment, then mounting it on the wall or ceiling could prove to be the better idea and you do get a complete installation kit inside the package that makes this process very easy: take the mounting plate and use a couple screws to connect it to the wall in the preferred area; next, take the A60 unit, remove the small plate on the back of the device and the silicone seal, connect an Ethernet cable to the Ethernet1 port and simply slide the access point into place (the A60 can be powered only using PoE, so you either need a compatible switch or a PoE adapter).
The Open Mesh A60 can also be mounted on a T-rail ceiling rail, but you need to take some extra steps: connect the two fixed T-rail clips and the two adjustable T-rail clips to the back of the mounting plate, clip the channel cable cover in the area where you removed the silicone band and simply attach the access point to the mounting plate, which should easily connect to the rail.
Note: The Open Mesh A40 shares the same size as the A60.
Open Mesh claims that the A60 can be mounted outside and the build quality seems to confirm it: the main body is divided into two pieces and there’s a rubber seal where the two parts meet to prevent water or dust from entering the case (it is IP55 rated), the Ethernet cables are also sealed by a silicone band and gasket and, nowhere was I able to find any cut-outs that would suggest vulnerability to heavy rains (the fact that it is completely sealed could raise some concerns about its heat management, but, even connected to multiple devices, the A60 did not overheat – but it did get warm). Furthermore, its operating temperature ranges between -4 to 122 degrees F, so, if you live in an area where the temperature goes below the advised minimum (or above the maximum), it’s better to keep the access point indoors. The A60 can be mounted outside, on a pole (without a special enclosure) and all you have to do is use zip ties or a metal ring to attach the mounting plate to the pole (then, just slide the access point into place).
Open Mesh has went a similar route as many other recent networking devices and equipped the A60 with a single LED light which shines from underneath the square from the top of the device. The LED indicator has the role of showing the status of the device or that of the network and these are some of the states: the LED will be solid yellow, when the device is starting up and solid purple for the boot loader; the LED will be solid red when the access point is upgrading the firmware and it will flash red if there is a net failure (no default route); the LED will flash white if there is a CloudTrax check-in failure and it will be solid white when the configuration is not ready (there are also some gateway and repeater specific states, such as mesh speed below or equal to 2 Mbps (flash green), above 2Mbps (solid green), Orphan (flash yellow, then green) or Lonely mode (flash red, then green)).
I have to admit that I have never been a fan of this type of system since the colour code is not something universal (except maybe for red, which usually indicates an error) and to actually understand what’s going on with the device, the user needs to consult the manual.
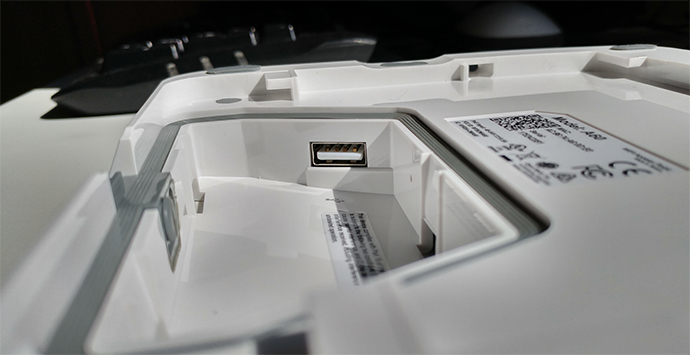
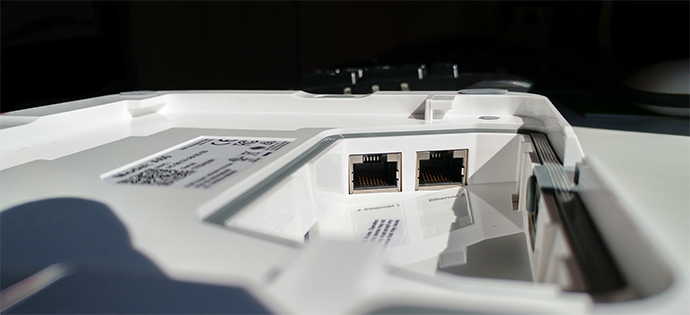
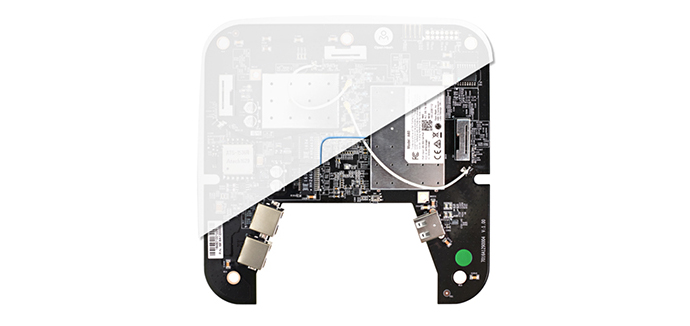
If you turn the device upside down and remove the protective piece of plastic, you’ll be greeted by a carved area, where you can find a recessed Reset button (accessible with a paper clip – resets the device to factory default settings), an Ethernet 1 Gigabit port (used for powering the access point – you will either need an 802.3af PoE injector or a PoE switch and, since quite recently, Open Mesh released its first series of cloud-managed PoE switches, it is worth taking a look as the S8, as it will work great with the A60 access points and will ensure a flawless integration with CloudTrax), an Ethernet 2 Gigabit port and a USB port (which, similarly to pretty much all the newly released mesh WiFi systems, is inactive and it’s left for possible future use).
Note: Inside the package, you can find one Open Mesh A60 access point unit, a very small Ethernet cable, two fixed T-rail clips, two adjustable T-rail clips, a mounting plate, a channel cable cover, blank centre tab (for custom logo), a Quick Start Guide and, as you can see, it does not come with a PoE injector.
Hardware
Inside the case, the Open Mesh A60 is equipped with a Qualcomm QCA9558 SoC, 128 MB of RAM (NANYA 1636 NT5TU32M16BG-AC) and 16 MB NOR flash (Macronix mx25l12835fmi-10g). Furthermore, the 2.4GHz radio band uses the Qualcomm QCA9558 chip, while the 5GHz radio band uses the QCA9880 802.11a/b/g/n/ac 3×3 radio SoC.
The Open Mesh A60 features a maximum theoretical data transfer rate of 450 Mbps using the 2.4GHz radio band and a maximum theoretical data transfer rate of 1,300 Mbps using the 5GHz radio band (added to the advertised 1,750 Mbps).
Setup and Features
The centrepiece of the Open Mesh access points is, as expected, the integration within the cloud-controller called CloudTrax. You can either perform the hardware installation of the device and then configure it via CloudTrax or, you can first create the configuration and, when the access points goes online, it will automatically use the configuration via the cloud. This is where the advantages of using a cloud-based controller comes to light, as you can configure your network from pretty much anywhere in the world (you will need a reliable connection), add and monitor an unlimited amount of devices through the CloudTrax and use the service for free (while other manufacturers have decided to make this feature a costly option). There may be a shortcoming though, as you are dependant on the longevity of the company, since, so far, you can’t configure the access point in any other way than using CloudTrax (if you lose the connection to the Internet for whatever reason, you can still use the access point, but you won’t be able to change the settings).
So, after the hardware installation of the A60 is done (check the Design and Hardware Installation section for any necessary info), you need to create a new network using the CloudTrax controller, so you can add, manage and monitor your access point and any other device you will connect to the new network (such as a PoE switch).
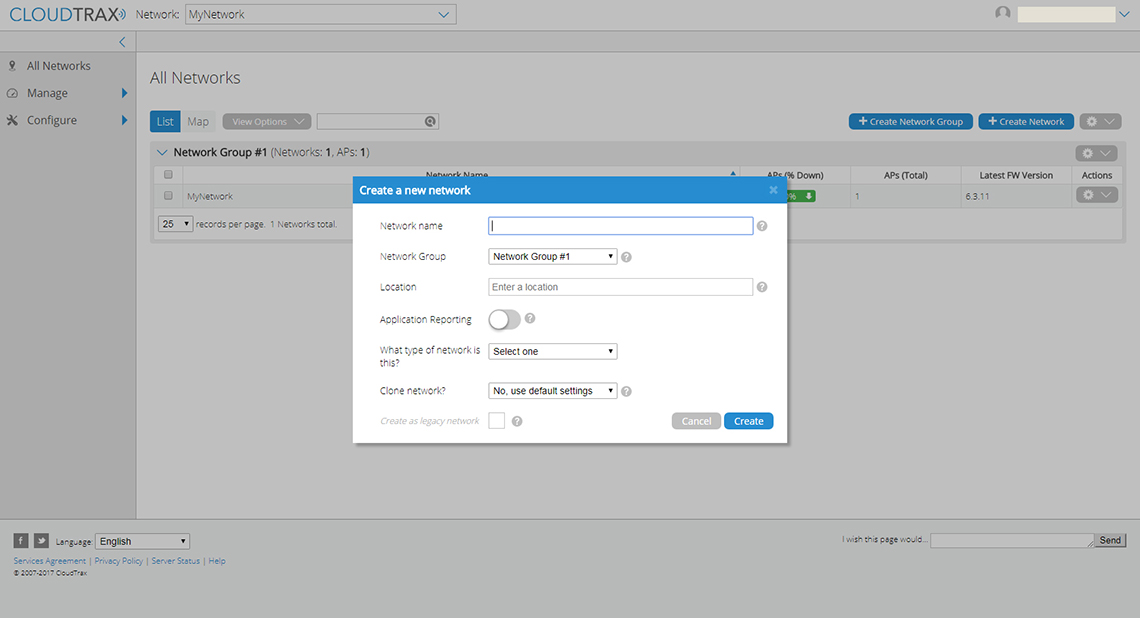
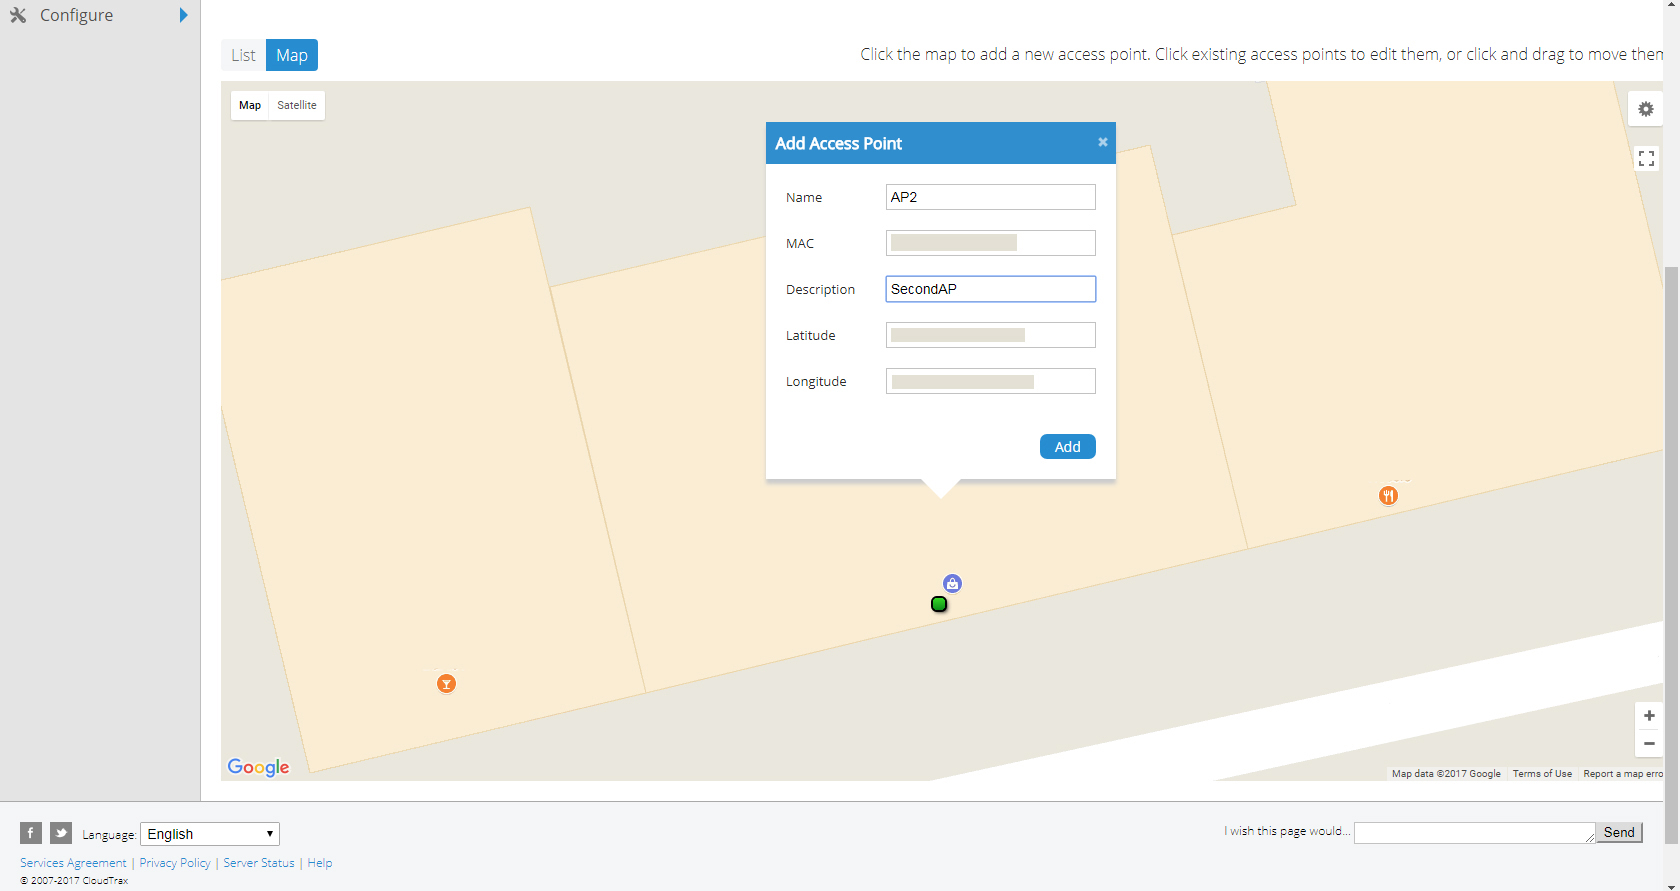
The first step requires that you sign up to the cloudtrax.com, gain access to the user interface and, on the All Network page, choose Create a Network (you can also Create a new Network Group). After you have created a new network, it’s time to add the new access point: to do so, go to Manage and, afterwards, to Access Points (Select List, if you are greeted by the Map) and simply click Add New (if you click on the arrow, there are three options available: Add access point on map, which is the default option, Bulk add access points via MAC or Bulk add access points via CSV upload). Next, a new window will pop up (with the map in the background), where you’ll have to insert the Name of the access point, the MAC address (can be found on the bottom side of the device – needed for the configuration to be applied to the device after it goes online), the Description and, by default, you’ll see the Latitude and Longitude of the access point. Press add and wait for the access point to get paired to the CloudTrax.
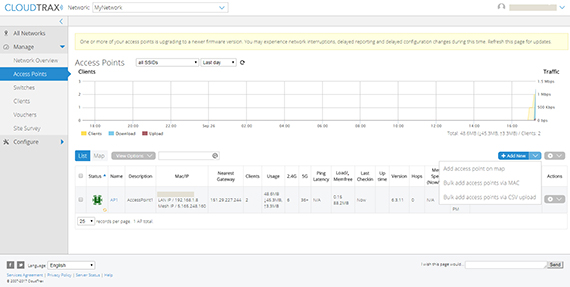
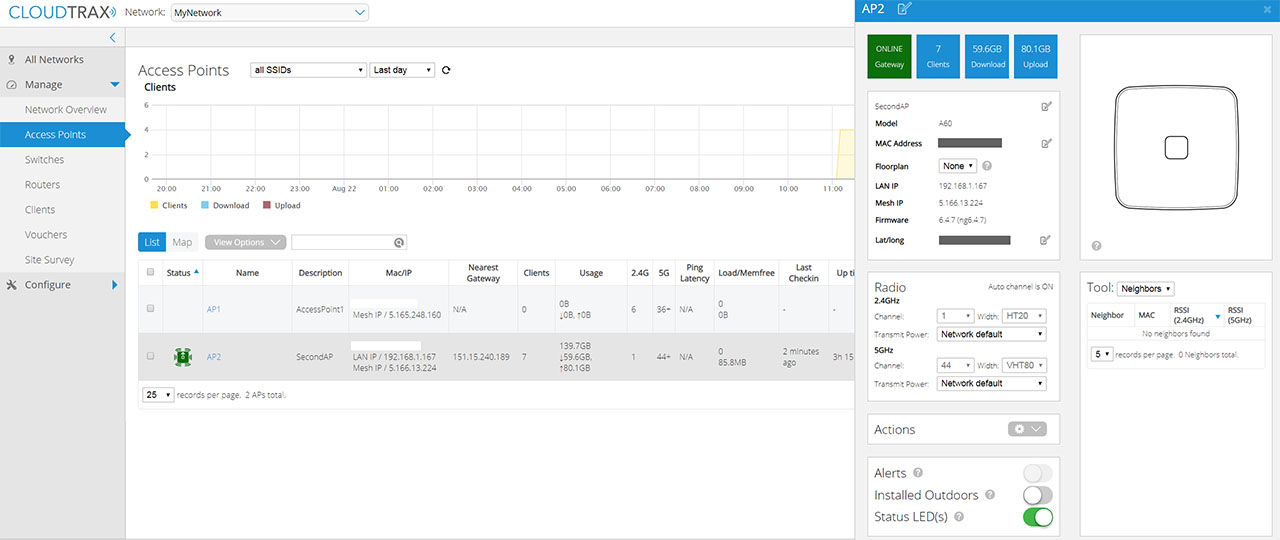
The newly added AP will appear in the Access Points page, where you can also view a graphic representation of your traffic (download and upload), as well as the number of clients over a specific period of time. Underneath it, you get to see the list of connected access points, along with some of their properties (status, name, description, MAC/IP addresses, the nearest Gateway, the number of clients, the upload and download usage, the channel used for both the 2.4 and 5GHz radio bands, the Ping Latency, the Load, Hops, mesh speed, outages and more – choose which options will appear by clicking View Options). If you click on the name of the access point, a new window will pop up with more structured info about the device: on the top left, there are four small squares which show the status of the access point, the number of clients connected to the network, as well as the total download and upload data.
Underneath it, you can see other various details about the A60 (name, MAC address, floorplan, LAN and Mesh IP, the firmware and the map coordinates), while on the right, there is a graphical representation of the device (you can add your own custom photo). Further down, you can see the Radio channels, reboot the device (through Actions), disable the Alerts and if you have more than one access points connected to form a mesh network, you’ll also see the Mesh Speed and the Nearest Gateway. On the right, there’s the Tools section which shows you the Neighbors (name, MAC address and the RSSI for both radios).
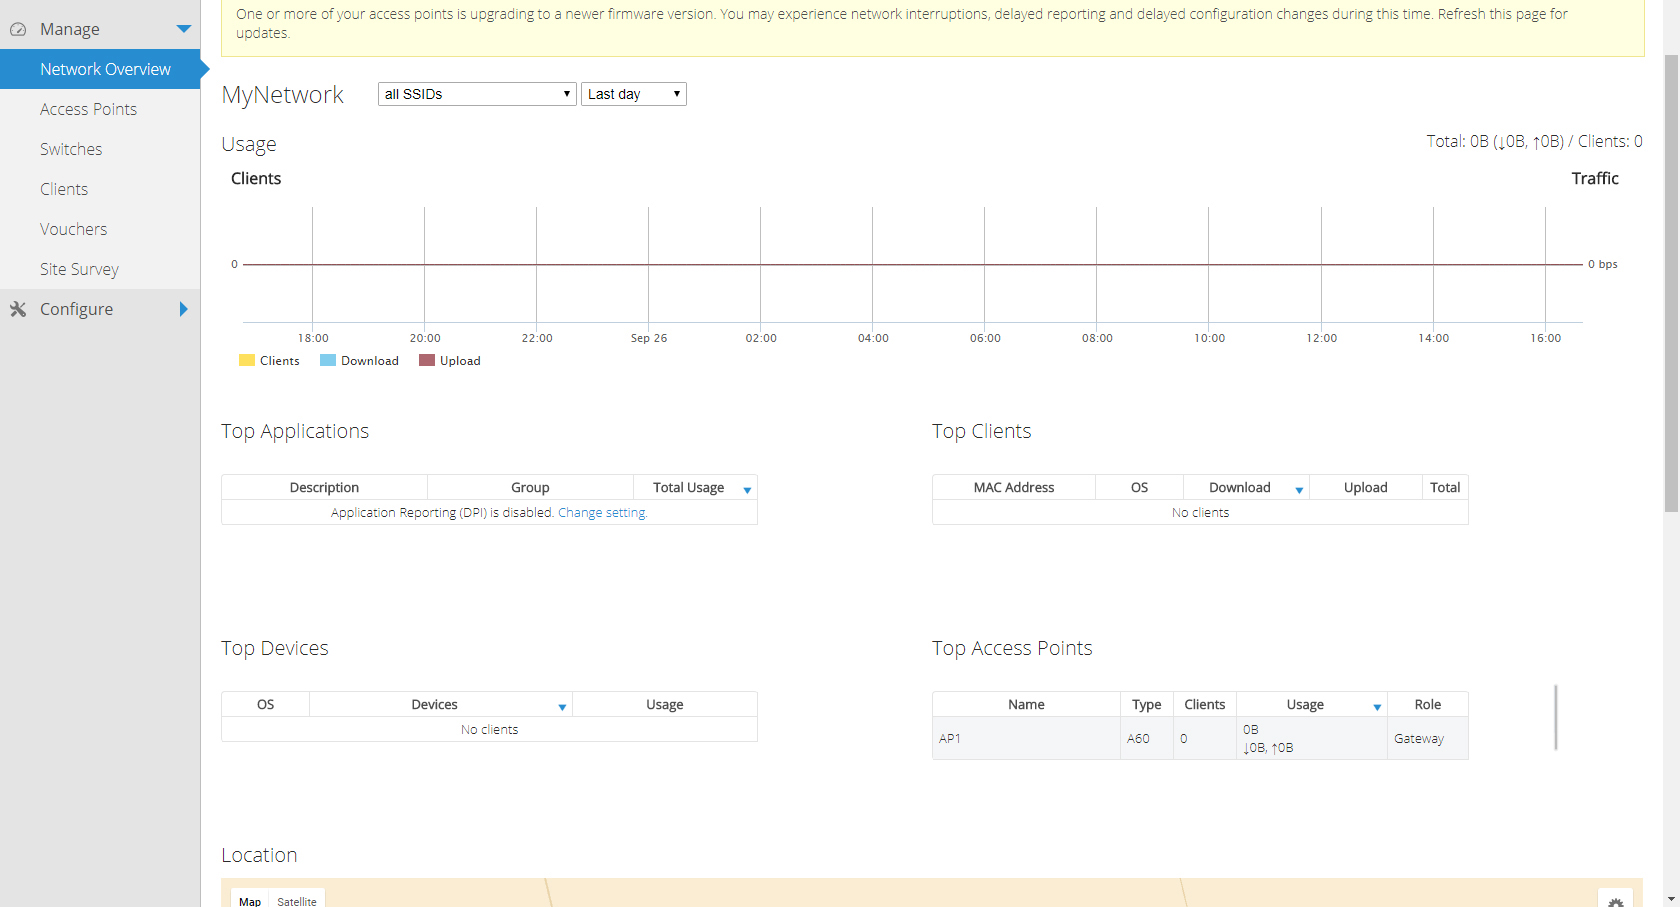
Under the Manage section, you can navigate to the Network Overview, to see the Top Applications, the Top Clients, the Top Devices, The Top Access Points and the Location. By accessing the Clients sub-section, you can see a list of all the connected devices (each with its own set of info: the MAC address, the last access point and the SSID it got connected, the OS, the radio, the size of the download/upload data and the usage) and a list of all the blocked clients. If you want to install the A60 in a restaurant, hotel or coffee shop, you’ll be delighted to see that the CloudTrax has implemented the Vouchers section, which allows the creation of unique codes that will be used by your clients to gain temporary access to your network: you can set the duration, the maximum devices that will be connected, the download and upload limit and purge it after several days (you can also edit the splash page). The last point of interest under the Manage section is the Site Survey, which display a detailed list of all the active WiFi networks in the vicinity.
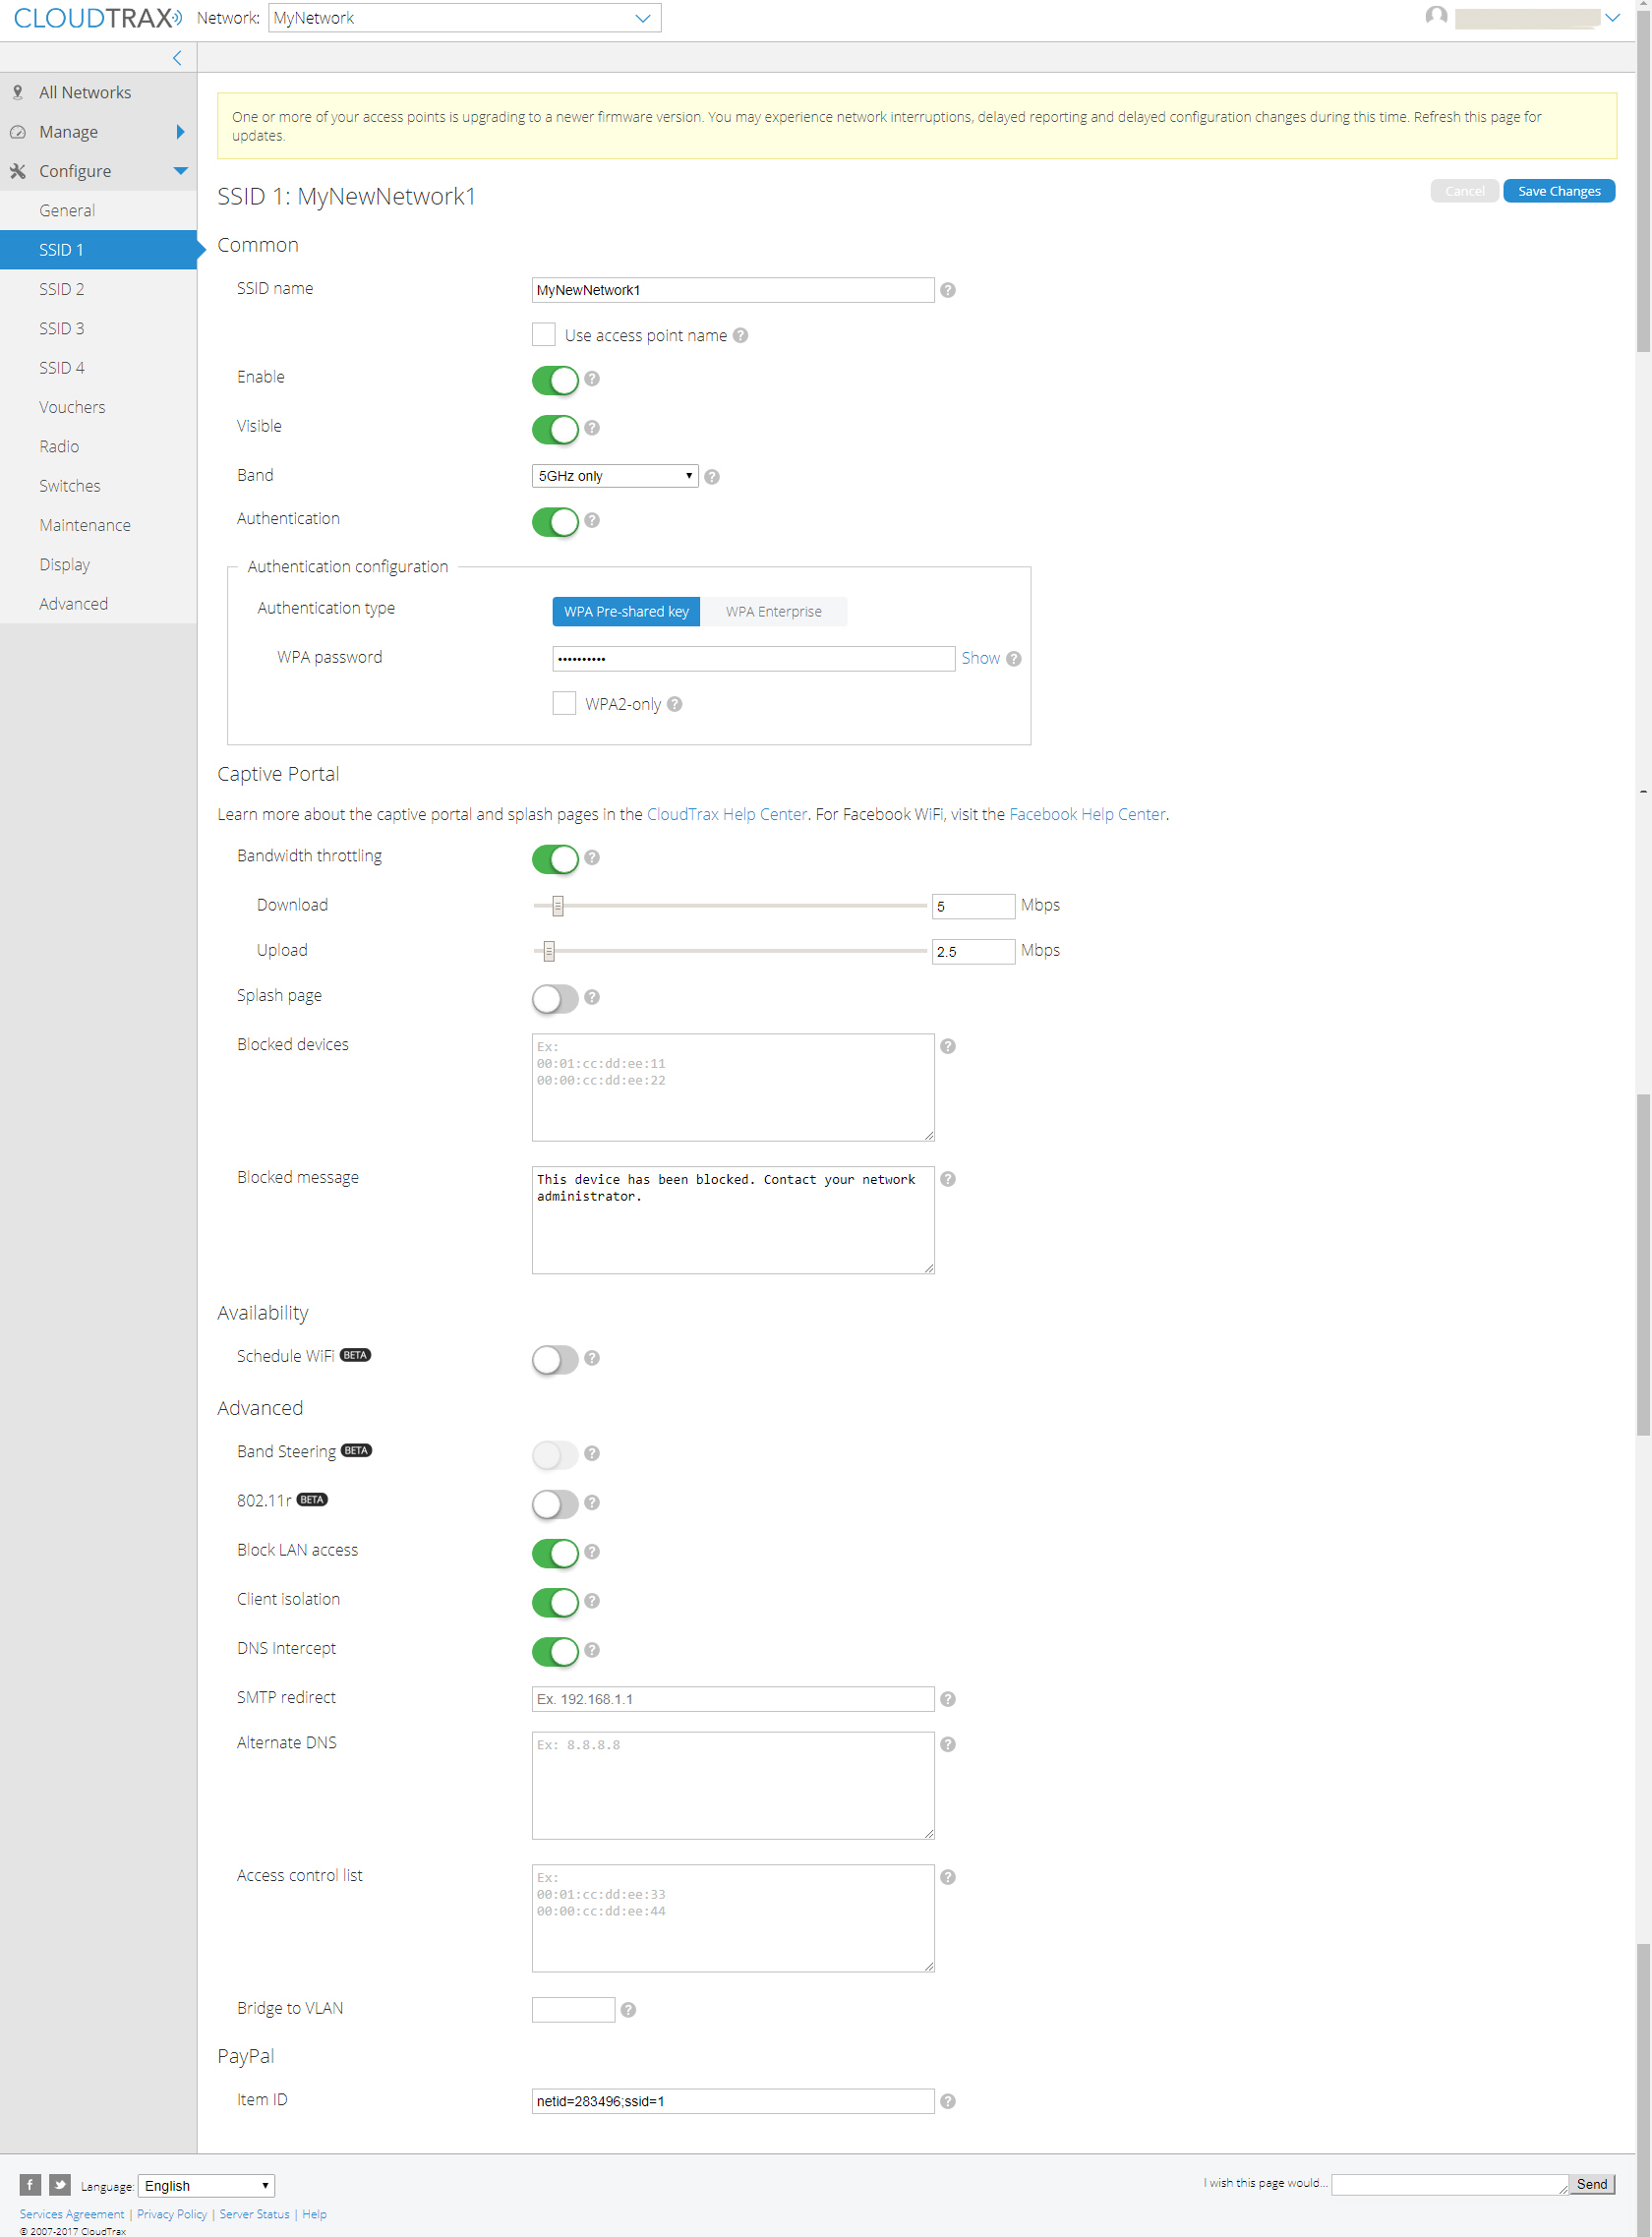
If you go to the Configure section, you can enable email Alerts (you can add multiple email addresses which will receive a message the moment an access point goes offline) or change the parameters of the four SSIDs: each will give you the option to choose the band and change the password, as well as limit the upload and download speed, enable the Splash page (users will have to either enter a voucher or purchasing accessing right using PayPal), create a list of Blocked devices (you can also enter a custom message for blocked users) or create schedules for when the WiFi will be available. You can also change some more Advanced settings, such as the Band Steering (which, at the moment will help keeping the 2.4GHz less crowded by attempting to move compatible devices to the 5GHz, when possible), enabling the 802.11r (or the fast BSS transition, which has the role of reducing the handoff delay when an end device goes from one access point to another), block the LAN access, enable Client Isolation (if you don’t want your devices to communicate), enable the DNS Intercept, set the Syslog Server, create an Alternate SMTP server IP address or an Alternate DNS IP address, create an Access control list or Bridge and tag the traffic from this SSID to the specified VLAN (you can also configure the PayPal access).
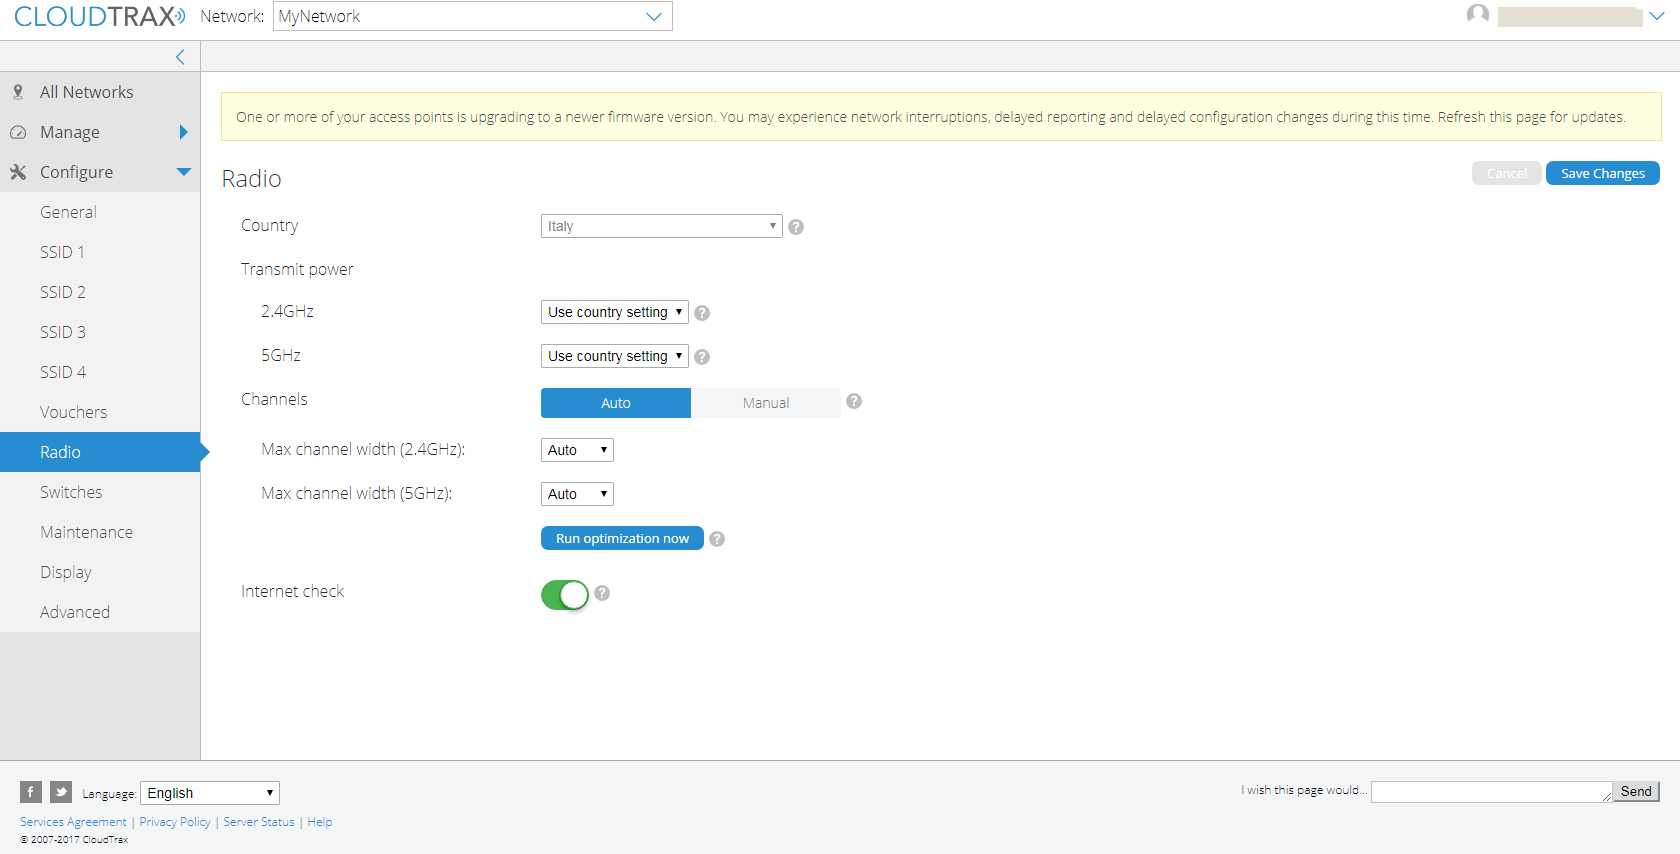
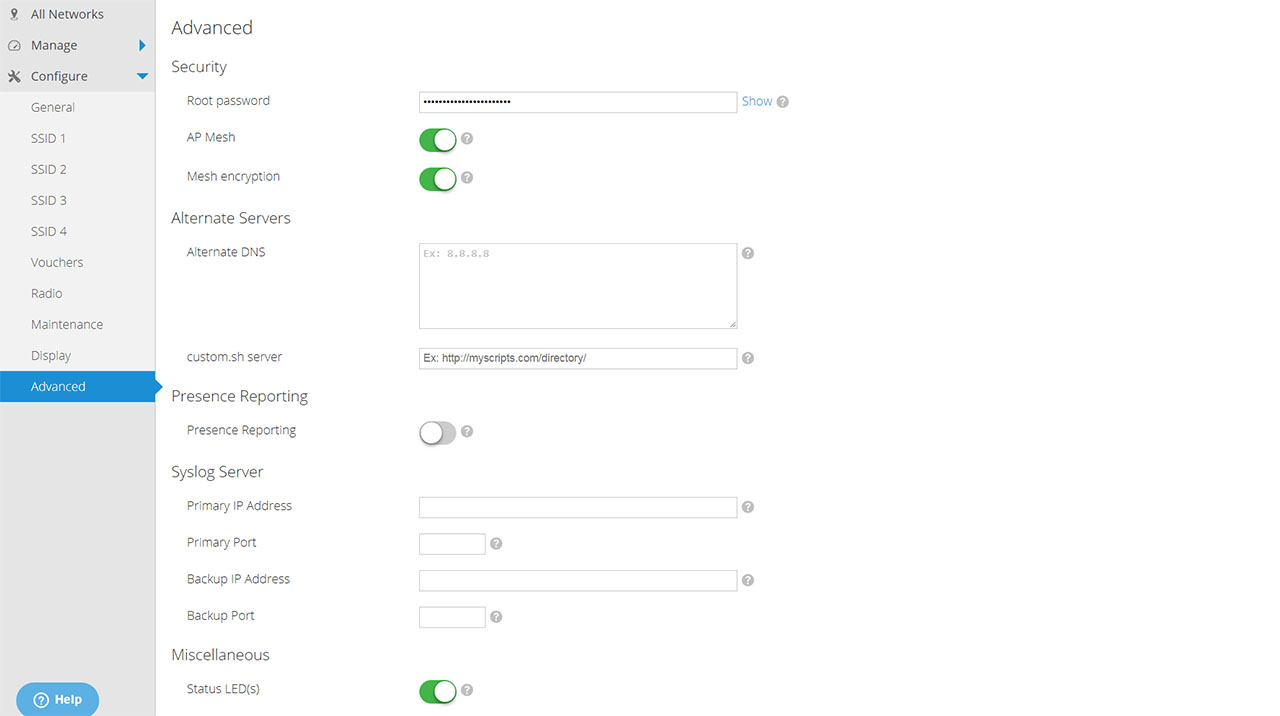
Also under the Configure section, you can change the settings under Radio (choose the Transmit power, the Max channel width and make the WiFi network visible only if there is an Internet link available), Maintenance (enable Automatic upgrades and view the current Firmware release) or Advanced: which allows you to change the Root password, turn on the AP mesh capability and create a Mesh encryption, enter a custom.sh server URL, enable the Presence Reporting (a useful API for exporting presence data about your wireless clients for location analytics – it is a free service for now), enable or disable the Status LED from your access point (useful if it becomes a nuisance during the night), choose the SSID to which a wired client will be connected to as an access point (Bridge wired clients) and choose an SSID to bridge to the LAN (Bridge SSID), enable the Application Reporting (DPI) or enable the IGMP Proxy (to allow multicast traffic over the LAN).
Note: Open Mesh has also made available a CloudTrax app for both the iOS and the Android OS and, similarly to the browser version, you can monitor the connected access points (you can also add new APs or new switches), check the clients and the traffic and you get full access to the Configure section (on the app, it’s called Settings), which allows you to do an in-depth configuration of your network and access points (as well as any connected switches).
Performance
Open Mesh has been actively associated with the WiFi mesh technology, especially because of the early OM access points that took advantage of all its properties and it seems that the A series has also implemented this tech so, you can still create a larger mesh network by using multiple access points. If you’re unfamiliar with how a mesh network operates, know that every connected device is considered a node and each node can connect to the most convenient access point from its vicinity (by taking into consideration the number of connected devices, the used channels and the radios that are being used, the signal strength and more).
You can add a large number of access points to the mesh network and every time, the data will be rerouted to the best path possible (each added node creates new possible roads for a faster transfer) and, if a node fails, the data is once again rerouted through the closest and least crowded node, so you won’t experience any downtime. But, as can be seen with the WiFi mesh systems, you shouldn’t add a high number of nodes to the network, because you will have to deal with the backhaul traffic (which has the potential to make the whole network unusable).
Even so, one big advantage of the mesh technology is that you can get a seamless connection even if you move around a larger area (as you will be automatically disconnected and reconnected to the closest access point – this process will be unnoticeable) – the Open Mesh A60 doesn’t seem to follow any mesh standard, so it uses a proprietary technology and it functions on a similar manner as the WiFi mesh systems (such as the Velop, Orbi or Google WiFi).
In order to test the wireless performance of the A60 (the second time), I took two computers: the first is a high-end laptop which gets connected using a CAT6 cable to the access point and it acts as the server (it draws its power from the S8 switch), while the second computer is equipped with a powerful WiFi adapter (the Asus PCE-A88) and acts as the client. First, I set the access point to use the 2.4GHz radio band only (implicitly, the 802.11n standard) and I have tested the server-to-client speed: at 5 feet, I measured an average of 148 Mbps 151 Mbps, while at 15 feet, the speed went down to 123 Mbps. At 30 feet, the speed was 105.8 Mbps 120 Mbps.
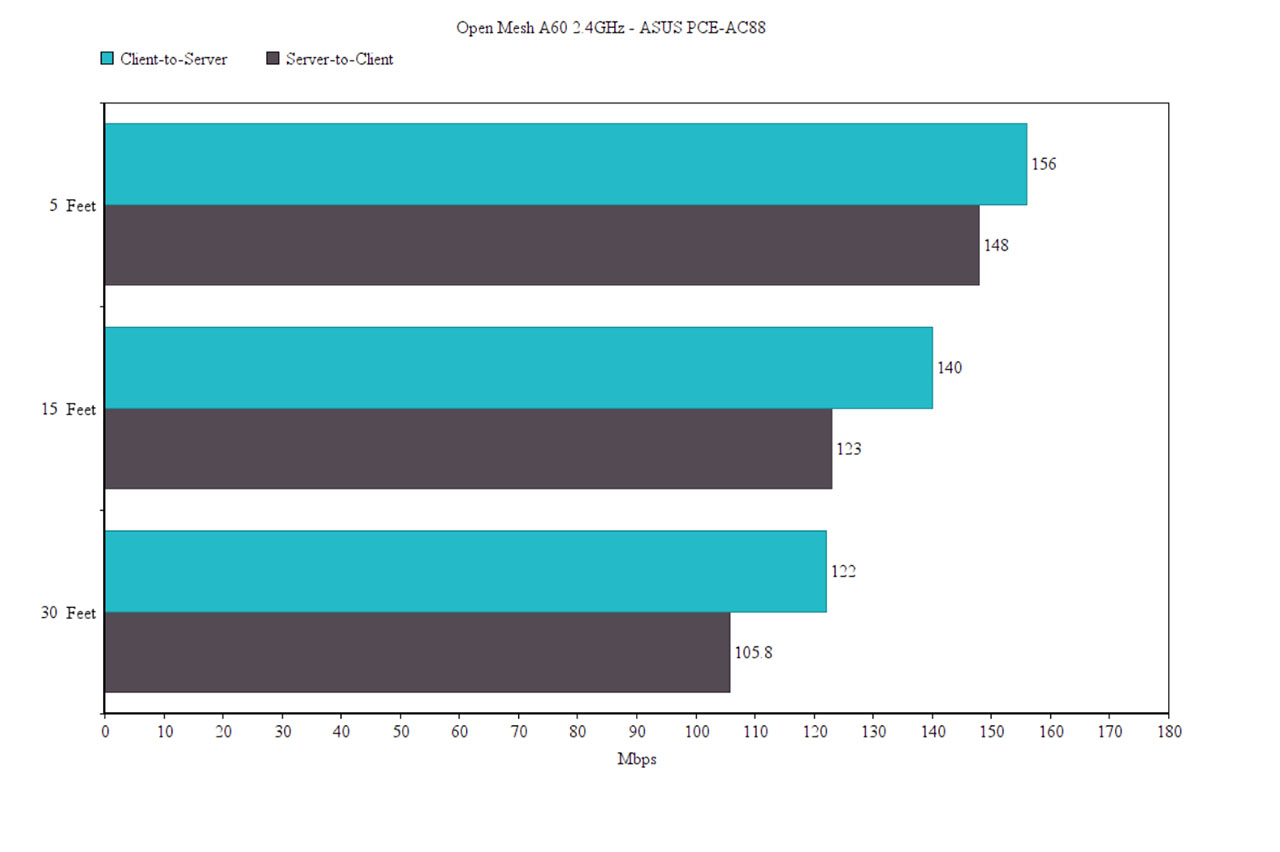
The client-to-server speed has proven to be better, as I was able to measure an average of 156 Mbps 165 Mbps at 5 feet, 140 Mbps at 15 feet and 122 Mbps 132 Mbps at 30 feet. It’s interesting to see that overall, the 2.4GHz is slightly worse than the first time I wrote the article, but considering that I tested the device in real-life conditions (and in a new location), the interference could be the reason.
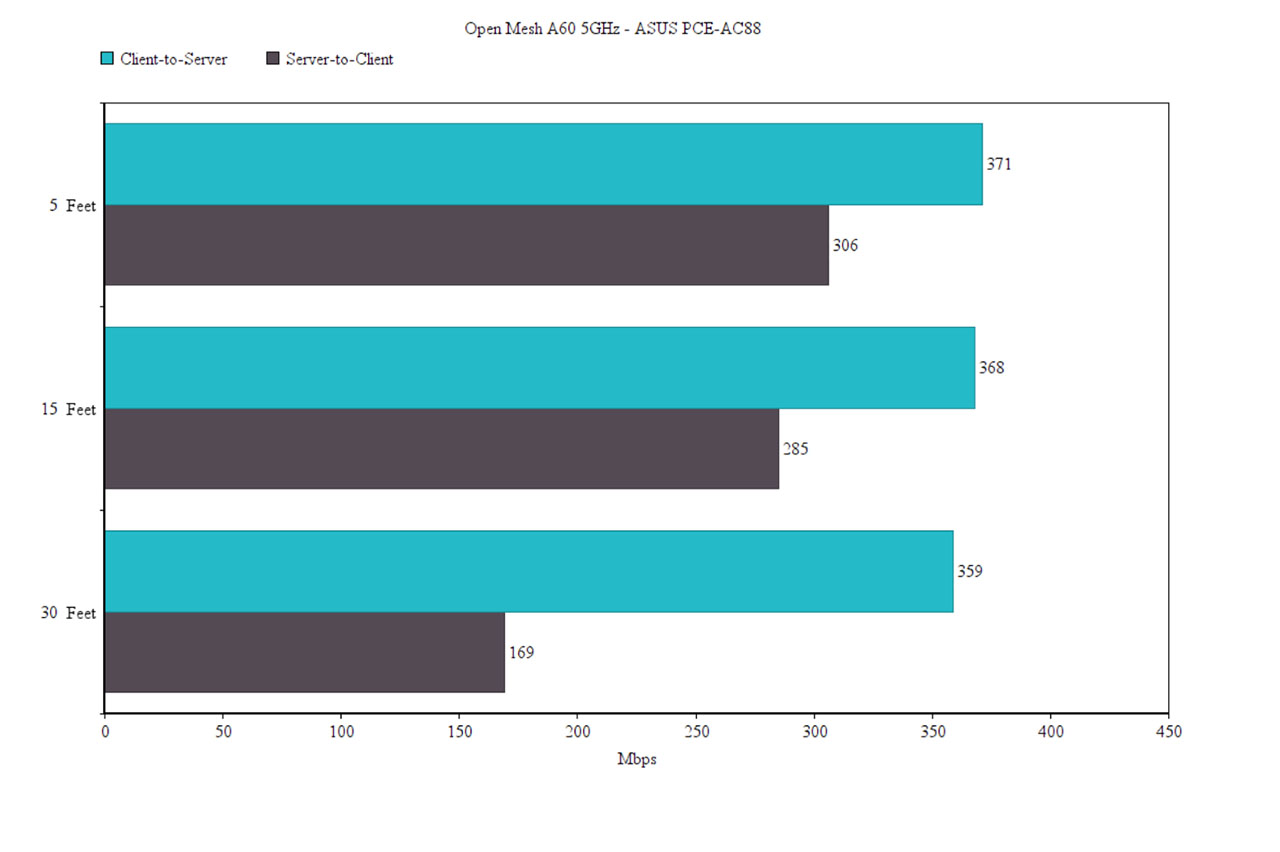
Next, I switched to the 5GHz radio band (the 802.11ac standard) and, first, I tested the client-to-server speed: at 5 feet, I measured an average of 371 Mbps 390 Mbps, while at 15 feet, I measured 368 Mbps. At 30 feet, the speed decreased to 359 Mbps 184 Mbps. Afterwards, I tested the server-to-client speed and, at 5 feet, I measured an average of 306 Mbps 365 Mbps, while at 15 feet, I measured 285 Mbps and, lastly, at 30 feet, the speed went down to 169 Mbps 156 Mbps. Overall, the 5GHz wireless performance seems to be improved and it is a lot more stable.
Conclusion
Similarly to its predecessors, the Open Mesh A60 offers everything one would expect from an access point (a strong signal, a good wireless performance, a minimalist design and an easy deployment), but it also adds some new and unique features that will make a difference and will give it an edge over its competitors: it has implemented the mesh technology (to cover a larger area and maintain a seamless transition through the access points) and the CloudTrax cloud controller, which is one of the most intuitive pieces of software I have encountered, allowing an incredibly easy installation and configuration process from pretty much anywhere in the world (if I would have to choose between CloudTrax and the UniFi controller, I found the former to be better structured and with a softer learning curve, especially for new users).
Check the product here:
![]()

Open Mesh A60

Pros
- CloudTrax Integration
- Minimalistic Design
- Great Wireless Performance
- The Mesh Technology
- Can Be Used Both Indoors and Outdoors
Cons
- Can't Be Configured Locally
- Inactive USB port
Just came across this website and really like the detail in your reviews. Also impressed that you have the newer Open Mesh products reviewed here – well done.
Hav you considered reviewing the newer Open Mesh A62 (compared to the A60) and compare against Netgear Orbi Pro and Linksys Velop for business applications?
I setup my client with the Open Mesh MR1750 about 2 years ago and now weighing between the newer A62 versus LinkSys Velop or Orbi Pro… my client doesn’t need a complex enterprise solution.
Also – Velop has newer dual band mesh units available now.
I’ll keep reading.. thanks
I cannot say if the OM A62 is better than the Velop or Orbi, but the A60 has kept a stable connection for almost a year now and the Cloudtrax controller is superior to the software of any home WiFi system available on the market.
I will try to get my hands on the newer access points, as well as their newest router to see what kind of improvements they have made from the previous generation.
Hi,
Nice review which I can only confirm from my experience.
Just wanted to point out that for people living in Belgium, France & the Netherlands they can buy open-mesh online from https://www.openmesh-be.com/webshop
Keep posting those nice reviews!