
The Imilab EC4 is a 4-megapixel wireless camera that was designed to survive outdoor conditions and yes, this is the successor to the Imilab EC2, featuring a better sensor, up to 2.5K resolution (1440p), a higher viewing angle and a slightly bigger battery.
| Imilab EC4 | |
|---|---|
| ImilabGlobal.com | Check Product |
| Batna24.com | Check Product |
The Imilab EC4 also has a nearly identical case to its predecessor, but the hub has an entirely different design. Indeed, the Imilab EC4 does make use of a small hub which supports up to five identical cameras to be connected at the same time, wirelessly. I have seen a similar approach with the Netgear Arlo suite of cameras and without a doubt, these were one of the sources of inspiration. Furthermore, Imilab has also made available a solar panel to continuously charge the battery of the EC4 and this is a now common (and very welcomed) approach with outdoor cameras since it removes the need to remove the device from time to time to recharge it.
And the 5,200mAh battery should prove to be enough for a few months of use (on a single charge), unless there is a lot of activity in front of the lens. Imilab does have at least a couple of difficult competitors, the aforementioned Netgear with the Arlo cameras and the Argus series from Reolink, both offering a satisfying track record of improvements with each new generation. The Imilab EC4 is trying to combat them by offering full-color night vision and what the manufacturer calls the AI face recognition and local human detection (a feature that, apparently, works locally). Is this enough to help the Imilab EC4 rise above its competitors? Let’s find out.
Camera Design and Build Quality
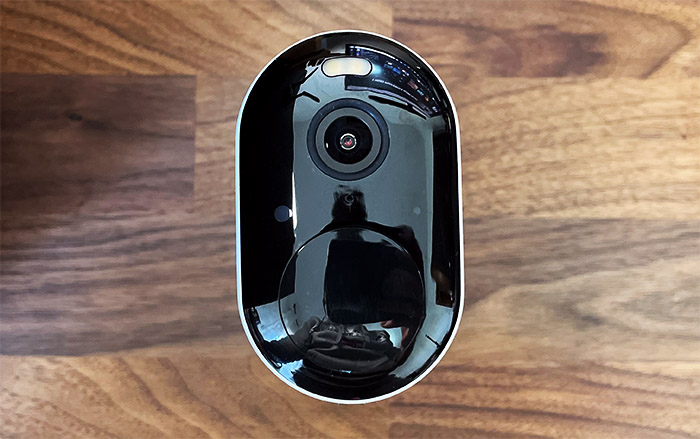
The Imilab EC4 features a pod-shaped case covered by a white glossy finish and with a glossy black front, a design that’s very common with wireless outdoor cameras. The device is fairly compact, measuring 3.4 x 3.2 x 2.0 inches (8.6 x 8.2 x 5.0 cm), so it’s a bit smaller than the Argus 3 Pro which makes sense considering that it has a smaller battery (6,500mAh vs 5,200mAh of the Imilab EC4). The case of the camera curves nicely and, save for the Imilab logo on the sides, the design remains clean and simple. Of course, the minimalist look is broken at the bottom, where there’s a Sync button and a rubber seal.
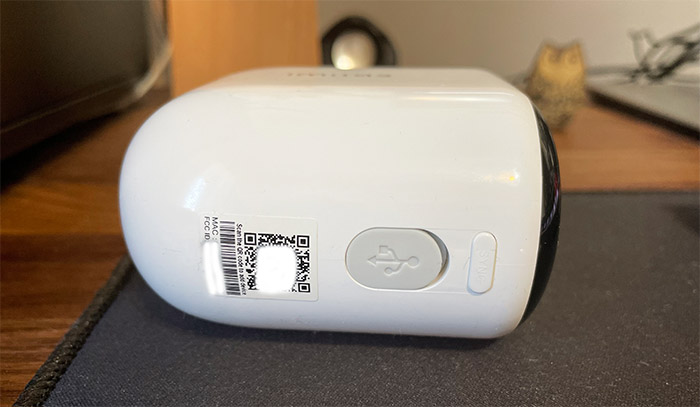
The Sync button can be used to power On/Off the camera (press and hold it for 2 seconds until the LED gets blue or 15 seconds until the LED starts blinking red) or for resetting the device to its factory settings (press it for 8 seconds until the LED flashes blue). It’s also use for syncing the EC4 to the hub, as expected. The aforementioned LED will show the status of the camera and it’s positioned on the front, next to the middle-placed microphone hole. Next to the Sync button, you can access the charging port by opening the sturdy silicone cover and, unfortunately, the manufacturer went with microUSB.
I have no idea why they thought that’s a good idea considering that most have already migrated to the USB-C, but I assume it was a recycled part of the EC2 (although the design is not really the same between the two cameras). In any case, the silicone cover will be able to prevent any water or dust from entering the camera enclosure and, after looking around the case, I noticed that there are no other openings. I even tried to remove the front cover to gain access to the internal components, but could not detach it. So yes, the Imilab EC4 is properly sealed and it is IP66-rated which means that the camera is completely sealed from dust ingress and it should also be able to handle powerful jets of water.
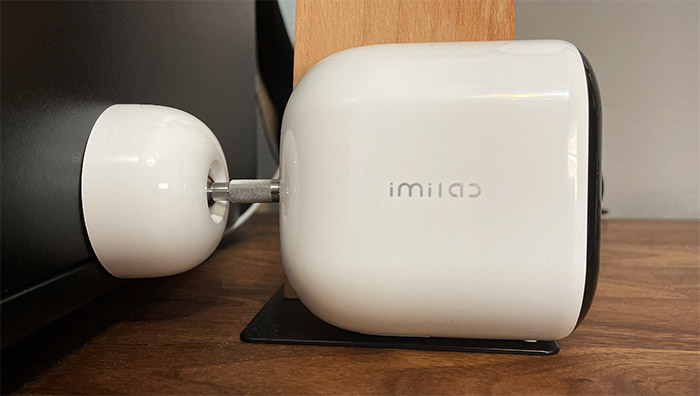
And this is needed when you mount a device outdoors, since the storms will definitely challenge the build quality of the EC4. The temperature at which it will remain operational ranges between -4 to 122 degrees F (-20 to 50 degrees C) and that should be enough for most areas in the world, especially since, unfortunately, proper winters are starting to be a thing of the past. Inside the case, I noticed that the manufacturer has added a nicely designed support which can be screwed to the rear side of the camera. The support allows a fairly decent angle adjustment, somewhere near 90 degrees and I did like that the arm was metallic.
But, there is one inconvenience and that’s the mounting / unmounting process which needs to happen every so often to recharge the battery. I know that Reolink has fixed it with the Argus 3 Pro since it uses a strong magnet to keep the camera into place, but Imilab did not go that route. Instead, it persuades you to get a separate solar panel to keep the camera always charged – and it’s not a bad idea, it’s just that it’s a separate purchase (it does work fairly well though). Before moving forward, I have to point out that the Imilab EC4 has a speaker on the rear side and, on the front, there is a spotlight at the top, a light sensor on the other side of the Status LED and a large motion sensor covering almost half the front of the camera.
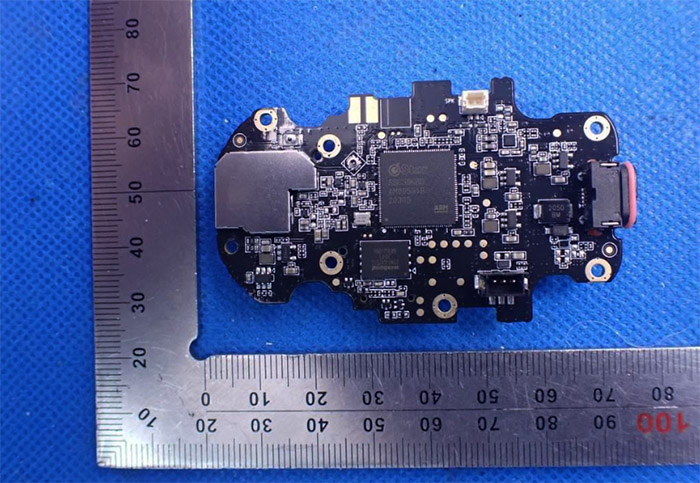
As I previously mentioned, I was unable to open the EC4 (without forcing it and thus removing its weather protection), so I had to rely on the FCC ID website and it seems that the EC4 is equipped with an ARM Star SSC30KBD AM00531B chip, 128MB of NAND flash memory from Winbond (25N01GVZEIG) and a Mediatek ARM MT7686DSN IC.
The Imilab EC4 Hub
Unlike the large base station of the Arlo Pro camera, the Imilab EC4 hub is surprisingly smaller, measuring only 4.0 x 3.5 x 1.5 inches (10.1 x 8.9 x 3.8 cm) and, despite its compact size, I was surprised by how sturdy it felt, without showing any signs that it may easily tip over. And that’s because the manufacturer has added a couple of metallic plates at the bottom of the case (on the inside) to keep the center of gravity low. And it works because as I said, the device will not tip over. The entire case is covered by a white matte finish and yes, the hub is made of plastic.
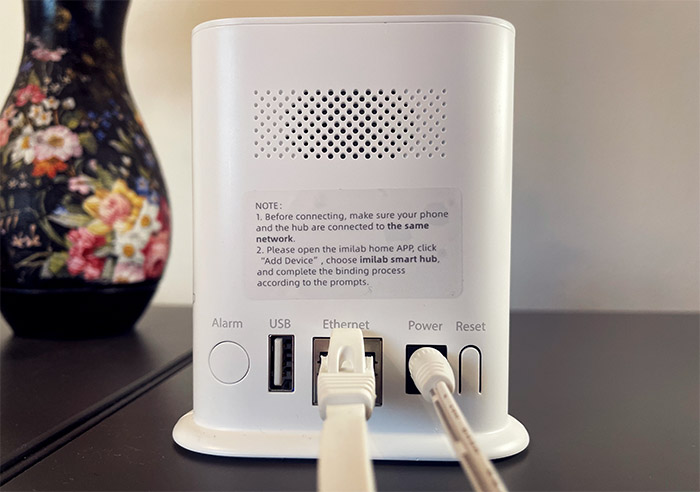
On the front, underneath the logo, there’s a small LED which has the role of showing the status of the hub (I really expected a LED ring at the top due to the shape of the case). Solid blue means that everything is connected and working properly and solid orange indicates that a firmware is in progress, the hub is booting or that a reset has been successful. If the LED flashes blue and orange, then the firmware upgrade has failed. If you turn the hub around, there’s a large speaker grill (yes, there’s a speaker underneath), an Alarm button (which you can use to silence an alarm, if you’re near the station) and a USB port.
This port can be used to add an external storage device (Imilab should make this clear in their user manual) and there is also a side microSD card slot that supports up to 64GB of storage. It’s a shame they didn’t go to at least 128GB, considering that you can add up to 5 cameras and 64GB will not be enough. It seems that the actual support goes up to 256GB, it’s just that the manufacturer doesn’t yet have the patent. Next to the USB port, there’s a Fast Ethernet Port (only up to 100Mbps, but it’s enough for a camera), a Power port and a Reset button. Since I couldn’t open up the camera, I had to do it with the hub and to do so, I removed part of the label at the bottom and, after taking out the two screws, I carefully used two prying tools to separate the device into two vertical pieces.
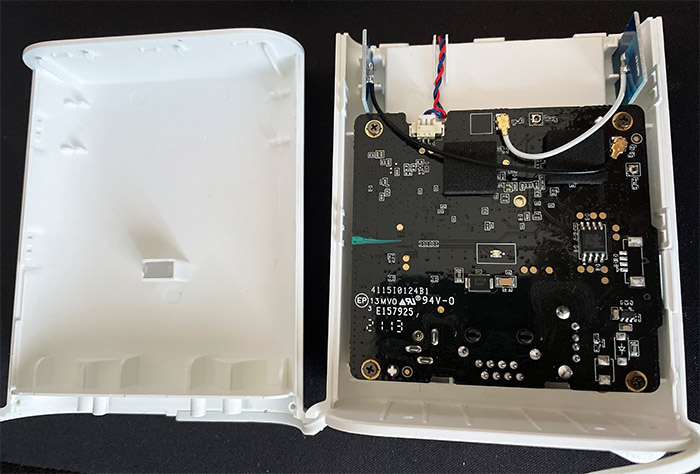
Inside, I could identify 128MB of RAM from Winbond (W971GG5NB-25), a Mediatek MT7628NN WiFi adapter (802.11n – only 2.4GHz) and a Realtek ALC5686 chip. I also saw to antennas. Be aware that the hub is not suitable for outdoor conditions, so keep it next to your router.
The Solar Panel
I have had the chance to check the solar panel that’s provided by Reolink and the one provided by SwitchBot for their smart curtains, and all had in common the reduced size and the long cable flowing towards the device that it needs to be kept alive. The Imilab solar panel follows the same principle, but the device is heavier and more bulky. The reason is because besides the black portion that needs to be pointed at the sun, the rest is made of metal, including the frame, with the exception of four plastic corners. On the rear side, I could see the junction box and, in the middle, there’s the spot where you need to attach the provided metallic stand.

From the junction box, a long cable flows downwards and it ends with a microUSB connector (still have no clear idea why Imilab went with the older standard). I need to mention that the solar panel is capable of producing 3.5W and its efficiency is rated at 20% (probably in ideal conditions).
The Installation
The Imilab EC4 can be used with the Imilab Home application which is available on both iOS and Android, but, installing and configuring the camera has been a frustrating and confusing experience. After downloading the app, I was asked to accept the terms (personal data collection – there was no way around it) and then I had to create a new account. Unfortunately I could not – I would continue to get an error that there was a network error. I immediately understood that it did not like that I was using a VPN so, to move forward, I had to disable it (and I didn’t like that one bit). Afterwards, I entered the email (there was also the option to use a phone number, but I preferred not to) and I got the message that the email was not correct.
It definitely was correct, it just that the app didn’t like Microsoft emails (UPDATE: the manufacturer says that they have lessened the email match rule, so it should have gotten less strict). It did like a gmail email, so I could move forward. Again, I had to accept lots of stuff and finally, I reached the GUI. From here on, things went smoothly – I first decided to add the Imilab hub and, after selecting it from the list, I had to make sure that the LED was flashing orange. If it doesn’t simply click and hold for a few seconds the Reset button. The biding should be successful afterwards.
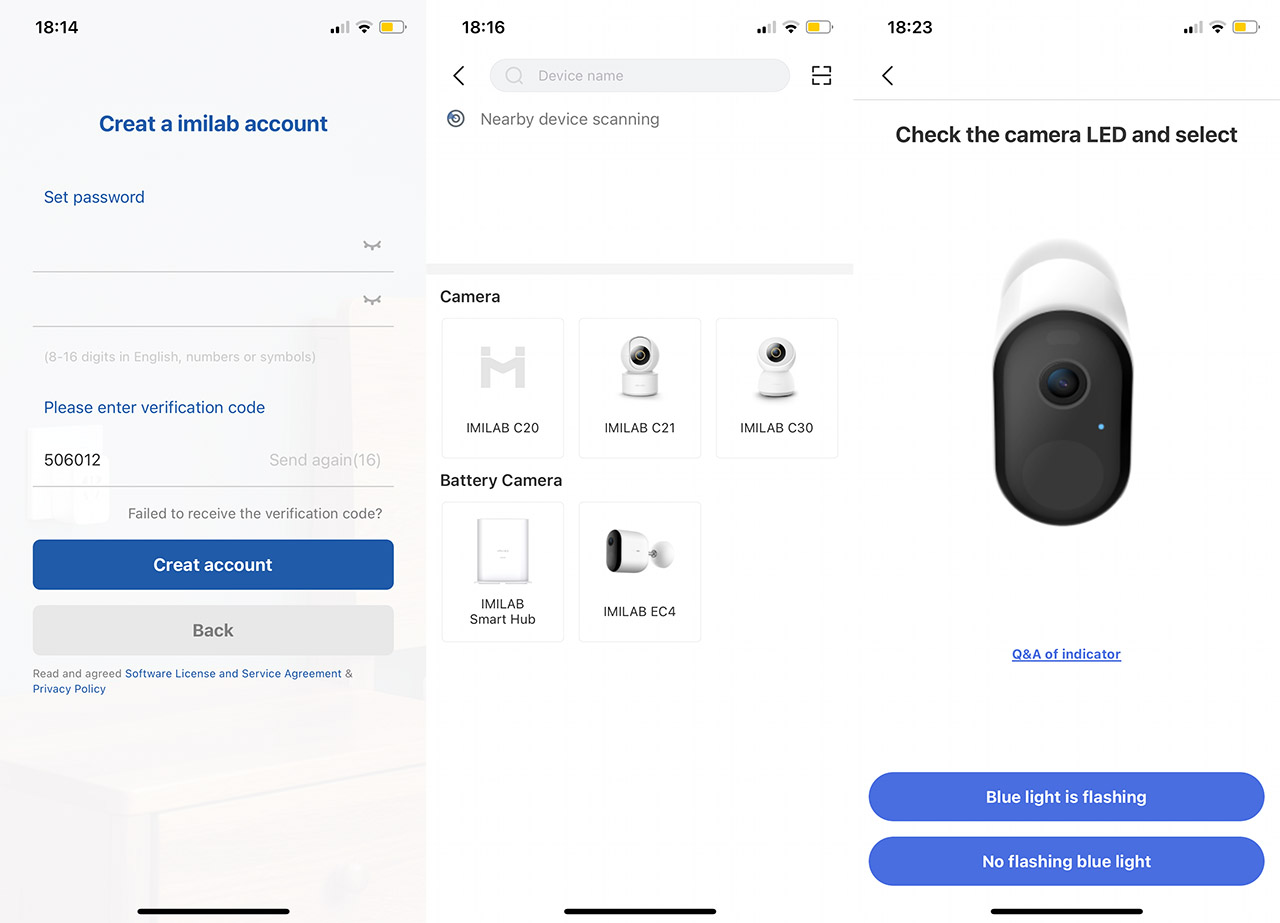
The pairing process for the camera is pretty much the same (with the exception of thew QR code scanning), it’s just that I would also get voice notifications and needed to check the front-facing LED. I have noticed a fairly strange, but annoyingly common occurrence where if I wanted to check the hub (or the camera), the app would hang at the ‘Downloading’ screen stuck at a certain percent and it sometimes required repeated attempts before I could access the devices. Some silverlining would be that I could access the live view without having to click on the camera itself. The app will give you three months of free storage after you are done pairing the Imilab EC4 and you will be able to select the way the camera will react to motion.
Imilab EC4
-
Pros
- Very good image quality, even during the night
- The app has lots of options
- Spotlight
- Speaker and microphone
- There is almost no lag between the live view and the action that's recorded
Cons
- MicroUSB port
- The app configuration can be a bit annoying at times
- Official support for only 64GB of storage (apparently it can go up to 256GB)
- A bit expensive
- The notifications arrive late during the night