
Be aware that after the WiFi connection has been made, the RAY5 will display the IP address that it received from your router, so go ahead and enter it into your browser. This way, it will open the web-based utility which essentially replaces the controls from the display. You can control the position of the laser, the intensity of the light, as well as the speed and distance of the axis.
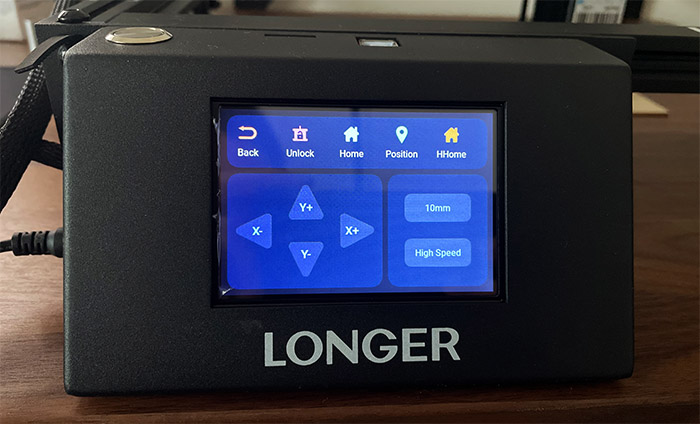
There ‘s also the option to send data to your SD card via WiFi and, under Settings, you can adjust various options, but do so only if you know what you’re doing. This is the open-source part where developers can adjust the way the laser engraver will work more in-depth than what the display has to offer.
The Software
The software that Longer says that you should use with the RAY5 is the LaserGRBL which can either be directly downloaded from the official website or by simply installing it from the USB drive that came with the engraver. I did the latter and, while installing it on a Windows computer, I noticed that it’s very lightweight and I also saw that there is a way to directly connect to the laser engraver. I just had to choose the correct port and baud rate. And it didn’t work. The reason why this happened is because I thought it would work via WiFi only, which is not really the case, I had to use the provided USB cable and physically connect the Longer RAY5 to the computer. This way, I got the new port open and I got a successful connection – be aware that the Longer RAY5 laser engraver will restart when that happens.

The user interface will give you the possibility to adjust the position of the laser module, as well as other parameters found on the small display. But, you do get the option to add files and I did quickly searched for a free model available online. I found this cool ship (here) and I saw that I could adjust the parameters.
These include the possibility to resize the model (to fit the board), the brightness, the contrast and the white clip, as well as the possibility to convert the model. Clicking Next will summon a small window where I could adjust the Engraving Speed, the Laser Mode, as well as the Image Size and Position. Push Create and let the laser do its work!
Note: Besides LaserGRBL, there is also a trial version of Lightburn.
Safety Precautions
Of course, before running the laser, make sure that you take all the necessary safety precautions. These include wearing the glasses that were provided in the package, but there is more because you need to make sure that the Longer RAY5 laser engraver isn’t put in an area where there are reflections. That’s because the light can move at various angles and may reach the eye of other people in the house. Besides the eye damage risks, there is also the possibility to damage your skin, so don’t put your hand in direct contact with the laser.
And it’s ideal to keep the Longer RAY5 in the open when it’s engraving. That’s because these type of open design laser engravers won’t ventilate the smoke, nor the dust that comes from the model. And it is toxic to breathe. So don’t just run it next to your working desk; if you can, position it outdoors. Furthermore, Longer had included a flame sensor, so, in case it detects fire, the laser is automatically stopped and there is a sound to alert you of the danger. Which is why it’s important to have a fire extinguisher at hand when the Longer RAY5 is operating. You shouldn’t solely rely on the sensor to let you know of potential fire hazard, so keep an eye on the Longer RAY5 laser engraver while it’s working. Never leave it unattended.
The Engraving Performance
The Longer RAY5 comes with three very small pieces of plywood and they’re suitable for some quick tests, so I decided to use them for the models that are already included on the USB drive that’s provided by the manufacturer. I left the default settings (100% laser power and 10mm) and as you can see, there are some burning marks around the bird models, so it’s best to lower the laser power quite a bit if the wood board that you’re using is not too thick.
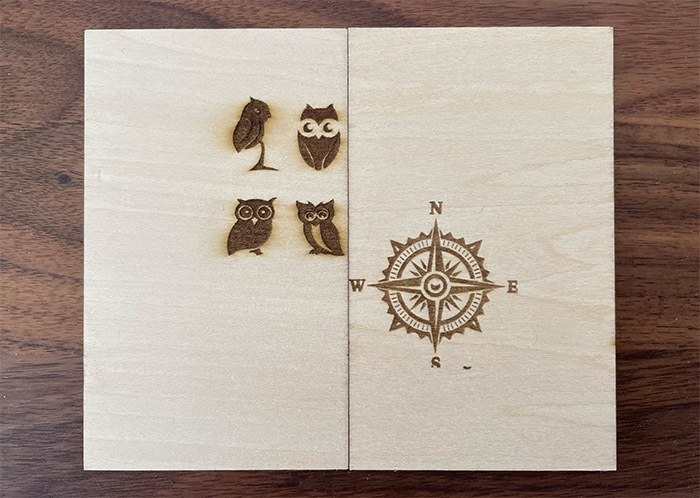
After lowering it to half the power, I tried again with the compass model and it turned out so much better (although I still have some problems adjusting the correct area for the plywood). Afterwards, I decided to engrave the Basic Powerscale Power 100% image which essentially gives you a benchmark on how well the laser engraver behaves depending on the speed and the power of the laser. But, being inspired by a friend who asks what would happen if the surface of the wood would be painted, I decided to take a wood board that was both painted and waxed. As most of you have anticipated, things did not go well.
Sure, the laser did its job – although I have seen that some rectangles weren’t that perfect – but the entire model was not really visible. Yeah, there were no burn marks visible enough to make out the contour unless I looked at the board at an angle. If that’s what you need for your projects then go ahead and engrave a similar type of surface, but since I needed to see what’s going on, I switched to a proper wood board and redid the benchmark test.
And this time I also finally checked the markings on the frames since they aren’t there just for the looks. This way, I adjusted the board to the correct dimensions in the LightBurn software and scaled down the benchmark image a bit. As you can see from the video, the first few markings are almost invisible, but, as the laser raises its power output and slows down, the engravings become better defined. This is how you should always evaluate the type of wood that you use and it’s ideal to keep a small piece in a storage somewhere so you don’t have to redo the benchmark tests.
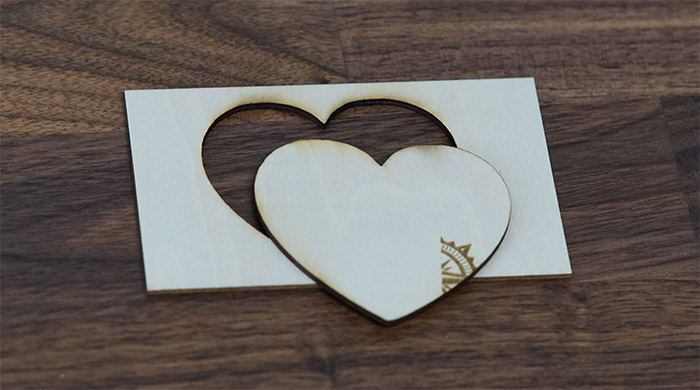
I have heard that the Longer RAY5 can also cut through wood, so I decided to give that a shot as well. I used LightBurn again (it was easier to get into than LaserGRBL) and I set the laser at max power and to go very slow (10mm/s). Then, I decided to give it a try at four runs, but it turned out that I underestimated the Longer RAY5, because the model was easily cut in two runs.
Next, I wanted to try engraving a metal piece as well, so I took a cool model of a ship from rawpixel.com and I tried two types of surfaces. The first one was very reflective and glossy, while the second one was matte. Obviously, the first one did not collaborate well, so I went with the second piece of metal – not in the best shape, but it will do. I pushed the laser power to the maximum, while the speed was set to the minimum and let it do its thing.
You may ask what’s with those burn marks and why don’t they appear everywhere? That’s where the laser had to go deeper, so more fumes were created in the process. In any case, even if this does happen, nothing that a clean cloth and some isopropyl alcohol can’t fix. As you can see, the end result looks very good and, after wiping it with the brush (provided in the package) and with some alcohol, it’s obvious that the laser did a good job.
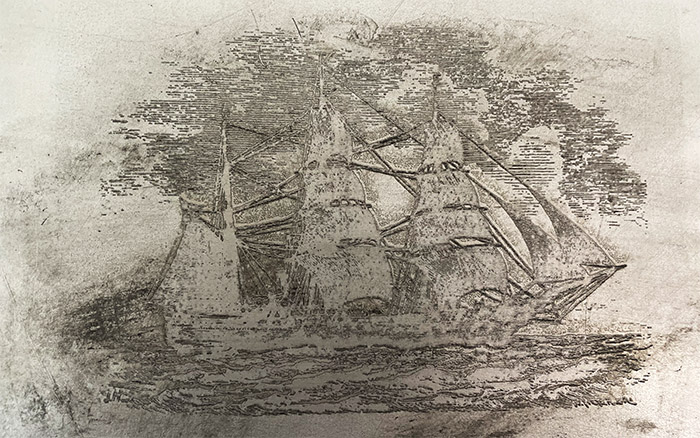
So, it’s not only some surface burn, the laser went quite deep. I did the same with the birds model which also turned out quite good.
Conclusion
The point of the Longer RAY5 is to be the perfect DIY laser engraver suitable for enthusiasts and hobbyists, and I think they did a great job at that. The work surface is far bigger than usual with these type of devices, the laser is quite precise and upgradeable and I liked that there’s display. There are additional two ways to connect to your PC, including WiFi. The assembly process is not difficult if you follow the instructions and I really liked that each plastic pouch was labeled to the corresponding step in the user manual. Its performance was also good, being able to both engrave wood and cut through it with ease. I was also able to engrave a metal sheet and it turned out quite well. So, overall, considering the price tag, the Longer RAY5 is an excellent laser engraver for the people that want to go a step further with their hobby and for those that want to get a better understanding on how these devices work (to prepare for future larger-scale production purposes).
Longer RAY5
-
Pros
- Good performance on both wood and metal (considering the price tag)
- Easy to install
- There is a display
- The laser module is upgradeable
- Some safety precautions in place
Cons
- The calibration mechanism will fail fairly quickly if you need to do constant adjustments
- It needs a heavily ventilated room with little to no reflective materials
- It needs continuous supervision while it's operating