
I know I am a bit late to the party, but since there is little coverage of networking devices these days, I said why not test the TP-Link EAP773 myself? And so I got my hands on this slim half metal, half-plastic WiFi 7 access point that rivals Ubiquiti not only in terms of size, but in terms of price and features as well.
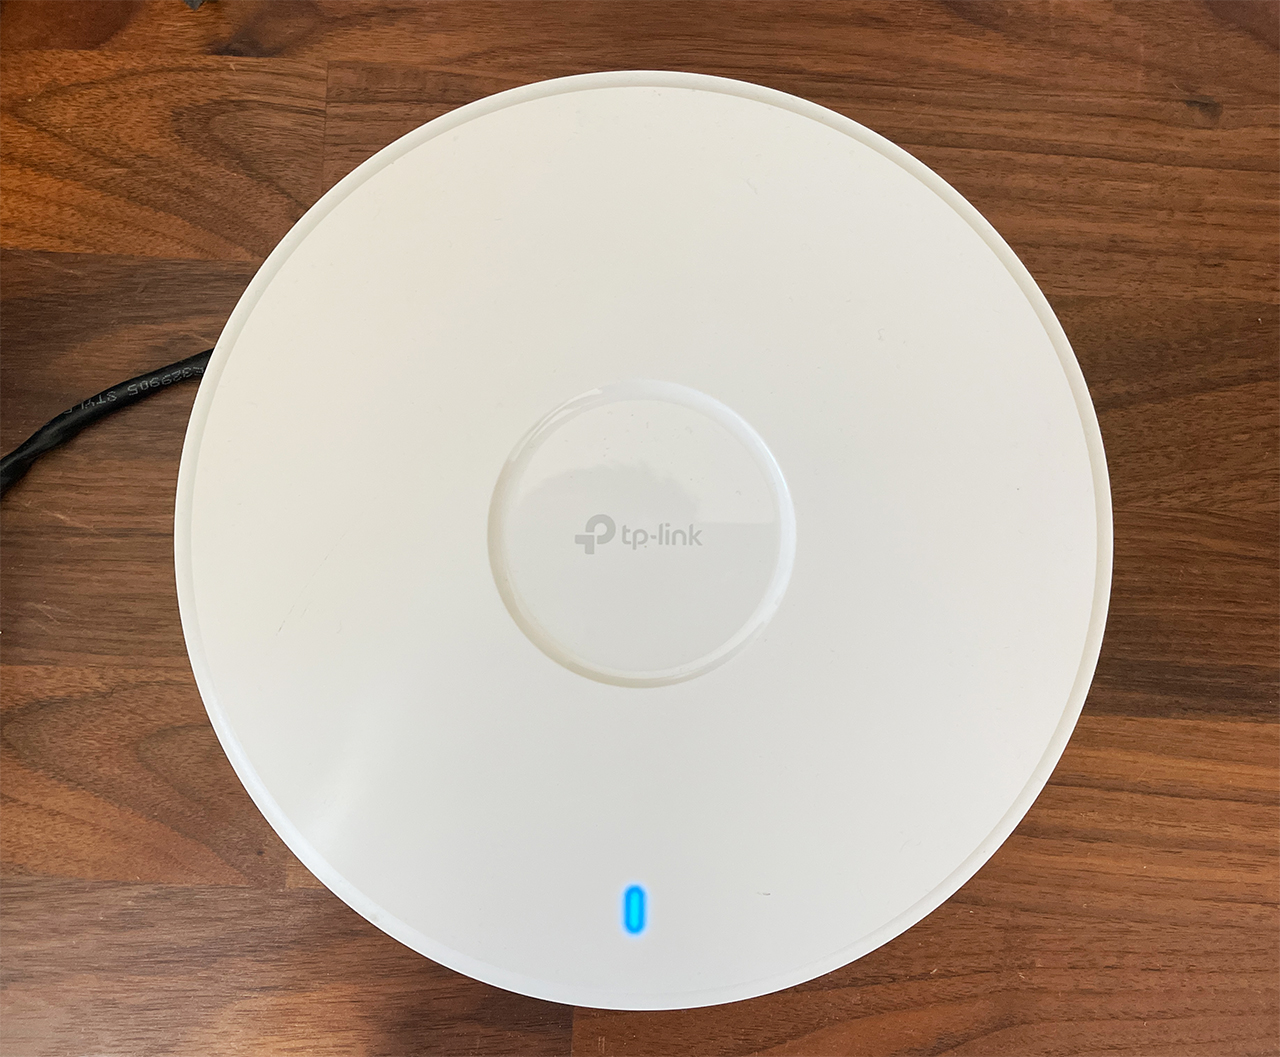
Indeed, the EAP773 is a tri-band AP which includes the 6GHz radio that can use up to 320MHz channel width, there’s MLO support, there’s Cloud and local management, mesh and AI roaming. It ticks pretty much all the boxes, but there is one other feature that I only saw on the far more expensive WBE660S. We got a 10GbE PoE port.
I do not know why the other manufacturers ignored this important piece on their mid-to-entry-level WiFi 7 access points, but TP-Link didn’t and this should allow us to see some impressive throughput, right? I think so considering that the WBE660S outdid all other devices, which means that the EAP773 might also have a chance. So let’s see it in action.
The Design and Build Quality
I did a teardown video of the TP-Link EAP773 a few months back and even then I was surprised by how slim the access point was, especially when compared to the EAP670 or the EAP660HD. So yes, gone are the days of bulky cases and I also appreciate that TP-Link went with a metallic bottom for a better heat management. EnGenius and Zyxel have been using this system for years and it has worked well for them.
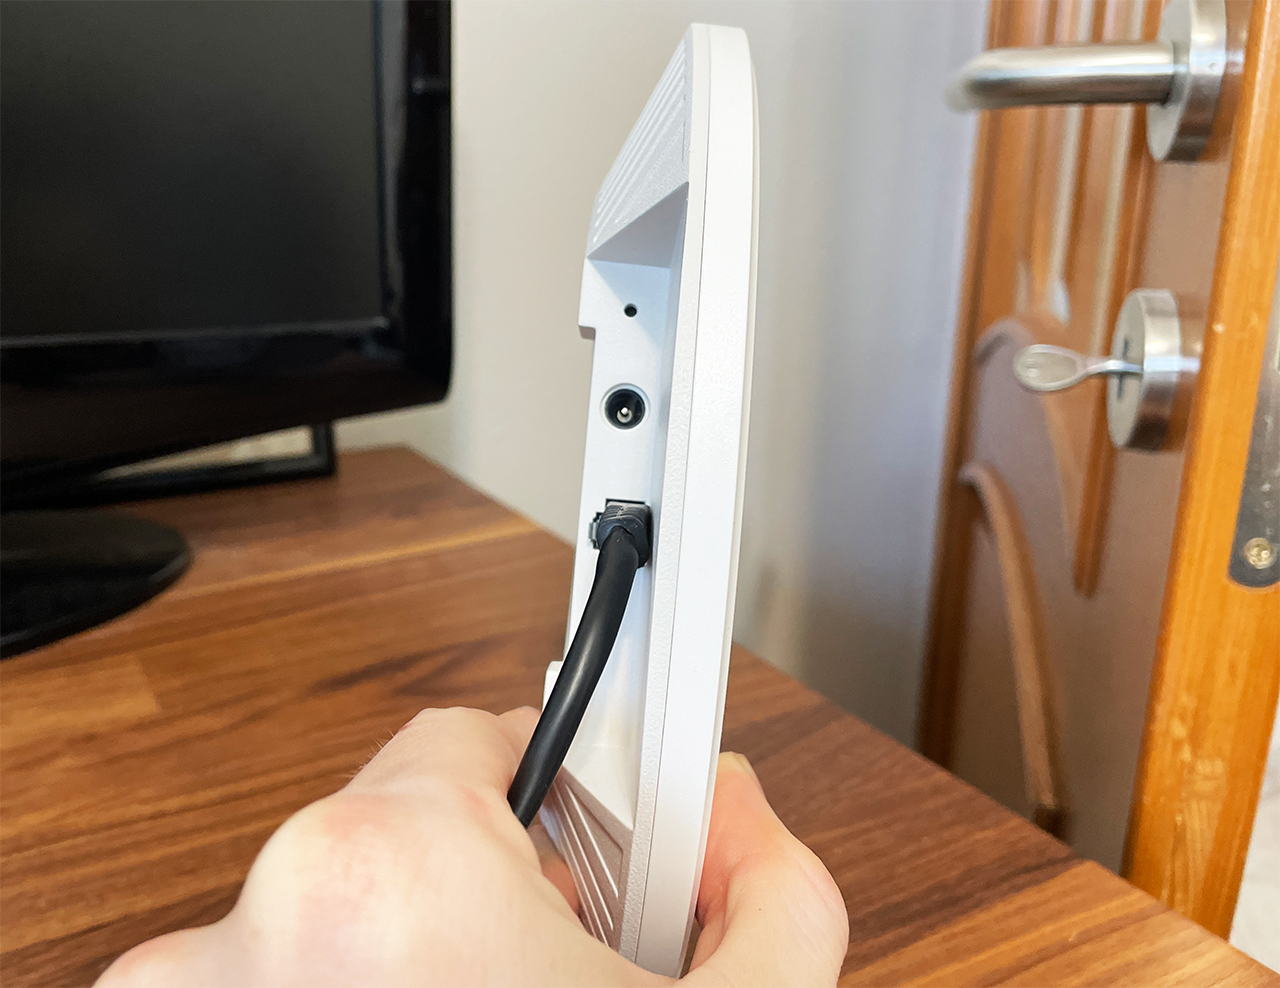
Ubiquiti is the odd one here, but it’s getting there, I hope. Anyway, we’re dealing with a ceiling-mount access point and there is a bracket in the package to do the actual mounting. You cannot really let this device on a desk since it will easily slip on the floor.
I didn’t see an obvious LED but it’s there, shinning through the plastic top, showing colors depending on the status of the network and of the access point. I always assume blue and green are good, while red or orange are bad. I mean, at this point, what else can we do, the minimalism craze has taken over everything. Flip the device back and we get to see a sunken area especially dedicated to the ports.
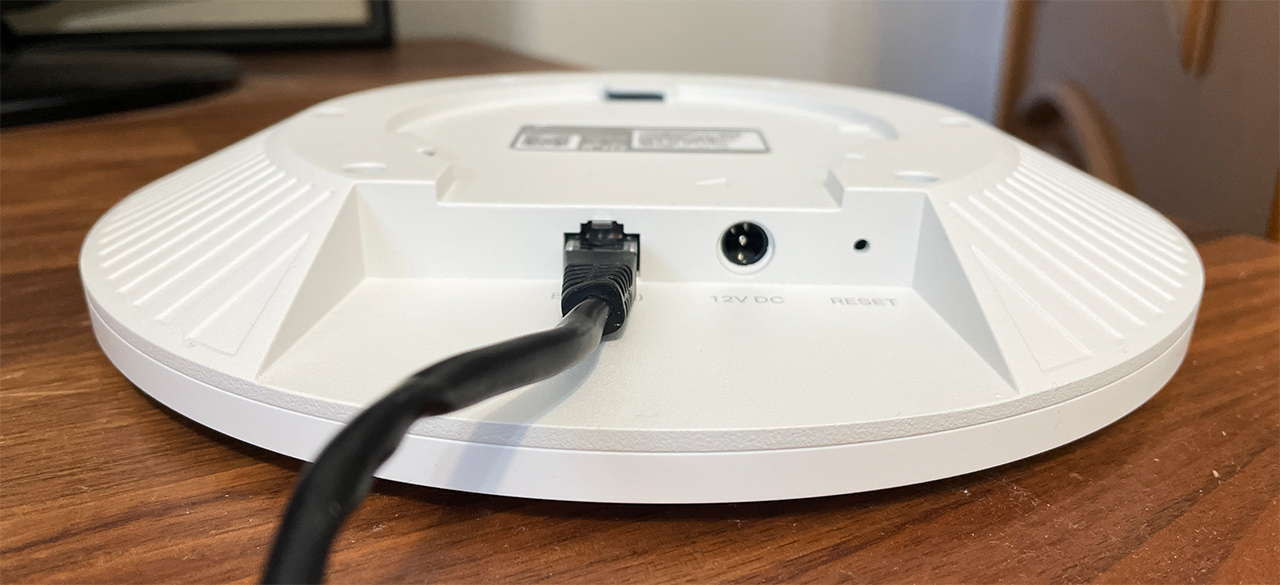
And we can see one Ethernet port which we know, is capable of speeds up to 10Gbps. It’s also PoE, of course. Next to it, there’s a 12V DC In port and a small Reset button.
The Thermal Management
As I mentioned before, the TP-Link EAP773 relies on the bottom metallic part of the case to take away the heat from the main components and there is no actual ventilation hole, that’s the entire system. Does it work or would a fan be better, as in the case of the U7 Pro and U7 Pro Max?
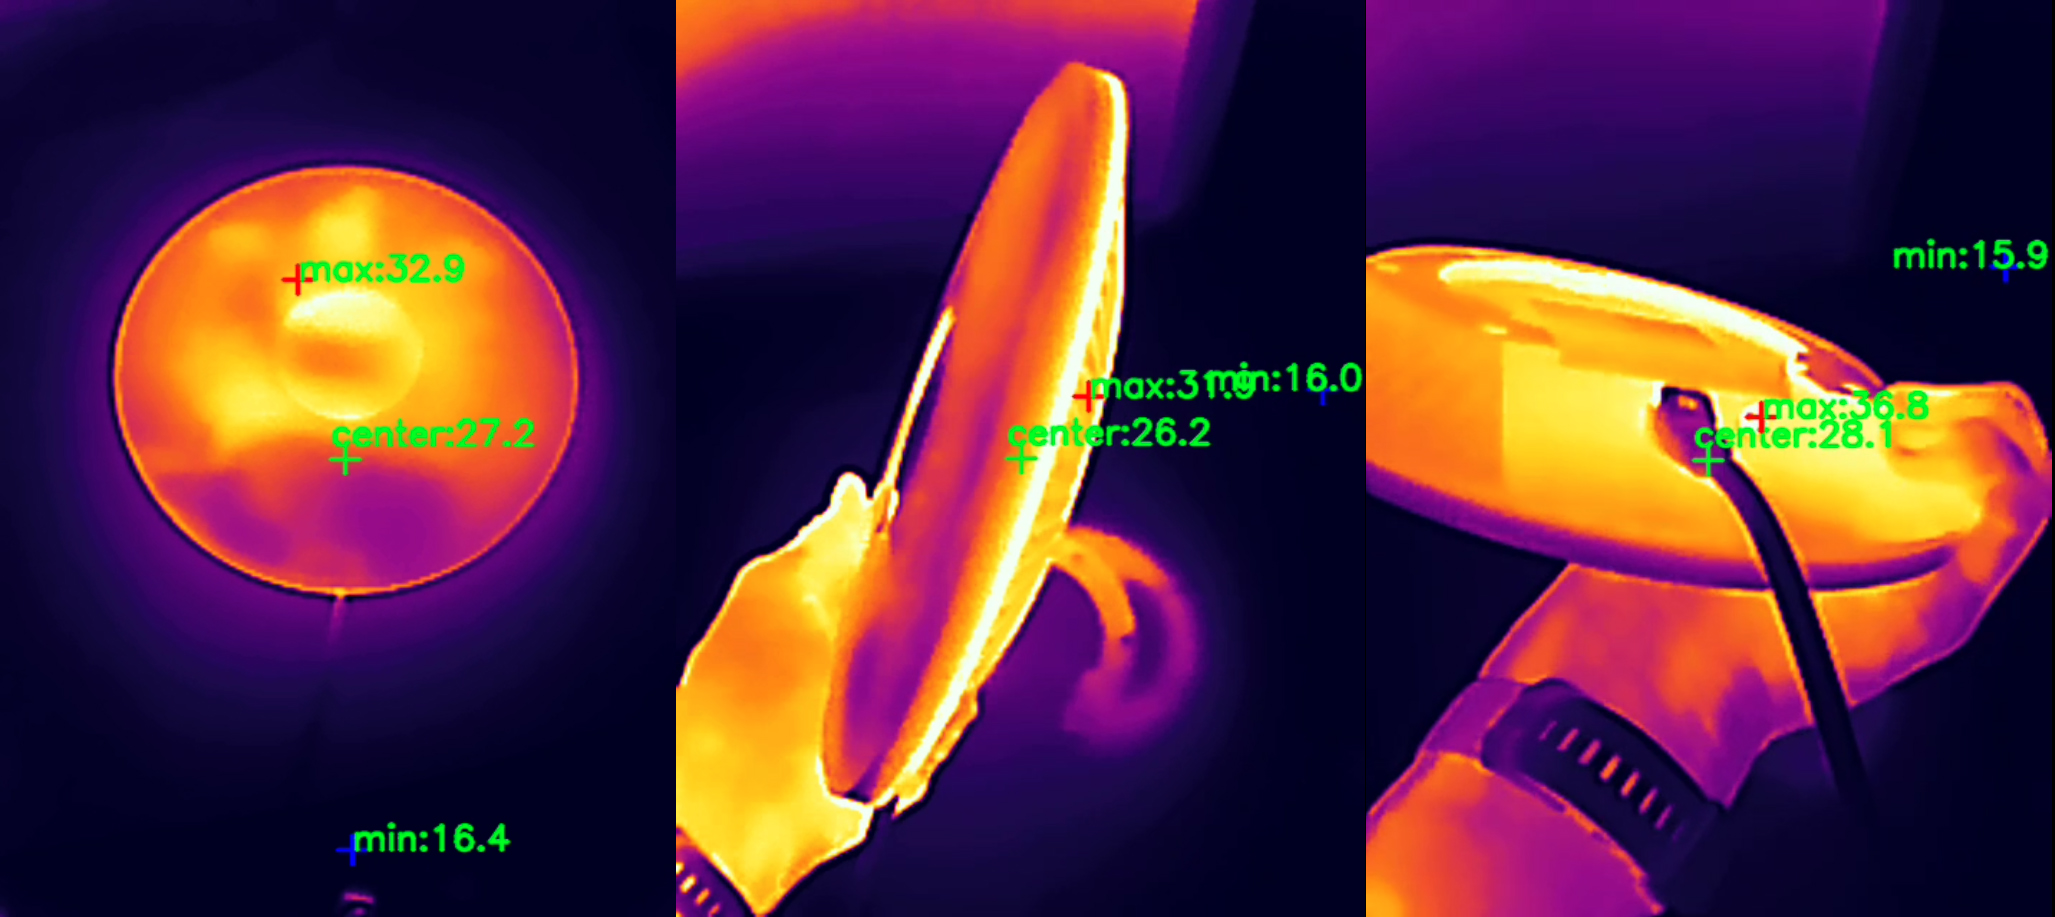
The thermal camera that I used here shows that it worked fairly well and the case does not overheat. So, despite being smaller and more compact, there is no need for a fan to keep things under control.
TP-Link EAP773 Teardown
Unlike other brands, TP-Link made opening up the case of the EAP773 a breeze. There are six screws that need to be removed and that’s about all, the top panel should easily pop out. Then, we get to see the PCB, but yes, the main components do rest on the other side. Not a big deal because it only takes the removal of a few screws. I quickly realized that there is no fancy antenna as on the WBE660S or even the cheaper NWA130BE, but we do get a good view of the main components. I also added a comparison table with other WiFi 7 access points.
Hardware Comparison
| TP-Link EAP773 | Ubiquiti U7 Pro Max | Zyxel NWA130BE | EnGenius ECW536 | |
| CPU | quad-core 1.5GHz Qualcomm IPQ9554 (A73) | quad-core 1.5GHz Qualcomm IPQ5322 | quad-core 1.5GHz Qualcomm IPQ5322 (Cortex-A53) | quad-core 2.2GHz Qualcomm IPQ9570 (A73) |
| RAM | 2GB DDR4 (2x 3KR75 D8BPK) | 1GB Samsung (SEC K4A8G16 SYC 8CTD) | 1GB Micron 3UR77 D8BPK (DDR4) | 2GB (2x Nanya NT5AD512M16C4-HRI) |
| Storage | 128MB NAND Winbond 24N01GWZEIG | 4GB Kingston EMMC04G-MT32 | 512MB (MXIC X233662 MX35UF46E4AD-241)/ 16MB NOR flash (MXIC MX25U12832F) | 512MB NAND (MXIC MX35UF4GE4AD) |
| Switch | Marvell AQrate AQR113C Gen4 PHY | Qualcomm QCA8081 Ethernet PHY | Qualcomm QCA8385 Ethernet PHY | 2x RealTek RTL8261N N2068H3 |
| 6GHz Radio | Qualcomm QCN6274 802.11be 4×4:4 | Qualcomm QCN6274 802.11be 2×2:2 | Qualcomm QCN6274 802.11be 2×2:2 | Qualcomm QCN6274 802.11be 4×4:4/td> |
| 5GHz Radio | Qualcomm QCN6274 802.11a/b/g/n/ac/ax 4×4:4 | Qualcomm QCN6274 802.11be 4×4:4 | Qualcomm QCN6274 802.11be 2×2:2 | Qualcomm QCN6224 802.11a/n/ac/ax 4×4 4×4:4 |
| 2.4GHz Radio | Qualcomm QCN5024 802.11b/g/n/ax 4×4:4 | Qualcomm QCN6274 802.11b/g/n/ax 2×2:2 | Qualcomm IPQ5322 802.11b/g/n/ax 2×2:2 | Qualcomm QCN6214 802.11b/g/n/ax 4×4:4 |
Single Client Tests (6GHz & 5GHz)
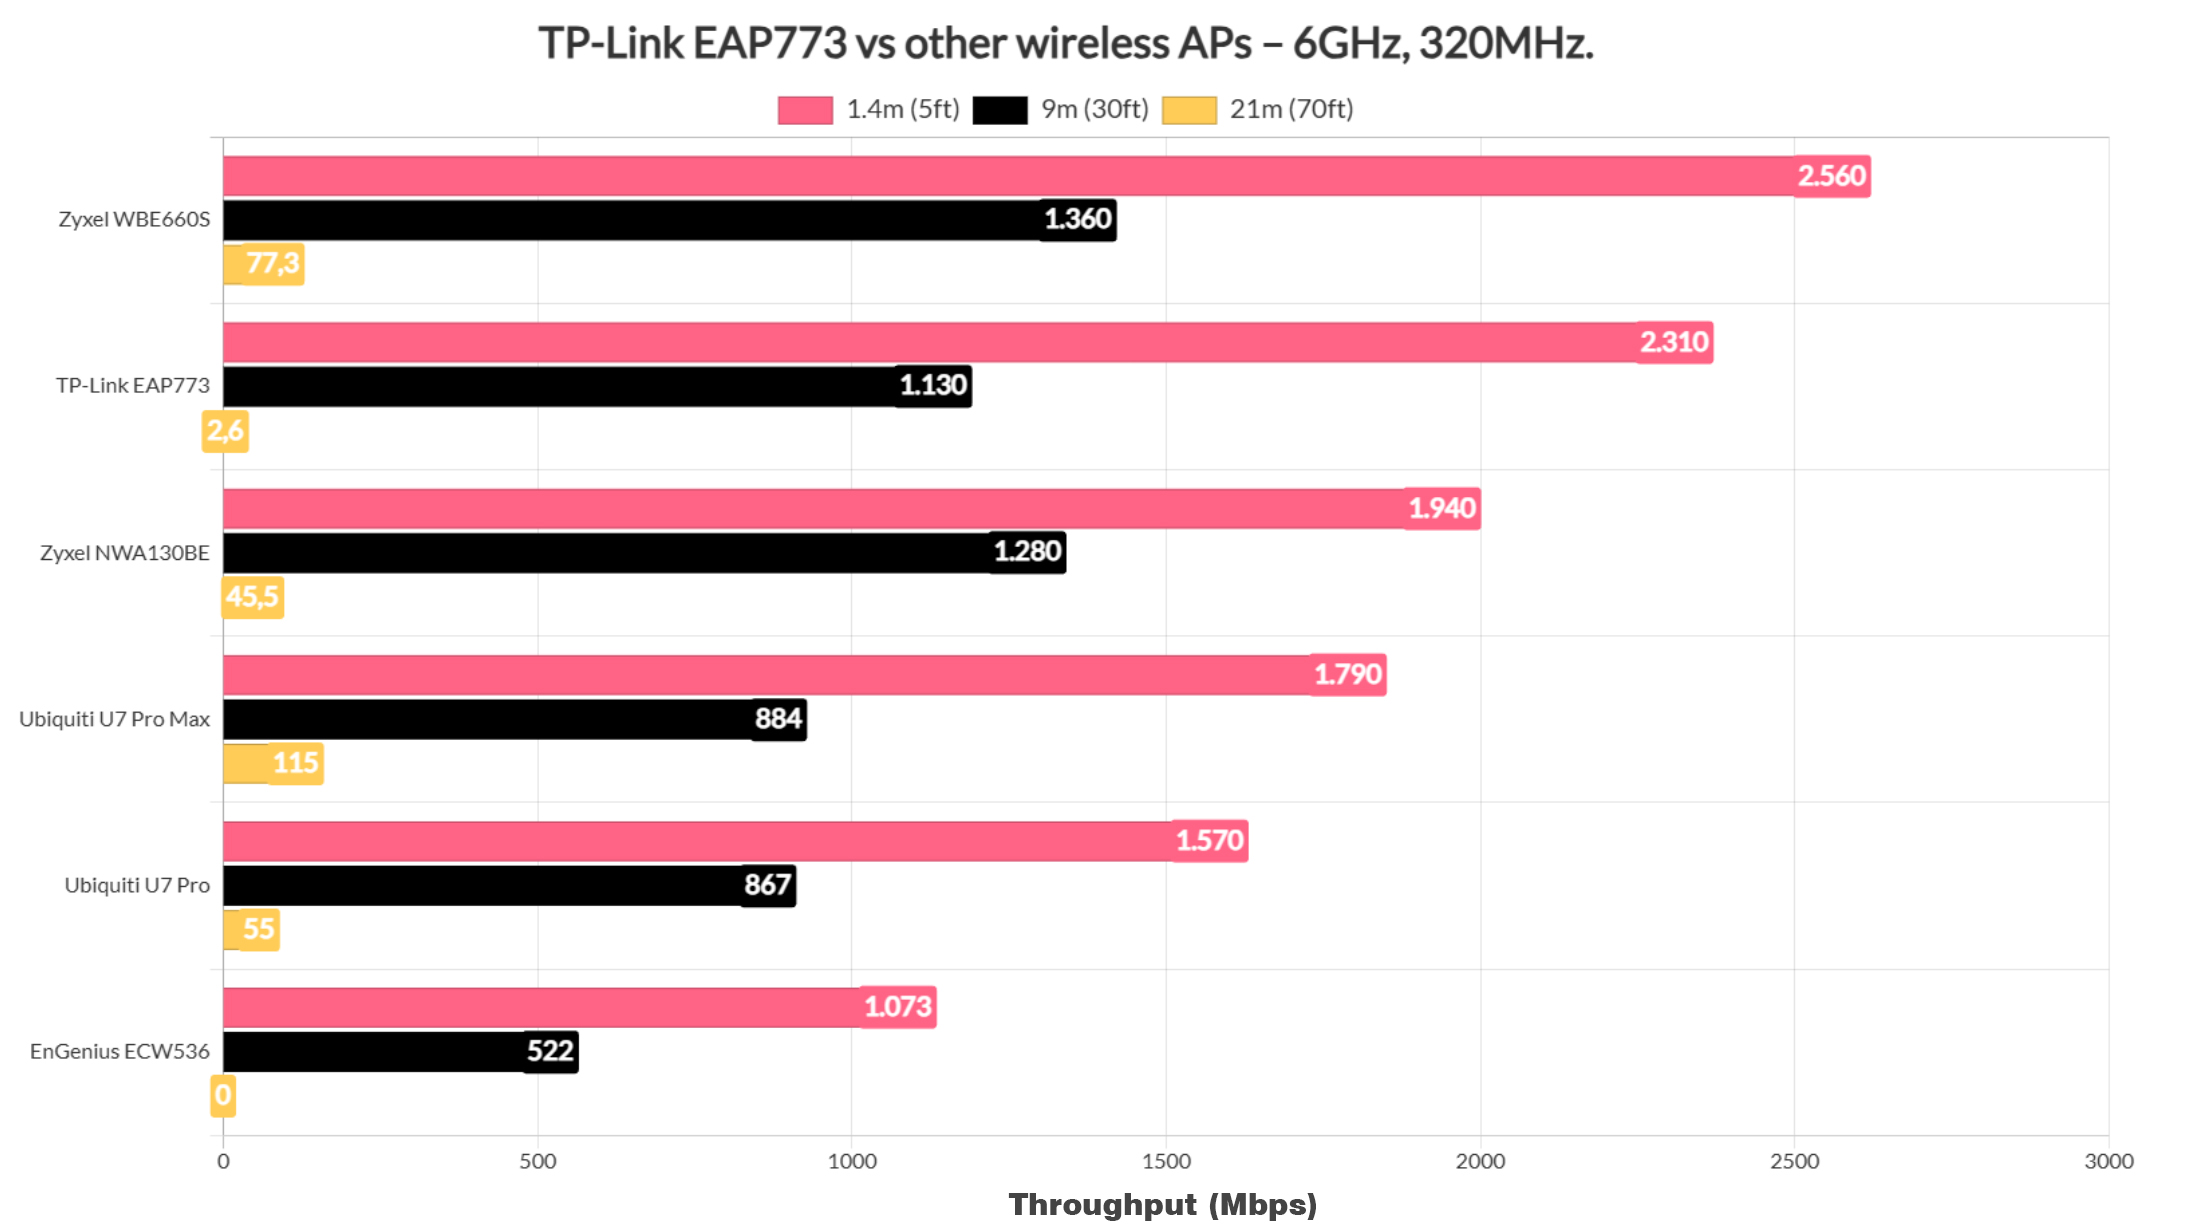
I admit that I was expecting the TP-Link EAP773 to offer a better throughput than the other WiFi 7 access points in the same price range and I was right. I did run a few single-client tests using WiFi 7, WiFi 6 and WiFi 5 client devices and we can see way over 2Gbps near the access point, but not as much of an impressive throughput at 70 feet or 21 meters. And this is true as long as I used the WiFi 7 adapter and, of course, the 6GHz radio.
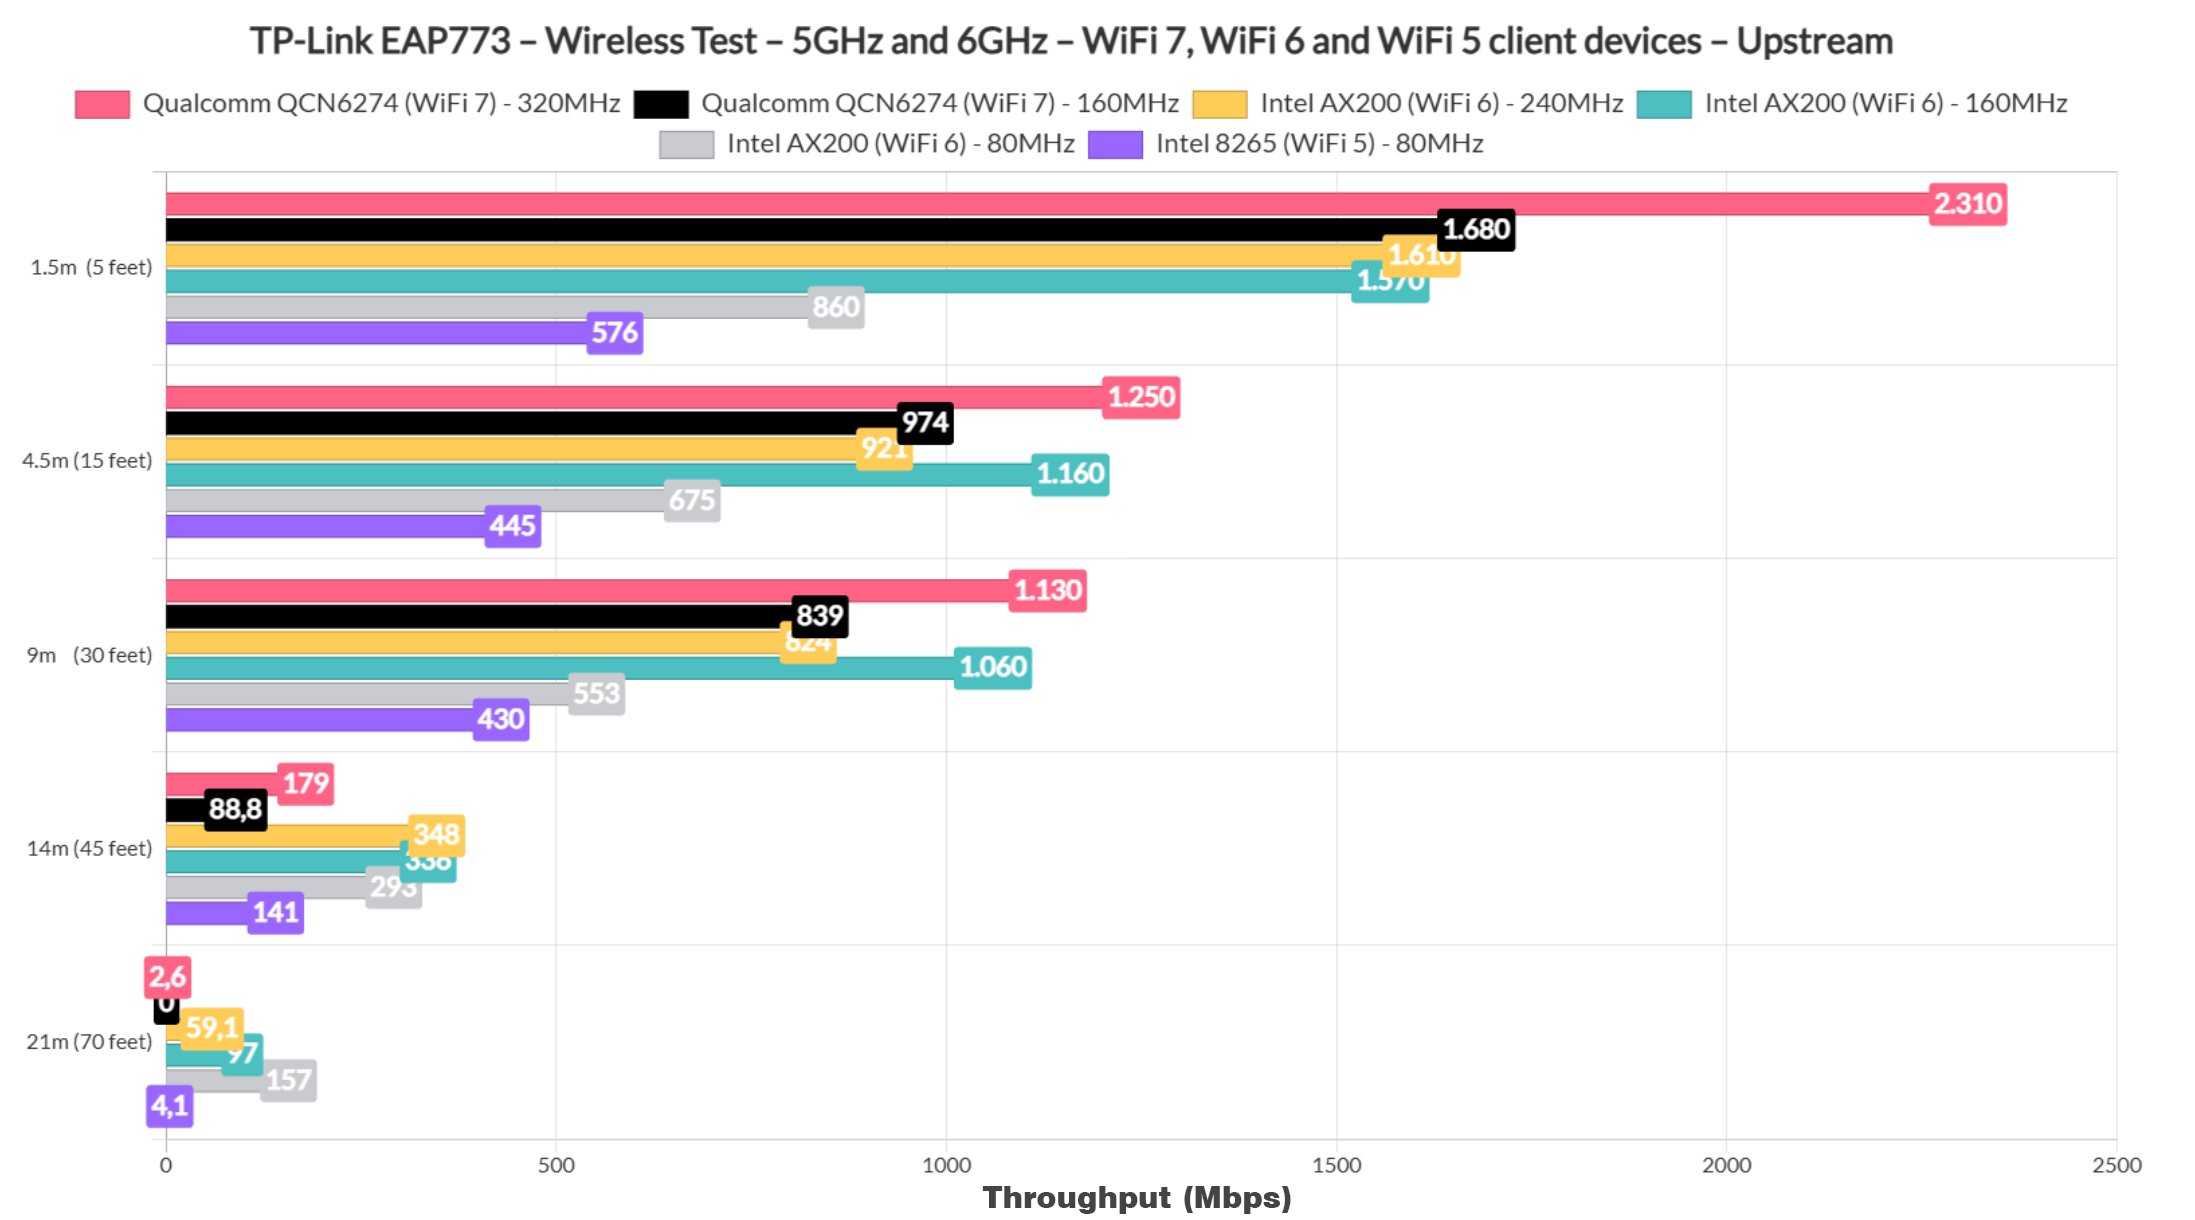
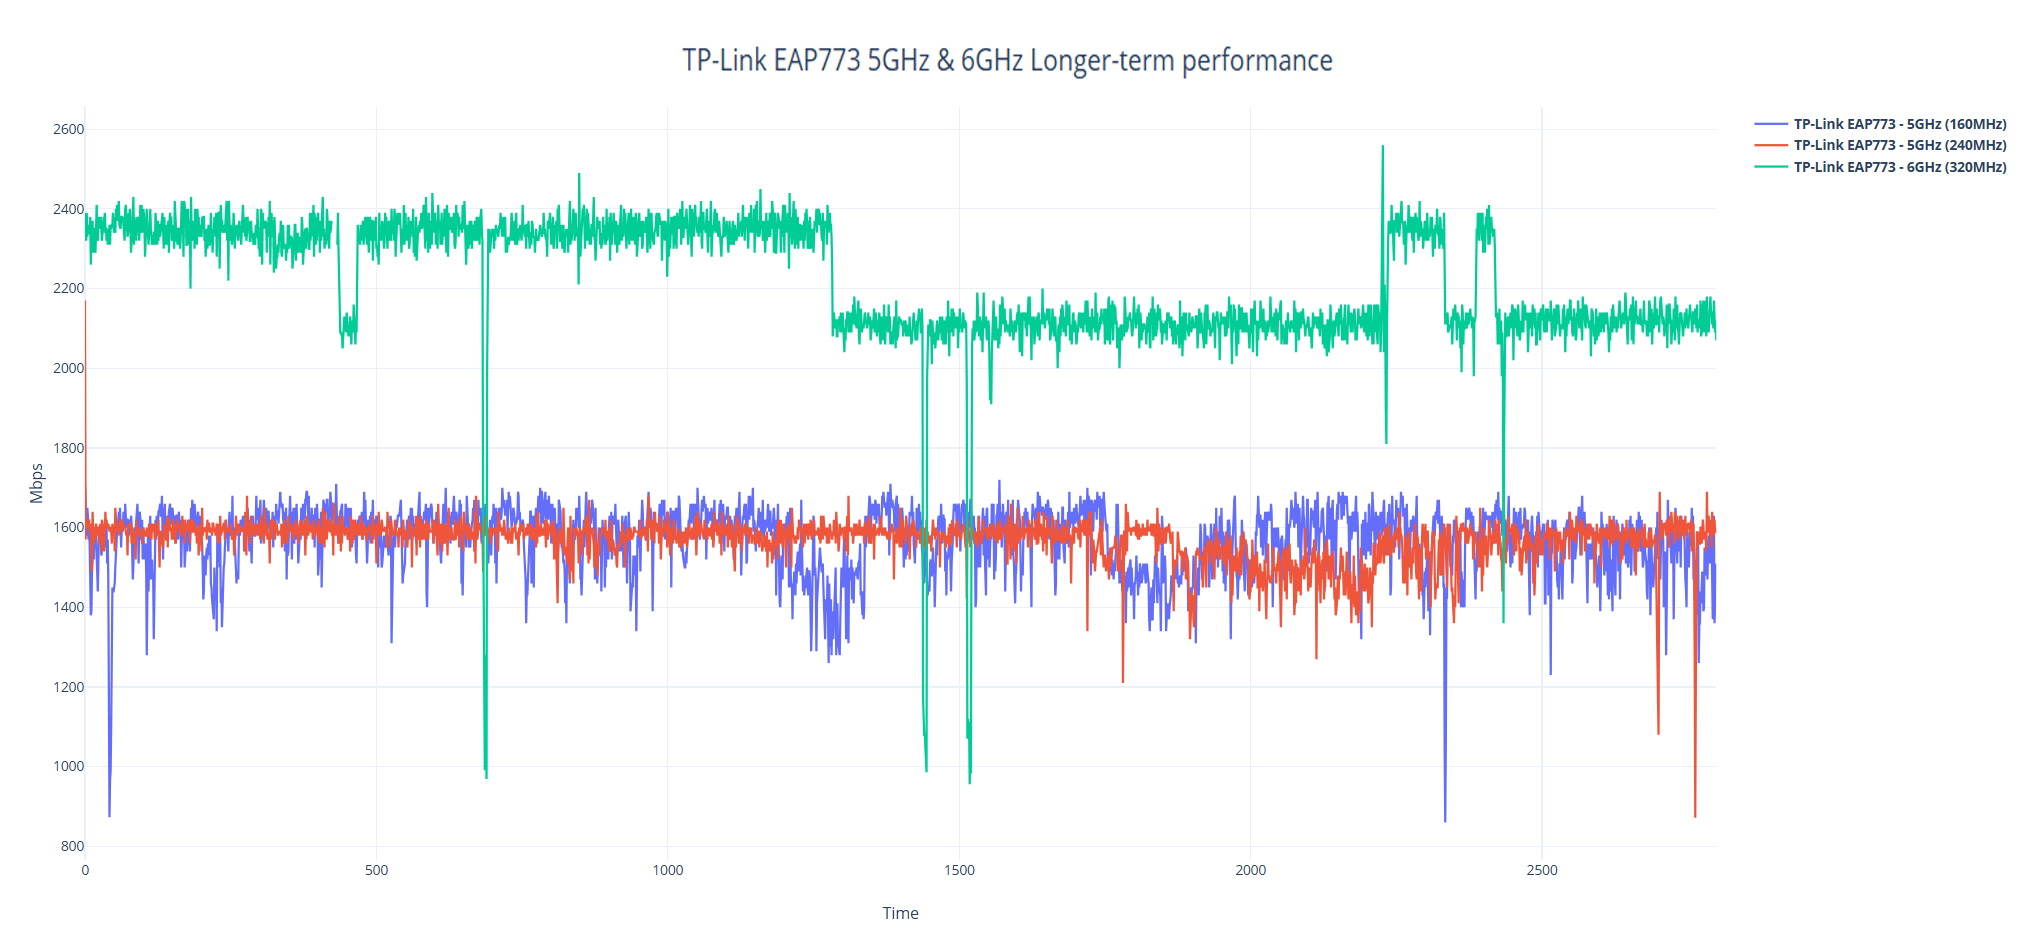
But switching to the 5GHz made some significant improvements. And it does seem that the TP-Link EAP773 is one of the few access points to use the 240MHz channel bandwidth. The signal attenuation graphic does confirm that it’s better to use the 5GHz radio if you intend to cover more ground with WiFi.
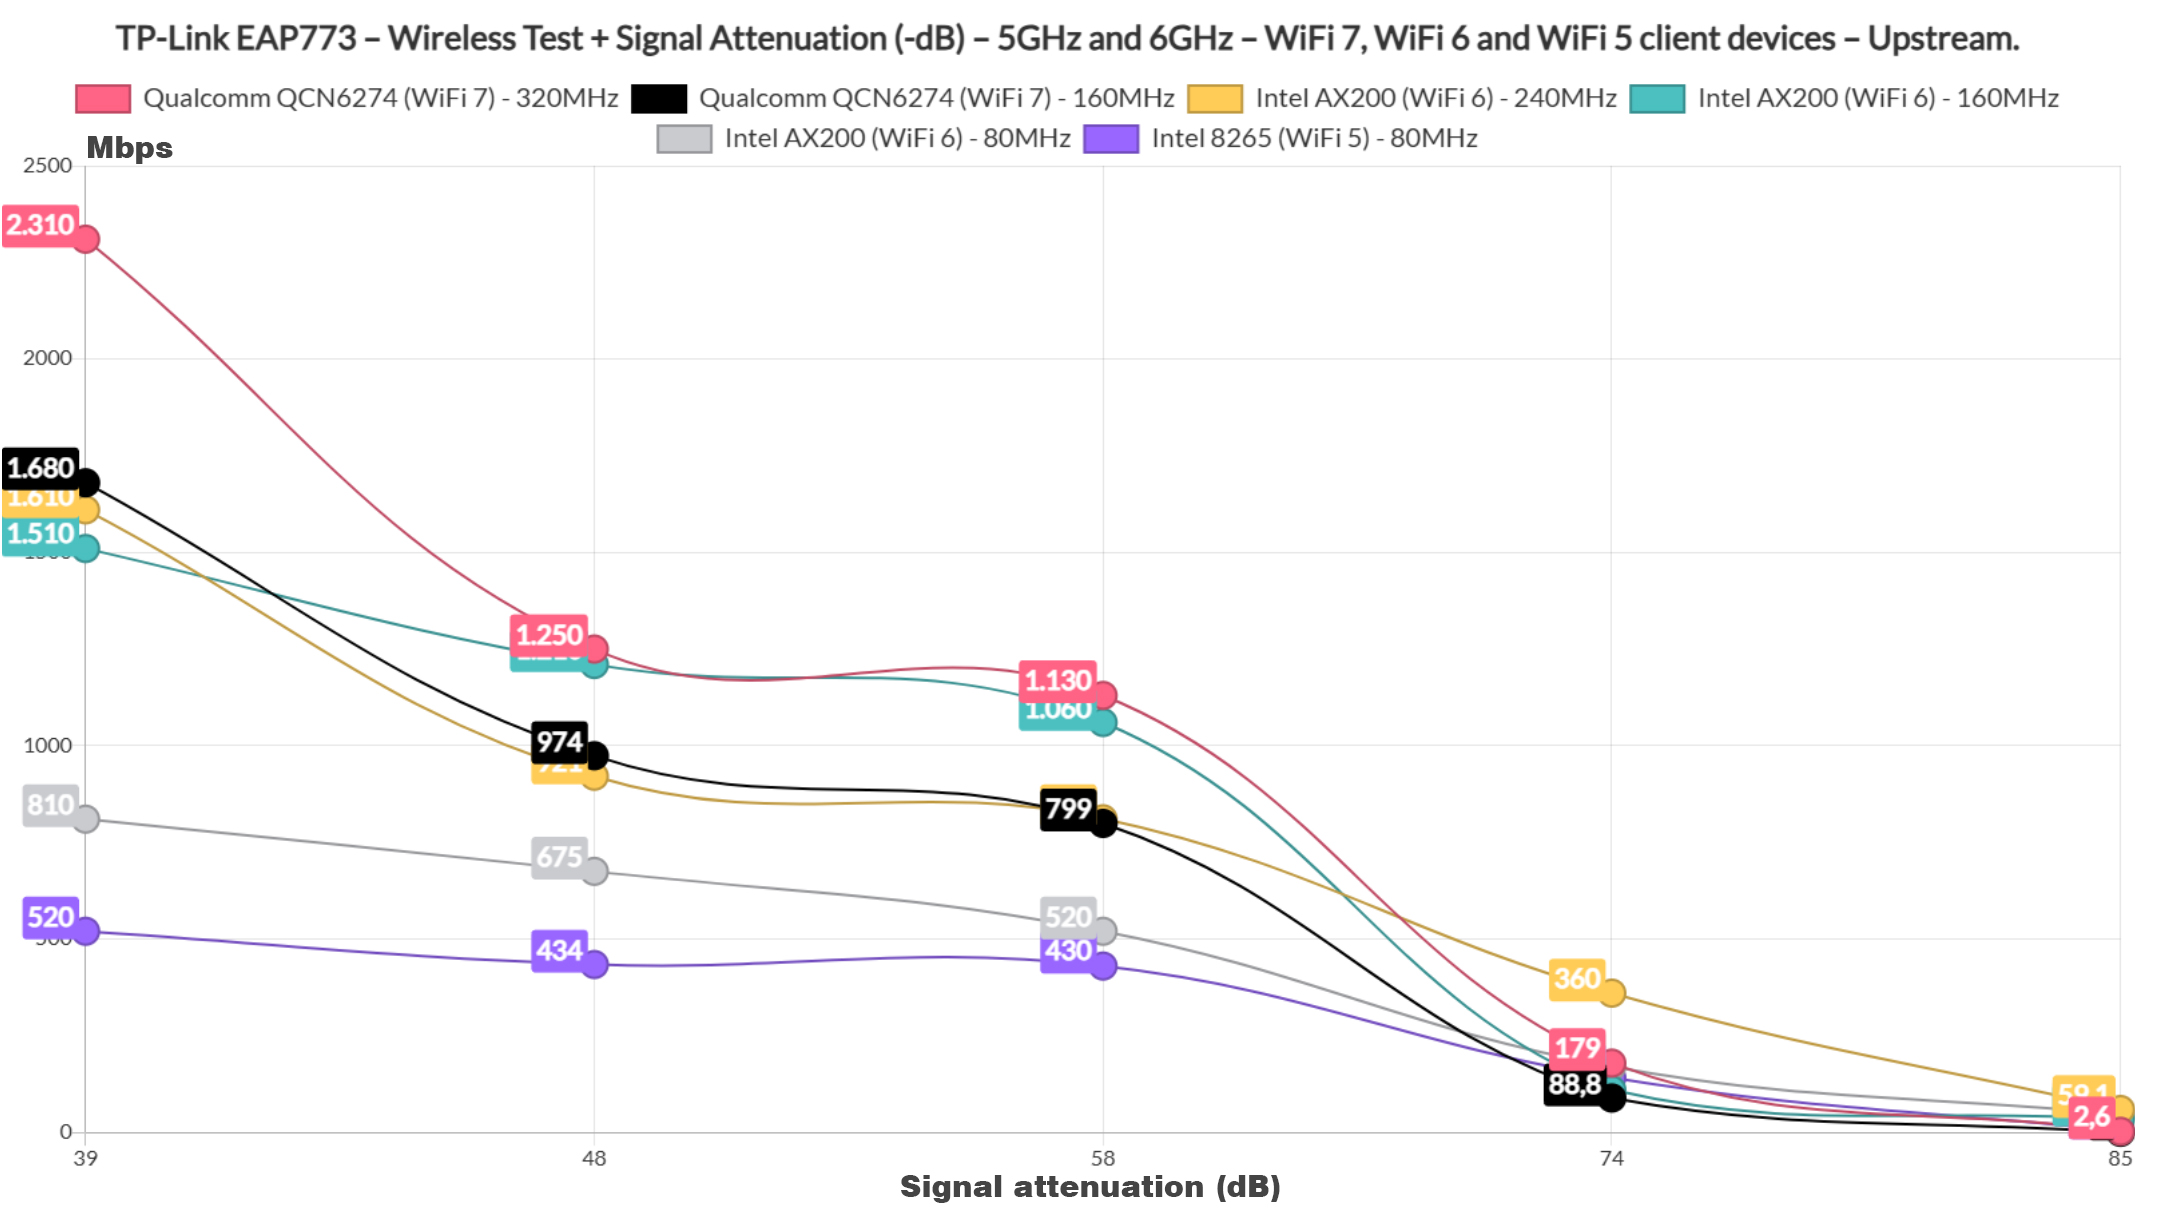
And that is true both upstream and downstream, as we can see in the following graphics.
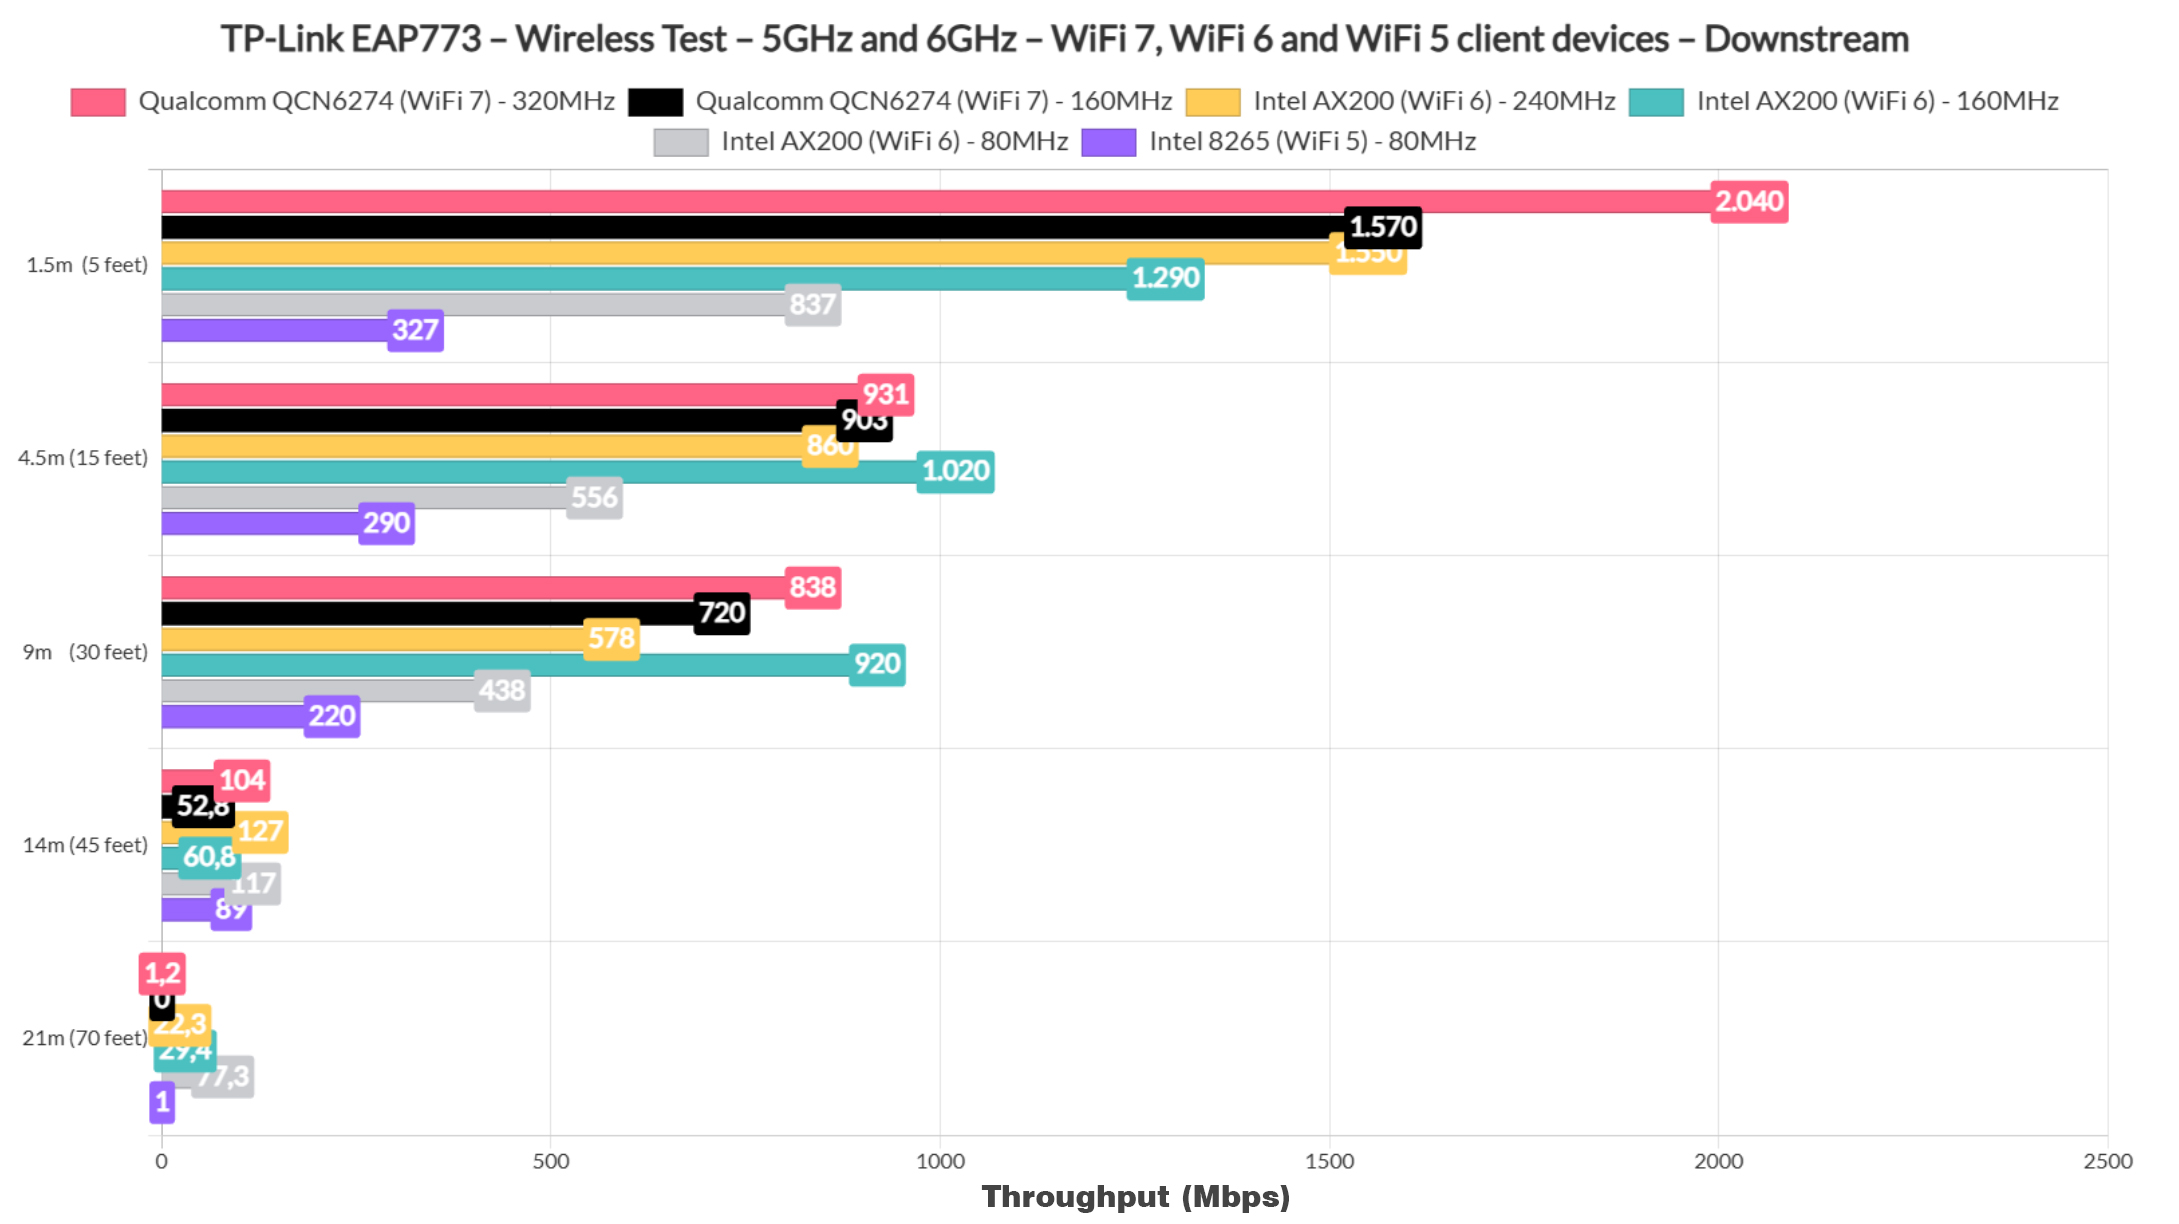
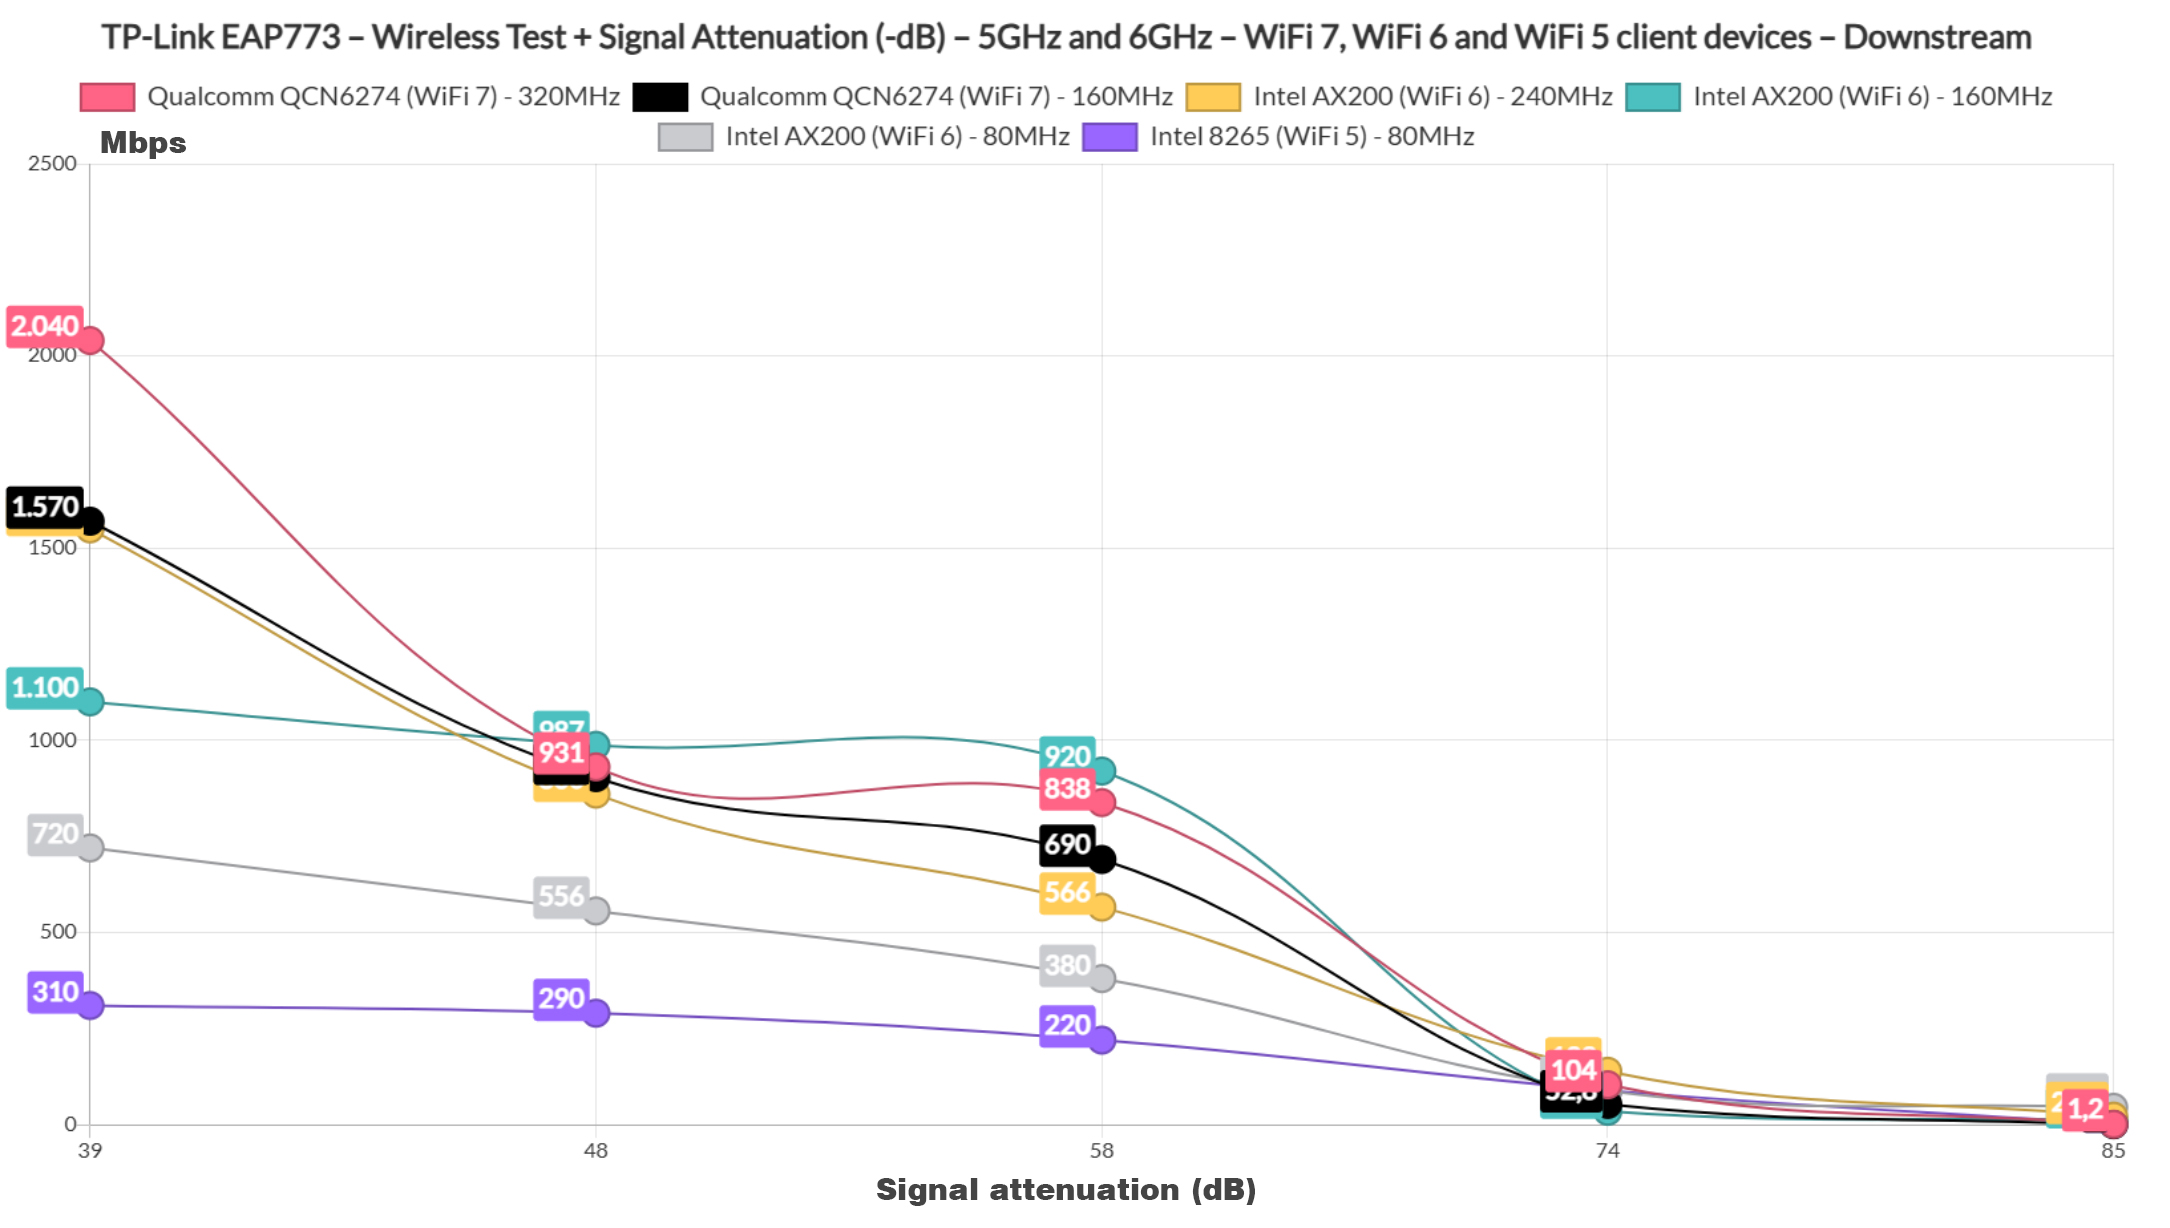
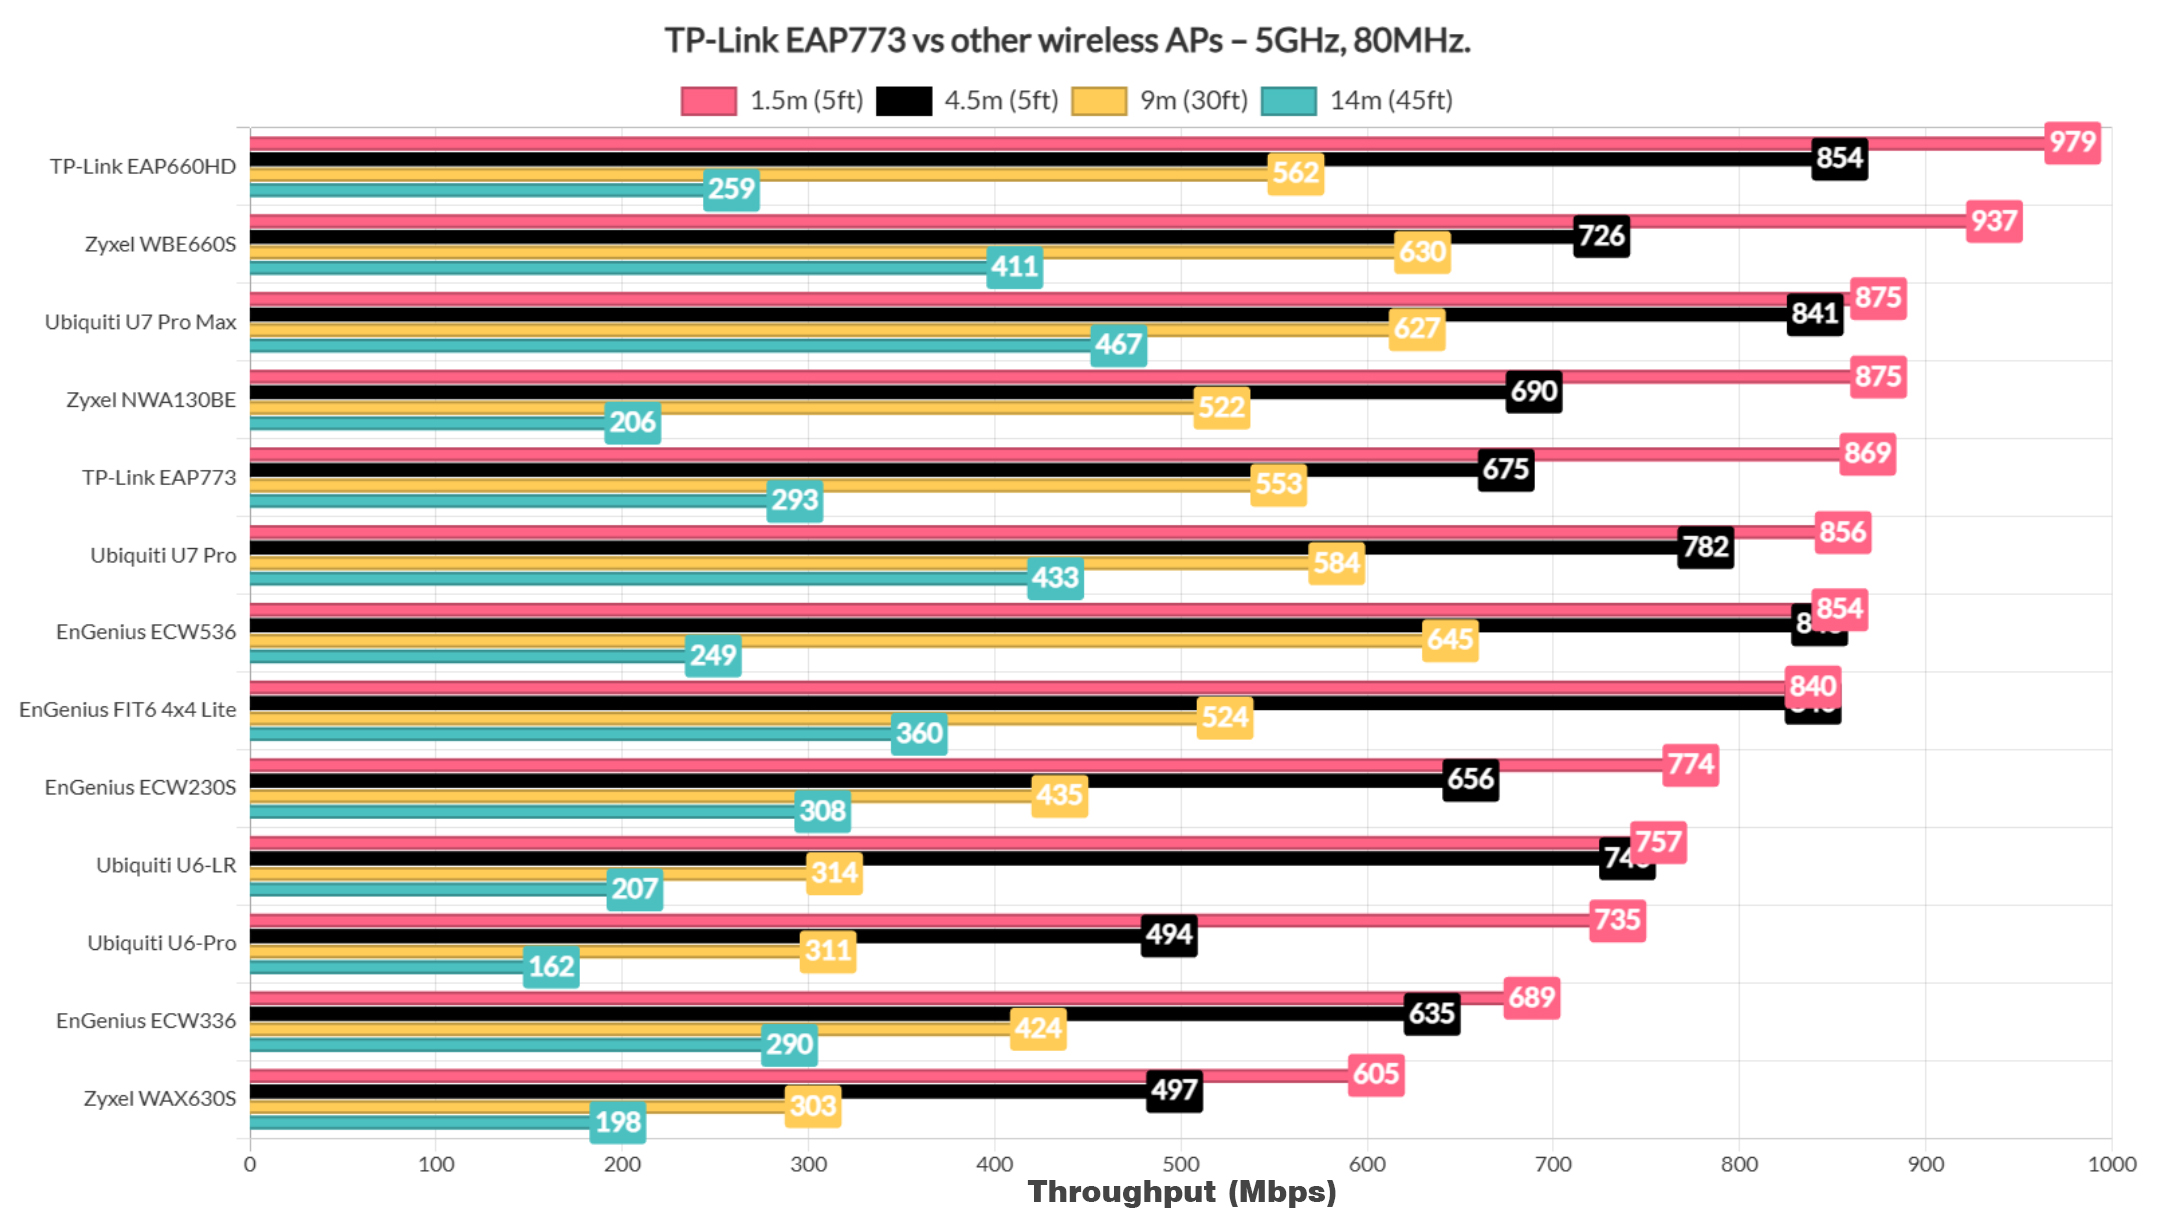
I did include a comparison with other access points that I tested over the years and, when using the 5GHz radio and the 80MHz channel width, the EAP773 sits in between the Zyxel NWA130BE and the U7 Pro.
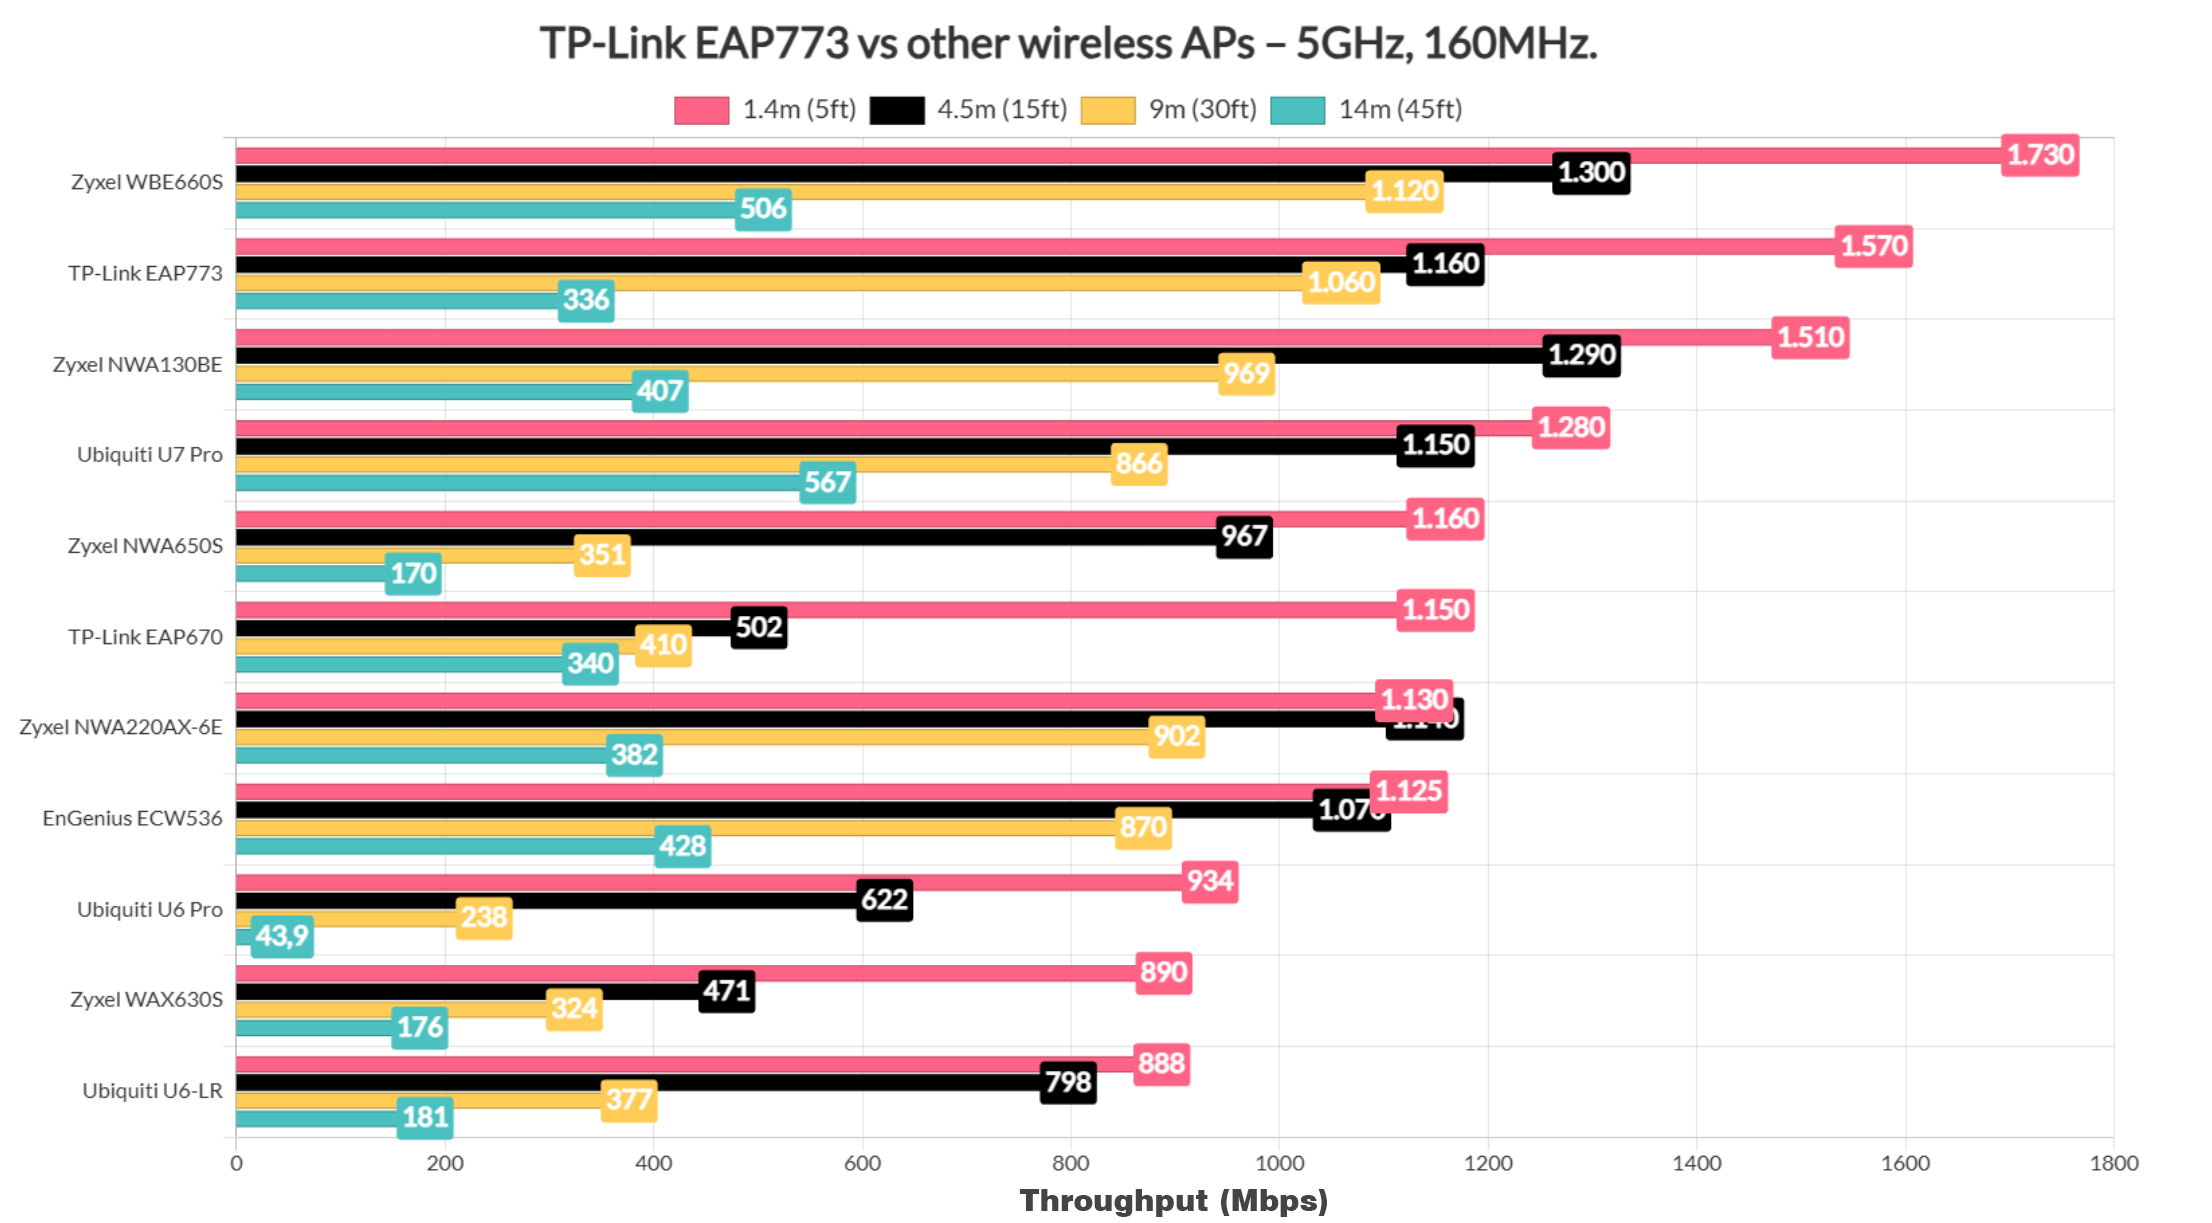
Switching to the 160MHz width, things do change and the EAP773 sits below the more expensive Zyxel WBE660S.
I was very curious how would it stand when using the 6GHz radio and the 320MHz channel bandwidth, and, as you can see, it does take the second place.
Before moving forward, I think it would be interesting to also check out how the throughput fluctuates over a longer period of time and whether a specific speed is sustained or not.
Single Client Tests (2.4GHz)
Now let’s have a quick look at the data I collected when using the 2.4GHz radio band and the 40MHz channel width. I used a WiFi 6 and a WiFi 5 client device, the former performing much better than the latter.
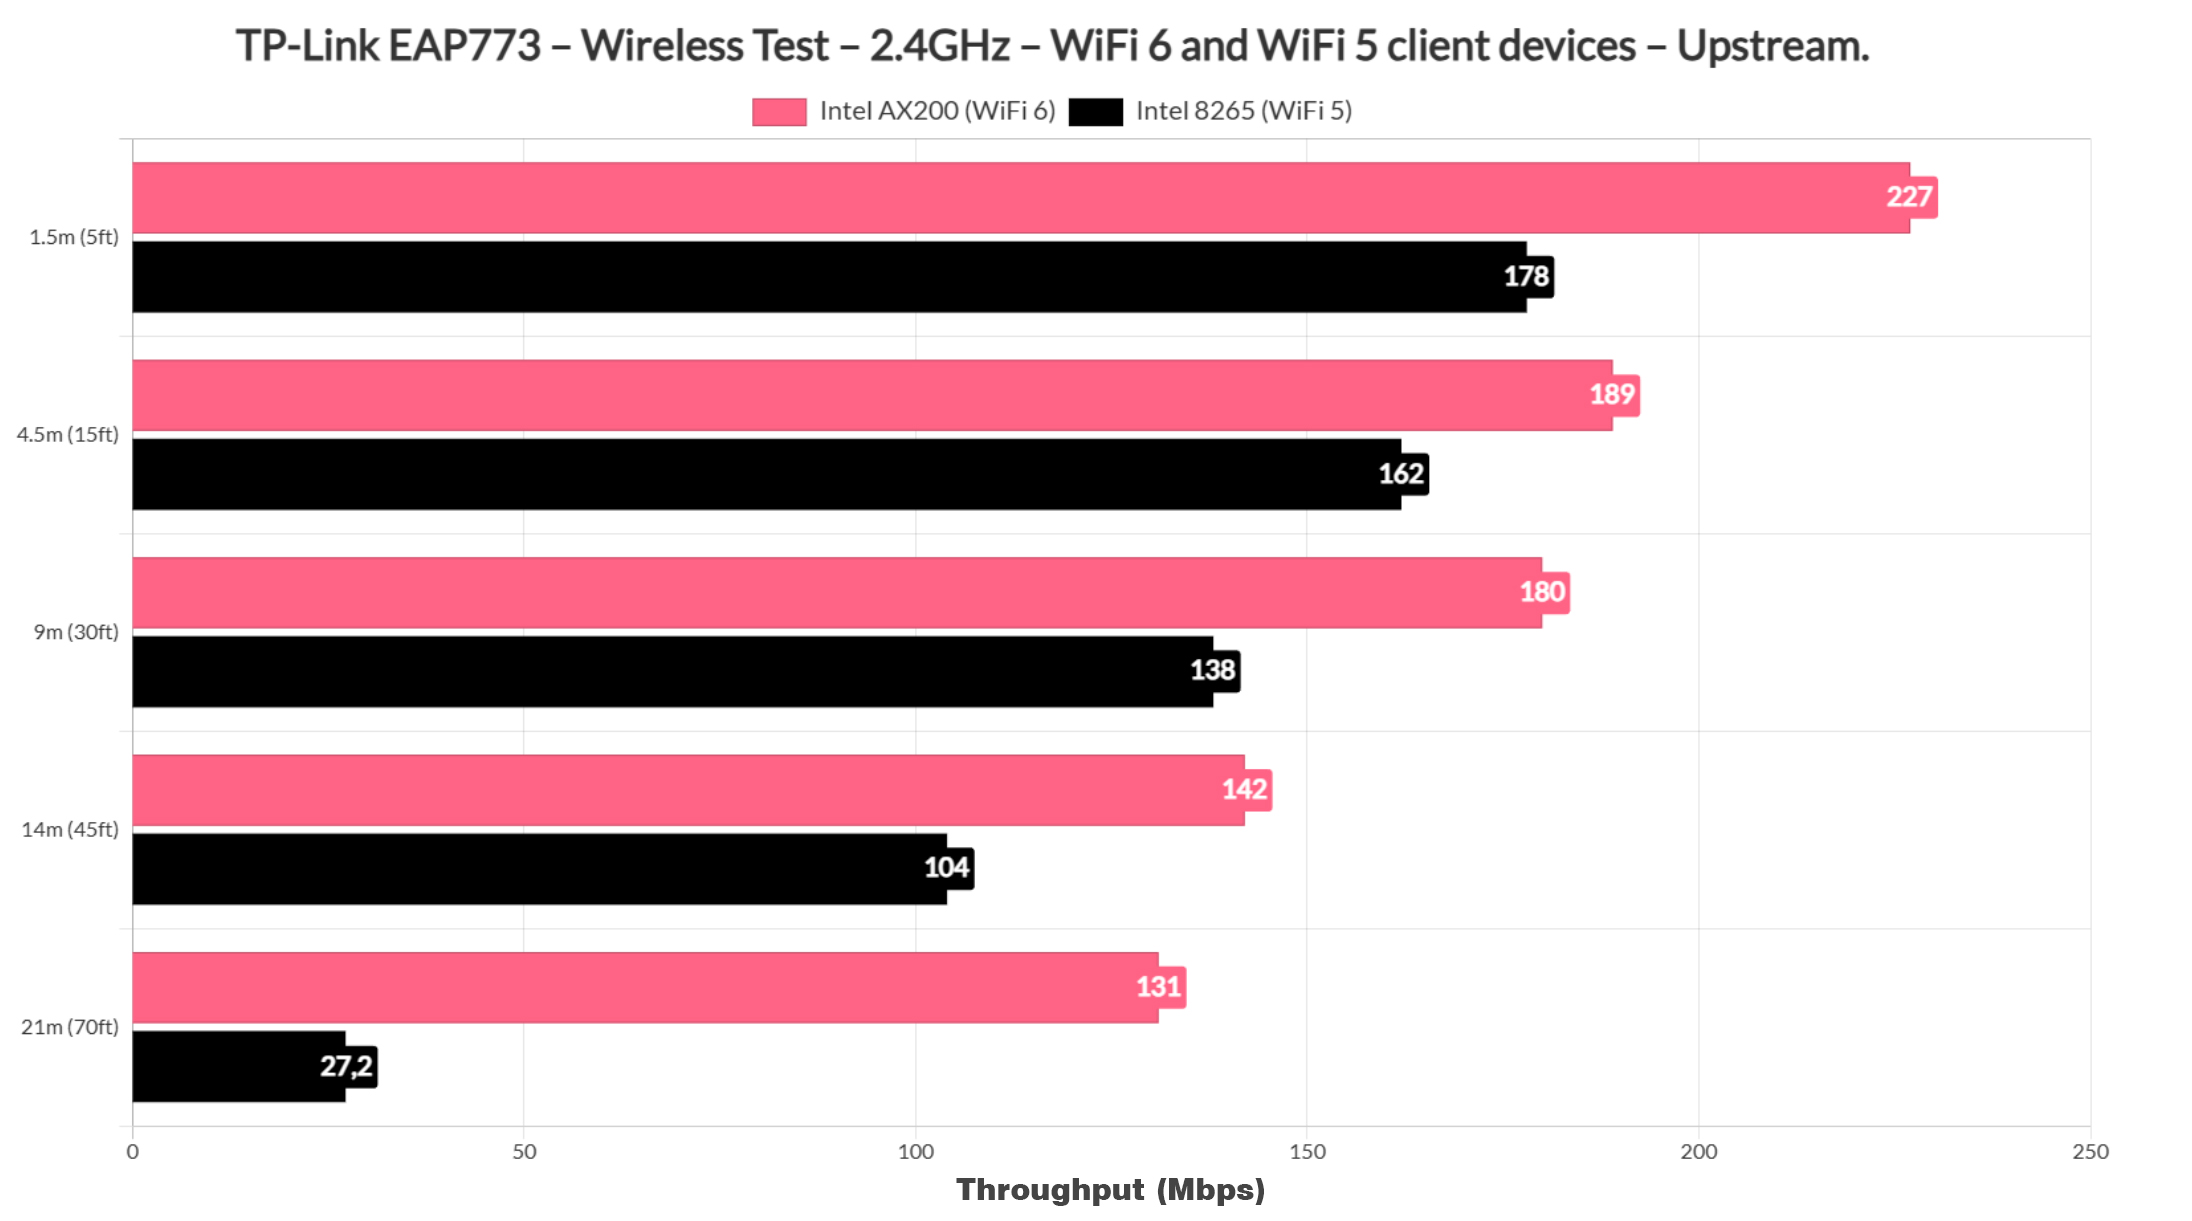
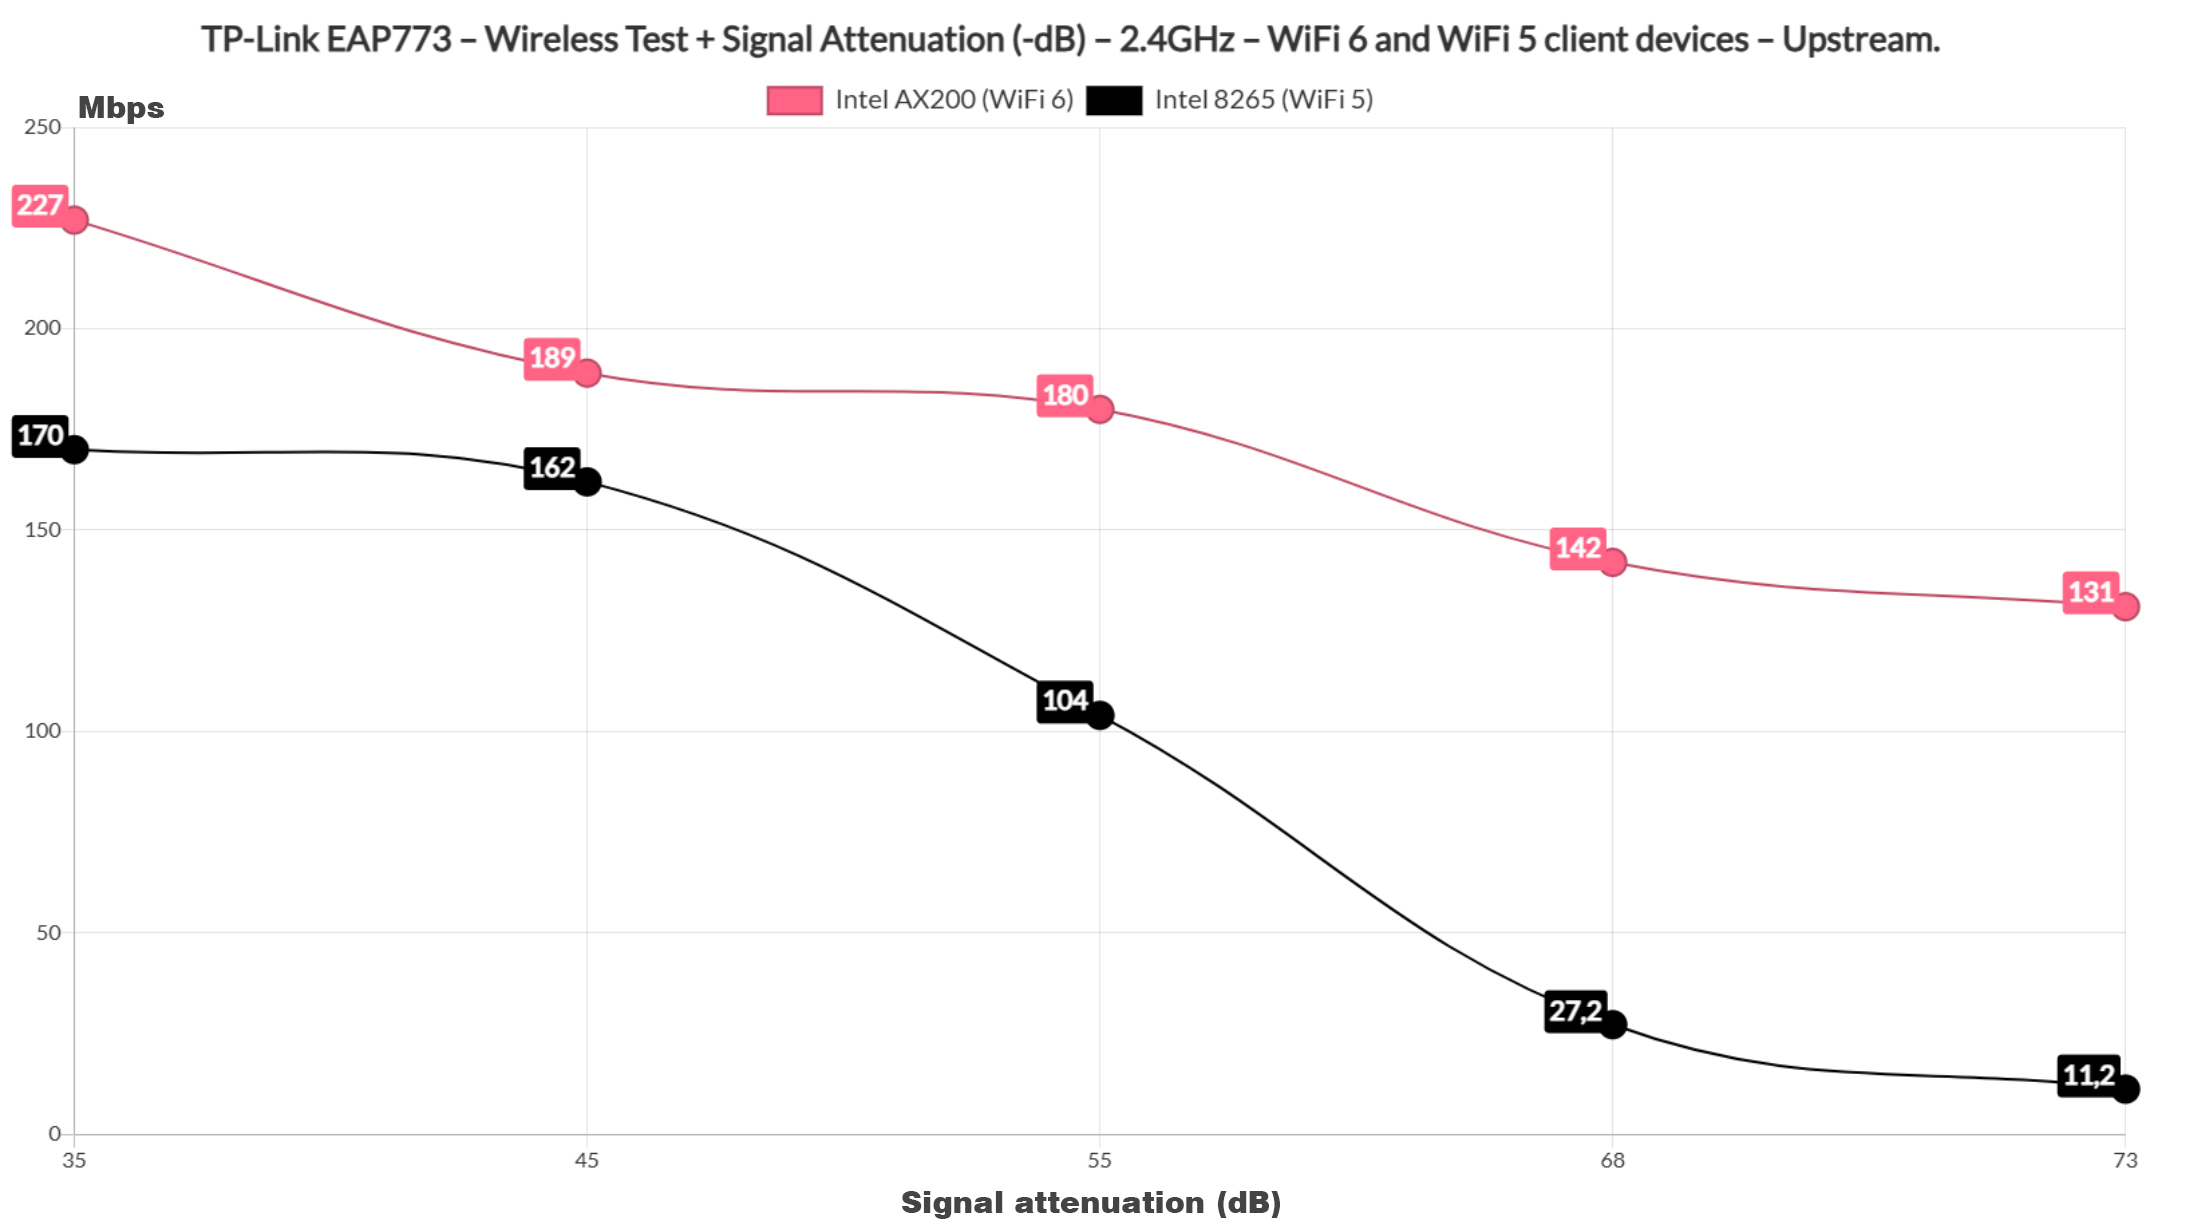
Then again, the 2.4GHz radio is better left for IoT and smart devices at this moment. I have also included a signal attenuation graphic in case you want to reproduce these results in your own home or office.
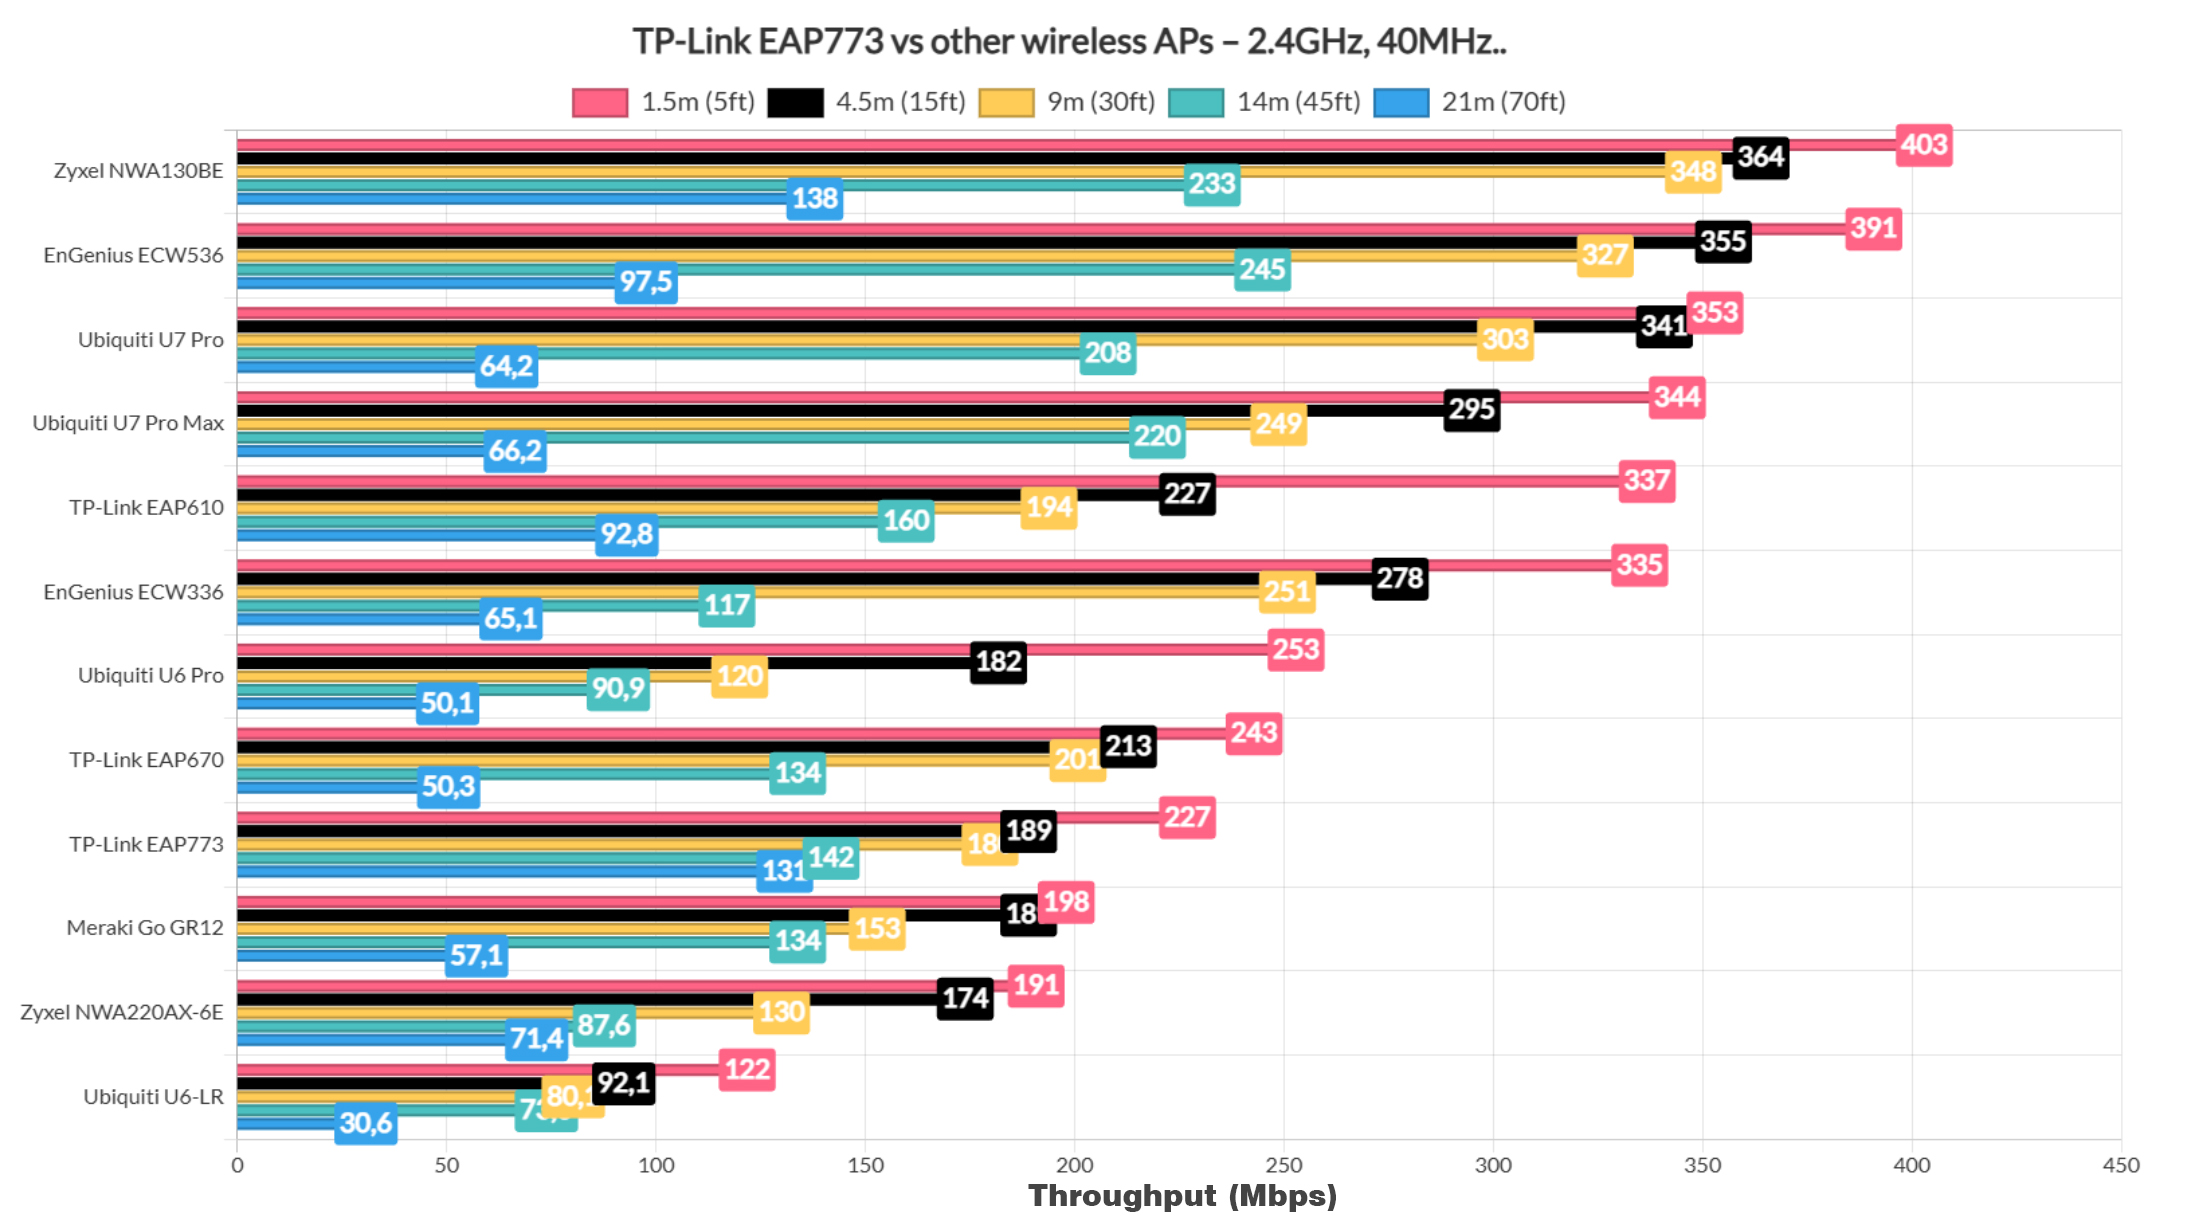
When compared to other access points, the EAP773 is not really a top performer, sitting below the EAP670.
The Multi-Client Tests
That’s all for the single-client trials, so let’s get a good look at the multi-client test results. I used net-hydra by Mr Jim Salter once again and, using a server PC, as well as five wireless client devices, I could simulate various types of traffic.
I started with 1080p streaming and we can see that the WiFi 7 client did really well, followed by the two WiFi 6 client devices which remained under 100ms for at least 95% of the time.
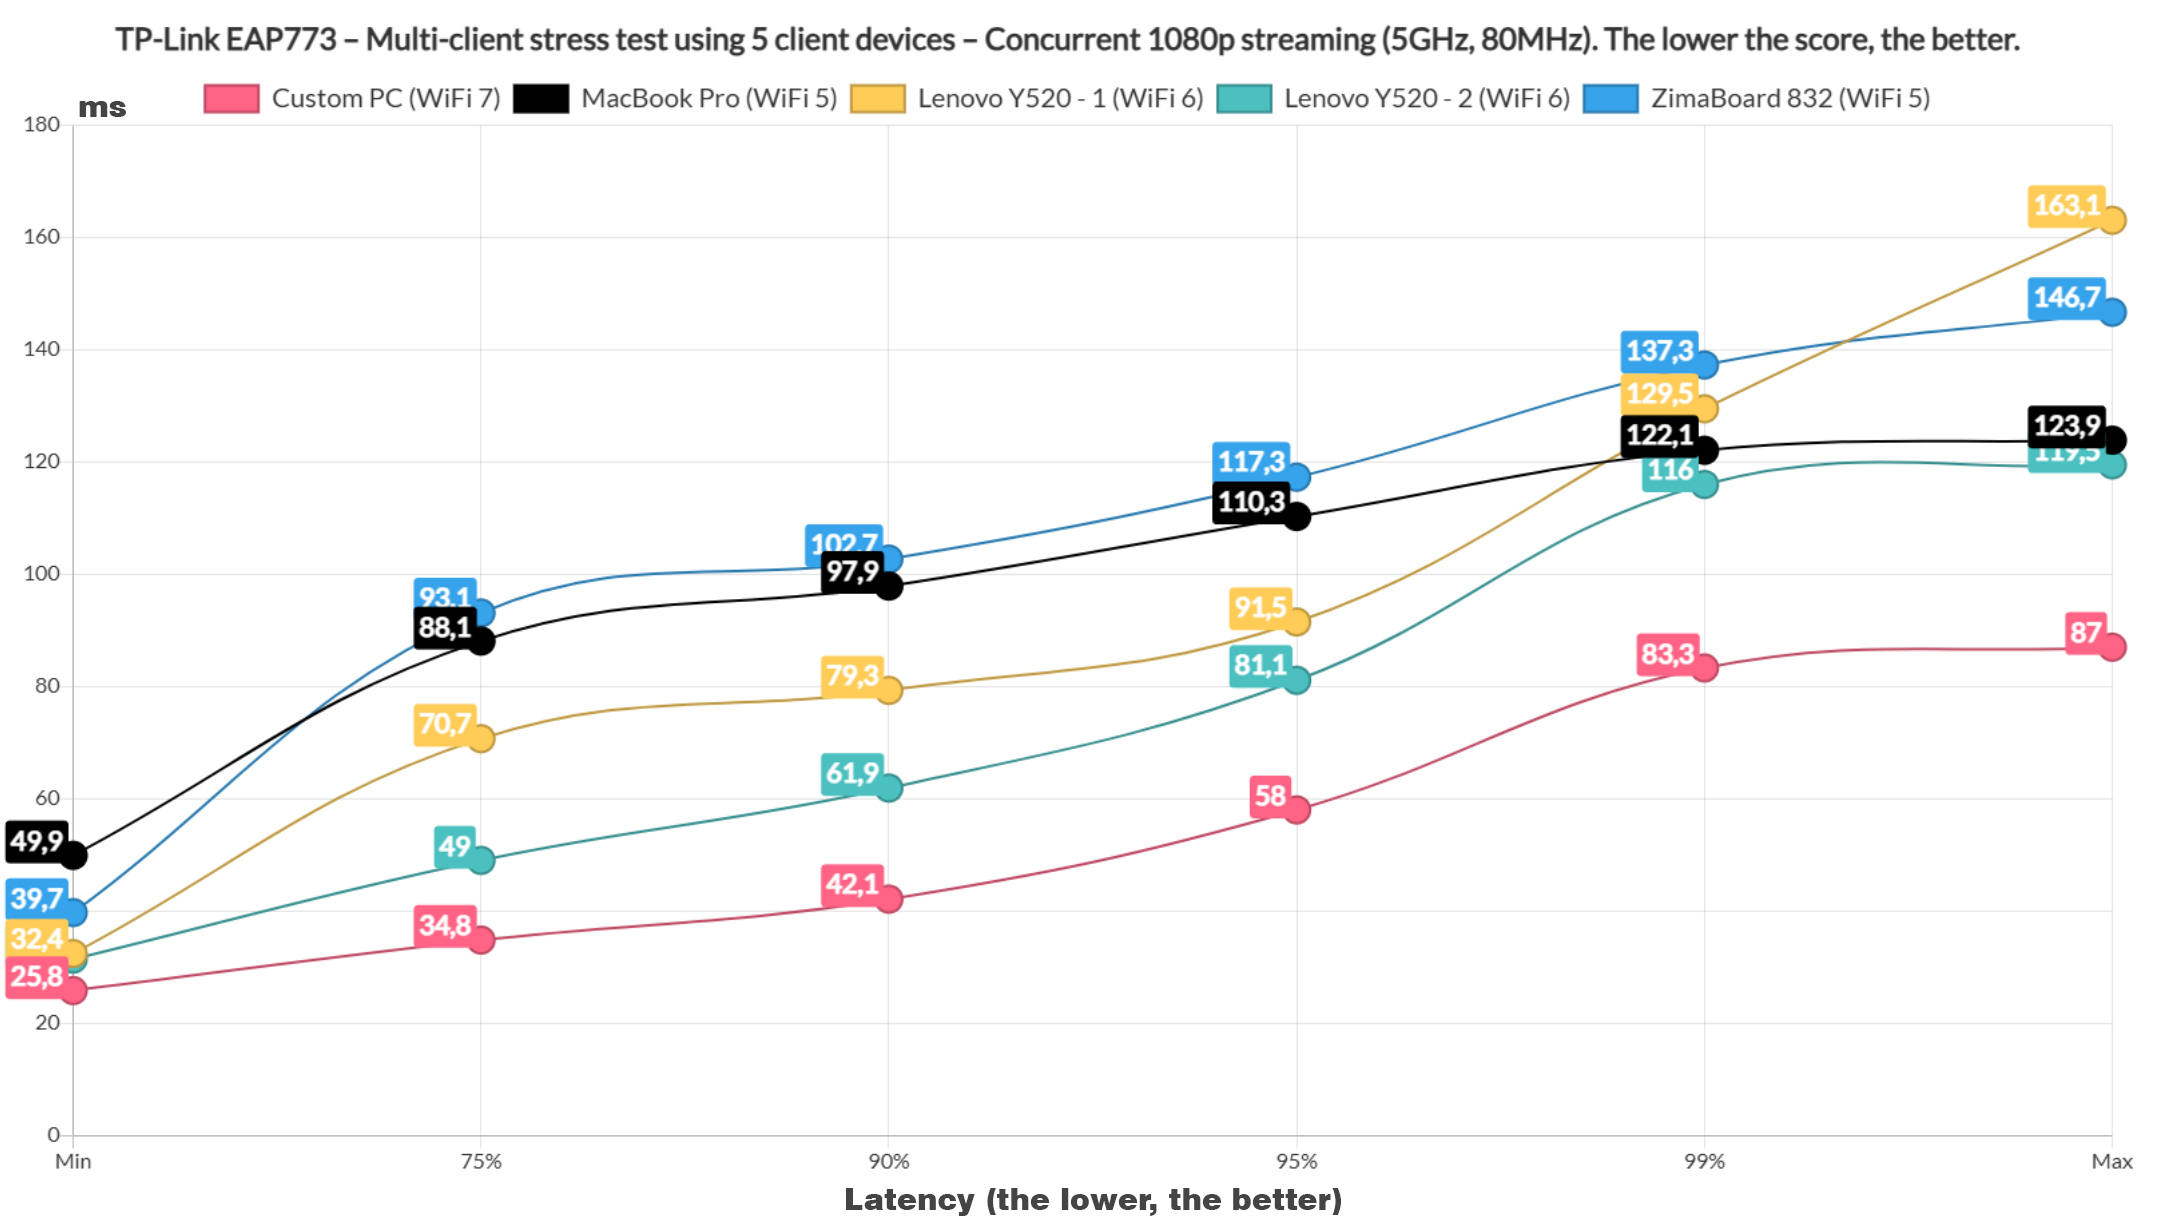
The two WiFi 5 clients climbed above 100ms for pretty at least 25% of the time which is a lot. The performance is similar to the Zyxel WBE660S and the NWA130BE, and also a bit better than the U7 Pro.
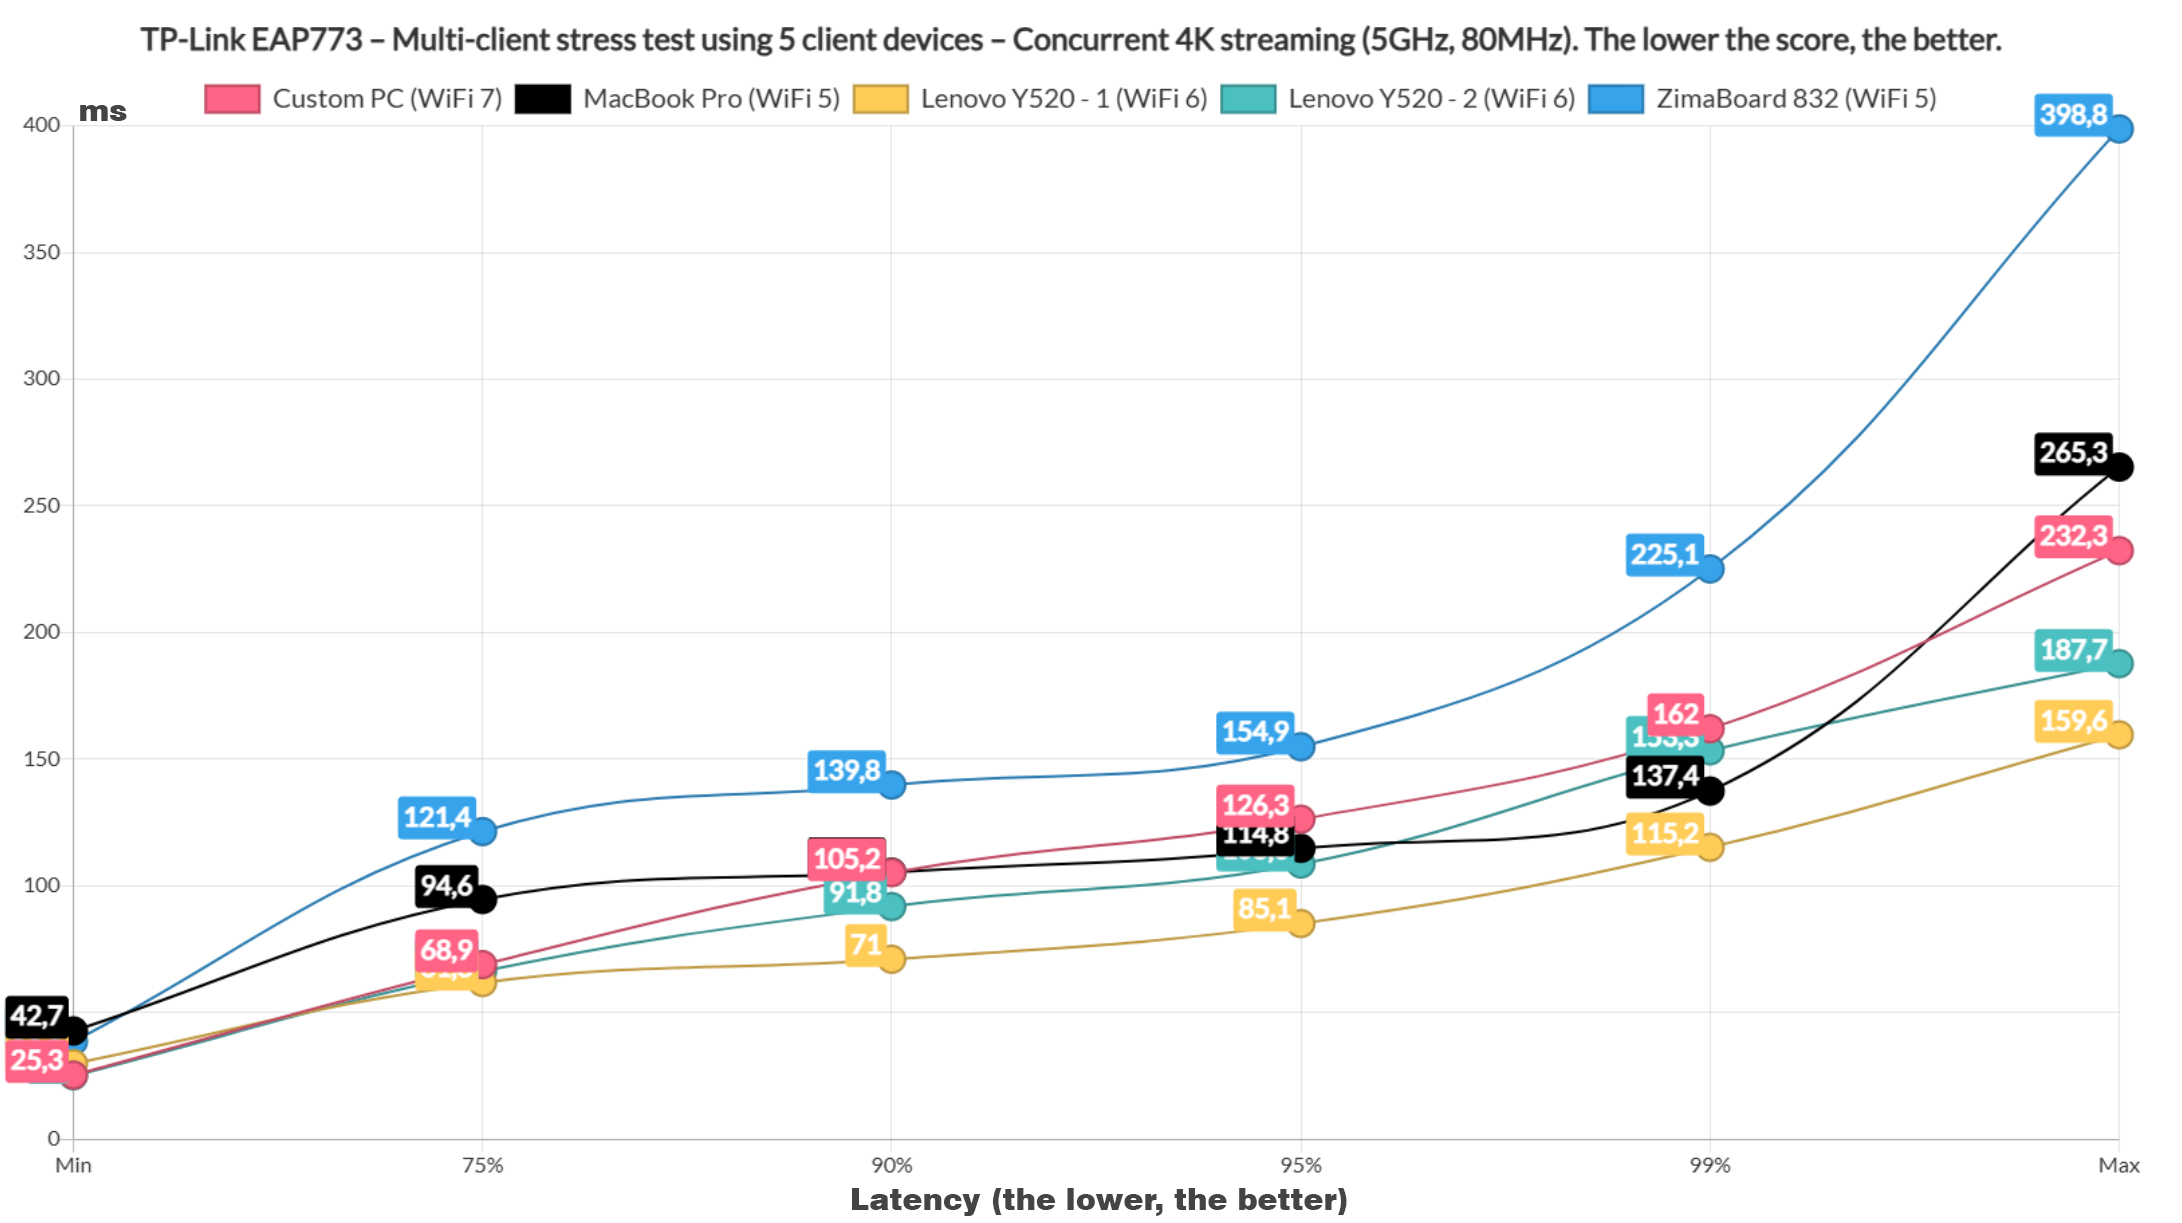
Next, I simulated 4K streaming traffic on five client devices and the latency was quite similar to what I saw with the Zyxel NWA130BE and the U7 Pro, which I suppose make sense considering all are within the same price range. Moving forward, I added intense browsing to run alongside 1080p streaming, and we can see that a couple of clients did perform relatively well.
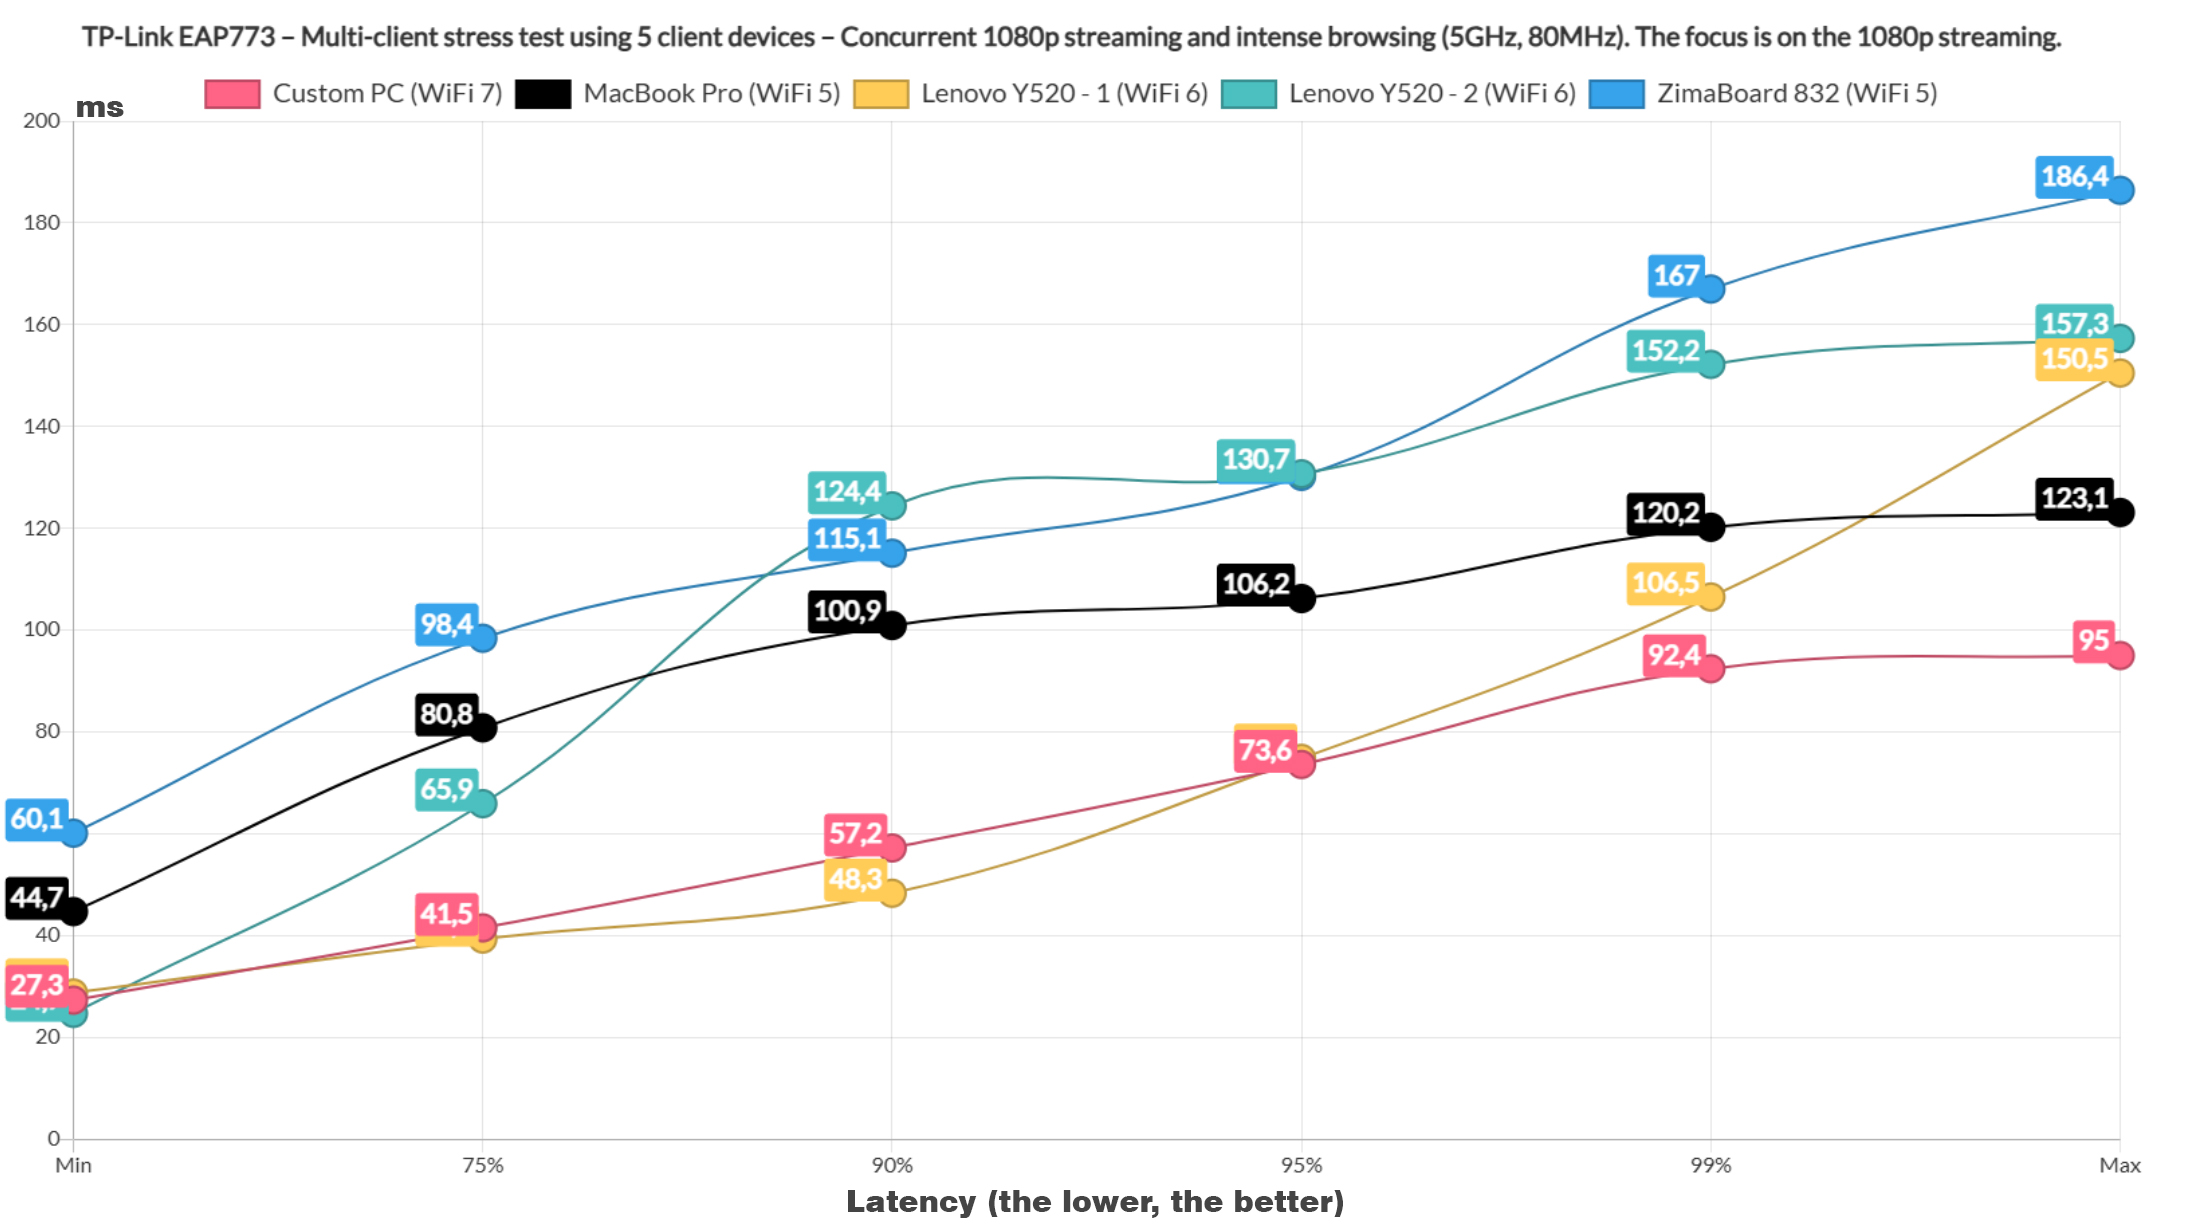
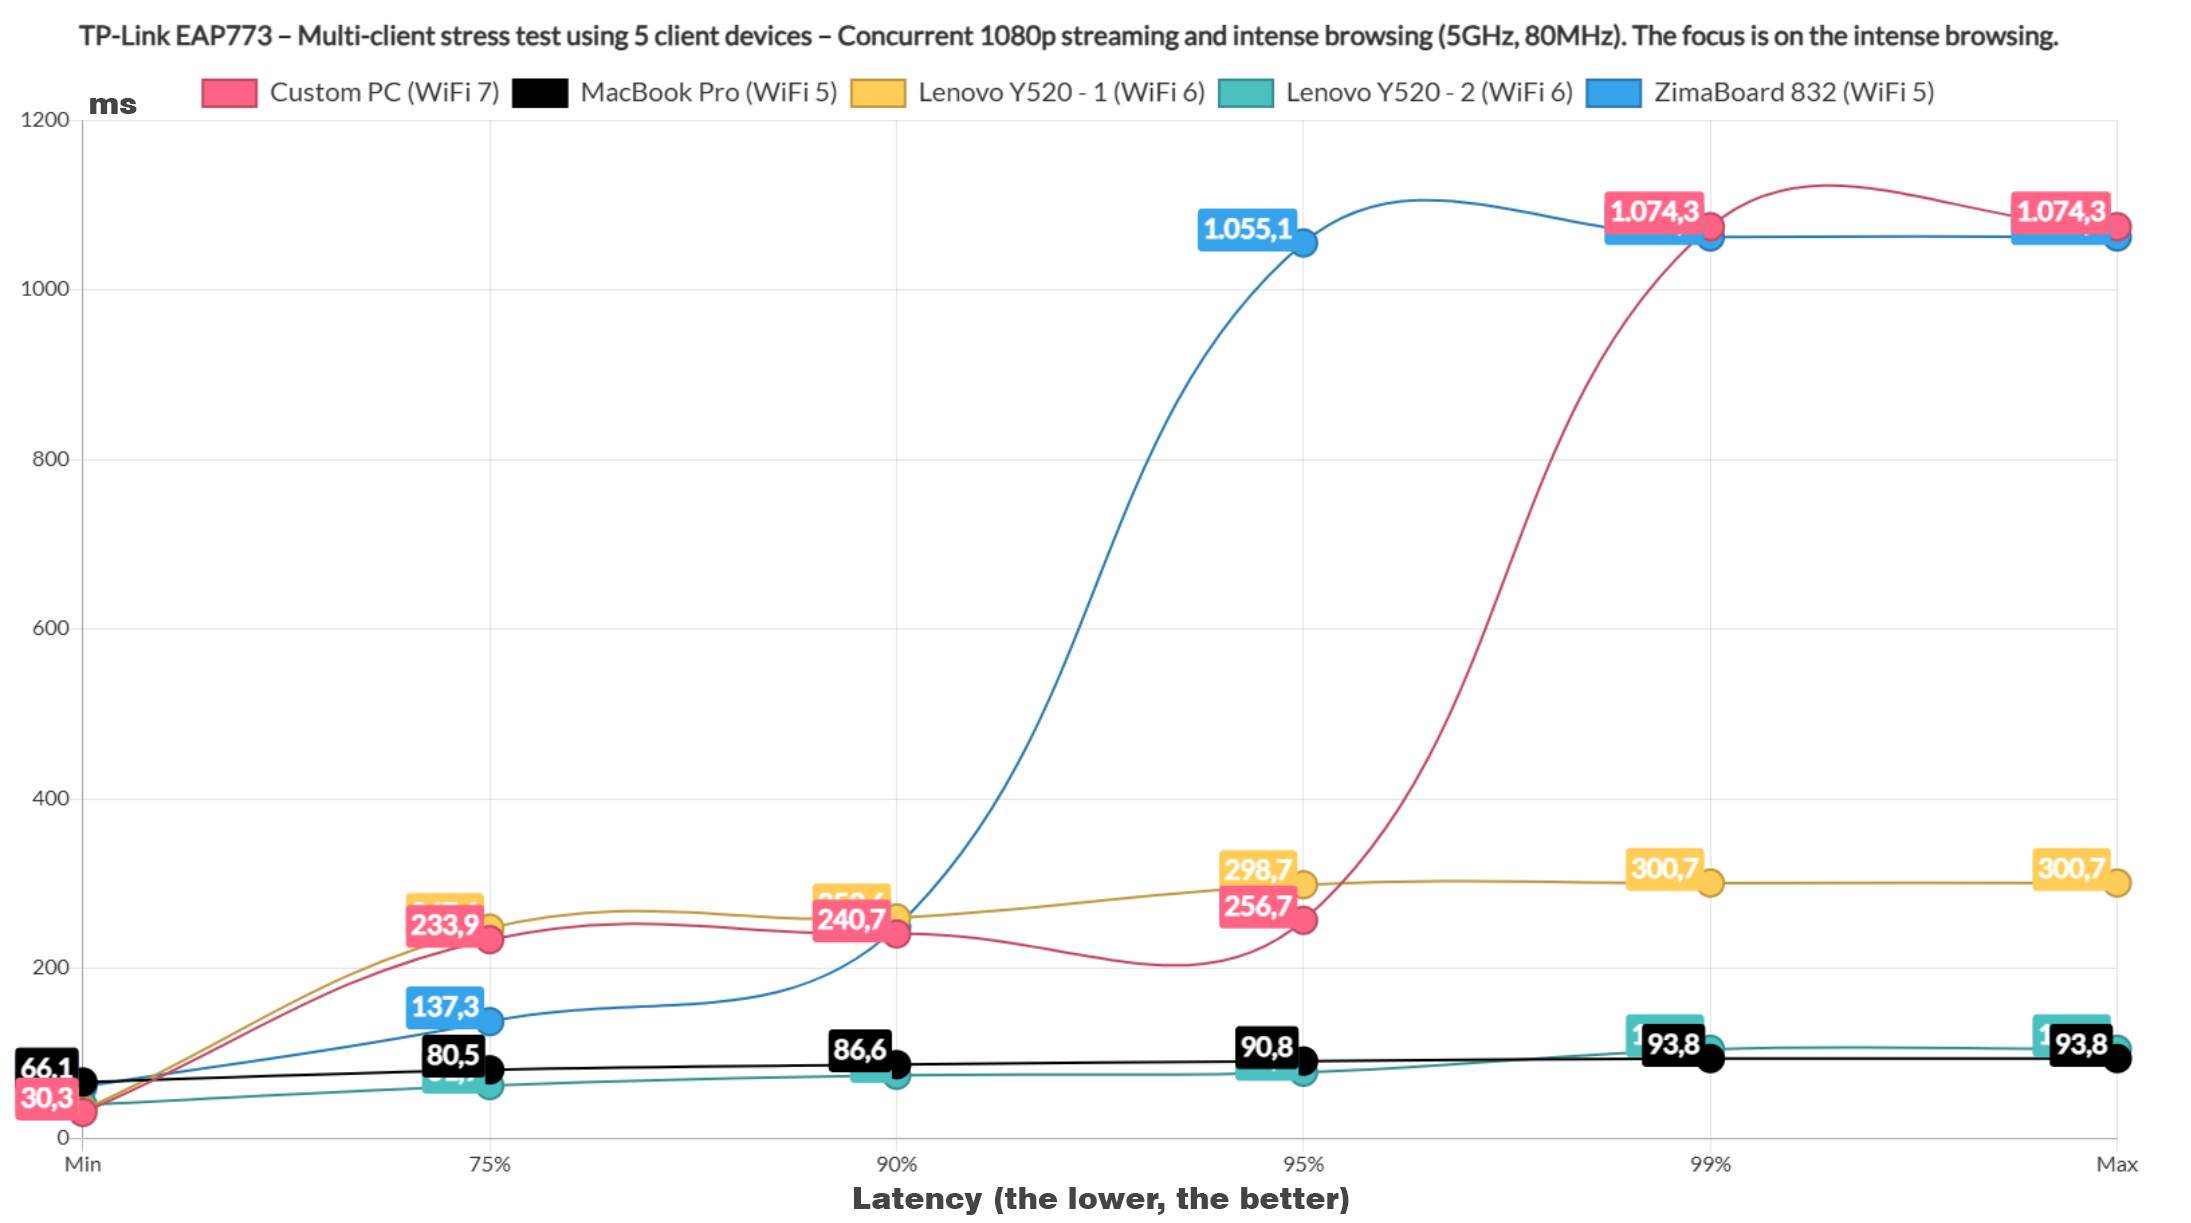
It’s not that much different from the Ubiquiti U7 Pro performance. As for the intense browsing graphic, the two WiFi 5 clients did better than the rest, but even those performed within limits.
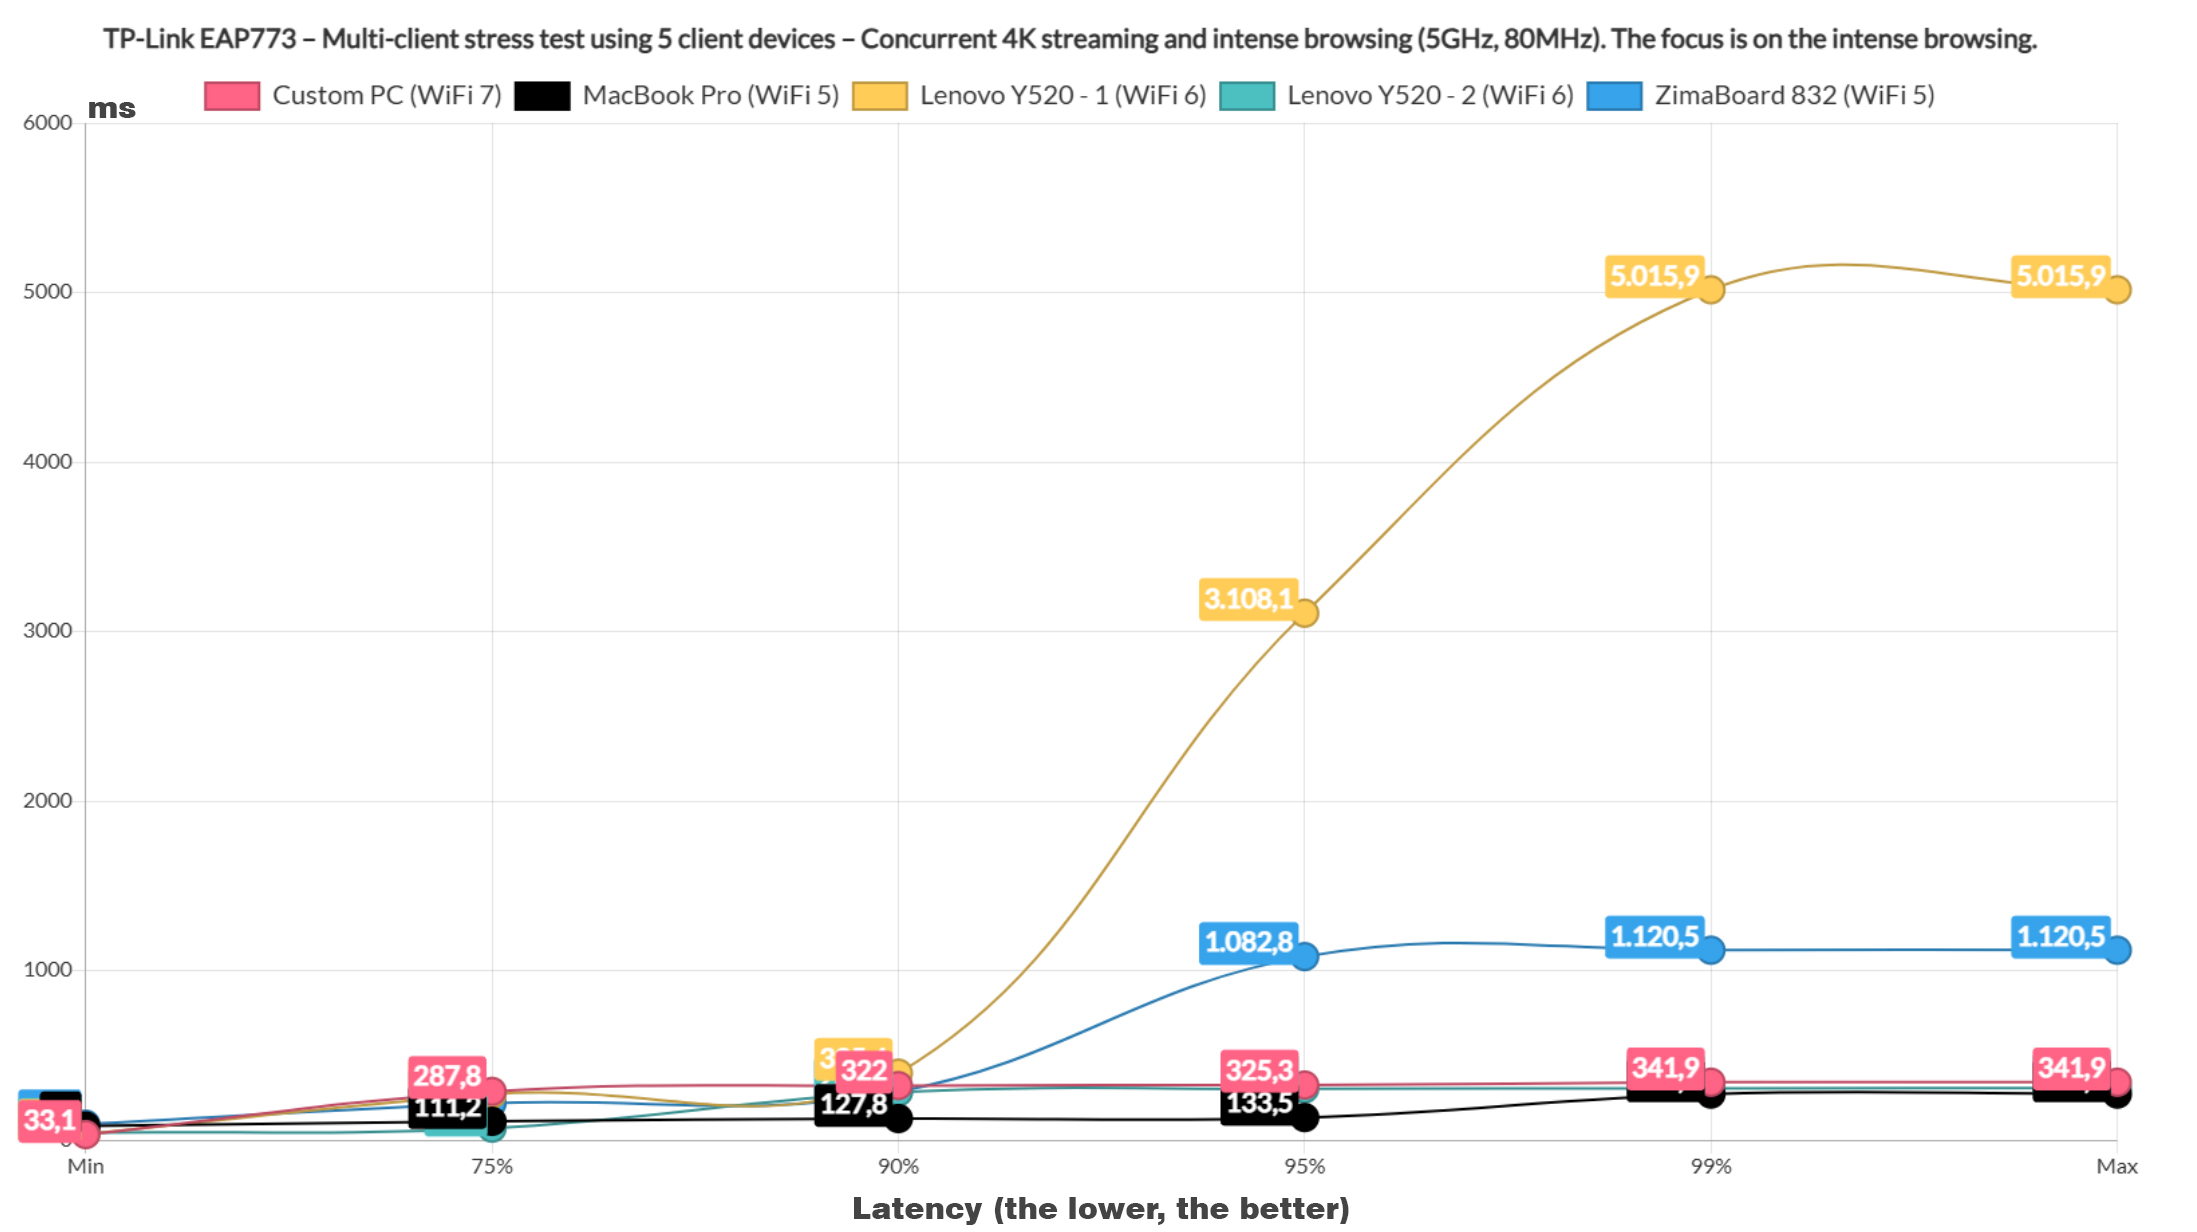
Now, moving on with the 4K streaming and the intense browsing test, only one WiFi 6 client remained beneath 100ms for almost the entire duration. It’s a very similar performance to the WBE660S for the most part, with only the ZimaBoard performing a bit worse.
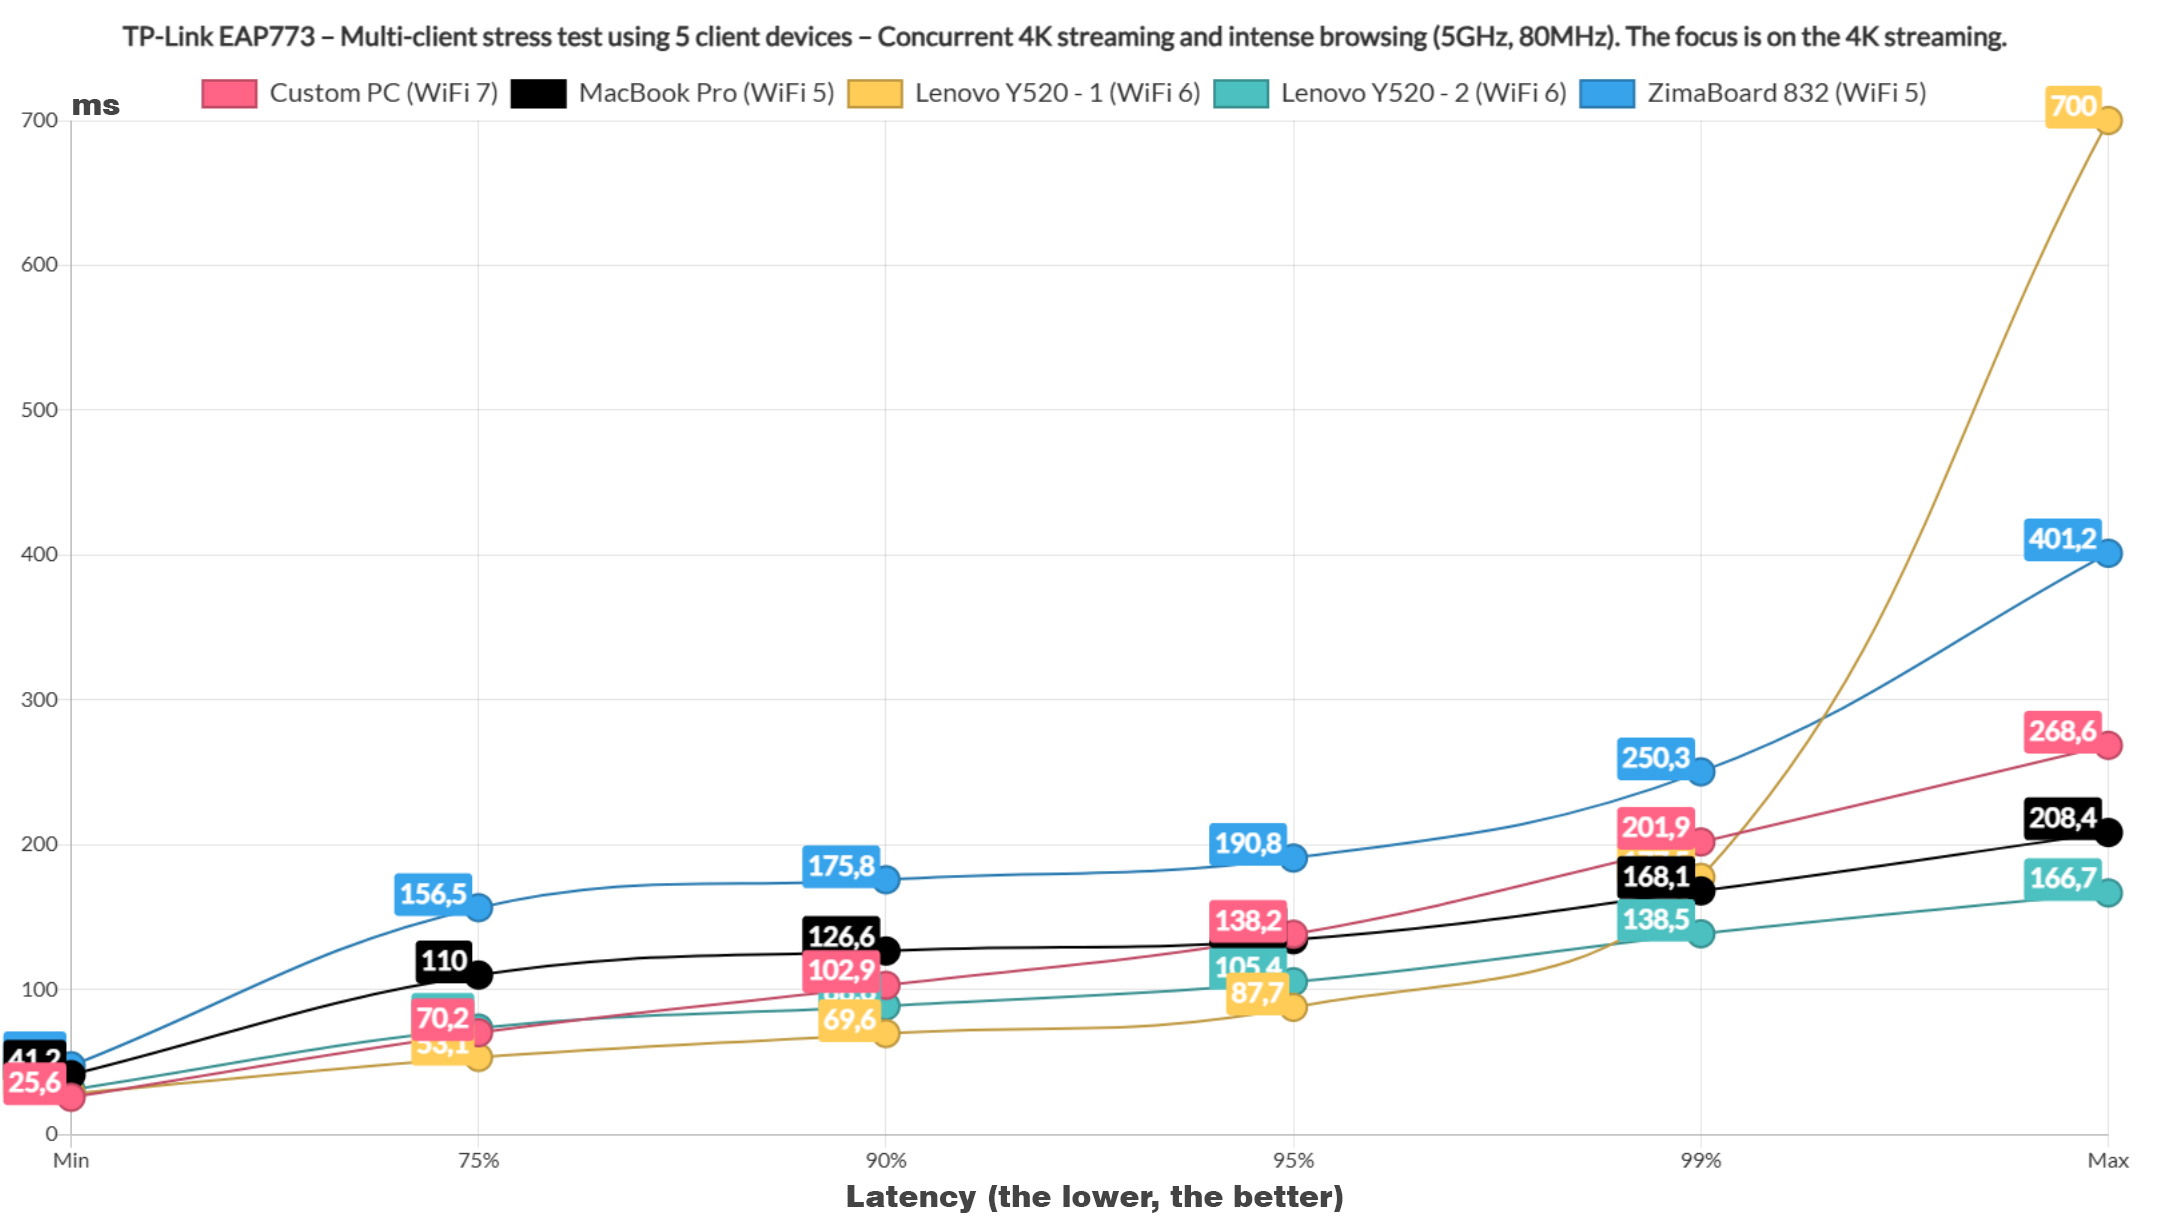
The intense browsing graphic shows one client going above 3 seconds for at least 5% of the time which is not really acceptable performance.
Let’s now include downloading traffic and we will be downloading a 10MB file continuously alongside two intense browsing clients and two 4K streaming clients. There is no limit, the clients can use up the entire bandwidth.
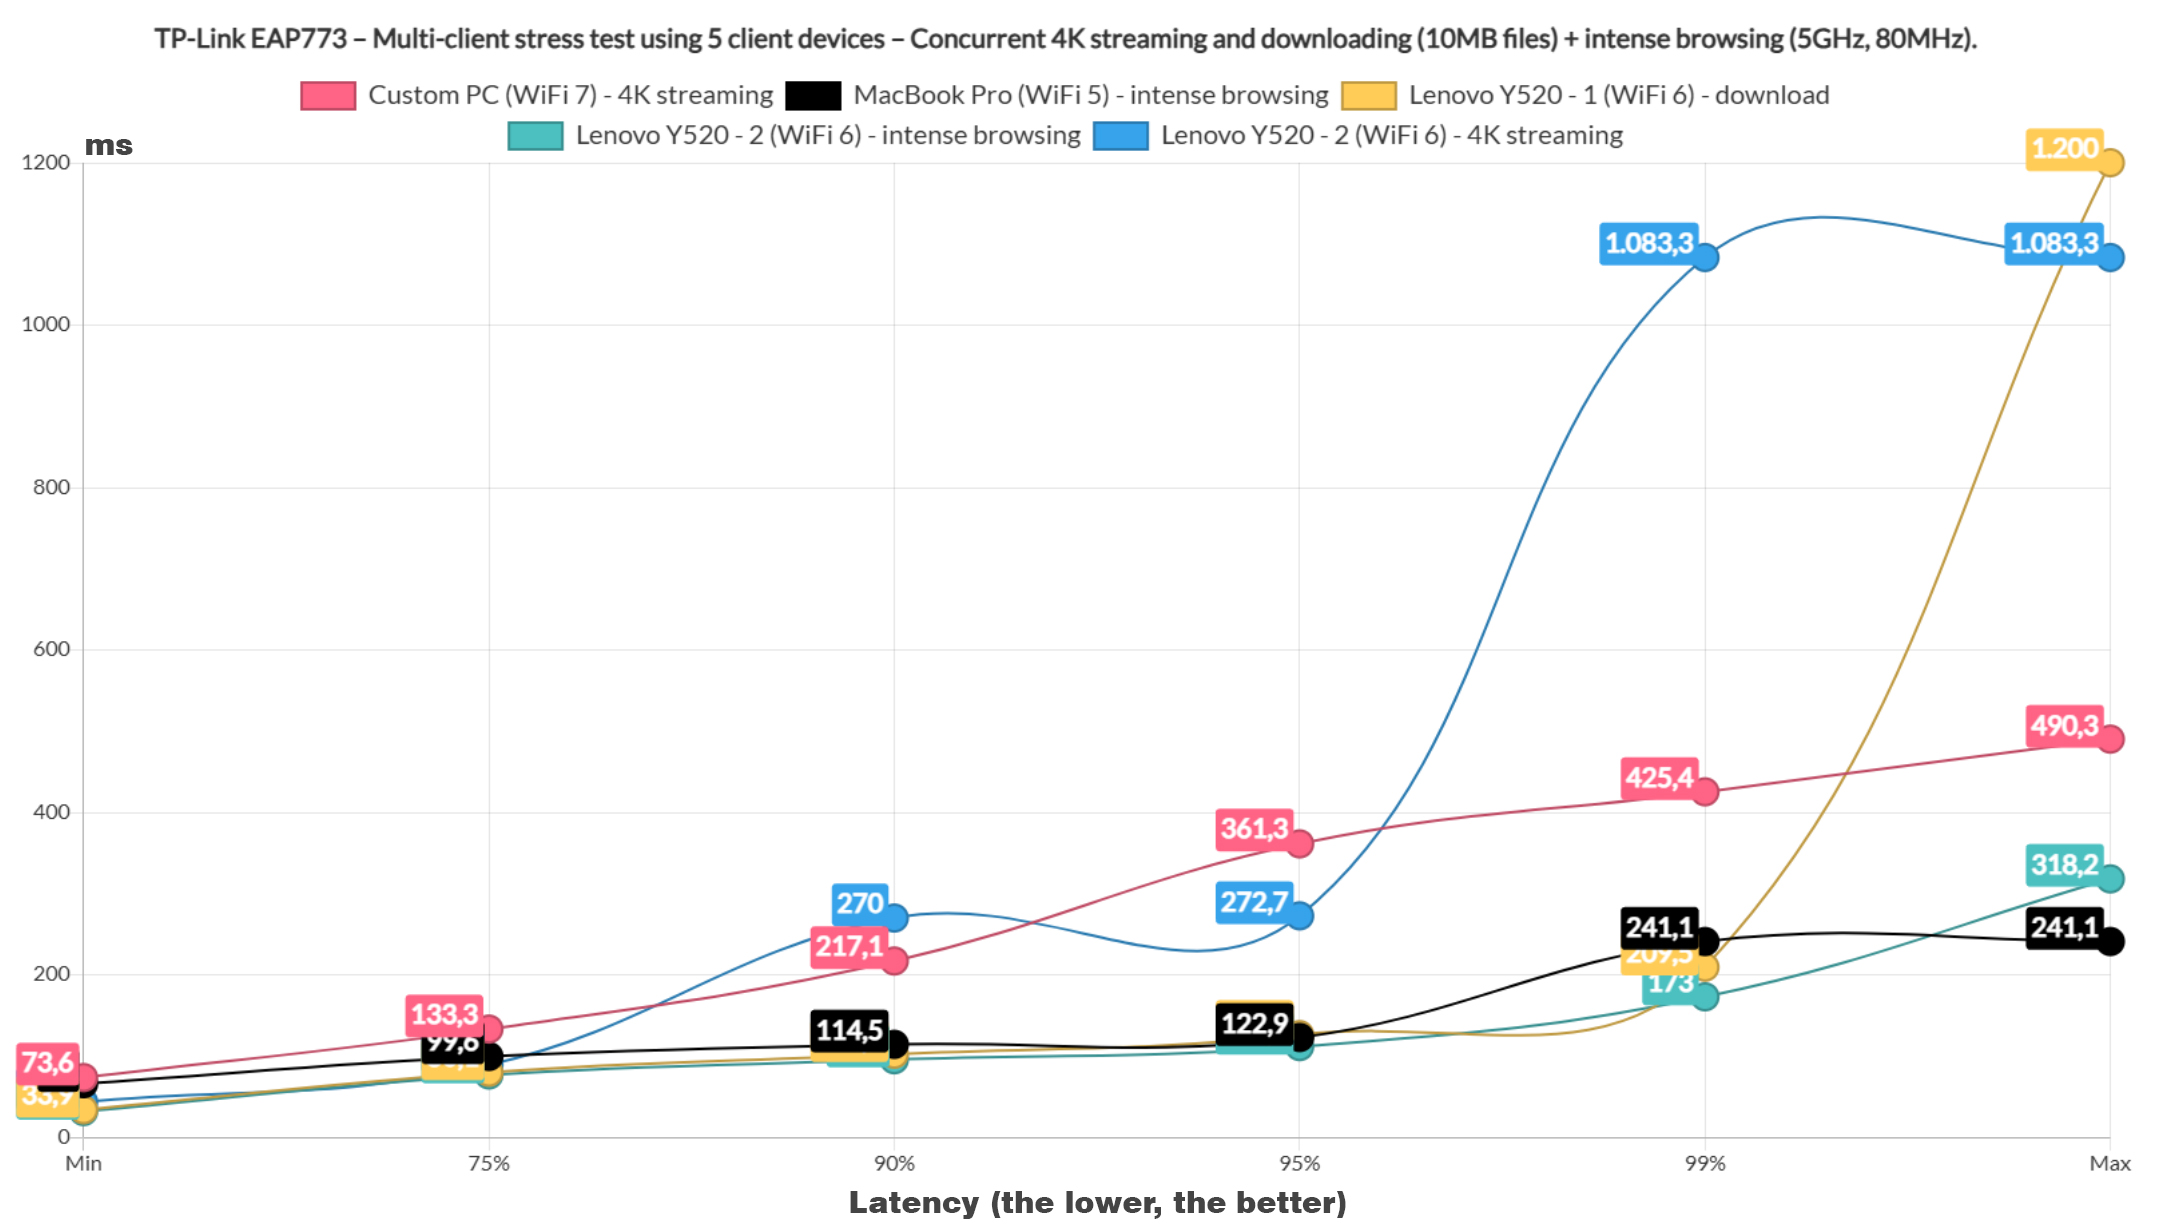
As you can see, the 4K streaming clients didn’t play nice, while the intense browsing was handled well. The downloading client needed 572Mbps of throughput and it remained near 100ms for 95% of the time which is far better than expected. It was better than the WBE660S which was already superior to the U7 Pro and the NWA130BE. With that in mind, let’s now add another downloading client. And things do change.
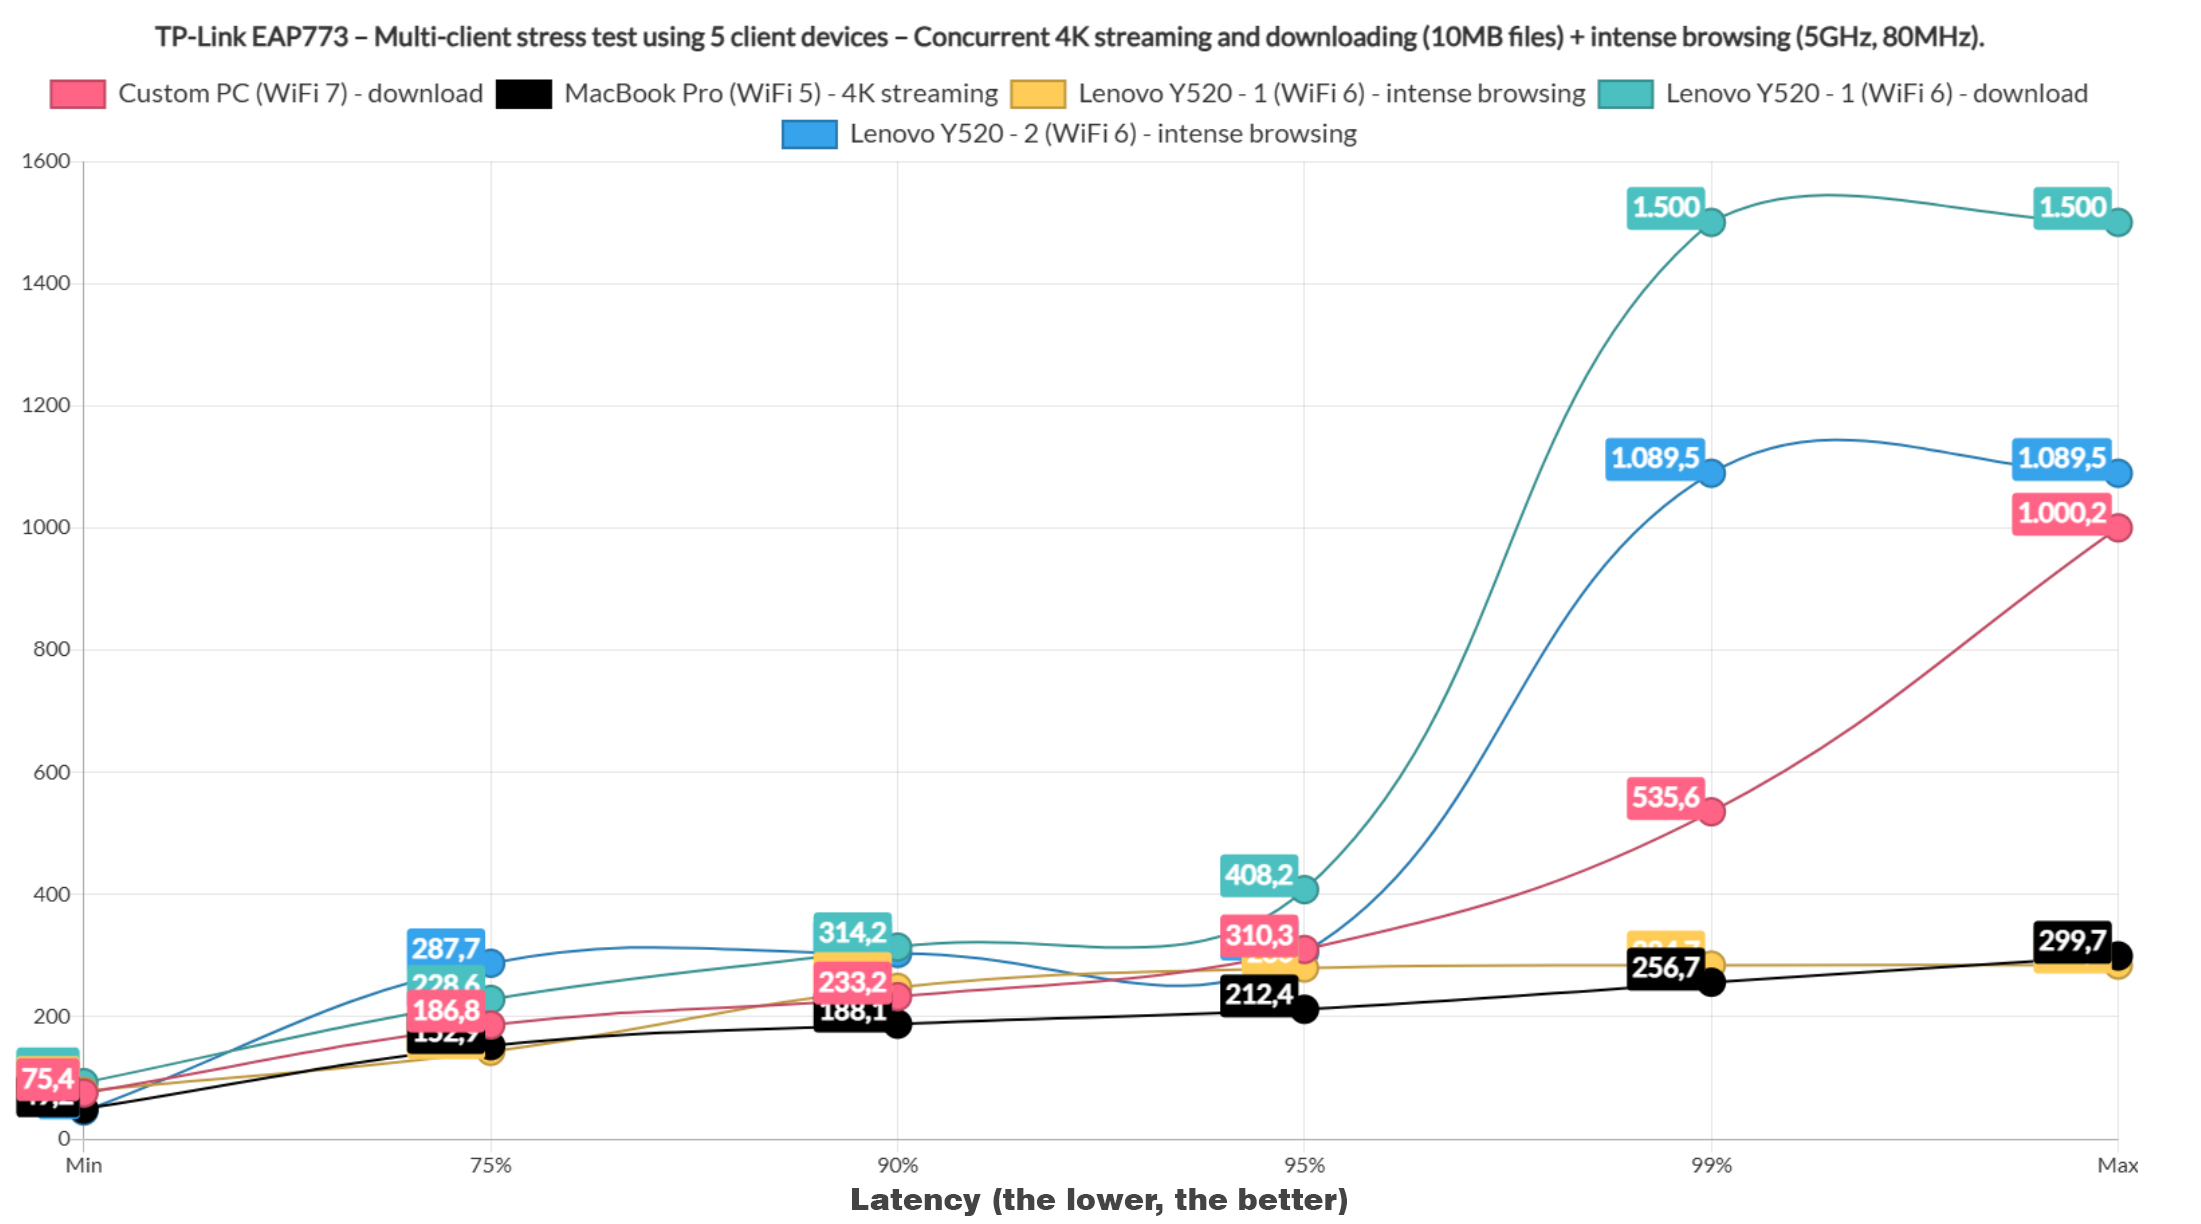
One client rises up from about 190ms up to 500ms, while the other is about 100ms more across the board. Again, while very far from ideal, it’s still a better performance than the WBE660S which is no small feat. The total throughput for the downloading clients was 749.4Mbps. Afterwards, I limited the number of clients to three, but kept one downloading client.
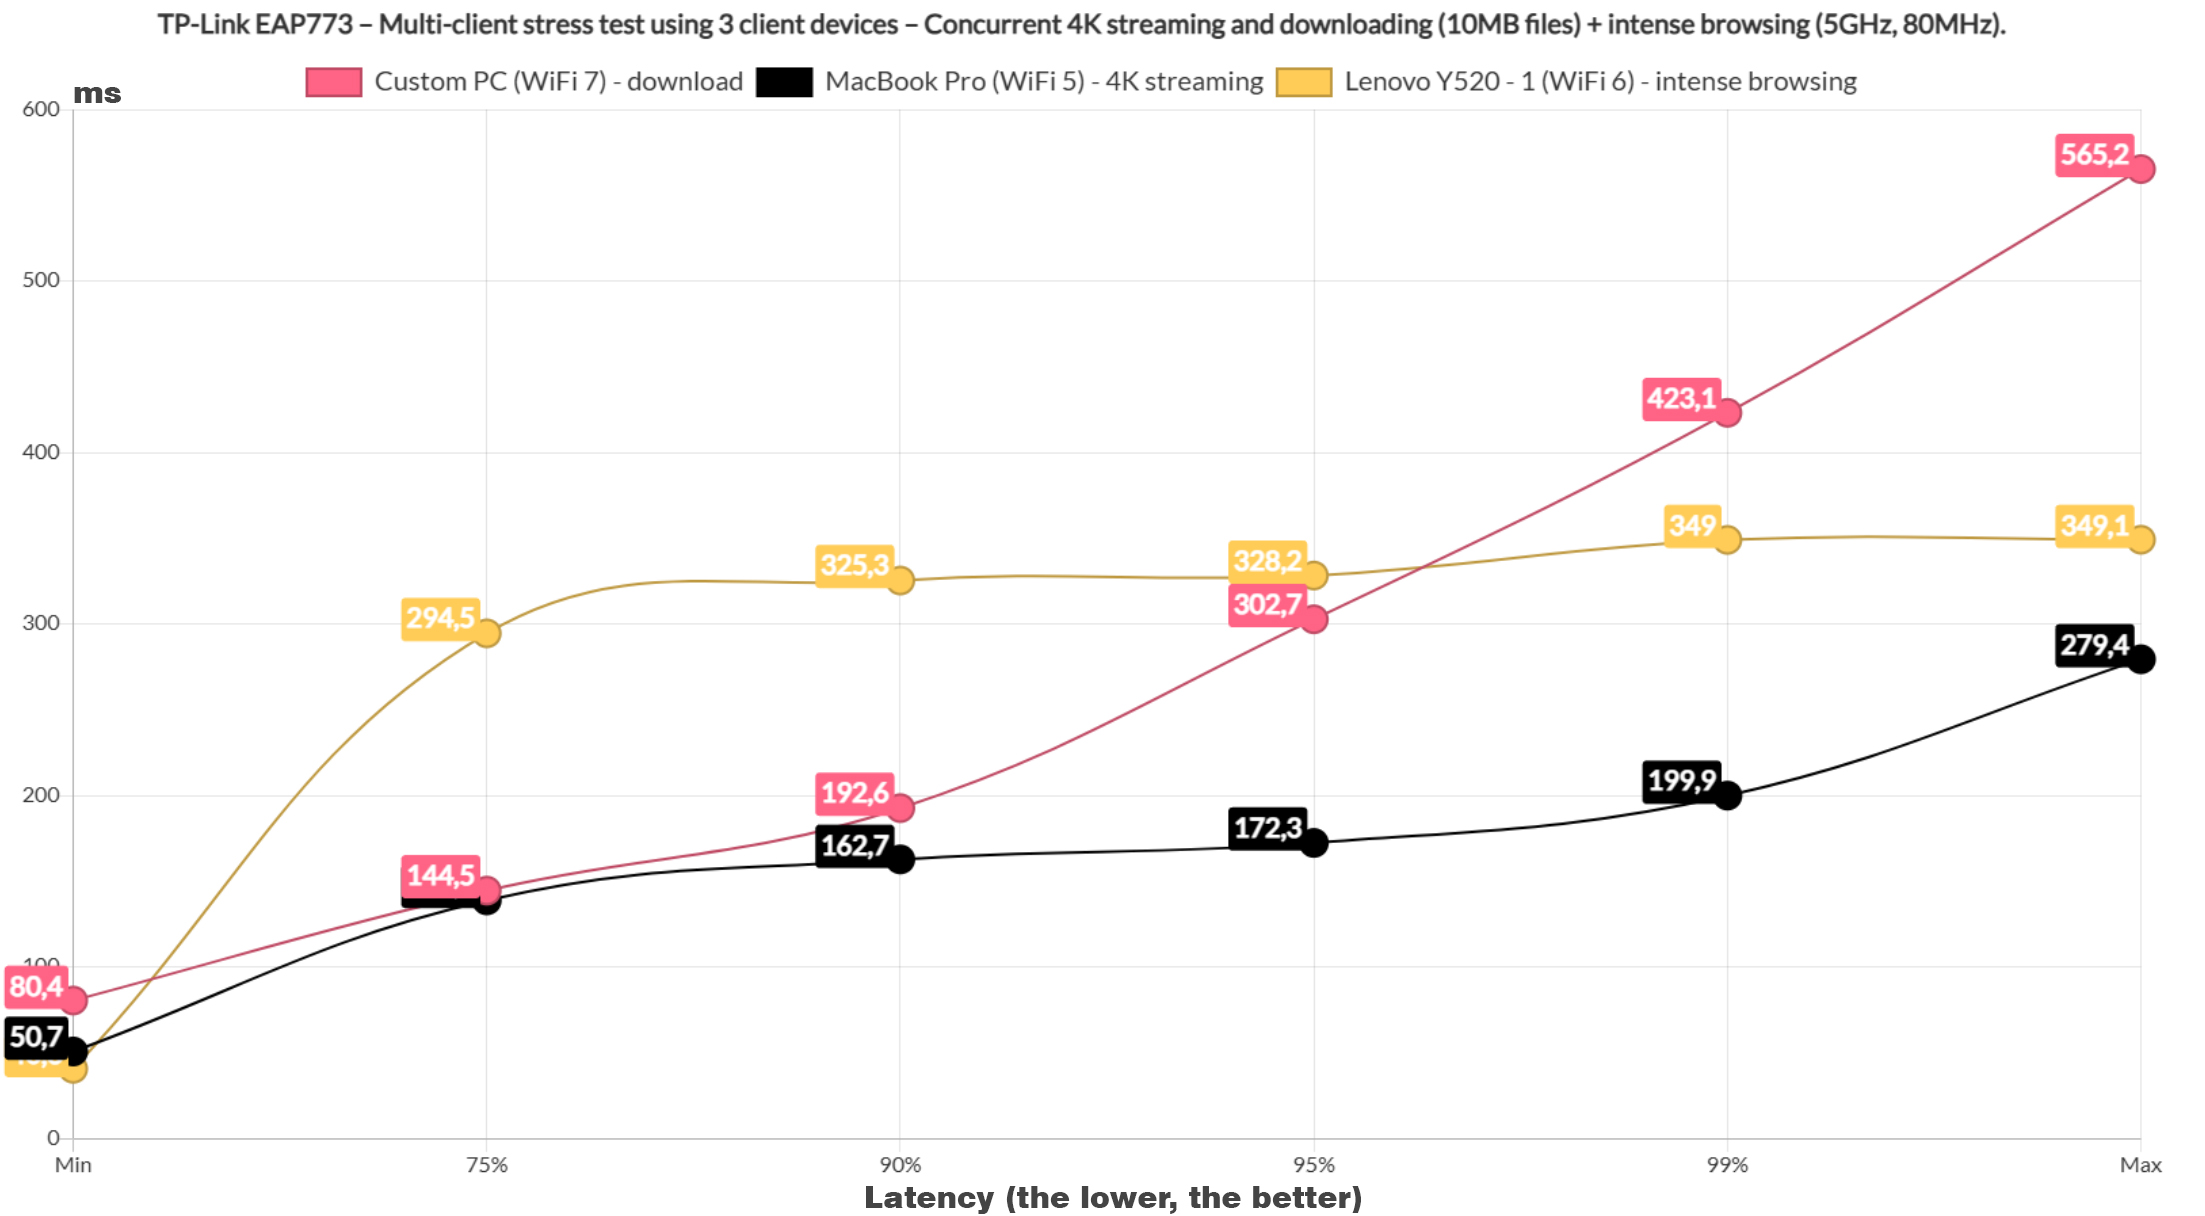
This way, we can see that it’s not enough to change things, so I decided to simulate the downloading of a 1MB file, keep the intense browsing client and add a VoIP one as well.
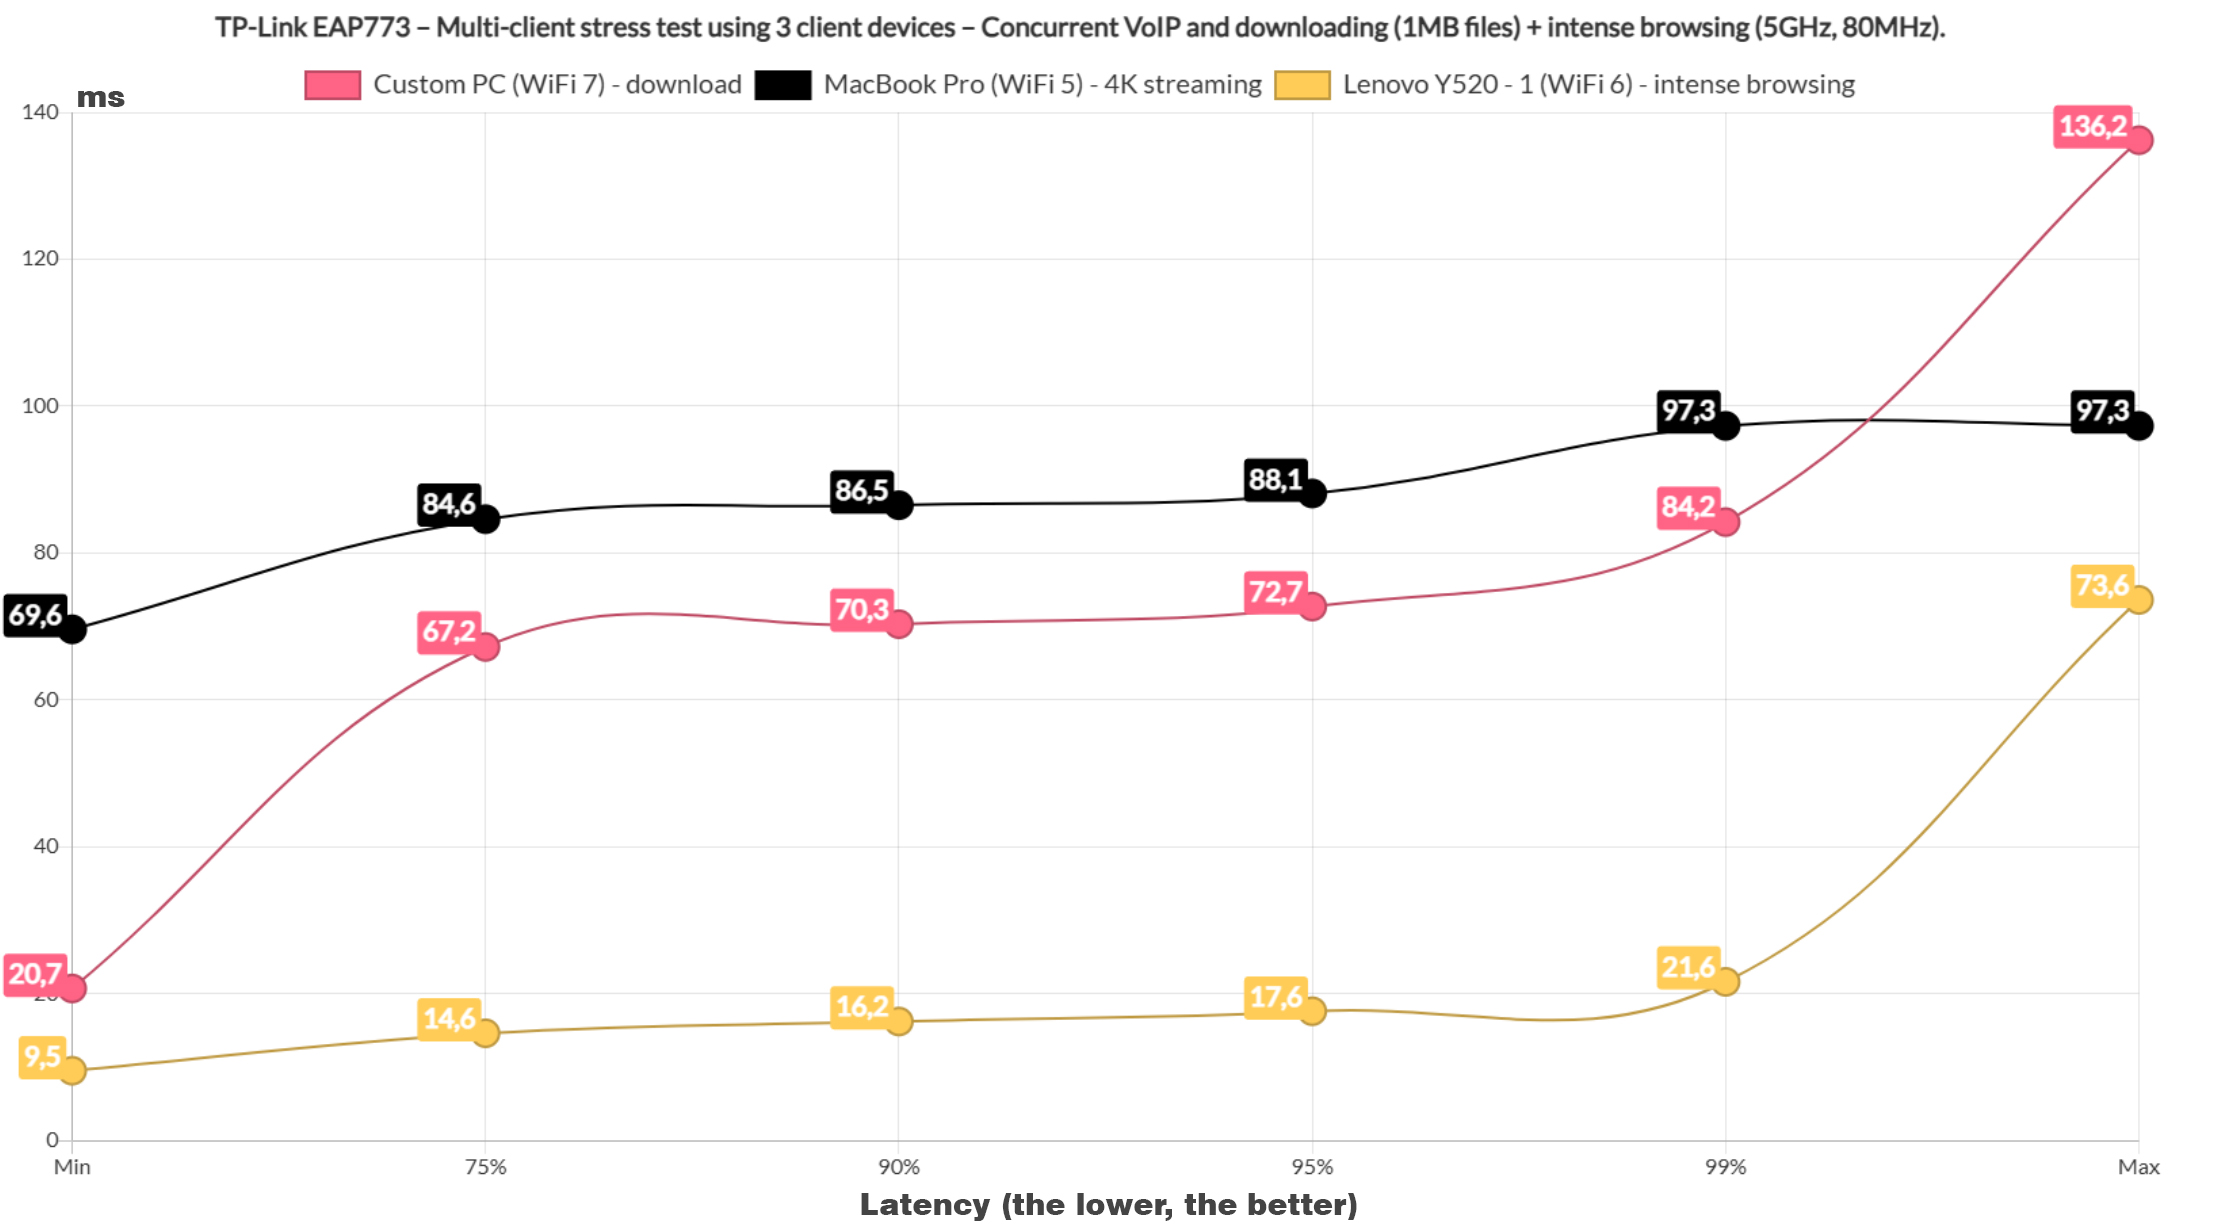
The downloading latency remains below 100ms, although less impressive than what we got with the Zyxel WBE660S, but far better than the U7 Pro. The other two clients were also within reasonable limits. Lastly, I decided to run the downloading traffic (10MB) on all five clients and, well, you can see the results for yourself.
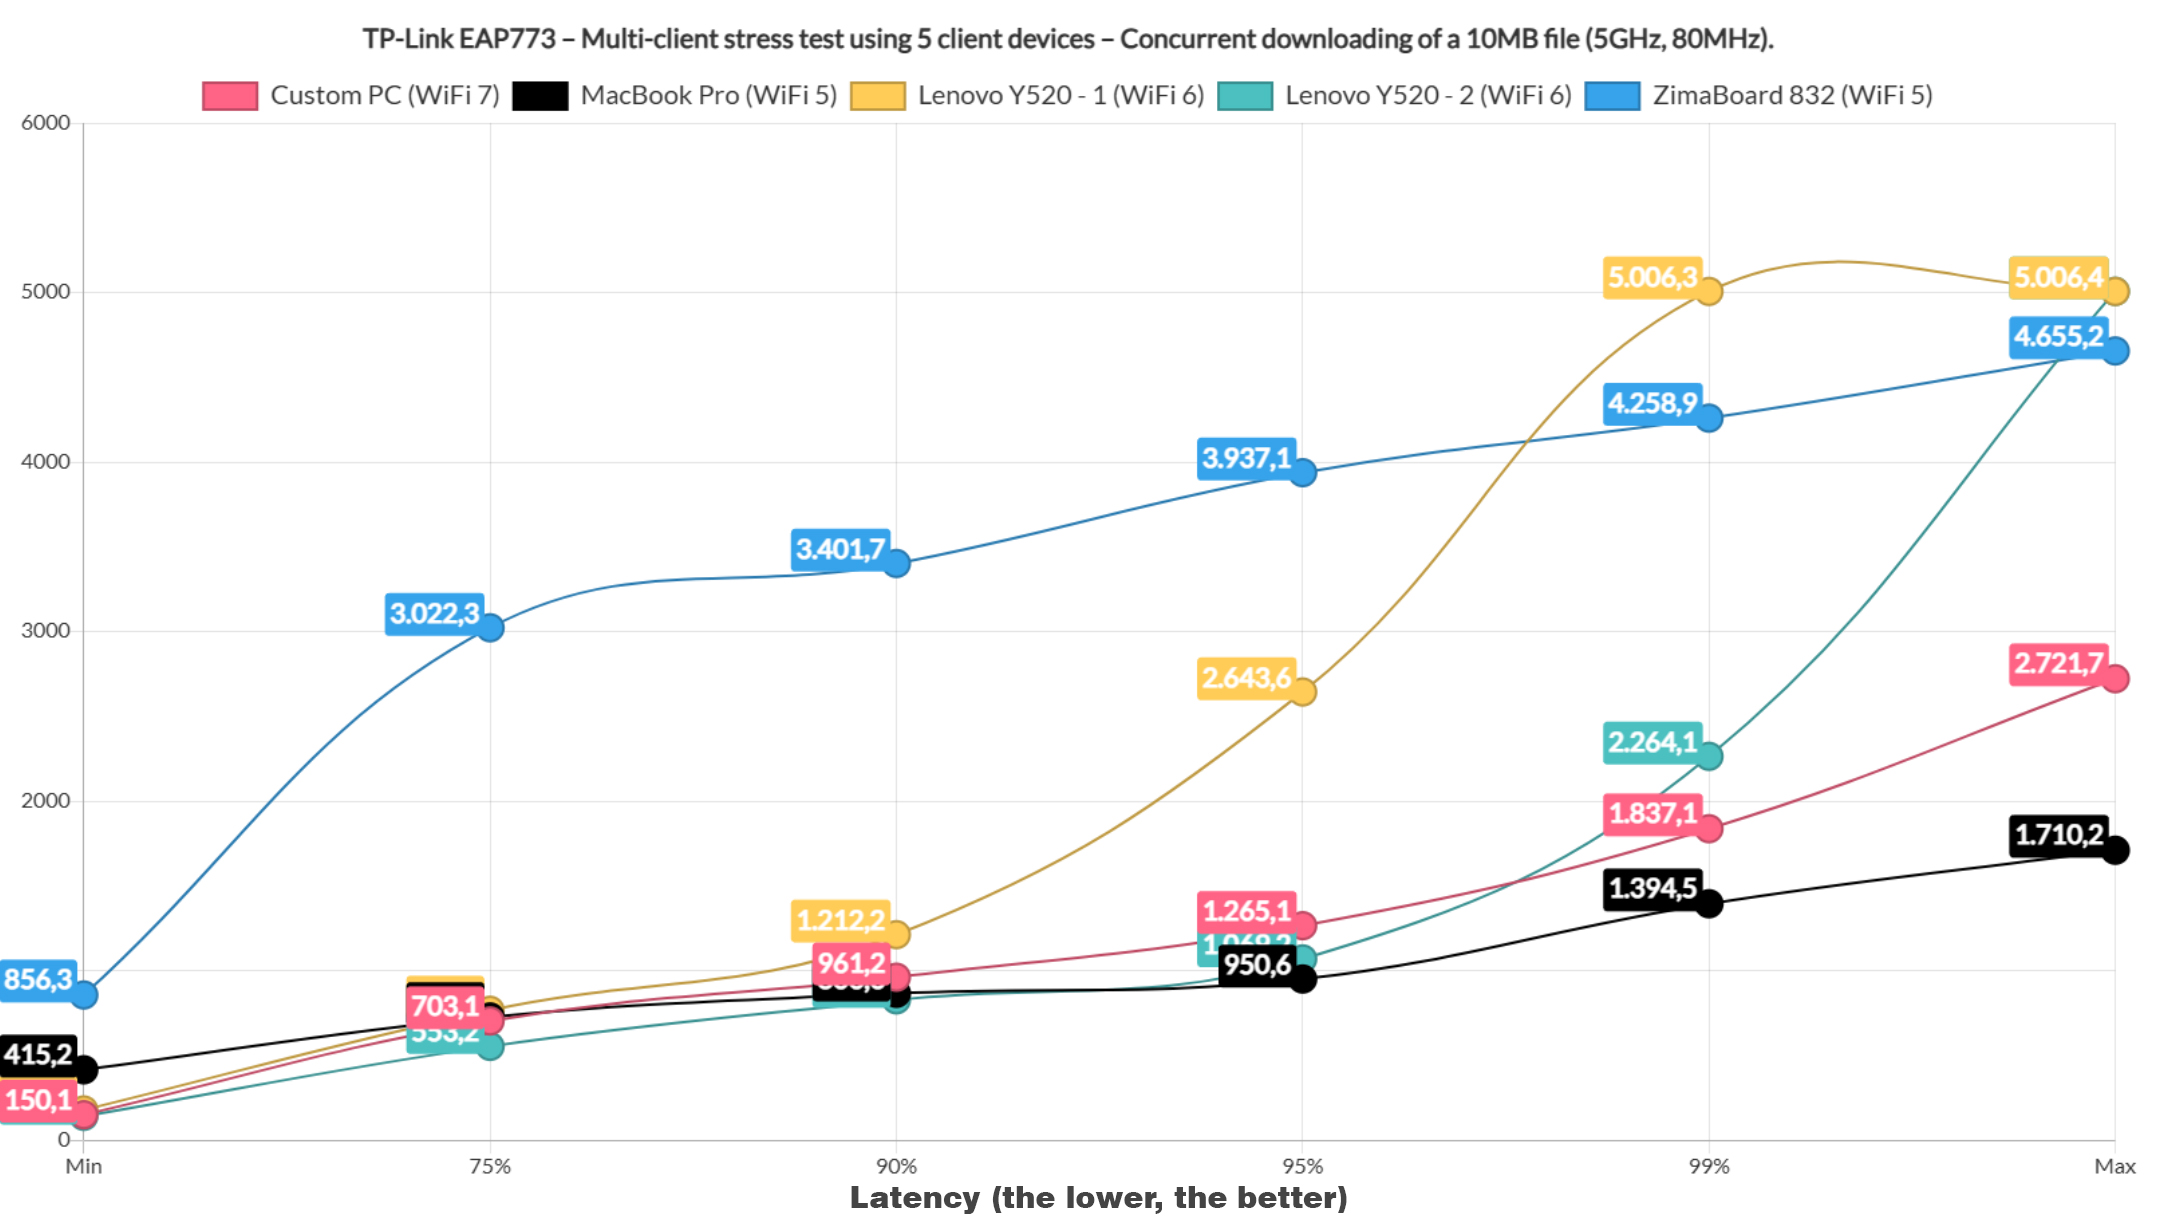
MLO Performance
Since pretty much all WiFi 7 access point now have working MLO, I had to also test it on the TP-Link EAP773. I already tested the Ubiquiti U7 Pro, the Zyxel NWA130BE and the WBE660S, the latter being the best performing one. Hopefully, the EAP773 can dethrone it. I have included the throughput for the 6GHz radio using both the 320MHz and the 160MHz channel bandwidth.
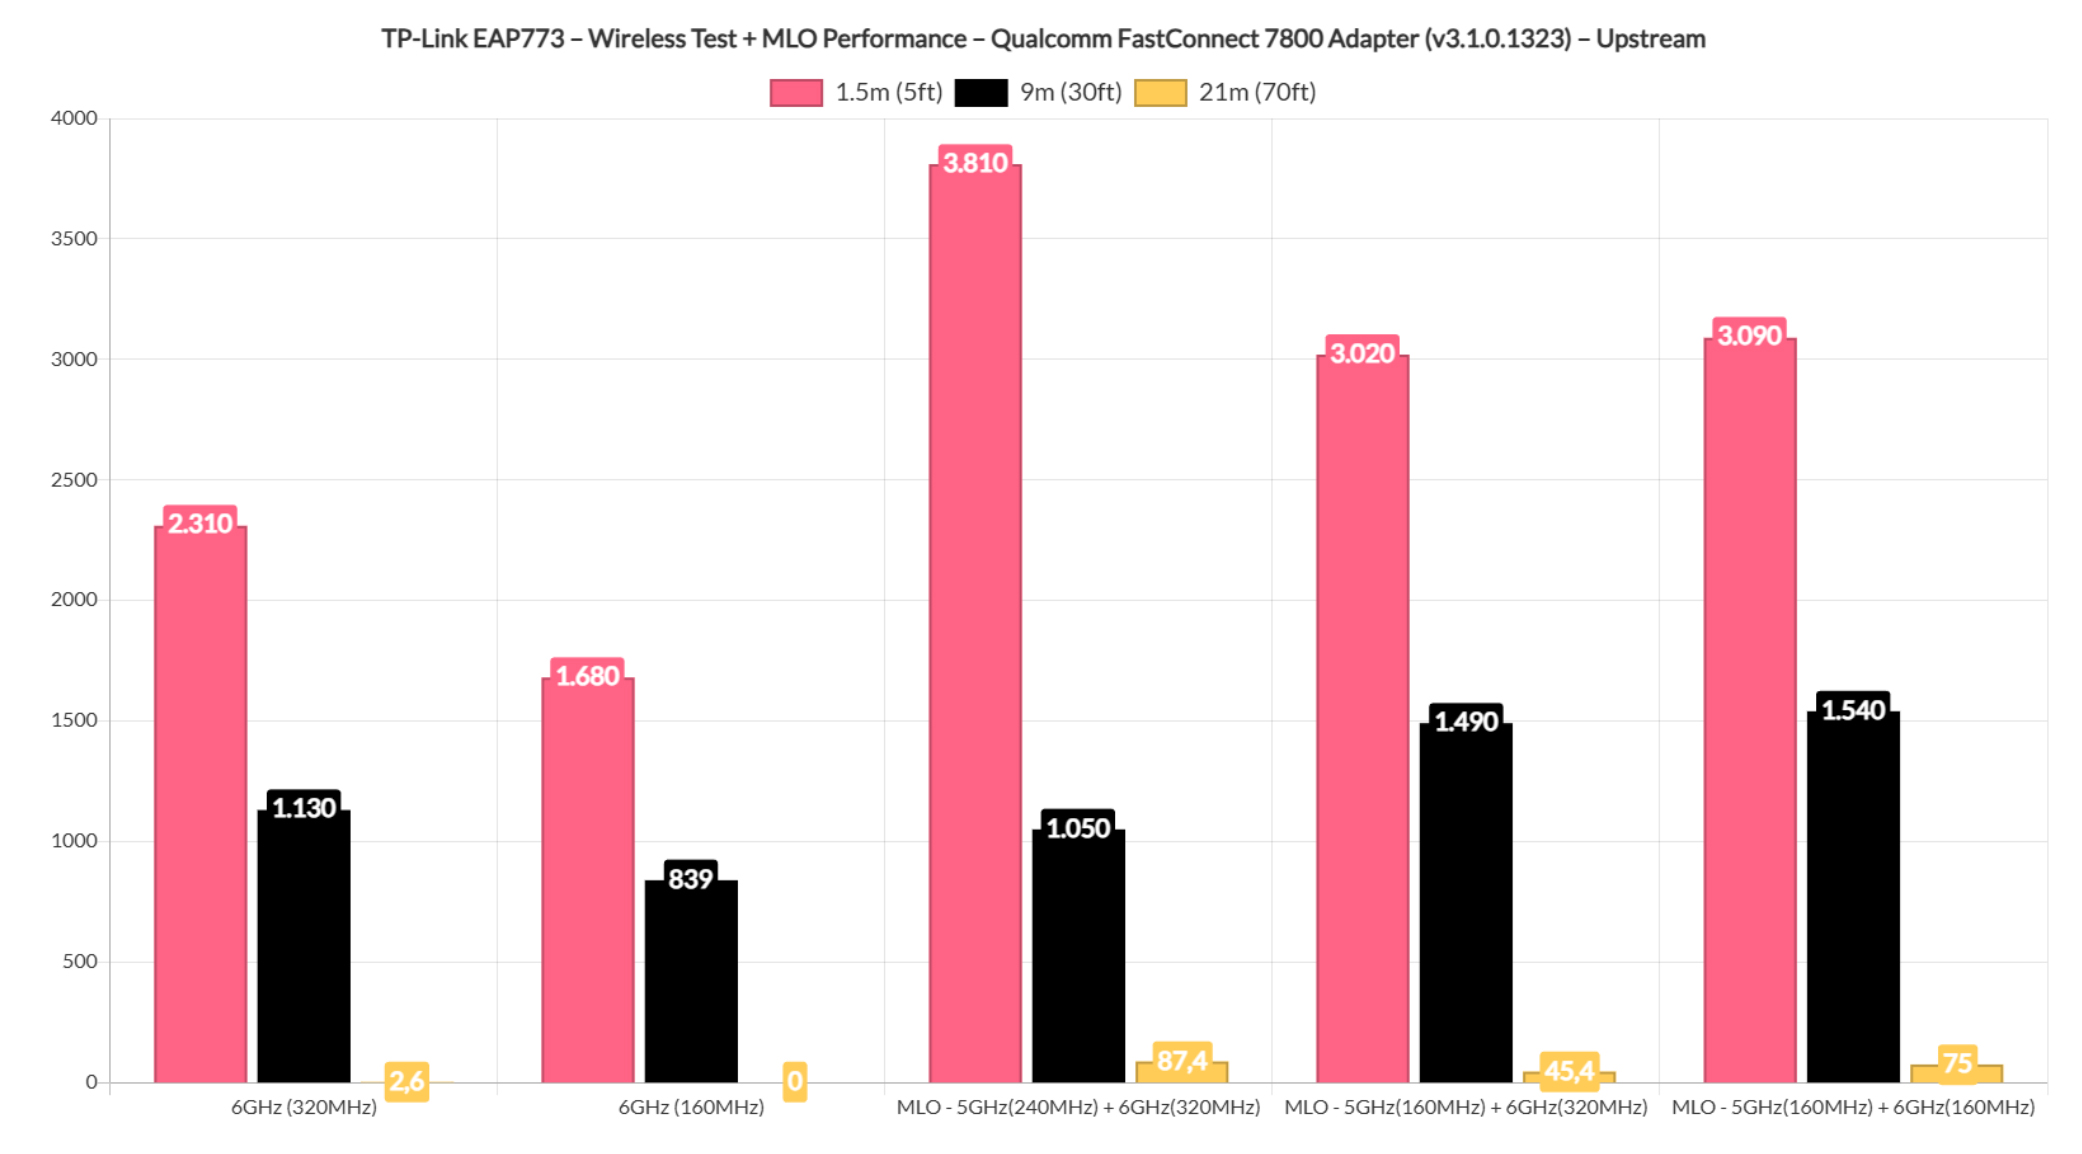
And, after aggregating the 6GHz with the 5GHz radio, the first on the 320MHz, the second on the 240MHz channel width, we get almost 4Gbps near the access point. This is indeed the best MLO throughput I have experienced so far. Then again, the throughput loses its potency after I increased the distance. Using the 160MHz for the 5GHz radio and either the 320MHz or the 160MHz channel width for the 6GHz radio showed a max throughput closer to 3Gbps, which is in line with other WiFi 7 access points.
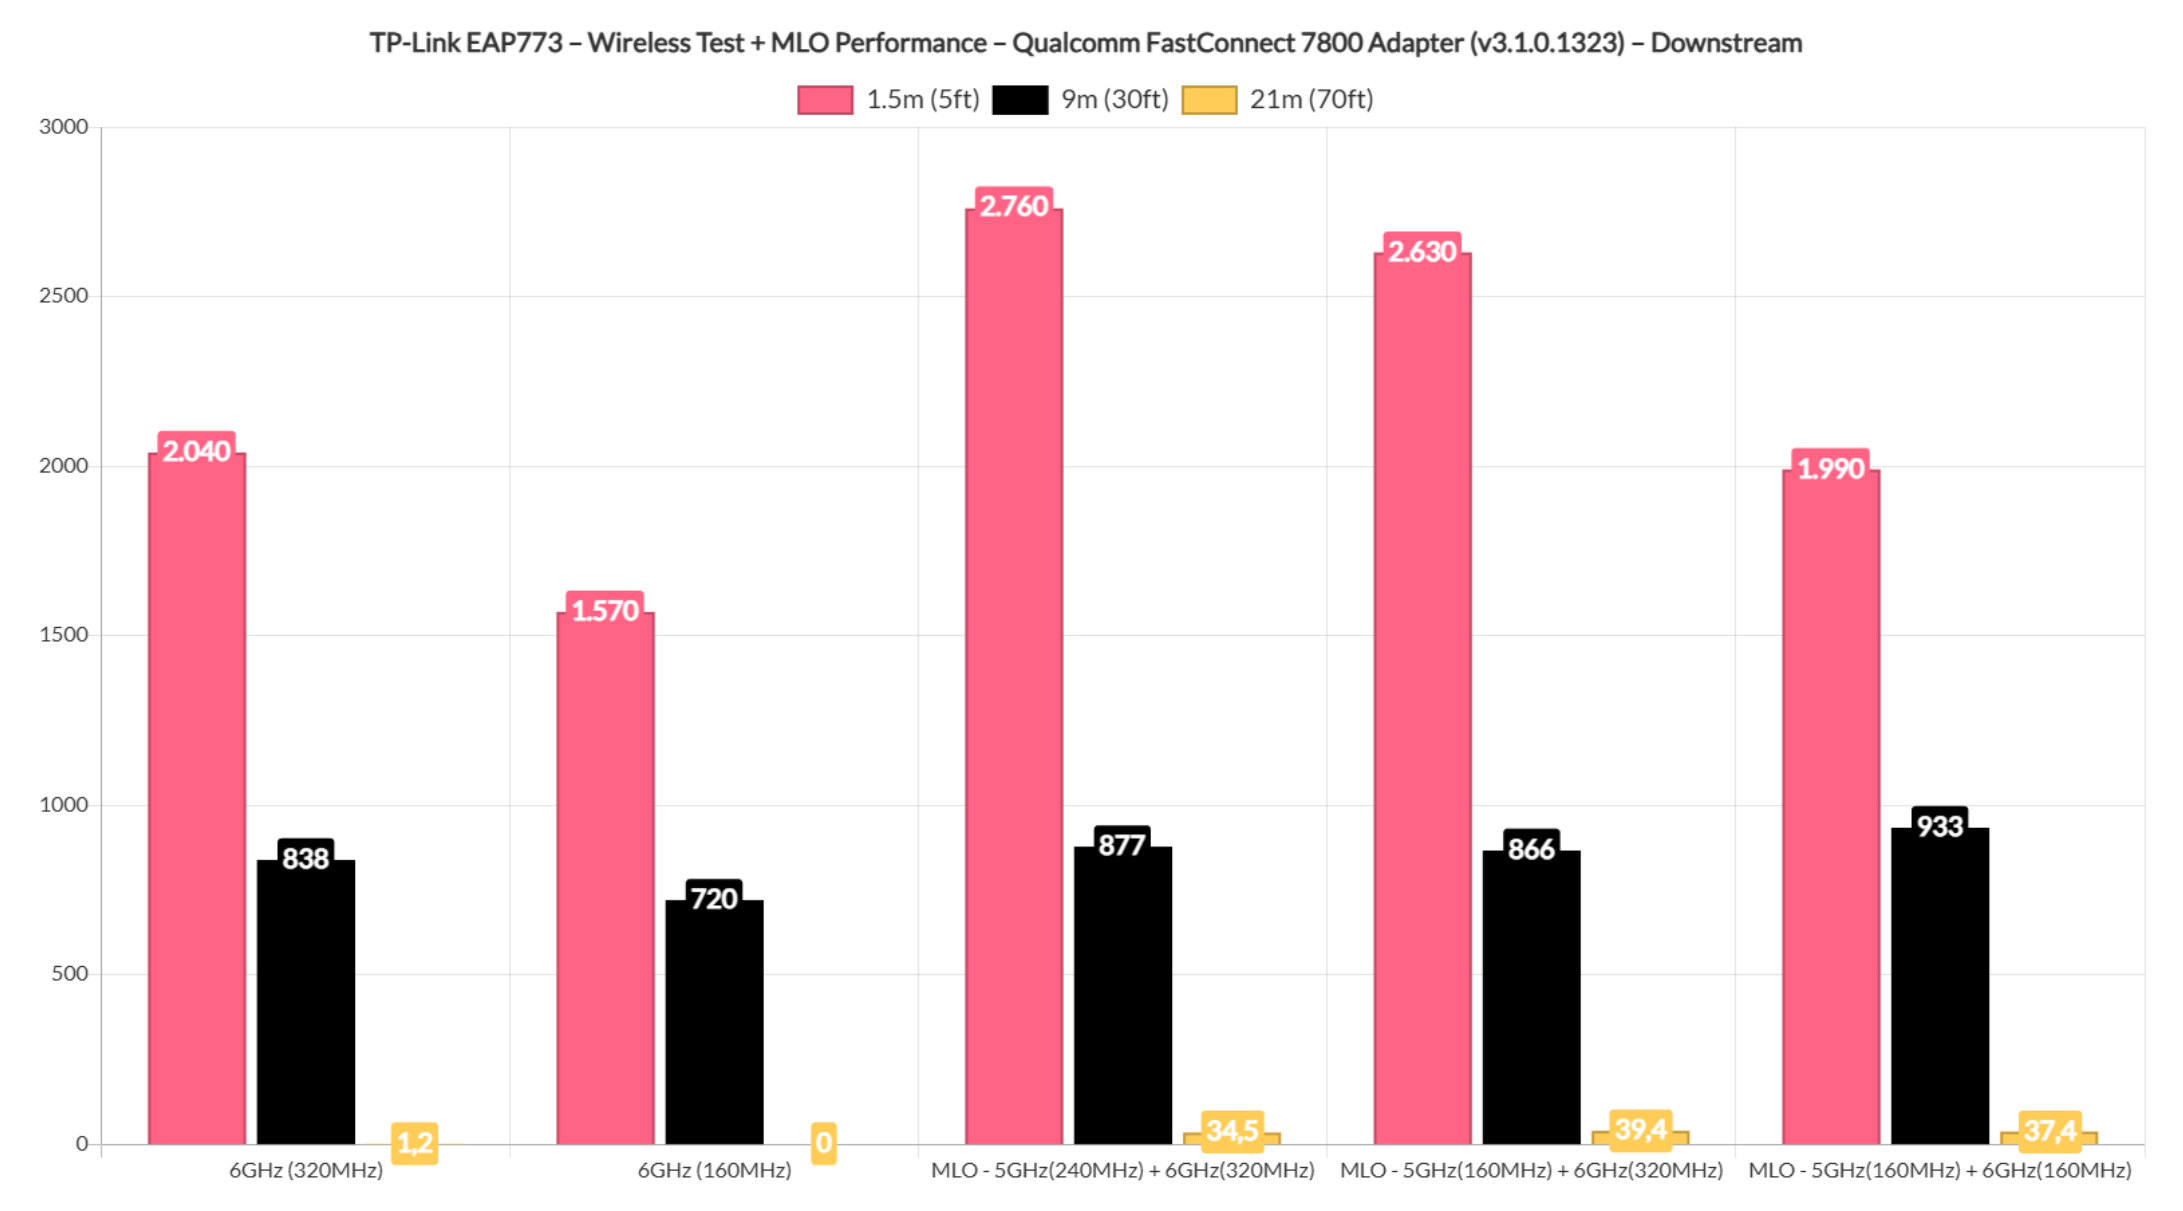
Downstream, we can see that the performance follows the same ups and downs, with a more subdued throughput. You may have noticed that I did not aggregated the 2.4GHz radio and the reason I didn’t is because this option is not available in the software.
It would have helped with the throughput when there is more distance between the client and the access point, so hopefully it will become available in the future. Lastly, I have decided to also include the results that I got while running FLENT.
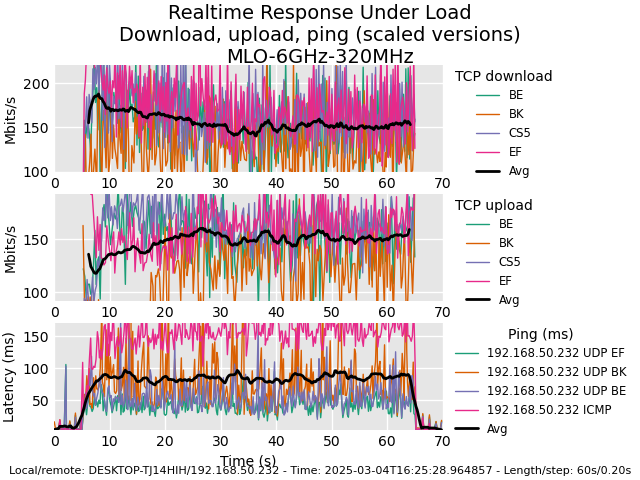
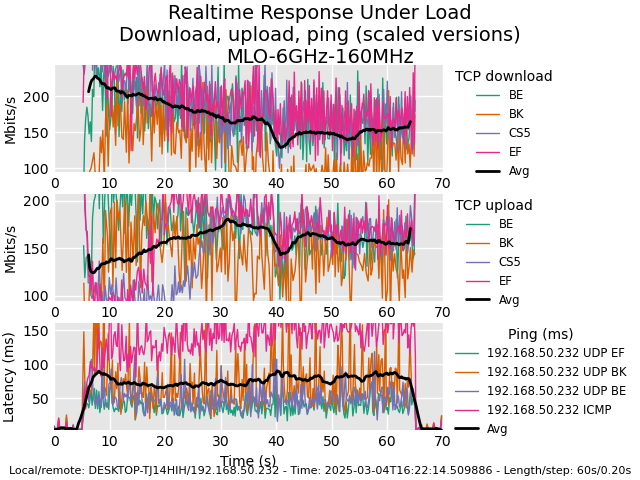
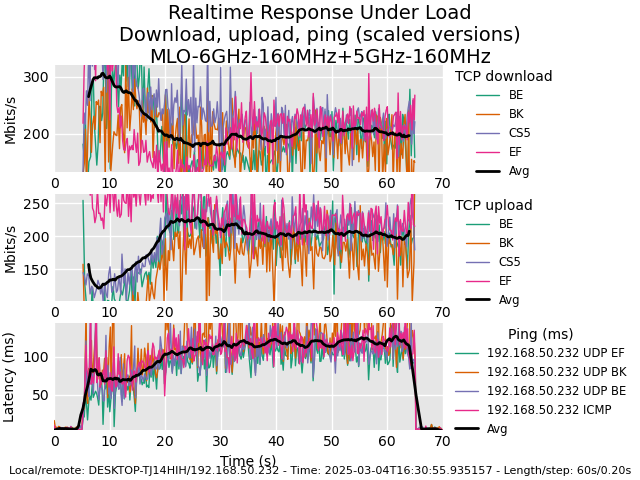
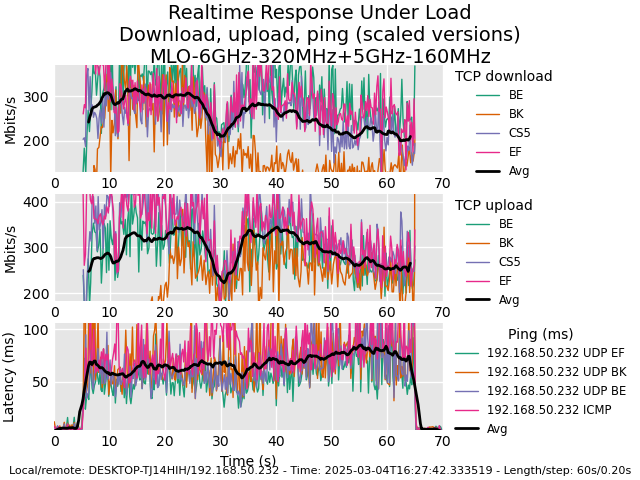
The Standalone Mode
Now let’s check out the software options. There is a standalone mode available and it does offer pretty much everything you need to configure and monitor the network. There are four main tabs, the first being the Status which shows info about the Device, the SSID and Radios, as well as about the Clients that are connected to the access point.
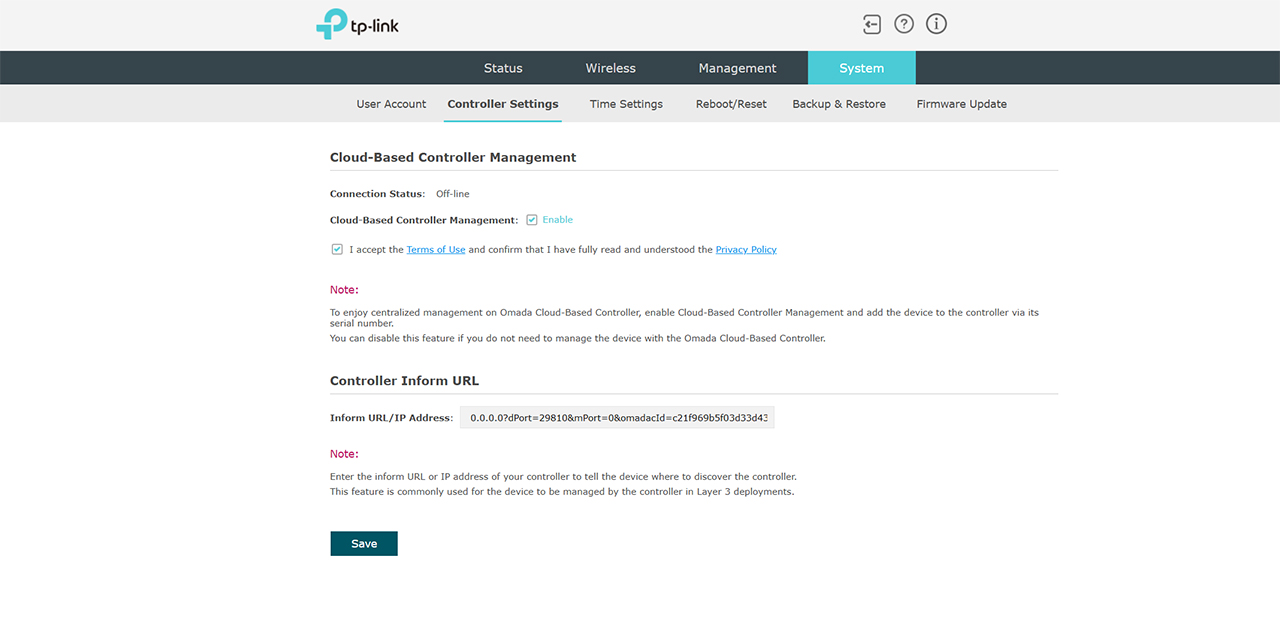
Then, we get the Wireless tab where we can set up the radios and the SSIDs, and yes, this is where you can also configure the MLO. Of course, we also get a captive Portal, VLAN support, QoS, Rogue AP Detection and more. The next tab is the Management where you can set up the IP, check the logs, configure the access ports, control the LEDs and some more options. Under System, we can update the account, update the firmware and enable the Cloud-Based Controller Management.
The Omada SDN
I did have available a hardware controller, the OC200 which made things easy for me, but you can also run locally on a PC. In my case, the EAP773 was detected automatically and I had to insert the username and password that I previously set up. Then, after some firmware upgrades, we can see the user interface. I did mention several times over the years that TP-Link was aiming at Ubiquiti, and I think it landed because the controller is much more mature and there is support for a lots of new types of devices.
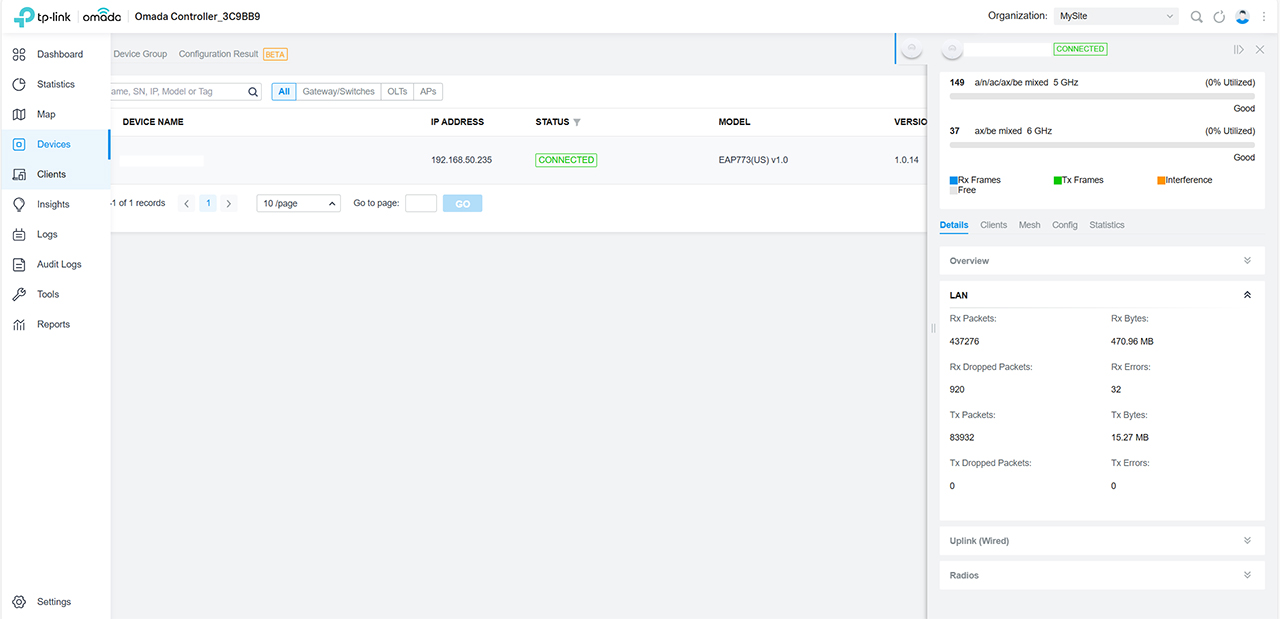
The UniFi familiarity is still strong, as we can see the access point dedicated section on the right side, while on the left, we can check the Dashboard for global status info, the Statistics area, and there is also a Map. Under Devices, we get to see out AP and there is a dedicated Clients section. I suppose I should mention the Insights and the Logs, both important sections to understand what’s going on with the network. But let’s not check out that dedicated section for the EAP773.
We have five main sections here starting with the Details which covers everything from Radios to the LAN and Uplink status info. Then, there’s the Clients section which does include a log History, followed by the Mesh section which will cover a potential mesh network which I don’t currently have configured. Next, we get to the Config section where we actually get to set up how things work, starting from Radios, SSIDs, VLANs and going to some Advanced options that include QoS and OFDMA. Lastly, we can check out the Statistics where we get some live monitoring tools available.
The Conclusion
It took me a bit longer than I would have liked to finally test the EAP773, but we got here eventually. And we discovered that the EAP773 offers a lot of value for the money and it’s perhaps one of the best WiFi 7 access points out there within the entry-to-mid-level hardware. In my tests it did better than the U7 Pro and it even went closer to the WBE660S in some aspects. The software got better over the years, so I see little reason why this access point won’t end up on your shortlist.

Mark is a graduate in Computer Science, having gathered valuable experience over the years working in IT as a programmer. Mark is also the main tech writer for MBReviews.com, covering not only his passion, the networking devices, but also other cool electronic gadgets that you may find useful for your every day life.