The SwitchBot Hub 2 is sort of a successor to the Hub Mini that I checked a couple of years ago, when I tested the smart Curtain U-Rail and I found it to be capable to handle a fairly large amount of smart devices, so why do we need the Hub 2?
| SwitchBot Hub 2 | |
|---|---|
| Switch-bot.com | Check Offer |
| Use code MQ10SBHUB2 for a 10% discount | Amazon.com | Check Offer |
There are a few interesting features that justify its existence, but the most important technology implemented on the SwitchBot Hub is Matter. The idea behind Matter is as old as the first couple of smart devices to hit the market: unify everything under a single standard already. But I heard this story from Z-WAVE, ZigBee, Thread and so on, and it all lead to more confusion. Then again, the software layer where Matter seems to operate does seem a lot more promising than proprietary protocols, so we may finally be on the right track.
So, SwitchBot Hub 2 wants to position itself in the perfect place to help unify multiple types of smart devices from various brands and there is a special emphasis on the HomeKit support, but the Google Nest is also mentioned, so it should be fine regardless of the automation system you may have installed.
If this didn’t convince you, know that The SwitchBot Hub 2 also comes with IR decoding, taking it a step farther than the Hub Mini and the developers decided that it would be cool to integrate the the SwitchBot Meter functions into the Hub 2, so yes, there’s a display that will show the temperature and humidity in the room. That’s about it for the intro, so let’s put the device to the test and see how it performs.
The Design and Build Quality of the SwitchBot Hub 2
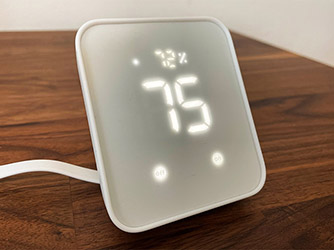
I did mention that the SwitchBot Hub 2 has integrated the functions of the Meter devices, but there are a few key differences. Yes, both rely on a Swiss-made sensor for measurement accuracy and both show the temperature and the humidity, but while the Meter (and Meter Plus) has a traditional display (that looks like glass – it’s plastic though), the SwithBot Hub 2 relies on LEDs that shine through a thin piece of plastic. As a consequence, the entire case seems to be made from the same material that’s covered by a white matte finish.
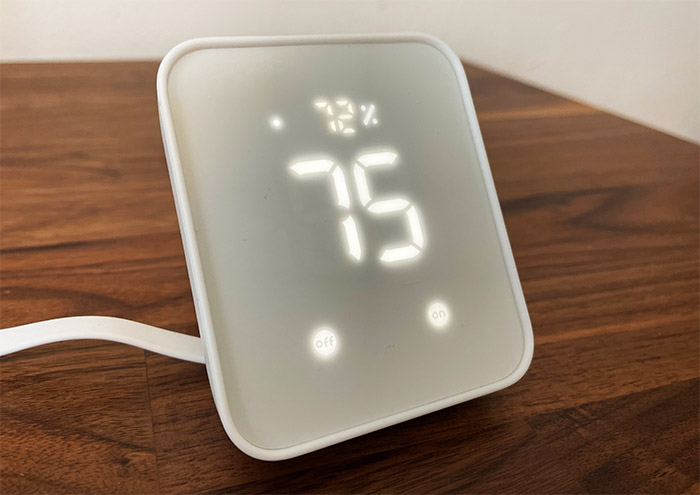
It’s kind of bland actually until you get to connect it to a power source, thus lighting up the LEDs. Doing so will dramatically improve the look of the SwitchBot Hub 2, but while the Meter lacked a backlight, the LEDs will brighten the room in the night. Fear not because you can turn the lights off – see those two icons underneath the temperature reading? They’re capacitive touch buttons and tapping on Off will turn off the LEDs, leaving only a very faint light underneath the aforementioned buttons. The hub also includes a beeper which will sound when you press the buttons or when the device is turned on.
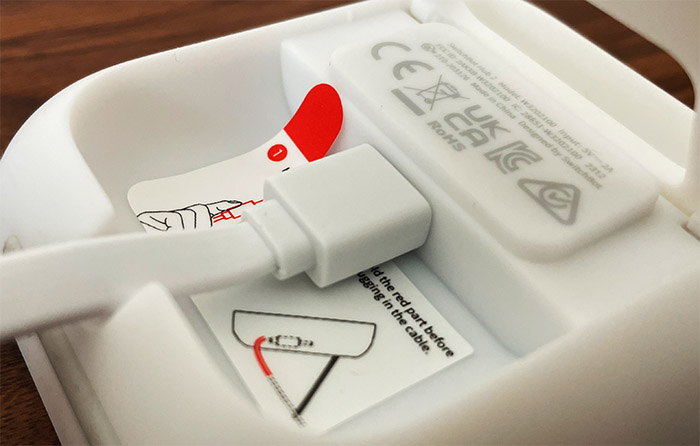
At the back of the SwitchBot Hub 2, there is a small stand that can be retracted, allowing the unit to sit at a visible angle. And it’s pretty much necessary to move it in order to access the USB-C port. Yes, the SwitchBot Hub 2 does not have an inner battery, so it needs to be connected to a power source all the time and I do have one complaint, well, maybe two.
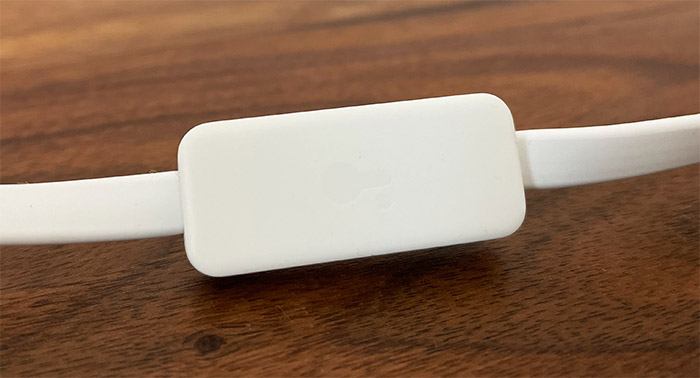
One is that the area where the cable needs to be inserted is very narrow, so only a particular type of USB-C cable can enter – I wouldn’t say it’s proprietary, but very much near it. Second, the measuring sensor sits on the USB-C cable which SwitchBot says was necessary for accuracy reasons. I won’t deny that it’s true since it may experience some sort of interference with other built-in systems if it was embedded into the case, but it does solidify the now certainty that the USB-C cable for the SwitchBot Hub 2 is indeed proprietary.
So yes, let’s hope that the manufacturer will sell it for a very long time or that the cable will survive for many years – by the way, the USB-C cable is 6.5 feet long. As a clarification, you can use other USB-C cables (if the head is short enough), but the readings will no longer be available.
The Accuracy of the Sensor
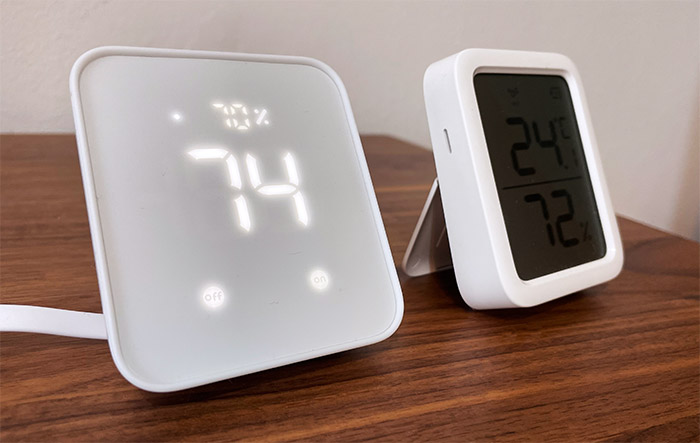
SwitchBot says that the Hub 2 uses a Swiss-made sensor chip to measure both the humidity and the temperature which should mean that we have to get accurate readings, right? I am not very familiar with Swiss-made sensor chips, but I do have the Meter Plus that uses the same technology, so I just put the devices next to each other to see if both show the same readings. The SwitchBot Hub 2 doesn’t show the decimal, just the rounded temperature and yes, it was the same as on the Meter Plus.
The curious thing was that the humidity readings were different on the two devices. The Meter Plus has the sensor built into the case, so I made sure to put the external sensor of the Hub 2 very near it. Even so, one showed 66%, while the other showed 69%. The app is absolutely terrible for the Meter units (the data downloading likes to fail constantly and I could no longer change the degree types), but I could see the decimals on the Hub which pretty much matched with the Meter Plus.
Bear in mind that the SwitchBot Hub 2 sensor will need some time to calibrate and I could see after about an hour that the humidity was now 66% as compared to the 67% reading of the Meter Plus. So, which one is the most accurate?
I would be inclined to believe that the SwitchBot Hub 2 may be more accurate. And that’s only because an outer sensor should be getting more accurate readings due to being immediately exposed to the elements.
The Installation and the App
The hardware installation process is a straight forward as it gets. Connect the USB-C cable to the hub and to the brick (that’s provided into the package – very much a rarity nowadays) and, after the beep, there should be a flashing LED indicating that the device is ready to be paired. Install the SwitchBot app and I have used it before with other devices, so I didn’t have to create a new account. But you do need to know that the hub relies on Bluetooth to pair and connect to most devices, it will send Notifications and most importantly, it ‘requires’ access to your location.
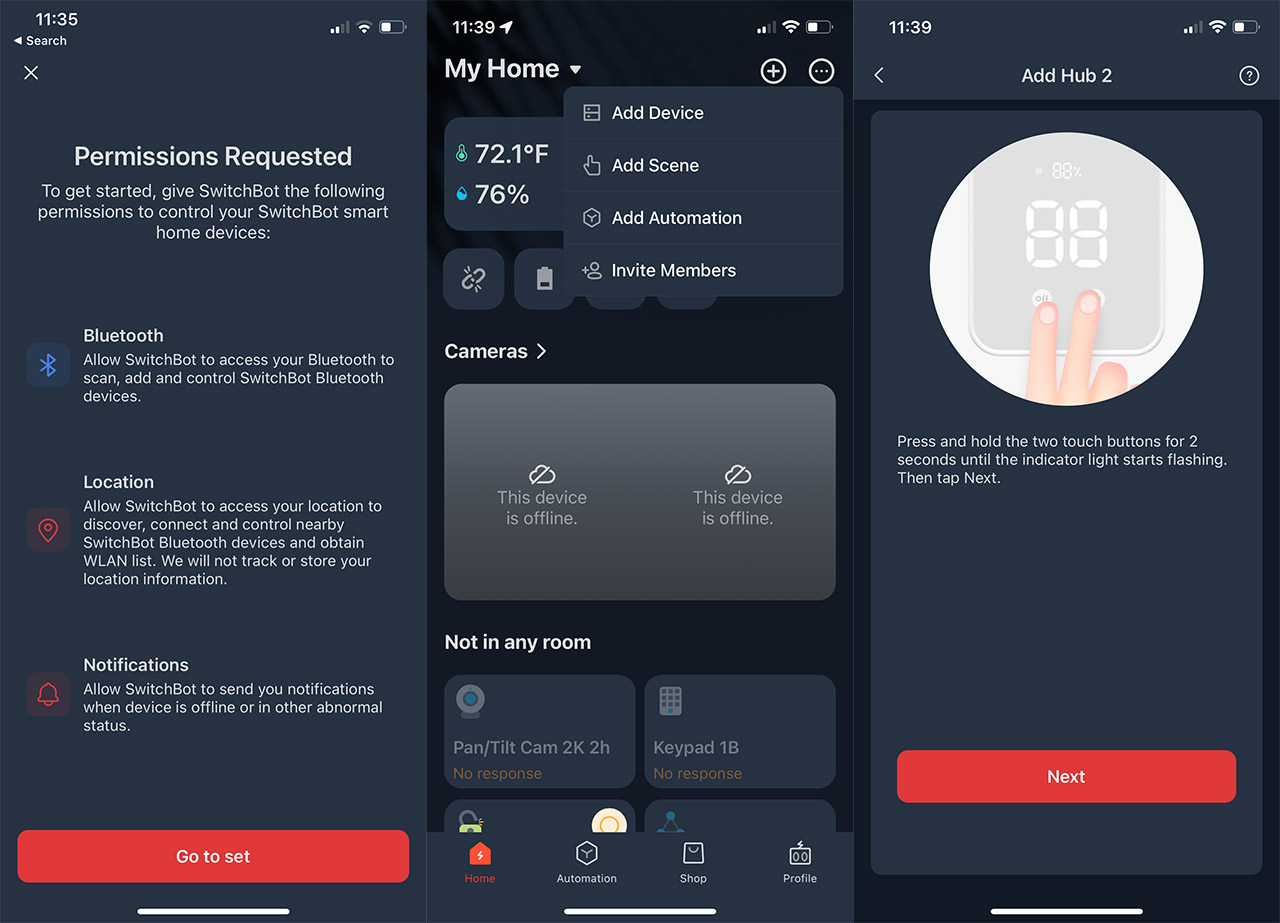
That’s because they apparently need to locate devices in the network (I can add them manually, thank you very much) – the manufacturer mentions that the location data is not tracked, nor stored which is better than what other apps are doing, if true. Afterwards, I gained access to the GUI where I could add the hub – tap on the Plus sign and select Add device. The app detected the SwitchBot Hub 2 immediately and then it asked that I pressed the two buttons on the unit at the same time.
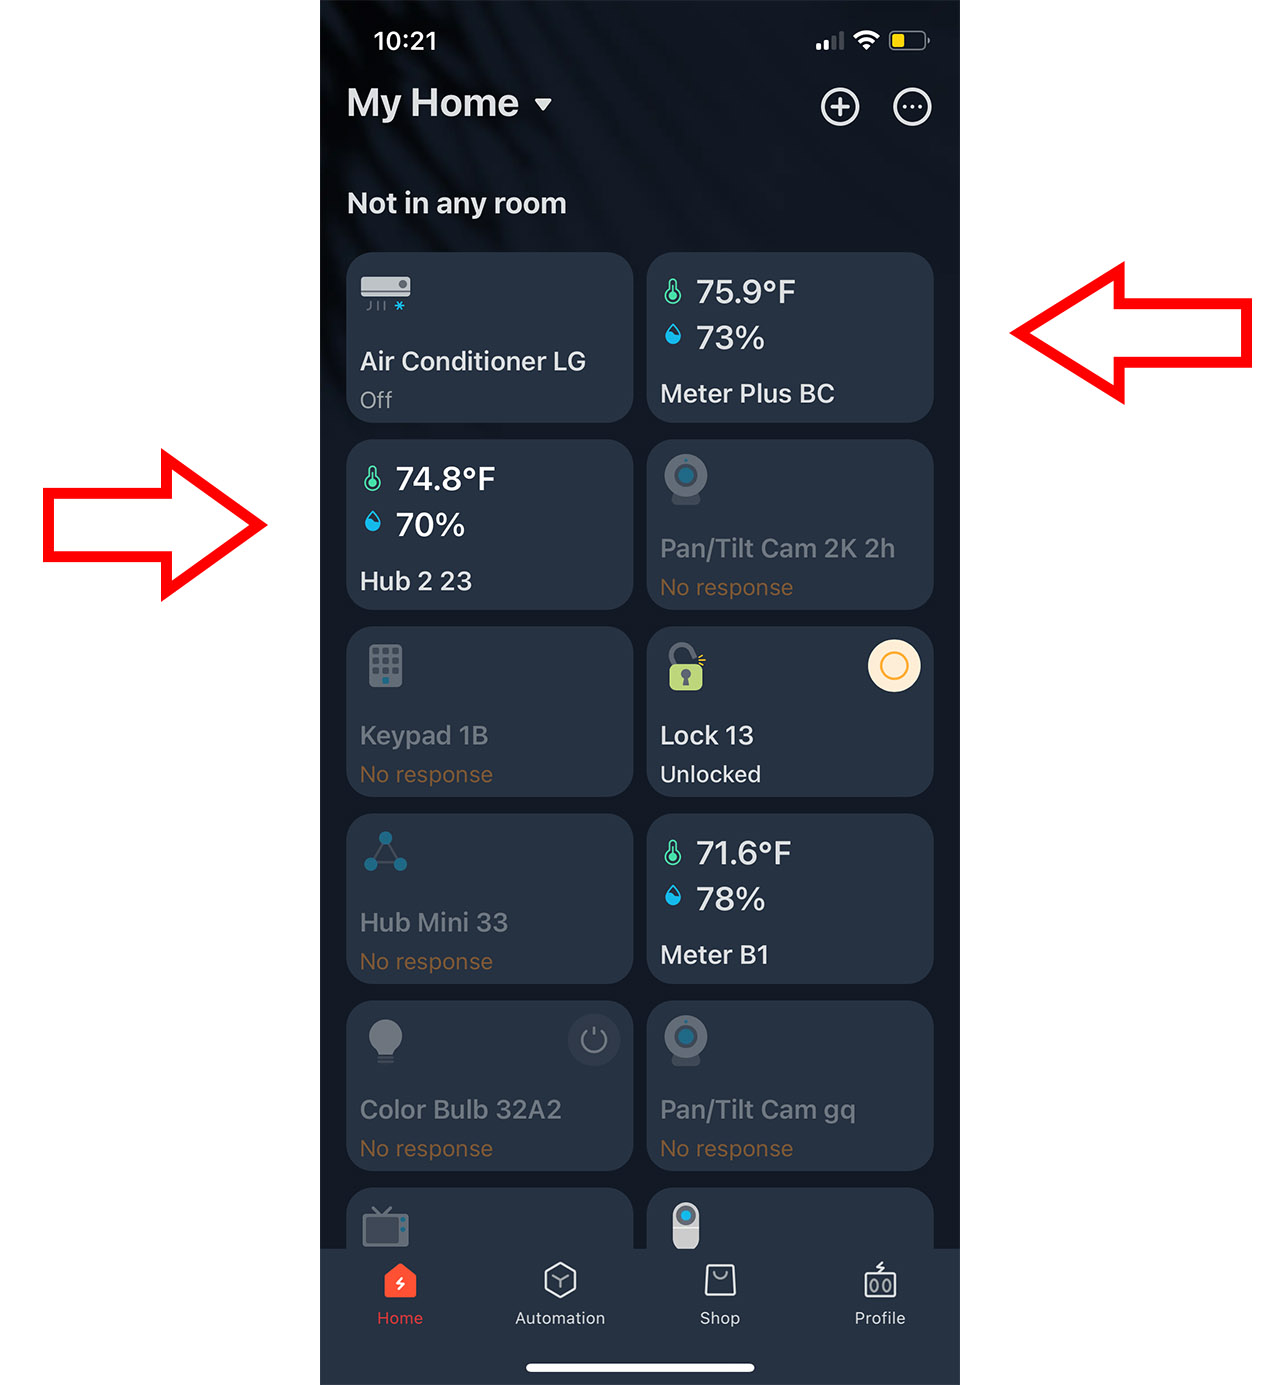
After the beep, the LED started flashing quickly and then I could connect to the WiFi network. As expected, there is support for the 2.4GHz band only and, after choosing the name and room, the unit was added to the Dashboard. There is much more info and a better layout than when I tested the Hub Mini, so the app got better over the years. At the top, you should see the live measurements from the sensors, including the Room Light – the hub relies on the IR receiver to calculate the output. You can tap on any of them to see the fluctuations over set periods of time.
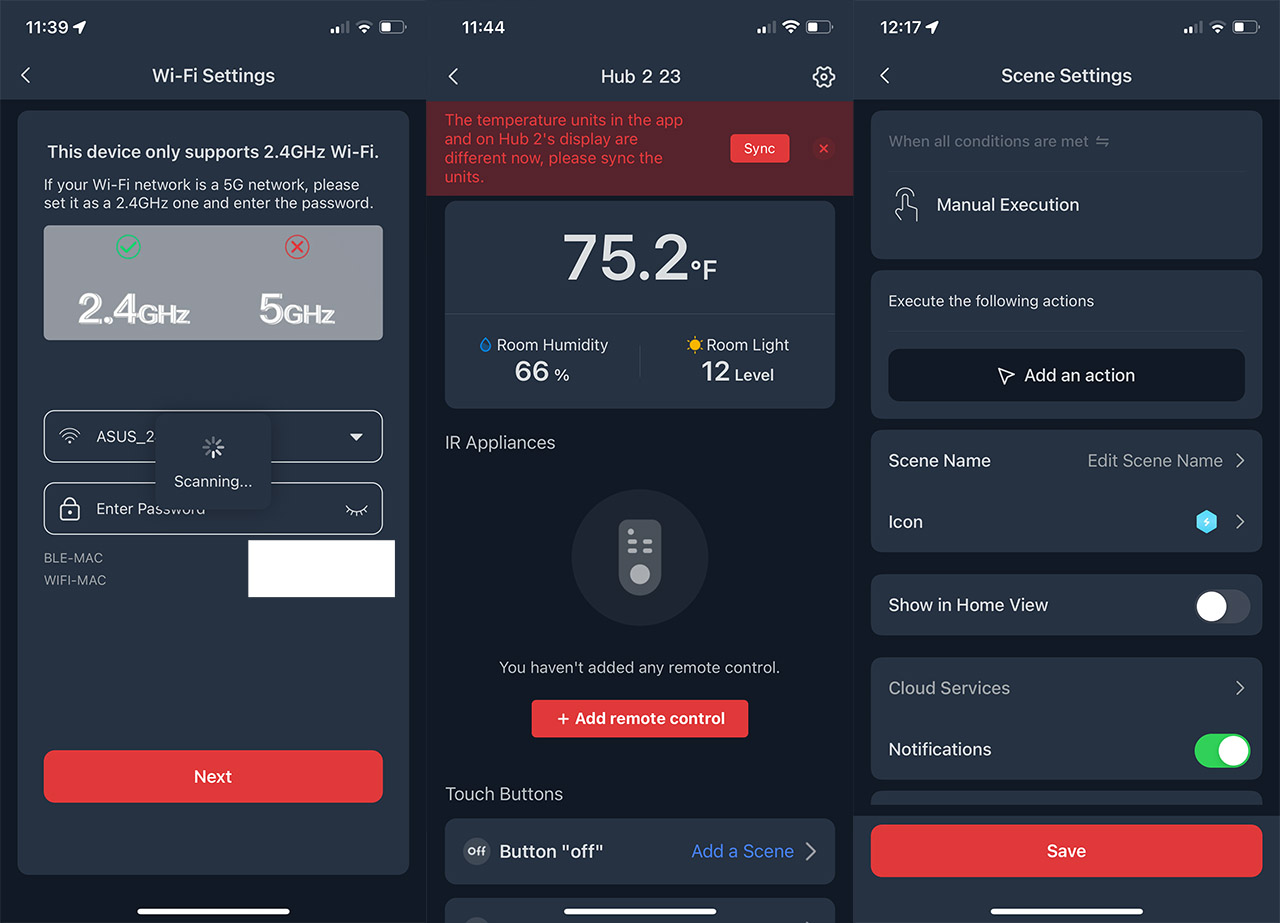
A bit lower, you can add and control IR appliances and further down, you can change the behavior of the Touch buttons by adding a scene. The process involves adding an action – select a device, such as the smart Curtain, so when you turn off the LED on the SwitchBot Hub 2, the curtains will close; alternatively, you can just set it to turn off the light in the room. There is more because after tapping the Settings icon from the top right corner, we can change the display behavior (for example, you can enable the Auto-adjust Brightness which is off by default), set Alerts when a humidity/temperature limit has been reached and you can also calibrate the unit.
If you have an instrument that’s proven to be more accurate, then you can adjust the Hub 2 to provide better readings. I’ve also seen that you can pair devices via NFC and that the Matter was in Beta, so it required a Firmware Update to become active. A few minutes later, I could add it Matter-enabled ecosystems, so let’s do that.
Matter and Google Home
I don’t know why I expected the Nest Protect to have received the Matter update, but the good news is that Google Home Mini did receive it, so I decided to connect the SwitchBot Hub 2 to the Google ecosystem.
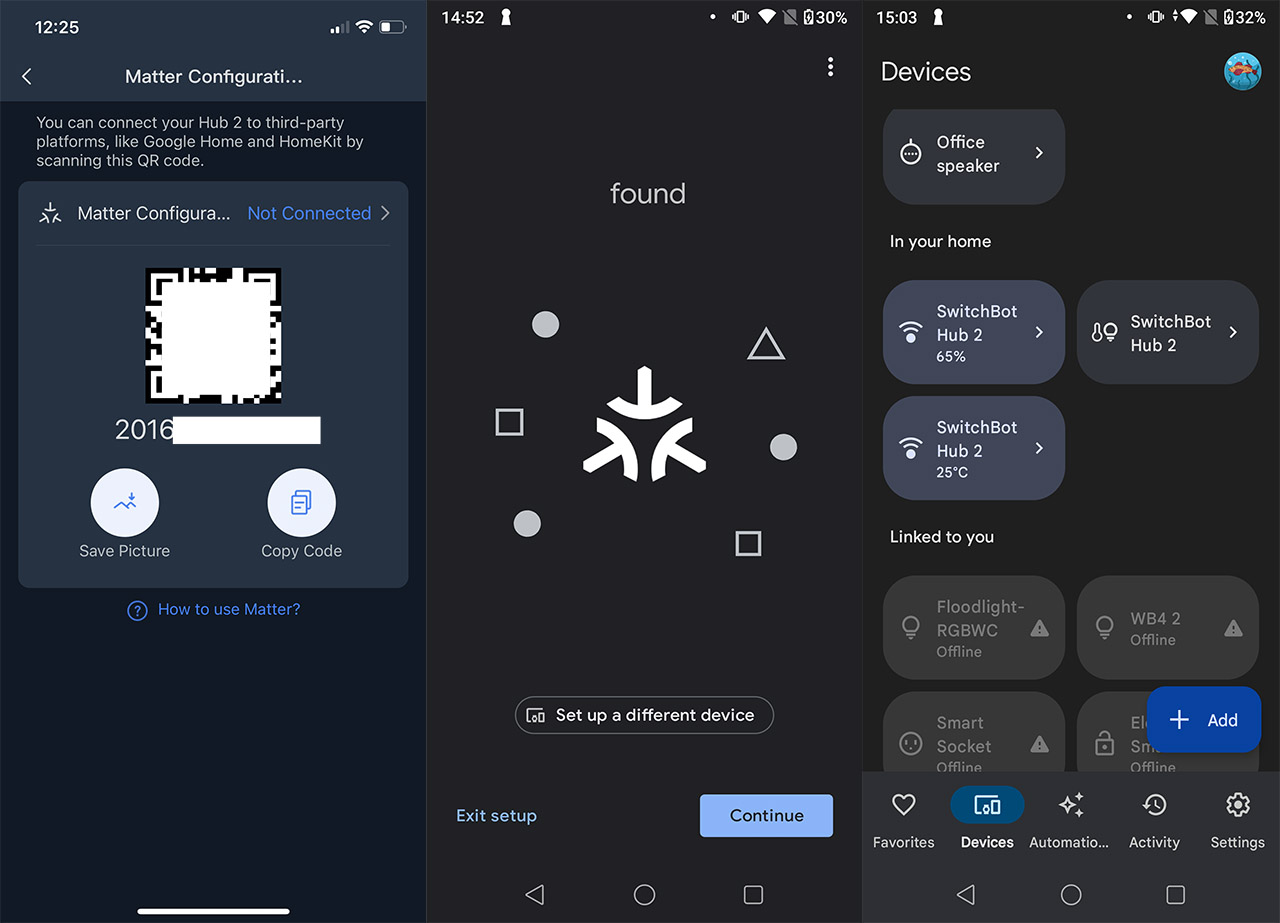
That’s because I did not have an Apple hub or Apple TV. The process is simple, but do be aware that there are some hiccups that I experienced (nothing major, don’t worry). After updating the SwitchBot software, I went to Settings of the SwitchBot Hub 2 and selected Matter Configuration (Beta) once more. This way, the app generated a QR and a PIN code which can be copied, and above them, you can see that it’s written ‘Not Configured’. Tap on it and follow the instructions: press the On and Off buttons for 15 seconds until the hub enters in pairing mode – the LED should flash slowly.
Don’t be like me and press the two buttons only a couple of seconds until the LEDs start flashing rapidly, then being confused why the process doesn’t work… The LEDs need to flash slowly. Tap on Connect and you should be taken to the Google Home app. I am going to assume that you have the latest firmware and that the app is properly set up, so go to Devices and click on the + icon. Choose New device, select the Home and tap on Matter-enabled device. The app will ask for a QR code, but you should click on the ‘Set up without a QR code’ tab, paste the previously copied code and the SwitchBot Hub 2 should now work with Google Home.
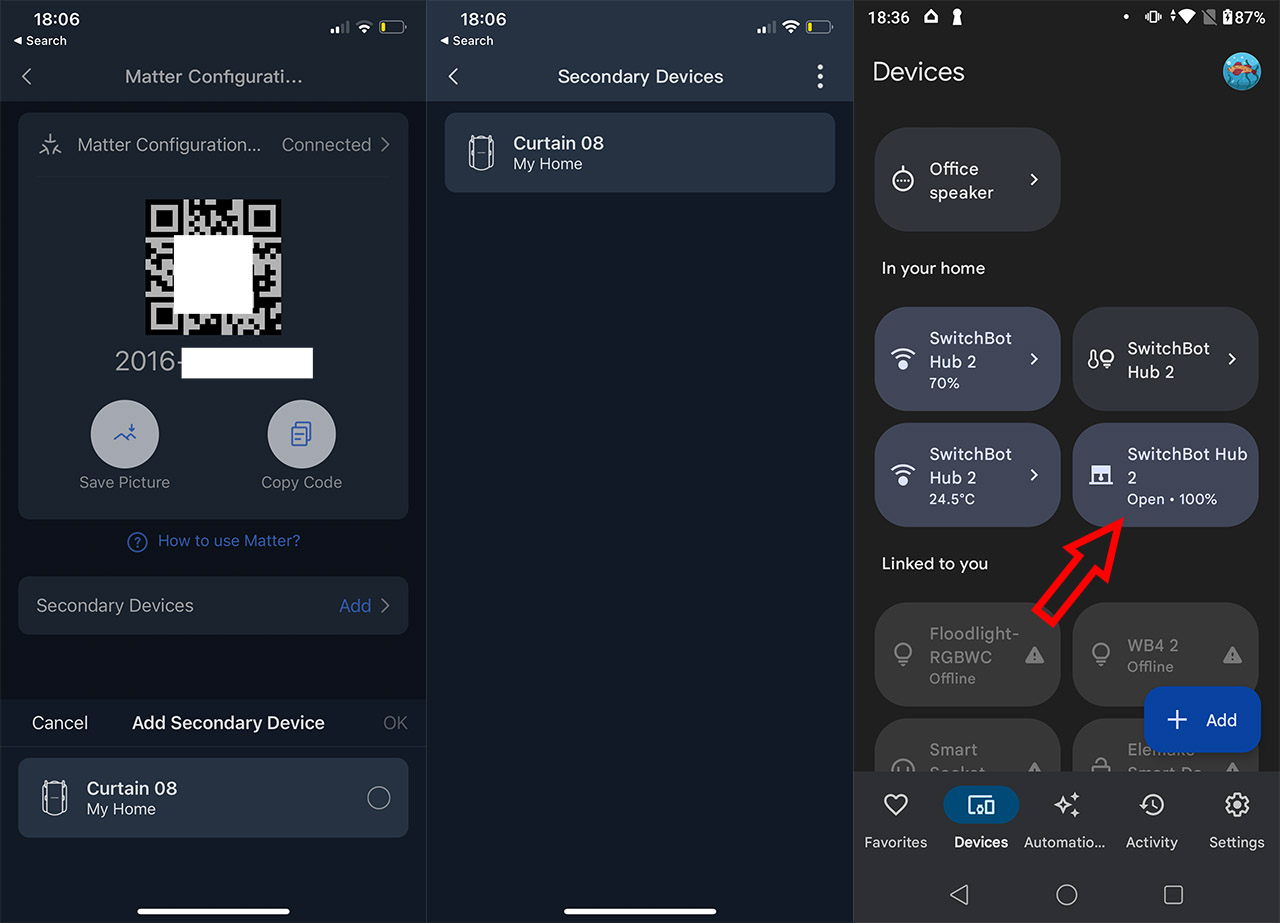
In my case, the device appeared as being connected, but the LED continued to flash. Yes, it got disconnected from the SwitchBot app, so I re-added it (after deleting the hub) and then it appeared as being connected to Google Home without me having to redo the entire thing again. So all was good after that. SwitchBot says that it’s a Beta feature, so it makes sense, but it does work and I could see and control the SwitchBot devices under the Google Home environment. We are not done because it’s necessary to choose which devices will be shared with the Google Home app.
This can be done from the SwitchBot app > Hub 2 > Settings > Matter Configuration > Secondary Devices. Here, you should be able to choose which of the already connected devices can be shared using Matter – in my case, it was the smart Curtains.
Does it work with Home Assistant?
Home Assistant has integrated Matter, but it is currently in Beta mode. If you intend to use it, make sure that you’re on the version 2023.5.4 in order to be able to install the Matter add-on. After installing the add-on, go to integration and add Matter, and then prepare the SwitchBot Hub 2.
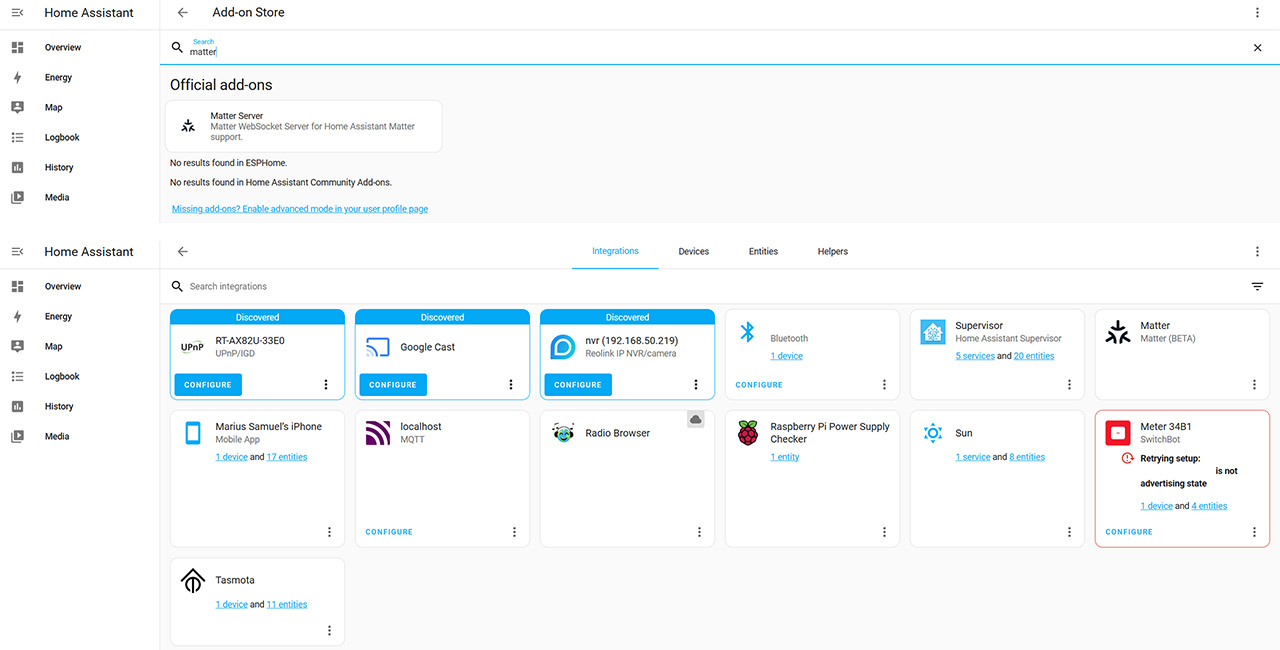
It’s pretty much the same steps as on the previous section: reach the Matter Configuration, get the code and return to Home Assistant. Now, go to Add Integration once more and select “Add Matter device”. Since I used the same smartphone for both apps, I chose to enter the code and then I got the message ‘Device Connected’. It’s worth mentioning that the Home Assistant is installed on a Raspberry Pi 4 and it seems to have everything that’s needs to work with Matter.
The last step is to share the Secondary Devices > choose whichever device that you want and is available (again, it’s the smart Curtains). I returned to the web-based GUI and I could see the available entities. It’s curious that the Hub 2 remained paired to the SwitchBot app afterwards, but did not do so after being paired to the Google Home, so maybe the issues are at the Google app level. It would not surprise me one bit.

Adding Infrared Remote Controls
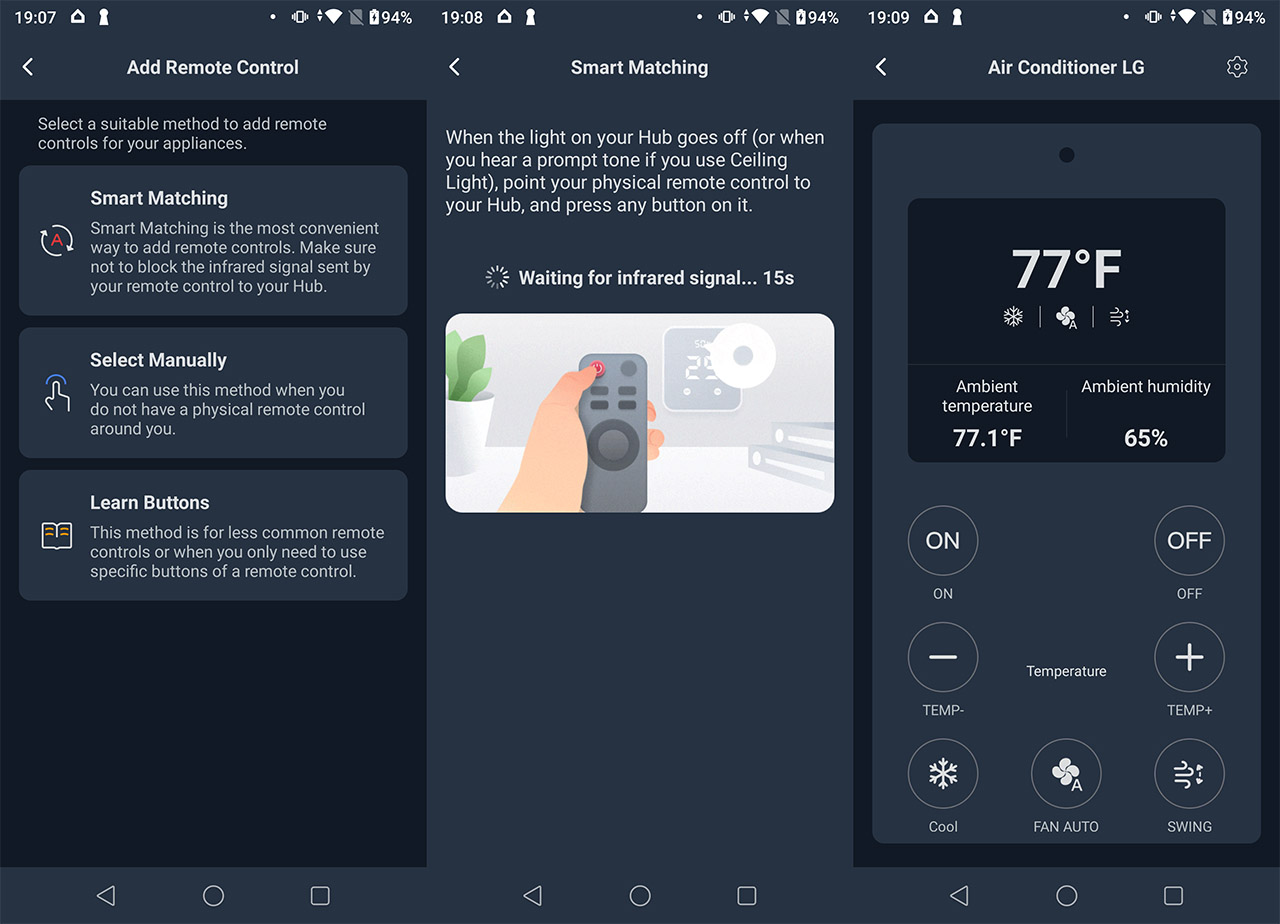
The process is incredibly simple. Click on Add remote control from the main window (dedicated to the SwitchBot Hub 2) and then choose the type of device that’s controlled by the existing IR remote control. I chose to use the LG air conditioner that I have installed in one of my bedrooms, so I selected Air conditioner from the list. Then, I could choose between three options, Smart Matching, Select Manually and Learn Buttons.
I chose the first since it looked very promising and the instructions said to wait until the LED on the SwitchBot Hub 2 turn off or when I hear I prompt tone to point the remote at the hub. I heard a faint beep, so I pointed the remote and the app immediately said that it found three templates available. The first one worked fine and I could now ditch the remote for the app.
The thing is that the Hub Mini could also connects to IR remote controls, so what does the SwitchBot Hub 2 bring new to the table? The new function is the IR decoding which should help synchronize the IR signal transmitted by the AC remote control with the app.
The Conclusion
Does Matter really matters? After seeing how it can bring together such various ecosystems that were previously closed off is very promising to the future of the smart home devices industry and the SwitchBot Hub 2 does help us get closer to a unified standard. I have tested it with Google Home and the open-source Home Assistant and it worked well (others have also successfully connected the Hub 2 to HomeKit). The IR function is better than on the Hub Mini and the app seems to be improved. Additionally, we get temperature and humidity readings to persuade us to keep the SwitchBot Hub 2 in the open (for the IR communication) which was quite clever. Overall, the Hub 2 is a very welcomed addition to the SwitchBot ecosystem and it will definitely help create a better smart home experience.
Mark is a graduate in Computer Science, having gathered valuable experience over the years working in IT as a programmer. Mark is also the main tech writer for MBReviews.com, covering not only his passion, the networking devices, but also other cool electronic gadgets that you may find useful for your every day life.