
After the Raspberry Pi 4 was released towards the middle of 2019, the better hardware got everybody excited about the prospect of running more powerful applications, but the increased performance always comes with more power draw, which, in turn, means a higher temperature.
| 52PI Ice Tower Cooler | |
|---|---|
| SeeedStudio.com | Check Offer |
| Amazon.com | Check Offer |
This had to be expected if the manufacturers wanted to persuade the users to dare exit the Pi Zero basic projects (which were mostly on the realm of microcontrollers) and have more faith that the Pi 4 can truly offer a Desktop PC experience. With dual-monitor support, a 1.5GHz processor, the Broadcom VideoCore VI and 4GB of RAM, the Raspberry Pi can definitely run Linux OS and, to keep the temperature low, it’s best to rely on a cooling fan.
Being inspired by the Desktop PC fans, 52PI has boldly designed the ICE Tower CPU cooling fan and, based on its performance, it does seem like you’re going to need it if you plan to go heavy on the small Pi 4. It’s worth noting that the Pi 4 has underwent some changes since its release and, while at the beginning, it did run quite hot (with lots of thermal throttling), after a software update, things do look a lot better (as confirmed by the tests below) even when using a case.
Design and Installation
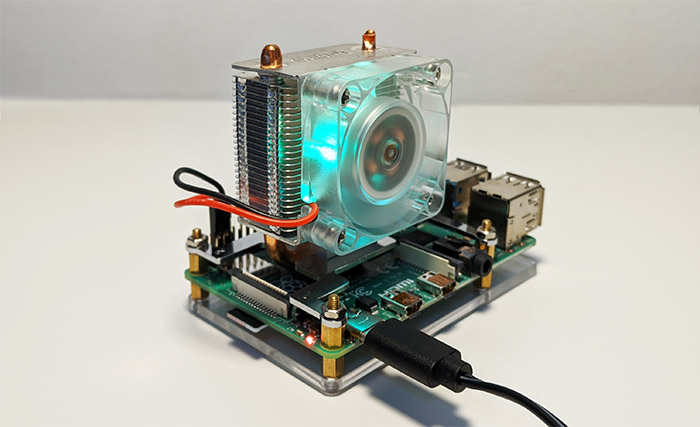
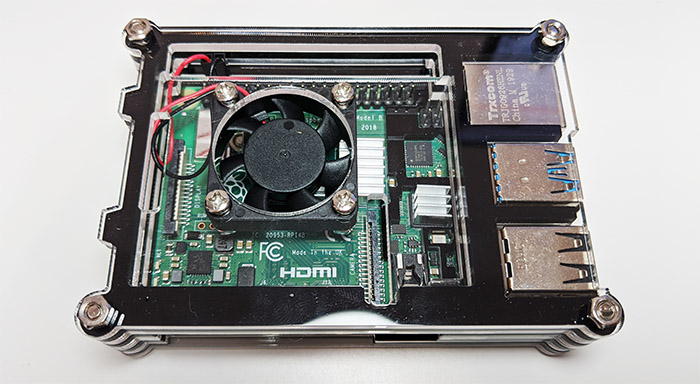
I got a Raspberry Pi 4 (2GB of RAM) about three months ago and I have been using it with a third-party plastic case that has some openings on the bottom and on the top, as well as a small fan to help keep the temperature at a decent level. After I got the 52Pi Ice Tower CPU cooling fan from Seeed.com, it immediately became obvious that there is no way that the Pi 4 with the fan mounted on top is going to fit in any available cases (unless you get really creative with a 3d printer), so the slate is going to be kept in the open and, thankfully, 52Pi has also added a plastic piece to help elevate the PCB a bit (and to keep the air moving underneath it).
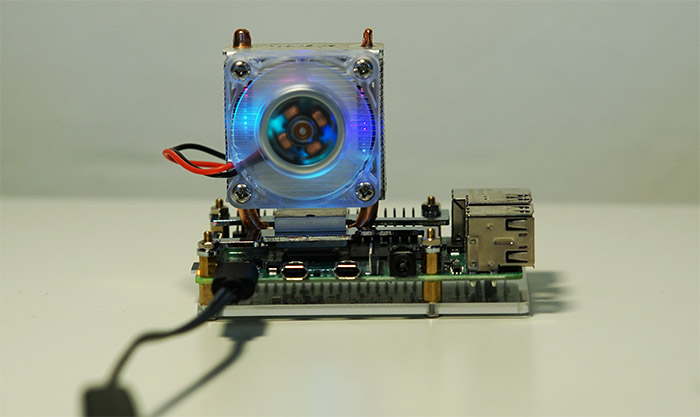
At about 2.28 inches tall, 1.61 inches wide and 1.37 inches deep, the 52Pi Ice Tower CPU cooling fan is the biggest small fan I have seen so far and I do have to admit that it looks a bit ridiculous on such a small board. But it’s not really the fan that’s that big (it’s not larger than the fan I was using before), it’s actually the heatsink that’s the more prominent piece and its size is actually justified to more readily dissipate the heat it receives from the CPU. As expected the fan is made of plastic, while the single-stack heatsink is made of aluminum alloy and with a 5mm copper pipe that runs from the top towards the point of contact with the CPU (through the provided pad, of course). The fan has seven blades and it does have some LEDs to give you that RGB experience that you’ve been craving for ever since the first Raspberry Pi was released (the color cycles through shades of red, green, blue and purple); it’s worth noting that the fan can be unmounted from the heatsink by removing the four screws.
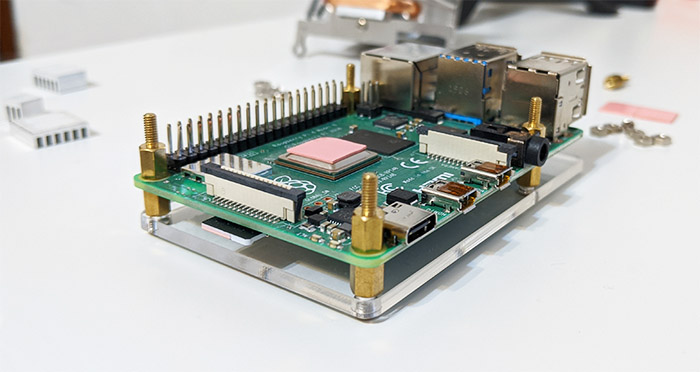
Moving on to the installation process, 52Pi has provided everything that’s needed to make the process as painless as possible: inside the box, besides the cooler, there are eight M2.5×6 (plus one) copper sticks, four M2.5 nuts (plus one), six M2.5×6 screws (plus one), a mounting bracket (consists of two pieces), an acrylic protection panel, a screwdriver and three thermal pads. The first step is to return the Pi 4 to its bare state (if you had it installed inside a case) and then, take the first set of four M2.5×6 copper sticks and insert them into the acrylic panel (before, make sure to peel both sides of the panel, so it becomes clear).
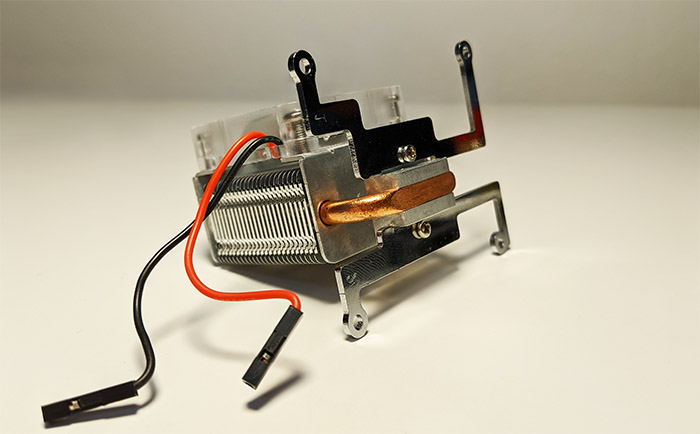
Afterwards, use four M2.5×6 screws and tighten the copper sticks to the acrylic panel; next, take the Raspberry Pi 4 and, using the remaining four copper sticks, screw them onto the protruded ends of the other four sticks (attached to the acrylic board). Now, it’s time to prepare the ICE Tower CPU cooling fan: take the two brackets and attach them to the back of the cooler using two M2.5×6 screws and then select one of the three thermal pads that needs to be laid on top of the CPU (make sure to remove the transparent plastic covers from both sides of the pad). Afterwards, simply slide the brackets into the four copper sticks that point upwards from the Pi 4 board; lastly, take the four M2.5 nuts and firmly fix the cooler to the Pi 4.
To power on the cooler, you have two choices, either use the 5V pin to make sure you get the best out of the Ice Tower Cooler (it will be a bit noisy and, although I wasn’t bothered at all, some people have complained about it) or the 3V3 pin which will push less air, so the temperature will be slightly higher, but the cooler will be nearly silent. And that’s it, power on the Raspberry Pi and run any applications without worrying whether the hardware will under-perform due to high temperature.
Note: The rated power of the ICE Tower CPU cooling fan is 0.4W 5V, 0.08A and, while the thermal pads will do just fine, if you want an even better performance from the cooler, you can use thermal grease.
Performance
As I said in the introduction, there have been some changes over the last few months on how the Pi 4 handles the workloads, so you shouldn’t see those high temperatures any more. The culprit seems to have been the USB 3.0 controller which ran too hot, so the manufacturer has made some power-saving tweaks to ensure that both the CPU and GPU throttling happens less often on a heavier load (it’s incredible how much of an impact can have a firmware update on the hardware functionality). That being, the Raspberry Pi 4 that I have is on the latest firmware and it currently has installed the Raspbian Buster with GUI on a 64 GB SD card from Samsung (UHS-I U1). In order to test the Raspberry Pi 4 with and without the 52PI Ice Tower Cooler, I did not write a script myself and, instead, I relied on an existing one called the Stressberry (here’s a link to it from Github).
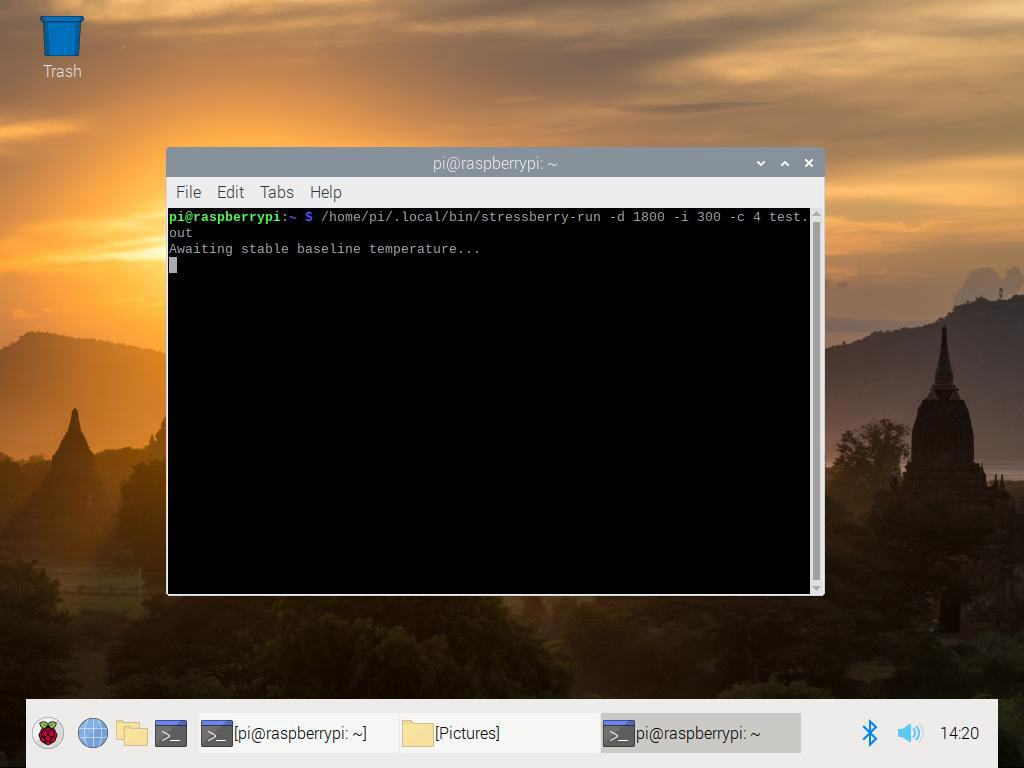
Using this lightweight script, I put an idle period of 5 minutes before and after the stress test and the test itself will run continuously for 30 minutes. The results are then plotted and displayed in a png image, showing the frequency, the time and the temperature. Since I already had the Pi 4 inside the case (that transparent type with a small fan on top and with three tiny heatsinks attached to each of the three main components), I decided to run the test without changing anything and see what type of results we could see – it’s worth noting that the case, which includes a fan, is similar in price to the ICE Tower CPU cooling fan, so it better make it worth it.
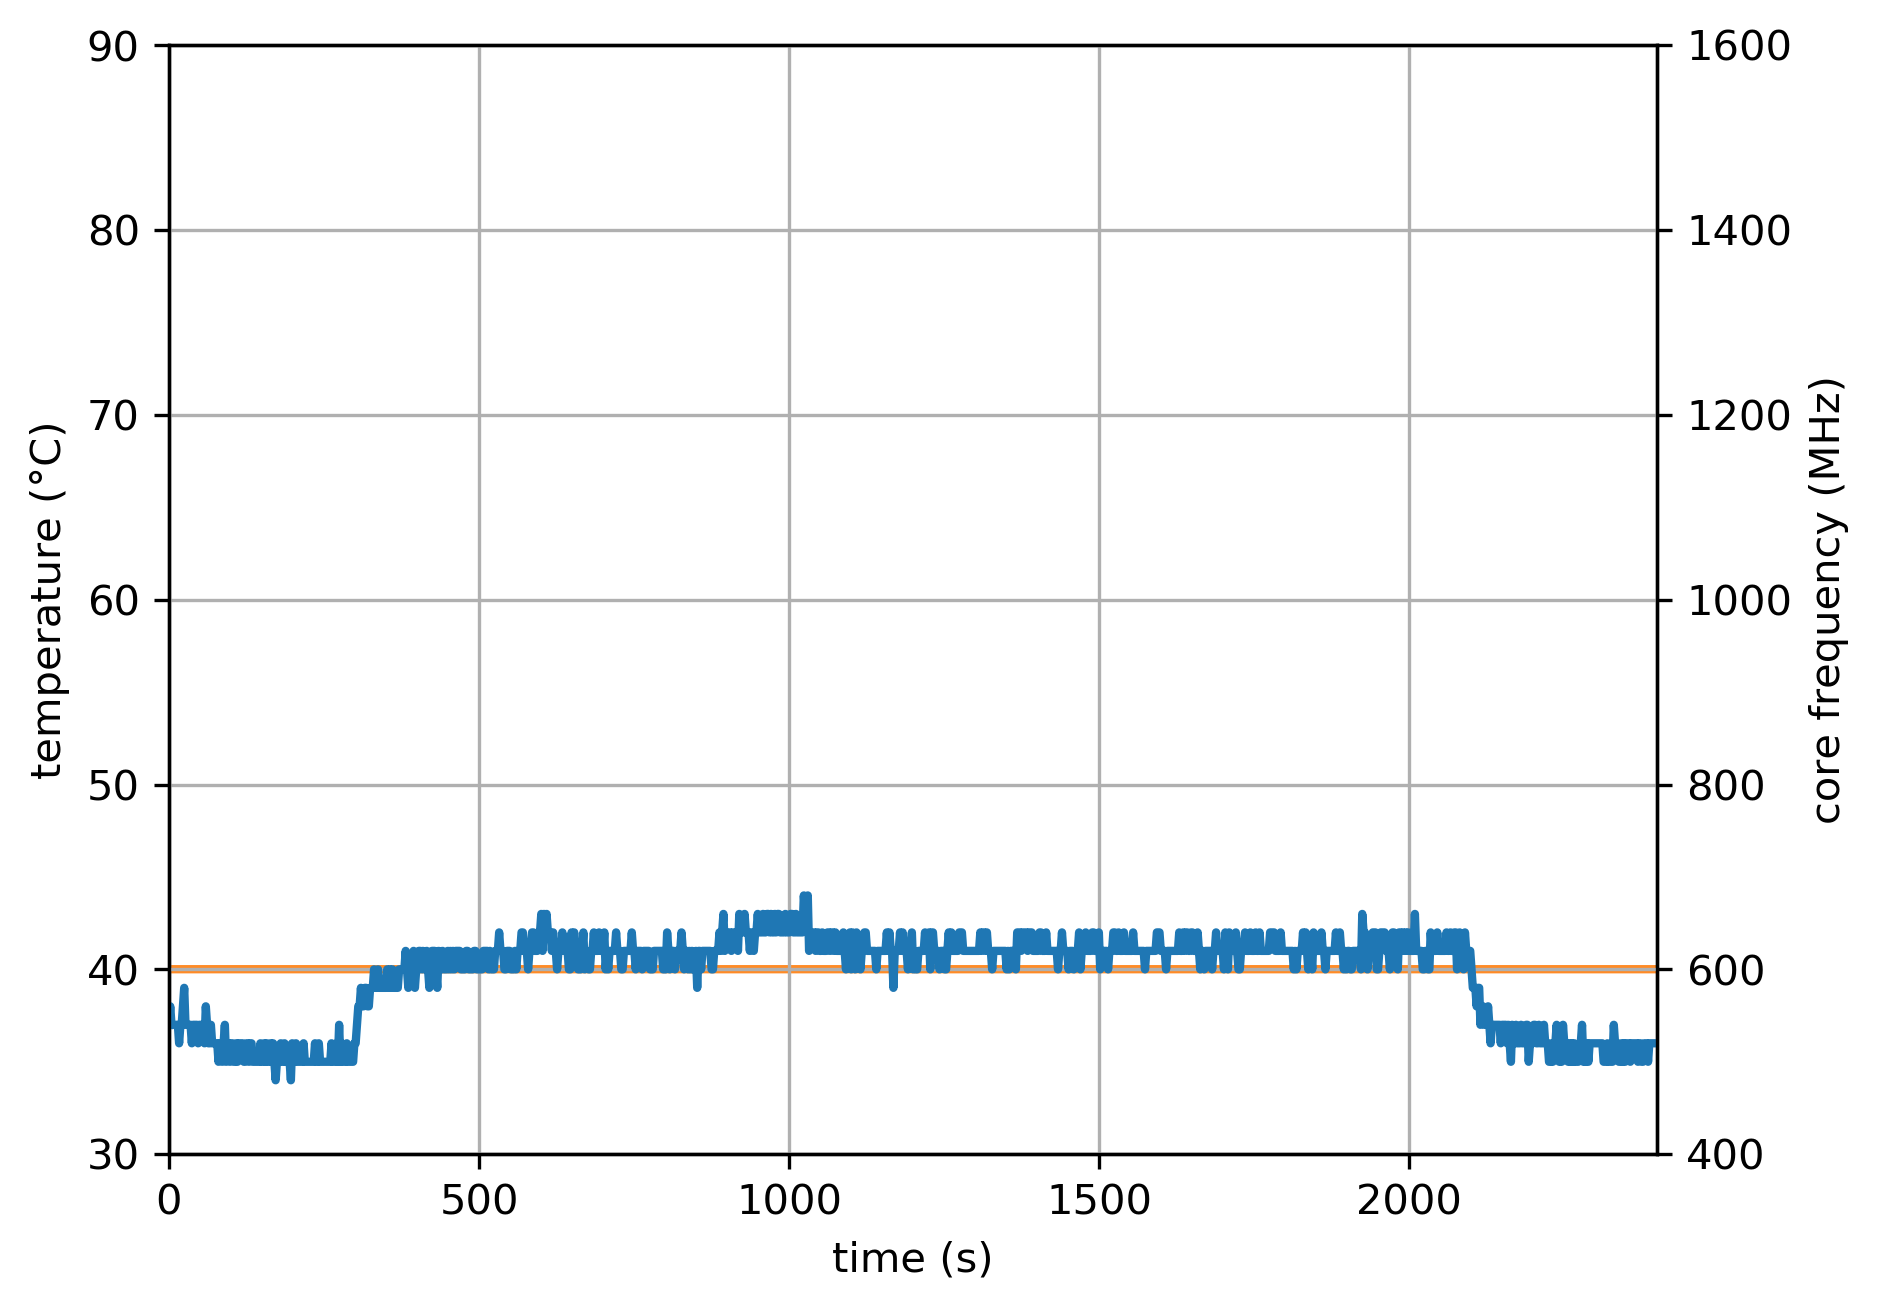
The test shows some small initial spikes nearing 40 degrees C (104 F), but it quickly cools down to an average of 36 degrees C (96.8 F) before going up after reaching the 5 minute mark (the time in the graph is in seconds). As can be seen, during the stress test, the average temperature was at about 41 degrees C (105.8 F) with occasional spikes to 43 degrees Celsius (109.4 F), so the small fan does a decent job.
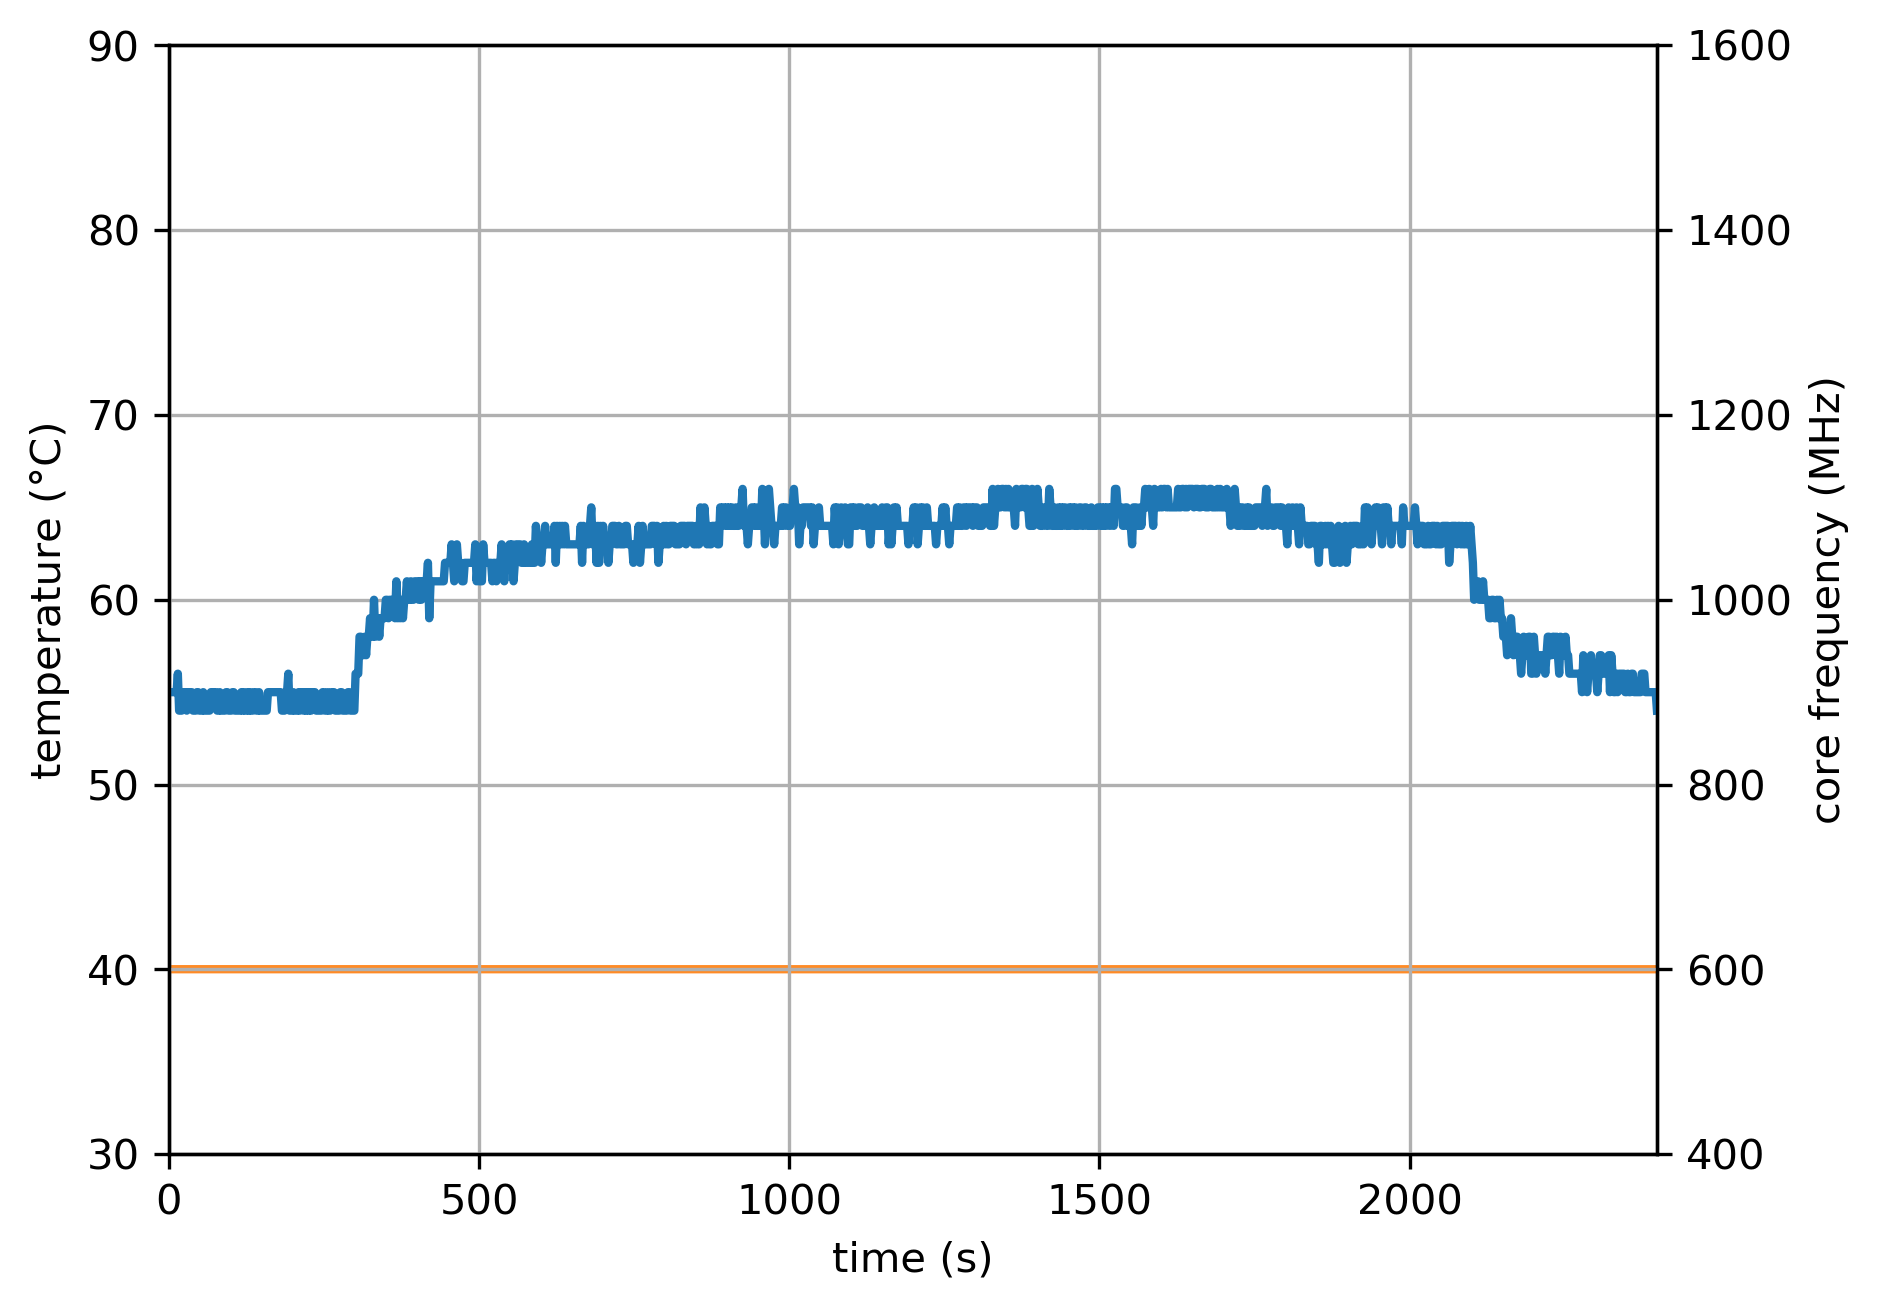
Afterwards, I removed the fan, but kept the three small heatsinks and ran the stress test again. It’s important to know that the case will now have another opening – where the fan used to reside, so, in addition to the other present cut-outs and the larger size than the official case, it should be a bit more efficient (the case is a variation of the GeeekPi Acrylic Case).
As can be seen in the image, during the initial 5 minute idle period, the temperature remains constant at about 55 degrees C (131 F) and, after the stress test starts, it gradually increases until it stabilizes at an average of 64 degrees C (147.2 F) with some (quite often) peaks at 66 degrees C (150.8 F).
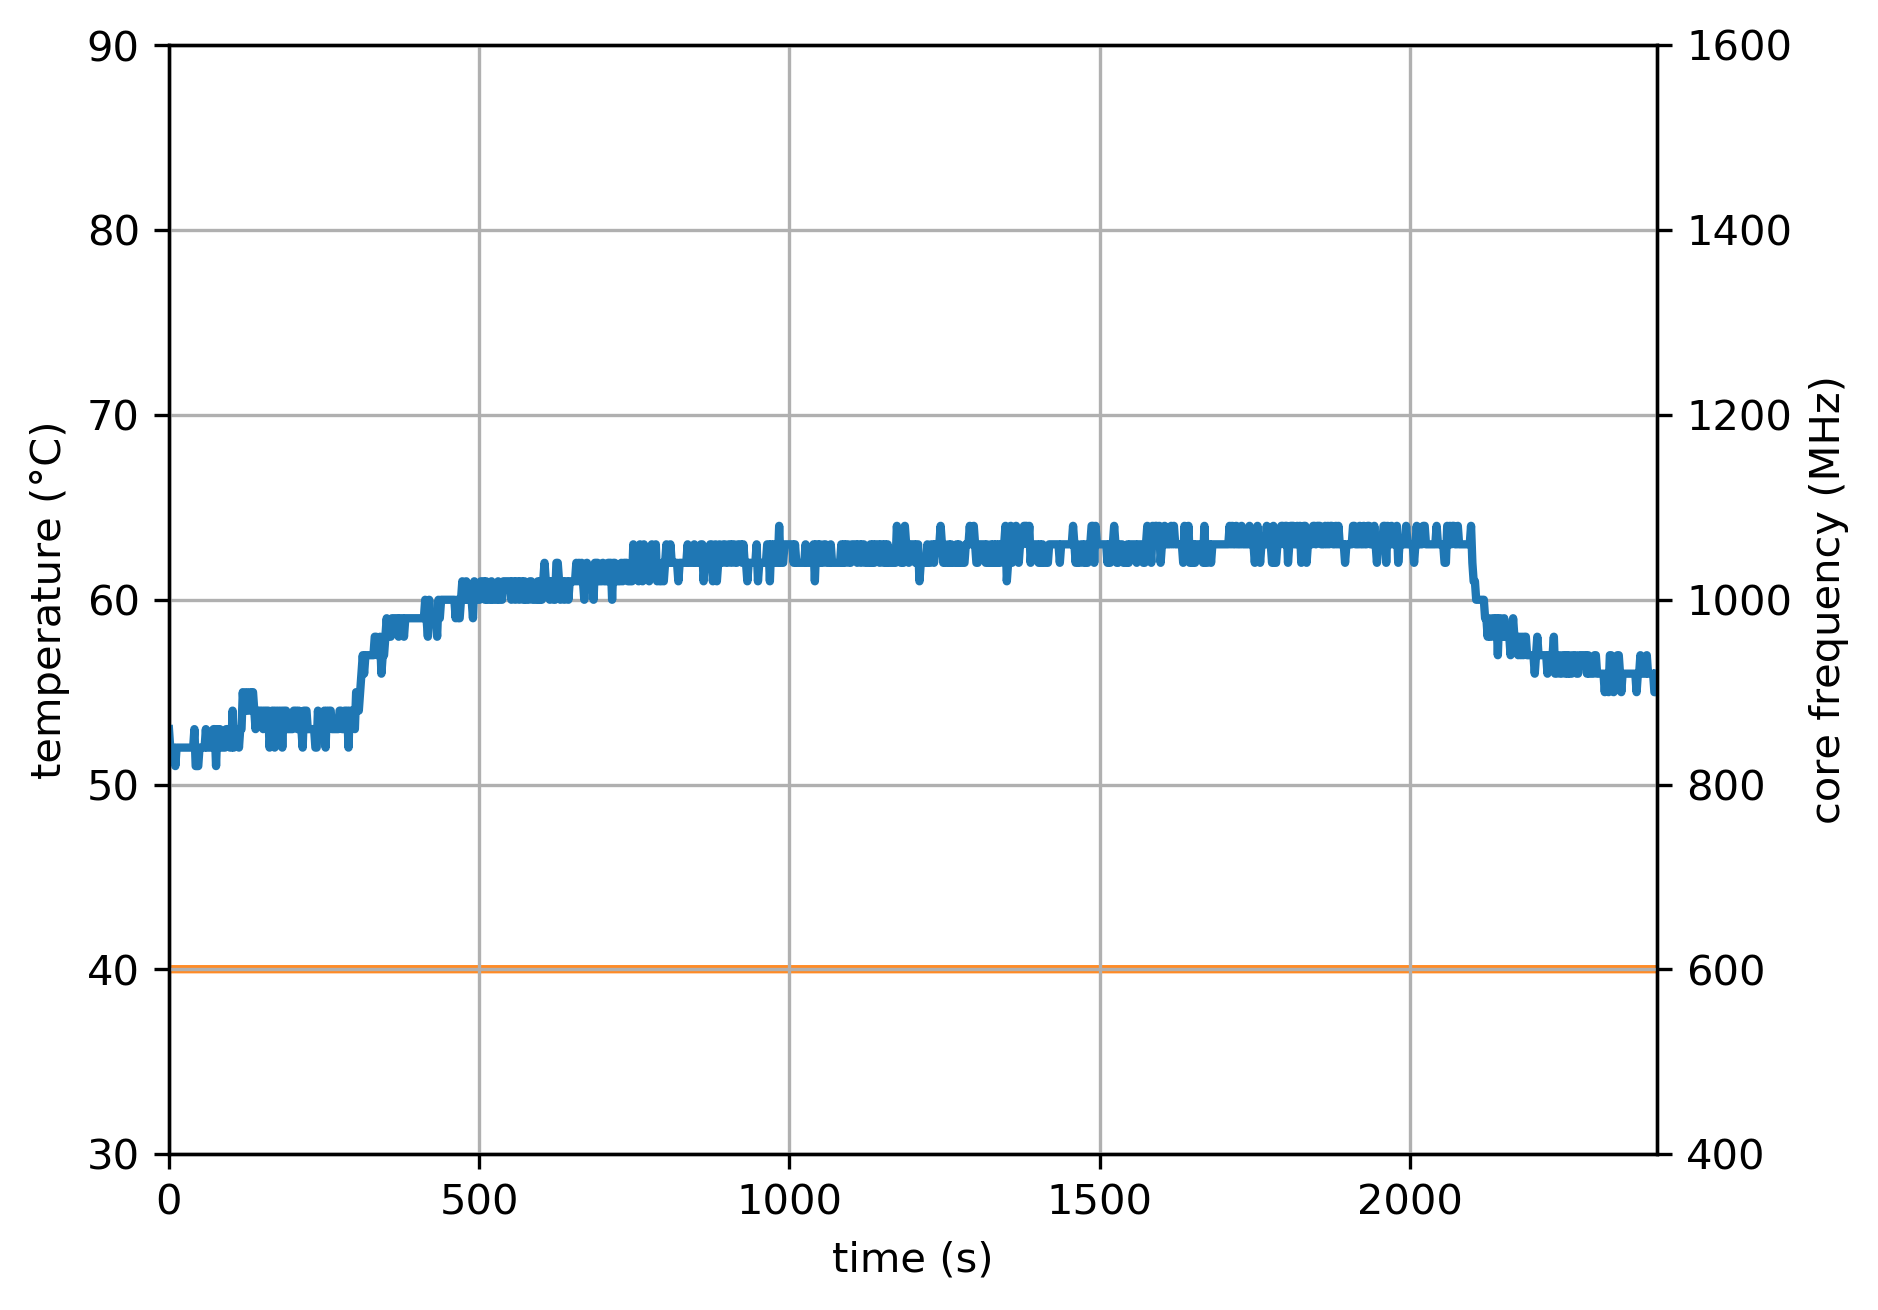
These are good results and it’s clear that the firmware update has been successful in making the Pi 4 usable with a case, while relying on passive cooling. On the next step, I removed the three heat sinks and I took the Raspberry Pi 4 out of the case and ran the tests in its bare state.
Interestingly enough, the results don’t differ that much than when using the Pi 4 with the semi-open case: the first five idle minutes, things have been a bit less stable with some variations between 52 (125.6 F) and 54 degrees C (129.2 F), with some occasional peaks at 55 degrees C (131 F); after the stress test starts, the temperature averages at about 63 degrees C (145.4 F) with very rare peaks at 64 degrees C (147.2 F).
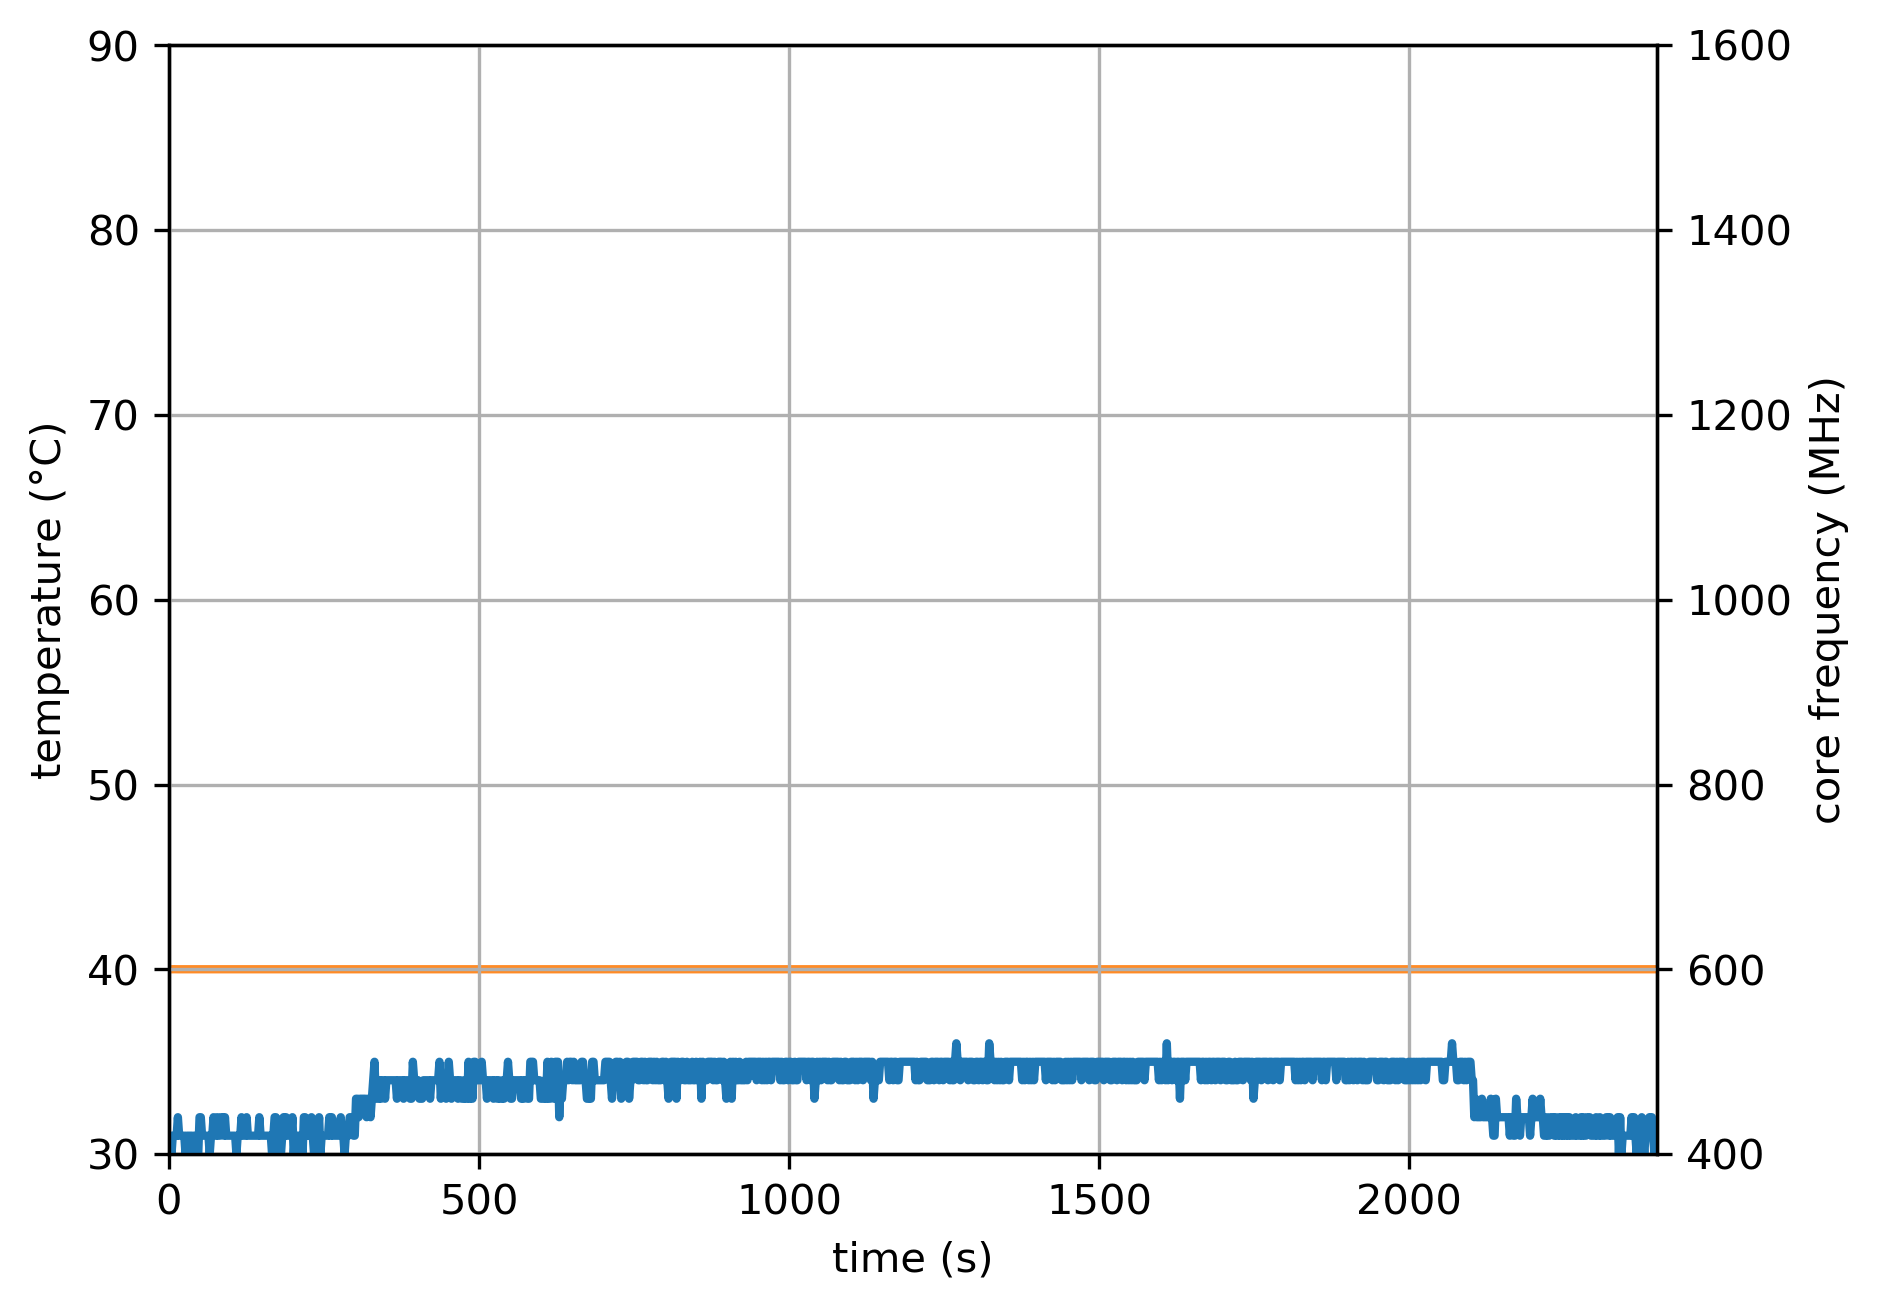
On the final step, I have mounted the ICE Tower CPU cooling fan to the Pi 4 (with the acrylic board underneath) and the results are indeed impressive: on the idle period of five minutes, the temperature averages at 31 degrees C / 87 F (with no significant spikes) and, after the stress test starts, it quickly stabilizes at around 35 degrees C (95 F), where it remains until reaching the 30 minutes mark (there are about 4 spikes at 36 degrees C / 96.8 F); the 5 minute cool down period immediately sees a returns to a stable 31 degrees C (87 F). So, there you go, the results are indeed spectacular and outshine any other approach that I tried before.
Conclusion
I know that a tower-style cooler on a small Raspberry Pi 4 may not be on everyone’s taste since it takes away from its unobtrusive nature, but it undoubtedly does lower the temperature of the board when running heavy applications and it does allow it to move past the micro-controller-like state and behave as a true mini computer (with Linux OS). Furthermore, the acrylic protective board is a nice touch and the RGB LEDs, while lacking a controller, are a welcomed addition.
52PI Ice Tower Cooler
-
Pros
- Capable of significantly lowering the the temperature of a Raspberry Pi 4
- Easy to install
- There is an additional acrylic board to ensure some airflow underneath the Pi 4
- The LEDs are actually pretty cool
- The manual has clear instructions
Cons
- A bit expensive
- Some people have complained about the fan noise (it's fixable, though)
- It's very big
Mark is a graduate in Computer Science, having gathered valuable experience over the years working in IT as a programmer. Mark is also the main tech writer for MBReviews.com, covering not only his passion, the networking devices, but also other cool electronic gadgets that you may find useful for your every day life.