
It has been about three years after Google started conquering the home-suitable networking market with its Google WiFi and it’s clear that it has aged like a fine wine since it is still being regarded as one of the best dual-band WiFi systems available right now. This happened due to the manufacturer’s somehow perfect understanding of what its audience needed, which was a set of small minimalist devices which would be very easy to set up and would offer a stable network over a long period of time.
If you got charmed by the Google WiFi and you got a system installed in your home, you may notice that the simplicity came at a cost since the app is very limited in terms of features and, if you want to run some advanced applications, it can become unnecessarily harder than with some traditional routers. For this reason, I decided to try and run Pi-Hole installed on a Raspberry Pi 4 alongside my Google WiFi system and see if the search engine giant has made this process more difficult than it needed to be or if everything is silky smooth (unfortunately, it’s the former).
Taking into consideration the recent news that the Chromium-based browsers (may soon include Edge) will have a built-in ad-blocking engine, therefore taking away this role from the ad-block extensions, it’s clear that Google desires to select which ads will be filtered and which will go through for you, so, if the ad-blocker extensions may become a thing of the past (even though I seriously doubt it), there is always the reliable Pi-Hole to block the annoying ads at the DNS level. This can help speed up the website loading time (since the ads are no longer downloaded), but it will leave a blank space in the place of the ads and you won’t be able to block the ads at a website level. Instead, you will have to block a certain category of ads globally and whitelist those ads that you deem unobtrusive (this is where the browser-based ad-blockers have the upper hand).

The developers did a great job with the Pi-Hole GUI, so the process is very simple and intuitive, but it’s not that simple to get to this point since you will have to install Raspbian on a microSD card which you will then insert in a Raspberry Pi and then make the necessary adjustments to make sure that the router will play nicely with Pi-Hole. I am not going to get in detail on how to install Raspbian on an SD card since I already explored the needed steps in the “Should you use Pi-Hole for blocking ads? (using a Raspberry Pi 4)” article, but there are small adjustments that you need to do before installing Pi-Hole.
Note: It’s important to know that you can’t disable DHCP on the Google WiFi, well, you can, if you set it to Bridge Mode, but this is not an option if you have more than one unit installed since the mesh capabilities will be disabled. So, for now, we’re going to leave DHCP enabled on the Google WiFi.
Option 1: DHCP enabled on Google WiFi, DHCP disabled on Pi Hole.
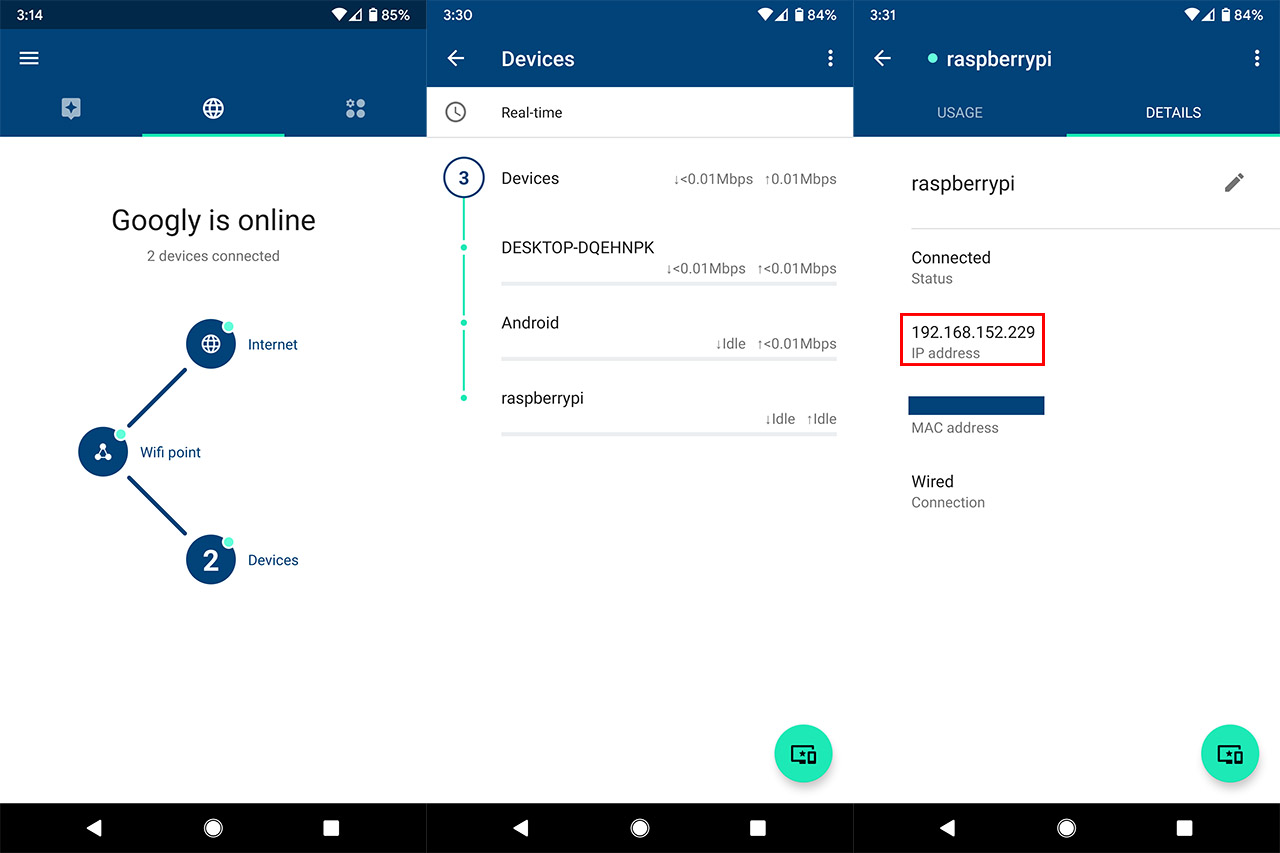
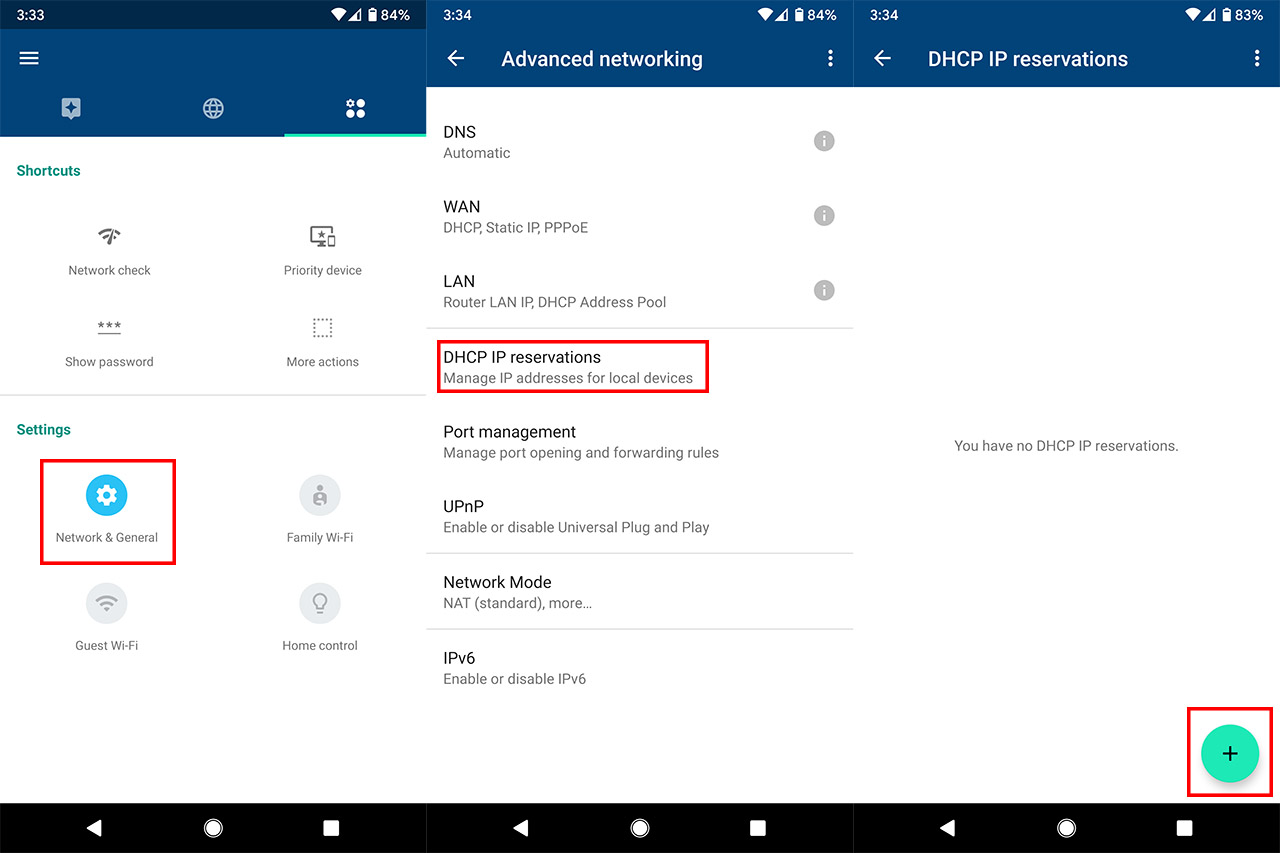
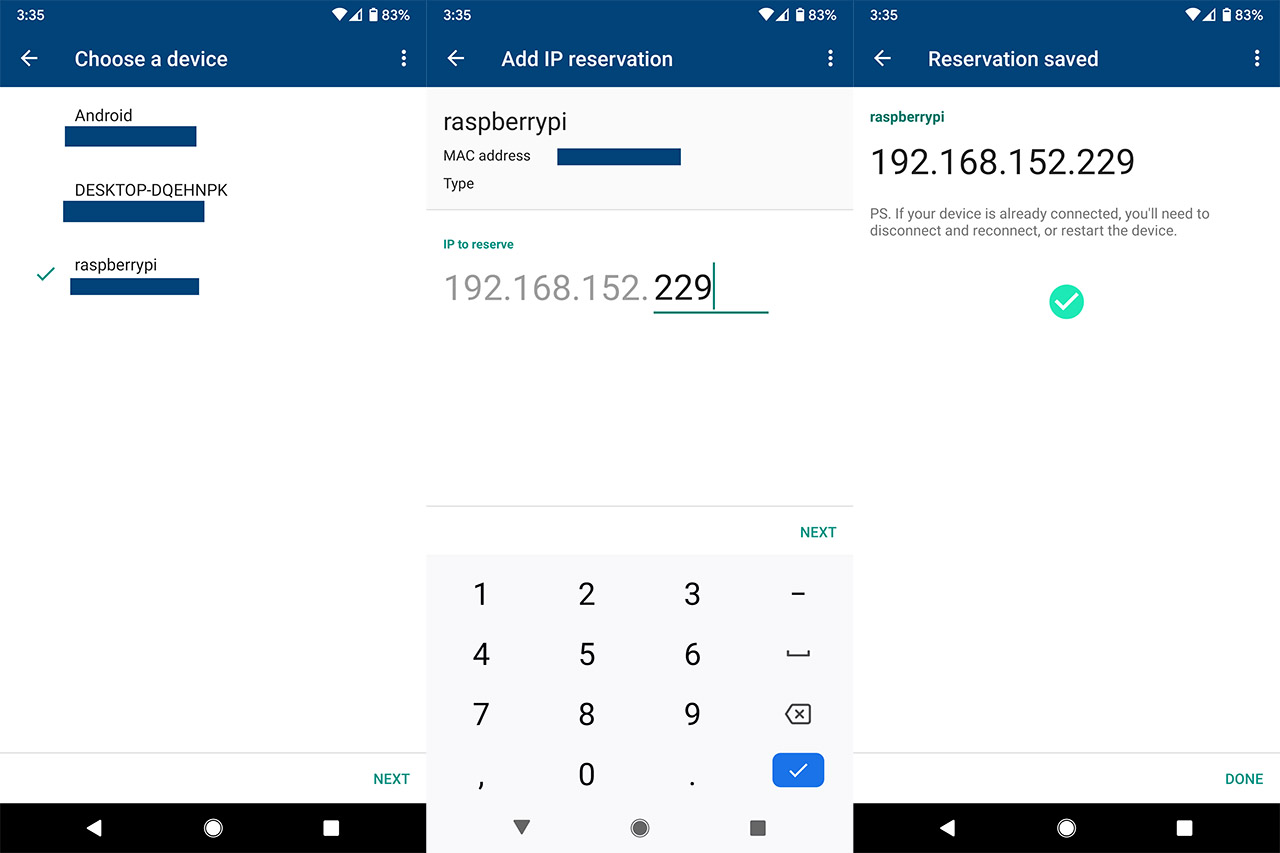
1. Since you don’t want the Google WiFi to change the IP address of the Pi-Hole, you will have to create a static IP address for the Raspberry Pi and to do so, you will need to identify the assigned IP address of the device in the Google WiFi app: from the Dashboard, click on Devices, identify the raspberrypi client and tap on it to see the designated IP address (under Details). Afterwards, return to the Dashboard and select the Config icon (the third from the top) and under Settings, click on Network and General. Here, click on Advanced networking and select DHCP IP reservations: tap on the green Plus sign, select the raspberrypi from the list and click next, followed by selecting the preferred IP address.
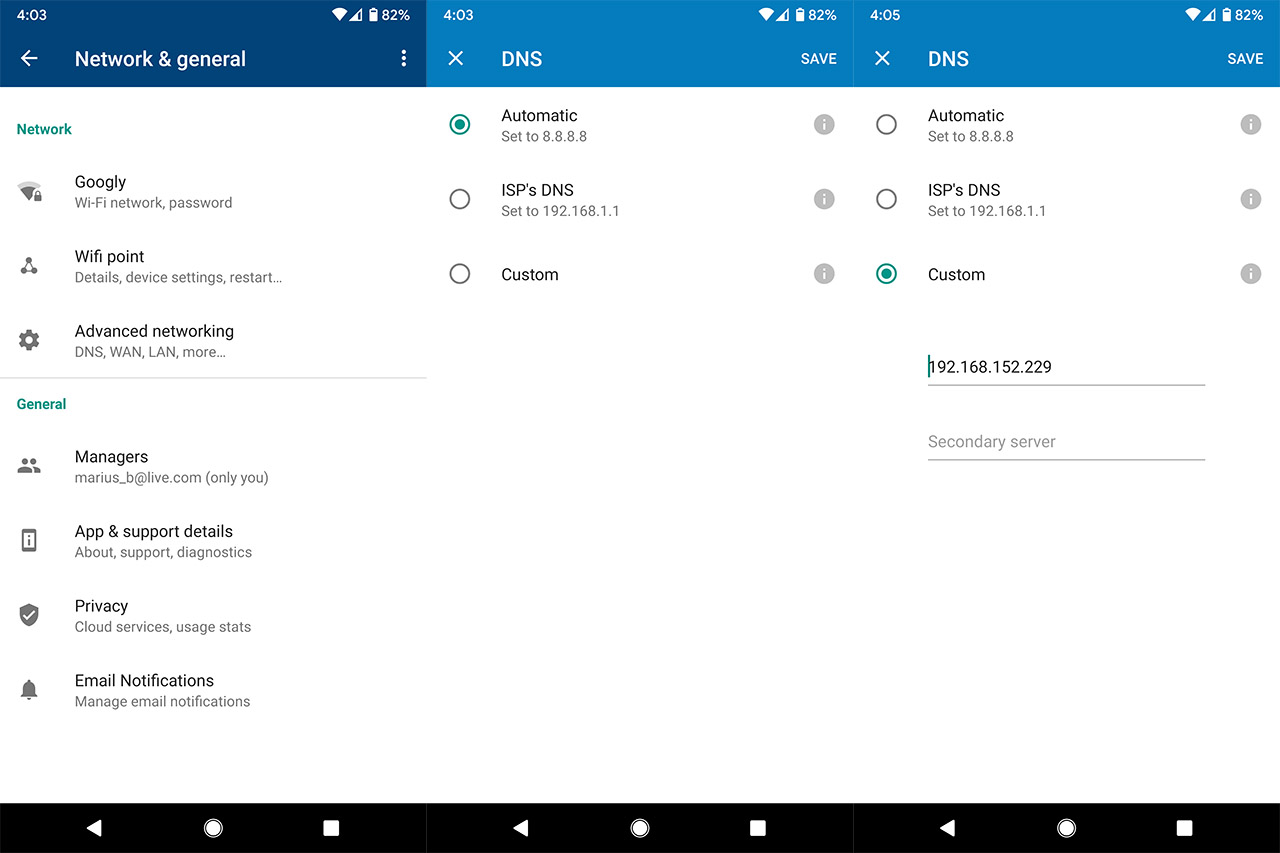
2. After that’s done, you need to install Pi-Hole using SSH (again, check the guide for instructions) and make Pi-Hole your DNS server. To do this, enter the Google WiFi app, tap on the Config icon and from the Settings, tap on Network and General followed by tapping on the Advanced networking. Here, enter the DNS option which should be set to Automatic (8.8.8.8) by default and select Custom: at this point, enter the IP address of Pi-Hole on the Primary server and then tap on Save. And that’s it, you should now be able to enter the Pi-Hole GUI (pi.hole) and adjust any desired parameters.
But, the problem is that you won’t be able to see the clients individually in the Pi-Hole Dashboard, instead it will be a single IP, that of the router, as in my case, it’s 192.168.152.1. Before using the Google WiFi, I let the AmpliFi HD GE for a while with PI-Hole and to alleviate the aforementioned problem, Ubiquiti has added the Bypass DNS cache feature in order to easily see what clients are active and which are heaving the ads blocked. Google didn’t bother with such functions and there is no easy work around it, but there is a difficult one, as provided by the user Geczy on github.com. This definitely works, but the problem is that you will have to root the Google WiFi by physically opening the device, put it in developer’s mode and then install GaleForce using a USB drive, so, besides saying bye-bye to the warranty, a lot of things can go wrong.
Again, it’s a valid solution and opens up a plethora of possibilities, but, specifically for Pi-Hole, there is another option.
Option 2: DHCP enabled on Google WiFi, DHCP enabled on Pi-Hole: Google WiFi only gives an IP address to the Raspberry Pi, while the devices that connect to the Google WiFi will receive the IP address from the Raspberry Pi.
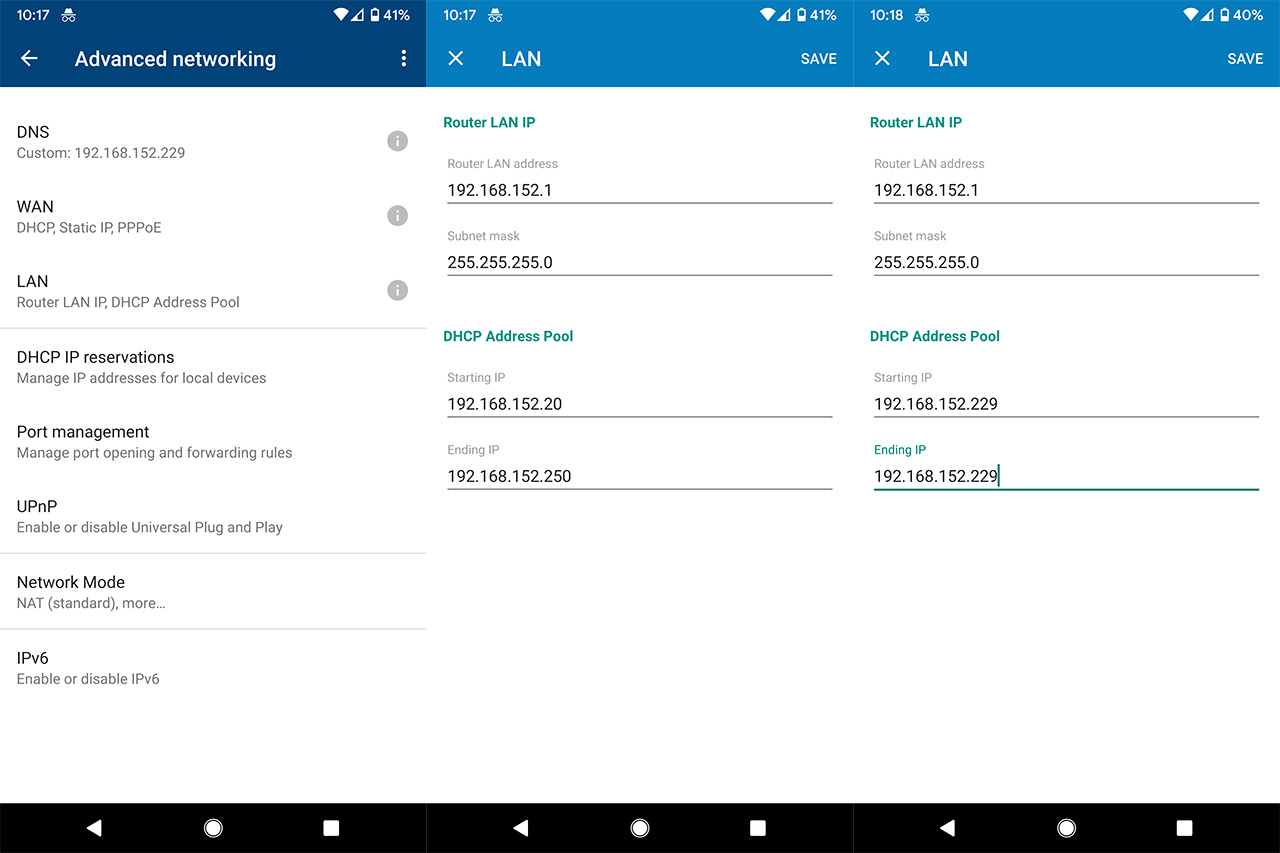
1. As in the step one of the previous option, it’s important to reserve an IP address for the Pi-Hole device and use this address as the DHCP Address Pool for the Google WiFi: open the Google WiFi app and from the Settings > Network and General, select Advanced networking, followed by entering the Pi-Hole IP address for both the Starting IP and the Ending IP under the DHCP Address Pool.
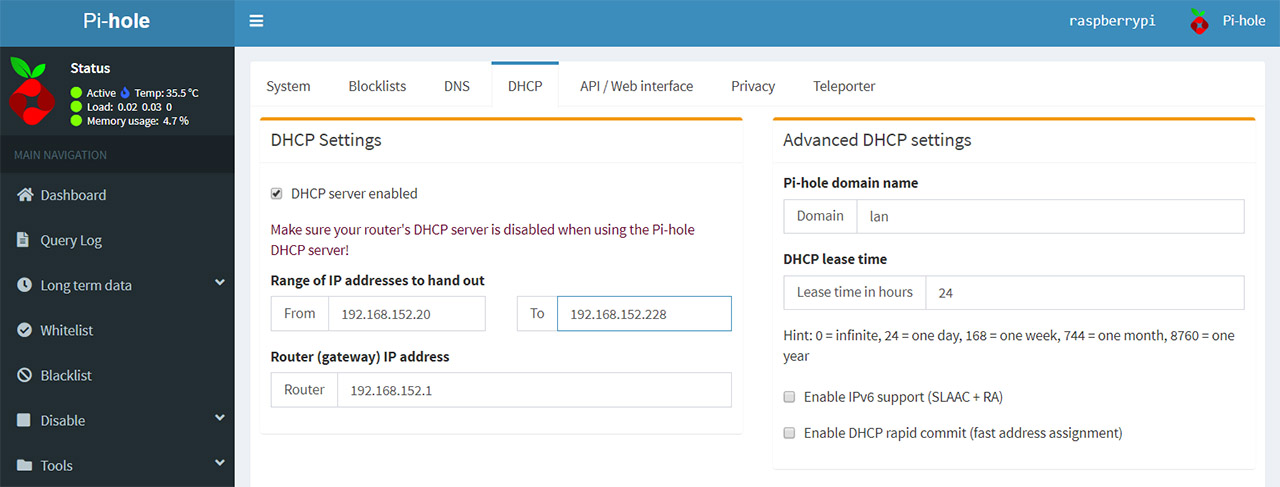
2. Afterwards, enter the Pi-Hole graphical user interface and, after logging in (to get access to the full suite of settings), go to Settings and select DHCP from the top menu. Here, you will have to enable the DHCP server and then enter a large enough pool in the ‘Range of IP addresses to hand out’ for your clients, but make sure that the subnet is the same as the Google WiFi and that there is no overlapping with the DHCP scope of the router (in my case, it was 192.168.152.229, so I stopped at 192.168.152.228); lastly, make sure that the Google WiFi IP is set as the default gateway (in my case, it was 192.168.152.1). Now, after restarting the router, if you go to the Query Log in the Pi-Hole GUI and hit refresh, it should start showing the IP address or the name of each client.

This way, you will be able to see the clients in the Google WiFi application and in the Query Log from the Pi-Hole GUI – I know that it’s not the most elegant solution (and I will keep it in my home network to see if I discover any issues), but, since the Google WiFi system is so rigid in its configuration, this is a working way to achieve network-wide ad-blocking. One negative consequence is that the Guest network is not going to be covered by the Pi-Hole ad-blocking abilities, but, in a way, it’s also a positive since you will be able to check if everything is working properly by simply switching between networks (instead of logging into Pi-Hole and pause its services).
Mark is a graduate in Computer Science, having gathered valuable experience over the years working in IT as a programmer. Mark is also the main tech writer for MBReviews.com, covering not only his passion, the networking devices, but also other cool electronic gadgets that you may find useful for your every day life.
Option 2 seems great, but after doing this can you still pause devices from the google home app?