
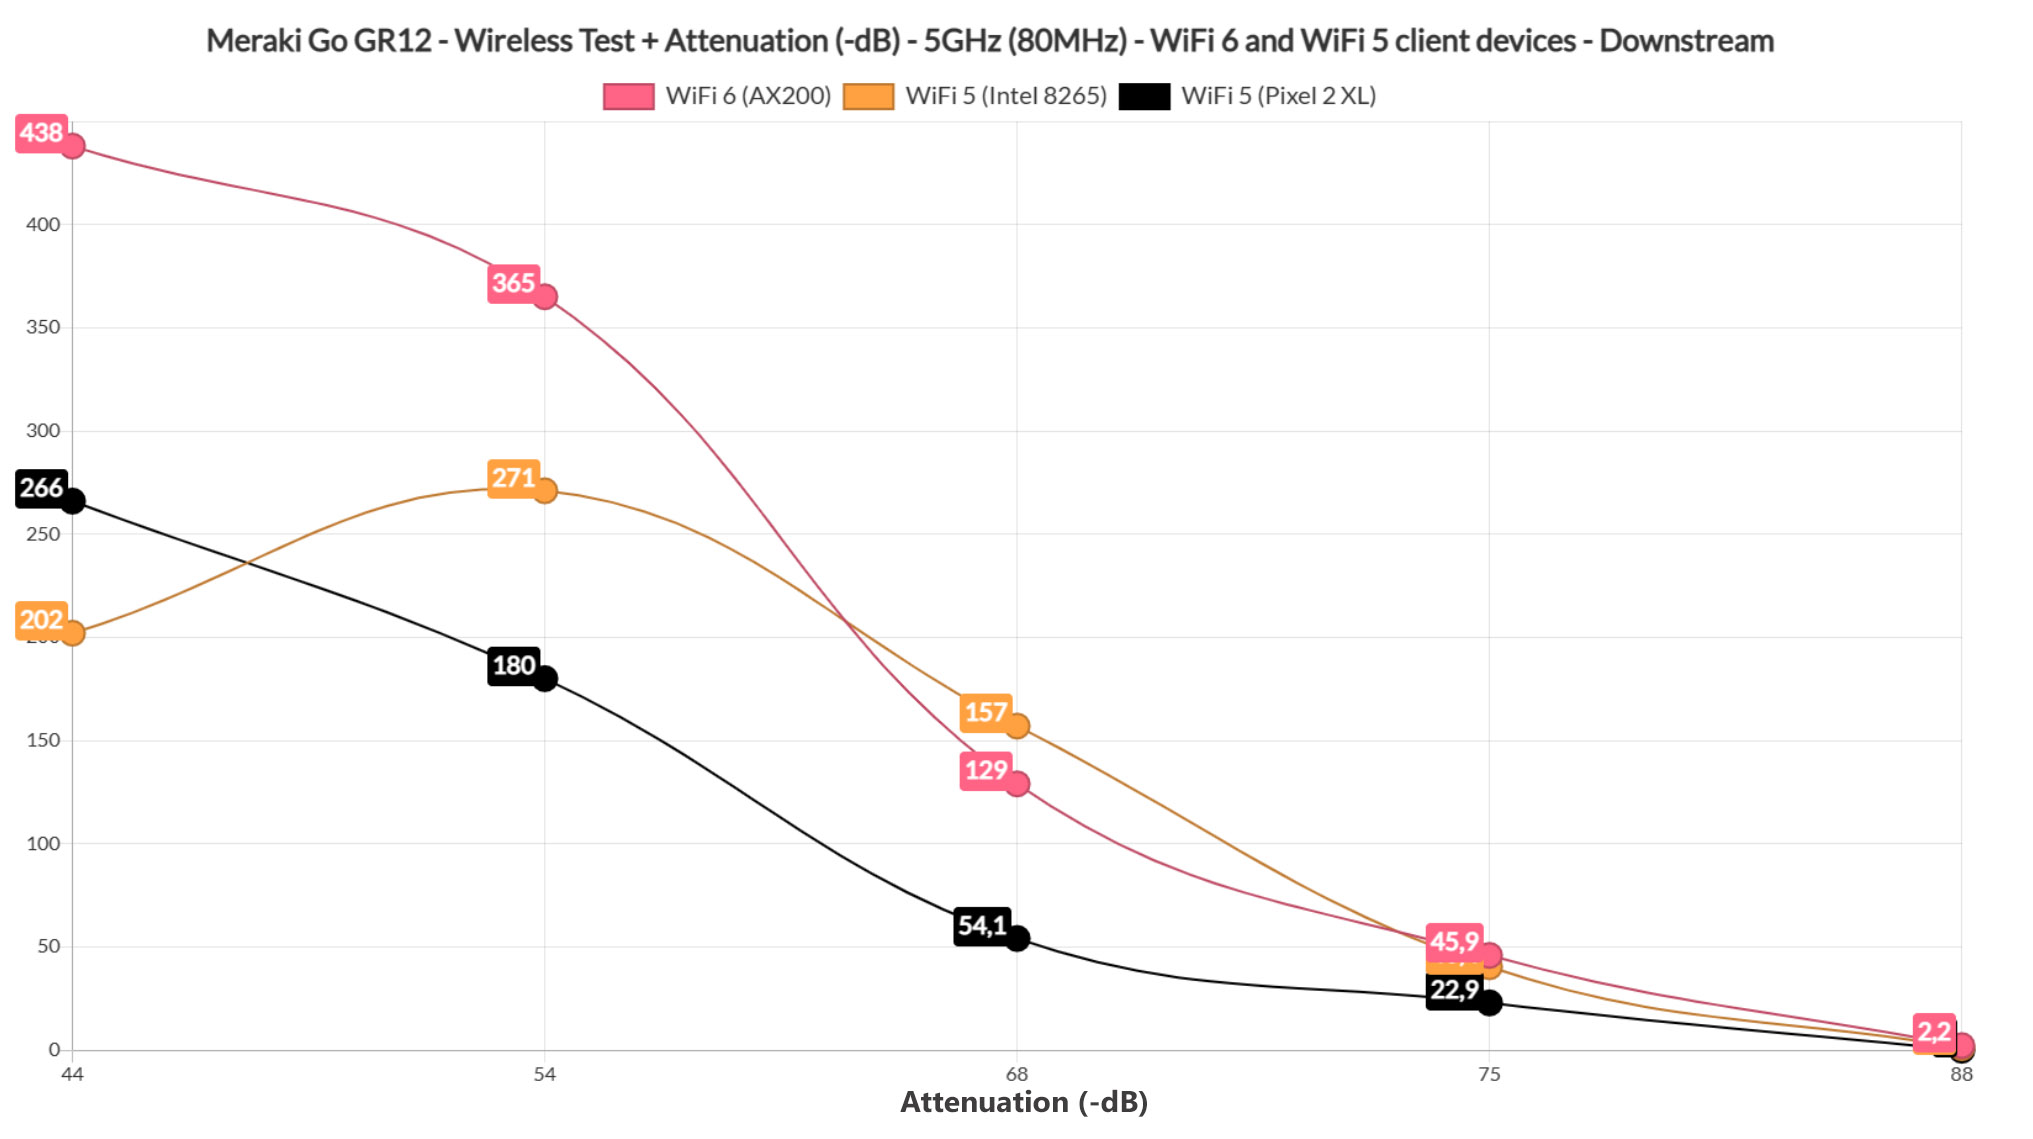
I suppose it was alright at 5 feet where I measured 514Mbps up and 302Mbps downstream, as well as at 30 and even 45 feet, where the throughput was 118Mbps and 49.9Mbps, respectively.
Wireless Test (2.4GHz)
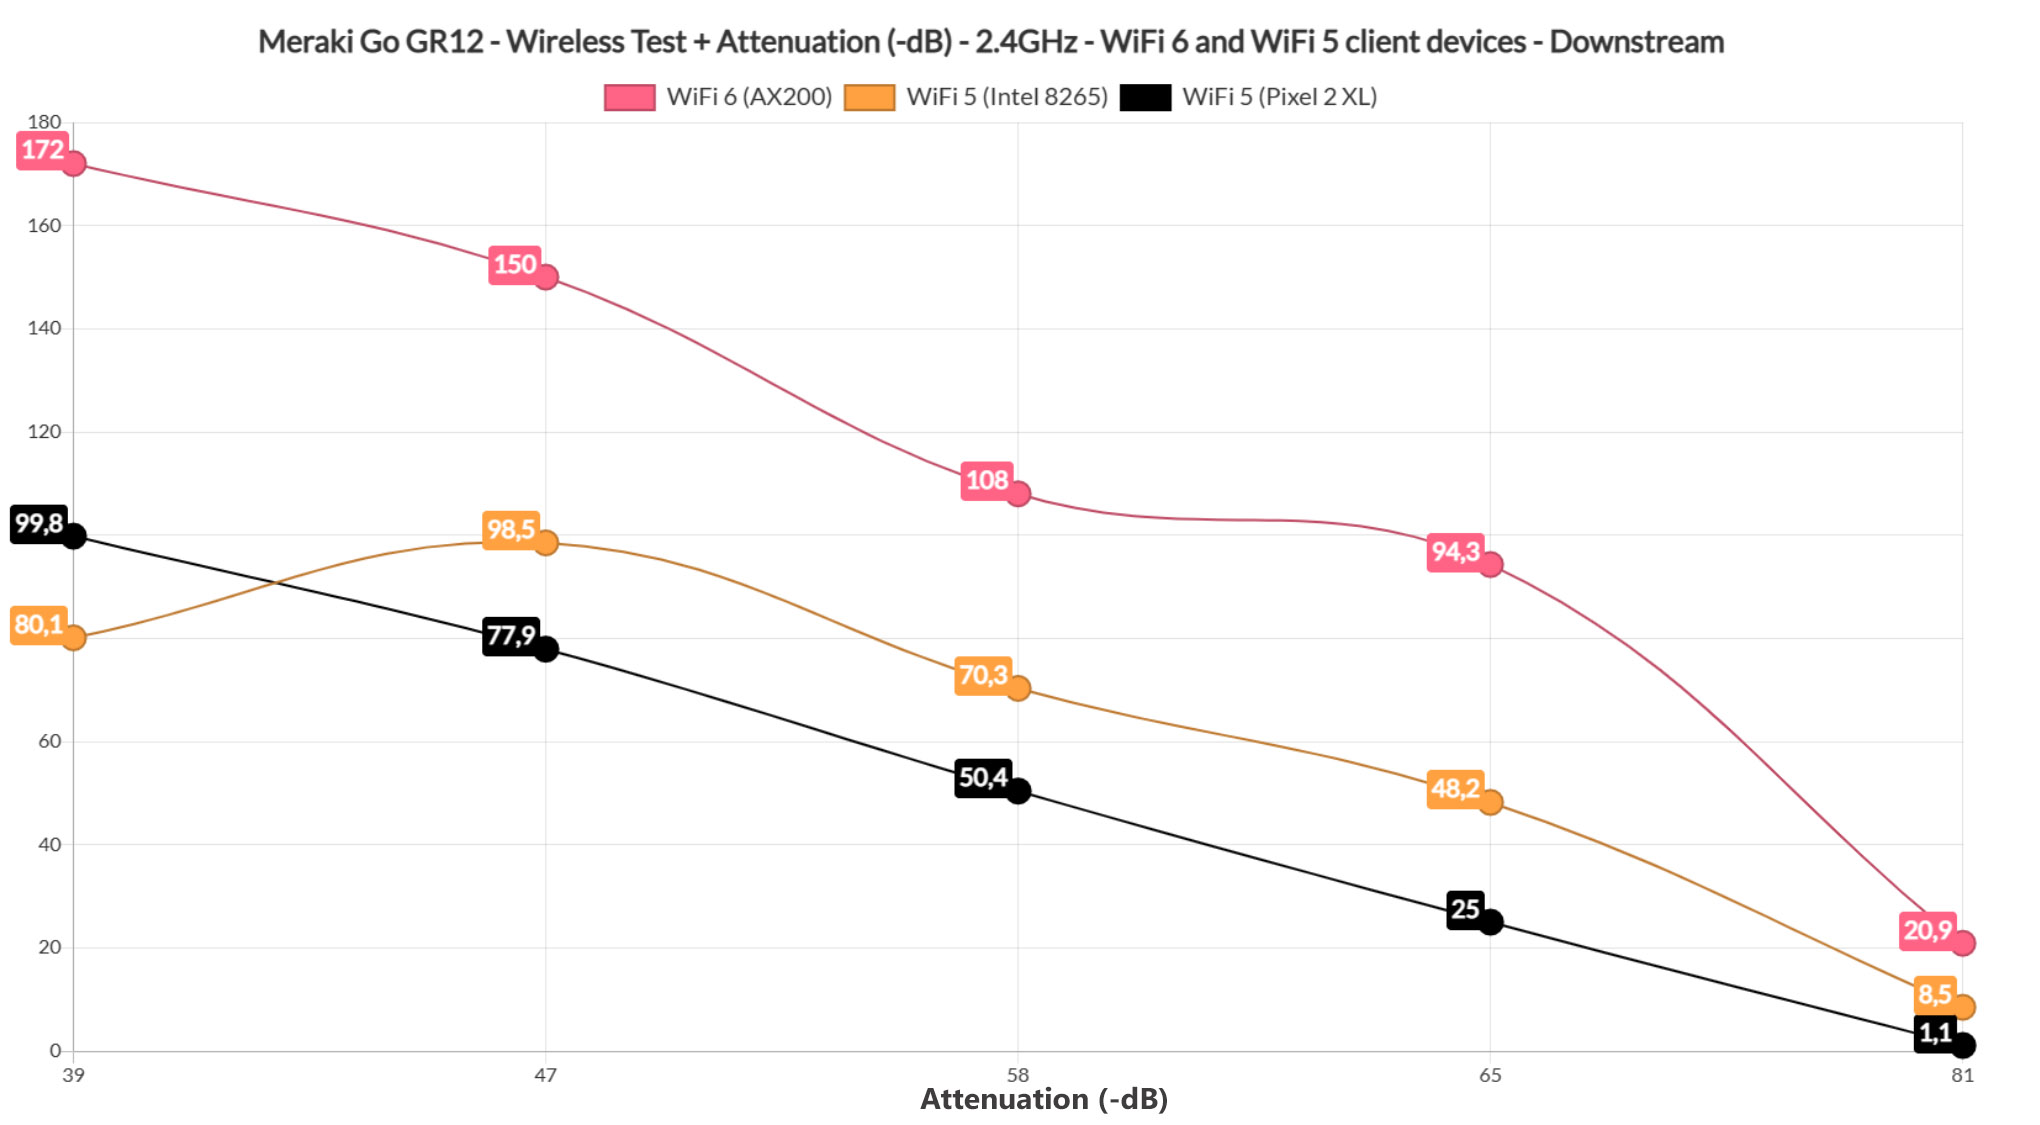
I kept the three client devices connected to the access point, but switched them to the 2.4GHz network. As expected, the WiFi 6 client (AX200) device performed really well – I was able to measure an average of 198Mbps up and 172Mbps downstream at 5 feet and the throughput decreased slowly as I increased the distance between the AP and the client device, reaching 112Mbps up and 94.3Mbps downstream at 45 feet.
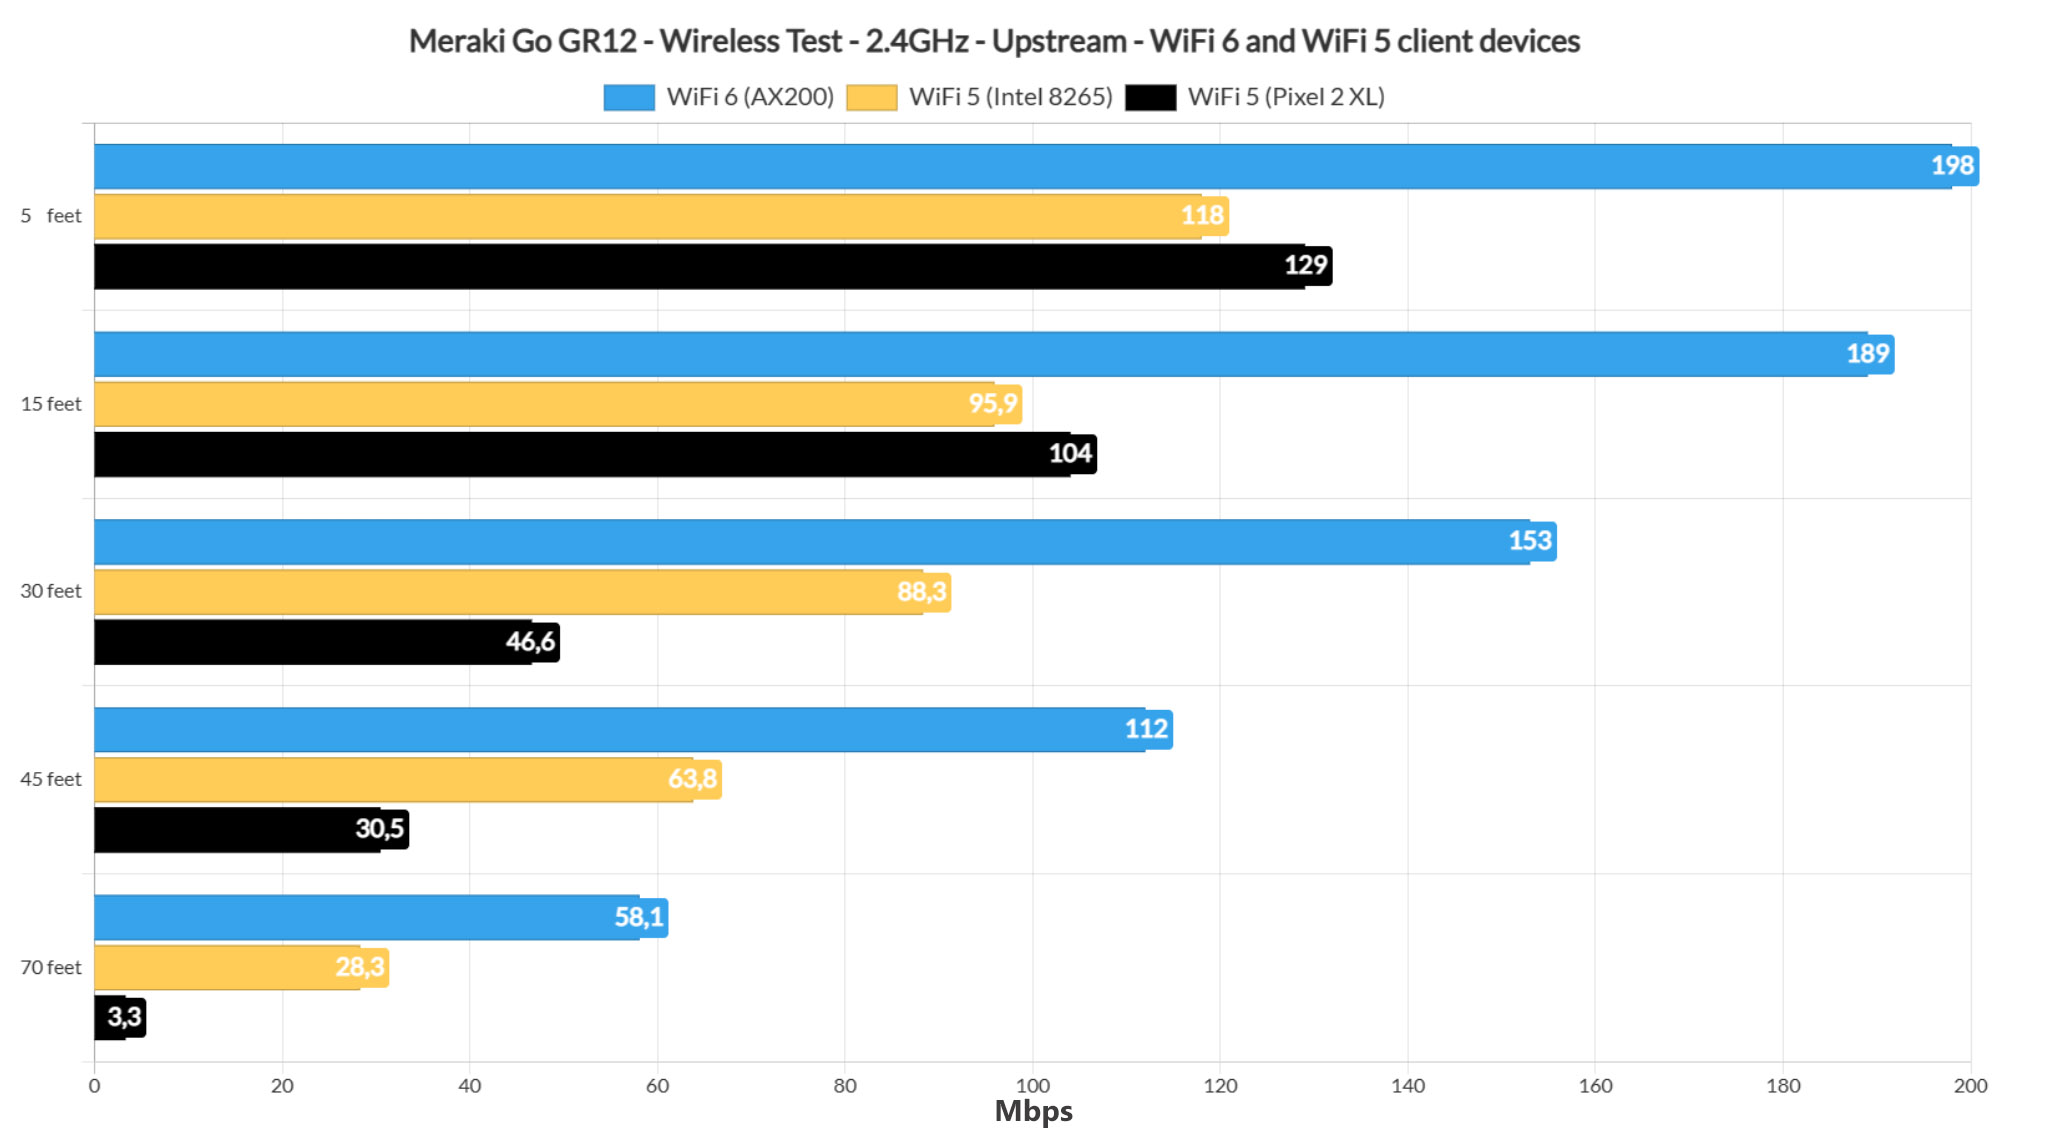
At 70 feet (where the attenuation was -81dB), I saw an average of 58.1Mbps upstream and 20.9Mbps downstream, so still fairly usable for a lot of applications. Moving to the first WiFi 5 client device (Intel 8265), I noticed that the performance was way below the WiFi 6 device.

That’s because I measured an average of 118Mbps up and 80.1Mbps downstream at 5 feet, while at 45 feet, it was 63.8Mbps up and 48.2Mbnps downstream. At 70 feet (-76dB), the throughput is barely usable – I saw an average of 28.3Mbps upstream and 18.9Mbps downstream.
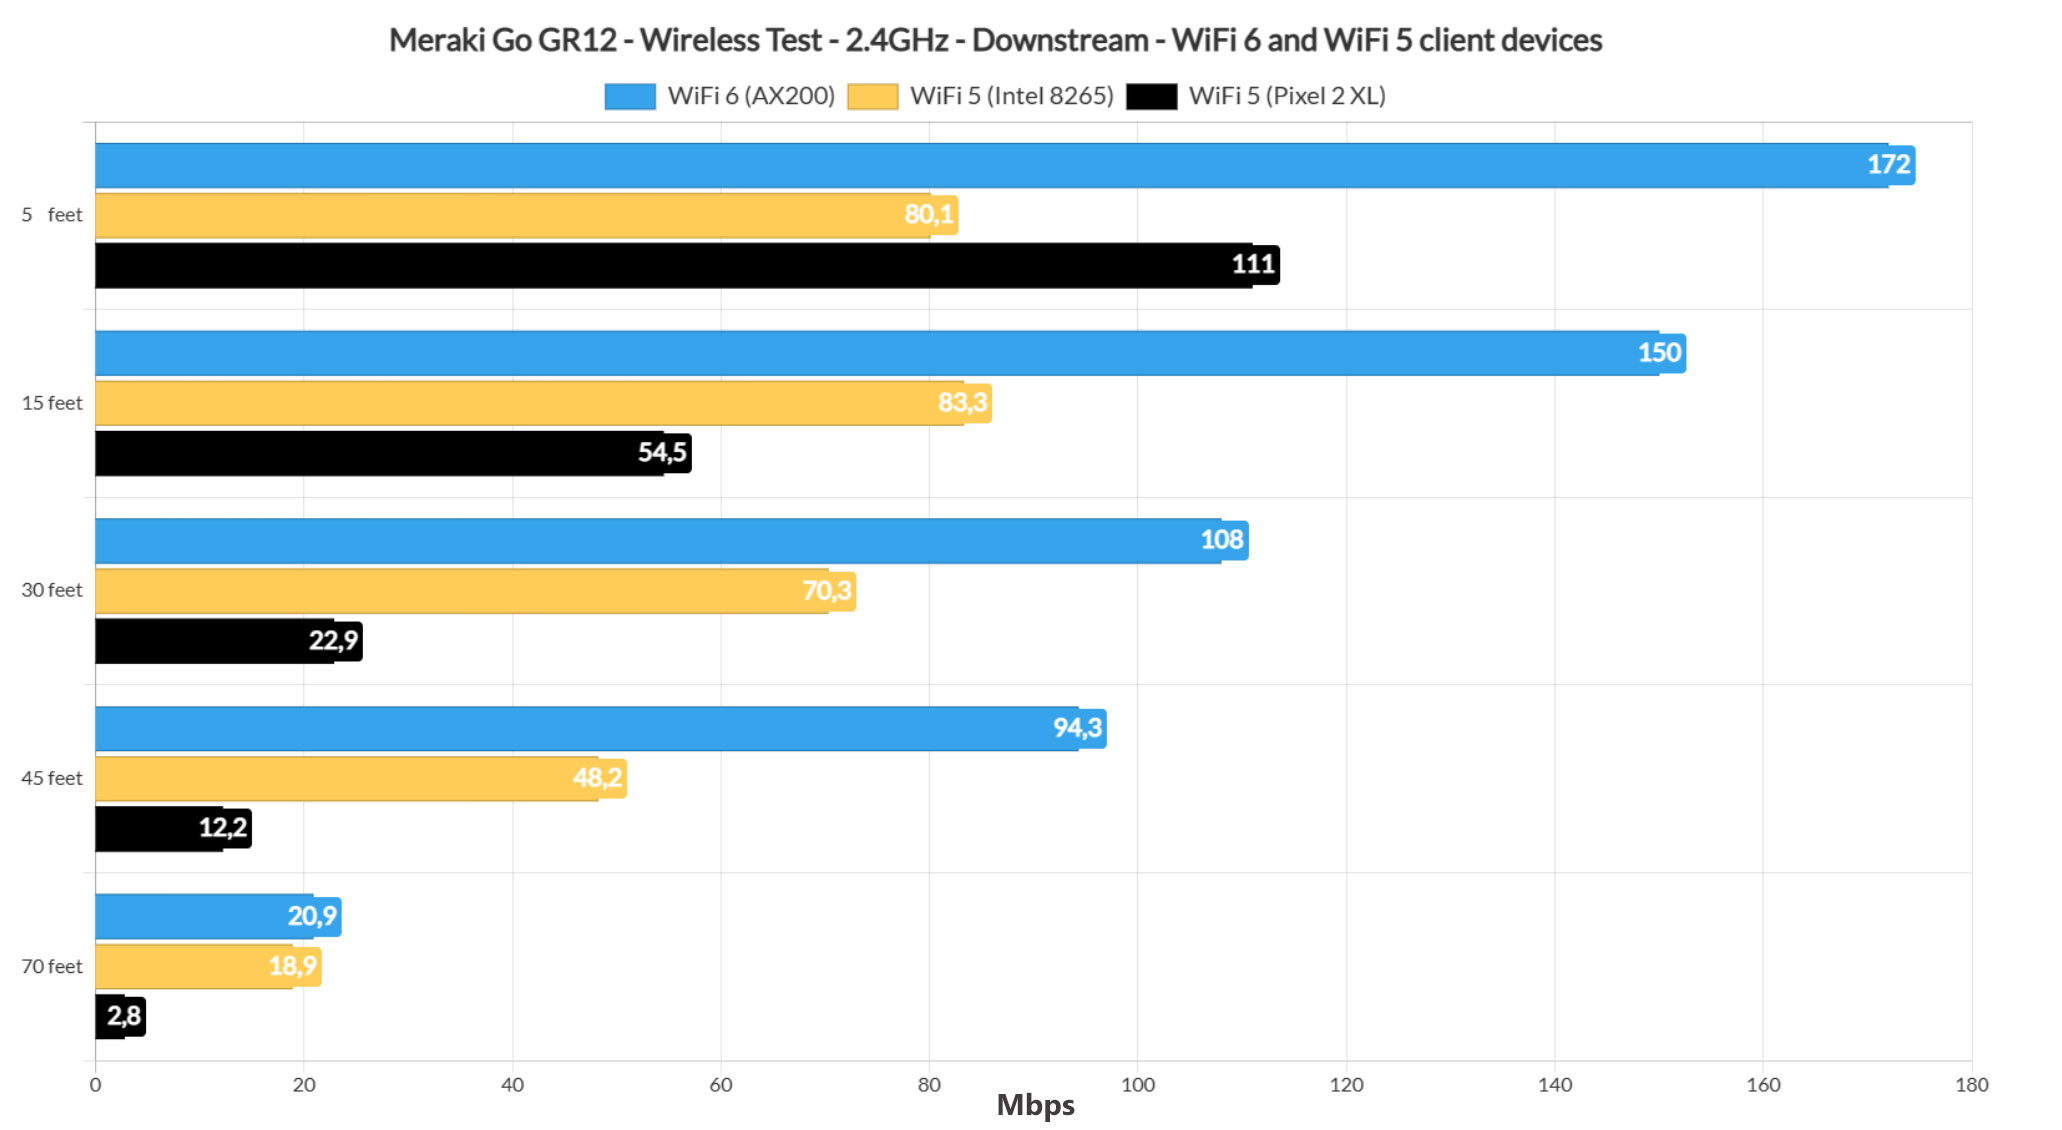
Moving to the Pixel 2 XL (second WiFi 5 client device), I saw that for the first few feet, it didn’t differ that much from the Intel 8265 laptop (129Mbps at 5 feet and 104Mbps at 15 feet – upstream), but the smartphone didn’t perform that well after passing the 45 feet mark. Sure, the client device connected to the access point (it didn’t to the 5GHz network), but I only measured an average of 3.3Mbps upstream and 2.8Mbps downstream, so only useful for some basic IoT devices.
Setup and Software
The Meraki Go GR12 can be configured and monitored either via a mobile app or using a web-based management platform and I did try to use the latter, but as soon as I connected to the WiFi SSID, the browser refused to start the wizard, so I decided to go the mobile app route. After installing the app (available for both iOS and Android), I was asked to create an account (it assumes that you must have a Company, but you can input whatever) and then, I had to accept the Terms and Conditions.
I did scroll down until I reached the data collection section and, while it’s the generic type of data (which means network stats and usage), I was a bit amused to see the way it was worded. ‘You are then transferring that data to Cisco for processing and storage, including data that may contain personally identifiable information on Network Users’. It’s not me who does that, Cisco, it’s your device, automatically. Anyway, I verified the email and logged in.
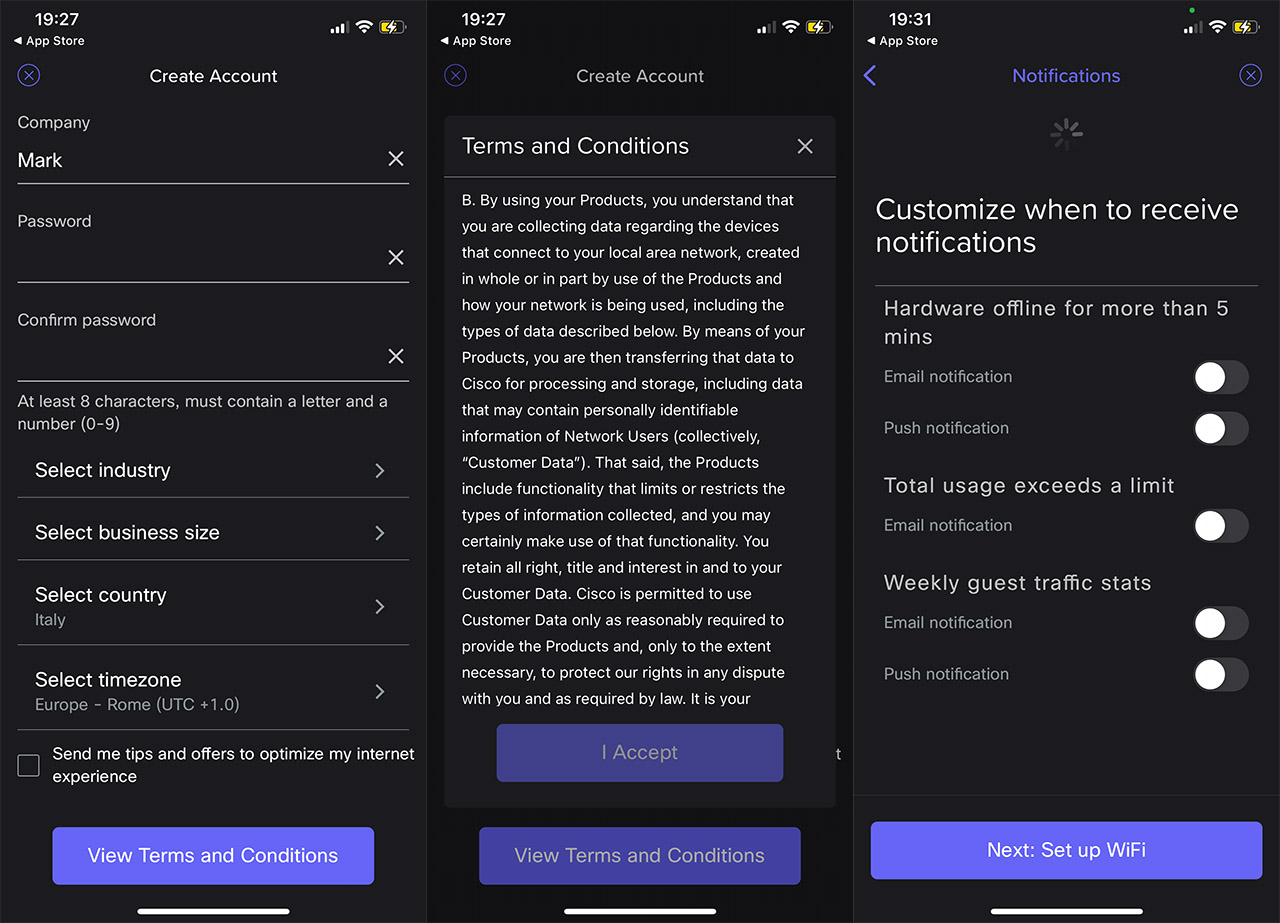
At this point, I scanned the QR code that’s printed on the bottom of the access point, the GR12 was detected and I could choose how I was going to be notified by the device status, as well as how often. Then, I created a WiFi network (one for both radios, for now) and I was ready to connect to this new SSID. It didn’t happen automatically because the Meraki Go GR12 insisted I didn’t actually perform the setup process, so I restarted both the access point and the router, hoping that it may have been some miscommunication. That seemed to have fixed it since I could see the SSID afterwards.
The Mobile App and the Browser App
Yes, I know, I wrote browser app and what does that mean? Well, the mobile app and the browser platform are the same thing, even Cisco calls it an app, so there’s no point on talking about them separately since the options and the settings are the same.
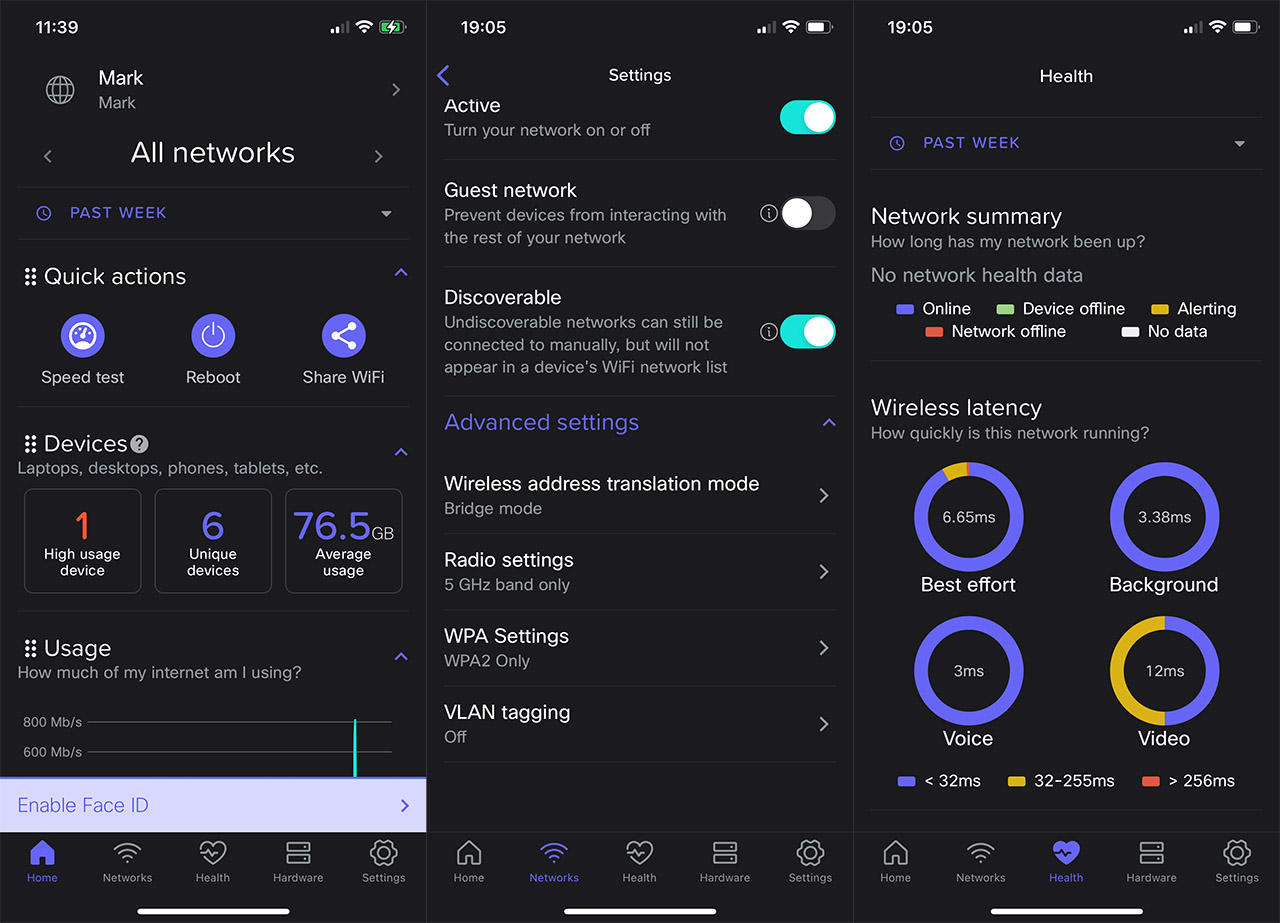
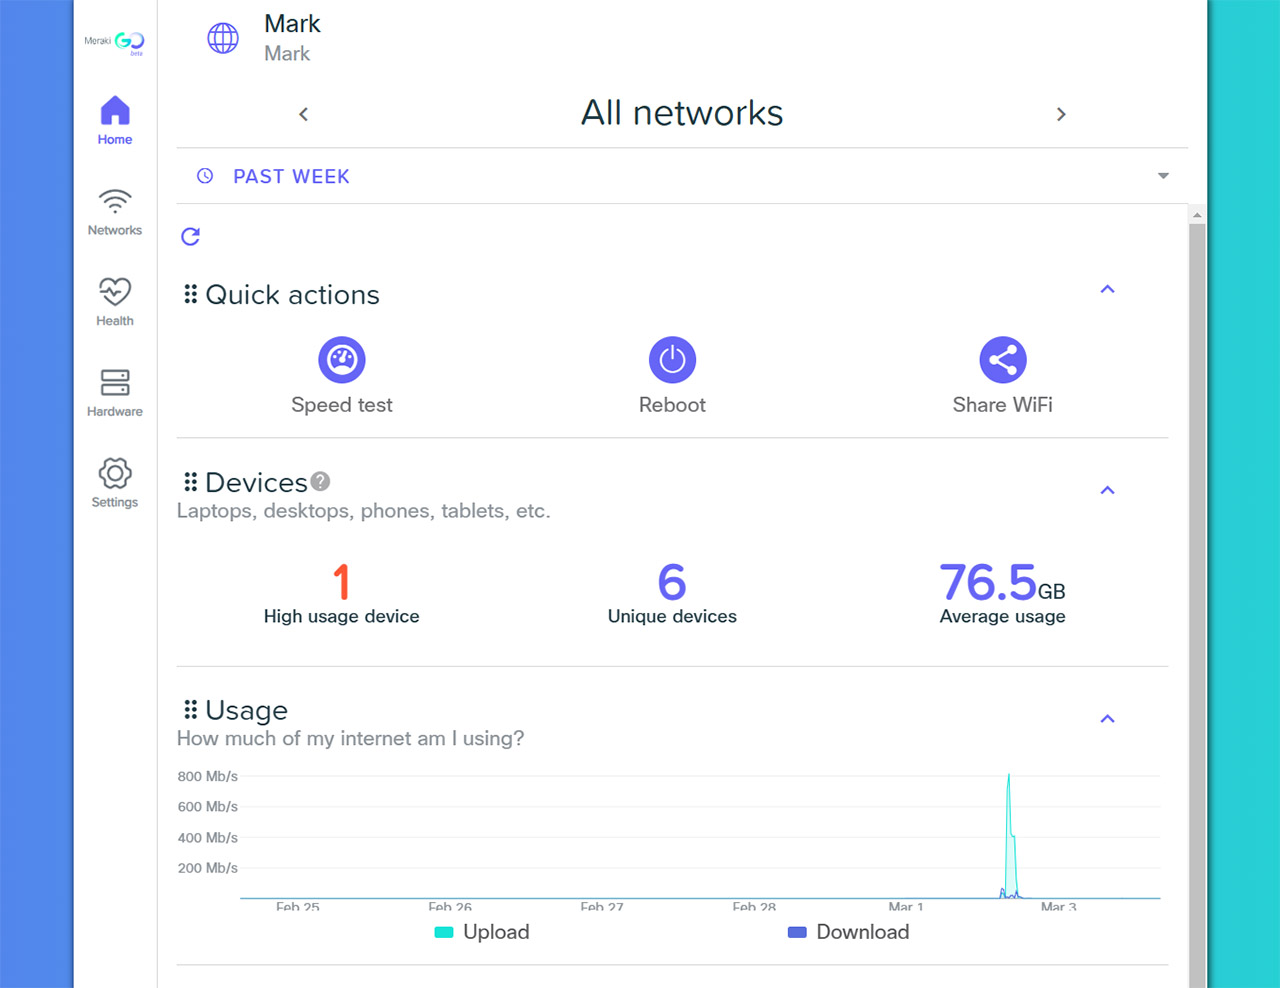
That being said, the interface offers five main sections, the first being Home where you can perform a few Quick actions (Speed Test, Reboot), check the connected devices along with some general stats and view the Usage over a period of time. If you click on the Unique Devices, there’s going to be a list of all the clients and it is possible to view some connection stats, as well as block a specific device from accessing one or all WiFi networks or limit its usage (to do so, press on the Settings section from the top right corner).
The next main section is the Networks where you can see all the networks that you have created and as I mentioned before, during the setup process, it’s possible to create a single one for both bands, but I do prefer to have the bands separate. That’s why I created a new SSID (it is possible to set WPA3 only or WPA2+3 for broader compatibility, which is nice) and then, I went back to Networks, clicked on the new WiFi network which displayed some interesting options.
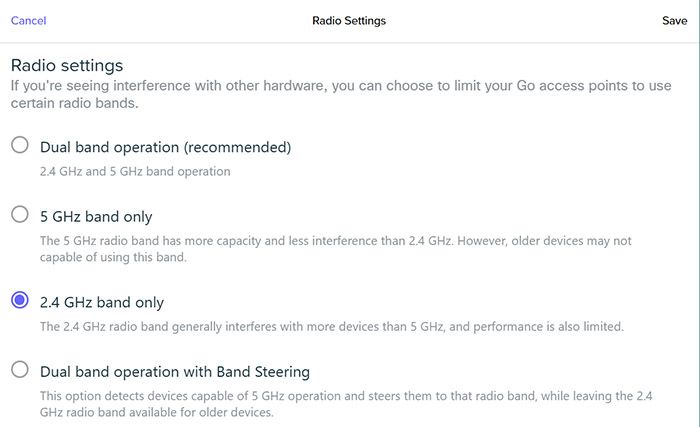
I could set up a Landing Page (useful in hotels, airports and hospitals), set Schedules for when the network is going to be available and I noticed that it was possible to set Web blocking. You can manually insert domains that need to be blocked, so no categories or any automatic database feed (SNORT or Suricata-style). The Advanced Settings is where the magic actually happens, since it’s here where you change the encryption, associate a specific radio to the SSID (including the option to add Band Steering), set VLAN tagging or, most importantly, select the Wireless address translation mode.
By default, it’s going to be NAT which ensures that any client device that’s connected to the network will receive a personalized IP address in a different subnet than the AP, making sure that there is no communication with other client devices. This is clever from the security point of view, but since I wanted some communication between devices (for testing purposes), I had to select Bridge – this setting can be performed on per-SSID basis.
The third main section is Health which shows some Network summary stats, the Wireless latency for various categories (haven’t seen it on other APs), as well as any Failed network connection, so it’s a very useful area. Afterwards, it’s possible to access the Hardware section, where you can switch between other APs in the network and lastly, there’s the Settings area. Here, you can see what new features Meraki added over time, check some Access and Usage/speed settings (pretty much the same as on the Networks), and then, there’s the Account. It was interesting to see that I could create multiple sites, grouping devices, but it is more limited than the other management platforms from other brands.
The Conclusion
I liked the compact case of the Meraki Go GR12 since it gives more mounting options, the wireless performance is good especially with WiFi 6 client devices and the PoE + DC power input has become fairly rare, so it’s nice to see it as an option on this access point. But, I suppose both the blessing and the curse of the Meraki Go line is actually the Cisco legacy. That’s because the people expect it to be near the enterprise-level software, while the engineers wanted to go into the consumer market with something very easy to install and use. I could see that there’s some Cisco pedigree there, but yes, a lot of settings are tuned to cater mostly to home users and perhaps some SMB office (on the smaller side).
Meraki Go GR12
-
Pros
- WiFi 6 features (OFDMA, BSS Coloring and TWT)
- Decent wireless performance
- NAT and Bridge wireless address translation mode
- WPA3
- Support for Mesh and PoE
Cons
- Some awkwardness when installing the access point (software-wise)
- The advanced features are not really that advanced
- No actual platform controller for multiple types of Meraki Go devices
Mark is a graduate in Computer Science, having gathered valuable experience over the years working in IT as a programmer. Mark is also the main tech writer for MBReviews.com, covering not only his passion, the networking devices, but also other cool electronic gadgets that you may find useful for your every day life.