
The YoLink water leak sensor 1 was developed to quickly detect any water leaks in a certain area and to send you a notification, thus preventing any unexpected and potentially expensive repairs. And I know that the IoT market has made some simple devices needlessly complicated, but a smart water leak detector is one of those rare essential devices which couldn’t have existed without the smart home ecosystem.
| YoLink Water Leak Sensor 1 | |
|---|---|
| Shop.YoSmart.com | Check Offer |
| Amazon.com | Check Product |
The YoLink water leak sensor 1 doesn’t rely on an external power source, since it uses two batteries (which are replaceable) and even if there is no Internet, the YoLink devices will continue to communicate between each other. So, it’s best to pair the YoLink water leak sensor with a valve controller, ensuring that in the worst-case scenario (no power, no Internet and you’re out of the house), the water is automatically turned off. Furthermore, one particularity of the YoLink water leak detector is that it uses the LoRa technology.
It’s a nice way to ensure that the small amount of data that needs to be transferred can reach very far, but I am not sure it was truly needed for indoors applications. In a warehouse, I suppose it makes sense and then again, it’s a nice addition to have as an equivalent to WiFi and BLE, but it’s worth mentioning that it’s currently close to being one of a kind since very few other smart home devices use LoRa. Also, it’s important to understand that the YoLink water leak requires the connection to a hub and will not work without it. So, without further ado, let’s put it to the test and see if it has a place in a smart home.
The Design and Build Quality
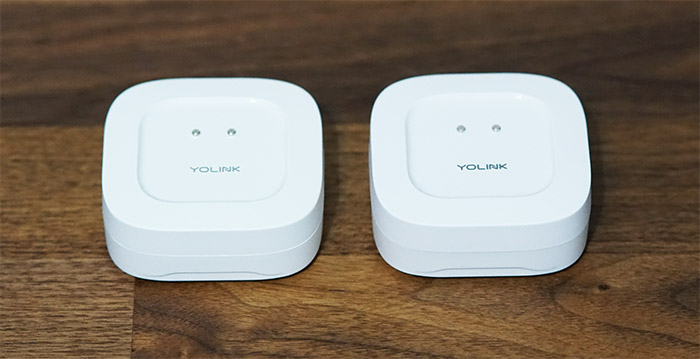
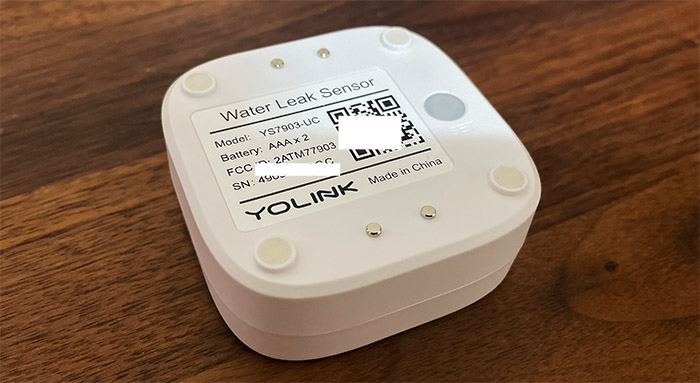
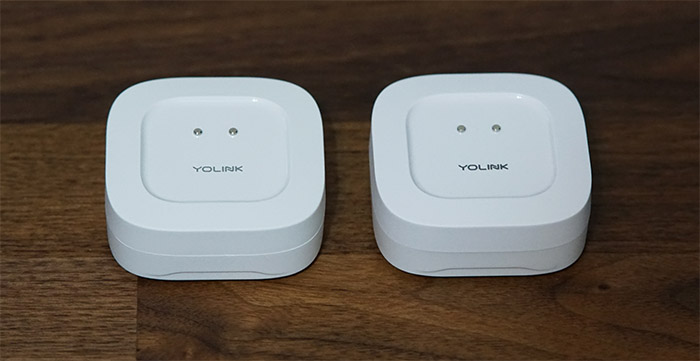
As you may have anticipated, the YoLink Water Leak Sensor is available in two versions (at moment of writing), there is a version 2 available which follows the approach of the other smart water leaks from the market. But the YoLink Water Leak Sensor 1 does not have a probe attached to its case and instead it relies on some sensing pins to detect water leaks. The lack of a probe allowed the version 1 of the sensor to be much more compact, measuring 2.44 x 2.44 x 0.96 inches (6.2 x 6.2 x 2.4cm), but both devices are made of plastic covered by a white finish (a combination between matte and glossy).
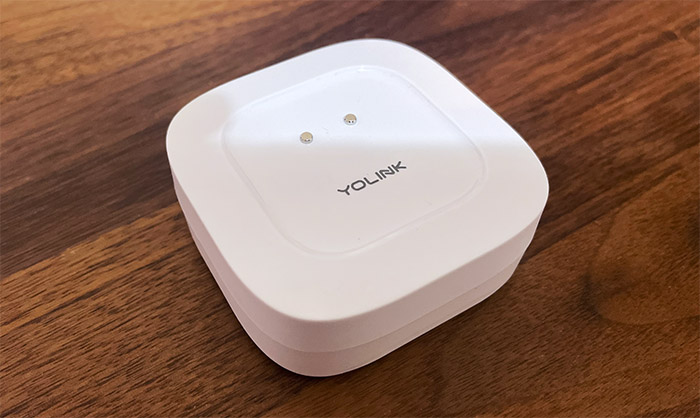
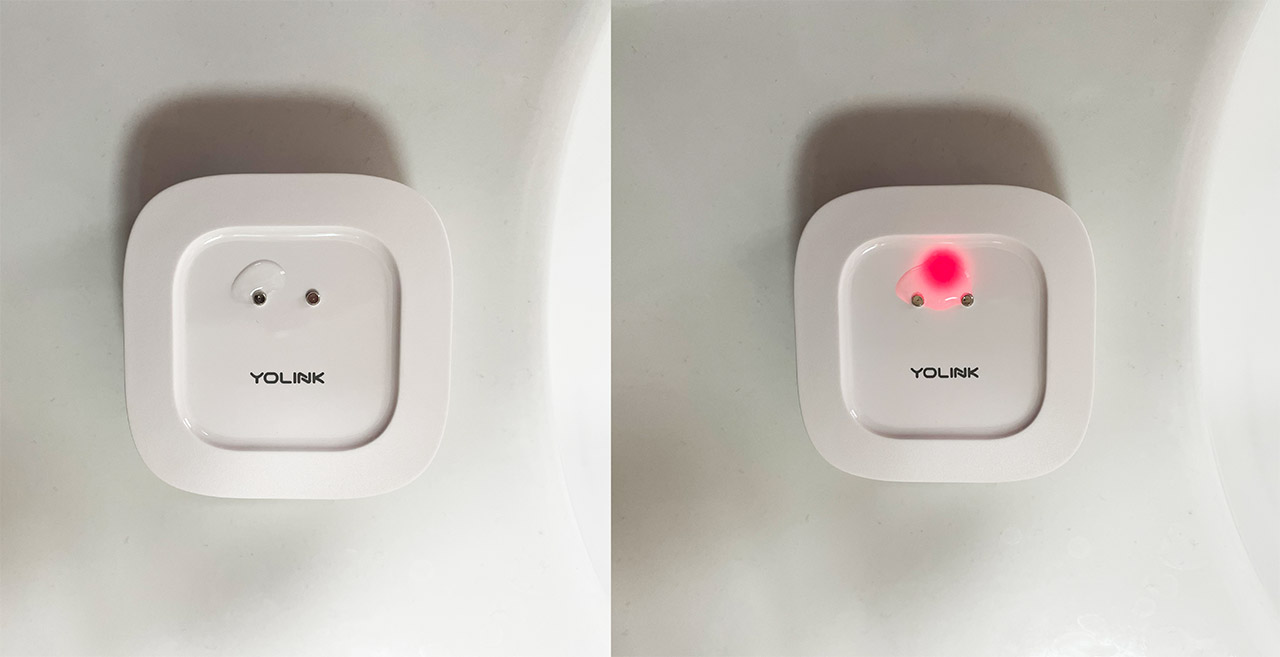
So, we’re essentially dealing with a puck which needs to be positioned near a water source (or pipe) and you don’t really need to worry about powering it up because it relies on two AAA batteries to last about 5 years or more. These batteries are already installed and, even if there isn’t an immediately obvious way to open the case, you can replace these batteries when they run out. I have mentioned the sensing pins before but do know that there are two at the top (useful if water is dripping from the above) and there are four sensing pins at the bottom which are useful for accumulating water.
Also on the bottom, there are four feet with silicone covers and there is also a SET button. This button needs to be pressed once to turn on the device – there is also a LED which will turn red once and then flash green a few times to show that the YoLink Water Leak Sensor 1 is connected to the Cloud via the hub. Also know that the device is completely sealed, so there’s no chance for either dust or water to enter the enclosure.
And, if you’re wondering about the heat management, the sensor will keep room temperature since the chip is very energy efficient and there isn’t really that much processing power needed.

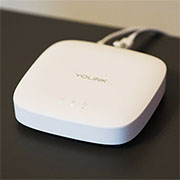
The YoLink Hub
The hub that comes with the YoLink Water Leak Sensor 1 is a bit larger than expected, but its low profile and the neutral color (white) should allow you to position it on the furniture, in the proximity of the router. Still, considering that it measures 4.33 x 4.33 x 1.06 inches (11.0 x 11.0 x 2.7cm), its footprint is a bit wider, but the good news is that the manufacturer has added a mounting hole so it’s easy to just install the hub on a wall.
How would that work when you have the router on the desk, you may ask? Yes, you do have the option to connect the YoLink hub to the router using the provided Ethernet cable, but it’s also possible to use WiFi, so you can position the hub anywhere you want, as long as it’s within the router’s range. The YoLink has a simple, minimalist design, with curved angles and at the top, there are three LEDs.
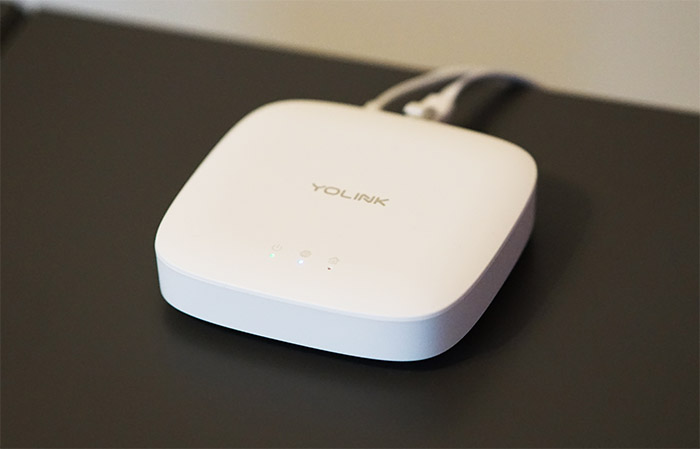
The first LED will show the status of the device (if it’s powered on or not), the second will light up when the hub is connected to the Cloud and the third LED is called the Feature light. This LED will flash red when you are factory resetting the hub and will slowly blink red when the firmware is being updated. Just like the YoLink Water Leak Sensor 1, the hub also has four small silicone feet to keep the device into place and they do a good job, even if the case is very lightweight.
The rear side of the YoLink hub is occupied by the Ethernet port which is, as expected, just Fast Ethernet. And it makes sense since it doesn’t need to transfer large packets of data (it may even be overkill).
Then, there’s the microUSB port that’s used for charging and it’s a bit of a shame that it’s not USB-C.
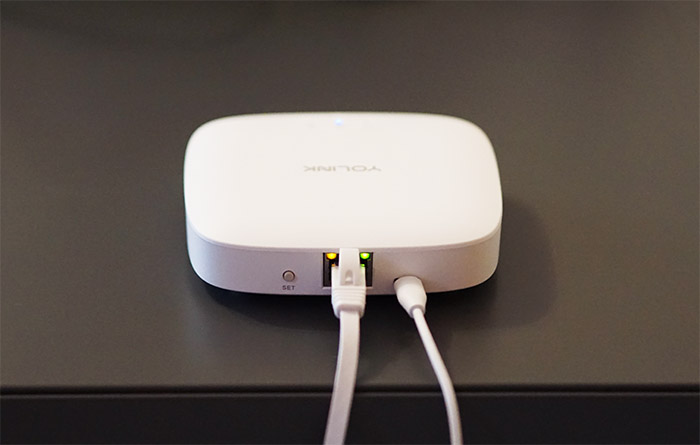
Lastly, there’s the Set button which restarts the pairing process when pressed and held for 5-10 seconds. You can use this button to return the YoLink hub to its default settings by pressing and holding it between 20 and 25 seconds.
The YoLink Water Leak Sensor Teardown
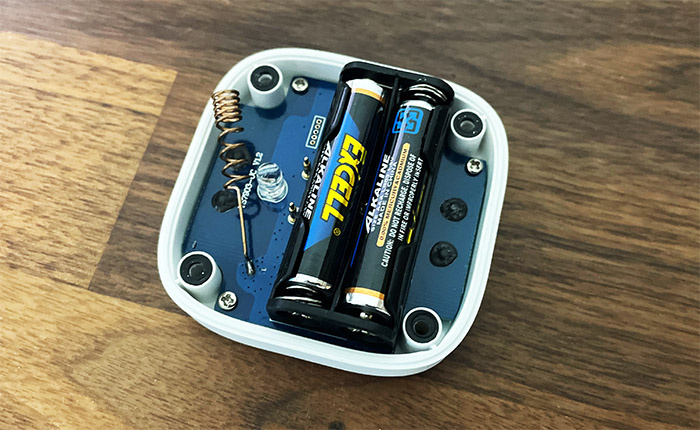
As I mentioned before, there is no obvious way to open up the YoLink Water Leak Sensor 1, but that option is still available, and it should not void the warranty. It’s because that’s the only way to change the batteries, even if it’s going to be after 5+ years.
There are four screws on the bottom of the device, one underneath each silicone foot and, after removing them, you should see part of the PCB and the battery slot. Next to it, there is also a contact spring, and I did try to detach the board and see what’s on the other side, but it was permanently attached to the plastic case using four melted plastic heads.
The Installation
If you wish to use the YoLink Water Leak Sensor 1, you need to install the YoLink app and connect the hub to the Cloud, there is no way around it. So, after installing the app, I was asked to allow some critical notifications which makes sense considering the importance of the sensor and then, I was asked to create an account. It didn’t ask for a phone number, just for an email. After that, you should see that there are no devices connected and that it’s necessary to Scan the QR Code from the senor to start the pairing process.
The app should see the YoLink Water Leak Sensor 1 immediately and then there was the option to Bind the device. Now we need to do the same for the hub (QR code to scan and room binding), then, I saw that it was necessary to Set Up the WiFi Connection. It makes sense considering that I did not use the Ethernet cable. And here is where the whole thing took a bad turn, for privacy. I was asked to press the Set button on the hub for five seconds up until the blue LED in the middle will start flashing. I did so and I connected the phone to the broadcasted WiFi network.
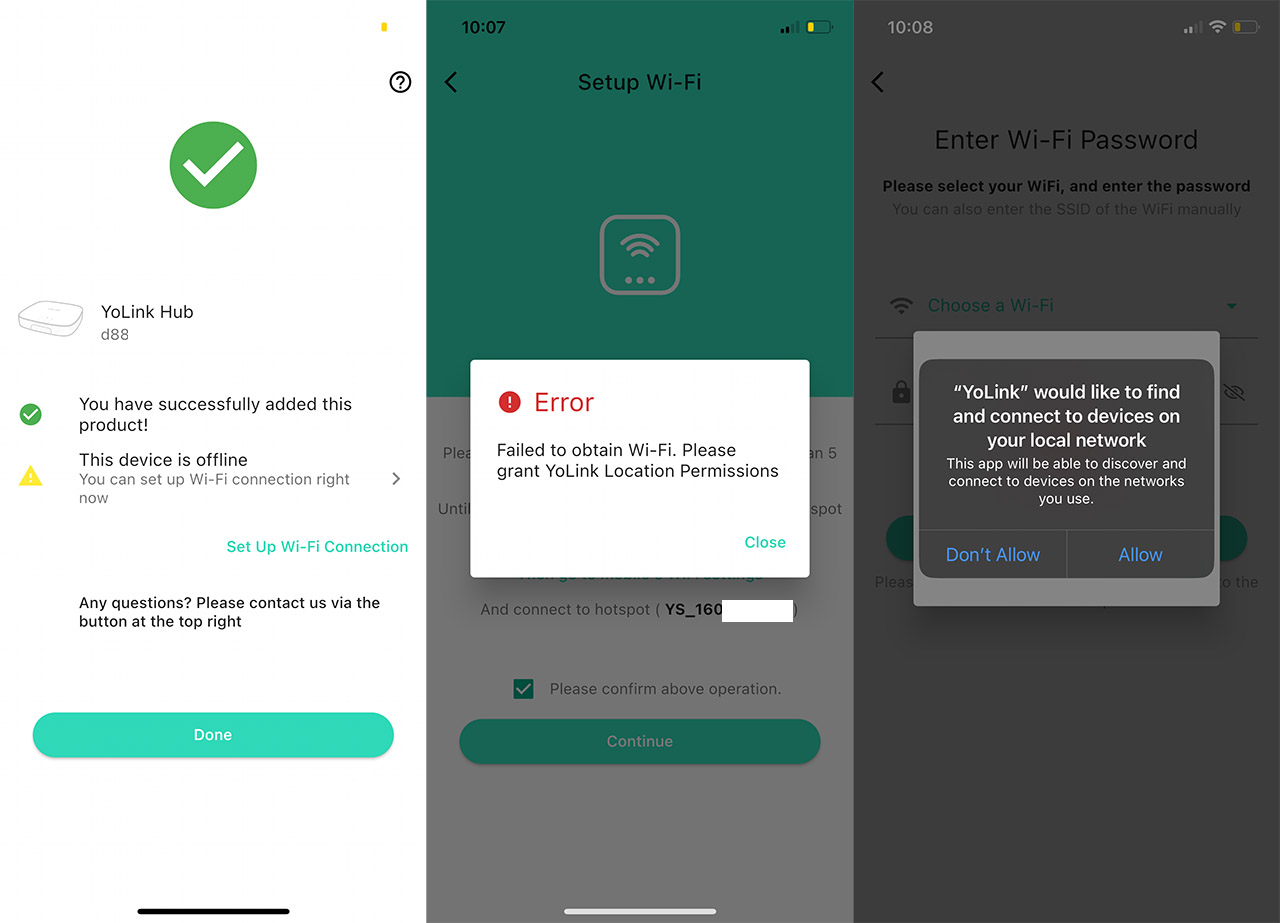
Then the app wanted to see my location so that it could detect the nearby WiFi networks at any time. I decided to set the Precise Location to off, but the app did not like that and started throwing a programmed fit. I said fine, check my precise location which led to nothing because I was still asked to enter the WiFi and password manually. Kind of, because the moment I clicked on the WiFi name to write it, I was asked to let YoLink detect devices in my local network. Again, I said no since I could just enter the WiFi manually, but the app was having none of that, it wanted that sweet access.
All this data is collected and sent to the servers of course and it’s funny that at the end I still had to choose the WiFi SSID and manually enter the password. So, what was all that about? In any case, I wanted to see the Ethernet-only connection, so I unpaired the hub and it’s far less invasive, just scanned the QR code and that’s about it, the hub was online. The curious thing is that the YoLink Water Leak Sensor 1 units that came in the same package as the hub all paired immediately, but I did have a separately bought unit which refused to go online.
I did try to reset the device (pressed and held the set button until the LED started flashing green, and then I waited until the LED turns off), but that didn’t help, so I decided to take out the batteries and put them back hoping for some sort of reset, but still no. I also tried re-installing the app and still nothing. The LED lights up, everything seems fine, but the device appears offline. Maybe I got a dud unit which is more likely or maybe there is an issue with the pairing process when trying to add units from different batches.
The App
There are two main areas of interest, the first is the dedicated page for the YoLink hub and the other is for the YoLink Water Leak Sensor 1. And you don’t really get that many options in either case. The hub does have a few settings available, such as the possibility to switch between WiFi and Ethernet, as well as to change the Alarm Strategies.
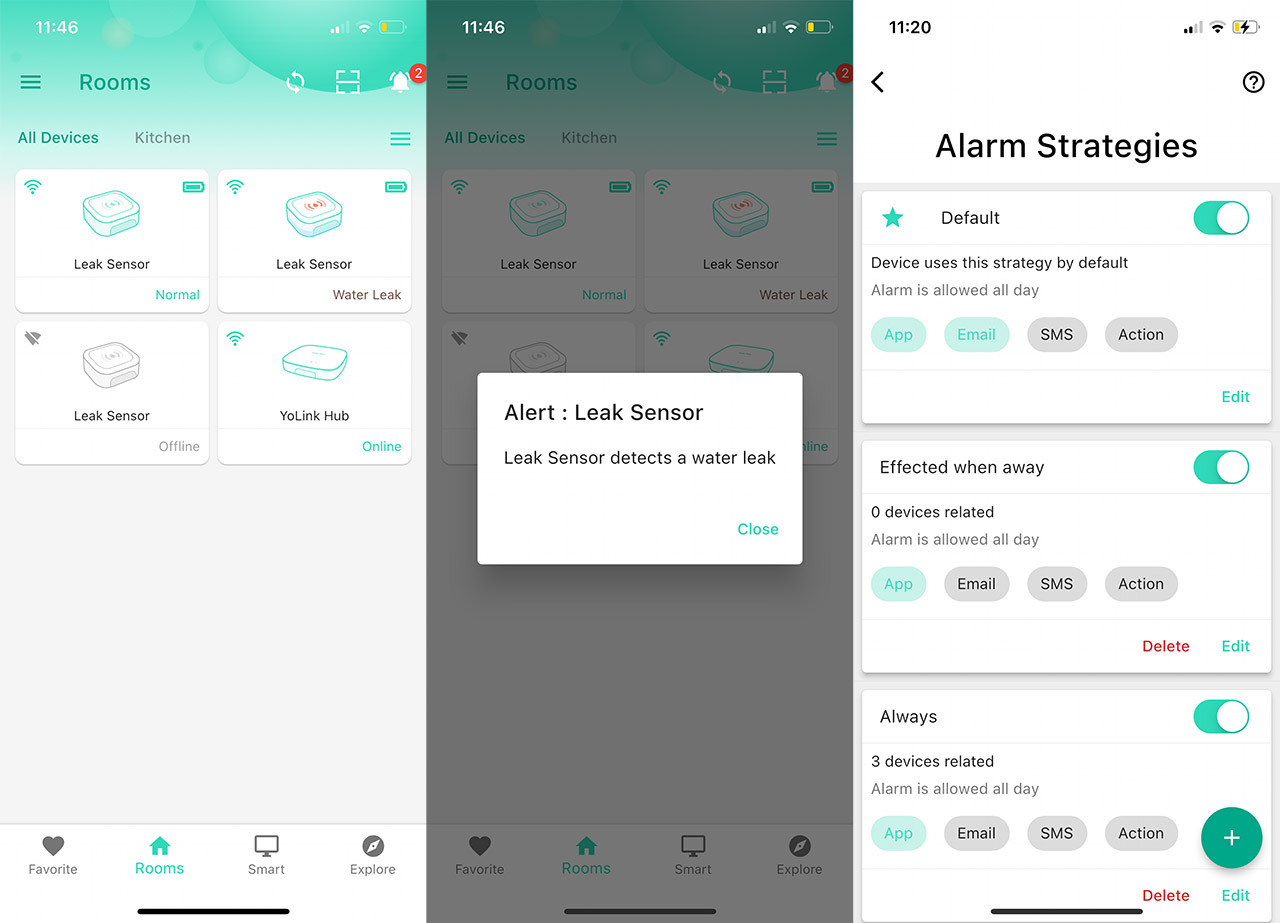
There’s also a log history. And you get pretty much the same set of options on the sensor side as well, plus a lot of status info.
The Performance
The most important test that we need to run is, obviously, if the YoLink Water Leak Sensor 1 accurately detects water leaks. And to do so, I put a drop of water on one of the upper pins. Nothing happened, so I put another drop on the second one which meant that there was contact between the pins and the alarm was quickly triggered. By quickly I mean in less than a second. The LED does get red and flashes once every five seconds up until you clean the water which returns the state of the device to Normal (as seen in the app).
As for the range, the manufacturer has advertised up to 1,000 feet and, even if the house where I tested is not small, the signal reached everywhere without issues. Even if the doors were closed or multiple walls were between the hub and the sensor. Since the status of the app would change almost instantaneously, the mobile notifications were also very quick.
The Conclusion
After testing the YoLink water leak sensor 1, I found the LoRa standard to be an excellent choice if interference messes up with your other smart devices. This does mean that you do need to use the YoLink hub and the app (which is not really privacy-oriented). Also, the pairing process has proven to be very simple, as long as the units work as intended. Even so, the water detection is quick and accurate, the notifications arrive almost immediately and overall, this is one of the few smart devices that everybody should consider having in their homes.
YoLink Water Leak Sensor 1
-
Pros
- The range of the hub is phenomenal
- The notifications arrive immediately
- The sensors have a long battery life (you can also replace them)
- Can connect the hub either via WiFi or using an Ethernet cable
Cons
- The app wants precise location when using the WiFi connection
- I couldn't pair one unit to the hub
Mark is a graduate in Computer Science, having gathered valuable experience over the years working in IT as a programmer. Mark is also the main tech writer for MBReviews.com, covering not only his passion, the networking devices, but also other cool electronic gadgets that you may find useful for your every day life.