
The Kaiweets HT208D is a fairly inexpensive inrush clamp meter which was designed to accurately measure 100A AC/DC current, 1000V AC/DC voltage, resistance, temperature and more. Unlike the KM601 smart digital multimeter that I tested some time ago, there is a dial which allows you to manually choose the type of measurement that you intend to do (no automatic assessment).
| Kaiweets HT208D | |
|---|---|
| Kaiweets.com | Check Product |
And it’s fine considering that the digital display makes an appearance once again (colored and with a backlight), there are couple of test probes, as well as the thermo-couple for measuring the temperature. But the most important aspect is, of course, the clamp itself which can be used to check a live wire (or any other conductor) and, considering that the display measurement always defaults on the DC current, the device is clearly targeted towards mechanics or any other automotive repair DIY enthusiasts.
Some other interesting functions include the detection of live wires without actually using any probe (the NCV) and the built-in flashlight (which only functions when the device is turned on). Since I already mentioned the KM601 which has proven to be an excellent multimeter especially considering the price tag, let’s put the Kaiweets HT208D inrush clamp meter to the test as well and see if it’s yet another gem from the Schenzhen-based manufacturer.
The Design and Build Quality
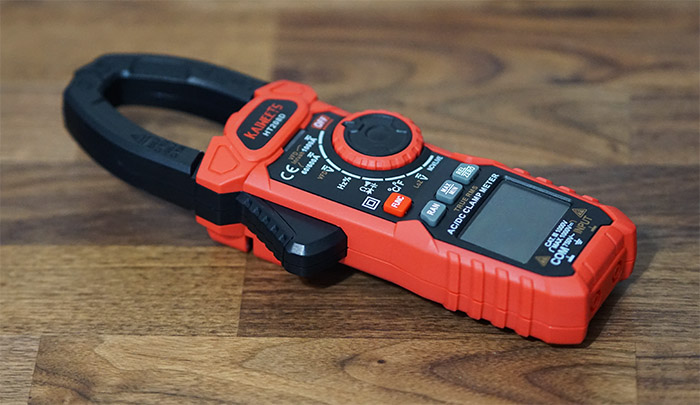
I have praised the modern design of the Kaiweets KM601 which ended up looking like a smartphone after having removed the dial in favor of buttons and used a big colored display. The Kaiweets HT208D looks more like a rugged tool which makes sense considering the type of device, but it still managed to slip in a fairly small, yet very obvious colored display. It’s positioned towards the user and, if you take the clamp meter in your hand, you’ll understand why.
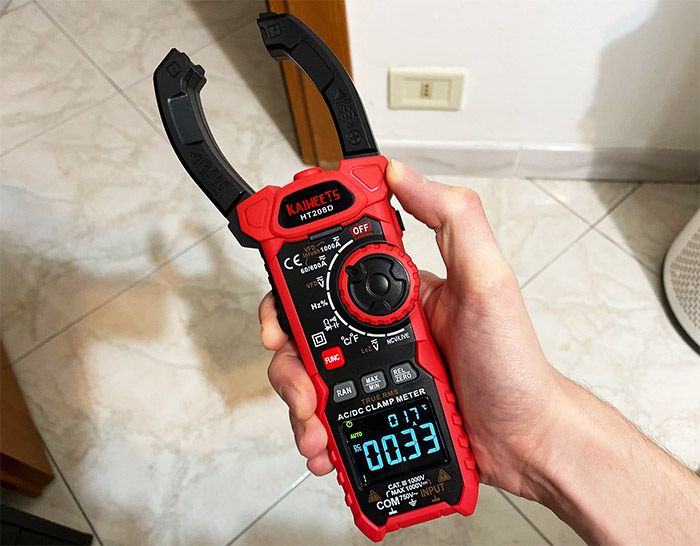
The clamp goes around the conductor, you’re going to hold your hand in a manner as to easily adjust the dial with your thumb and the display will naturally sit the closest to your eyes. Above the display, there are three buttons, the first is called RAN and its role is to cycle through all the available ranges (holding it for 2 seconds restores the range values to default).
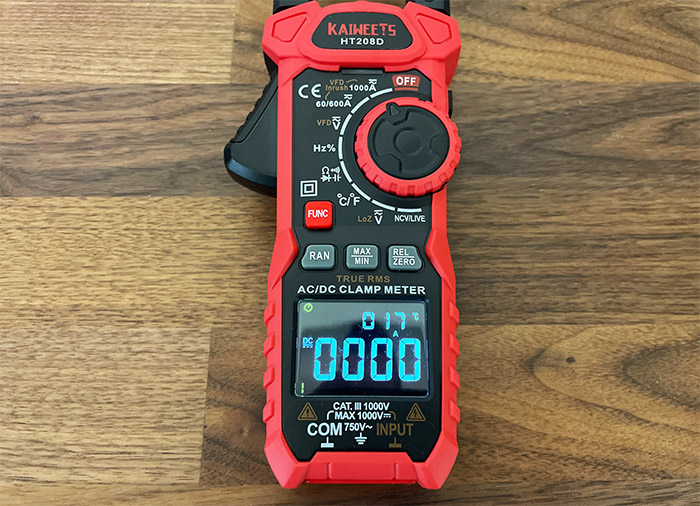
Then, there’s the MAX/MIN button that’s going to help set a specific value range; the REL/ZERO button will behave differently depending on the mode the clamp meter is set at that moment. If it measures DC, then the button will set the magnetization effects to zero, but in any other situation, the button will default to REL and it will store the current reading, setting a reference point for the next reading.
Above these three buttons, the manufacturer decided to rely on a dial to help you move through the available functions – it moves counter-clockwise, from the OFF position.
The dial is fairly easy to operate due to the ribbed silicone frame, and the same type of material also surrounds the device almost in its entirety, so the Kaiweets HT208D is easy to hold and won’t slip out of hand. Then, there’s the clamp that’s covered by plastic and is opened by pushing on the lever from the side of the device. The mechanism is spring operated and it’s easy to open the clamp with a single finger. There are couple of other buttons that I need to mention, the first being the FUNC buttons which will cycle through the available secondary functions when checking out a specific measurement (for example, switching between DC and AC). On the side, there is an H/lantern button and, when quickly pressed, it has the role of holding a stable measurement (it’s suggested to keep the function disabled at the beginning of the test).
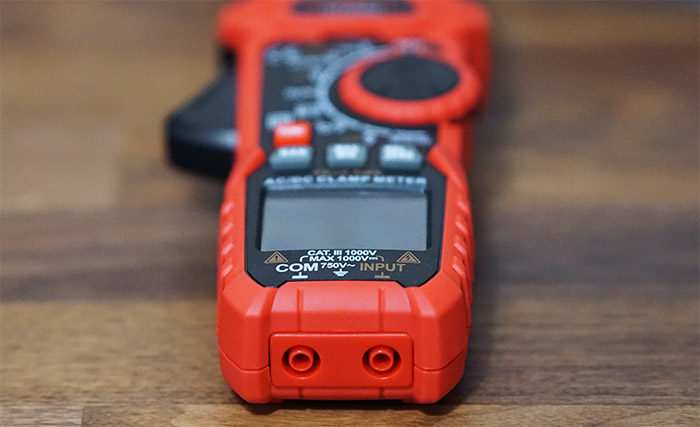
If you press and hold the button for two seconds, it will enable the flashlight that’s positioned at the top of the Kaiweets HT208D, slightly obstructed by the clamp. And, as I said in the intro, I noticed that it won’t turn on if the device is turned off. Kaiweets has positioned two probe slots on the frame of the meter, on the other side of the clamp and, as expected, the HT208D cannot be positioned upwards when conducting measurements. Lastly, know that the Kaiweets HT208D measures 10.0 x 3.5 x 2.0 inches (25.4 x 8.9 x 5.1cm) and it weighs 1.54lbs (0.7kg).
The Display (What’s being measured?)
The Kaiweets HT208D does have a small colored display which is backlit, but the brightness is not very high, so, if you’re using it outdoors and it’s very sunny, then it is going to be a bit difficult to see the values. In shade, it should work fine and, moving the dial, you get the option to measure the AC or DC current with VFD (Variable Frequency Drive Filtering) – adjust the knob to the proper range since it can be either 60/600 Ampere or 1000 Ampere.
Pressing the Func button will switch between AC and DC and it will also enable the Auto VFD, as well as start the Inrush measurement. The VFD can be used outside the aforementioned ranges and, moving the dial lower, it’s possible to check the frequency (Hz). Next, you can check the Resistance (Ohm) by using the probes and, if you press the Func button, it’s also possible to check the continuity, as well as run a Diode test. Don’t forget to insert the red lead into the INPUT terminal and the black lead into the COM terminal (check the labels next to the terminals).
Going lower on the dial, we can check the temperature (Celsius and Fahrenheit); Kaiweets does have a thermo-couple in the package that you can use to check the temperature. Towards the end of the dial, there is the LoZ (low impedance) measurement and the NCV/Live which allows you to check if there’s an electromagnetic field, signaling that there’s a live wire in the wall. If the signal is weak, then you will see the character –L and if the field signal is strong, then, the displayed character will be –H.
What’s inside the Kaiweets HT208D (Teardown)

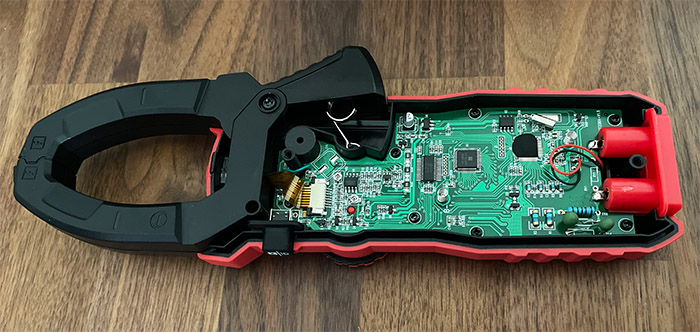
If you check the rear side of the Kaiweets HT208D, you will see that there are two visible screws, one easily accessible which keeps the battery section covered and then, there’s a more recessed one which needs to be removed if you intend to go deeper into the device. But that’s not the only screw that needs to be removed because underneath the QC label, there is another. I think it’s some sort of a warranty seal, so be aware that the manufacturer may use the damaged seal as grounds to void the warranty.
You should now be able to remove the rear panel along with the battery slot and see the PCB. The components that I was able to identify were the CS1622GN LCD driver chip, 8MB of programmable read-only memory from EEPROM (HE24C08), the P204 HY17P48 8-bit mixed signal micro-controller and the GS8552 CMOS.
The Kaiweets HT208D in action
Just like with the Kaiweets KM601, I ran some of the more basic tests which I suppose most people will use the most. And the first is to check the accuracy of the NCV detection which should properly see if a socket is live or not. And, being very close to a socket that I knew had a live wire, I noticed that being a few inches did prompt the LED to turn red and for the display to show –H. Moving around the socket, the display showed –L and the LED was green, but touching a portion of the wall where there was a live wire would again start the intense beep, the red LED and the –H.
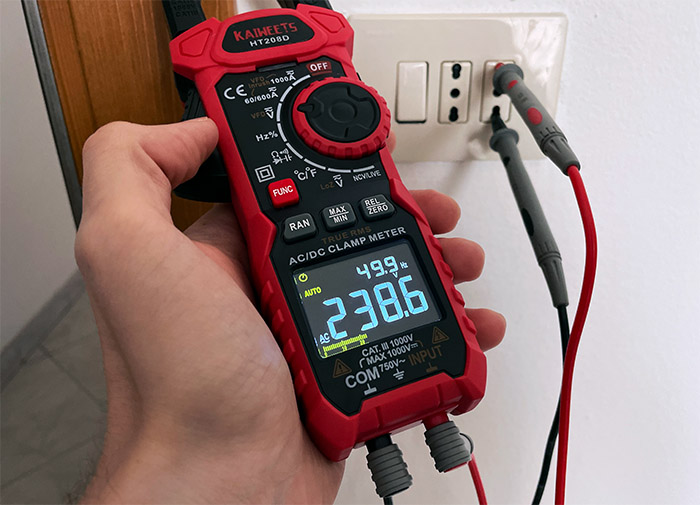
So, it’s fairly accurate, but the meter does seem to prefer touching the surface instead of just hovering above it. Then, I connected the probes to the terminals and I checked the voltage of one of the wall socket. This test was done in EU, so don’t freak out when you see it go past 220V. Indeed, the Kaiweets HT208D showed an average of 238V – be aware that you need to properly insert the probes to get an accurate reading. The duty was already displayed at exactly 50Hz, which is the expected (and correct) value.
Then, I also ran the continuity test by touching the two probes and setting the dial to the suitable icon. And yes, the clamp meter let out as sharp beep and the LED turned red for as long as the two probes were touching, so all is good. Considering that I also had to use the clamp, I went to the garage that has some wires out (the panel installation is coming soon) so I could check some parameters. Another very valid application is to use it for the battery in the car and I already mentioned that the display always defaults to DC which means that Kaiweets knew that people which work with cars (and other automobiles) will most likely use a clamp meter.
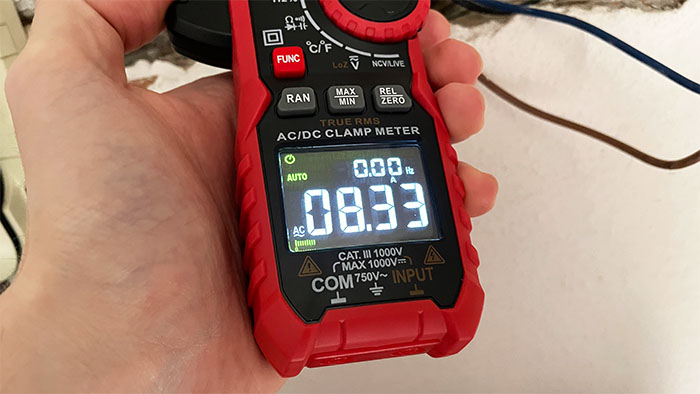
That being said, as you can see from the photo, the Kaiweets HT208D did show an average of 8 Amperes and the duty was 50Hz. Keep in mind that you can’t use the clamp on the average type of cable found inside the house because it’s most likely to have the neutral wire inside the cable, so you won’t get the correct values. There is also the inrush aspect which is the maximal instantaneous current drawn when you first plug an electrical device and yes, the Kaiweets HT208D is capable of capturing it as well – I don’t yet have an alternative tool to check its accuracy.
The Conclusion
Just like the KM601, the Kaiweets HT208D is a very competent device, especially considering the price tag (which puts it somewhere in the entry-level bracket). You get multiple types of measurement, you can use the clamp and the probes to check both AC and DC current, as well as the inrush current and you also get a colored display. So yes, if you’re in the market for a clamp meter, check out the Kaiweets HT208D.
Kaiweets HT208D
-
Pros
- Colored display with backlight
- Clamp meter + probe terminals
- Battery powered
- Flashlight
Cons
- The display is a bit dim
Mark is a graduate in Computer Science, having gathered valuable experience over the years working in IT as a programmer. Mark is also the main tech writer for MBReviews.com, covering not only his passion, the networking devices, but also other cool electronic gadgets that you may find useful for your every day life.