
In this article we’re going to explore some of the most common methods of cascading routers in order to isolate your smart devices from the rest of the network. The reason why you’ll want to keep your IoT devices isolated is because most manufacturers care little or not at all about implementing some type of security measures within their devices and those that do, most often don’t update their products ever again, leaving you with vulnerable devices which can easily become infected, therefore compromising the entire network. It’s true that since last year, some steps have been taken towards forcing a number of regulations on the smart devices, but we’re still a long way until all IoT products can be considered secure (at least at a basic level), so we have to take some precautionary measures to ensure some level of privacy.

Connecting one router to the other (also known as cascading routers) is a solution to this problem since it leaves one router for your private network which contains any sensitive data, while the other router will be used for the smart devices and, since most come with WiFi, it will also be a good way to cover more ground (this way, you’ll also be able to connect more clients). Of course, it’s not the only solution, since you can also set up a VLAN (assuming you either have a managed switch or an enterprise router), but it is a relatively simple manner to both recycle an older device and keep your network more secure. For now, I’m going to use two Asus routers, an RT-AC86U which will be connected directly to the modem and an Asus RT-AC68U as the secondary router which will connect to the primary Asus device.
Considering the application that we’re trying to accomplish, the LAN to WAN approach is the best solution since in this case the routers will have different IP segments, so the devices won’t be able to communicate between the two routers, but we’re also going to explore the LAN to LAN solution as well, which is more suitable for extending the network and making it easy to roam between the routers, while also covering a lot more area (this approach could be an alternative to some dual-band WiFi mesh systems, such as the Google WiFi or the TP-Link Deco M5).
Note: Be aware that the two routers will have to be connected through a cable and not via wireless (for the latter, there are other approaches, such as WDS).
LAN to WAN (Asus RT-AC86U as primary and Asus RT-AC68U as secondary router)
Note: Cascading two Asus routers in the LAN to WAN configuration implies that the two routers will have different IP segments, so it requires some different steps than the LAN to LAN setup.
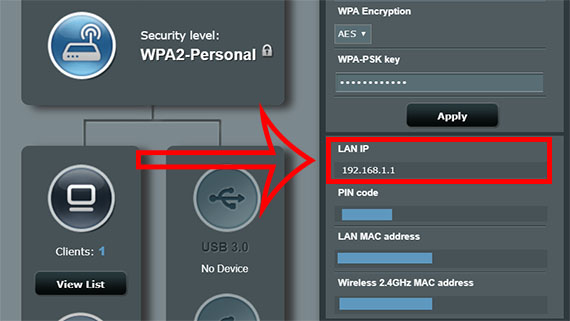
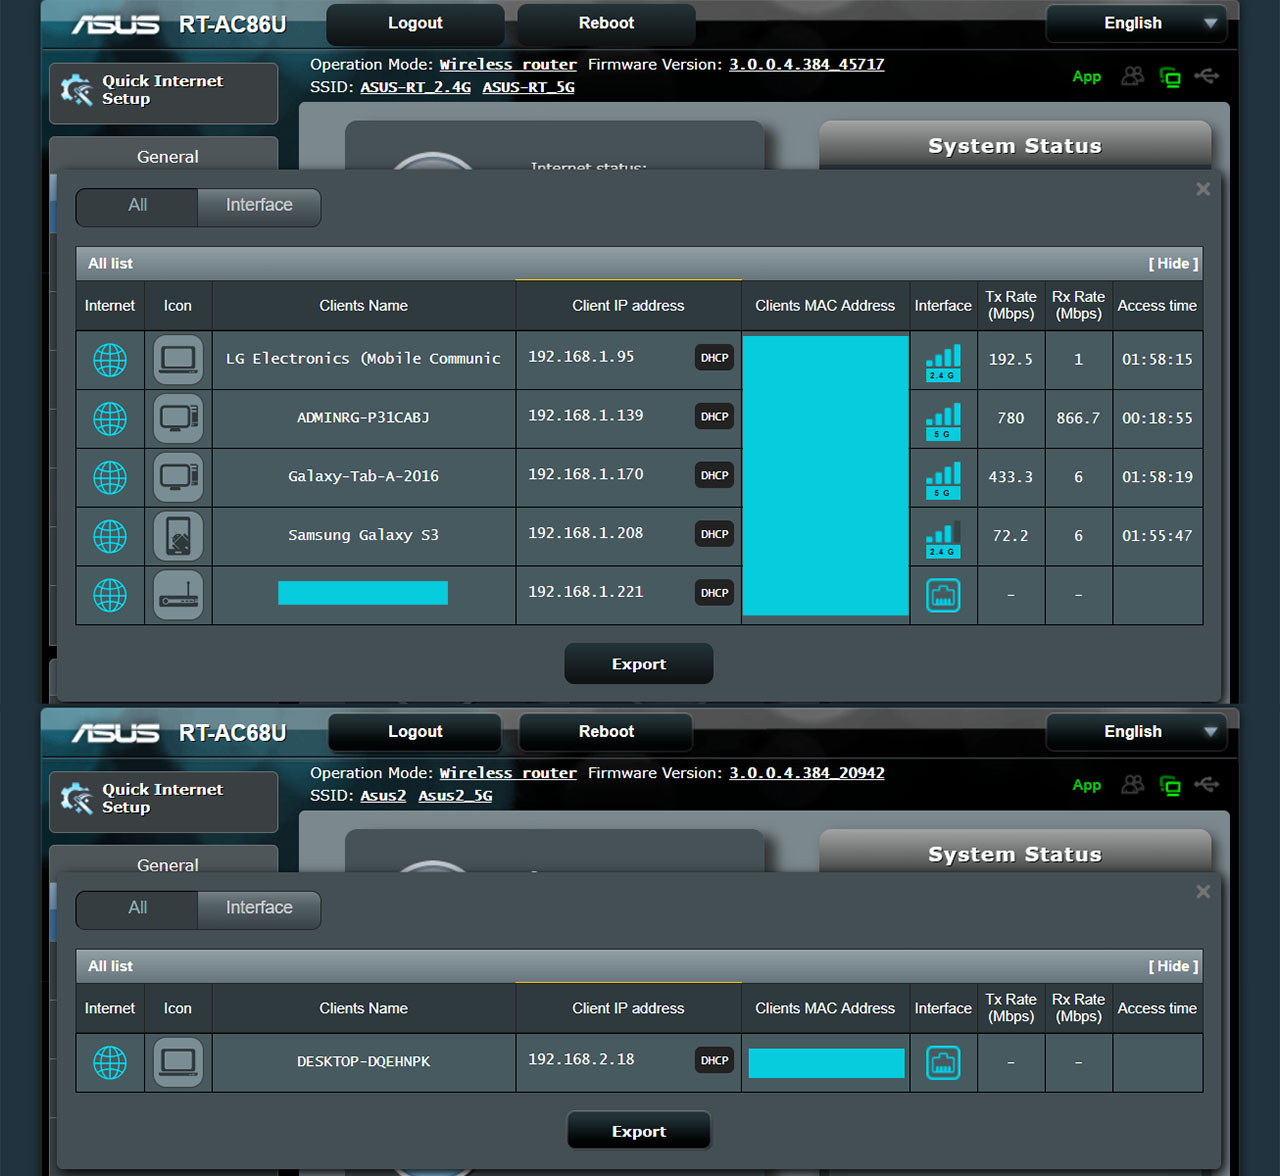
1. Assuming that the primary router is already configured and it receives Internet access (my connection is PPPoE), you will need to take note of the IP address that it is using (in my case, it was 192.168.1.1). If you have trouble identifying the default IP address, then you could either check the physical label on the rear side of the device or try entering 192.168.1.1 in any web browser – if it loads the Asus user interface, then this is the IP address that you should write down, otherwise, you could try entering router.asus.com in the URL section of your browser and take note of the LAN IP written on the right side of the Network Map page. In case you still can’t access the ASUS UI, then follow this guide to identify if you don’t have a static IP address set on your Windows computer (the guide is written for Linksys routers, but it will work for Asus devices as well).
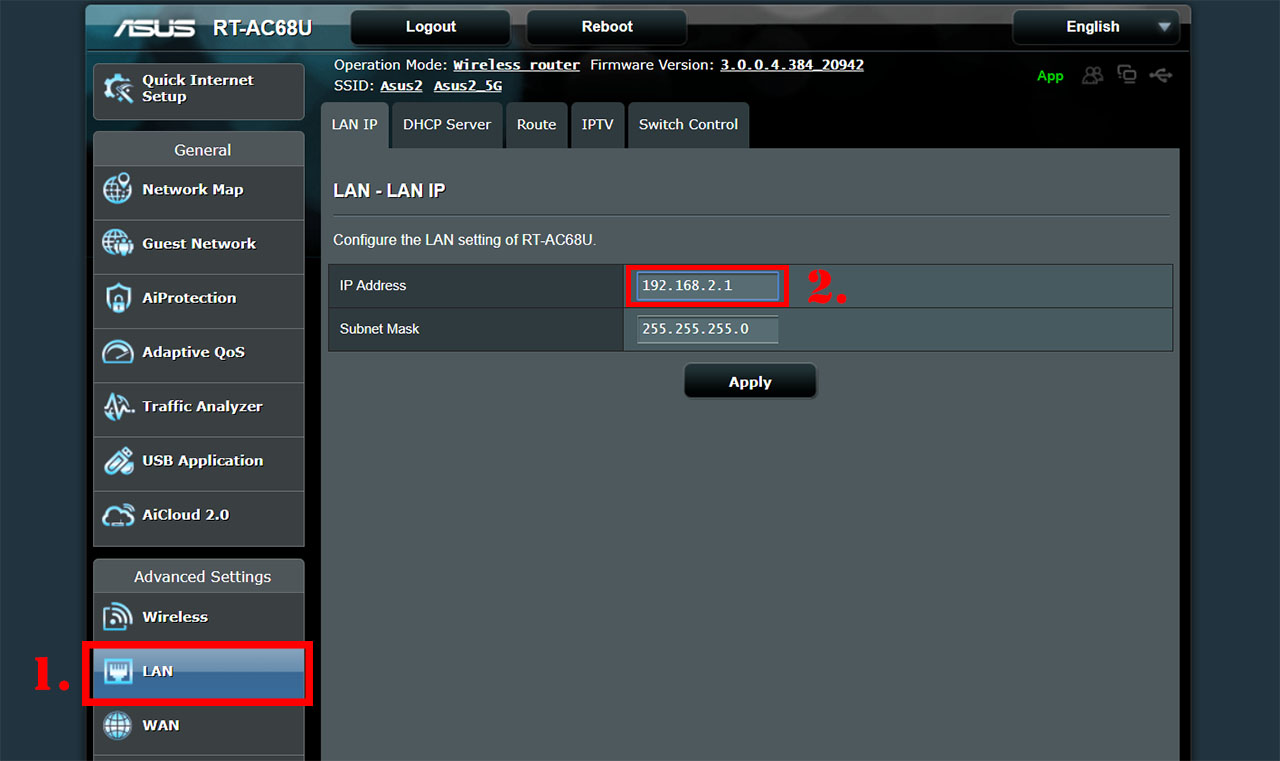
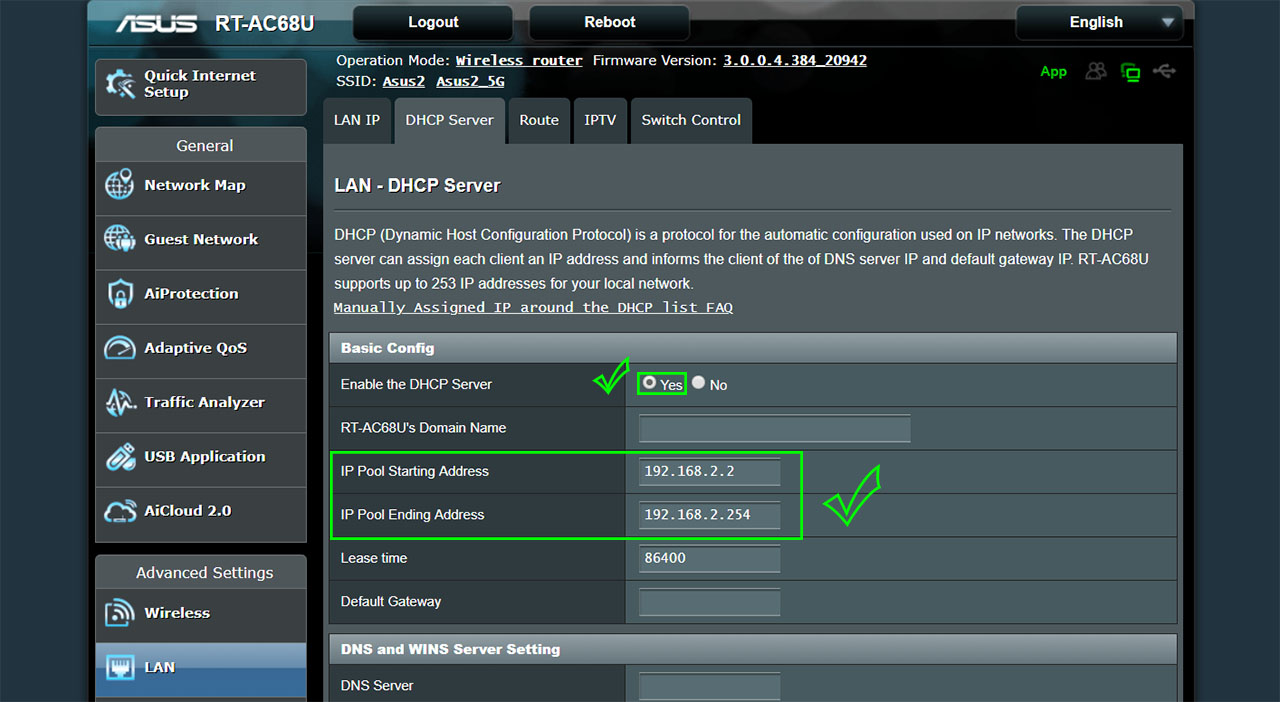
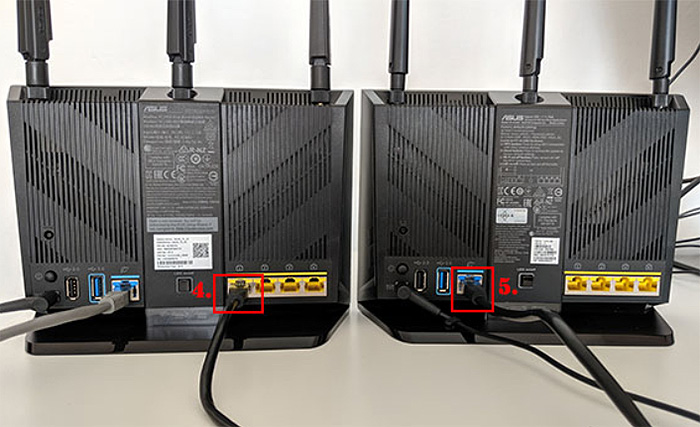
2. Now that you have the IP address of the primary router (Asus RT-AC86U), take the secondary router (Asus RT-AC68U), connect it to a power source and, using an Ethernet cable, connect one end to a LAN port on the RT-AC68U and the other end to the Ethernet port from your computer. If you haven’t set up the router, now it would be a good time to do it (don’t connect the Internet cable yet) and, once you have access to the interface, click on LAN from the menu on the left (underneath the Advanced Settings section). Here, you’ll be greeted by the LAN IP settings and, next to the IP Address, change the third number of the address: if the IP Address is 192.168.1.1, then change it to 192.168.2.1 or 192.168.3.1 and click Apply. After the settings have been applied, you can check if the IP pool is properly configured by going to LAN > DHCP Server and seeing if the third number has been accordingly changed. Furthermore, still under the DHCP Server, make sure that DHCP is Enabled.
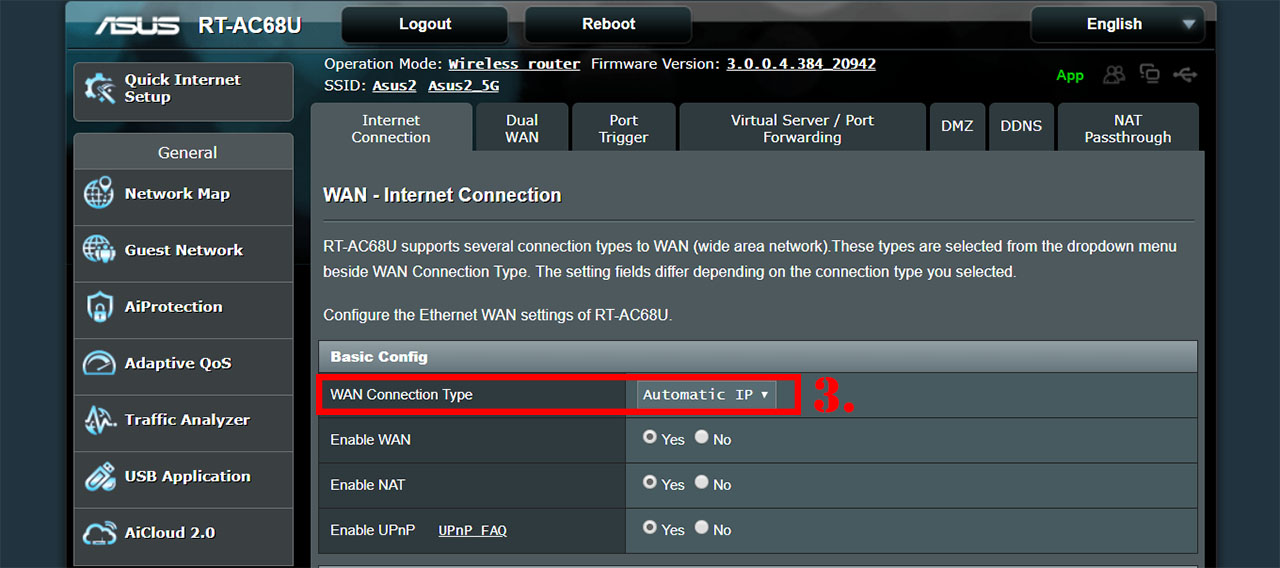
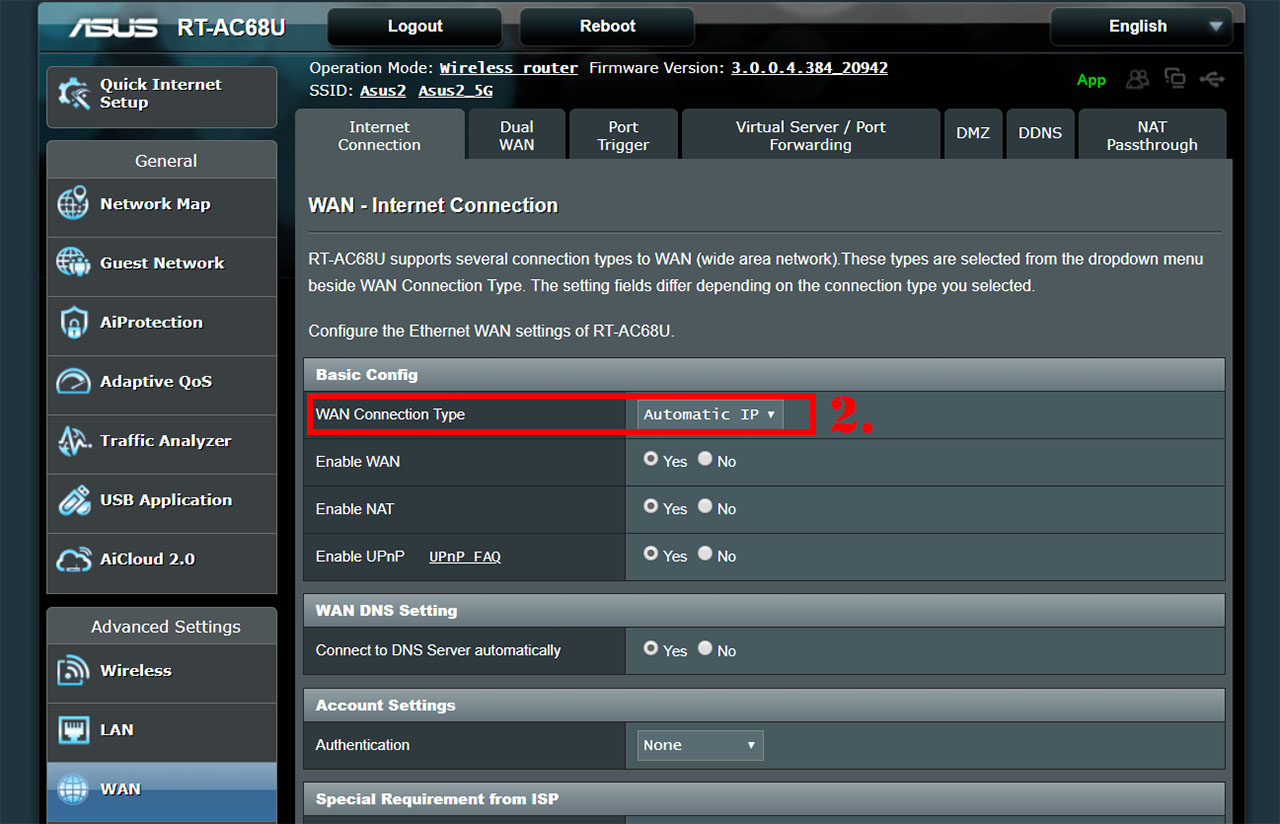
3. My main router is configured as PPPoE, so the secondary router needs to receive the IP address automatically: press on WAN from the menu on the left and, from the new window, select Internet Connection (the first option on the top); here, under Basic Config, identify the WAN Connection Type and from the drop-down list, select Automatic IP.
Click Apply and connect an Ethernet cable from the RT-AC86U (use any LAN port) to the RT-AC68U (use the WAN port!). This should immediately give you access to the Internet from both the first and the second router.
LAN to LAN (Asus RT-AC86U – main and Asus RT-AC68U – secondary)
If you aim is to simply extend your network and recycling an older router (such as the RT-AC68U), then a LAN to LAN configuration is a great way to pair two routers (both will stay under the same LAN IP segment) – this way, you can create a single large WiFi network (or a couple of them) where your clients can easily roam from one device to the other.
1. Once again, I will assume that the primary router is already configured and is connected to the Internet, so we will have to identify its IP address (it’s usually 192.168.1.1, but, in case you’re not sure, read step 1 from the LAN to WAN configuration).
2. Afterwards, you need to connect the secondary router to a computer (don’t connect it to the Internet or to the main router yet) and go to its default IP address to access the user interface (it should be 192.168.1.1 – you can also go to https://router.asus.com).
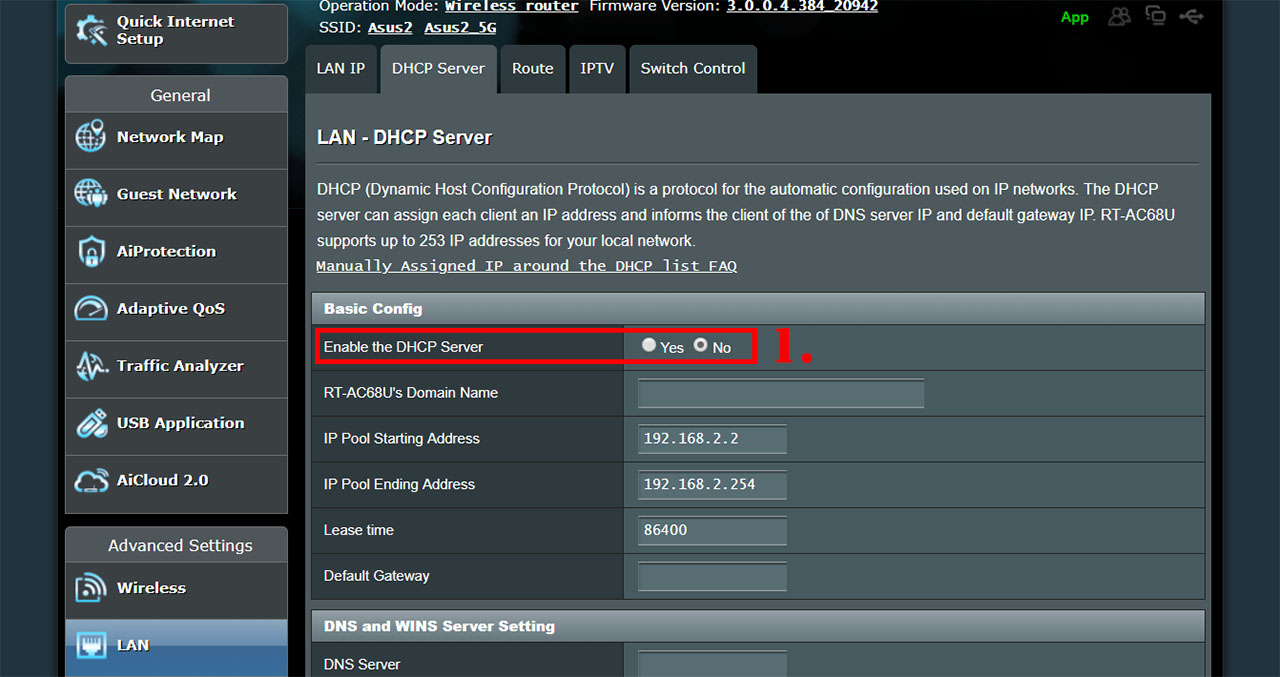
3. Next, you need to disable the DHCP server, so only one router will deliver IP addresses to the clients: to do so, go to LAN (from under the Advanced Settings on the left menu) and click on DHCP Server – here, under Basic Config and next to the ‘Enable the DHCP Server‘ click on No and Apply.
4. Similarly to the LAN to WAN configuration, the WAN Connection Type has to be changed and to do so, go to WAN, stay in the Internet Connection section and, under Basic Config and next to the WAN Connection Type, select Automatic IP and click Apply.
5. On the next step, we’re going to change the IP address, so it won’t go into conflict with the main router: go to the LAN section and, under LAN IP, change the IP Address from 192.168.1.1 to 192.168.1.2 (or another preferred number – it’s important to change only the fourth octet). If the third octet (number) was different, change it to be identical to the one on the main router (ex: if the IP address of the secondary router is 192.168.2.1 and the IP address of the main router is 192.168.1.1, change the IP address of the secondary router from 192.168.2.1 to 192.168.1.2).
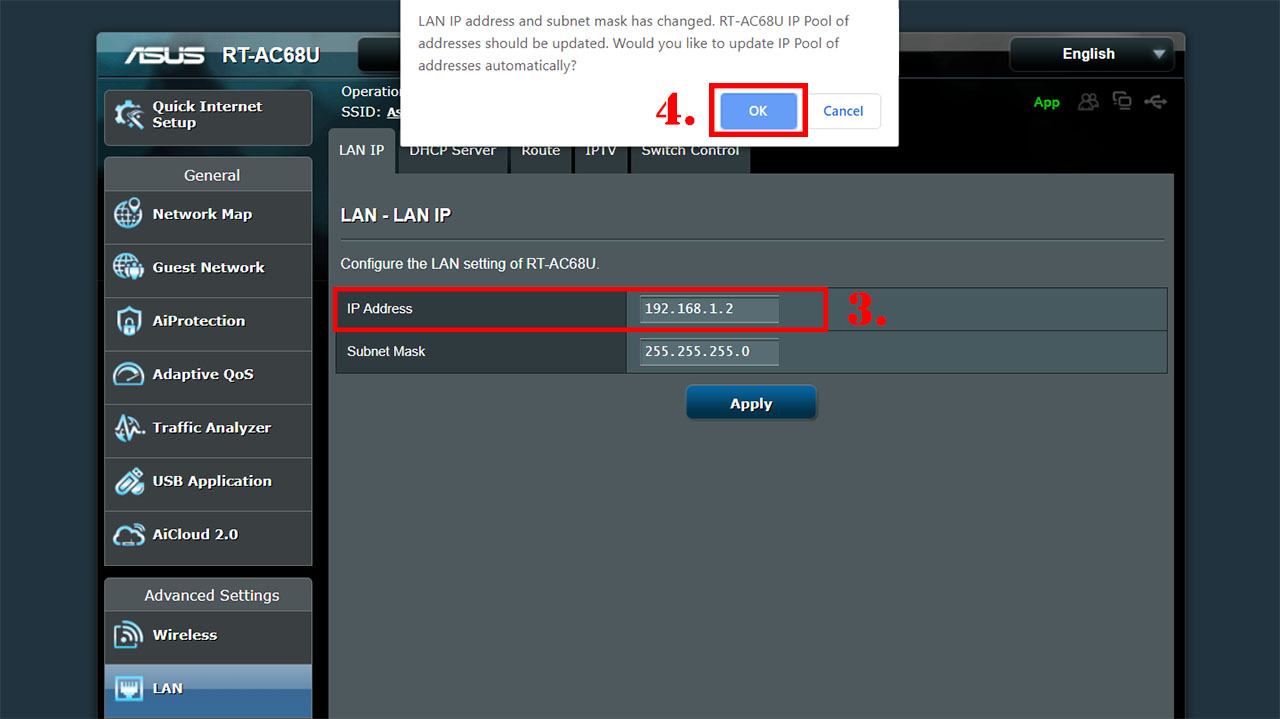
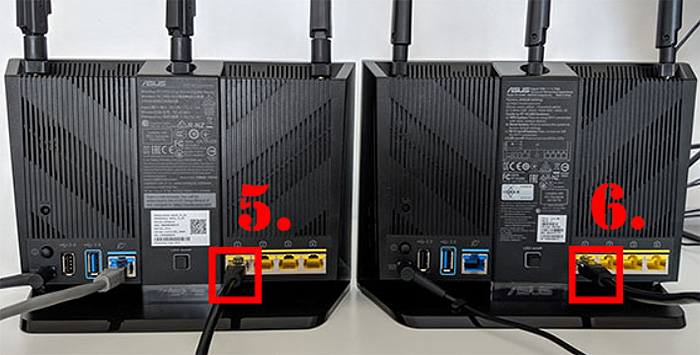
6. Press Apply and connect an Ethernet cable from a LAN port of the RT-AC86U to a LAN port on the RT-AC68U. If both the primary and the secondary router has Internet access, then the process has been concluded.
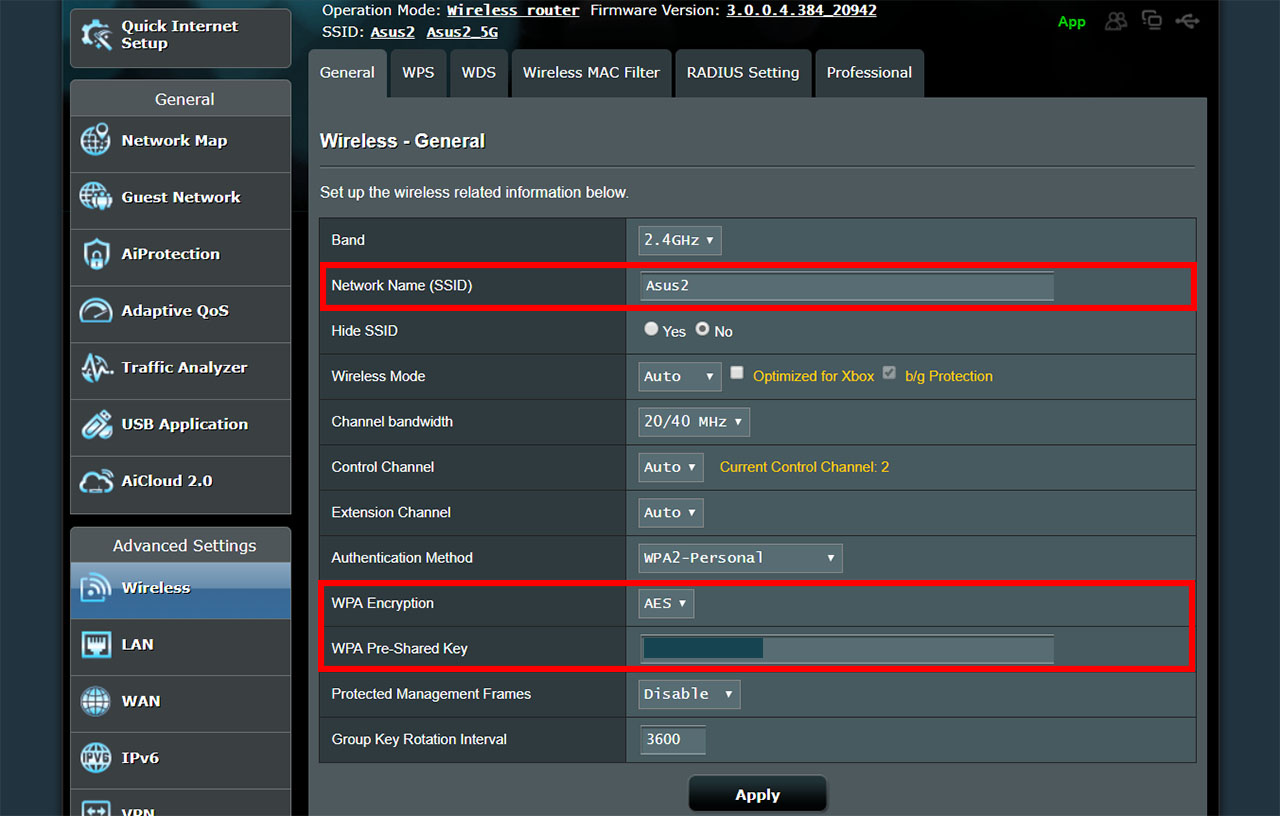
7. Additionally, you may want to synchronize the WiFi SSID and password, so the clients can easily roam from router to router: this can be done by going to Wireless and changing the Network Name (SSID), as well as the WPA Pre-Shared Key (make sure the WPA Encryption is also the same on both Asus routers).
Mark is a graduate in Computer Science, having gathered valuable experience over the years working in IT as a programmer. Mark is also the main tech writer for MBReviews.com, covering not only his passion, the networking devices, but also other cool electronic gadgets that you may find useful for your every day life.
I have configured the LAN-WAN setup using my main router on 192.168.2.1 and a secondary router on 192.168.3.1. Most every works as expected except for one major thing. When logged onto the wi-fi on 192.168.3.x network, I’m able to communicate with devices connected to the primary router’s LAN (on the 192.168.2.x network). Evidently the internet port on the route allows this to happen. However, when logged onto a device on the 192.168.2.x network, I’m unable to communicate with devices connected to the secondary router on 192.168.3.x. I really wanted it the other way around so devices connected to my secondary router cannot get to my internal LAN on the primary router, but only the Internet.
Did you figure it out?