
The Creality Ender-5 S1 is a sort of mid-range DIY 3D printer model, sitting between the Ender-3 versions and the better performing Ender-6 and above models, offering a rectangular frame for stability and being able to go up to 250mm/s in terms of printing speed.
| Creality Ender-5 S1 | |
|---|---|
| Creality.com | Check Product |
All of these are impressive, but can it convince the users to finally leave the much loved Ender-3 printers behind and go for the version 5 and above? I have no idea and I say that because Creality recently made available the Ender 3 V2 Neo, so the ‘entry-level’ model is still very much supported. And the popularity of the Ender 3 3D printers is due to the users involvement into developing various mods, improving the performance of such a cheap machine.
And yes, Creality did hit a sweet spot with the model 3 in terms of price and performance. But that doesn’t mean the Ender-5 S1 is an inferior product, quite the contrary. Yes, it’s still a cartesian model (not core xy) and the manufacturer decided to go with wheels for the Y axis instead of linear rods. But we do get a Sprite direct extruder which apparently can go up to 300 degrees C, so using most types of filaments should not be a problem and we get auto-leveling bed which is a very welcomed addition.
The Creality Ender-5 S1 has a decently sized touchscreen display where you can make additional adjustments to the models and overall the software is good enough considering that Creality has been in this game for a long time, so it has a lot of experience. Then again, there is already work being done to the Marlin firmware from the community, so it may get even better soon. That being said, let’s see how well the Creality Ender-5 S1 can print.
The Design and Build Quality
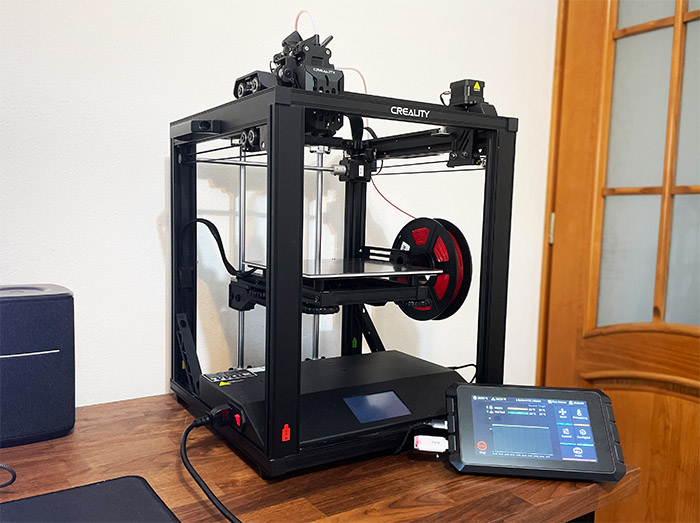
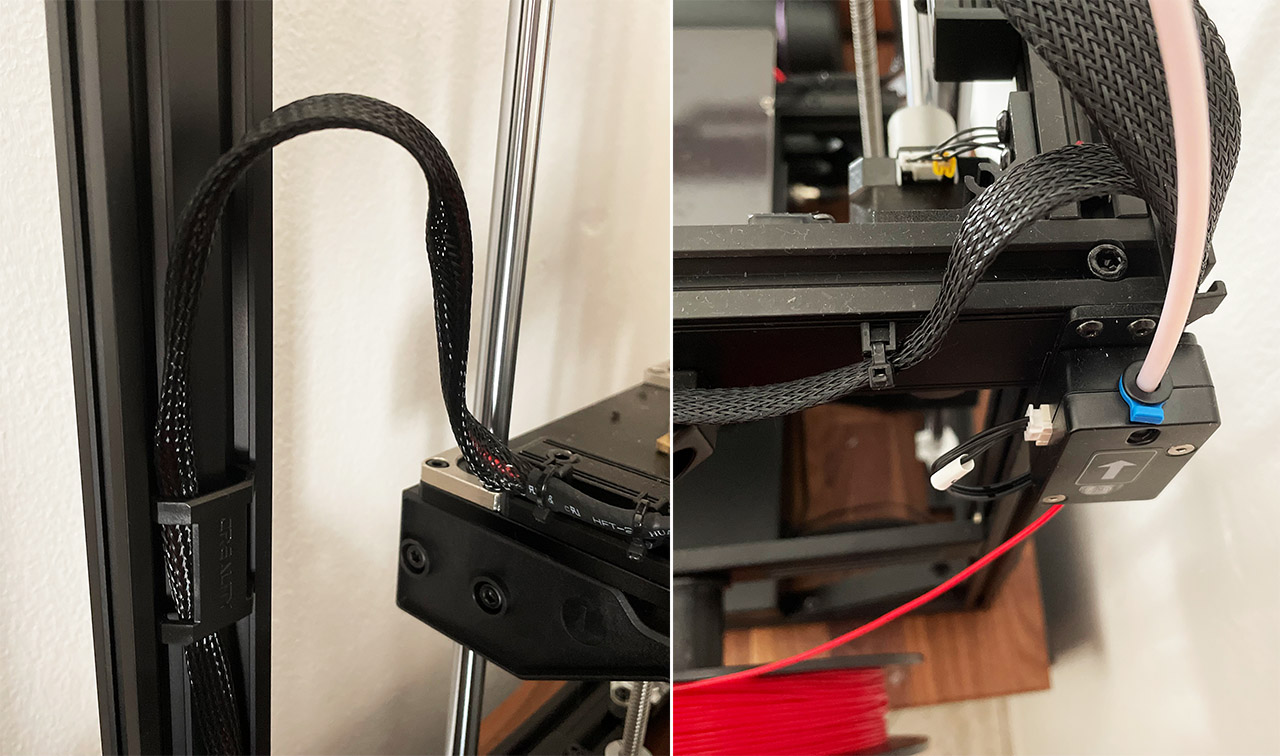
The Creality Ender-5 S1 is smaller than the Ender-5 Plus, but even so, it will occupy a bit of space from the desk considering that, after installed, it measures 22.4 x 18.1 x 16.7 inches (or 57.0 x 46.0 x 42.5cm). But unlike other DIY/hobby 3D printers, everything is very neatly put together, so pretty much nothing hangs outside the metallic cuboid created by the frame. Obviously, it’s up to you to make sure that the cable management is done right, but Creality does give you everything you need to keep things neat and tidy: zip ties, wire clip, flat cable flips and there is even a cutting plier inside the package.
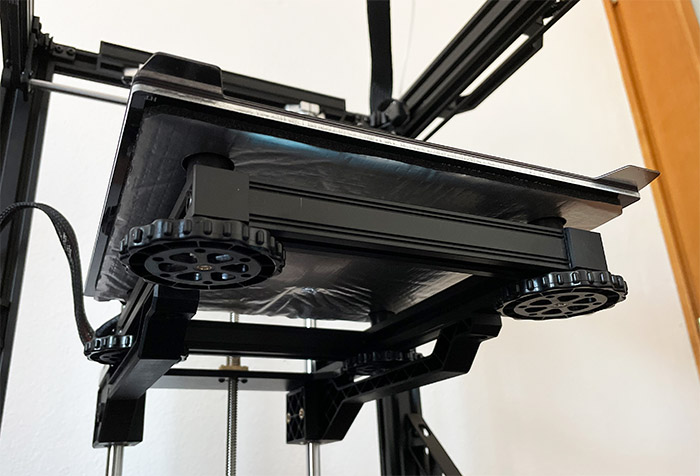
Overall, there is very little plastic, so the 3D printer feels well built, but it’s going to be a bit heavy – I do appreciate a lot the metallic handles that the manufacturer added on the sides which help a lot especially when assembling the 3D printer. The PSU, the main board and the display, all are inside the large bottom piece that comes already attached to the bottom frame and has four feet to no scratch the surface it stays on. There are three stepper motors, one for each of the three axes.
The Z-Axis moves up and down along a metallic rod and I did see an anti-backlash spring there which I accidentally pulled out and had to install again. I thought that I had two left hands, but I later found out that it was actually a QC issue and I had to completely replace the flexible coupling. The motors for the X and Y axes move with the help of belts and wheels and there are better options out there – yes, the wheels do wear out eventually and need replacing, so not really the ideal way of doing things especially considering the price tag of the Creality Ender-5 S1.
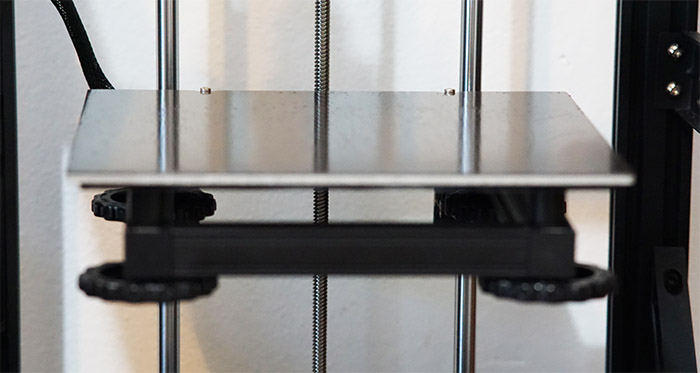
The printing plate can be adjusted using the four wheels underneath it (they’re large, so kudos to Creality), but I do have one complaint here. There is a PC spring steel sheet which should be flexible enough to allow the prints to easily come off. Well, it should but that doesn’t always happen and in time, it will wear out – some users have complained that it happened very quickly, so why not just add glass? Anyway, remember that this is one element that can be easily replaced and I suggest doing so right away for a better printing experience.
Also, the printing surface itself is not really that big, measuring 11.0 x 8.6 x 8.6 inches (22.0 x 22.0 x 28.0cm), but I suppose the Ender-5 Plus is an option for those that need more space. Moving on to the extruder assembly, we see that we’re dealing with an all-metal ‘Sprite’ dual-gear direct drive extruder which works very well with difficult material (such as TPU – we’ll test it in a minute). The nozzle is made of brass and I saw that I got an extra piece in the package, which is a nice touch.
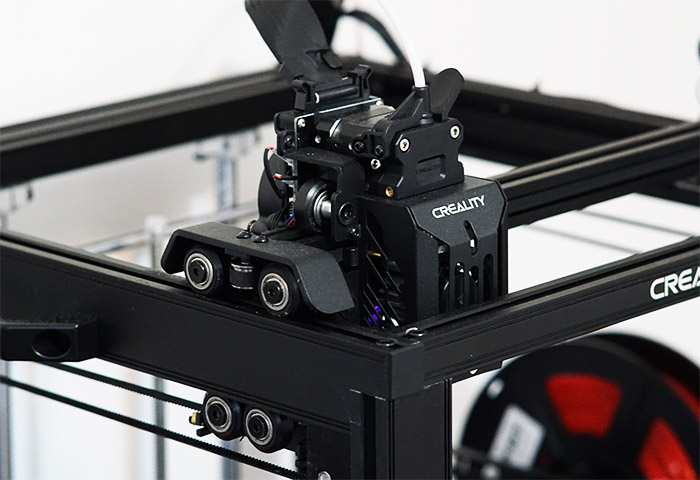
There are some fans which are audible, but not very loud and I saw that Creality already added some extra exhaust pieces which other manufacturer have left for the user to print themselves (I like that). The filament does get fed into the machine by a Bowden tube and the Creality Ender-5 S1 is the first 3D printer that actually has a solid support for the filament and not some flimsy plastic thing that bends under a larger roll.
Note: It’s possible to add plexiglass panels to the sides of the 3D printer.
The Creality Sonic Pad
The open-source Klipper firmware was developed to run on a separate single-board computer (SBC) and to work alongside the existing 3D printer board by providing additional processing power thus lowering the printing time, with no penalty on the quality. So there is no drawback to using this firmware with the exception that as most DIY projects, it is necessary to manually install the software, to configure and calibrate it in order to make it work with the existing 3D printer.
It’s still a very fun process and a good use of a Raspberry Pi, but for the people that don’t have the time or want to bother going through the hoops of installing such a system, Creality has made available the Sonic Pad which comes with the Klipper software pre-installed and configured to work with not only the Creality Ender-5 S1, but a lot of other 3D printers. And yes, you can use one Sonic Pad with up to four Creality 3D printers at the same time, so while it’s not the most cost-effective solution, it does make sense when using more than one 3D printer.
The Sonic Pad very closely resembles a rugged tablet, sporting a 7-inch touch-screen display with a resolution of 1024×600 pixels. And the case is made of hard plastic covered by a combination between glossy and matte black finish. Inside the device, there is a 64-bit Creality T800 SoC, 2GB of RAM and 8GB of ROM. The Sonic Pad can be connected to the network either via the RJ45 Ethernet port or by relying on the WiFi module (802.11b/g/n, so mostly, 2.4GHz) – it’s quite useful for quickly installing firmware updates, but you don’t really need to use the device outside the local network.
On the rear panel of the Sonic Pad, there are two adjustable legs to keep the ‘tablet’ at an angle and there is also a Power port here along two USB ports, an Ethernet port and the G-sensor interface. There is also a recessed button for Resetting the Sonic Pad to its factory settings. There are two additional USB ports on the frame of the device (amounting to four USB ports for four 3D printers), while on the other side of the Sonic Pad, rests the Power button and two LEDs, one for showing the status of the System, the other for showing that the device is powered up.
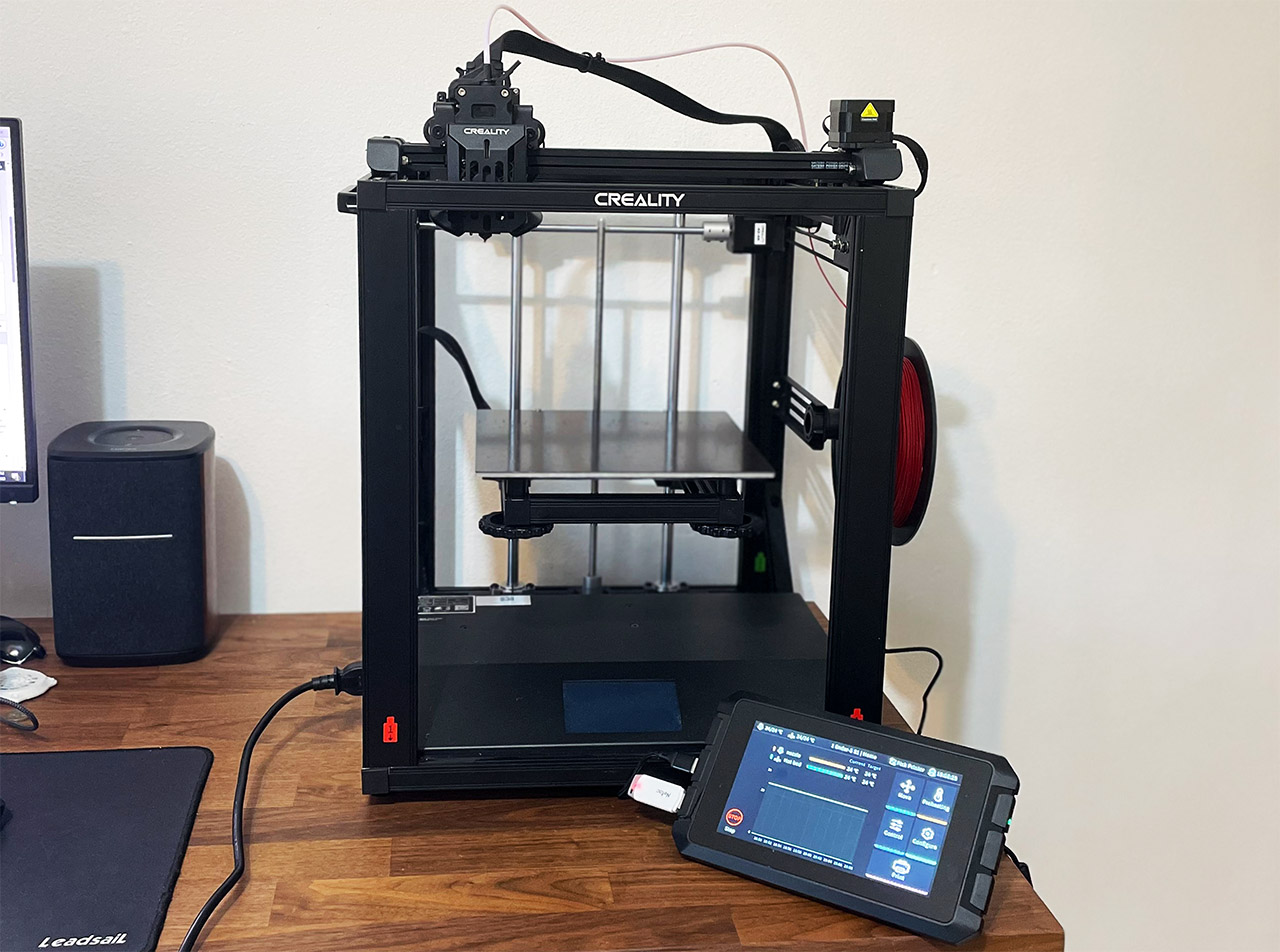
Obviously, once you connect the Sonic Pad, it will replace the built-in display on the Creality Ender-5 S1, but I did not see a way to add it to the frame of the printer – the USB drive that comes with the Pad does have the models ready to be sliced.
Which protection features are on the Creality Ender-5 S1?
As expected considering the price tag of the Creality Ender-5 S1, it does have the option to resume the print after a power outage enabled by default (it can be disabled from the Parameters if you don’t want to use it).
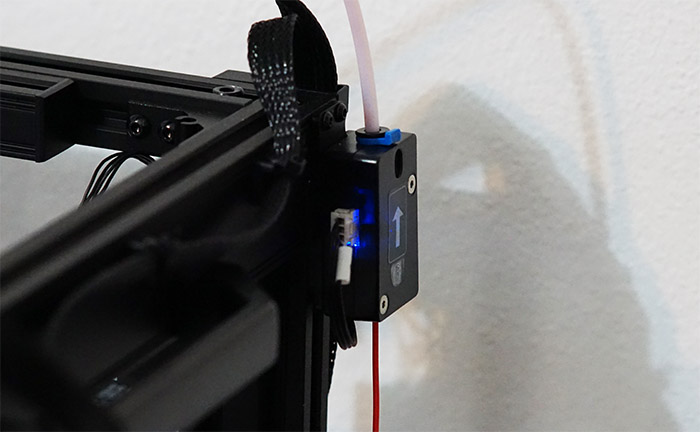
Additionally, the printer has a filament runout sensor so when the filament runs out, the print will pause awaiting for you to feed it new material. You would think that this feature should be standard, but I’ve seen it missing on some less expensive models such as the Voxelab Aquila S2. Since I have mentioned the Voxelab printer, how does the Ender-5 S1 stand in regards to the thermal runaway protection? It does have this very important feature enabled and it will trip the power any time it detects abnormal heating behavior. Also, when in doubt, always trust the community, so make sure to keep up with their custom firmware releases since in case of any issues, the patches usually come very quickly.
Putting Everything Together
After assembling a few 3D printers, I can confidently say that the Creality Ender-5 S1 was the easiest DIY 3D printer I had to put together. Certainly, it doesn’t come already installed, but there are only a few pieces that can easily be attached.
All you need to do is mount the four profiles (each is labeled accordingly) to the bottom section using the provided screws, then mount the top component in a similar manner. The bed section is a tiny bit more complicated since you need to attach it to the Z-Axis, but it took about five minutes to install it and to insert it into the metallic cage. I suppose the only word of warning would be to be careful about the anti-backlash spring which may need replacing, so it can be necessary to take out the rod entirely (by loosening the two screws that hold it at the bottom) and re-insert the spring back properly.
After that, it’s necessary to attach all the cables to the suitable ports. And, while the wires are labeled, the ports were not, so little mistakes can happen. That is unless you follow the manual. Lastly, Creality has provided instructions on how to keep everything tidy, so make sure you use the clips to have a good wire management for a neat look.
I should also mention the Bowden tube that you will have to insert manually into the extruder mechanism and it’s very important to switch the PSU to the suitable voltage. If you’re in the US, it’s most likely 110V, but in the EU and most of the world, it’s going to be 230V. This is a very important step and could lead to damaging the 3D printer if not done properly.
Leveling up the bed
The process is not difficult, but quite on par with other, more cheaper 3D printers. First, warm up the bed, then, from the menu on the display, go to Settings > Leveling Method and the bed + hotend should move around, ending up prepared for the leveling process to begin. You’ll be presented with two options, Auxiliary Leveling and Auto Leveling. It’s best to do the former first and then the latter immediately later. Grab a piece of thin paper or just use the paper provided in the package and then select AUX LVL.
There are five points and you will have to manually go through all four, adjusting the knobs underneath up until the hotend barely scratches the paper. Then, tap on the AUTO LVL and let it do its thing for about a minute or so. That’s about it, it should now be properly leveled and ready for printing. It’s worth mentioning that this was the first time I realized just how obnoxiously loud the beeper can be. Every time I touched the screen, a loud beeeep tried to deafen me – another argument for the Sonic Pad.
The Built-In Display
The built-in display has four main sections, one is Home where you can see the temperature of the bed and hotend, the speed of the print and the Z offset. Then, there’s the Print section where you can see the available models on the microSD card – there is no WiFi connection built into the device which is a shame. The third section will allow you to Prepare for the printing and the last is the Settings where you can choose between the PLA and ABS preheating modes, level the bed and change the language.
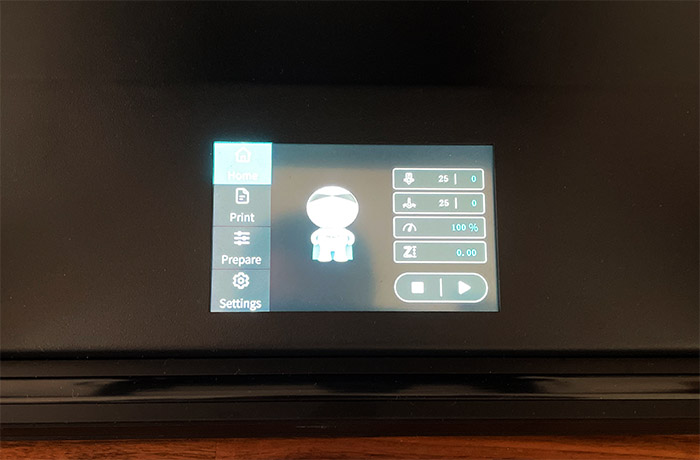
There are some Advanced settings which allow you to disable the Runout sensor, return the Creality Ender-5 S1 to the default settings, adjust the Motion Settings, as well as the Temperature PID values for the nozzle and bed.
The Sonic Pad Installation
Using the Sonic Pad is a different experience and I would have liked if it would have replaced the existing system from the beginning. After starting up the tablet, I could choose the Language and then I was asked to accept the privacy Policy which states that when connected to the web, the Sonic Pad will collect geo-location, mobile device, push notifications and when you’re using the Creality apps.
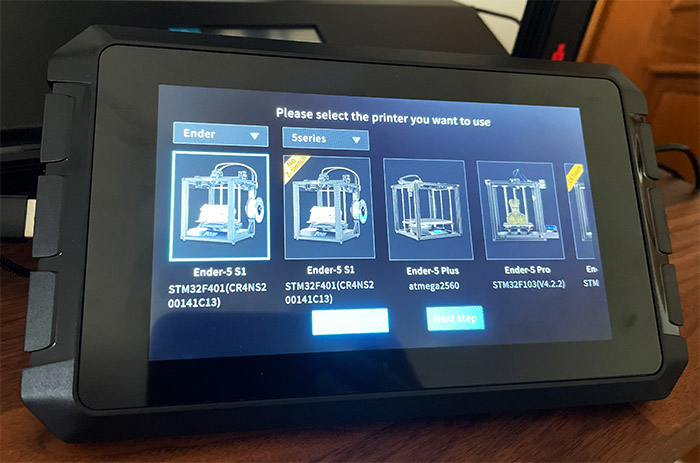
Since Klipper is open-source, I am not sure whether all this info collection necessary, but what do I know? On the next step, I could connect it to the WiFi network if I wanted so I managed to install the new available firmware (it can be done offline as well). Then, I was asked to choose the model and I could see that the support covers almost all Creality printers. I chose the Ender-5 S1 and, after selecting USB communication, I was asked to enter the microSD card reader with the SD card attached, so it can write the firmware on it and then I had to transfer it to the 3D printer.

After that I was asked to once again manually level the bed (Z-offset and the four corners) and then I got to the auto-leveling part. This is where the problems started because the extruder wanted to break through the heated bed and when it failed to do so, it gave the following error: “Auto leveling No trigger on probe after full movement”. I am not the only one that experienced these issues when using the Sonic Pad and the Creality Ender-5 S1, so I accessed the web-UI – as long as the Sonic Pad is connected to your router (either via WiFi or using an Ethernet cable), it will receive an IP. Enter that IP address into the URL and you should be able to access the Sonic Pad utility.
Then, from the vertical menu (on the left), go to Configuration and choose printer.config. I know that Creality has updated this file before, adjusting the x_offset and y_offest to match the Ender-5 S1 and not the Ender-3, but they still haven’t adjusted the mesh_min and mesh_max values. I followed the values provided in this reddit thread and they worked perfectly. The auto-leveling finally concluded and I got a nice mesh graph. At this point, all that’s left to do is to print some models.

The Sonic Pad Interface and web GUI
On the display, the Sonic Pad will initially show the Home section and here you can see the temperature for both the hotend and the bed (there’s also an emergency Stop button always at hand), while on the right side, you can move the heated bed in the position you prefer, as well as Preheat the hotend to the desired temperature. There are three more sections, one for Controlling the Extrusion, the Fan, the Temperature or set the Motors to off.
Creality Ender-5 S1
-
Pros
- Cuboid-shaped for better support
- Successfully tested with PLA, TPU and PTEG
- Built-in touchscreen display
- Has filament-runout sensor
- Works well with the Sonic Pad
Cons
- The flexible coupling needed immediate replacing.
- When using the Sonic Pad, I had to manually change some parameters for the auto-leveling to finish.
- Sometimes, I get an "out-of-range" message which solves itself after a device reboot.
- It is very difficult to insert the TPU filament into the Bowden tube.
- The 3D printer does not support WiFi unless you add the Sonic Pad.
Mark is a graduate in Computer Science, having gathered valuable experience over the years working in IT as a programmer. Mark is also the main tech writer for MBReviews.com, covering not only his passion, the networking devices, but also other cool electronic gadgets that you may find useful for your every day life.