
The second section is called Configure and it’s here where you can manually or auto-level the bed (once again), use the Probe calibration tool, adjust the Network settings, the Movement parameters (Acceleration, Velocity and more) and it’s also possible to connect a webcam so you can see in real-time how the model is being printed. The last section just starts the Printing process from the sources that you prefer: Local network, USB stick, Creality Cloud.
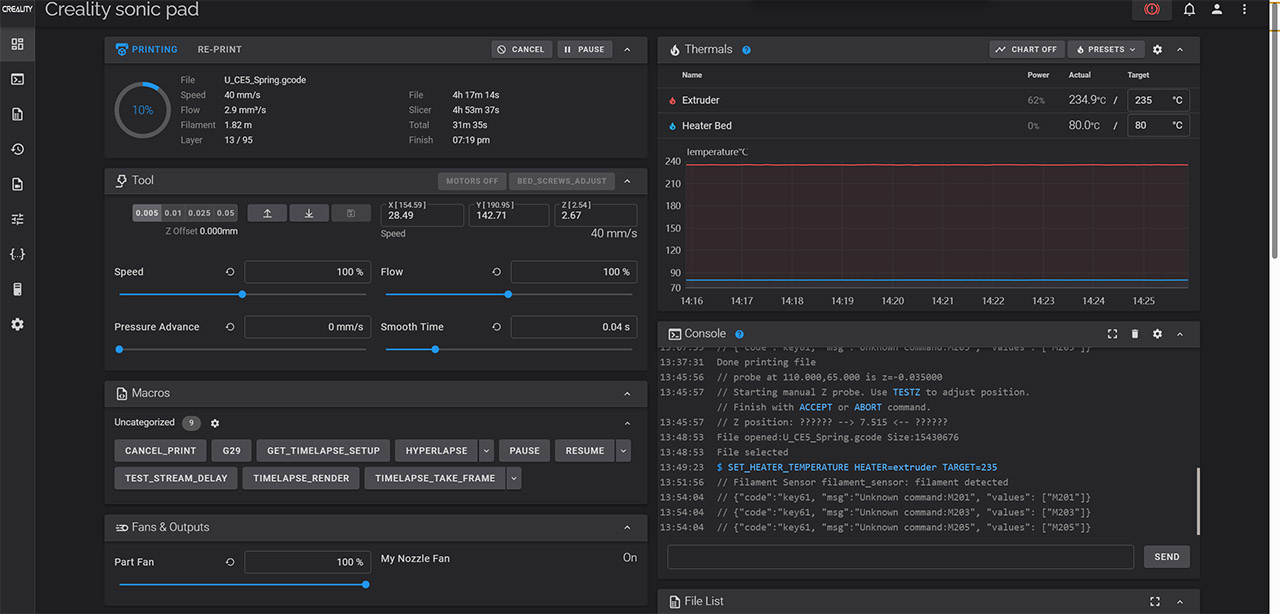
To get full control on how the Sonic Pad behaves, you need to access the web-based GUI and here you get a far better view of what’s happening when printing a model. You can see from the screenshot that besides having the option to adjust the temperature, speed, flow and other ‘mundane’ options, we get Macros, the Console where you can interact with the software in real-time, you can load the Gcode to see a live preview of the model, the temperature and much more.
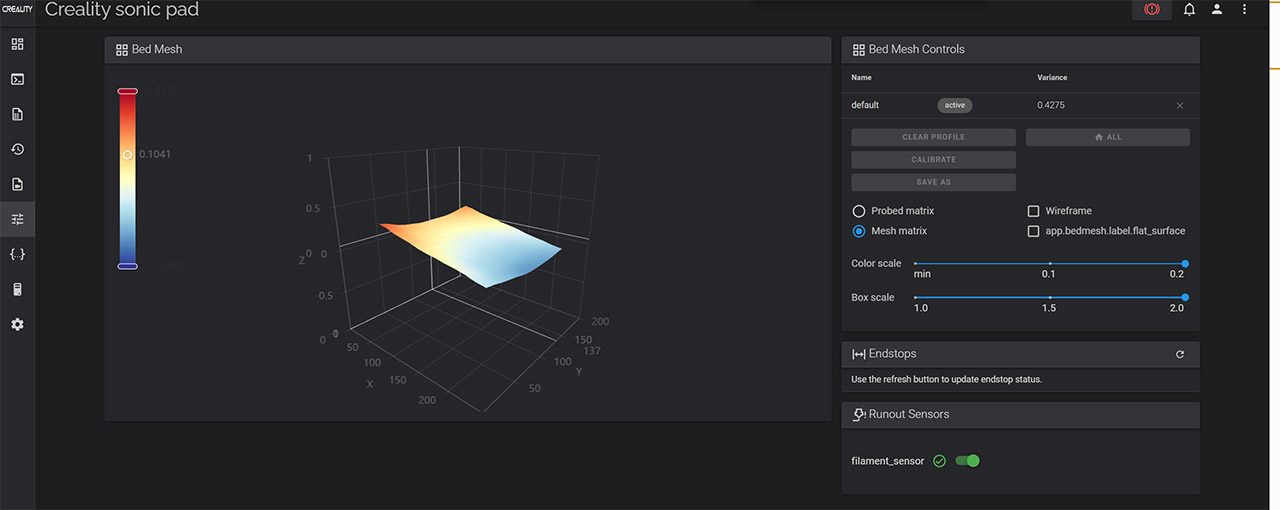
This is only in the Home section, but the vertical menu contains more than that. There’s the dedicated Console section, the History and I really liked the Tune section because it display a plot for the Bed Mesh in real-time: the model that I was printing was a headband for a pair of headphones, which is why the heat is more towards one side than the other.
The next main section is the Configuration and, as long as Creality doesn’t adjust all the parameters for auto-leveling, this section is going to be the first you’re going to visit after assembling the 3D printer. You can also see some stats, update the firmware and there is a similar suite of Settings as found on the Sonic Pad integrated display.
The Performance and Odd Behaviors
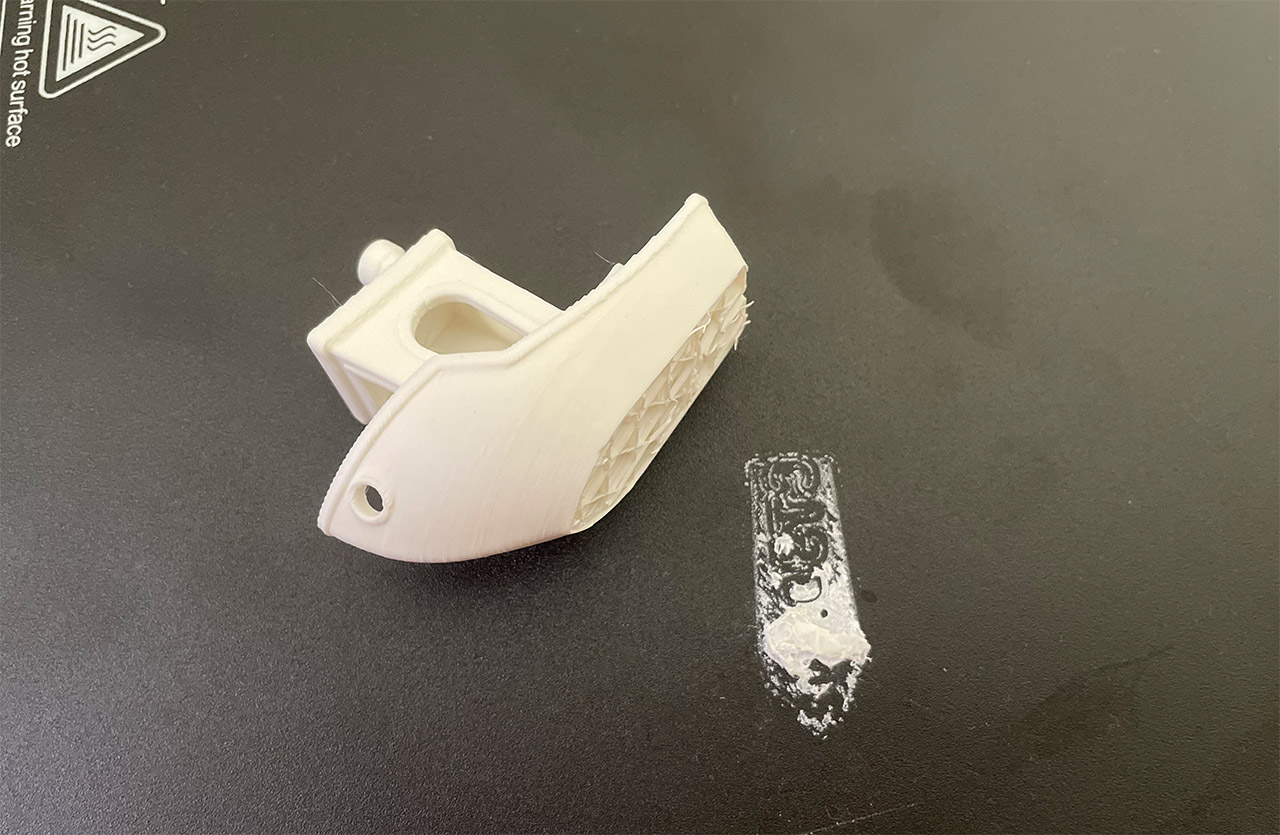
Let’s start with the unfortunate remark that the bed plate that Creality added is completely useless and that it has immediately ruined an otherwise perfectly good model. As you can see, the 3DBenchy was good, but it lost its butt and that’s when using PLA – I can’t even imagine what would have happened if I started with PETG or TPU. In any case, I used the PEI magnetic plate from the Voxelab Aquila S2 in order to proceed with the printing tests, so I suggest you get a different plate from the beginning to avoid wasting any filament.
I have printed lots of models over the past three weeks and I saw that the leveling held up nicely – I did not have to do any adjustments, even after I upgraded the firmware – and it’s worth mentioning that Creality is actively working on the Ender-5 S1 since I got two firmware updates the past couple of weeks. I did noticed an issue that occurs after a few prints. When I started the process of printing a new model, I would get an error stating that the the extruder was out of range. Of course, that was not the case at all because a reboot would fix it – it’s still annoying that it happens once every 3-4 prints.
I checked the Klipper software using the web-based utility to get a better idea on how stable the temperature of the extruder and the hotend was over the printing sessions. And I saw there were no unexpected changes that needed to be corrected, the temperature remaining stable for most of the time. Now let’s use a thermal camera to see the temperature uniformity of the heated bed. On the first photo, there’s the PEI plate and we can see that the temperature seems a bit higher on the bottom right side which is then confirmed by the second photo where I removed the plate.

So the temperature is not really perfectly uniform, but does that affect the 3D model? The largest model that I printed was the PTEG headband which went around the entire bed and I did not see any issues with the plate adhesion. The last odd behavior was after upgrading the firmware while the USB drive was connected to the Sonic Pad. It overwrote something, I think, because afterwards, I just had to format it to make it work again.
Printing with the Creality Ender-5 S1
The first type of filament that I used was, as expected, PLA and the first model had to be the 3DBenchy. I left everything on standard (0.2mm layer, 200 degrees C), but I did push the speed to 200% and the model finished printing in 49 minutes. Not a bad time at all and overall, the boat looked really good, with the exception of its broken butt due to the low quality plate, so I printed it again. Now let’s see it a bit more in-detail.
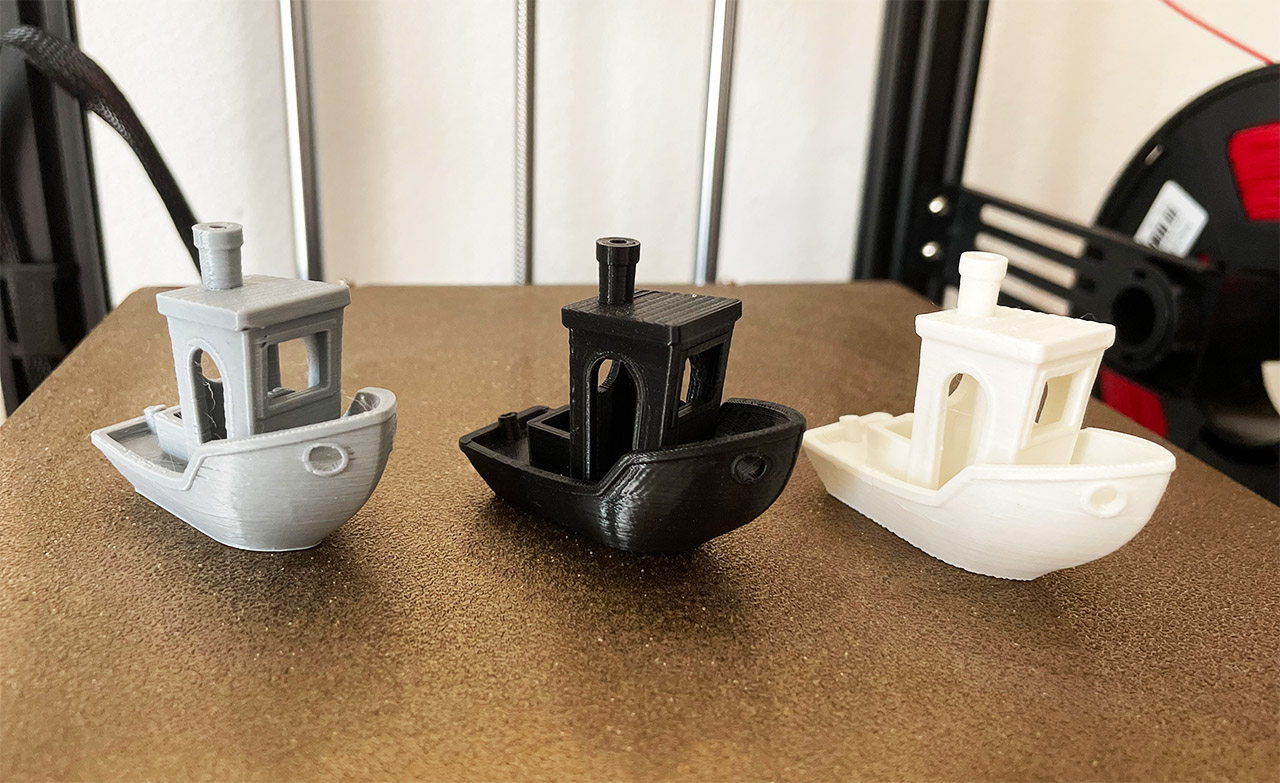
There is very little stringing, we got the logo written on the bottom side, the windows were well reproduced despite not having supports, both the circular and the rectangular ones, the chimney ended up fine and, if it wasn’t for some very minor under-extrusion (that’s barely visible), I would say that this is the best 3Dbenchy I have printed with any 3D printer. Let’s make it faster. I pushed the Initial Layer Speed to 50mm/s, the print speed to 100mm/s and then added the 200% acceleration which did give me a model in 35 minutes. But the quality went down the drain (I flew too close to the sun).

It’s still a successful print with no collapsed arches and everything is where it should be, but there is a very noticeable amount of under and especially over extrusion all around the boat. It’s actually weirdly close to the best prints I got with the Voxelab Aquila S2 and the Longer LK5 Pro, but these cost about half the price. So, if you managed to push it below 49 minutes, while keeping the quality up, kudos to you, I only managed to get a near perfect model at 49 minutes.
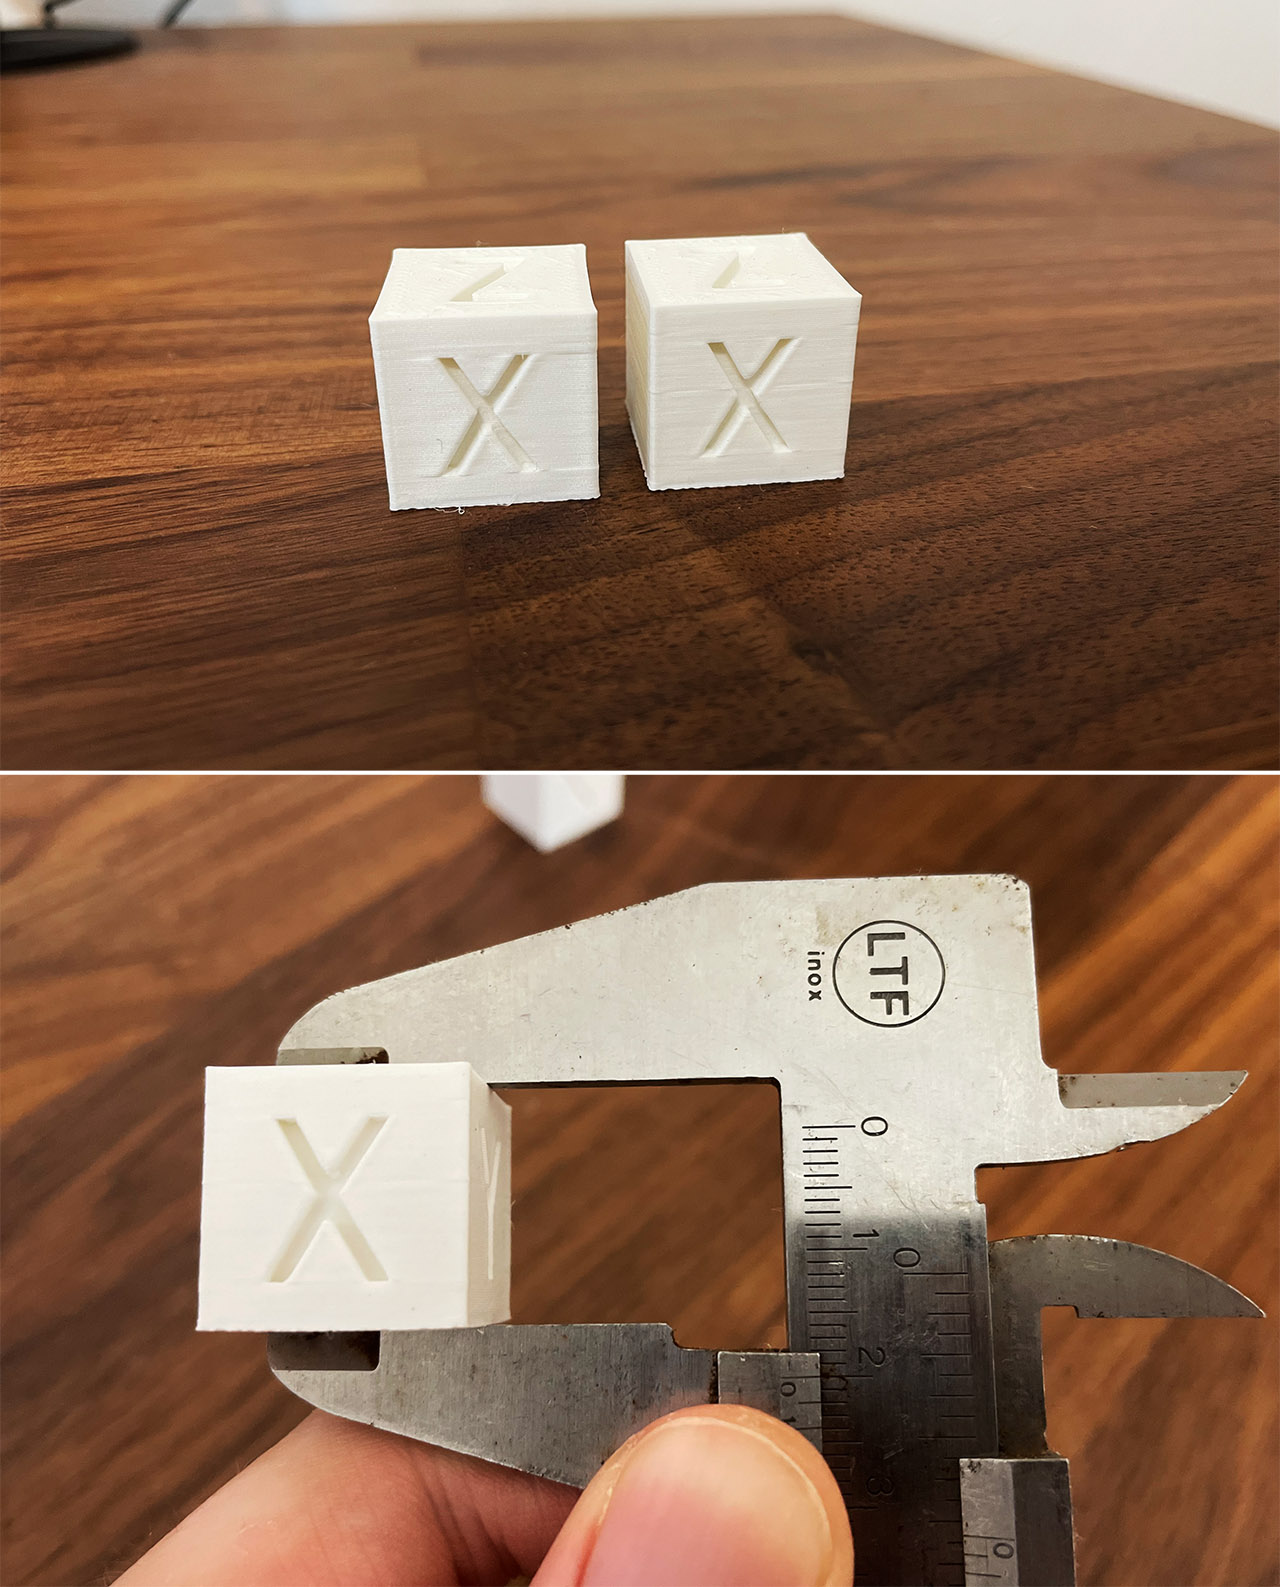
Next, I printed some calibration cubes, one without relying on the Sonic Pad which took about 29 minutes and I checked if the proportions were correct and, as you can see, we get a perfect 2cm on all sides. Plus, there is no ghosting which shows that the decision to make the Creality Ender S1 more stable using a rectangular design has paid off. Things do change after I used the Sonic Pad and pushed the speed to 200%. Not by much since the proportions remained perfect, but we can see some faint ghosting on the letters.
I printed some other models using PLA, such as the Rattlesnake which lost his head when I tried to remove the supports and it’s interesting to see that even if I pushed the speed to be higher using the Sonic Pad, the model still required about 16 hours to complete which is way above the predicted 7 hours and a half. Afterwards, I moved to PETG.
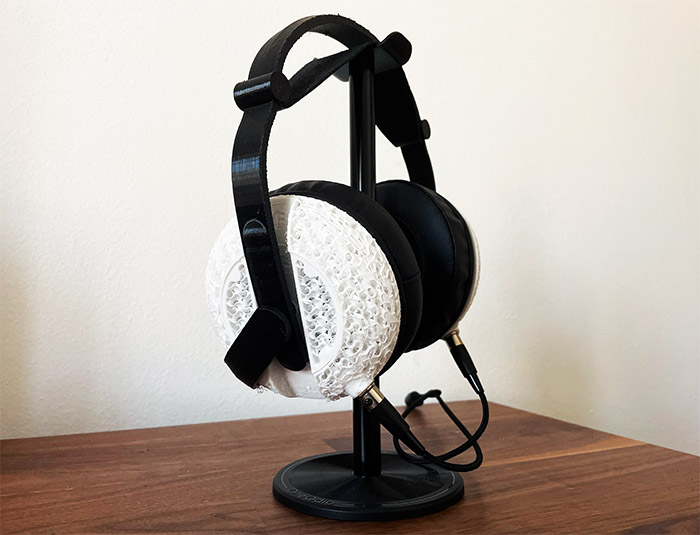
The reason I did so was not only because I wanted to check this incredibly moody type of filament, but also because it was finally time to print the Vector Finese head(amame) pair of headphones that I have been putting off for over a year. And, as you can see, it’s a very, very complicated model. There is a very high amount of stringing which I suppose I managed to keep in check on most pieces, but I could not on the open-ear cone design. I know that the developer used a Prusa machine and yes, the results are much better.
The proportions were at times not that great and I had to carve into the model for everything to fit in properly, but, in the end, a few cuts on my fingers later, the model was done and the headphones sound good. Again, it’s not the best print and I did follow the instructions to the letter, so if you’re budget-constrained, the Creality Ender-5 S1 will work fine, but for perfect prints with PTEG, you may want to up the budget a bit. Now let’s talk about TPU. I honestly expected a disaster, but it turned out that the Creality Ender-5 S1 can handle this filament just fine and you don’t even have to print very slowly either.
The first time I printed with TPU (using the Creality Ender-5 S1), I decided to just leave everything on default, up the temperature to 235 degrees (80mm/s speed, default retraction speed on Cura) and I know it will not be a surprise to anyone that’s been 3D printing for a while, that the nozzle got clogged a few layers in. So, I swallowed my pride and slowed down the print to 30mm/s (still plenty fast) – I also disabled retraction and lowered the hotend temperature to 210 degrees C.
Three hours later (double the amount it took to print it with PLA), I got a good model. There was some stringing between the eyes, but considering that the model was printed without supports. I think it turned out better than expected.
The Conclusion
Seeing that it’s constantly updated, it’s clear that the manufacturer wants to make the Creality Ender-5 S1 the community darling just as much as the Ender 3 printers. And you do get lots of options for modding plus the open-source nature of the software do promise a bright future for this series. The cubic frames help a lot with stability especially when using the Klipper software and it goes without saying that the Creality Ender-5 S1 needs to be use it with Klipper – be it the Sonic Pad or just a Raspberry Pi – it’s worth it, trust me. The prints are faster without a compromise in quality.
I have tested the 3D printer with three types of filament and it handled both the PLA and TPU with ease, and I can’t say that it struggled with PTEG, but it may not produce the best works if the model is overly complicated (unless you figure out a way to keep the stringing in check – I did not). There are some hiccups here and there, some necessary adjustments to the Sonic Pad software (if you’re using one with the Creality Ender-5 S1), but the developer team seems to be keen on solving everything quickly. I suppose the one major complaint is the plate which is just unusable. Replace that and you get a very good 3D printer for the price.
Creality Ender-5 S1
-
Pros
- Cuboid-shaped for better support
- Successfully tested with PLA, TPU and PTEG
- Built-in touchscreen display
- Has filament-runout sensor
- Works well with the Sonic Pad
Cons
- The flexible coupling needed immediate replacing.
- When using the Sonic Pad, I had to manually change some parameters for the auto-leveling to finish.
- Sometimes, I get an "out-of-range" message which solves itself after a device reboot.
- It is very difficult to insert the TPU filament into the Bowden tube.
- The 3D printer does not support WiFi unless you add the Sonic Pad.
Mark is a graduate in Computer Science, having gathered valuable experience over the years working in IT as a programmer. Mark is also the main tech writer for MBReviews.com, covering not only his passion, the networking devices, but also other cool electronic gadgets that you may find useful for your every day life.