
The 3-axis handheld gimbal has played a critical part in the video and movie industry, being able to ensure a higher degree of stabilization for the camera operators and like any other technological development, it has gotten cheaper over time, therefore accessible to the larger public. This will cheer up a lot of videography students that can now leave behind their cheaper flycams and embark on a new, more easily stabilized journey.
But, the smartphone has brought a numerous new public which is very curious about how to get that buttery smooth video shot and possibly have their first go at vlogging. At the same time, this public is not willing to spend hundreds of dollars on a gimble and fortunately, there are lots of entry-level devices to help them get their feet wet with how to use this technology and one of the main representatives is the Funsnap Capture 2.
This device is the second generation, so there are various aspects that have been improved from the original gimbal and some of the features that you can expect, besides the 3-axis stabilization, are the time lapse modes (includes slow-motion, motion lapse and hyper lapse), the auto face tracking which has proven to be surprisingly well implemented (there’s also object tracking) and the rocking bar moves in all directions to allow you to capture that perfect shot.
Furthermore, the Capture 2 is a lot more portable than the professional-grade gimbal, so you shouldn’t have any trouble carrying it with you on a long trip. That being said, this gimbal does look promising, so let’s delve a bit deeper and see if this device is a good starting point towards capturing better videos.
Design
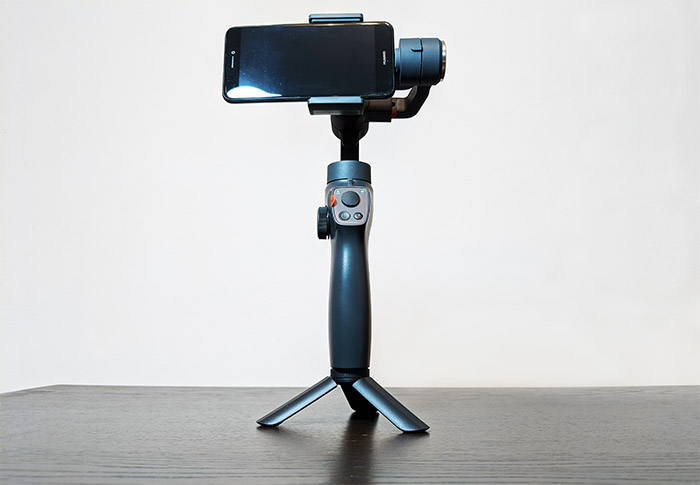
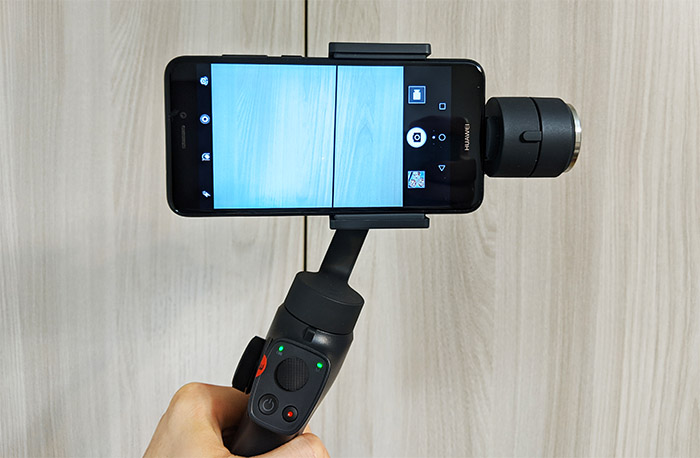
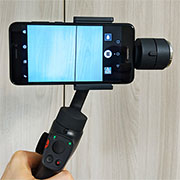
Immediately after I opened the box, I realized that Funsnap Capture 2 took some inspiration from one of its main competitors, the DJI Osmo Mobile 2, so you can expect a similar ergonomic handle, shaped in a way that offers a comfortable grip which is something very useful when you’re shooting videos for a long period of time and at the top of the handle, there are three arms that can rotate up to 320 degrees. At the end of the third arm, there is a small adjustable clamp that can fit most types of smartphones (the clamp can be rotated 360 degrees in increments of 90 degrees). The handle piece and the clamp are made of plastic and both are covered by a black matte finish, while the arms seem to be metallic which does give a premium feel to the device (they’re also covered by a soft-to-the-touch matte finish). It’s worth noting that the DJI Osmo Mobile 2 and the Capture 2 do feel the same, but the latter is currently significantly less expensive.
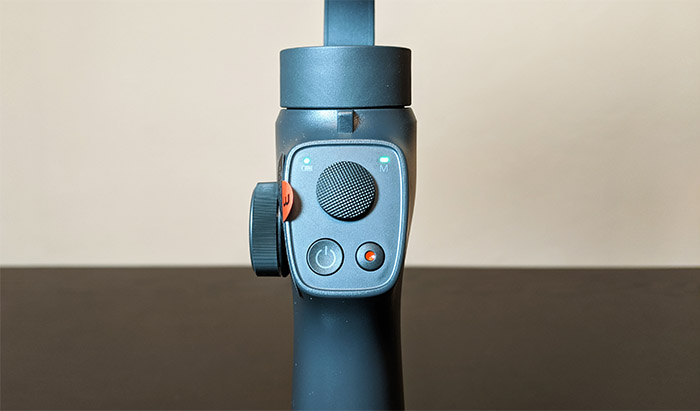
The handle has a small area on the front which is easily accessible with your thumb and it contains the Power / Mode button which you need to keep pressed for 3 seconds to power the device on or off and if you quick press it, it will change the Mode: by default, the M LED will be green and the device will be in Full-follow Mode (the pan and tilt axis follow the handle movement, while the roll axis is locked) and if you press the Mode button, it will take you to the Lock Mode (all the axis are locked and the M LED will be red); if you press the Mode button again, it will take you to the Pan-follow Mode, where the tilt and roll axis are locked, while the pan axis follows the handle movement (in this case the M LED will be blue). Next to the Power/Mode button, there’s the Shooting button (press it once to capture a photo and press it for 2 seconds to start recording – quick press it to end the recording) and on top of these two buttons, there’s a joystick.
The joystick is surprisingly responsive and it will quickly pan and tilt the attached mobile device; to the left and to the right of the joystick, there are two LEDs, one is the aforementioned M LED (will show which mode is active) and the other is the Battery LED which will be solid green when it’s fully charged, it will become solid green when there is less than 30% of battery life remaining and when it goes underneath 10%, the LED will start flashing red. To the left of the handle, still very easy to access with your thumb, there’s a Zoom dial which I’ve got to admit is a superior solution than what DJI has to offer, making it a lot easier to zoom in and out of a specific scenario than when using a slider (you can also adjust the sensitivity from the proprietary app).
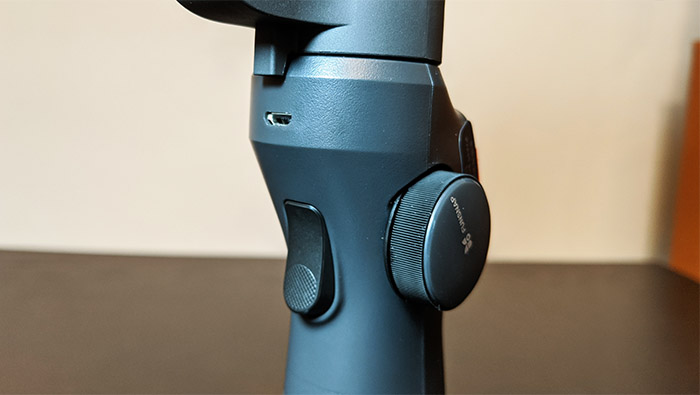
On the rear side of the handle, there’s the Trigger button that can be used to activate the Lock Mode and quickly pressing it twice should put the device in Power-on state (it didn’t do anything in my case – you can also define its functions using the app). Close to the Trigger button, you will notice a small microUSB port that you can use to recharge the battery (there is a small cable provided in the package). At the bottom of the handle, there is a tripod mount available, so you can attach the Capture 2 to any type of tripod – if you don’t have any available, Funsnap has added a small plastic tripod in the box, which has proven to be surprisingly sturdy even after I attached the 6.17oz Google Pixel 2 XL to it.
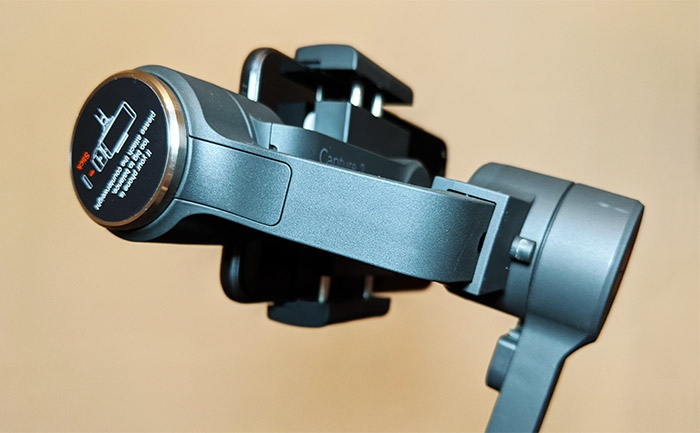
One mildly annoying thing is that you can’t add any external microphone to the gimbal, so you will have to rely on the phone’s mike (the end of the phone sits into the designated area next to the tilt motor); if you do manage to put the phone the other way around, while also keeping the footage unaffected by the arms of the gimbal, you should be able to attach a mike at the end of the phone. If your mobile device is too large (Funsnap says that the clamp range is between 2.3-3.6 inches) and if the motors struggle a bit to keep your phone balanced, then you can use the provided counterbalance – it needs to be glued to the other end of the tilt motor (by removing the sticker). I’m not really a fan of this approach and I do think that the counterweight should have been magnetic since in this scenario, it’s a permanent solution to a temporary problem.
The problem with some stabilization gimbals is that despite being made for easing up the work of a videographer, they’re quite large and heavy, so they’re not easy to take along on longer trips. As you may expect, this is not going to be a problem for the Funsnap Capture 2 which measures 11.6 x 44.4 x 28.3 inches and weighs 17.63oz, so it’s also going to go easy on your hand if you’re about to shoot a long video. To carry the gimbal around, you get two options: either use the styrofoam case in which you received the device or the small textile pouch (which I also found in the package, but I’m not entirely sure if it’s available for every configuration). Ideally, when you travel, you would want that the arms of the gimbal to be locked and not move around and the Capture 2 does allow you to lock the roll motor into place, but the other parts will still move (it’s still better than nothing).
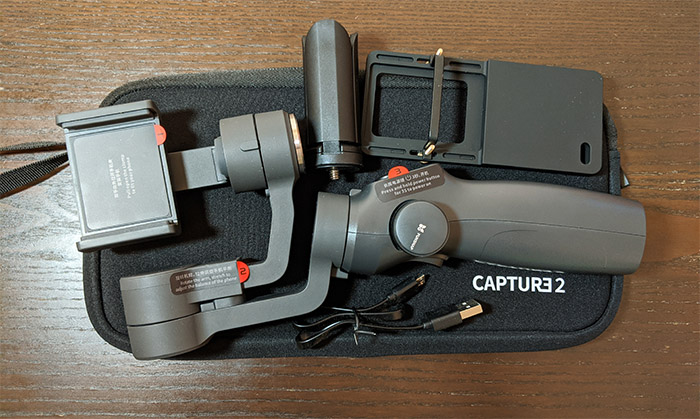
Inside the package, I also received a rectangular metallic piece covered by a rubber-like coating that has the dimensions of a small smartphones and can be used to attach a GoPro (5/4/3+/3) – you need to use the two provided screws and the additional metal piece to snap the GoPro into place and then attach it to the Funsnap Capture 2 like you would with a regular smartphone.
Note: The Capture 2 gimbal does not have a Sling mode available.
Setup and Functionality
After you take the Funsnap Capture 2 gimbal out of its cover, it can be a bit intimidating figuring out what you should immediately do. Thankfully, the manufacturer has strategically placed three info labels to get you going: first, you need to position your smartphone inside the clamp (I had to remove the cover from a Pixel 2 XL since it didn’t seem like it properly sat into place – it did without the cover) and you need to push the device inside the dedicated area attached to the tilt motor. On the next step, you need to unlock the arms by pushing lightly to the left (if you don’t do this before unlocking the mechanism, the motor will have a weird tremor while trying to stabilize the phone, due to it being stuck) and lastly, you need to press the Power button from the handle. Doing so, will light up the two LEDs (so you can quickly see how much battery is left) and after a few movements from the gimbal’s arms, the phone should stabilize in a proper position.
At this point, you can simply open the Camera app from your phone and start recording a video and toggle through the available modes that can be activated using the physical buttons. But, to get the most out of your Capture 2 gimbal, it’s worth checking up the proprietary app. The application is called Capture 2 and after I installed it on my mobile device, I was asked to either log into an existing account or create a new one right away. Of course, I chose the latter and after I entered the credentials, I kept getting a Chinese message (I have no idea what it meant – it’s worth noting that the language was set to English) and after a few tries I gave up and just tried to log into an nonexistent account. And it worked… I have no idea how or why, but I apparently could log into the app without having to register (the app developers should really have a look at this issue since it may pose security risks).
After logging into the app, I was welcomed by a new window, where I could choose between the first Funsnap gimbal model or the Capture 2 and after choosing the correct device, a small window appeared in the middle asking me to choose the gimbal that I wish to connect via Bluetooth.

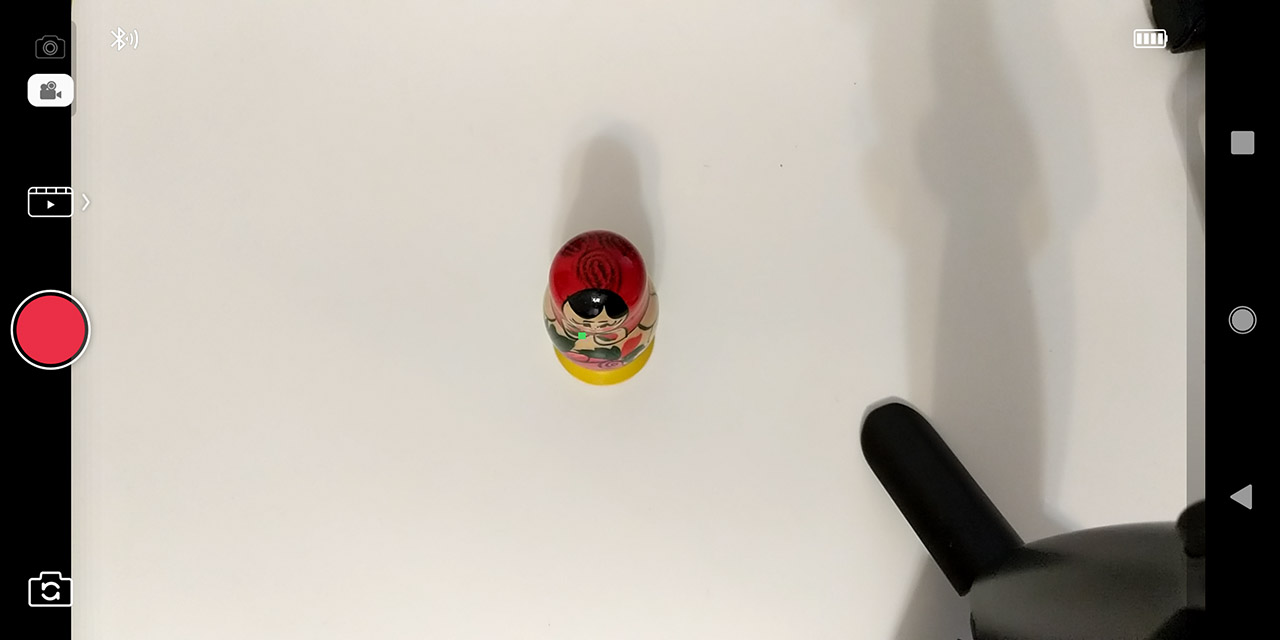
Doing so has taken me to the main UI, which resembles the native camera app, but it does have a different set of options: on the top left corner, you can change between the Photo and Video modes (right next to these icons, there’s the Bluetooth signal strength, which should always be full since the two devices are always attached one to the other) and underneath, when you’re in Video Mode, you can toggle through the four available TimeLapse modes: first, there’s Auto, followed by Timelapse (you get to select the Interval and Duration), the Hyperlapse and the Motion-Timelapse (similarly to the previous two modes, you will be able to select the Interval and Duration, but before that, you will need to create several positions by moving the camera, so it will know in which way to move while creating the timelapse video).
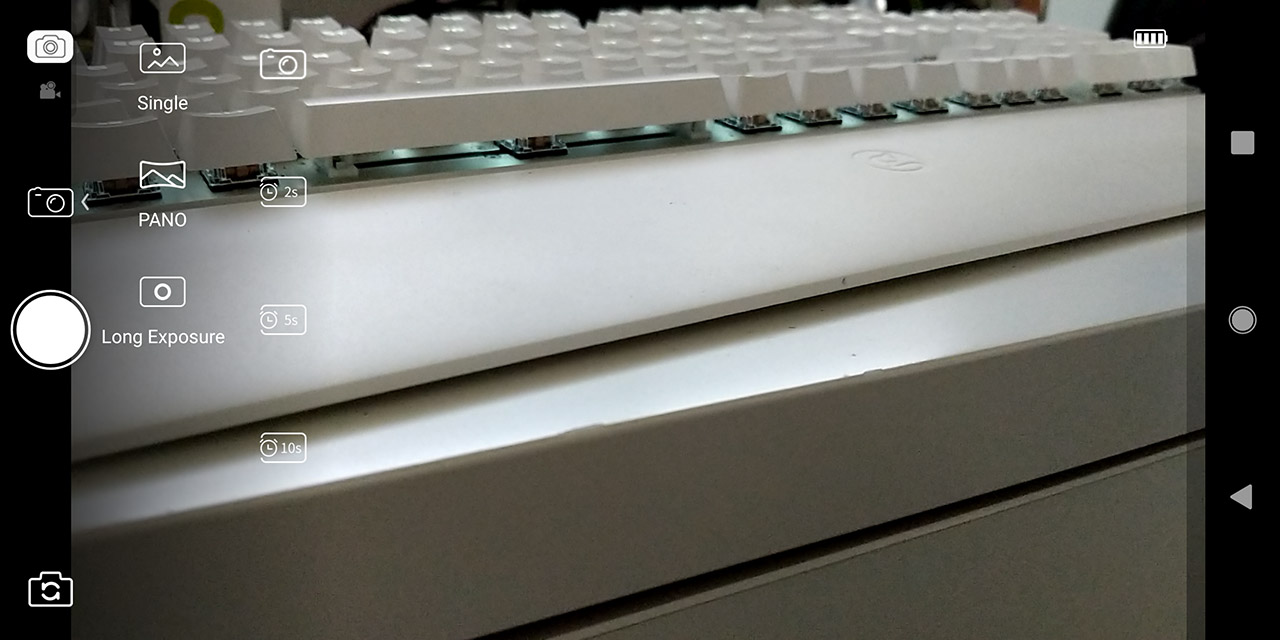
If you’re using the Camera mode, then you will get to choose between the Single shot (you can also set timers), the Panorama mode (180 or 320 degrees + grid) or the Long Exposure mode (select between Ghost and Long Trail – both create awesome effects). On the right side of the screen, there is another set of options: Home (to return to the window where you can select the gimbal), followed by Tracking option, where you can select between Face Tracking and Target Tracking. The Face Tracking works great and it will follow the person around at a walking pace but I found that the Target Tracking is a bit of a hit or miss, so even after I selected a certain area, the camera would sometimes fail to detect it, especially if there is a lot going on in the background – I did try this option with a white background and a small object and it worked perfectly fine.

Further down, you can change the Camera settings, which includes the Video Resolution (can go up to 4K), enable the Beautify Mode (the max resolution can only be 720p while using this mode), select the Filter (such as Antique, Calm, Emerald, Fairy and more), adjust the White Balance, configure the Flash, enable the type of Grid that you want in the frame, the Photo Aspect Ratio, the Storage Location and Other functions (allow you to enable/disable the Video stabilization and see the firmware version).
Underneath the Camera settings, there are the Gimbal settings, where you can adjust the Scene mode (it’s the response speed of the gimbal depending on the type of movement that you’ll be doing – can be Walk, Sport and Extreme), choose between the Lock All Mode and FPV mode, select the function of the Trigger button (Lock or Phone go), the way the Wheel will react (adjust its Sensitivity, Reverse it’s movement and select between Pitch and Yaw modes), adjust the Joystick feedback and configure Other functions (such as Initializing the sensor, performing Horizontal fine-tuning or viewing a Video tutorial for how to use the gimbal). Lastly, there’s the Gallery, where you can view the captured photos and videos.
When you’re walking, the gimbal will go up and down depending on how fast you walk and that’s because this is the only axis that the device does not stabilize (only the rotational ones), so, to get a smoother video, you will need to learn to walk more smoothly, so you can stabilize the gimbal first and then it will do its work stabilizing the smartphone or GoPro camera.
Note: The device comes equipped with a 18650LiB 4000 mAh non-removable battery and it will take about 2 hours and a half to fully charge it – while I tested the gimbal, I noticed that the battery would be able to provide about 8 hours and a half to nine hours (a bit short of the promised 12 hours, but still quite decent).
Conclusion
While it still can’t completely replace a professional camera, the smartphone has made some serious advances in the photo and video shooting department, so, if you’re willing to get more serious about videography, then the Funsnap Capture 2 gimbal does offer an inexpensive way of getting a smoother footage and there are some cool features to explore, especially if you’re a novice in this field and still learning things. Both the design of the gimbal and the app are very similar to what DJI has to offer with its Osmo Mobile 2 which means that while the Capture 2 doesn’t bring anything to the table that we haven’t seen before, it does work as intended (regardless of some small shortcomings), so, if you’re on a tight budget, but want to get a more stabilized video, the Funsnap Capture 2 is the way to go.
Funsnap Capture 2
-
Pros
- Reliable stabilization
- Solid build quality
- The face tracking works great
- Lots of cool features and adjustments
- The travel case is a nice touch
Cons
- The target tracking i a bit of a hit or miss
- You can't switch cameras when recording a video
- The registration process is weird