
Pi-Hole has been deemed as one of the most effective ways to block ads network-wide since it works at the DNS level, which means that it doesn’t affect the network performance and it can actually improve it considering that some ads can slow down the loading time for websites or apps (and with Pi-Hole, they don’t get downloaded at all). I don’t think I have to explain to anyone why some ads are bad and intrusive, so, in order to protect ourselves from being bombarded by advertisements everywhere on the web, there are some browser-based extensions to tame some websites’ invasive nature, such as uBlock Origins, Privacy Badger or AdBlock Plus. Considering the number of steps necessary to actually run Pi-Hole are a lot more difficult than using an ad-blocker (and it may require some additional hardware components), this solution has always been seen as something more suitable for the tech-savvy users.

Unfortunately, due to the current war waged against the ad-block software (mostly by Google), the Chromium-based browsers will be changed so the ad blocking is taken away from the dedicated extensions and performed by the browsers themselves, where the big search engine giant will decide what ads should go through and which should be blocked. For this reason, the ad-block software may become less effective and more users should try looking towards Pi-Hole as their best solution. It’s worth noting that Opera pushes some integrated VPN functions (will work more like a browser proxy) and Firefox wants to become the most secure browser, while Google Chrome prefers to eat glue (and Microsoft Edge wants to join in – Chromium will soon be at the core of the Microsoft Edge).
- What is Pi-Hole?
- How to install Pi-Hole on a Raspberry Pi 4? (with AmpliFi HD)
- How good is Pi Hole at blocking ads network-wide?
What is Pi-Hole?
Pi-Hole is a DNS-based ad blocker (also known as a DNS blackhole or sinkhole) which effectively compares the received DNS requests from your clients to the pre-set filters and, if the domain is not blocked, then it gets through, otherwise, it returns a Null IP (Pi-Hole can also be used as a DHCP server). To get a better understanding on how things work, let’s have a look at what Pi-Hole can do. Pi-Hole was originally developed to work with Raspberry Pi mini computer, but it can now be installed on a a virtual machine and it’s even compatible with some Linux distros – in my case, I decided to install it on a Raspberry Pi 4. Furthermore, Pi-Hole works network-wide which means that every device connected will have the app blocked and not only on the browser, but in apps, as well, which is something that the ad-blockers haven’t been able to accomplish – unfortunately, YouTube seems to remain unaffected.
Since that the ads are blocked even before they’re downloaded in your devices, you gain both a faster network (considering that the images, videos or sound files aren’t being downloaded, the websites will load a lot faster) and a less bandwidth consumption (helps keeping the latency low), but there is also a welcomed side-effect: using some specific lists, you can even prevent malware from infecting your devices. Very recently, the Pi-Hole developers announced that they will drop the support for ad blocklists which where used by the traditional ad-blockers (that worked at the browser-level) and instead it will be using DNS/host-based blocklists.
The reason for that is because the developers wanted to use blocklists that are formatted specifically for Pi-Hole since before, the AdGuard lists would generate lots of false positives and the community has been complaining about it for a while now. More specifically, the previous lists would block an entire domain when the target was only a script and the best example is the Facebook apps (including Messenger) which would break due to some domains being blocked (such as graph.facebook.com). That being said, besides less false positives, you shouldn’t really see any difference between the functionality of the Pi-Hole using the previous and the current lists.
One disadvantage that Pi-Hole has over the ad-blockers is that it doesn’t remove the location of an ad and instead, it leaves a blank space which can be very annoying when browsing via a mobile device; at the same time, one advantage is the fact that it keeps logs for every DNS query sent to it, so you can easily see what type of traffic is coming and going from your network. Probably the most relevant difference is the fact that Pi-Hole blocks the ad domain, so, if you want to whitelist a website that you like, you will have to whitelist the ads domains globally, so, they’ll show up not only on your favorite website, but on other websites as well – at the same time, this is an effective tool to block only those unwanted, annoying ads, while still leaving those that aren’t that aggressive.
Note: Pi-Hole is a free software and is constantly being maintained by a team of dedicated developers, so, if you like using it, then you should consider donating to the project.
How to install Pi-Hole on a Raspberry Pi 4? (with AmpliFi HD)
Note: This is not going to be the most comprehensive guide available and there are far better step-by-step guides available on the web, such as the one from Blog.Cryptoaustralia.org.au or from SmartHomeBeginner.com.
Pi-Hole can be installed on a Raspberry Pi device, but, as I said before, this is not a limitation since it can be installed on other platforms as well, but, considering that I want to use it alongside some routers and WiFi mesh systems, I found the separate small computer to be more than ideal. Keep in mind that the process is not even close to Plug-and-Play and there are multiple steps that can be deemed mildly difficult, especially for a non-techy person.
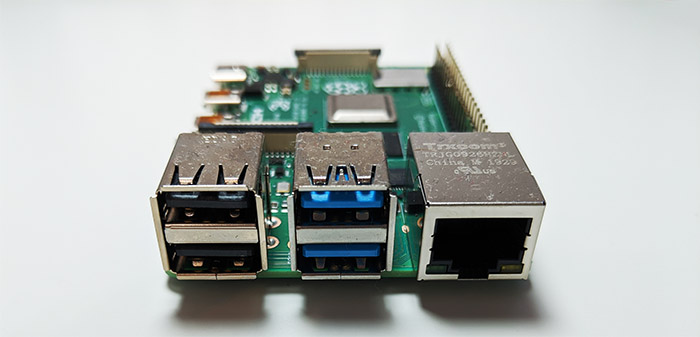
Now, why did I choose a Raspberry Pi 4 and not something from the previous generation, considering that Pi-Hole will not be using it at its full potential (which includes double 4K streaming!)? Well, it’s true that Raspberry Pi 3 may have been more suited and would have been cheaper, but the Pi 4 is newer, so it will eventually completely replace the Pi 3 (with all its variants), so there’s longer support for it and I also do have other projects in mind for the Pi 4 which can utilize it to it full potential. The device that I chose is the 2GB variant (the 4GB would have been seriously overkill) and some of the improvements from the Pi 3 B+ are the better CPU (Broadcom BCM2711 with quad-core Cortex-A72 clocked at 1.5GHz as opposed to the Broadcom BCM2837B0 with quad-core Cortex-A53 clocked at 1.4GHz), LPDDR4 RAM memory available in three variants (1GB, 2GB and 4GB), the 2.4GHz and 5GHz network connectivity + Bluetooth 5.0, USB 3.0 ports and the supports for dual 4K monitors at 60Hz.
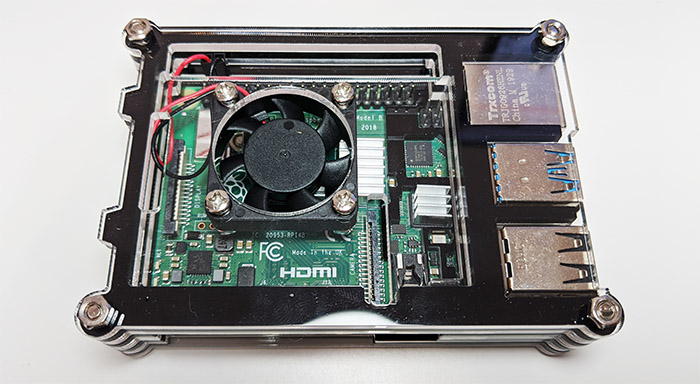
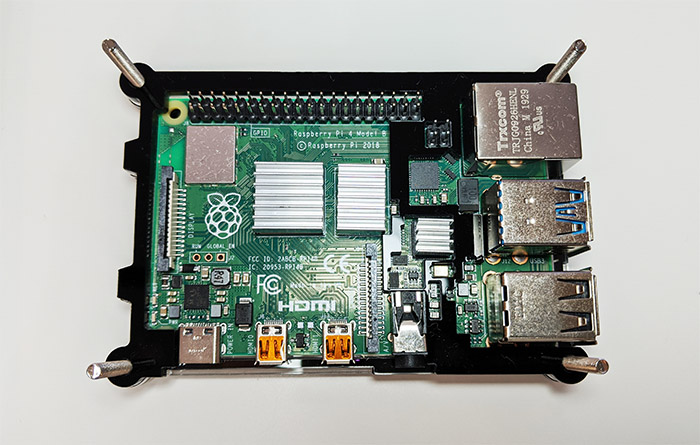
The Raspberry Pi 4 does come as a single slate, so I would advise to also purchase a case kit which should include a fan (the Pi 4 does have a bad habit of getting very hot), a USB type-C power cable (ideally, with an On/Off switch, since the Raspberry lacks such as button) and, depending on your approach, a microHDMI to HDMI cable (to connect the Pi 4 to a monitor) – I chose a transparent case similar to this one from Smraza which looks really cool and the small fan seems to be doing a decent job.
You will also need a microSD card to install the Pi-Hole since there is no on-board storage available. That being said, on the first step, you need to download and install Raspbian on the microSD card, but before that, you need to format it using any software available, such as SD Memory Card Formatter or Mini Tool Partition Wizard. There are lots of comprehensive guides that let you know how to install Raspbian, but the general consensus is that it’s better to download the Buster Lite version which is headless (no GUI) and considering that you’re only going to use Pi-Hole, you don’t really need anything more.
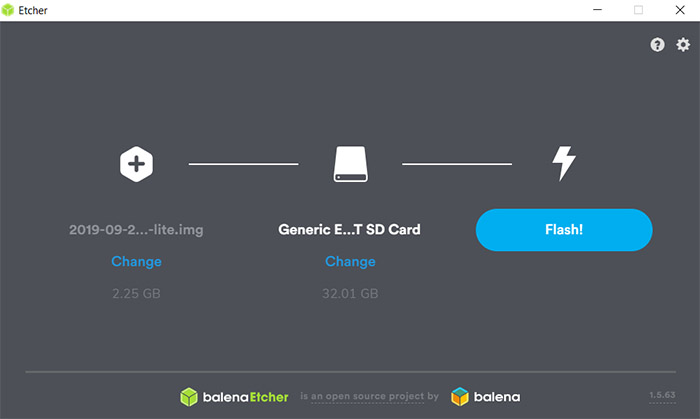
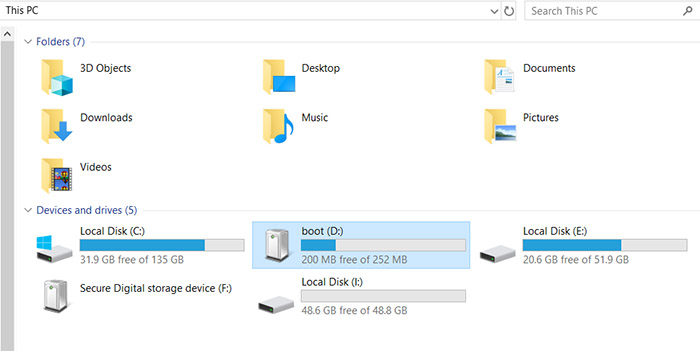
After you’ve downloaded the software (it’s going to be a disk image file), you need to use Etcher to flash the image on the microSD card and once the process is done, you will notice two new drives in the ‘Devices and drives’ window, from which we need to go to boot (if Windows OS asks to format the drive click on Cancel) and here, you need to create an empty text file named ssh without adding any extensions – this will allow you to manage the Pi-Hole server afterwards (if you don’t want to go the ssh route, you can simply connect a monitor and keyboard to the Raspberry Pi and go through the configuration wizard – the username is going to be pi and the password is going to be raspberry).
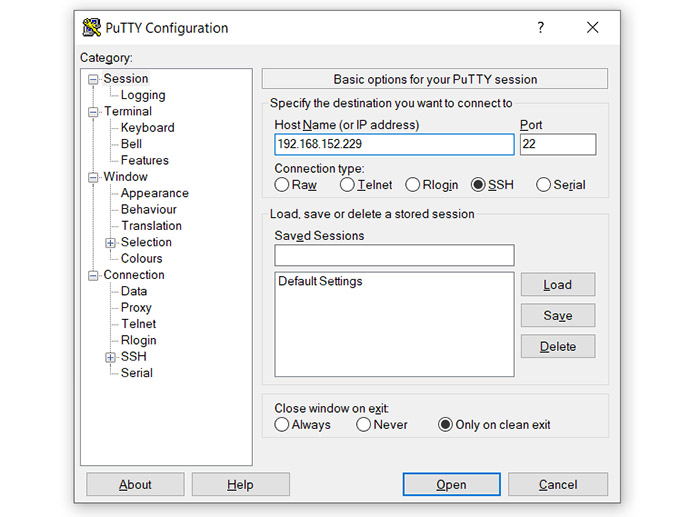
After you have added the ssh file, simply un-mount the SD card (safely, so no data is lost) and insert it into the Raspberry Pi. On the next step, we’re going to need to check the IP address that the router has given to the Pi 4 and to do so, you will have to access the router UI and identify it under clients. At the moment, I use an AmpliFi HD GE WiFi system, so everything will happen on the app: after I opened the AmpliFi app, I clicked on the Clients option which took me to the list of all connected clients and, after I saw the raspberrypi client, I tapped on it to open the dedicated client window; here, I could find the IP address under Client Details.
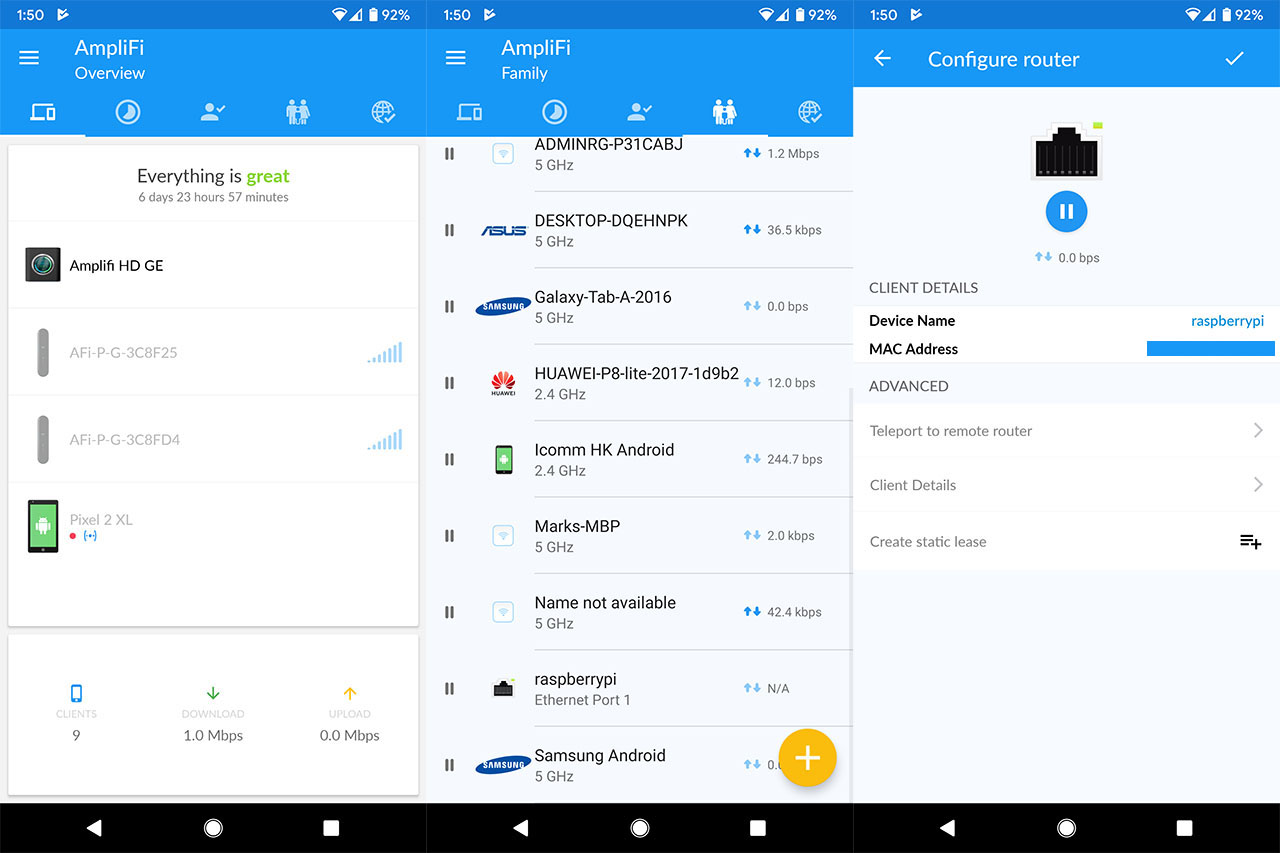
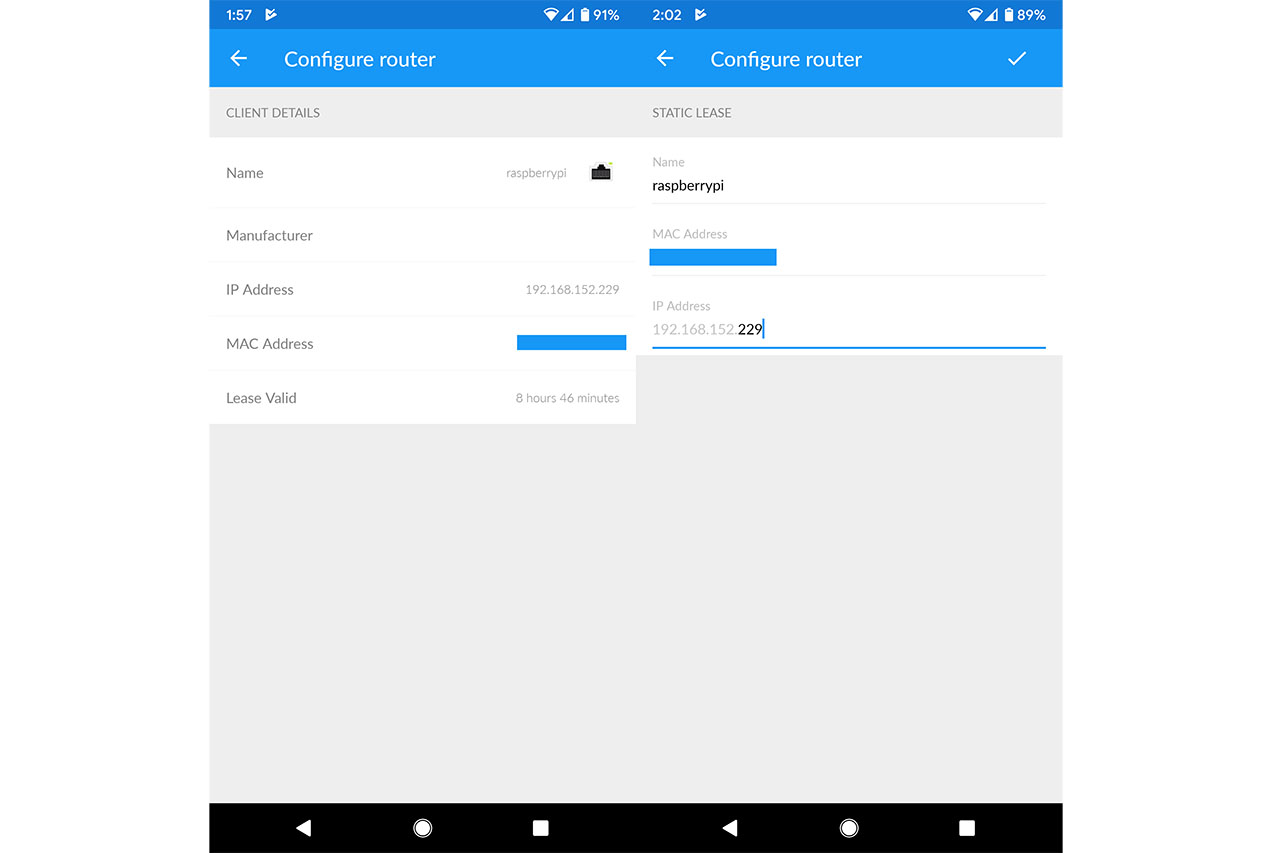
Since we’re here, it’s time to also assign a static IP to the Raspberry Pi (to prevent the router from changing it later on which would prevent the Pi-Hole from working with the router) and to do so, I had to click on ‘Create static lease’ and select the preferred name as well as the IP address that will always be used by the Pi-Hole. After that’s done, you will have to use an SSH client to enter the Raspberry Pi.
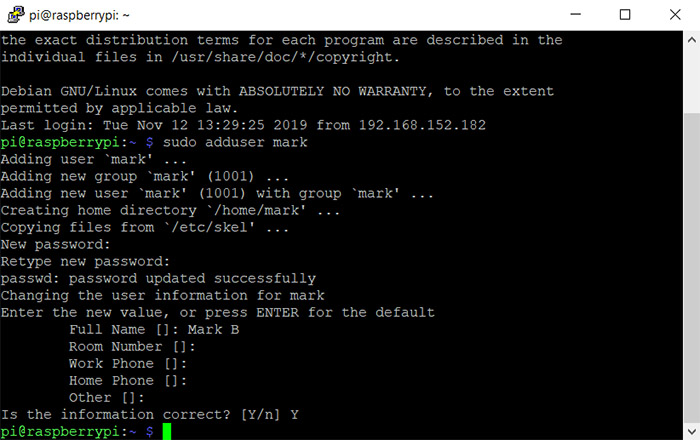
I chose PuTTY and, after I inserted the IP address, it opened a command prompt, where I had to insert the name and password (pi/raspberry) – the latter can be changed using the the ‘passwd’ command, but, it is better to completely delete the pi username and create a new one from scratch (for security reasons): first, create a new user by tipping ‘sudo adduser [name]’ and then ‘sudo adduser [name] sudo’ to become part of the sudo group, followed by rebooting the device with ‘sudo reboot’. Afterwards, after logging back in with the new username, type ‘sudo deluser pi’ to completely getting rid of the default username. Now that you have a more secure Raspberry Pi, it’s time to install Pi-Hole.
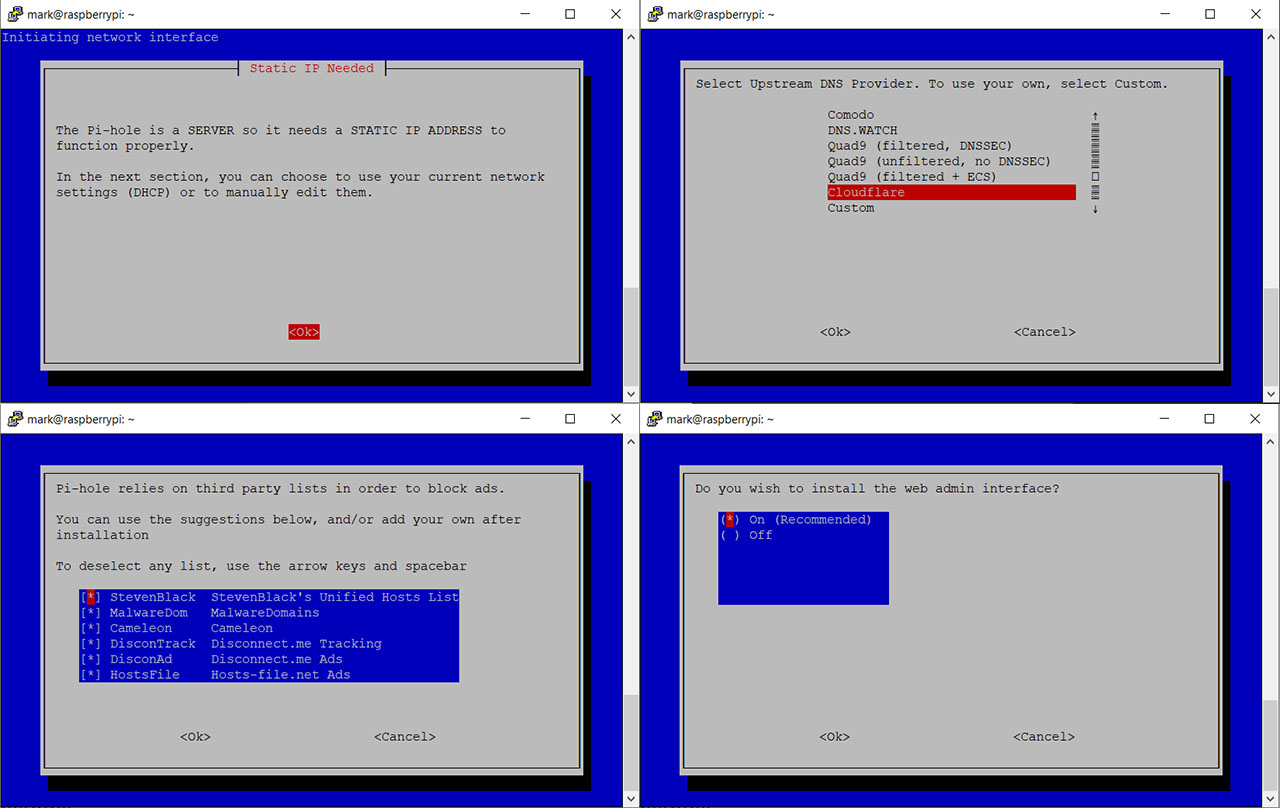
To do so, insert ‘curl -sSL https://install.pi-hole.net | bash’ and follow the instructions which include selecting the Upstream DNS Provider (I selected Cloudflare since it’s quite fast), the third party lists (by default, they’re all selected and I left them like that), the Protocols (can be IPv4 and IPv6 – I chose the former) and you’ll be asked if you want to use the current network settings as a static address (we already made sure that the Pi-Hole will have a static IP address, so it’s a Yes); afterwards, you can enable the web admin interface (you should since it will be more user friendly this way), you can also install lighttpd (which is a webserver that will work fine with Raspberry Pi) and lastly, you can enable the log queries (it’s a very useful feature that allows you to see what’s going on with the network).
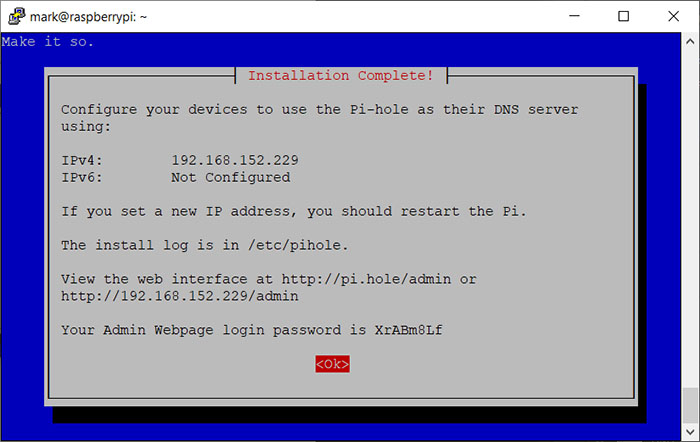
After Pi-Hole finishes the installation process, it will display a window containing some useful info that you need to write down: the install log location, the web interface address and the Admin Webpage login password.
But this not everything that you need to do, since you now have to make the Pi-Hole your DNS server, so let’s head back to the router UI and if you’re using an AmpliFi HD router, from the Overview page, tap on the main unit which will take you to the Configure router window and here, you need to tap on Internet and under Primary DNS Address, enter the IP address of the Pi-Hole while on the second you should either leave a blank space or enter the same IP address.
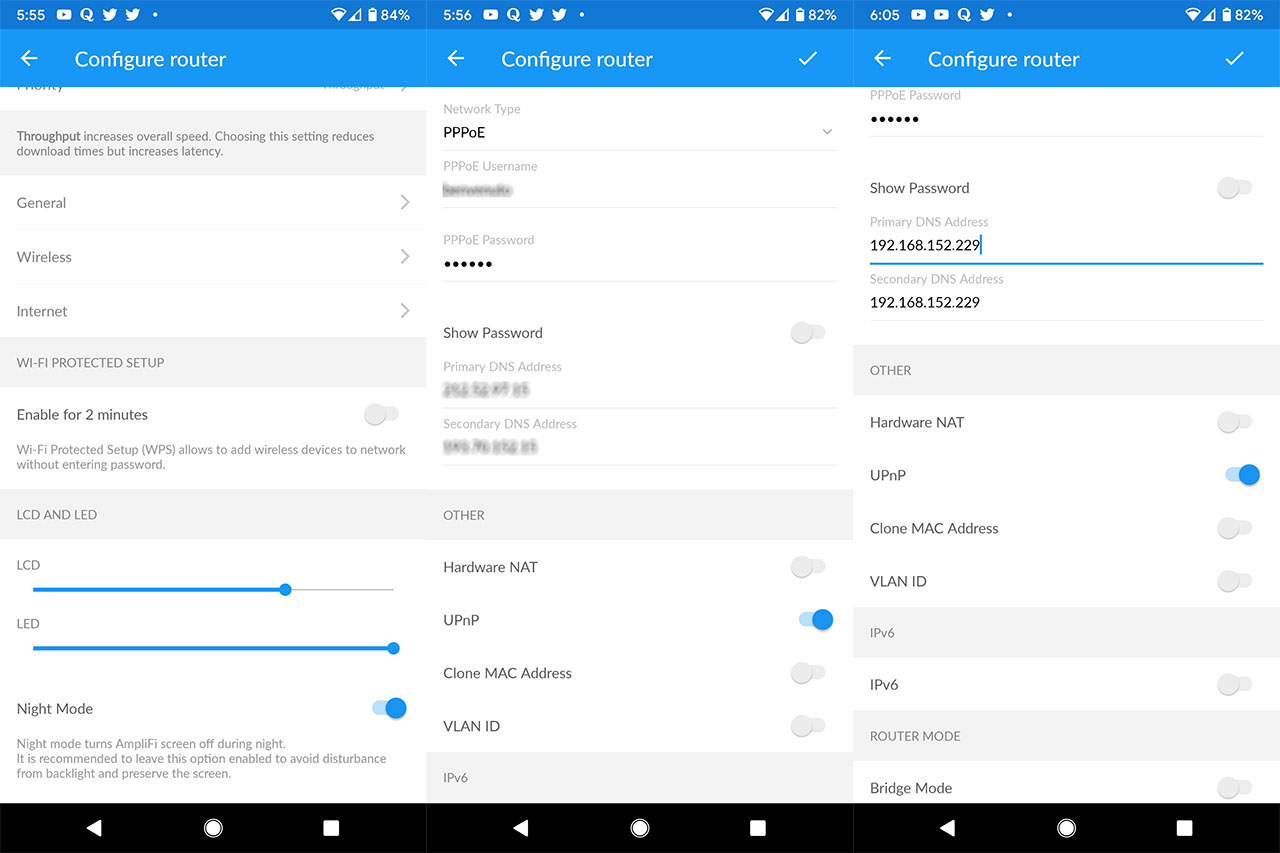
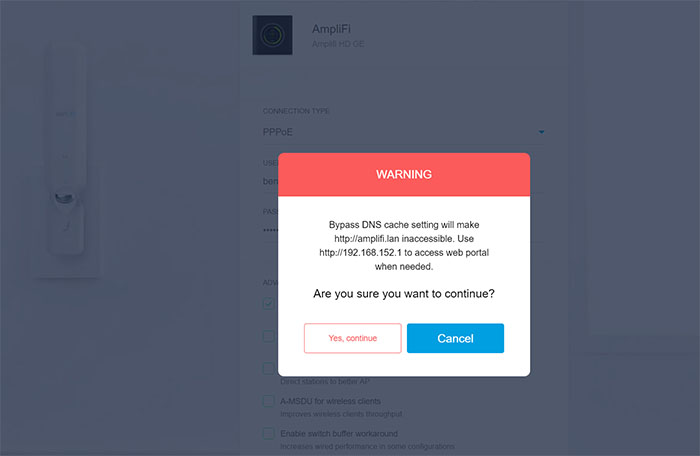
Since I didn’t set up the Pi-Hole as the DHCP server, I won’t be able to see each device, but the localhost, so, to remedy this, I had to enable the Bypass DNS cache feature and I was actually surprised that it was missing from the app, but I could find it after I logged into the web-based interface and after I enabled it, I understood why it was missing from the app: you won’t be able to use amplifi.lan to enter the web-based UI, instead, you will have to insert the IP address.
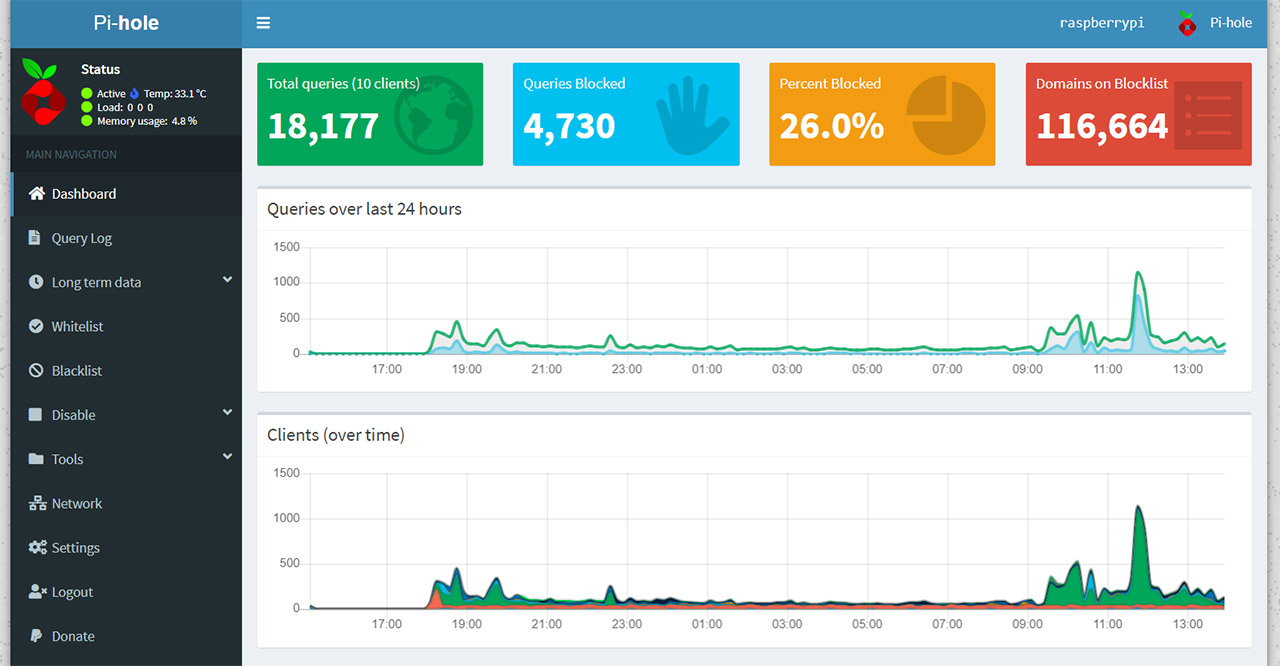
After that’s done, restart the router and all connected devices should now be blocking the ads. If you wish to customize Pi-Hole (which you should periodically do, to whitelist your favorite domains), then simply enter http://pi.hole/admin in the URL of any web page and you’ll be immediately greeted by a colorful dashboard, where you can see the Total queries (no of clients), the Queries Blocked, the Percent Blocked and the Domains on Blocklist, but, in order to fully experience what the Pi-Hole has to offer customization-wise, then you need to Log into the software using the password provided at the end of the installation process. After that, the menu on the left will be populated by lots of options and the Dashboard window on the right will be richer in the displayed info.
How good is Pi Hole at blocking ads network-wide?
I have multiple types of devices connected to the router, which includes two laptops (Windows and macOS), some Android phones, an Android tablet, a Desktop PC and a smart TV and the ads were blocked globally on all devices on all websites, including some apps (those that don’t have embedded ads), minus YouTube.com and other websites that have the ads served from the same domain as the video, therefore remaining unaffected by the blocklists (you could try seeing the domains in the Query Log and block them manually, but these change frequently and it will be a tedious work).
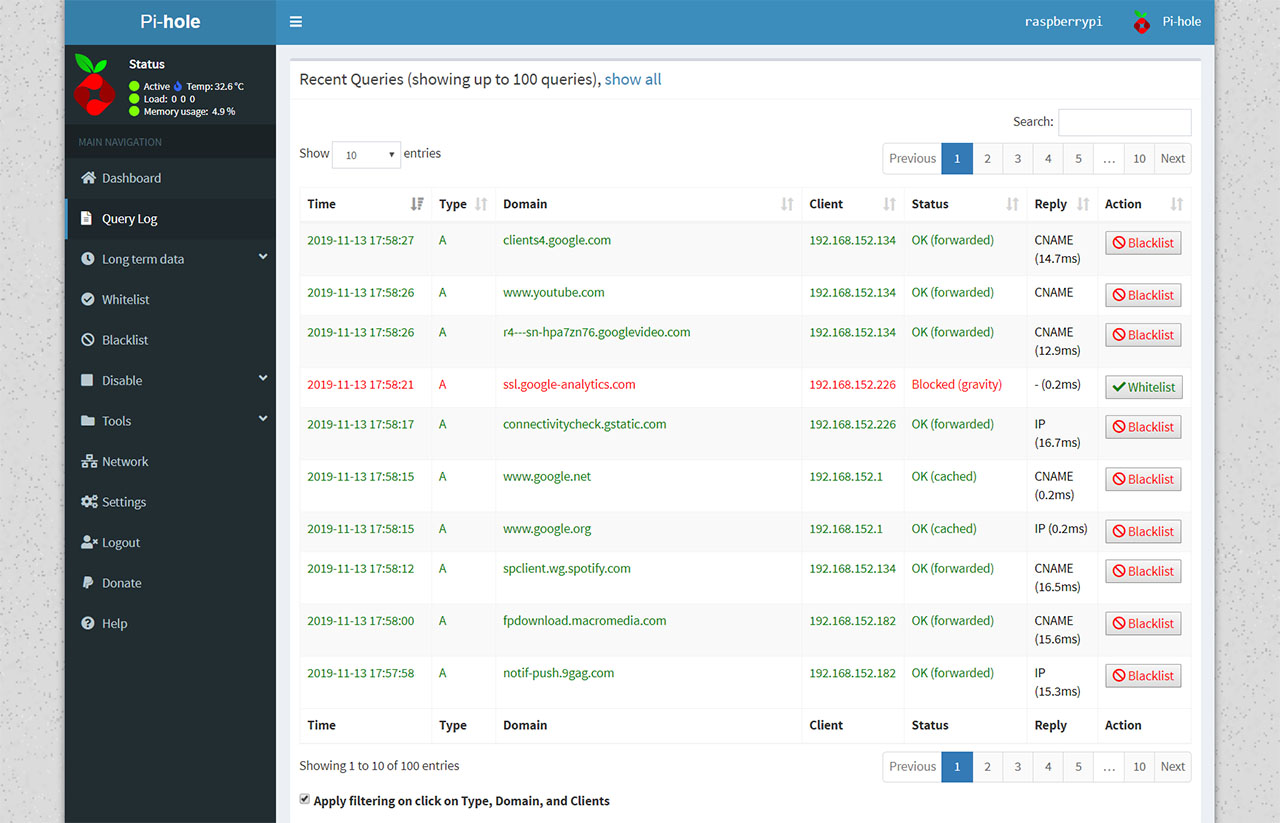
The options that I think will be the most used on the Pi-hole GUI are the Query Log and Whitelist. The Query Log can help you identify which domains are forwarded and which are blocked, so, in case there is a website that you want to it to display ads, you could whitelist those domains – to do so, you can either click the Whitelist option next to the domain directly from the Query Log or go to the Whitelist option and insert them manually. As I said in the previous section, whitelisting a website domain will still prevent the ads from being displayed since they’re usually served from an external domain, so you will have to whitelist the ads globally (they’ll appear on other websites as well).


I did find that whitelisting a specific website is easy, but time-consuming and depending on what type of ads are being served, there is a high chance that you won’t be able to whitelist them all (at every refresh, a new domain can pop-up and there we go clicking on whitelist, refresh and again and again..). One workaround could be to use a browser extension (Pi-Hole has a dedicated one), but it is important to understand that ads are probably the only reason why you don’t have to pay for the content your read online, so you should whitelist your favorite websites (at least to a certain degree) and block those that are filled with invasive ads.
So yes, Pi-Hole is very effective at its work, but my opinion is that it wasn’t created to completely block all ads from the Internet, but to identify only those intrusive and annoying ones (pop-ups, videos and the such) and block them from eating up the bandwidth and from completely pissing you off.
Mark is a graduate in Computer Science, having gathered valuable experience over the years working in IT as a programmer. Mark is also the main tech writer for MBReviews.com, covering not only his passion, the networking devices, but also other cool electronic gadgets that you may find useful for your every day life.
Thank you for this how to! Started researching this after a little bit and it seems pinhole is good but a better and more secure option along with a better GUI would be AdGuard Home. What do you think and have you tried this option yet? Seems like it performs better and can also be achieved from a vps with TLS encryption and also TLS encryption on the admin side as well.
This is just from research I’ve done. I haven’t tried either of them yet.
AdGuard is great and it’s been on my to-do bucket list for a while now – as well as a vs with Pi-Hole. So I can’t really tell you if one is better than the other, yet, but, if you have a Raspberry Pi, it doesn’t seem like you can go wrong with either options.
23 December 2019: The pi-hole is a LOT of work to set up and it doesn’t block even 1/10th of the ads. It is definitely not worth using. I hae scoured the internet for current block lists and my pi-hole is blocking over 2 million urls — but evidently they are not the urls that produce ads. It DID block my VPN until I white listed it. It blocked YouTube — not just the ads, but EVERYTHING. So I had to white list that. But my browsing expeience is terrible with pi-hole because of all of the popup ads that it allows — not to mention the others. If you have a Raspberry Pi and two days to kill (the time it took me to get the pi-hole software up and rinning), you’d be better off just building a NAS or some other project. Pi-hole is a waste of time and of a Pi.