
If you own a gaming console, be it a PS5, a PS4 or an XBox and if you have connection problems, you may have wondered how to change the NAT type in an attempt to fix all of these issues. Be aware that frequent disconnects or high ping rates are rarely attributed to the NAT type, so, before changing various settings inside the router, you should make sure that you have a strong enough Internet connection (WiFi can be a problem if the router signal is not powerful enough, although WiFi 6 has proven to be quite powerful, but an Ethernet connection is always the preferred one). If the console settings confirm that indeed you have a NAT issue, then there are a few things that you can do to alleviate the problem (some more secure than others): DMZ, Port Forwarding and UPnP. Before that, it’s important to understand what is NAT and what is the difference between the NAT types.
NAT (Network Address Translation) was created out of necessity because we started to run out of IPv4 addresses, so, when you connect multiple clients and devices to your router, instead of receiving individual public IPv4 addresses, they’ll all use a single public IP address (the WAN address), while the router will have the role of translating the inbound and outbound traffic from this address to the clients from the local network.
To do so, the router needed to create NAT rules and, while the traffic that goes from your clients to the Internet is allowed by the NAT rules by default, the inbound traffic is the one that requires special attention because the outside traffic will point towards the single public IPv4 address and it will be up to the router to point it to the right client from the local network. So, to accomplish this, the NAT rules will use specific ports to make sure that the inbound traffic will reach the private IP address of your client and these rules can be created manually or automatically depending on the approach you choose.
Which are the NAT types?
The NAT type is a concept created specifically for the gaming consoles to define the limitation level applied to the connection between your console and an external host or public network. To view the NAT types on a Sony PlayStation 5 (available also on the PS4) you need to go to the main menu, select Settings, Network and under the View Connection Status, click on Test Internet Connection to see the current NAT type. It can be:
- NAT Type 1: also known as Open NAT, it indicates that the PS5 or PS4 is fully open to the outbound and inbound traffic, so it has the least chance to experience any disconnects in this mode (usually achieved through DMZ – you can also directly connect the console to the modem and assign it an IP address).
- NAT Type 2: known as Moderate NAT, it correctly points the inbound traffic to the console, so it poses minimal security risks (achieved through UPnP or Port Forwarding).
- NAT Type 3: this is the Strict NAT which may not accept the incoming traffic properly, so it can cause problems with some games (and you may not be able to connect to some users over the Internet).
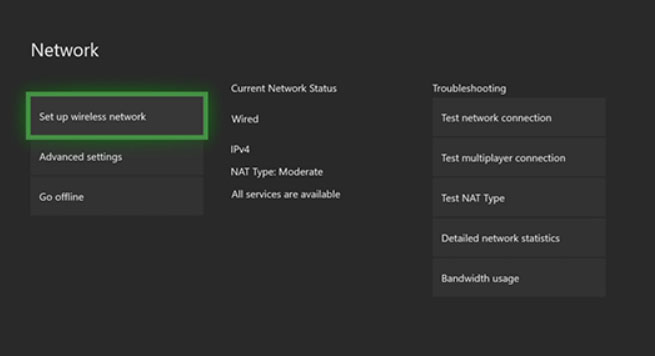
To view the NAT type on a Microsoft XBox (X / S), you need to go to Settings, General, Network settings and, under Current Network Status (on the right side of the UI), you should be able to see the NAT Type which can be:
- Open NAT: unlike the PS5 / PS4, it doesn’t necessarily indicate that the console can connect to anyone from outside the private network, regardless of their NAT type, but that the ports are forwarded properly (you can be the host for multiplayer games).
- Moderate NAT: this NAT type is defined by Microsoft as allowing you to be the host in a multiplayer game most of the times, but it can also create problems over time and it may lead to lag – so, in a sense, it seem to be close to Type 2 on a PS4, but slightly worse (you may not be able to forward ports from some users).
- Strict NAT: Microsoft defines this NAT type as not allowing you to be the host of a multiplayer game and you may also be unable to connect to all outside users (the ports aren’t forwarded properly).
Besides these NAT Types, you may sometimes notice that your gaming console will say that it detected Double NAT. This happens when both the router and the modem act as DHCP server and to fix the Double NAT issue, all you need to do is to make sure that the router is the only DHCP server, while the modem is put in bridge mode (this situation is very common when dealing with DSL modem routers).
What are the most common methods to change the NAT types?
DMZ
First, there’s the DMZ method (demilitarized zone) which allows the outbound traffic to be forwarded towards a separate network which will include either your PS5 (PS4) or the XBox, so it is a safe approach especially since the gaming consoles are pretty much robust in terms of security. But, the problem is that what some routers call DMZ is actually an exposed host. What this means is that the outbound traffic (which comes from the outside) doesn’t point towards a separate network (such as a VLAN), but towards the client itself within your internal network.
This means that in case the console becomes compromised, the infection will spread throughout your network and affect other devices as well (such as your PC). If you play competitive games that require a lower latency (such as COD), then DMZ is the best solution and will allow that Open NAT to appear on your console, but you need to make sure that the router doesn’t just expose the host.
Note: Another issue that may arise is the possibility that if you add an IP address in DMZ, it may be assigned to a different device over time, but to alleviate this problem, some routers do allow you to configure DMZ using the MAC address, instead of the IP.
How to configure DMZ on an Asus router?
The first thing that you need to do is access the web-based user interface of the router (I used an Asus RT-AC86U) and to do so, go to the default IP address (which is usually 192.168.1.1 or 192.168.0.1 – with newer Asus routers, the default address has been changed to 192.168.50.1) and enter the user name and password. Afterwards, on the menu on the left, under Advanced Settings, click on WAN, select DMZ from the top menu and click on Yes, next to Enable DMZ. Lastly, enter the IP address of your console (can be found at the Network Map > Clients) and press Apply. If you’re using AsusWRT (Merlin), then setting up the DMZ is identical to the default firmware.

How to configure DMZ on a Netgear router?
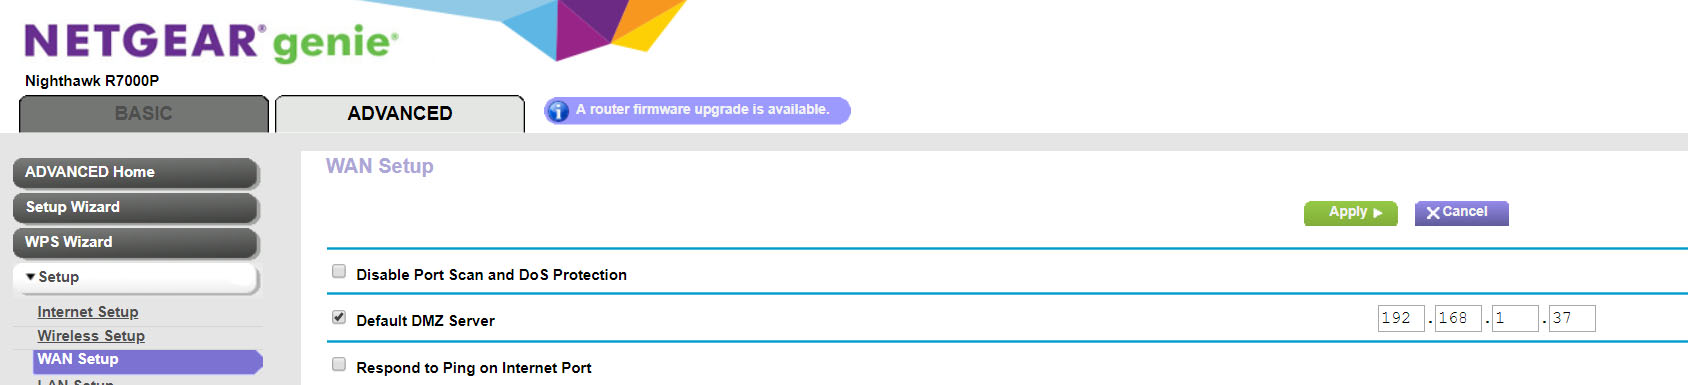
Just like on the Asus router, you will need to gain access to the Netgear Nighthawk user interface (I used a Netgear R7000P) by going to the default IP address (192.168.1.1 or 192.168.0.1) and enter the password. Next, select Advanced from the horizontal menu and, from the left menu, choose Setup and WAN Setup. Here, simply enable the Default DMZ Server and insert the IP address of your console (can be found under Basic > Attached Devices).
UPNP
Since DMZ is not ideal, the most common method is to use UPnP. Unlike DMZ which opens all the ports, the UPnP (Universal Plug and Play) dynamically assigns which ports need to be open, so you don’t have to manually set them (the Port Forwarding method). But I know you heard that UPnP is bad, so should you still use it? The security problems with UPnP came to light about 7-8 years ago when some routers were exposing services on the WAN interface (not all routers were vulnerable) and, in the meantime, most, if not all router manufacturers have released fixes for this problem and the newer routers should be completely safe.
Still, UPnP remains a risk because of its nature: your console makes a request to your router to open a port, so it uses UPnP to automatically open that port – UPnP will never open a port if the request came from outside the network, so it should be safe right? Yes, UPnP is completely safe if none of your connected devices are compromised already. If this happens, then that device can make use of UPnP and open ports towards malicious services – this is extremely common in the case of those obscure IoT devices that never get updated and lack any security protocols by default. So, once again, the safest route is to isolate devices that need UPnP in a separate network (then again, if you have malware in your network already, then you already have a huge problem to solve).
It is worth mentioning the important role that the NAT filtration plays in how UPnP will behave. For example, some of you may see that despite enabling UPnP, the NAT Type remains on Strict (Level 3) and this can happen if the router uses Symmetric NAT filtering which basically means that the inbound traffic is allowed only from the same external IP address and the port used as the destination. The solution is to use Full Cone NAT filtering, so if the incoming traffic towards your console doesn’t originate from the same IP address, then it will still arrive at its destination (it’s obviously the less secure option).
How to configure UPnP on an Asus router?
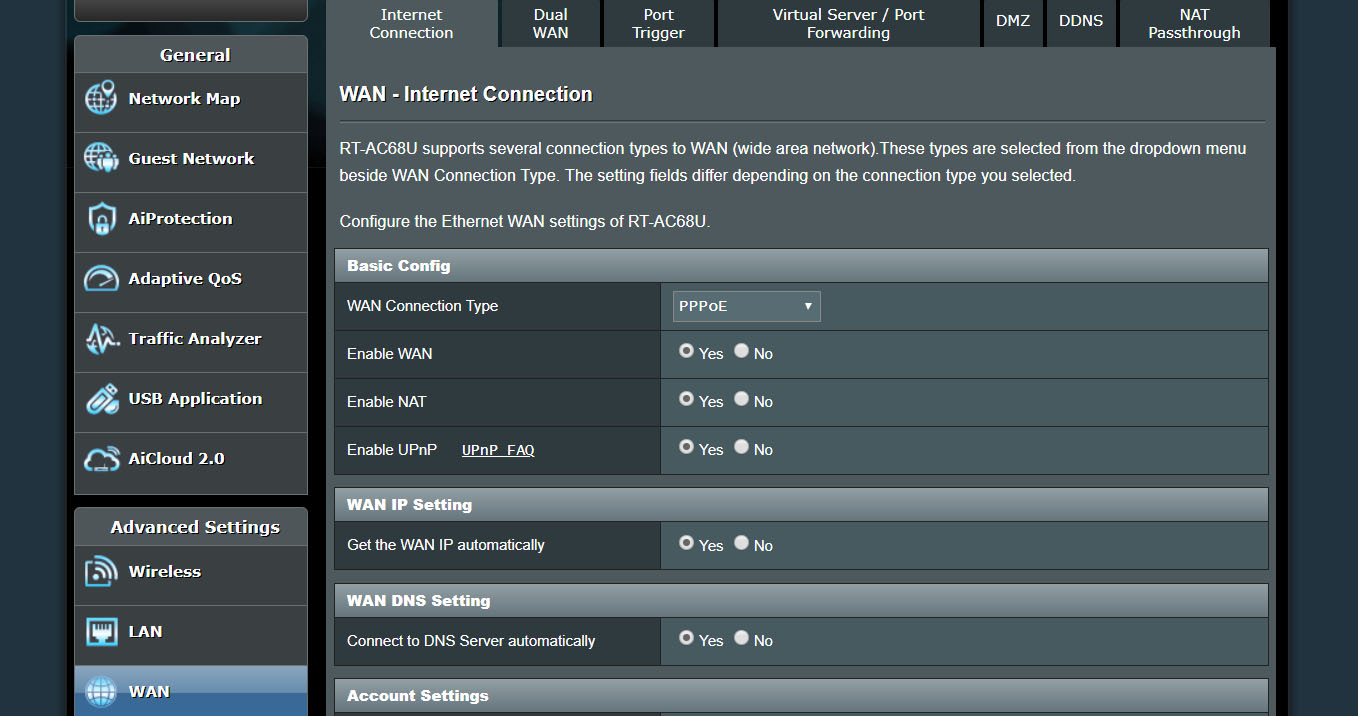
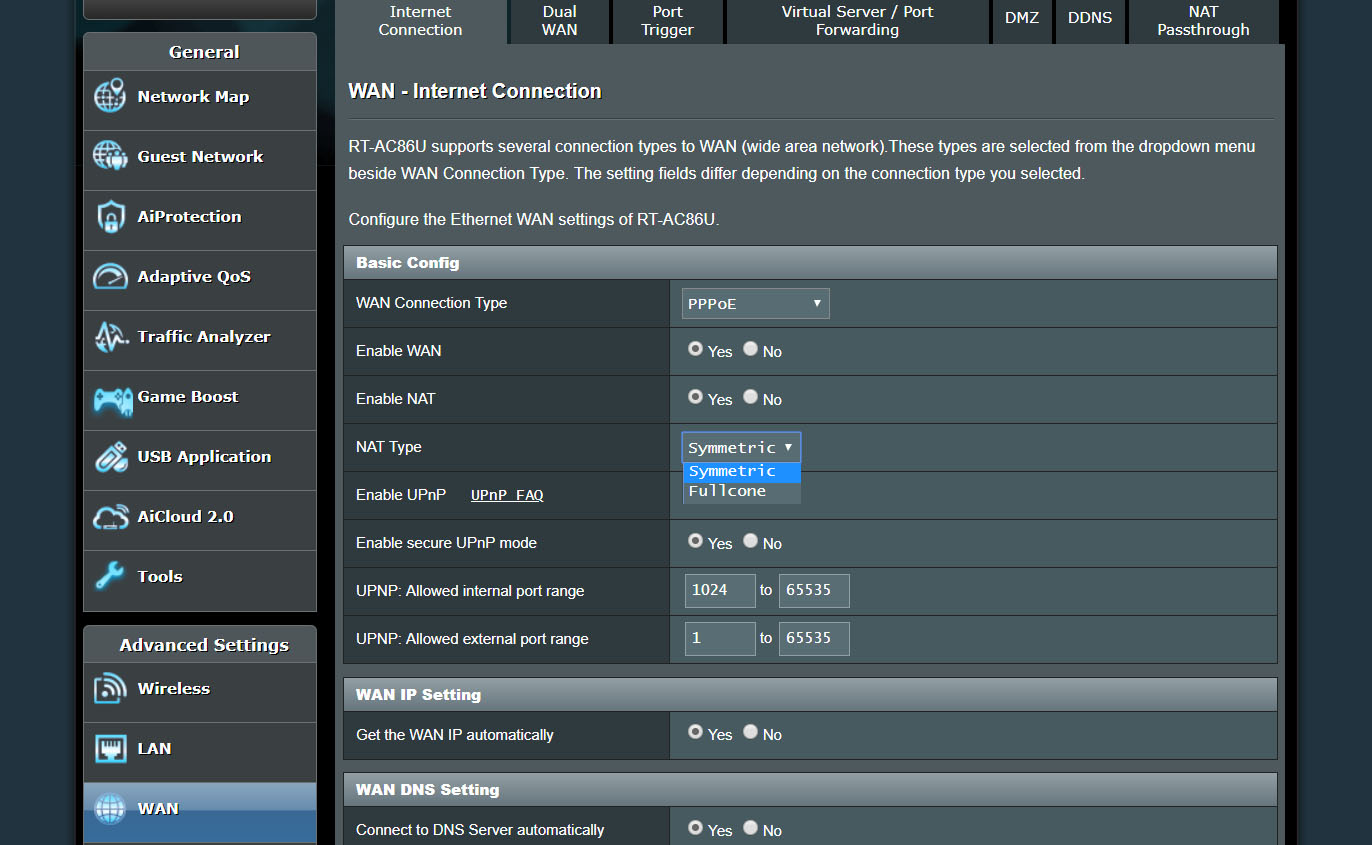
After accessing the user interface, navigate to Advanced Settings (the menu on the left), select WAN and, on the new window, select Internet Connection. Here, under Basic Config, you should see the Enable UPnP option (newer Asus routers should also allows you to set up the NAT Type). If you use AsusWRT (again, I used an Asus RT-AC86U), then you’ll have more UPnP settings that you can configure besides simply enabling it: choosing between the NAT Types (Symmetric or Full Cone), enabling the Secure UPnP Mode (doesn’t allow port forwarding for a different IP address) and choosing the allowed internal and external port range.
How to configure UPnP on a Netgear router?
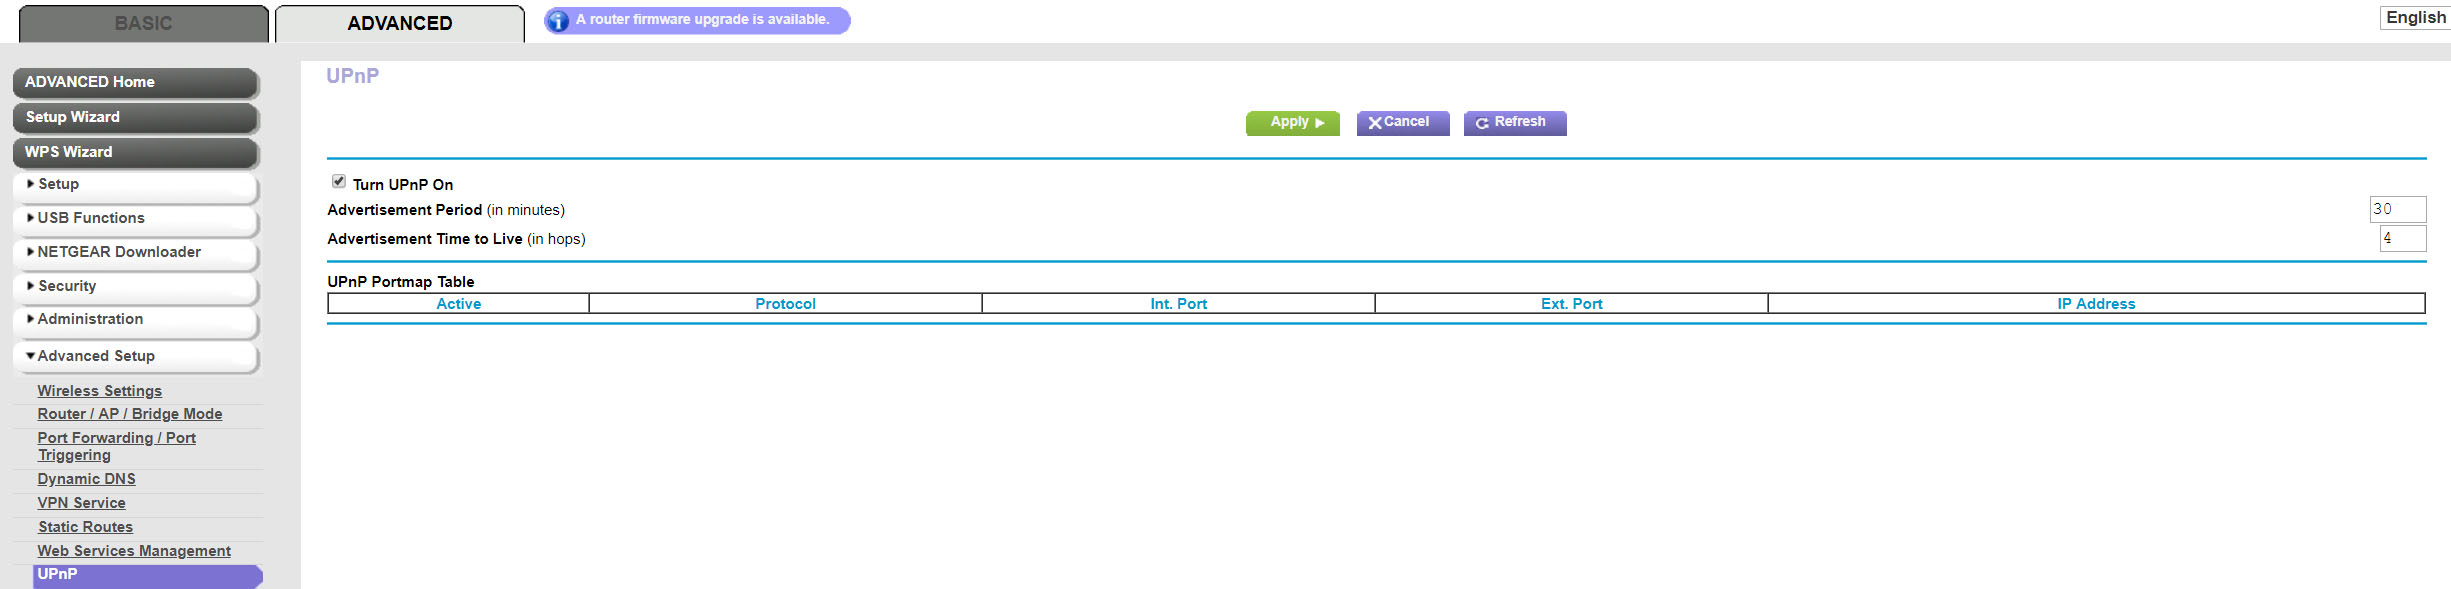
To configure UPnP on a Negear Nighthawk router, after you’ve accessed the user interface, select Advanced from the top menu and then, from the left, choose Advanced Setup and UPnP. Here, you’ll be able to Turn UPnP On, adjust the Advertisement Period and Time to Live (should be left at the default values) and underneath, there’s a UPnP Portmap Table which displays the type of port that is open and if the port is still active for each IP address.
Port Forwarding
The third option is to use the Port Forwarding method which works in a similar manner to the UPnP, but, instead of automatically opening the necessary ports, you will have to manually set to which port will the the inbound traffic be translated into the IPv4 of your gaming console. This should give you more control on how your devices connect to the Internet, but, since it’s so rigid, you may have to to add new ports all the time and these ports will remain open, unlike the case of the UPnP which closes the port as soon as it is not used any more (well, unless you close it yourself, manually, from the router interface).
This method is generally regarded as the safest option, but some games require some ports, while other games a new set of ports, so you need to constantly modify and add new ports and the fact that these remain open permanently can pose a security risk at some point in time.
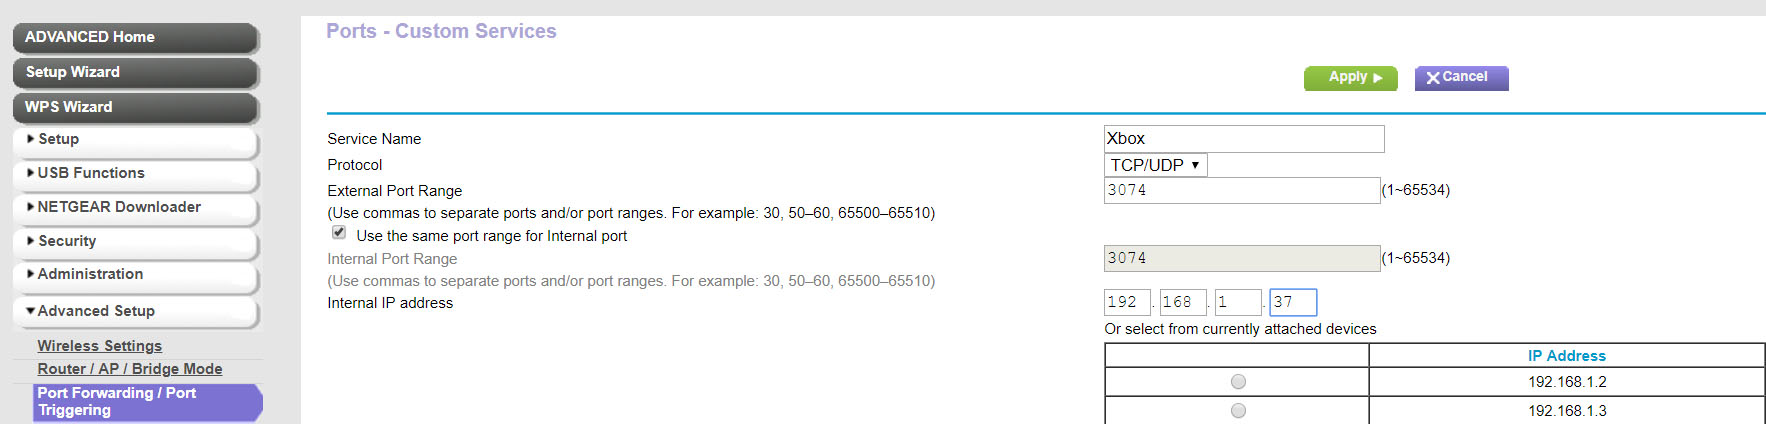
Note: XBox Live uses the following static ports: 3074 (UDP & TCP), 53 (UDP & TCP), 80 (TCP), 88 (UDP), 500 (UDP), 3544 (UDP) and 4500 (UDP). The PS5 uses the following static ports: 80 (TCP), 443 (TCP), 3478 (TCP & UDP), 3480 (TCP), 3479 (TCP & UDP) and 49152 to 65535 (UDP).
How to configure Port Forwarding on an Asus router?
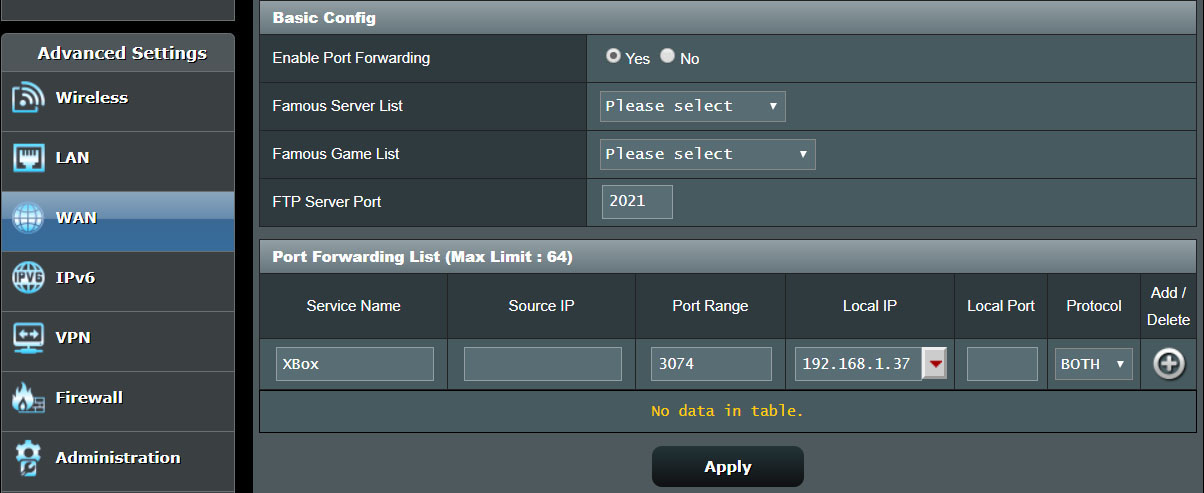
To configure Port Forwarding on an ASUS router that has the default firmware, you need to gain access to the UI and, under Advanced Settings, select WAN. Next from, the horizontal menu (on the top), select Virtual Server / Port Forwarding and, under Basic Config select Yes to Enable Port Forwarding. Afterwards, under the Port Forwarding List, insert the Service Name (the name of the console), the Port range (the port that needs to be open) and the Protocol (TCP and/or UDP). The ports and the protocol differ from console to console and from game to game.
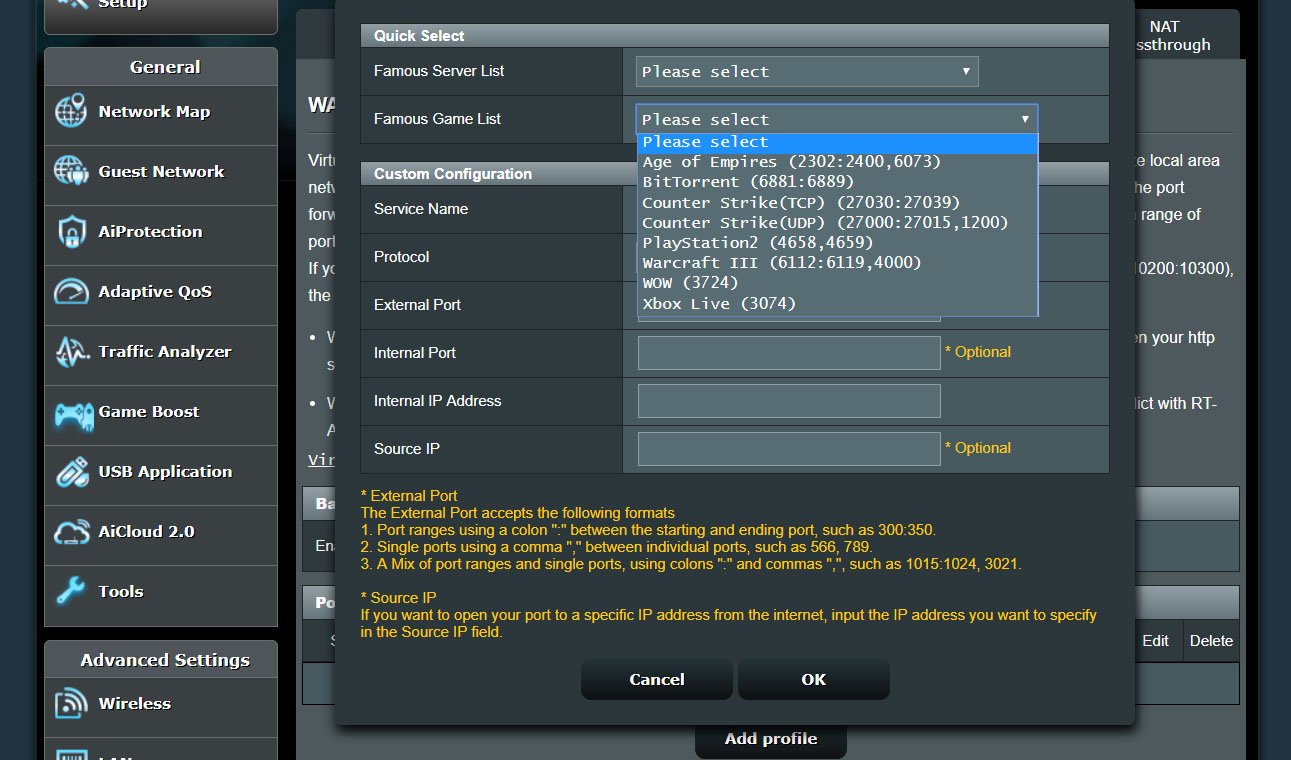
If you use the custom firmware from Merlin, then the settings are a bit different: you’ll be able to reach the Virtual Server /Port Forwarding the same as on the official firmware, but, under Basic Config, you’ll have only the Enable Port Forwarding switch, while underneath it, under the Port Forwarding List, you’ll have to click Add profile to summon a new window. Doing so will give you the ability to choose from the Famous Server List and Famous Games List (for quick configuration if the game that you run is on this list) and, the options of interest are, as before, the Service Name (console name), the External port (the port that you need to open) and the Protocol (UDP and/or TCP).

How to configure Port Forwarding on a Netgear router?
Setting up Port Forwarding on a Netgear Nighthawk router is pretty straight forward: you need to access the user interface, select Advanced from the top menu and, from the left menu, select Setup > Advanced Setup and Port Forwarding / Port Triggering. Here, you need to select Port Forwarding and, towards the bottom, click Add Custom Service. This will summon a new window where you’ll have to enter the Service Name (the console), the Protocol (UDP and/or TCP), the External Port Range (the port that needs to be open) and the Internal IP Address (the IP address of the console).

Bibliography:
SNBForums.com
Wikipedia.com
Mark is a graduate in Computer Science, having gathered valuable experience over the years working in IT as a programmer. Mark is also the main tech writer for MBReviews.com, covering not only his passion, the networking devices, but also other cool electronic gadgets that you may find useful for your every day life.