
The two-in one camera approach has been very welcomed by the general public, so Reolink has made available the new and improved Duo 3 which not only offers 16-megapixel camera lens, but can also cover up to 180 degrees at the same time.
| Reolink Duo 3 PoE | |
|---|---|
| Reolink.com | Check Product |
Essentially removing the need to use two or more cameras to check the same area. I did test the original Duo and it’s still up and running, but the slightly lower resolution was one of its main shortcomings. So, seeing that the Reolink Duo 3 can (hopefully) reproduce so much more detail in the captured videos, it can make it suitable not only for home surveillance, but also as a legit part of a larger business security system.
The two spotlights are still there and the IR LEDs do help a lot with the night vision. There is, of course color night vision, but it does rely on the aforementioned spotlights, so not the same system as on the CX410. Also, pretty much the entire design of the Reolink Duo 3 seems to be unchanged from the original Duo, at least on the surface.
I say that because the new case is better protected from the elements, sporting an IP67 rating. I saw that Reolink dropped the pet detection feature in favor of the seemingly better animal detection which, as its name suggests, it does mean that a larger range of animals can be detected by the camera. Kind of how the Go Ranger PT was able to. There do seem to be a lot of improvements and a few new features, so let’s put the Reolink Duo 3 to the test and see how it performs.
The Design and Build Quality
I found the design of the original Duo to be practical, so it’s nice to see that the Reolink Duo 3 hasn’t changed it that much. I mean it’s almost the same device, sporting that flat, but wide body which measures 7.7 x 4.1 x 2.2 inches (19.5 x 10.3 x 5.6cm), so it has a very different look than the regular bullet-type IP camera.
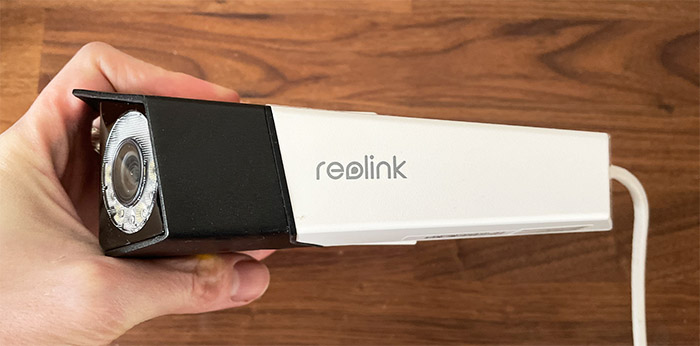
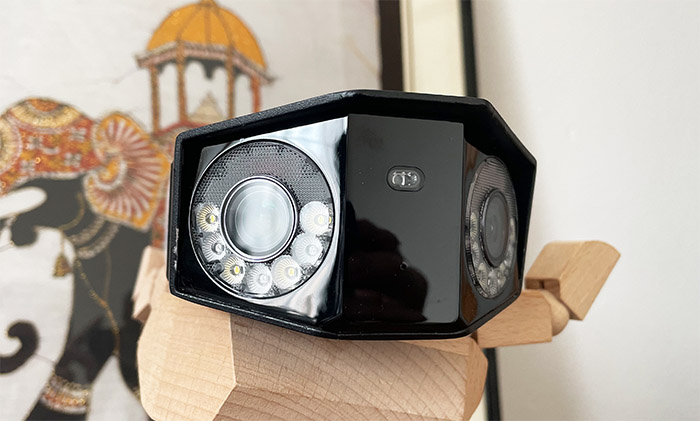
The reason for this peculiar design is the need to include two front-facing lens and to maintain the black and white color palette found on pretty much all other surveillance cameras, Reolink decided to have the front side of the Duo 3 black, while the rest of the body is covered by a white matte finish. The black portion which encapsulates the lens and has a small sun roof is made out of a metallic alloy. The rest of the case is made of plastic. And yes, that does include the stand as well. Now let’s talk a bit about the front-facing lens.
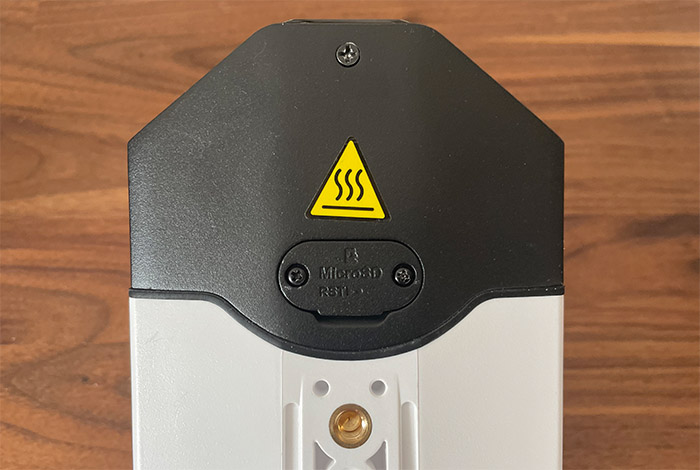
There are three IR LEDs and four spotlight LEDs on each side surrounding the bottom part of the lens, the same layout as with the original Duo camera. And in-between the two circular portions, there is a visible daylight sensor, while below it, hidden by the black glossy finish, there’s a microphone. On the bottom of the case, still within the black portion, there is a cover held by two screws.
Remove it to expose the microSD card slot (supports microSD cards up to 256GB) and a small Reset button. Going towards the rear side, we can see the large speaker protected from both water and dust intrusion.
And this does bear the question on whether the Reolink Duo 3 is suitable for outdoor use. I admit that I was a bit skeptical about keeping the original Duo in the open, but even with its IP66 rating, it still survived for a couple of years outdoors (and hopefully many more). So, the IP67 rating of the Reolink Duo 3 does mean that we should get an even better protection from both dust and water ingress.
And I know that Reolink has included some waterproof gaskets into the package to keep water from the wire contacts. But I have two fried Reolink cameras and I found out that a good isolation band around the gasket will act as a better water deterrent in the long run. The cable on the rear side continues to be permanently attached as with all other Reolink PoE cameras that I tested so far.

And this time it does bifurcate into the Ethernet cable connector and the power connector if PoE is not available. Lastly, know that the provided stand can be attached above the camera or below it, as you could with the previous Duos from the same series.
Reolink Duo 3 Teardown
At the moment, there is no dedicated FCC ID page, so I had to do the teardown of the Reolink Duo 3 myself. The first thing that needs to be done is to remove the glossy plastic that surrounds the lens. Use a prying tool and gently detach it, then you will see two screws on the side and one at the top, hidden deep.
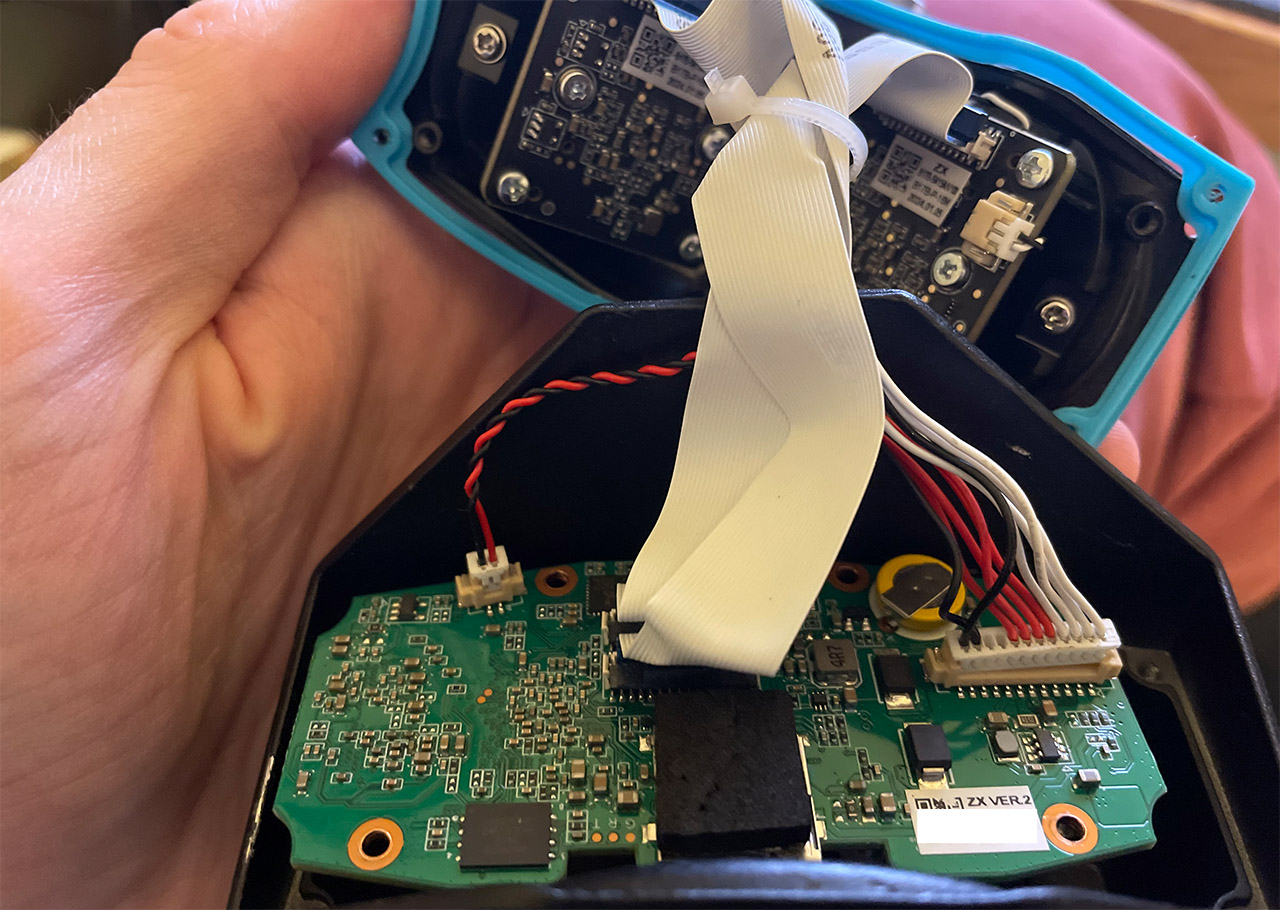
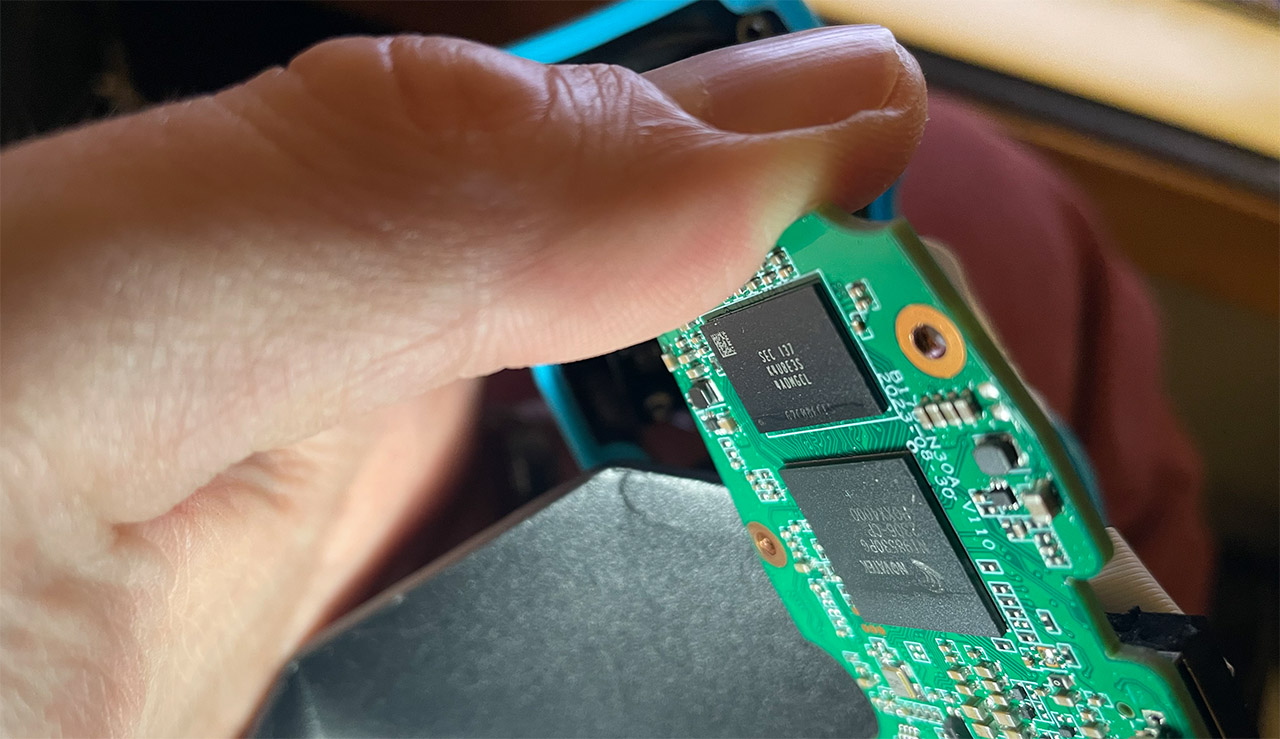
I also took out the screw which was near the microSD area, just to be safe and then the lens part could simply slide out. Then, I could see the silicone seal that prevents water and dust from entering the enclosure, as well as pretty much all of the main components.
I could see that Reolink went with a quad-core Novatek NT98530PG (ARM Cortex A53) SoC, a 1.5GB of RAM from Samsung (SEC K4U8E3S4ADMGCL), an RTL8201F 10/100Mbps Ethernet controller and 128MB of storage from Winbond 25N512GVE1G. And as I said before, you can add up to 256GB of extra storage, so you don’t have to rely on the small amount that’s built into the camera.
Installation and App
The installation process requires that you attach the metallic plate on a flat surface with the lip at the top. Then connect the mounting bracket using the screw from the package and lastly, attach the camera. Then, if you use PoE, connect just an Ethernet cable to your switch or NVR. That’s about it. We are going to go the app path, so I used the same Reolink mobile application that’s available for pretty much all cameras.
And to pair the Reolink Duo 3, all that you need to do is tap on the Plus sign from the top right, scan the QR code from the camera and the Duo 3 will make a noise that it was detected. It will then appear as uninitialized, so let’s create a password (the admin account can’t be changed apparently) and that’s about it. You should now be able to access the dedicated GUI.
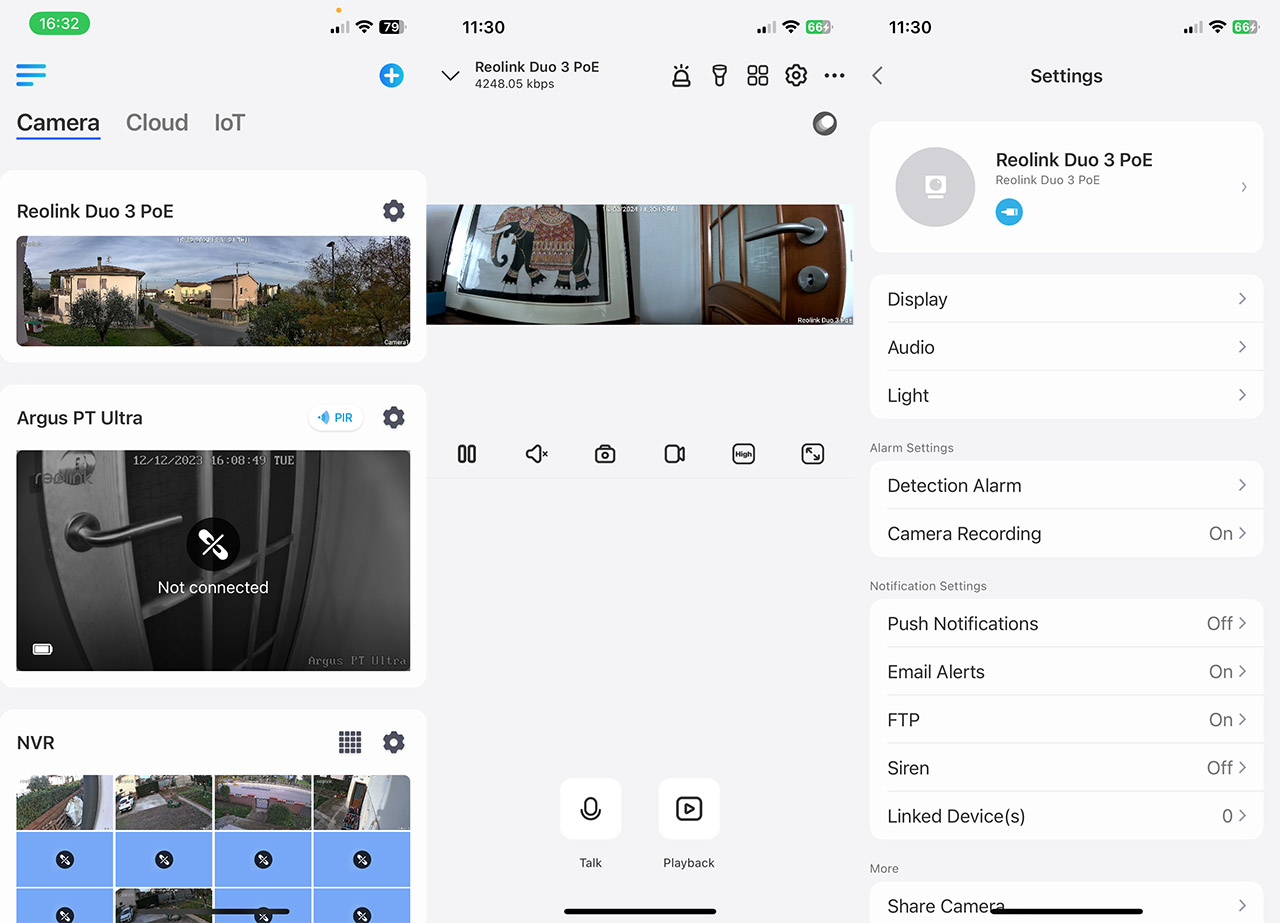
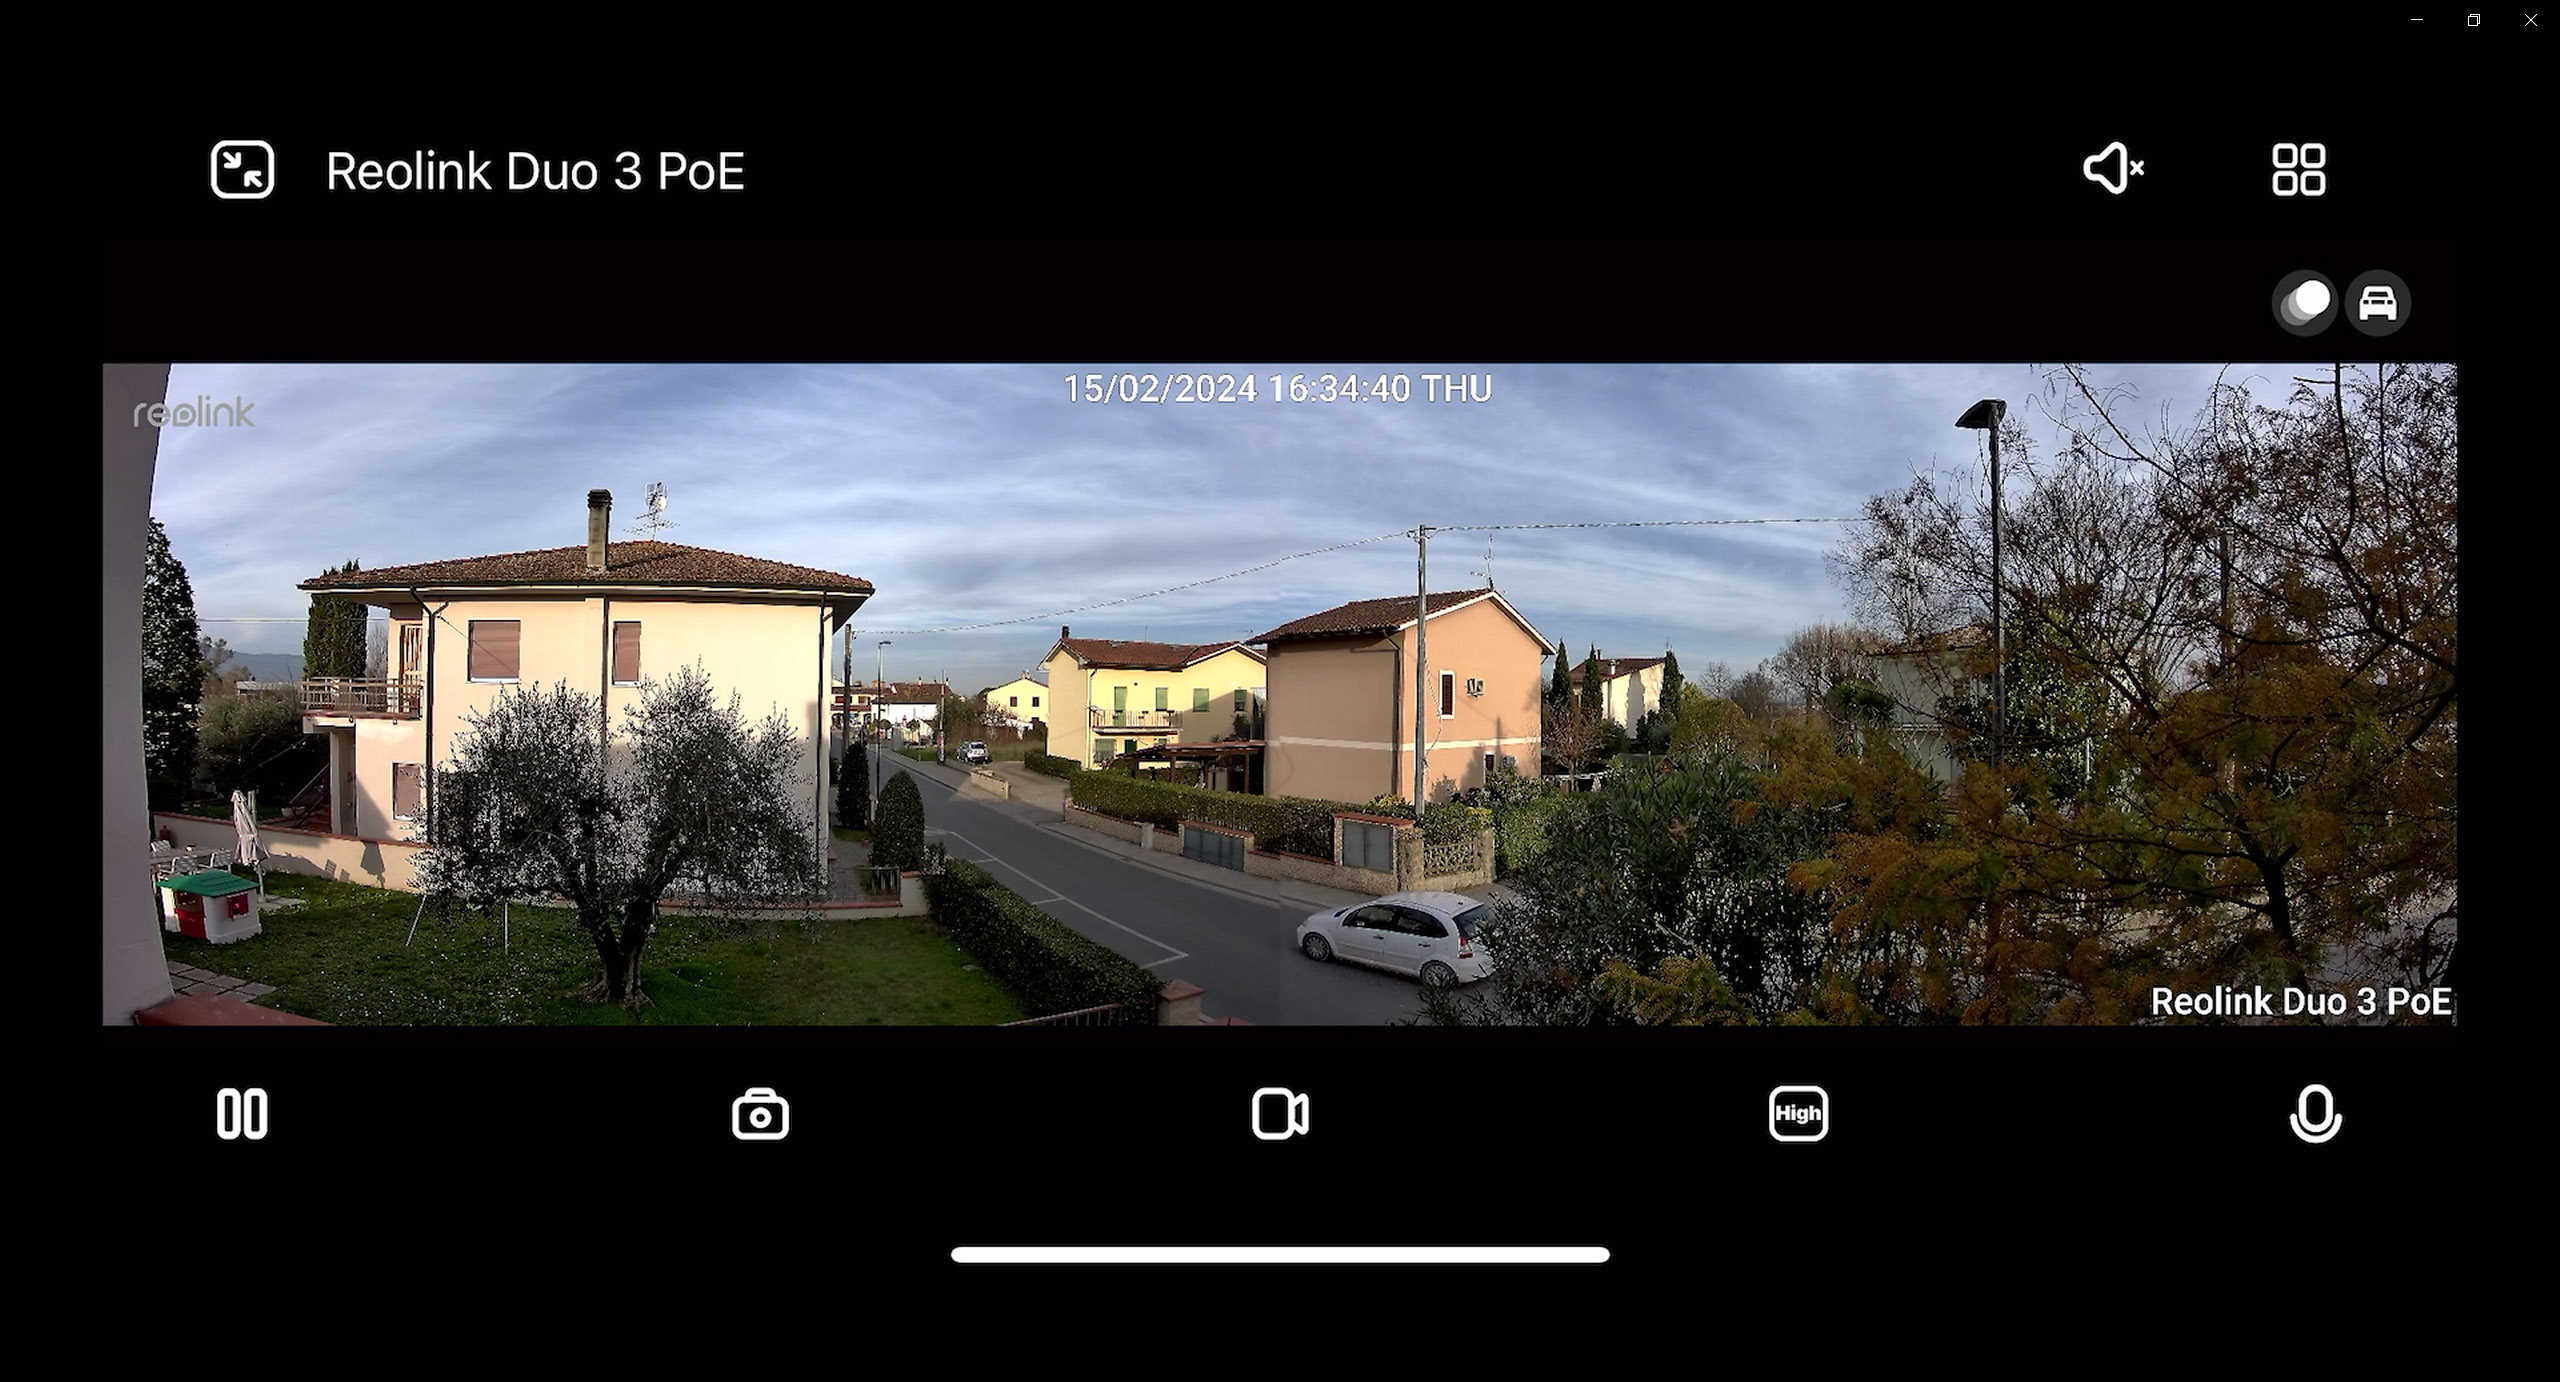
The main area is the live footage which is not very tall, but it makes sense considering that it has two camera feeds sewn into one. Above it, you can enable the alarm, turn on the spotlights, change the view or check the extra Settings. Before doing that, I adjust the video quality to high and which immediately added a delay of about two seconds. And at the bottom, it’s also possible to use the Talk function (the speaker and the mic combo come into action) and check any previously saved videos using Playback.
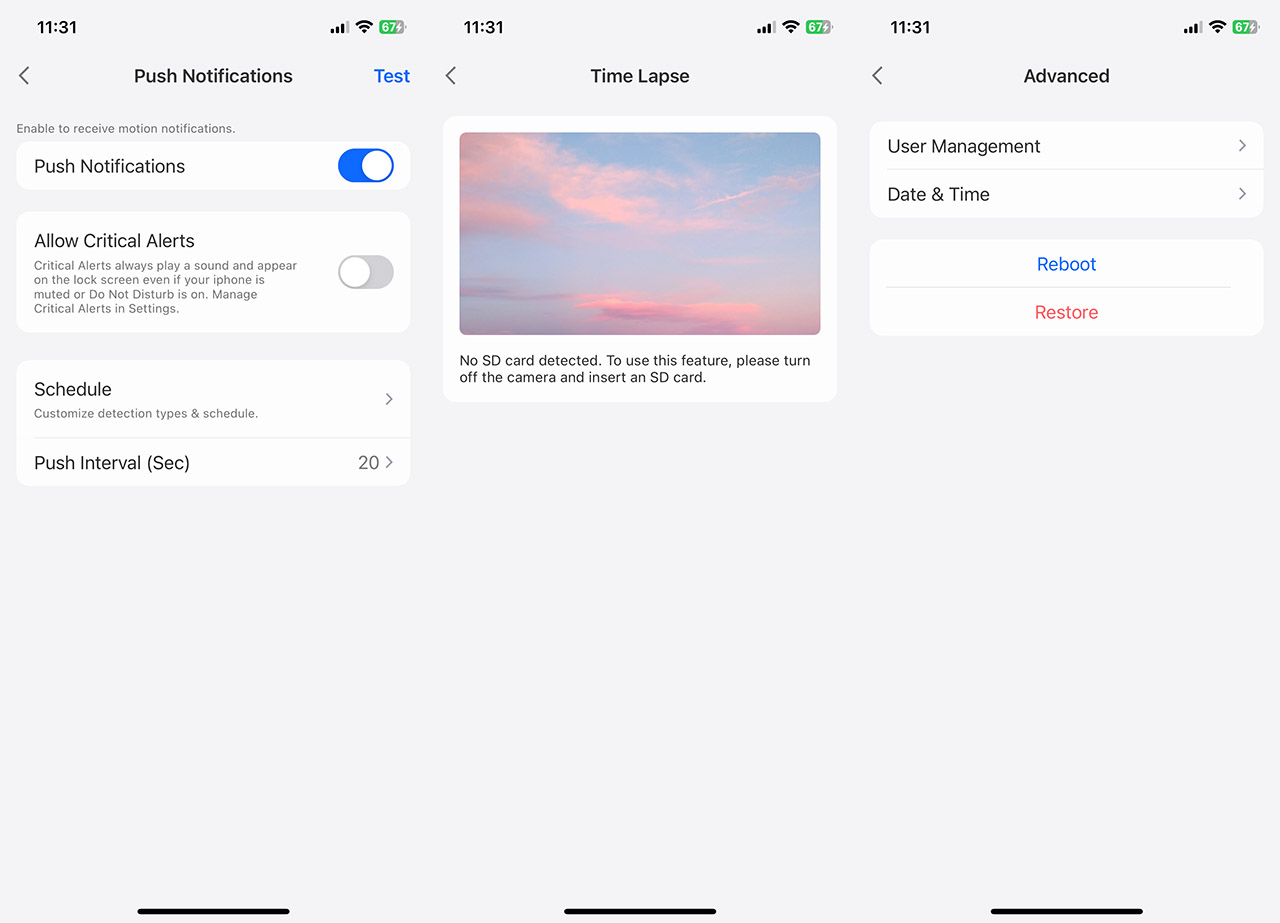
The Playback section is well organized and you can check videos by date, hour and by the type that triggered the recording. Now we can go to the Settings and it’s here that you can adjust the Display, Audio and Light options, change the Detection Alarm (it does have the Motion Mark feature in beta – we will talk about it more in the dedicated section) and there are some Notification settings as well. Be aware that while the detection happens at the camera-level, when you enable notifications, they will pass through Reolink’s servers.
Connecting to an NVR
I had the Reolink RLN8-410 available, so I reset the Duo 3 and powered it up using PoE from the NVR. And then things got weird. First, the NVR simply refused to see the camera, so I went into the channel settings and forced it to broadcast the live footage by replacing an existing camera with the Reolink Duo 3. And then things got weirder. As you can see from the image, all the camera connected to the NVR started glitching out. I checked the footage using the app and all was working properly, so it must have been the HDMI connection.
I even assumed that it may have been the monitor, but after checking with multiple ones, the issue remained. I did initially check if the firmware was the latest one, but since the NVR was set to Auto-Update and it appeared to be on the latest version, I didn’t pry it further.
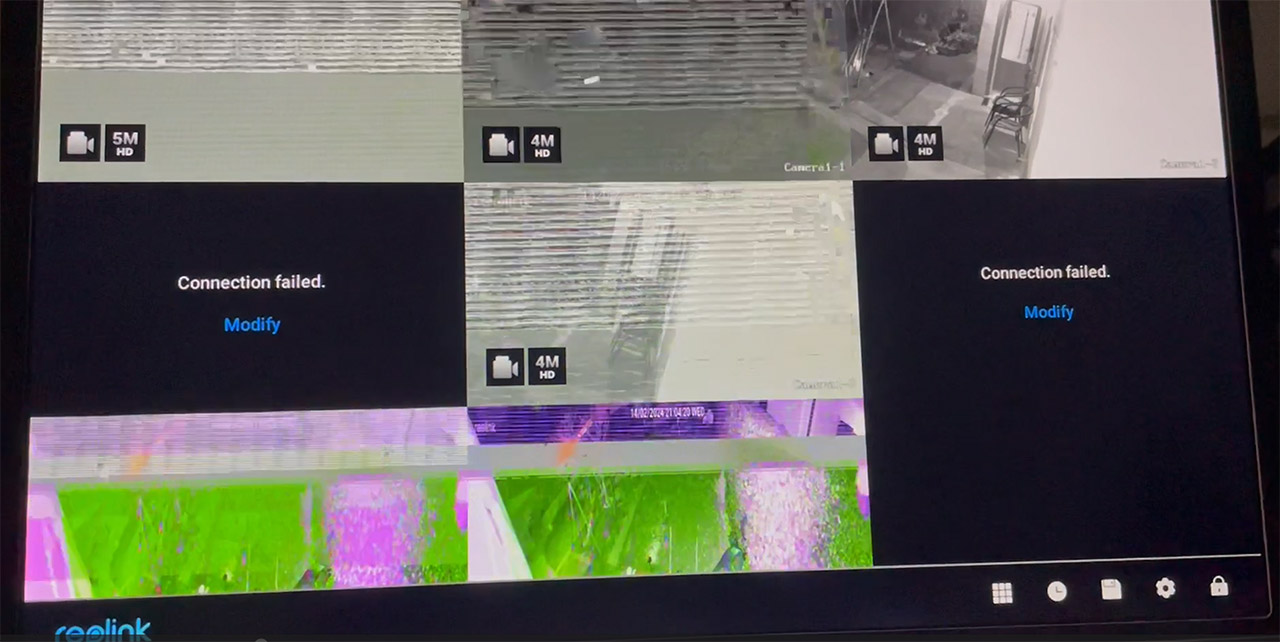
I should have. It seems that the hardware version of my NVR is N3MB01 and it doesn’t support 16MP which means that it can’t show the live footage at max resolution. And Reolink has released a firmware update last year which apparently didn’t come through with the Auto-Update, so I had to update it manually. It’s an easy process: add the file on a USB drive and simply upload it to the NVR. A few minutes later, the NVR showed the footage properly. It’s worth noting that the Reolink Duo 3 occupies a single channel stream, unlike the original Duo which needed two.
The Image Quality of the Reolink Duo 3
Unlike the original Duo which used a couple of 4-megapixel sensors, the Reolink Duo 3 is equipped with two 8-megapixel 16-megapixel sensors, managing to offer a resolution of up to 7680 x 2160 pixels (20fps though). So I had high expectations in terms of details. I usually first check the day-time footage, but, since the days are shorter at the moment, I managed to capture a few nigh-time videos.
I didn’t want to spook any passerby’s, yet, so I kept the spotlight off. This way, we can see the stitched videos do indeed look very nice, covering the full 180 degrees. In terms of details, despite the 16-megapixel sensors, I couldn’t clearly see the license plates on the cars positioned at about 70 feet away. I could with other cameras, but not here. I don’t think anyone can hide in the shadows since the IR LEDs are more than enough to reveal anyone moving around.
Then I switched on the spotlights and the videos became colored. I really like the approach behind the ColorX (used by the CX410), but unfortunately, the Reolink Duo 3 did not receive it, so it needs those bright spotlights. Don’t get me wrong, they do serve a very important purpose beyond the rendering of colored images. They’re used to deter any trespassers and it is possible to use them in combination with the audible alarm.
Returning to the night-time footage, I have attached a low quality and a max quality version to get a better idea about what to expect. And in terms of detail, you can see for yourself that it’s good, especially at max quality. From what I could gather, the focus is a bit more near the lens, where you get that insane amount of detail and quality, but, just like the original Duo, the Duo 3 isn’t really a champion at long-distance night-time surveillance.
Now let’s see how it fared during the day. I do need to mention that I have noticed some occasional freezes when the quality was set to maximum, while the lowest quality (which needs the least amount of bandwidth) was far smoother. The saturation is still a bit on the higher side, something common with Reolink cameras, not that I mind it that much since the videos end up looking better than in reality.
The Smart Motion Detection
The smart motion detection has been an important part of the Reolink cameras ever since the A series was released. And the developers worked hard to make it better.
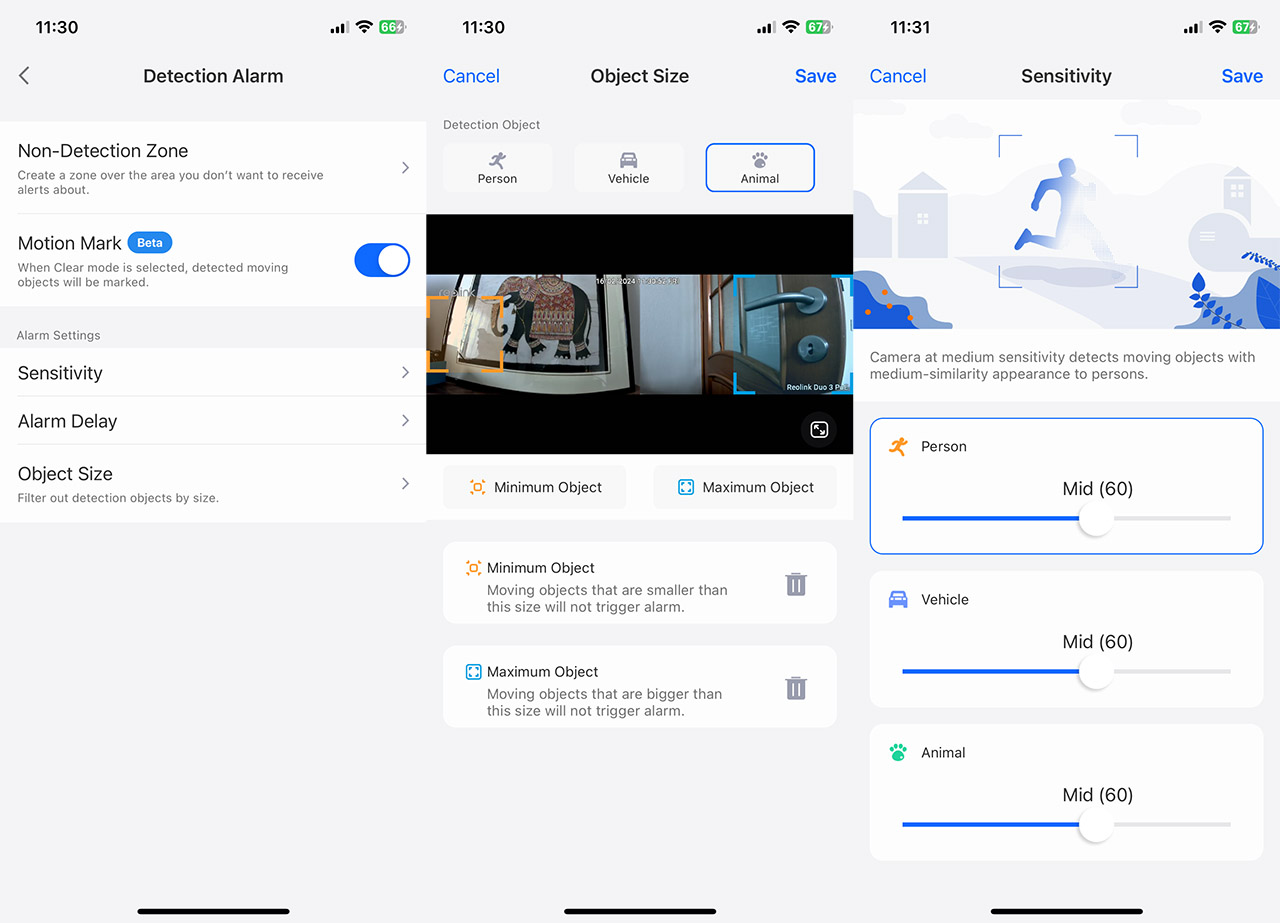
The car detection works perfectly at the moment, the Reolink Duo 3 managing to detect them even when covered by the leaves. The human detection also works very well and Reolink has included the Motion Mark which essentially highlights the object that’s in movement. It’s not really a new feature on other cameras (such as from ANNKE), but it’s new on Reolink devices. But what I was the most interested in was the animal detection.
Unlike the pet detection which could tell when there was a dog or a cat near fairly close to the camera, the new system should be able to tell between a higher variety of animals. I don’t have any pets, but my vegetable garden is often visited by neighboring cats, so I installed the Reolink Duo 3 and pointed it towards a specific area for the entire duration of the night. I woke up in the morning excited to see what it detected. And it was nothing. Wait a minute.. Apparently the camera detected a person strolling in the night.
That’s not good. I checked out and it was a cat. Yep, just a cat. So it needs a bit more work. Then again, the CX410 was able to successfully detect cats, so the system is working in most cases.
The Conclusion
The Reolink Duo 3 is a robust successor to the Duo 2 and the original Duo. It kept the same design, but the changes which matter are usually on the inside. The cameras have been improved a lot, offering a far better image quality and the detection system should technically be better. But so far, I will need more time to thoroughly test its abilities since I was left underwhelmed. I did like that it’s better built to withstand the elements, so even if not really a huge leap from the second gen, I think that it’s still worth checking out the Reolink Duo 3.
Reolink Duo 3
Pros
- Two cameras in one
- 16-megapixel lens
- Color night vision using floodlights
- Supports two-way communication
Cons
- The animal detection needs a bit more work
- Missing non-IR color night vision
Mark is a graduate in Computer Science, having gathered valuable experience over the years working in IT as a programmer. Mark is also the main tech writer for MBReviews.com, covering not only his passion, the networking devices, but also other cool electronic gadgets that you may find useful for your every day life.