
The latter is recommended for 1bit BW Dithering, while the former will work with the other Conversion Tools. The S-MAX setting needs to be chosen according to the used material and also don’t forget to select the size of the graph that will be engraved. You can then send the command directly to the Two Trees TS2 or you can save the GCode and put it on a microSD card which then gets to be inserted into the engraver.
The Mobile App
If you think you can just install the app on your phone and then use the Two Trees TS2 as any other smart device, you’re very much wrong.
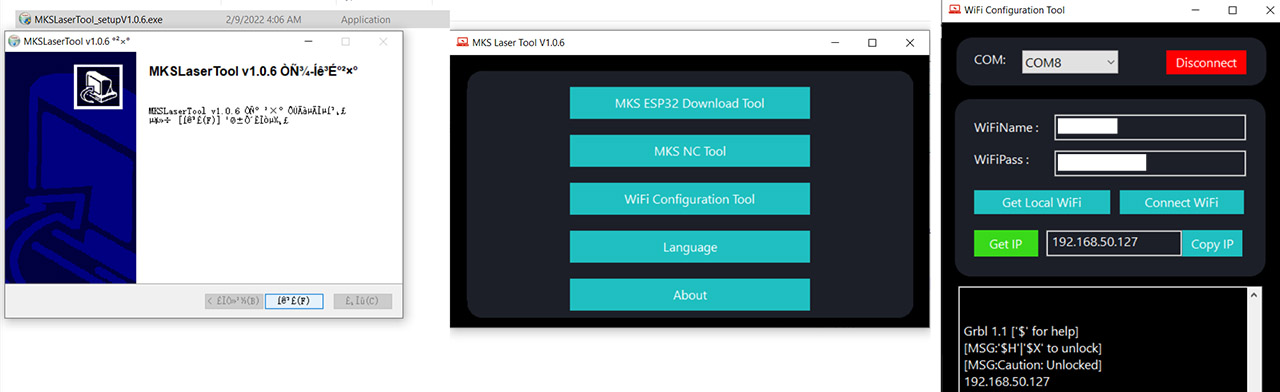
The manual says that I had to install the MKSLaserTool software on my PC before anything else and it should be on the microSD card that I got in the package, but it was missing, so I downloaded it from GitHub. After some very confusing hieroglyphs, I managed to install it and, after running the Tool, I had to click on the WiFi Configuration Tool. On the next page, select the right port (in my case, it was COM8) and then I inserted the SSID and the passkey from the router – be aware that it will only work with 2.4GHz networks.
Click on get IP and now it’s time to install the app. The app is called MKSLaser and it’s available on both Android and iOS. It has a cool layout, but I liked that it didn’t require any weird permissions. To connect to the Two Trees TS2, click on the link icon from the top left and then insert the IP address that you got from the tool.
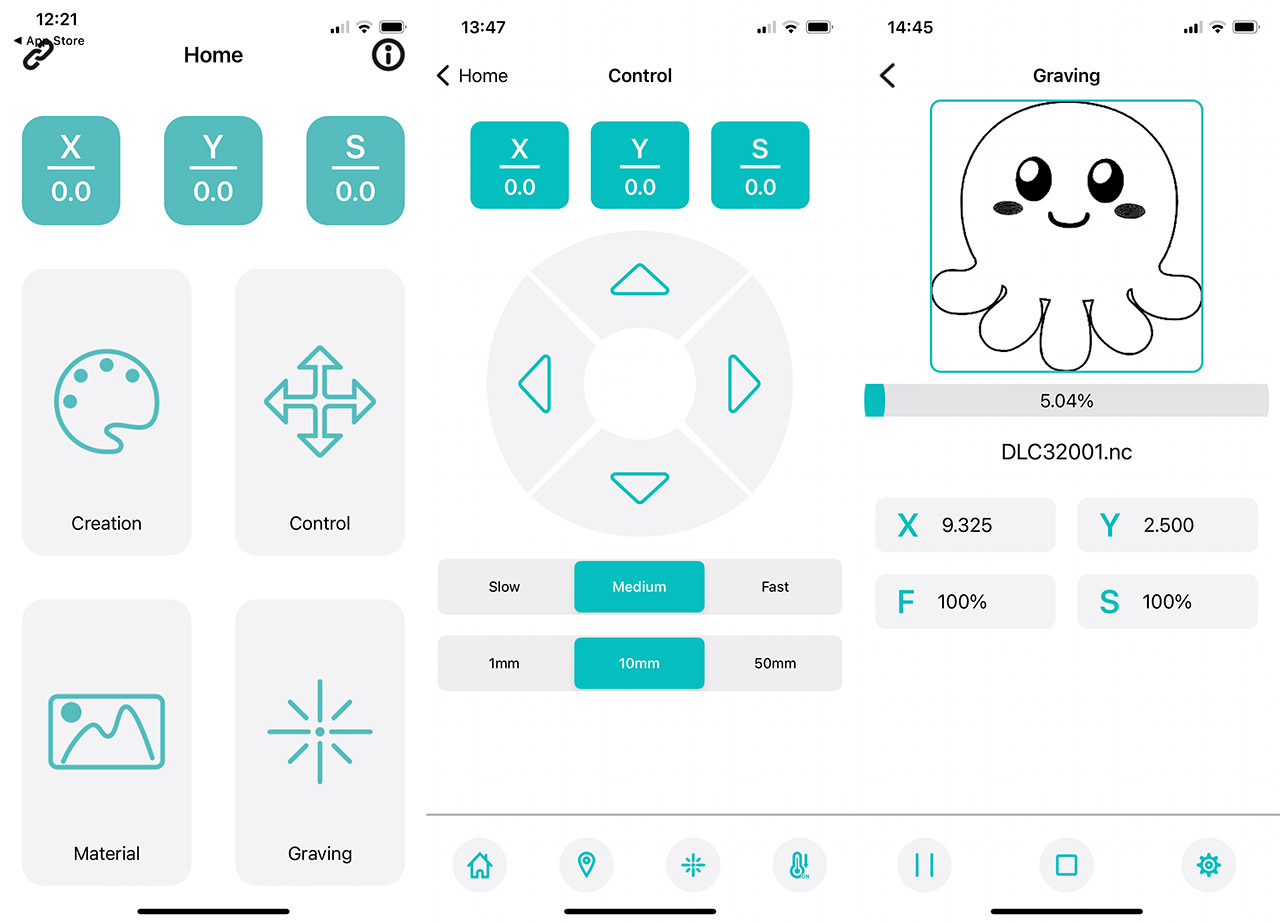
Click Connect and it should work – you can return to Home and tap on the arrows to make sure that the laser module indeed moves accordingly. You can now add various models to the microSD card and, after inserting it into the laser engraver, the app will act as the missing display interface. But do be aware that the feature set is still quite limited, so you won’t be able to make any major adjustments to the way the model will be engraved.
The AutoFocus
Unless you don’t mind adjusting the height of the laser module by hand, you can set up the autofocus. And it’s not that difficult to do so. From LaserGRBL, you need to add three Custom Buttons, as written in the user manual and this way, for engraving, the focus will stay at 7mm, but if you intend to cut into the surface, then the focus needs to be lower (4mm).
The Engraving Performance of the Two Trees TS2
Inside the package, you get all sorts of materials on which you can laser engrave, but I still decided to use my own 1.5mm plywood to check the performance of the Two Trees TS2. The first model is a default cartoon (Pikachu) from the app which turned out like taken from a horror movie.
The reason why that happened is because the laser module was too high (plus 100% intensity & low speed) and yes, we do need to either focus the laser manually or rely on the autofocus function. After the calibration has been done, things were much better. So I decided to try out an image of a dragon and I was curious how the 1bit BW Dithering would work on plywood. After uploading the photo and inverting the colors, I adjusted the Engraving Speed to 300mm/min and the laser intensity to 100%.
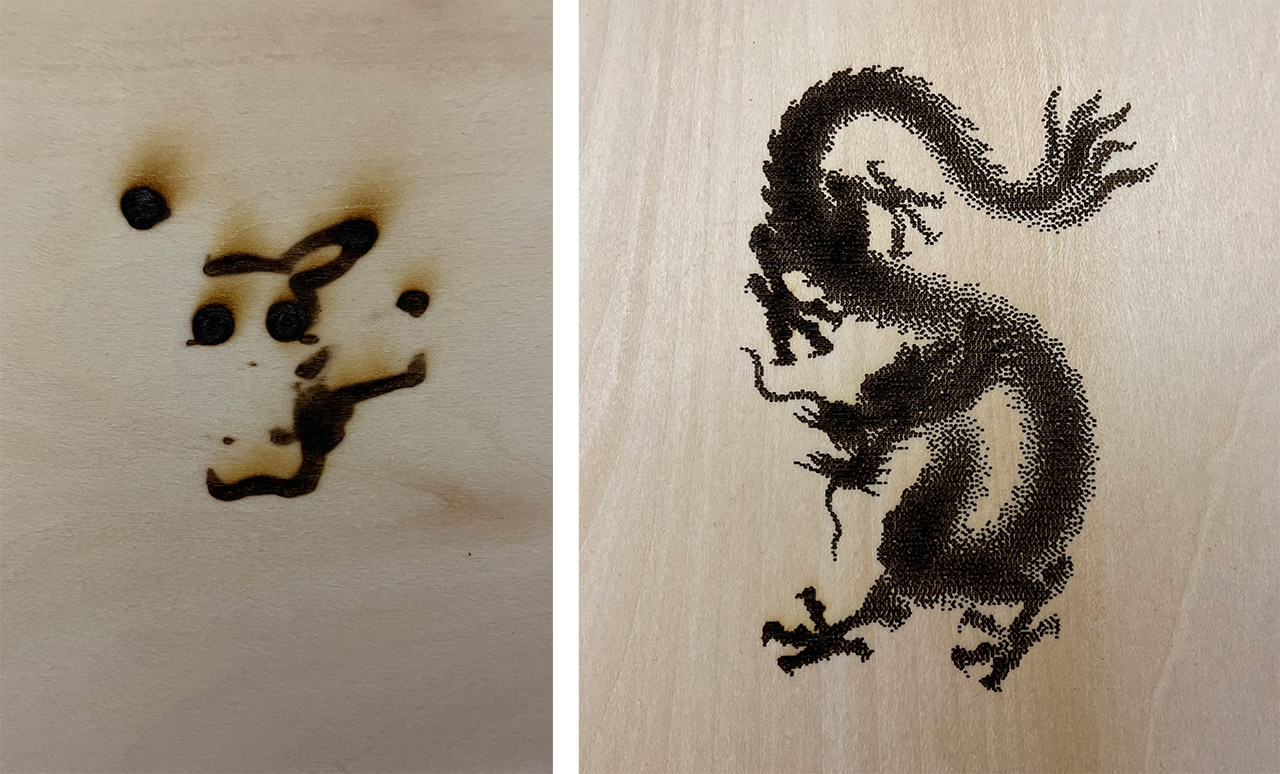
It didn’t have to go that slow, but I wasn’t yet convinced by the laser engraver. The result was good, with minimal burnt marks, despite pushing the whole full power of the laser and yes, the sensor did not go off, even if there was smoke everywhere. The reason why that happened is because the Two Trees TS2 was positioned outdoors, so it had a very good ventilation by default. I know that some users have encountered issues with the flame sensors, but it didn’t yet happen to me while I was engraving a model.
I did happen a couple of times out of the blue, while it was in Idle mode, which was strange and I couldn’t really reproduce the conditions, so it seems random. Maybe some dust may have triggered the sensor.
UPDATE: The manufacturer has released a new firmware update which should cut down the number of false alarms even more, so make sure to install it. It essentially cuts the time before the smoke would trigger the alarm from 1 second to 6 seconds.
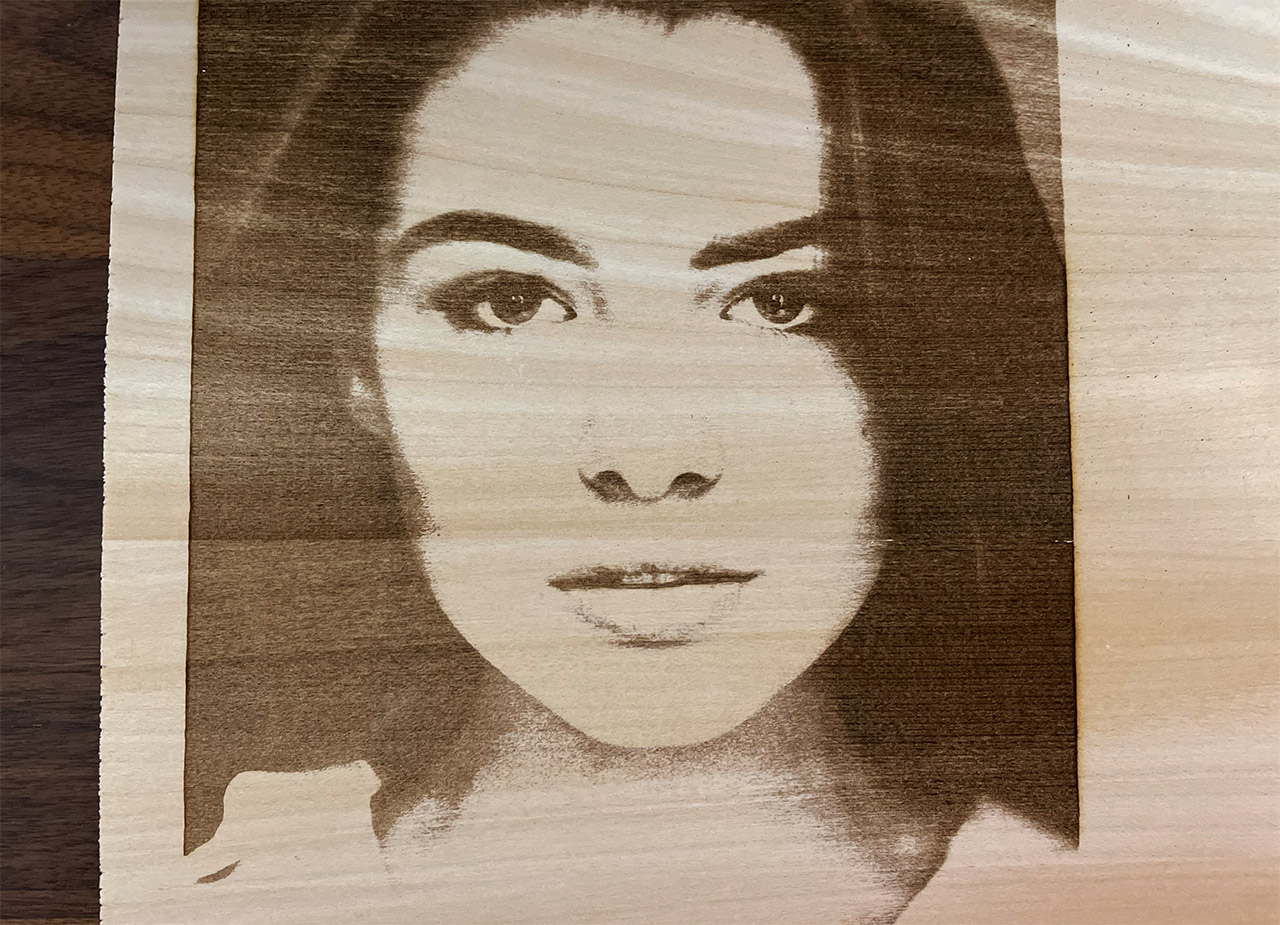
Now it’s time to try out a more difficult picture, a portrait to be exact and without much thought, I went to pexels.com, chose a photo of a woman by Grisha Chernigowsky and adjusted only a little bit the contrast and brightness.
Inside LaserGRBL, I kept the quality to 3000 lines per mm, the Engraving Speed still slow at 1000mm/min and the Laser Mode to M4. The laser intensity was set to 80% and I let the engraving process start. About an hour and 20 minutes later, the picture was done and it did not look as I expected. Sure, the details are there, I was even surprised to see how deep into the plywood it went, but the end result is not something I could brag about.
So, I had to edit the image to make it both brighter and with deeper blacks. A few minutes later, I was ready to give it another shot, but I changed some settings in LaserGRBL as well. I increased the Quality to 12,000 lines per mm, I increased the speed to 6000mm/min (got more confident that the Two Trees TS2 is fast enough, while remaining precise) and the laser power was raised to 80%. The result is way, way better than before, as you can see from the video (yes, the camera got overheated near the end – the summer is insane here).
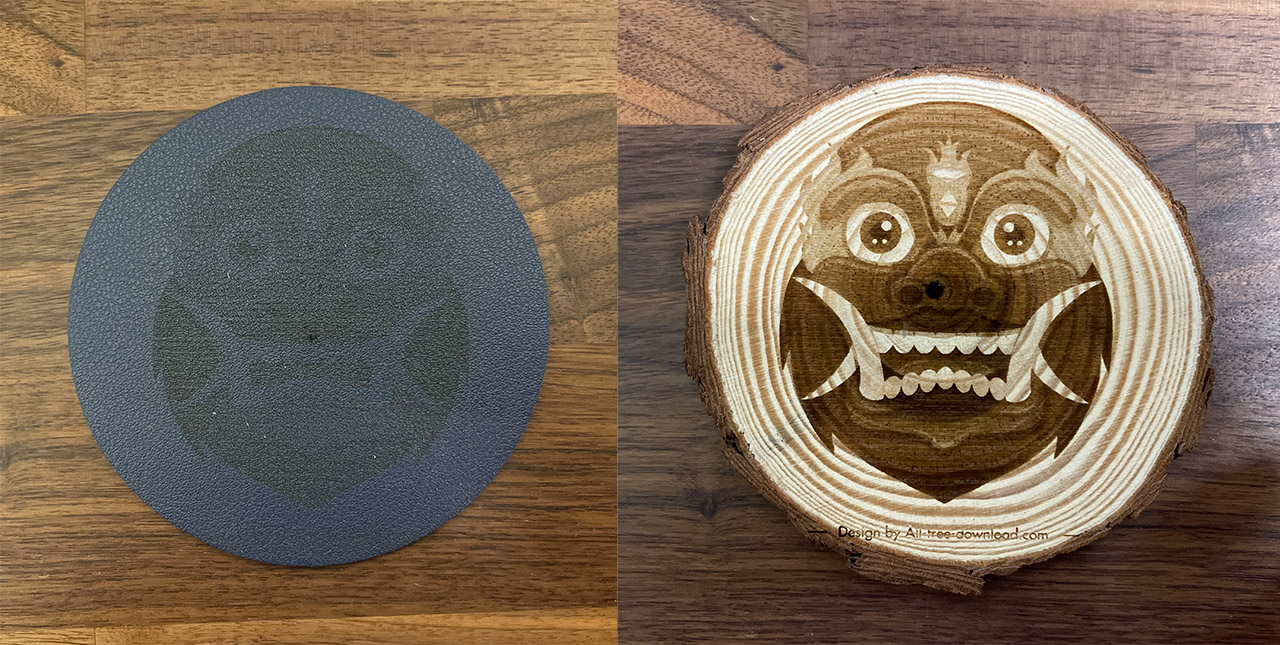
I then switched to leather and as the model, I chose a cool looking mask from All-free-download.com and I let the Two Trees TS2 laser engraver do its thing. I started with 20% power and the speed was set at 6000 and, while the model was definitely engraved, I wanted it to be a bit deeper, so I increased the laser intensity to 50%. Still wasn’t deep enough and unfortunately, I ran out of non-black leather, so I had to rely on the last piece where I set the intensity to 100%.
I do think that if I set the speed a bit lower, things could have been even better, but the end result is not bad. A bit superficial, but it does look decent. Keeping the same model, I decided to engrave it on the circular piece of birch wood that came into the package. The settings were the following: the quality was set to 12.000 lines per mm, the engraving speed was 4000mm/min, the Laser Mode to M4, the laser intensity to 100%. And the result was impressive.
All the shades of gray were visible and there was no smudging. I forgot to mention that you can’t smudge the model on any surface, not even on metal. Since the manufacturer did include a few metallic pieces, I decided to engrave the dragon and, while it went slightly out of bounds (my fault, obviously), it still ended up looking very good. There were some solid pieces of steel inside the package as well for writing the name of the pets and this is where things got interesting.
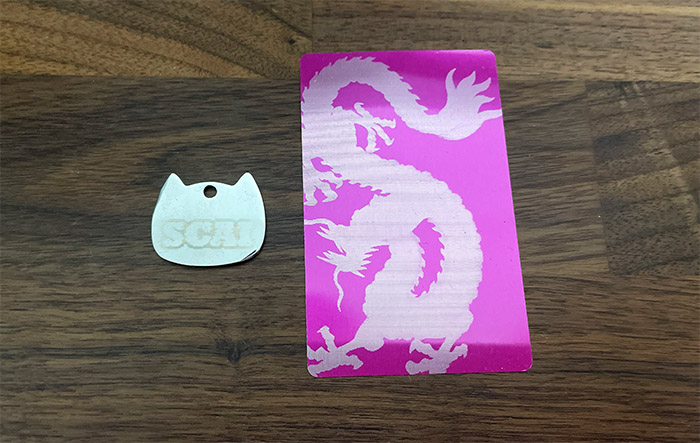
I wanted the incision to enter the metal at least a little bit, but I couldn’t find a way to do so. This meant that the end result was more akin to printing than to engraving. Don’t get me wrong, the model will remain engraved into the metal, it’s just a bit shallow (you won’t smudge it off with your finger).
As for cutting, the manufacturer said that one round should be enough at max laser intensity, but that was not what I experiences with 1.5mm plywood. I tried it with a single run and it was not even close to enough. Two runs were close to being enough, but three times did the trick – still a bit imperfect, but good enough to detach the model.
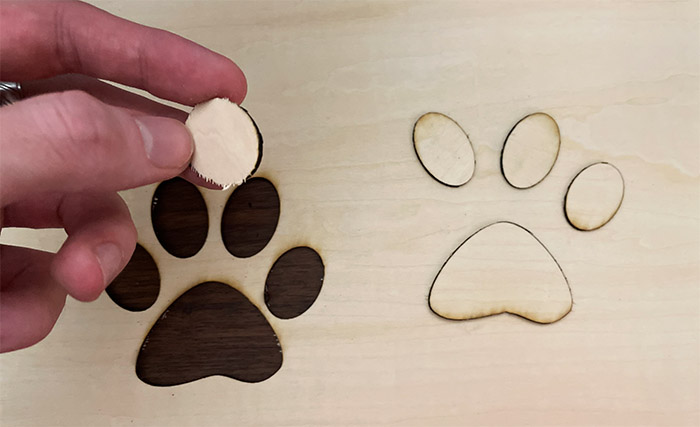
UPDATE: I managed to re-test the Two Trees TS2 cutting performance and I adjusted the settings in the following manner: the speed was set to 300mm/min, the max power to 100% and the Mode to Line to Line Tracing. This time, the laser was not only able to cut through the plywood like it was nothing on the first run, but it also went quite deep cutting a bit into the metallic plate as well. So what happened last time? I set the speed to be too fast, so the laser didn’t have enough time to cut through the material. Also, it’s very important to do a proper calibration before cutting because the laser should be a bit lower – follow the instructions in the Autofocus section to do so.
The Conclusion
I am quite sure that the Two Trees TS2 is currently one of (if not) the best DIY laser engravers on the market. And I say this because it actually feels like a tool which the longer you use, the better the results, without getting in the way of your creativity. The build quality is robust and it has what I would call industrial ruggedness, the motors move the laser module smoothly, without any vibrations and the cable management is well done. The autofocus works really well and this is an actually speedy laser engraver.
The only thing that you need to take into account is that there will be some trial and error, but overall, it’s very easy to ignore some of its shortcomings after seeing the excellent results it can produce. I say that because the open source software does mean that there are some additional steps to be able to use the app (this is not really a complaint from me, but the non-enthusiast public will want things to be a bit more intuitive) and I would have liked to get all the tools on the microSD card. Other than that, all I can say is that if the Two Trees TS2 is in your budget, you’ll be hard pressed to find a better device right now.
Two Trees TS2
-
Pros
- Large working area and improved stability
- There's an app - WiFi connection
- It's fast and can engrave really well
- Drag chains for cable management
- Emergency button + flame sensor
Cons
- The laser itself is silent, the motors more smoothly, but the fan is very loud
- It's not that easy to assemble the device
- It's a bit difficult to set up the WiFi, although rewarding at the end.
Mark is a graduate in Computer Science, having gathered valuable experience over the years working in IT as a programmer. Mark is also the main tech writer for MBReviews.com, covering not only his passion, the networking devices, but also other cool electronic gadgets that you may find useful for your every day life.