
If you’re one of the unlucky souls that has decided that now (at the beginning of 2021) is a good time to built a new PC and actually managed to get a hold of the Ryzen 5 5600X CPU, along with a MSI MAG X570 Tomahawk WiFi motherboard, then you do need to flash / update the BIOS since it doesn’t support the new Ryzen 5000 series out of the box. Flashing the BIOS isn’t really a difficult process, but it can induce a lot of anxiety, especially if it’s the first time building a PC from grounds up. The good news is that even if you botch the firmware, the MSI MAG X570 Tomahawk WiFi can be recovered from a bricked state using the BIOS flashback function (or perform a CMOS reset by taking out the battery), so don’t stress too much about updating the BIOS. Since I didn’t have an older gen Ryzen CPU (I am coming from an Intel i5 2500K!), this process has been done without a CPU in the socket which is the more difficult way – if you do have an older AMD Ryzen CPU, just go here and follow the steps posted by MSI on their official website, otherwise, carry on with this guide.
The specs of my new build:
| PC Specs | |
| CPU | AMD Ryzen 5 5600X (Yes, I managed to get it at almost MSRP) |
| Motherboard | MSI MAG X570 Tomahawk WiFi |
| RAM | 2x8GB Crucial Ballistix 3600 MHz DDR4 CL16 |
| Storage | 500GB WD Black SN750 NVMe |
| PSU | Corsair RM750 80 Plus Gold |
| Cooler | Be Quiet! BK022 Dark Rock Pro 4 (I know that it’s overkill, but it costed the same as a Scythe Fuma 2) |
| GPU | Gainward GTX 560ti (Oh yes! Gaming at 720p! And no, I wasn’t able to order any GPU from the new series BECAUSE THERE ARE NONE!). |
What do you need to flash the BIOS on the MSI MAG X570?
You will need three things in order to update the BIOS on the MSI MAG X570 Tomahawk WiFi: the motherboard itself, the PSU and a very basic, low-storage USB flash drive. Before handling any PC components, make sure to use one of those anti-static straps, especially if you live in a dry climate (I know that the possibility to damage a component is very low, but why be a part of the statistic?).
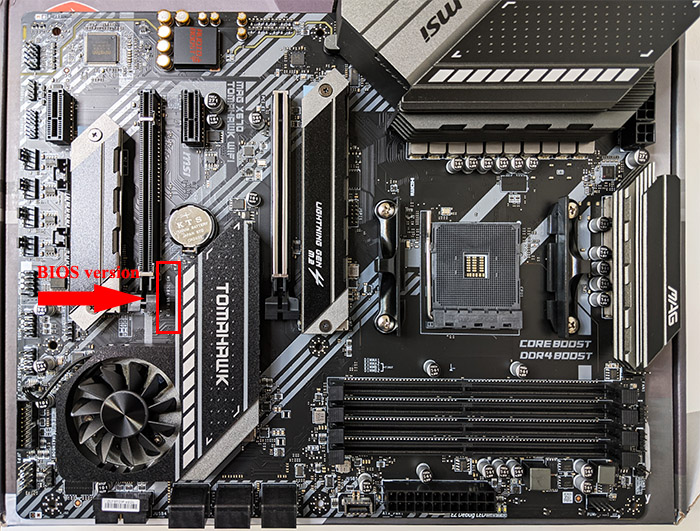
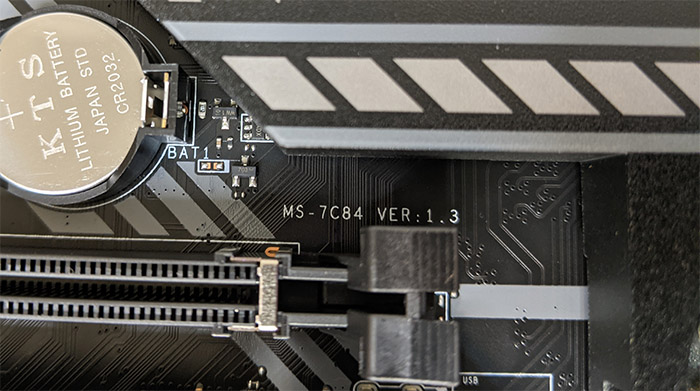
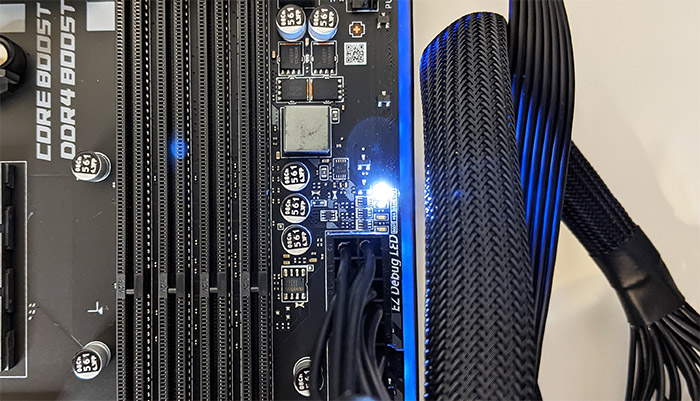
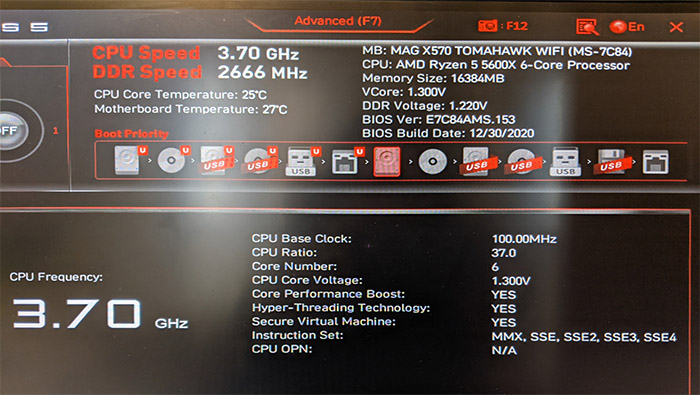
Then, take the motherboard out of the package (it’s ideal to leave it on its box) and then check out the BIOS version to make sure you actually need to update it. You can find it next to the PCIe slot and the CMOS battery – in my case, it was MS-7C84 Ver 1.3 which is quite recent, but to get the most out of this mobo, I decided to go with the latest beta version (7C84v153) – at the moment of writing.
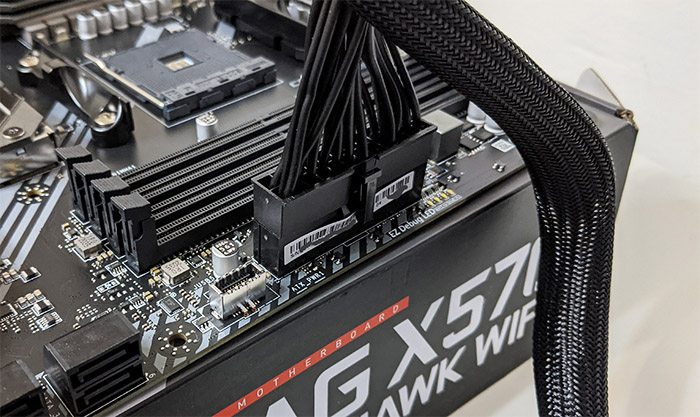
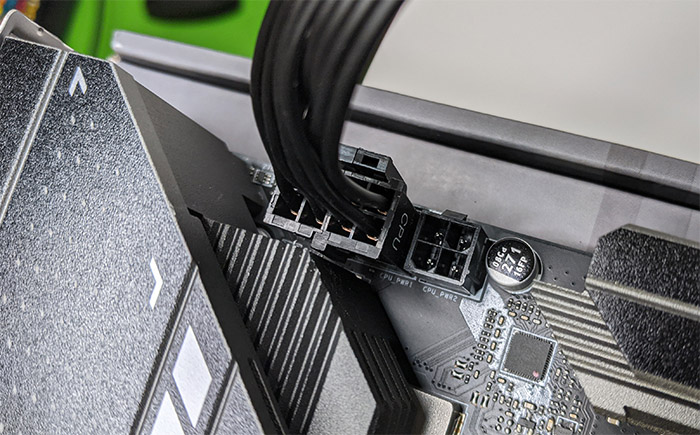
Next, I took out the PSU out of the box – it’s a Corsair RM750, so it’s fully modular, meaning that I could choose which cables I need, maintaining the inside of the case far neater.
I only needed the ATX 24-pin cable and the CPU cable which have their dedicated slots on the PSU, while on the motherboard, the ATX cable goes on the right side, next to the RAM slots and the CPU cable goes at the top left side. Then take the power cable and insert it to the other end of the PSU, next to the ON/Off switch. Before powering on the PSU, we need to prepare the last piece of the puzzle, the USB flash drive.
Preparing the USB flash drive
The general consensus seems to be that you should use the oldest USB storage drive that you have laying around, ideally not going above 8 or 16GB. I was lucky to find a 10-year old 4GB USB 2.0 SanDisk drive that had been through a lot (the printed info has been completely erased), but you can either borrow one or just buy a cheap USB 2.0 flash drive and you should be good to go – it doesn’t necessarily need to have an LED, but it’s going to make things clearer if it does. Take the drive and insert it into your PC and then head over to the MSI official website (msi.com). Here, select Products > Motherboards and then MAG Series, I selected the MAG X570 Tomahawk WiFi from the list (it should be on the second page). Afterwards, click on Support and you should be able to see all the available BIOS firmware updates. Please make sure that you select the correct motherboard model, otherwise, you can mess things up quite a bit (nothing that can’t be recovered, but it’s better to avoid it).
Here, you can either go with the stable or the beta version and most people will, of course, go with the latest stable version (the non-beta), but I read that a few people had some trouble with the version 7C84v14, so I decided to take the risk and downloaded the latest beta version – it can always be updated afterwards, so I wouldn’t worry too much. Unzip the downloaded folder and you should see two files: a TEXT Document (7c84v1x) and a .153 file (E7C84AMS.153).
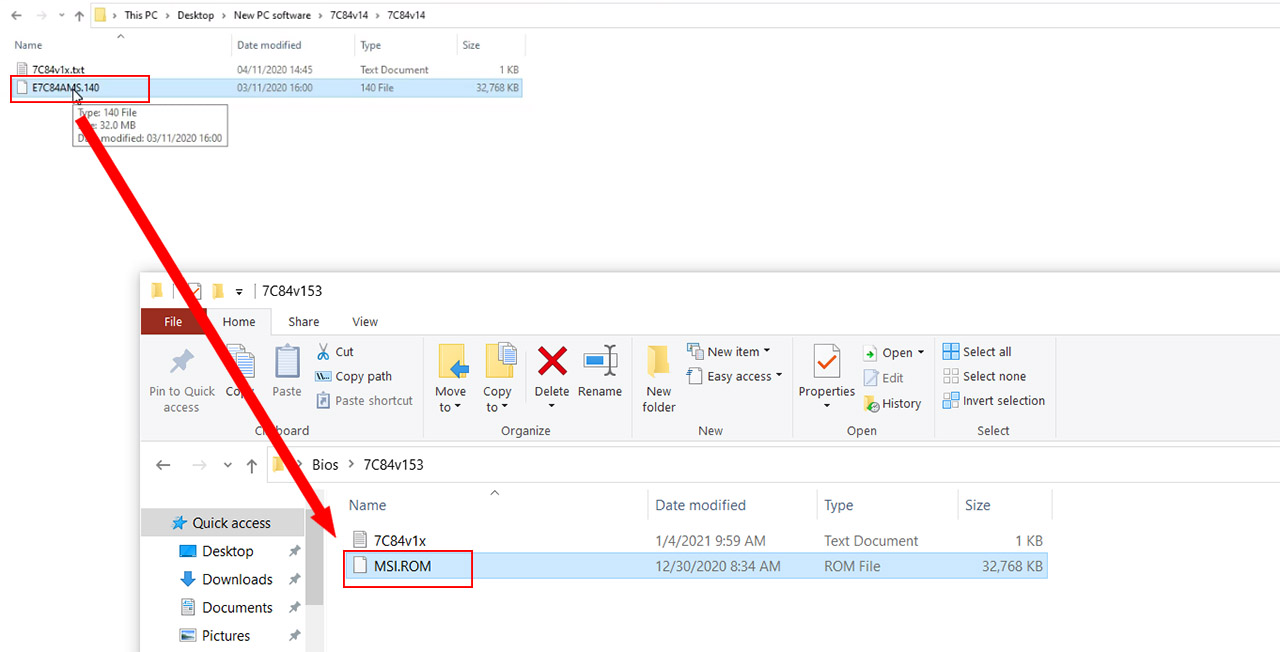
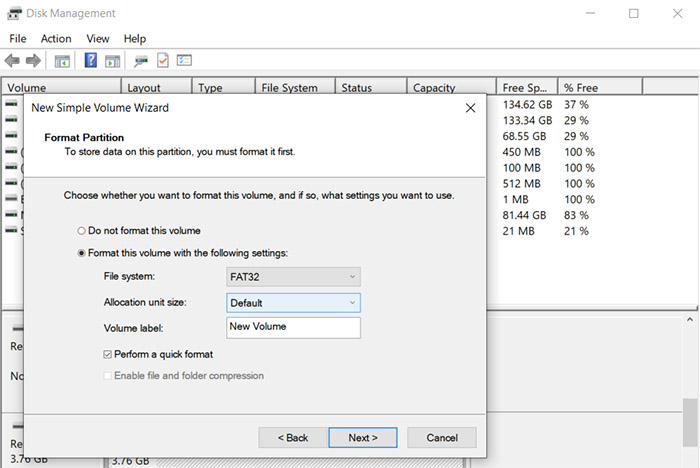
You need to rename the E7C84AMS.153 file to MSI.ROM (don’t worry about the warning message) and then move both the 7c84v1x and the MSI.ROM to the USB drive – make sure that it is formatted to FAT32 beforehand! Safe remove it from the PC and then you need to insert it into the motherboard.
Flashing / Updating the BIOS
If you have followed the previous steps, then you should have the USB drive ready so, simply insert it into the USB drive that has written Flash BIOS next to it.
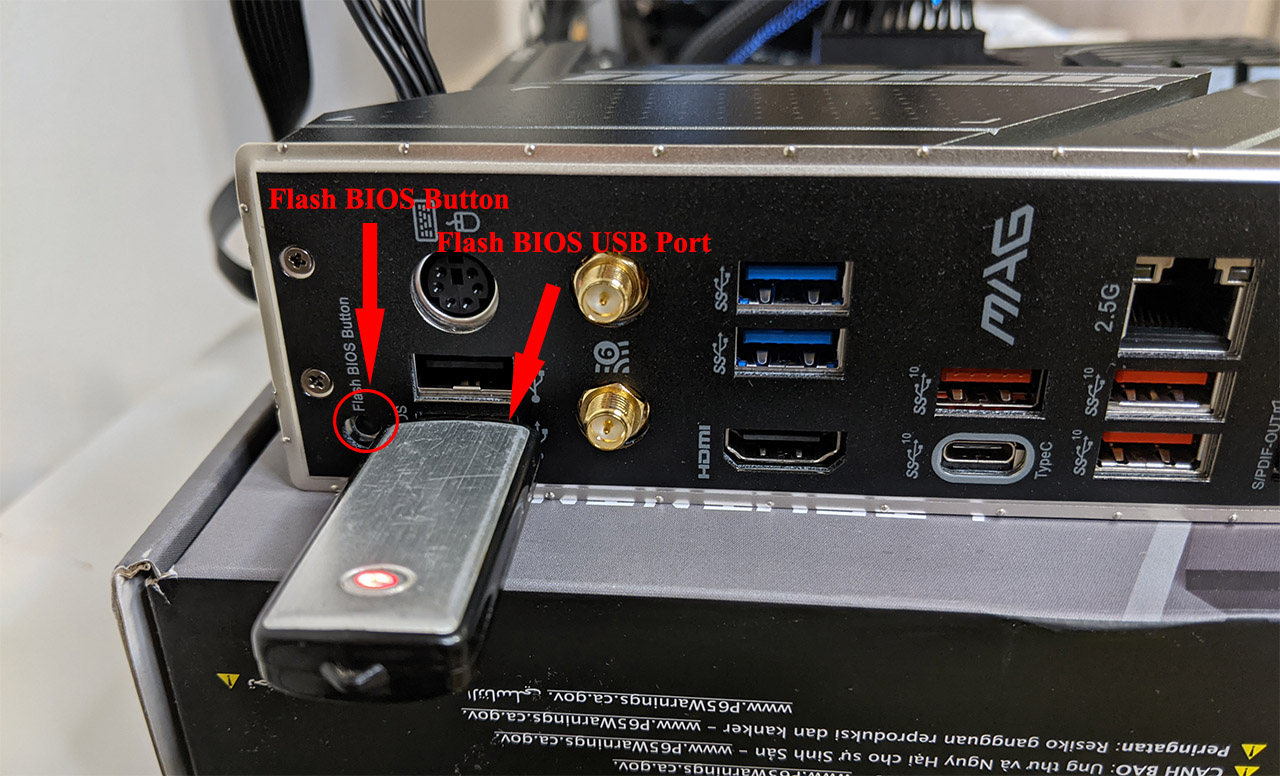
At this point, power on the PSU (make sure to insert it in a reliable socket since it’s paramount for the power to not be cut off while updating the BIOS) and wait for the EZ Debug CPU LED to turn solid white – when it does, take a pen and push the recessed Flash BIOS button. A white LED that you will be able to see shinning through the I/O shield will start flashing, as well as the LED on the USB drive (if it has one) and all you have to do now is wait for a few minutes until the process is done.
Some people said that it took about 3 minutes for the process to finish, but, in my case, it required 7 minutes – the CPU LED will turn off for a second and then back on, and all other LEDs should turn off.
Before cutting the power, make sure that there is absolutely no LED activity (except for the solid CPU white light) and to be on the safe side, just wait another 5 minutes. Press the Off switch from the PSU, remove the cables and start building. If everything went fine, you should be able to enter the BIOS, otherwise, read on to see some troubleshooting steps that seemed to have worked for a few users.
Troubleshooting
1. If everything seems to work fine, but you don’t get a signal to your monitor, check whether you have plugged your display into the GPU and not the motherboard, since the Ryzen 5 5600X does not have an integrated graphics card. If you still don’t get an output, change the monitor (a TV will also work), since it seems that in some odd cases, it won’t work with monitors that support a native resolution above 1080p.
2. If you connect your USB drive and start the BIOS update process, but the LED only flashes a few times and then it turns off, it may be because it doesn’t like your USB stick. Which is why it’s best to go with an old USB 2.0 stick that doesn’t have a large capacity (it will not work with USB 3.0 storage drives).
3. If the BIOS update was successful and it will still not recognize the Ryzen 5 5600X, but will work with other CPUs from the older generation, you can try to flash a previous, preferably non-beta BIOS version. Also, make absolutely sure that the flash drive doesn’t have any other partition left from previous applications and that it’s completely empty before writing the two BIOS files.
4. If the BIOS update has failed, you can try clearing the CMOS which will reset the BIOS – to do so, you need to power off the PC and unplug the power cord, identify the JBAT1 pins (they’re towards the bottom) and use a jumper cap to short JBAT1 for about 5 to 10 seconds; remove the jumper cap from JBAT1 and then power on the computer.
5. If the previous method didn’t work, you can try removing the CMOS battery (again, with the PC shut down and the power cord removed), wait about 30 minutes and then put the battery back. Power on the computer and try flashing the BIOS firmware once again.
Mark is a graduate in Computer Science, having gathered valuable experience over the years working in IT as a programmer. Mark is also the main tech writer for MBReviews.com, covering not only his passion, the networking devices, but also other cool electronic gadgets that you may find useful for your every day life.
small discrepancy on my end. The white LED did not turn on automatically after turning on the power. I had to push the Flash BIOS button for it to begin.
Bought this MB and had been made aware of this article by somebody. Based on the info on the physical board, I expected having to update the BIOS as well as I plan on sticking in a 5800x.
When powering on the PSU with the pen drive in the USB port, the EZ Debug CPU LED would not turn on, at all, even after waiting ~10 minutes. Scared to have busted something, I’ve power cycled a few times (with big waiting times in between) without any difference.
Not really knowing what to do, I decided to press the Flash BIOS button, after which the CPU LED turned on and has remained solid white since, and the RGB LEDs on the backside of the MB started pulsing and cycling through the color range.
Has anybody encountered this as well? Could this be an indication the BIOS had already been flashed, or something else? I could not find any info on this anywhere.
I think it may be the flash drive. Can you try it out with another, older, preferably USB 2.0 drive (<=4GB)? This seems to be a problem with this MSI MB, so it's worth asking around for an old USB drive and try again.
I used a confirmed USB 2.0 drive of 2GB branded from an event that took place in 2015, so it should be at least 6 years old. I also tried another another drive which was slightly newer but also confirmed USB 2.0 of just 1GB, with the same result. I decided to continue the build, but am still awaiting my GPU so have not been able to confirm yet whether or not it actually is good now, but I will provide an update once I have more.
I love how this “how-to” is dumb-proof and helped me step-by-step to update my Bios! Also, thankfully, Mark and I have the same specs (including the brands, etc.) except for the Cooler and GPU 😂
I am happy that I could help. Hopefully, the GPU market will improve so I can finally move past the 560ti.. 🙂