
The Software
The microSD comes with some software that you can install on your computer and there’s Cura, as well as the in-house-made VoxelMaker. After installing the VoxelMaker (I already had Cura), it immediately required to be updated and, after selecting the profile for the Voxelab Aquila S2, I could Load a model and adjust its settings.
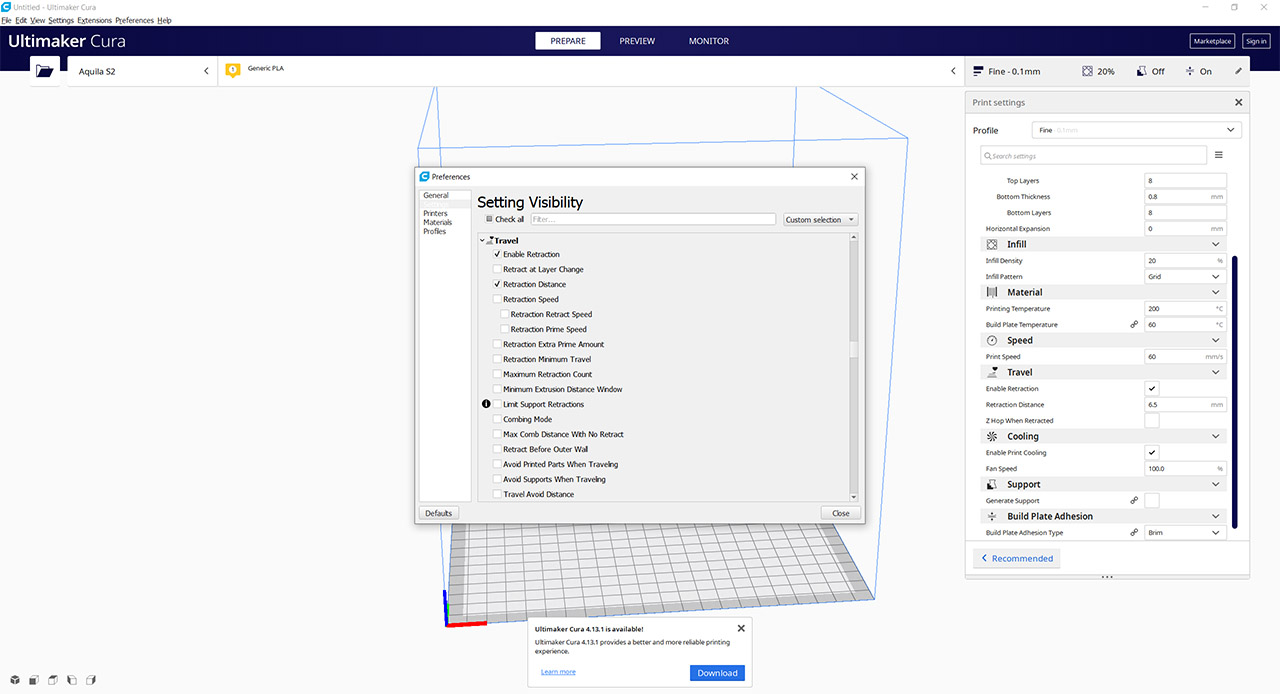
But, I have to be honest that I preferred Cura, since I already got accustomed with it from other 3D printers – the VoxelMaker is a perfectly valid software as well. With Cura, you do need to create a custom profile because there isn’t one for any Voxelab printers, so I used the values that were suitable for the original Aquila. Then, I adjusted the values depending on the model that was being printed and on the type of filament. For example, PLA will work fine with a temperature up to 200 degrees C, while TPU will require a higher temperature if you intend on printing faster. After everything is to your liking, click Slice, select the SD card where you will write the file and then insert it into the printer.
The Printing Performance
The Voxelab Aquila S2 can be used with a wide variety of materials, including TPU, PETG and ABS, and it will obviously work great with PLA as well. I had PLA and TPU available, so I decided to print a few models to see how the device behaves. With the first model that I printed, I didn’t change any settings, simply inserted the microSD card, selected the Aquila Test Model which consists of several small shapes on a thin support.
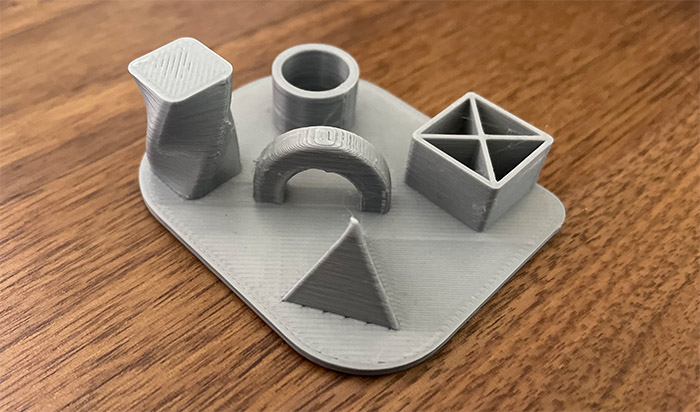
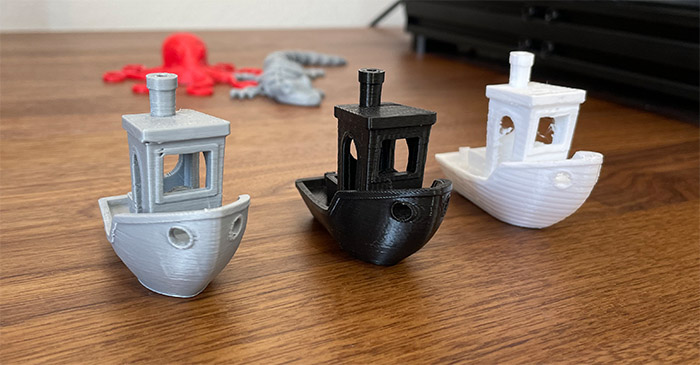
There’s a triangle, half a ring, a cylinder, a rectangle and a covered spiraling cylinder. There is some very faint stringing and at the top of the spiraling cylinder, there is a slight under extrusion. Overall, the Voxelab Aquila S2 did a good job. Next, I printed the obligatory 3DBenchy, the boat model that has been torturing 3D printers for years and I used the suggested settings. I used 0.2mm for the layer height, 10% infill, the print speed was 50mm/s and the print travel was set to 120mm/s. This way, an hour and a half later, I got the small boat model and, as you can see, it’s not bad at all.
There is almost no stringing, the proportions are correct and there are no deviations in the wall that are usually caused by vibrations (so there are pretty much none). However, there is a noticeable amount of under-extrusion on the side of the boat, but none at the top. The top half of steering wheel is under-extruded, but the chimney is properly round and the windows have their rectangular shape without any collapsed filament layer. It’s not perfect and it can be done better, but this is the result with the settings suggested to keep up a certain testing standard. As a comparison, the Longer LK5 Pro did a bit better at this test since it also had no stringing and very little under-extrusion, but it did suffer from vibrations (it needed to be slower).
Afterwards, I printed a calibration cube and I found it to be more accurate in size than the one printed by the Longer LK5 Pro, but it did have some minor issues on properly highlighting the letter at the top.

To wrap it up with the PLA filament, I printed a fun little model from from Thingiverse. The articulated lizard turned out excellent and these are the settings: the layer height was set to 0.2mm, 15% infill density, the printing temperature was set to 200 degrees, I enabled the retraction distance to 2mm and the speed was 60mm/s (the travel speed is 120mm/s). It took a bit over 2 hours to get the model done and it turned out really well: there is very little stringing, I noticed at some part of the body a bit of under extrusion, but overall, the lizard was close to perfect.
After that, I took out the PLA filament and added the TPU one. I did have a try with this type of filament with the Longer LK5 Pro and I have managed to create a small flexible cube after slowing down the printer feed rate to 20% and raising the temperature to 230 degrees. The Voxelab Aquila S2 was build to handle this type of filament, so there’s no need to pamper it too much. Still, I wanted to use some conservative settings, so I inserted these values:
- infil densitiy: 20%
print speed: 35mm/s
travel speed: 100mm/s
initial layer speed: 17.5mm/s
printing temperature: 230 degrees C
bed temperature: 60 degrees C
enable retraction: yes – I know that some of you think that there is no need for retraction, but I still used it to make sure the model turns out fine
retraction distance: 1mm
retraction speed: 25mm/s
retraction prime speed: 10mm/s
retraction minimum travel: 1mm
combing mode: all.
Using these settings, I was able to get a good model using the TPU filament in 3 hours and 25 minutes. As you can see, the model is an octopus (again taken from Thingiverse) and the head is flexible, as well as the arms, showing no signs that they may break when extended.
Furthermore, the extrusion has been near perfect all around the model, there was very little stringing, so it seems that the Voxelab Aquila S2 likes TPU more than PLA. I do need to mention a couple of things that I noticed while the printer was creating these models. First, the nozzle is heating up fast, like way faster than some of its competitors, which is excellent. Secondly, even if I did set the temperature in Cura, the nozzle temperature was always set to zero, so I had to adjust it from the Tune settings to start the printing process (otherwise it just hangs indefinitely).
At the beginning, the fans are fairly loud, but once the model starts printing, the process gets very silent. That’s because the noisy fan is the one cooling the model layers and it doesn’t really start with PLA. Using TPU, it did start at some point and, yes, the printer has gotten noisy again.
Conclusion
This is the first time I try a 3D printer with a direct-drive extruder and I admit I had a lot of fun with it. That’s because I was able to go beyond the common PLA applications and create flexible models with far trickier materials, something that’s very difficult to achieve with the printers that use the Bowden tubes. And what’s surprising is that the price tag is not higher than other entry-to-mid-range level 3D printers on the market. At the same time, the entire DIY aspect is a bit brutal because the instructions don’t really like holding the user’s hand, nor is the leveling process that intuitive. But, considering the price tag, you would be hard pressed to find another 3D printer that supports high temperatures (for ABS and TPU) and that comes with a magnetic PEI plate.
Voxelab Aquila S2
-
Pros
- Direct drive extruder: up to 300 degrees C
- Can handle TPU filament with ease
- It's relatively fast and, when using PLA, it runs surprisingly silent
- Very little vibrations + solid base
- Magnetic PEI plate
Cons
- No filament runout sensor
- No dedicated bed leveling adjustments in software
- Putting everything together can be made simpler with clearer instructions and especially if the screw busts are labeled
Mark is a graduate in Computer Science, having gathered valuable experience over the years working in IT as a programmer. Mark is also the main tech writer for MBReviews.com, covering not only his passion, the networking devices, but also other cool electronic gadgets that you may find useful for your every day life.