
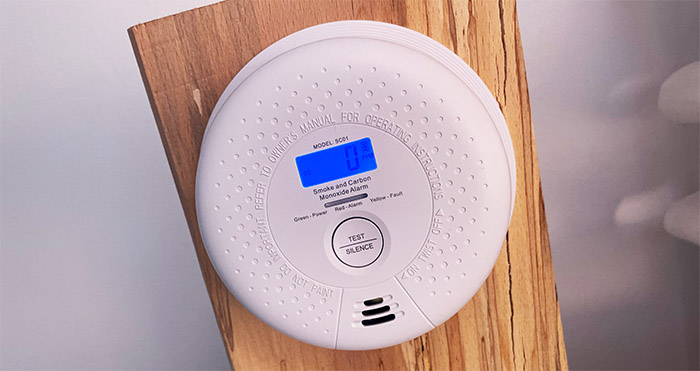
The X-Sense SC01 is a fairly no-frills smoke and CO detector sporting both a photoelectric and an electrochemical sensor to be able to sense rising smoke levels, as well as if there is a spike in the CO concentration in your home.
The manufacturer calls it a Dual-Sensor and it’s not wrong, it’s just that it is a terms that frequently refers to the ability to detect smoke from both smoldering fire and the fast flaming fires. I am fairly sure that the X-Sense SC01 is great with the detection of large particles and doesn’t have a dedicated beam for detecting smaller particles (as Nest does with its blue LED light).
So, the smoldering fires should be better detected by this Smoke and CO alarm. I noticed that there is no app, nor any way to inter-connect with other smoke detectors. And I know that this is actually a selling point for a lot of people that don’t want to put their safety in the hands of a complicated machine.
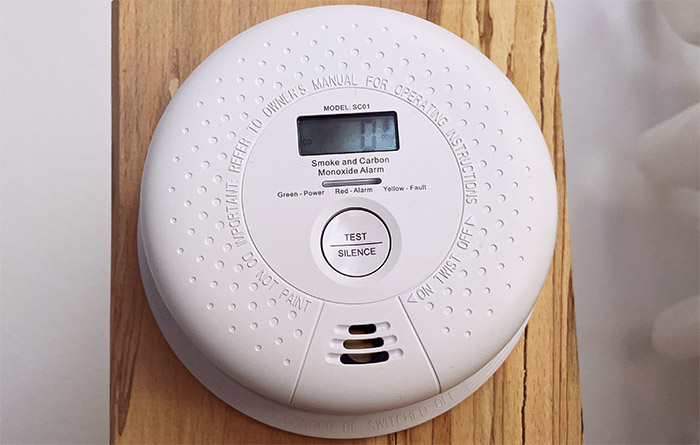
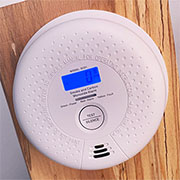
So, if you do need to at least be able to interconnect more units, then you can give the SC06-W a chance since it has pretty much the same type of sensors available. The X-Sense SC01 does have a small display though (just like the SC07-W) which will show some status data in real time. And the interesting thing is that it doesn’t seem to have any relevant impact on the battery life considering that it’s rated at 10 years. Furthermore, I noticed that the device is ETL-approved and it meets the UL 217 and UL 2034 standards, so, without further ado, let’s put it to the test.
Design and Build Quality
Since the X-Sense SC01 needs to have room for both the photoelectric sensing chamber and the CO sensor, the device is not that compact. It’s somewhere in the same range as the SCO501CN and the Nest Protect, so, at its 5.7 x 5.7 x 2.0 inches, it’s going to be noticeable.
Up to a certain point obviously because even the largest devices (such as the wireless access points), if they’re white on the ceiling, they won’t attract that much attention. But, the X-Sense SC01 has a flashy element, the display – the good news is that it does not stay lit the entire time, only when it’s enabled by the button. The entire case is made of plastic and it’s covered by a white matte finish, as most smoke alarms are, and I did notice a lot of similarities with the SC06-W.
Sure, there is no actual grille, just a faint pattern on the plastic, but the Test / Silence button sits in the same place (and has the same functions), just like the three cut-out areas for the speaker. The speaker is loud, as expected, reaching 85 dB at 10 feet (which is in line with the other smoke detectors), so it’s going to be heard from every part of the house.
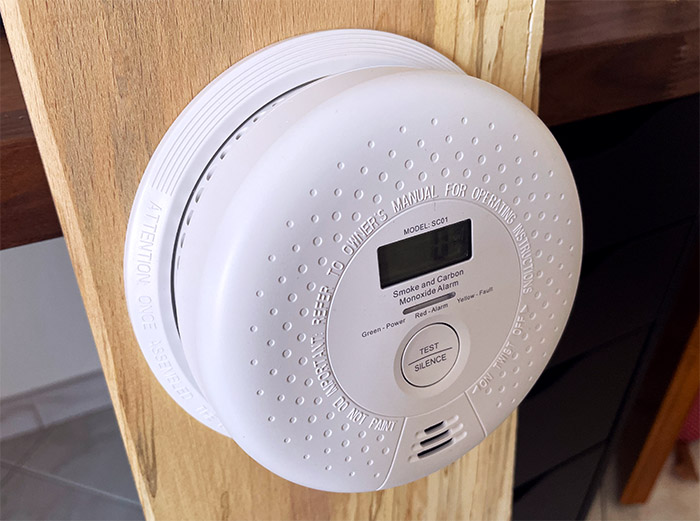
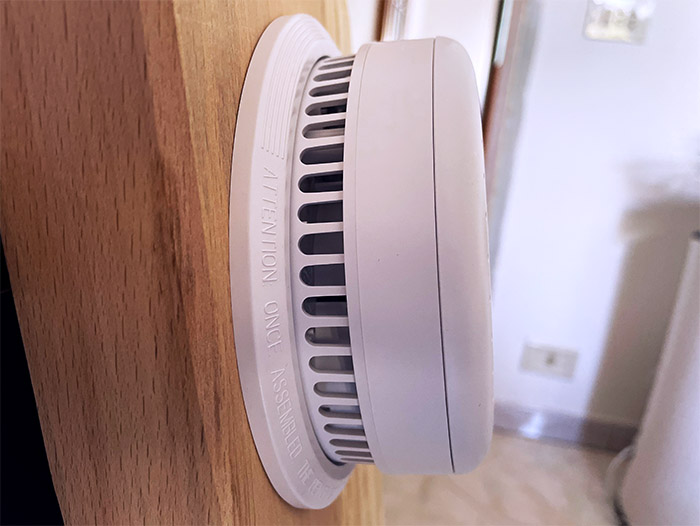
The smoke and CO can only enter from the sides of the X-Sense SC01, where the manufacturer added multiple holes. After opening the case, I found it interesting to see that there was a transparent plastic piece dividing the circuits from the sensing chamber. And they have added a small hole for the CO sensor – the plastic film doesn’t really seal the inner portion of the device.
Will it have an impact on how quickly it will detect the rising CO levels? No idea since I don’t have the means to test it (probably not though – this is an ETL-approved device after all). I already mentioned the Test / Silence button that you need to use to check if everything is in order (you should test the X-Sense SC01 at least one a month – check these proven methods on how to safely do it).
Next to the button, there’s a narrow LED which will flash green once in a while to let you know that everything is in order, it will flash yellow if it encounters an error and it will turn red when it detects smoke and/or rising CO levels in the room. If you turn the smoke detector upside down, you will see that there is no battery tray and that’s because similarly to the SC06-W, you can’t remove the battery.
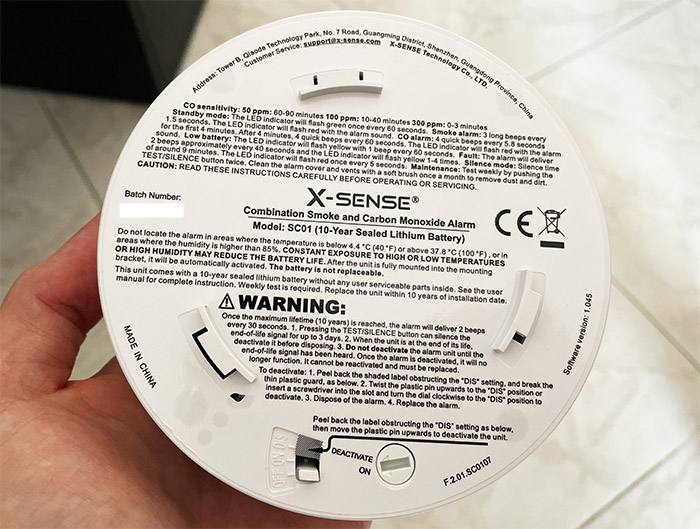
Indeed, the idea is to enable the X-Sense SC01 and then throw it after 10 years have passed. Surely, if you have turned the device On and it is defective, you do have the option to Deactivate it, just be aware that it’s permanent. X-Sense have made sure to add some plastic seals in the way, so you don’t accidentally brick your smoke alarm, but you should still exercise caution when moving the switch.
The Display
The X-Sense SC01 does have a display and, while it does have the back light on for a few seconds when you operate the Test/Silence button, it’s going to be a turned off completely. That’s to preserve the battery life. You will still be able to see the CO concentration if you press once on the Test button which, ideally, should be zero.
But in case it does get above 30ppm for a longer period of time, the alarm will be triggered; if the high CO levels was only temporarily, then the LED will turn green, but the horn will not get enabled. This shows that the X-Sense SC01 does try to keep the false alarms to the minimum.

Besides the CO levels, the display will also show how much battery is left, but it doesn’t seem to contain any info on the smoke detection. When the device will reach EOL, the display will show END and at that point, you should replace the detector.
What’s inside the X-Sense SC01 (Teardown)
You should not open up any of your smoke and CO detectors for obvious reasons – you’ll not only lose the warranty, you also risk tampering with the device, making it less efficient (or completely bricked). But, we do need to know what’s inside of it, so I decided to open up my unit.
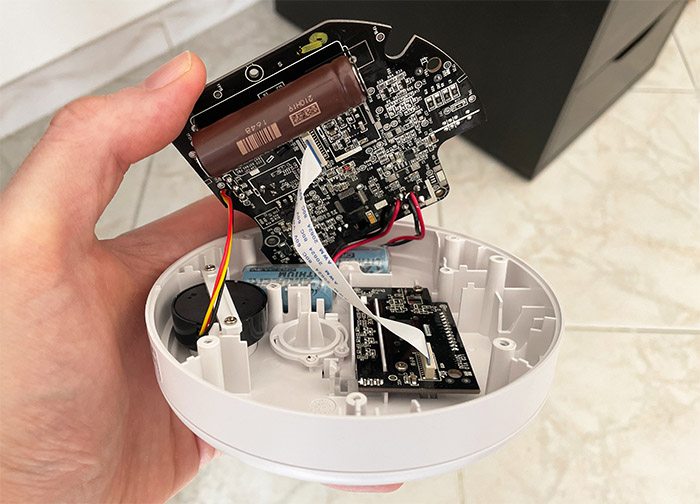
To do so, I had to peel off parts of the label that covers the entire bottom side of the X-Sense SC01. Then, after removing the four screws, the bottom section came off easily, revealing the sensing chamber for the photoelectric sensor and the aforementioned transparent plastic layer.
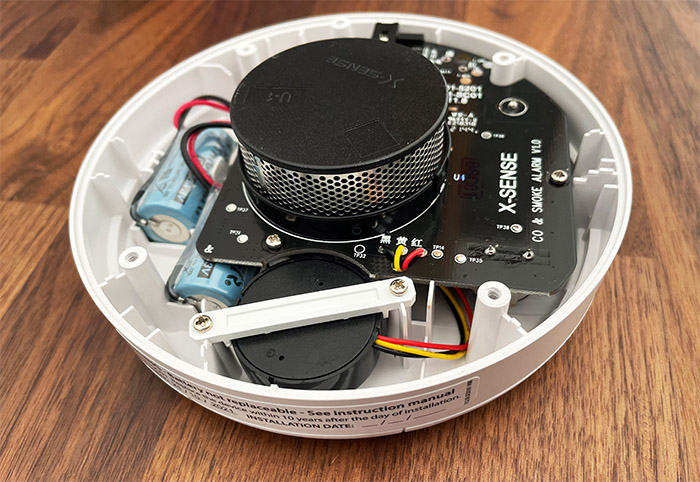
I could also see the blocking mechanism for the On/Off switch and the speaker. Just like on the SC06-W, there are two batteries to keep the smoke and CO alarm alive (both are CR2/3A 3V) and yes, you can technically replace them, but I suggest you don’t since most smoke detectors will stop working properly after about 10 years (and need replacing).
After taking the screws off the board, I saw that the display has a separate circuit board and I could also identify the ultra-low-power 8-bit MCU STM8L052 CPU (from STMicroelectronics) clocked at 16MHz. As for the CO sensor, the X-Sense SC01 uses the same Figaro TGS5042 which resembles a battery – the SC06-W and the First Alert SCO501CN uses the same Carbon Monoxide sensor.
The Installation
The hardware installation process doesn’t differ from most other smoke alarms. You take the plastic bracket and drill some holes in the ceiling following the dedicated cutouts. Then, attach the bracket and rotate the X-Sense SC01 into place. This way, the switch will automatically move to the On mode and the smoke / CO detector will now be enabled.
Wait a few seconds until the LED turns off and the display will start showing the current CO levels in the room. It’s good practice to immediately run a test, but that’s pretty much all – there are no wires that you need to connect since this is a battery-operated smoke and CO alarm. Like I said in the intro, you can’t inter-connect the SC01 with other X-Sense smoke alarms, but there are other models that do, such as the SC07-W which also has the same type of display.
I also need to mention that there are some guide lines that you need to take into consideration when choosing the perfect place for the X-Sense SC01. Avoid putting it above or very close to a stove (you will get lots of false alarms if you do so); it’s also not a bad idea to keep it away from the bathroom door since steam may come out and trigger the alarm.
You should also make sure that there are at least 20 inches from the near corner when you install the device on the ceiling and at least 4 inches in case you decide to mount the X-Sense SC01 to the wall (both the ceiling and the wall are very valid options if you keep in mind the airflow).
The Features
The two main aspects of the X-Sense SC01 are the sensors, one for detecting smoke and the other for the rising CO levels. I know that a lot of manufacturers rely on a dual-sensing photoelectric sensor to detect both fast flaming fires and smoldering fires.
And the Nest Protect is the prime example at that. And it makes sense considering that the traditional ionization sensor is no longer permitted due to the environmental damage that it can do. The X-Sense SC01 doesn’t seem to have a special type of sensor for both types of fires, so it’s mostly going to do best with smoldering fires, where large particles of smoke rise towards the ceiling.
And, as soon as they enter the sensing chamber, the alarm gets triggered. That’s because the concept is to shine a beam of light away from the sensor and, as soon as any foreign particle enter this chamber, it should deviate the light towards the sensor, thus triggering the alarm. As for the Carbon Monoxide, the X-Sense SC01 uses the Figaro TGS5042 electrochemical sensor (that we saw in the teardown section) which looks like a battery.
The way it works is that at one electrode, the sensor uses fuel cell to oxidize CO to CO2, while on other end, it consumes O2. And a signal current is created proportionally to the amount of detected CO in the room (the display will show the CO value).
I saw that the X-Sense SC01 is ETL certified which is excellent for the EU market and it’s kind of accepted in the US as well, although not everywhere. For example, it’s not uncommon for people to not pass the safety inspection in certain states (CA) if you don’t have UL-certified smoke alarms. It’s interesting to see that the X-Sense SC01 does seem to have passed the tests required for the UL 217 and UL 2034 standards, but the manufacturer didn’t want to go the extra mile for the certification.
Testing the X-Sense SC01
I know that some of you still test your smoke detectors with real fire. Don’t be that person. The Test/Silence button can start a simulation and check if every important part of the X-Sense SC01 is in working conditions – do this often, ideally once a week, but once a month is fine as well.
But I also understand that people may be skeptical about whether that self-inspection actually does anything, so they rely on other means of ‘making sure’ that it works. The most common is by using actual fire. If you do it this way, in the best case scenario, the smoke detector will get damaged due to the continuous heat exposure (some smudge may also end up inside the sensing chamber causing more frequent false alarms).
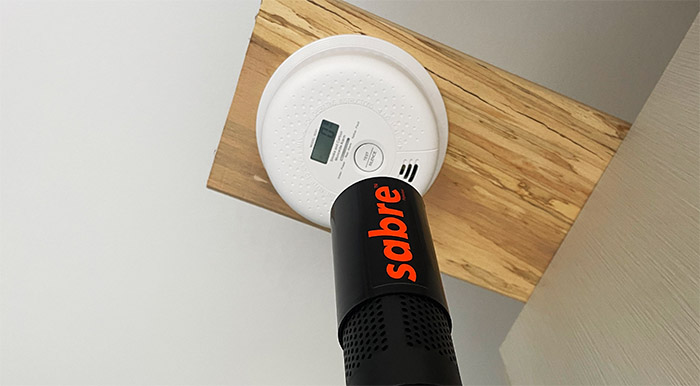
That’s why as an alternative I do suggest using synthetic smoke cans, if you don’t trust the self tests. I use some cans from Sabre and they work great, but be aware that the same smudge issue applies in this case as well. It’s just that you won’t risk burning your house down by testing your smoke detectors. That being said, in order to test the X-Sense SC01, I used a Sabre can of fake smoke and I prefer this type of cans due to the prolonged neck which better accumulates smoke (so, a more realistic representation of how smoke from real fire spreads).
Of course, I did try to get my hands on a proper testing tool, but it costs several thousands dollars and no company ever replied back. Anyway, the idea is to push smoke for 1 second at 1 foot underneath the X-Sense SC01 (it’s mounted next to the ceiling) and then check how long it takes for the sensor to be triggered. And it took 12 seconds with one second of accumulated smoke, which is really good.
Next, I went a bit lower, to 2 feet and redid the same test. But one second of smoke wasn’t really enough to trigger the alarm, so I decided to push two seconds of smoke towards the X-Sense SC01. This did the trick since the alarm was triggered after 10 seconds. Afterwards, I moved to the 3-foot point underneath the smoke detector and pushed smoke for 2 seconds once again.
Surprisingly, it was enough to trigger the alarm after 12 seconds, which is excellent since 2 seconds can accumulate quite a bit of smoke.
The Conclusion
If you think that the smart smoke detectors will replace the traditional devices, think again. Most people still prefer no-frills devices which will quickly sound the horn immediately after there’s smoke in the room. And that’s exactly the functionality of the X-Sense SC01. It can detect smoke fairly quick, it has a CO sensor built-in as well and a display to let you know the CO levels + battery life. I would have like to see the inter-connectivity feature, but the whole idea is to be a simple device which does its job properly. And the large majority of people want exactly that (I actually got scolded on my Best smart smoke detectors article for focusing on smart smoke detectors too much).
X-Sense SC01
-
Pros
- Good reaction time during the smoke test
- Can detect both smoke and CO
- The display shows the CO levels
- Long lasting battery life
- Is ETL-certified
Cons
- Can't interconnect with other smoke detectors
- Can't be turned off (unless you want to do it permanently)
- Isn't UL-certified
Mark is a graduate in Computer Science, having gathered valuable experience over the years working in IT as a programmer. Mark is also the main tech writer for MBReviews.com, covering not only his passion, the networking devices, but also other cool electronic gadgets that you may find useful for your every day life.