
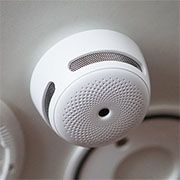
The X-Sense XS01-WR is a very compact smoke detector designed to be as unobtrusive as possible while ensuring that, in case of a fire, it quickly triggers the alarm, thus allowing enough time for you and your family to get away from harm. I know that First Alert and Kidde are well known names in the US market (and lately, Google has pushed the Nest Protect into the mainstream as well), so X-Sense does have a tough competition to go against and there’s also the UL-certification aspect.
| X-Sense XS01-WR | |
|---|---|
| X-sense.com | Check Product |
While in Europe (and almost the entire world), the people have grown to accept other certifications standards (obviously, the domestic ones), in the US, the UL certification is still considered the best way to let the customer know that your product has adhered to all the safety regulations.
The X-Sense XS01-WR is approved by TÜV, which, just like UL, is a perfectly valid safety certification and the interesting thing is that TÜV can be just as expensive as the UL certification, but some manufacturers seem to not want to bother with UL for various reasons.
That being said, the X-Sense XS01-WR appears to be a no-frills smoke detector and, while it doesn’t have smart capabilities, you can inter-connect multiple units, so they can sound at the same time in case one detects smoke (it worth noting that it also doesn’t have any CO sensor – you will have to buy one separately), so let’s have a closer look at the device and test its reaction time.
ALSO CHECK OUT: THE BEST SMOKE DETECTORS OF 2020
Design and Build Quality
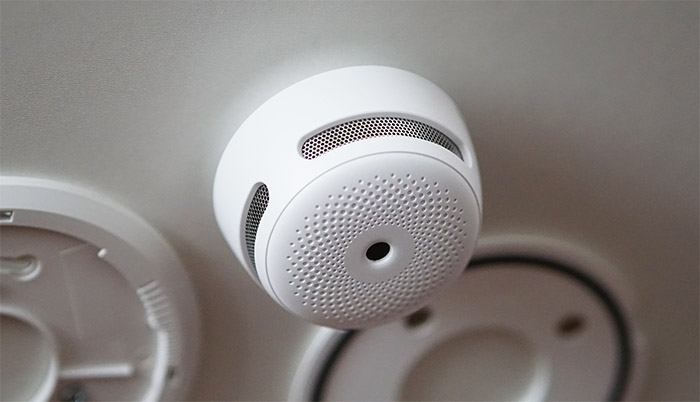
The most common design for a smoke detector is the circular white plastic case with as little particular traits as possible in order to not attract any attention towards themselves when mounted on the ceiling. I know that the smart smoke detectors have gotten more daring in this regard and I can give the Nest Protect‘s LED ring as an example, but all the other devices that I have tested (the First Alert SCO501CN-3ST and the Kidde 2070-VDSR) do indeed keep a low profile, each sporting a fairly large circular plastic case. X-Sense decided to go against the traditional look and made the unit very small and compact (the XS01-WR has a 3.0-inch diameter and it’s 1.9 inches wide), but it still sports a round plastic case which protrudes a bit more from the ceiling (or wall) than most other smoke detectors on the market (was to be expected when you have to cram everything up in a small case).
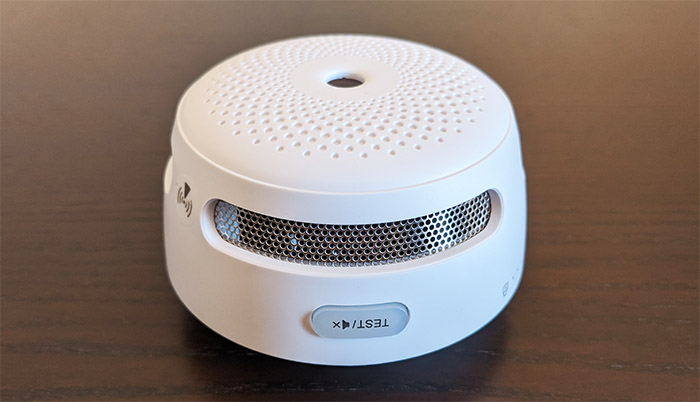
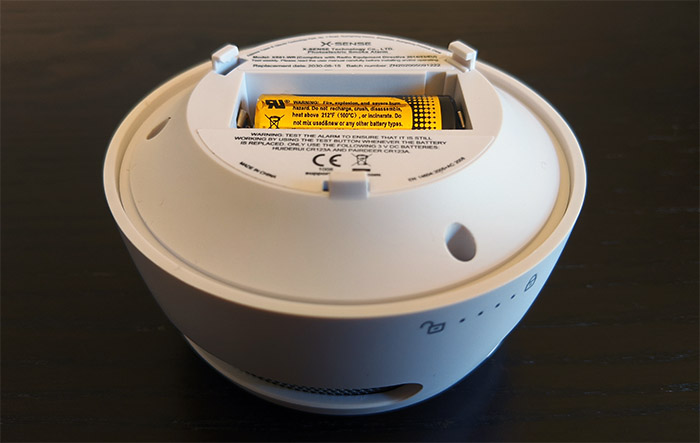
At the top, there is a circular opening towards the speaker and on the sides, there are three cut-outs that expose the internal metallic mesh covered by small holes which will allow the smoke to enter the sensor chamber and trigger the alarm. Also on the side of the device, you can identify a small Test / Mute button which is a bit awkwardly placed if you want to quickly silence the horn (when you’re sure it’s a false alarm – otherwise, the horn will re-activate a few seconds later). If you turn the smoke detector upside down, you’ll be greeted by the mounting bracket which is already partially attached to the XS01-WR’s case – simply rotate it counter-clockwise and remove it to gain access to the battery slot.
X-Sense has added a CR123A 3.0V Lithium Battery which should last for up to 10 years and to activate the device, you need to pull the transparent plastic tab (there is a dedicated Pull tab that you need to use only to remove the battery from its slot). Doing so, the LED underneath the Test button should flash red once and then once every minute to show that the smoke detector is functioning correctly.
It’s very important to always test the alarm after you’ve added the battery and you can run the built-in diagnostic test by pressing the Test/Mute button; this way, the horn will sound 3 quick beeps and the LED will flash red every second while the alarm is activated. As with other smoke detectors on the market, this test checks the internal circuitry, so you don’t have to use improvisations to check if the device functions correctly.
Installation
Since the X-Sense XS01-WR is a battery-operated smoke detector, the installation process is ridiculously easy, you just have to select the right spot, drill a couple of holes in the ceiling or wall, use the provided screws to attach the bracket and then rotate the smoke detector into the bracket (clockwise motion). And that’s it, you don’t need access to any wires or anything of the sorts, but the location needs to be selected very carefully, otherwise, you can get a lot of false alarms (and you don’t want those happening especially during the night). The general consensus is that you shouldn’t put a smoke detector directly underneath a stove and you should keep about 20 inches from each corner – the middle of the ceiling is considered to be the best place. Furthermore, you should prioritize putting a smoke alarm in every bedroom and in the hallways, ensuring that you can easily hear the horn (if you have hearing problems, there are some specially designed alarms with strobes of light and even bed shakers that can keep you safe).
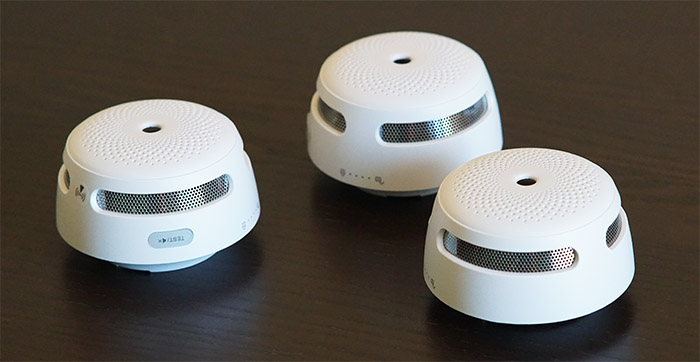
It’s worth mentioning that if you have multiple X-Sense XS01-WR smoke alarms, you can inter-connect them since all have a built-in RF module and to do so, take two units and press the Test button four times on one of the two devices until the horn beeps once and the LED will start flashing red continuously. This means that the devices are in pairing mode, so just wait until the smoke alarms get paired: the horn will beep once when this happens and the LED should stop flashing. To interlink a third (and so on) unit, again press the Test button four times on the new device and wait until it automatically gets connected to the previous two detectors. It’s worth noting that you can interlink up to 24 smoke detectors and all will sound the horn at the same time if one of the units detects smoke. It would have been great if you could at least enter a location, so you would know which device was triggered when a false alarm occurs, but, in case of a real emergency, you will definitely be waked up by the sound of an army of smoke detectors (the horn sounds at 85dB).
Features and Test
Like I said in the introduction, the X-Sense XS01-WR is pretty much a no-frills smoke detector, relying on a photoelectric sensor to detect larger particles from a fire (somewhere between 1 and 10 micron). And the way it works is that there’s a chamber inside the device where a light beam points away from the sensor and, when the particles enter the chamber, the light will be reflected towards the sensor, therefore triggering the alarm. This type of sensor is less prone to false alarms than the ionization one which relies on a small quantity of radioactive material to detect fast flaming fire. It’s true that the ionization sensor has been commonly used with smoke detector for a very long time, but it has been recently deemed hazardous for the environment, so it’s being slowly pulled from the market. Some manufacturers have found a workaround for detecting both types of fires relying on a dual photoelectric sensor which gets triggered by both smaller and larger particles, covering the entire possible spectrum.
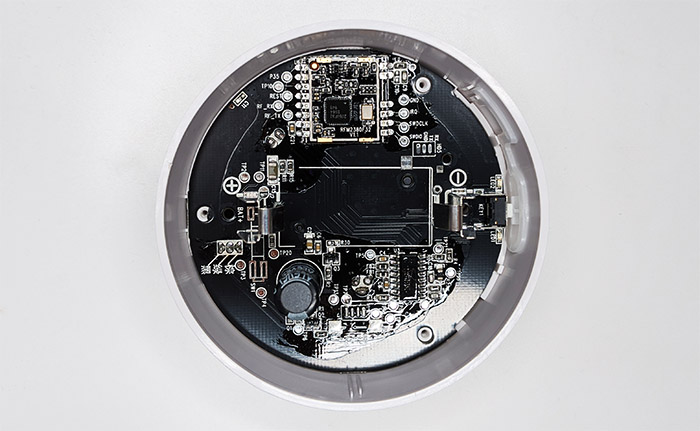
I’ve seen this technology on the latest devices from Kidde (the tech is called TruSense), as well as on the smart smoke detector Nest Protect, but it seems that it’s not yet adopted on the X-Sense line of devices. It’s also important to know that the X-Sense XS01-WR does not have a built-in CO detector, so you either have to purchase a separate one (some argue that’s the best option, since if one device is breaks down, the other will continue to function correctly) or you could check out the SC06 since it includes an electrochemical sensor to accurately measure the CO levels in the room it’s installed. It’s worth mentioning that I did open up the case of the X-Sense XS01-WR and I saw that the unit was equipped with a RFM2380F32 V1.1 (2380F32 E964 1945) the wireless radio interface.
Reaction Test
The best way that anyone can ensure that the smoke detector still functions is by relying on the Test button which should start a proper circuitry check to let you know if it finds any faults, therefore requiring the replacement of the unit. The problem is that while most manufacturers do indeed implement a proper testing procedure, some do not and since the users want to make sure that their house is safe, they may rely on unsafe methods to check that the device functions. Again, pressing the Test button at least once a week should be enough to ensure that the smoke detector is in mint conditions, but in no circumstance should you rely on real fire to test the device. First because you can set fire to your house (or at least harm yourself) and secondly because you can damage the device, making it more prone to false alarms (if it remains functional at all). One solution that a lot of companies seem to prefer is the synthetic smoke in a can method. The way this works is quite simple: you cover the detector with a special device which then pushes a certain quantity of fake smoke and if it triggers the alarm, it means that it functions properly.
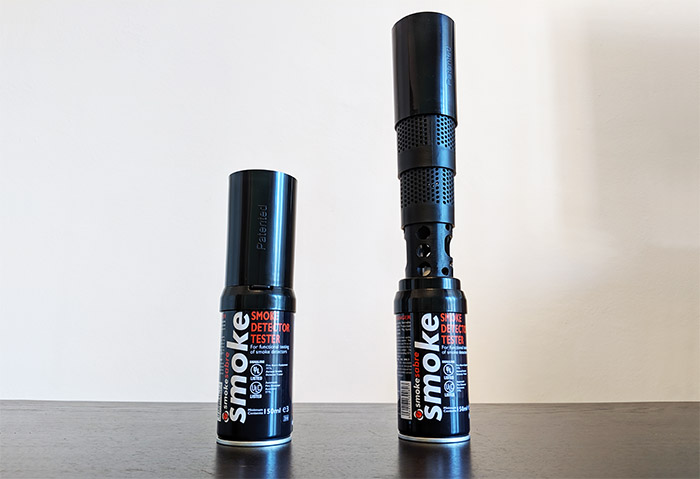
Since I do not have professional equipment (which can get ridiculously expensive), I instead purchased a couple of Sabre smoke cans which have a retractable neck, allowing for a more uniform smoke accumulation before reaching the detector. That’s how I tested all the smoke detectors that I reviewed so far and I applied the same method here: I mount the smoke detector to the ceiling and then I release a quantity of smoke (measured in seconds) at three different spots – I also waited about 15 minutes between sessions with the windows open as to not skew the results. That being said, the first location is about 1 foot underneath the detector and spraying the synthetic smoke for 2 seconds has triggered the alarm after about 30 seconds. It may seem like a long time, but the smoke quantity wasn’t that high and spraying the fake smoke a second more triggered the alarm almost instantaneously. Afterwards, I went a bit lower, down to 2 feet and again I sprayed the fake smoke towards the detector. The alarm didn’t trigger until I sprayed for about 4 seconds and it needed about 5 seconds until the horn activated.
Lastly, I went down to 3 feet and again sprayed the fake smoke towards the XS01-WR. This time, it required about 6 seconds of smoke and the alarm triggered after 5 seconds.
Also check out this comprehensive guide on how to test a smoke detector at home without damaging the device and without risking to start a fire.
Conclusion
I know that a lot of people prefer using non-smart smoke detector and it’s a perfectly fine decision considering that if there are less features that aren’t vital, it means that less things that could go wrong. And this puts the X-Sense XS01-WR in the perfect spot since it can detect smoke in a timely manner and the case is small enough as to not ruin the look of your ceiling (it also has a good price tag). Furthermore, you can interconnect up to 24 devices which is a welcomed feature, but I know that the US public will complain about the lack of the UL certification. Technically, TÜV is just as good and valid, so the device has definitely passed the safety tests and, if you’re OK with this certification, you should definitely give the X-Sense XS01-WR a chance.
X-Sense XS01-WR
-
Pros
- Small, compact case
- Approved by TÜV
- Can be interconnected with other X-Sense smoke detectors
- Has a decent reaction time to smoke
Cons
- No voice alarm (or location setting)
- Not UL certified
Mark is a graduate in Computer Science, having gathered valuable experience over the years working in IT as a programmer. Mark is also the main tech writer for MBReviews.com, covering not only his passion, the networking devices, but also other cool electronic gadgets that you may find useful for your every day life.