
The Anycubic Photon Mono 4K is the newest member to the budget-friendly resin 3D printer series released by the Shenzhen-based manufacturer and it is an improved version over the original Photon Mono. Specifically, the XY resolution is now increased to 4K (3,840 x 2,400) from the 2560 x 1620p of the previous Mono resin 3D printer.
| Anycubic Photon Mono 4K | |
|---|---|
| Anycubic.com | Check Offer |
Does this actually matter that much to warrant an entire new device? It does matter because you get more pixels in the same area (as the first Photon printer), so the models should be far more detailed (there is a huge difference between 2K and 4K). And if the price remains roughly the same, then the Anycubic Photon Mono 4K should be a great replacement over the roughly five-year old resin 3D printer.
That being said, the Photon Mono series was and still remains suitable for new-comers since these resin 3D printers are not that expensive and, if anything goes wrong, it’s not too difficult to either repair or completely replace the device. Also, the Anycubic Photon 3D printers are actually able to create some really good models, a performance that was only possible a few years ago with devices that easily exceeded $1,000. But, before moving forward, I need to admit that this is the first resin 3D printer that I have used and tested, so I have made quite a few mistakes (and so will you, if you’re new to all this stuff), but the silver lining is that my approach will be similar to how the regular new-comer would see and do things. So, without further ado, let’s check out the Anycubic Photon Mono 4K.
The Design and Build Quality
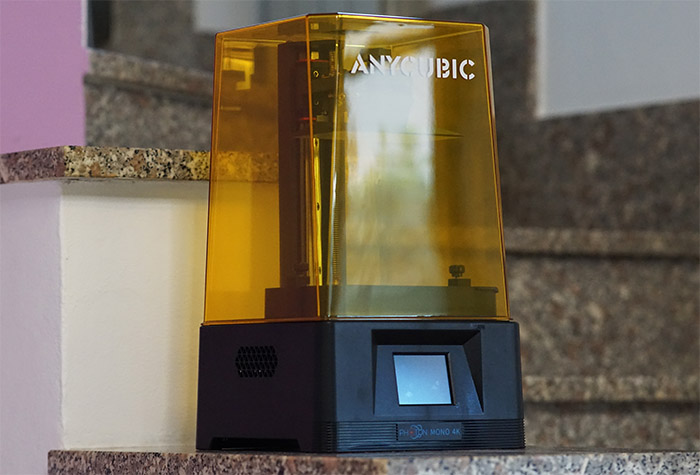
Since I have been using a few inexpensive FDM, I am accustomed to having an open-case design where both the cables and the connectors aren’t really contained (it makes sense since the arm needs to move in certain directions). So, I was immediately surprised by how compact the Anycubic Photon Mono 4K was and how there were no exposed wires or cables. At 15.1 x 8.9 x 8.7 inches (38.3 x 22.7 x 22.2 cm), it won’t occupy that much from your table, but don’t let that fool you, a resin 3D printer will occupy your entire desk with all the accessories needed for cleaning the models afterwards.
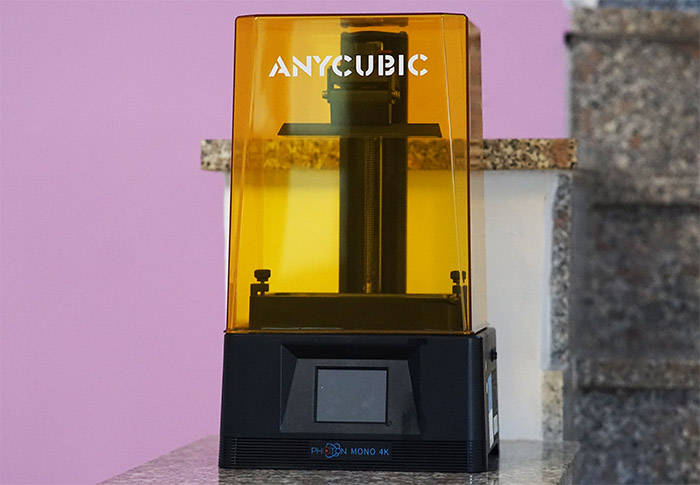
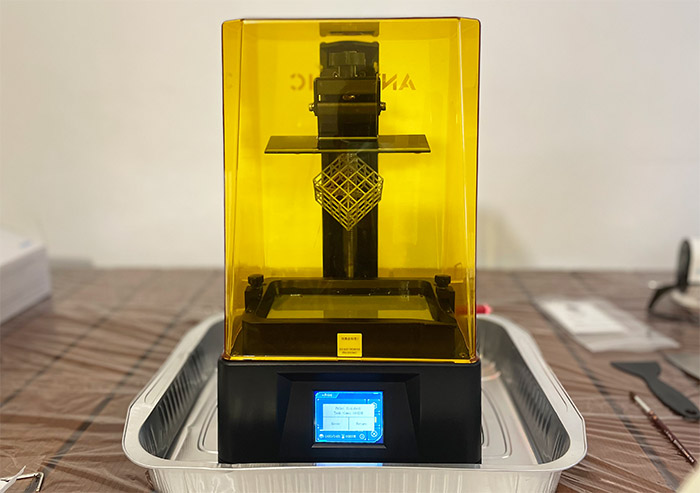
It’s also not really bedroom-friendly due to the fumes and the risk of contaminating your stuff with uncured resin. In any case, the build volume is not that big 6.5 x 5.2 x 3.1 inches (16.5 x 13.2 x 8.0 cm), but it should be enough for small and medium-sized models (then again, larger models are usually printed in separate parts, so it may still work just fine with the Photon Mono 4K). So yes, the 4K version is the same as the original Photon Mono in terms of design, which means that there’s a black base and a yellow UV-blocking transparent top cover.
Unlike the more expensive Anycubic models, the top cover needs to be completely removed (it’s not just a lid), but the good news is that the 3D printer does have a sensor which will not allow you to start the printing process unless it detects that you added the cover.
The Photon Mono did not have a fan despite having some cut-outs that may suggest otherwise and it seems that the manufacturer has kept the Mono 4K fanless as well. This does mean that it should be more silent, but you will still be able to hear the movement of the elevator (Z-axis). The good news is that it’s surprisingly quiet, with just that characteristic low-volume squealing noise – since the Anycubic Photon Mono 4K will not end up in your bedroom (a garage is the more likely room), it won’t matter that much how noisy the printer is.
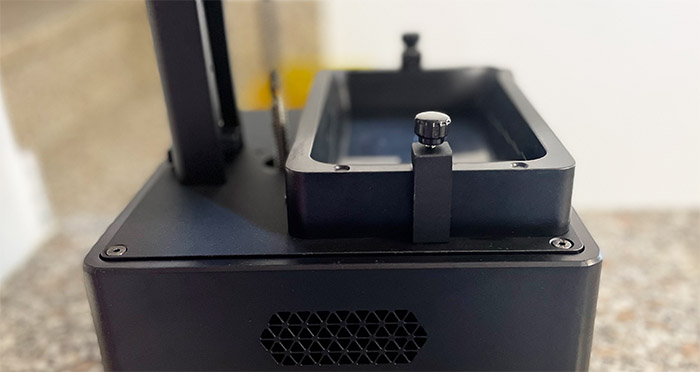
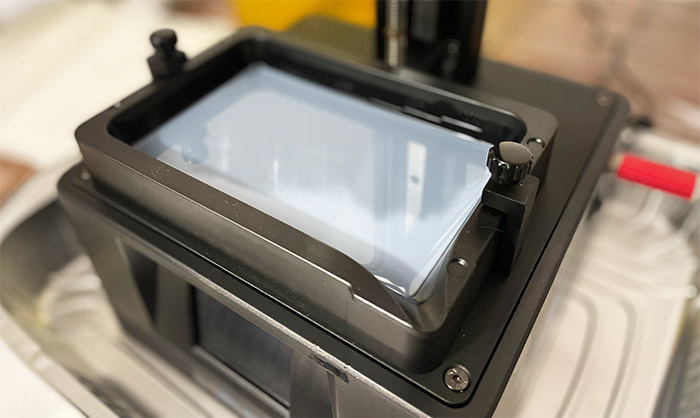
Since we’re dealing with an MSLA 3D printer, there is a 6.23-inch monochrome screen facing upwards and next to it there are two metallic supports with knobs for fixing the vat into place (which will contain the resin). I really like how Anycubic has added various measurements inside the vat, including a maximum limit, so that you don’t overfill it, therefore risking spilling some resin when the build plate needs to come down. The build plate is going to be separate in the package and you will need to add it to the support and calibrate it using the provided paper. On the front of the Photon Mono 4K, there’s a 2.8-inch color TFT touchscreen display which has proven to be very helpful.
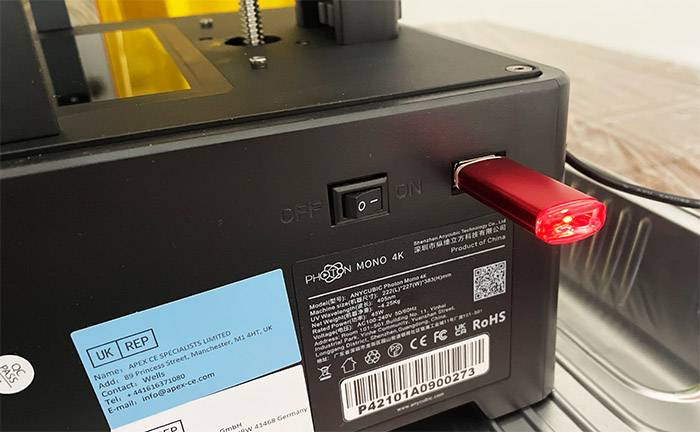
You can use it to select the model that you want to print, to adjust the UV power, to move the Z-axis rod, to adjust the exposure, the rising speed, retraction speed and more. I did find the LCD display to be fairly responsive and it did move fast through the menus (a very similar performance to what I saw on the Longer LK5 Pro), but I also need to mention that you can see a live rendition of every layer that’s getting cured, as well as an approximate time until the model is going to be done. All around the base, you can see that there are quite a few ventilation cut-outs and, on the right side, there is a Power switch and a USB-A connector that you can use to insert an external storage device.
Note: After printing a few models, I noticed that the printing platforms has developed a few scratches from the metallic scrapper, so bear in mind that it is considered a consumable and may need replacing after printing a large number of models.
Putting Everything Together
The FDM 3D printers (the ones that use filament) are not easy to put together and even those that do come with most parts pre-attached, still require that you carefully follow the instructions and dedicate at least a couple of hours for the assembly. And then there’s the lengthy calibration. The SLA 3D printers are already pretty much fully assembled and everything is underneath a case, so you don’t have to deal with wires or rods. In the case of the Anycubic Photon Mono 4K, the installation process is incredibly simple and the first step is to power it on: attach the cord to the rear port and press the Power switch. The display should light up and show the Print, System, Tools options.
Select Tools > Move Z and then 10mm – press the Up arrow several times to raise the platform bracket using the Z-axis rod. Inside the box, you should be able to see the metallic printing platform: take it out and unscrew the four lateral screws. At this point, I decided to remove the protective plastics, but you can remove them later as well (it’s going to be more difficult though). On the platform bracket, you should be able to identify the large black knob which you need to unscrew and then slide the printing platform.
Secure it into place using the knob and then take out the leveling paper from the box and place it on the upper-facing glass screen (the paper was a bit large, but you can insert only a portion of it). From the display, press the Home icon to descend the Z-axis. When it stops, place your fingers on the printing platform and push gently on top of it, while tightening the four screws (using the provided Allen key). After that’s done, return to the display and click Tools > Z=0 and press Enter twice to save the current calibration. Afterwards, go back to Tools and select Detection. Next choose one of the three images and the exposure time – the screen should display the same image as you have chosen.
Now, it’s time to install the resin vat. Make sure that the screen is clean (I used a small blower that came with some camera lens and it worked great for removing dust particles) and then simply slide the vat into place. Tighten the two knobs and you’re good to go. Yes, there are seemingly many steps, but the real-life process will take very little and will feel very intuitive. The more difficult steps are later, when you actually finish printing a model.
Printing with Resin and Accessories
While the more difficult part when using a FDM 3D printer is the assembly process and the leveling, the SLA printers are a bit trickier to use than simply letting a filament be molten to form a certain shape. Before doing anything, you need to understand that uncured resin is toxic and hazardous to both yourself and the environment, so you need to handle it in a manner that it doesn’t end up touching your skin, Also, the disposal method needs to be in accordance to the local rules. So, don’t just pour the isopropyl alcohol and the uncured resin down the drain, but take it to the proper disposal center that’s nearest to you. There are countless videos on how to handle resin with 3D printers and I did take some advice from this video made by Maker’s Muse.
So yes, I used an aluminum tray to prevent any spills that I may have from the printing platform to reach unwanted surfaces, and I did use two separate plastic containers with lids for the isopropyl alcohol. I went a bit overboard, so I covered the entire table by a transparent plastic layer and then I put the printer into the aforementioned tray, but my routine was the following.
I put gloves on, as well as a mask and safety glasses, I stirred the resin bottle a bit and then carefully poured the resin into the tray (up until it almost reached the max level). Then, I took the gloves off and put the UV-blocking top cover. Afterwards, I inserted the provided USB drive and selected the model that I wanted to print (I used the test file), and then let the printer do its thing. Fast forward to a few hours in (about 4 hours and 10 minutes), I took the lid off the two containers and generously poured the isopropyl alcohol into both of them.
Anycubic Photon Mono 4K
-
Pros
- Very good print accuracy
- 4K resolution
- The resin vat is metered
- The display is useful
- If the lid is open, you can't start the print
Cons
- The native software needs some work
- In case of a power outage, you can't resume the print
- I already had some fairly deep scratches on the platform after printing four models
Mark is a graduate in Computer Science, having gathered valuable experience over the years working in IT as a programmer. Mark is also the main tech writer for MBReviews.com, covering not only his passion, the networking devices, but also other cool electronic gadgets that you may find useful for your every day life.