
The Elegoo Mars 4 DLP is the only model from the series to rely on the digital light processing method instead of adopting the MSLA technology (which is used by the other Mars 4 3D printers from the series). And, while MSLA is a perfectly valid method of printing with resin, the DLP tech is usually deemed as superior due to the increased longevity of the light source, way better energy consumption and less light bleed (which is fairly common with LCD screens).
| Elegoo Mars 4 DLP | |
|---|---|
| Amazon.com | Check Offer |
| Amazon.ca | Check Offer |
| Amazon.com.au | Check Offer |
The manufacturer says that the projected beam has up to 95% uniformity (at the bottom of the resin tank) and, due to the use of tempered glass, there is less light diffusion as well as less chance of stray light interference. There is also anti-aliasing algorithms for smoother surfaces.
This should translate to more accurate printed models and the resolution of the projector is 2560 x 1440 voxels, so the models should also be detailed. But is this the native resolution, because Texas Instruments (the chip manufacturer) prefers to use a particular type of upscaling. I didn’t find any info about this online, so I just peaked through the glass to check for myself.
From what I could gather, the 3D printer relies on the DLPC1438 controller from Texas Instruments, same as the Anycubic D2, so it does not seem to be native 2K resolution. The software that comes with the Elegoo Mars 4 DLP is called Voxeldance Tango and I am curious to see how easy it is to use, so let’s put the 3D printer to the test and see how it performs.
The Design and Build Quality
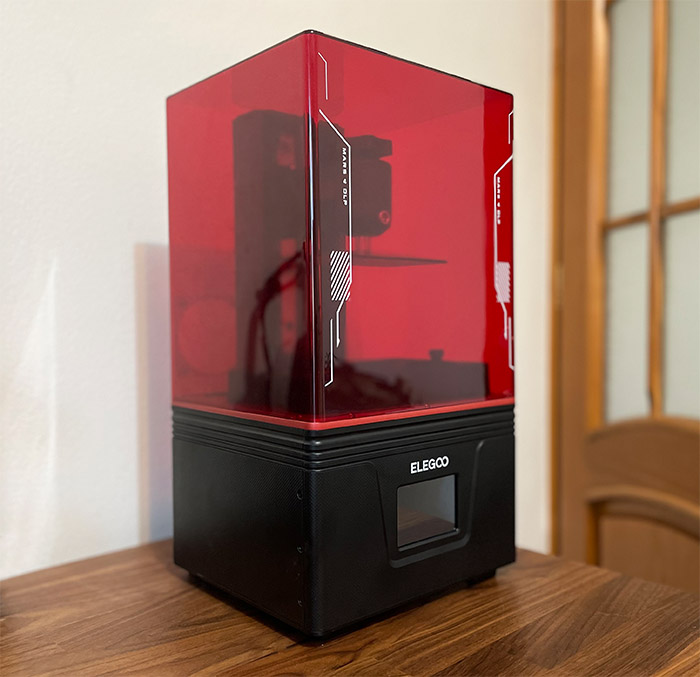
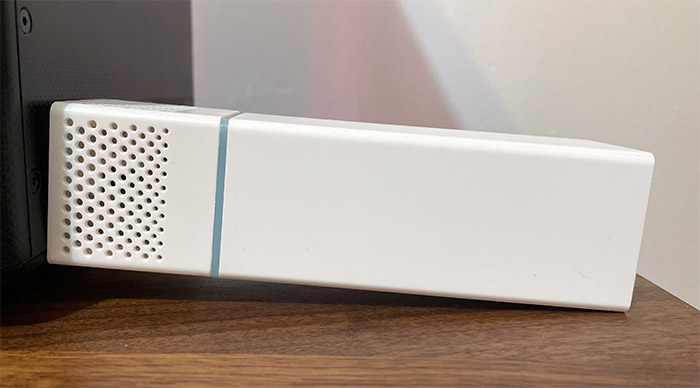
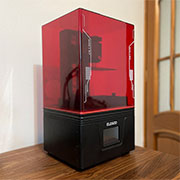
Since we’re dealing with a DLP 3D printer, the Elegoo Mars 4 DLP has a fairly small footprint, while also being quite tall. The device measures 17.8 x 9.7 x 9.1 inches (45.3 x 24.6 x 23cm) so it’s not going to occupy that much space from your desk, but we both know that you can’t just leave the printer anywhere to do its thing.
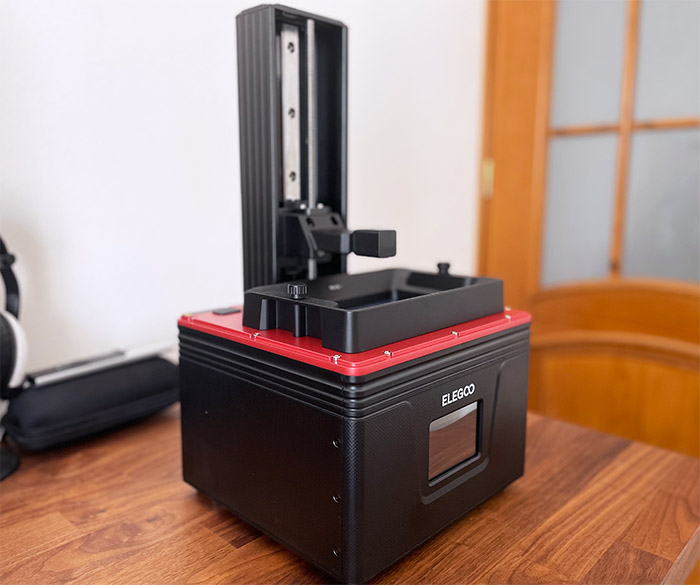
We need a tray to prevent resin from spilling on the desk or floor, so make sure to leave a bit more space for the printer. The Elegoo Mars 4 DLP has a very similar design and look to the other budget-friendly resin 3D printers out there, so there’s a smaller base which is solid and heavy enough to keep the unit into place, and then there’s the upper part where there’s the Z-Axis arm hidden by an Anti-UV cover (it’s red and semi-transparent).
Since the device relies on the DLP technology, the plate is not really that big, so bear in mind that the build volume cannot exceed 5.9 x 5.2 x 2.9 inches (15.0 x 13.3 x 7.5cm). The base is covered by a black matte finish and it is made of plastic (there are also four feet to keep it steady). Covering the top of this base, we should be able to see the red metallic plate that’s fairly heavy (it’s thick) and above it, there’s the resin tank kept into place by a couple of knobs. It’s worth mentioning that unlike the Elegoo Mars 3 where you had to slide the tank out of a couple of brackets, the Elegoo Mars 4 DLP can be raised up after removing the two knobs.
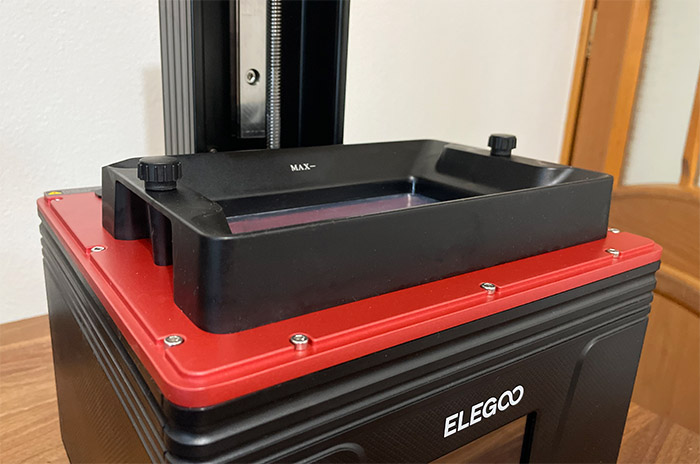
The resin tank does have a Max limit printed on the side, so you don’t overfill it. The build platform is also made of metal (same as the Z-Axis) which is a very nice touch, and yes, you will have to install the platform yourself. Not that it’s a complicated process – just slide it into the designated space and then use the knob to fix it into place.
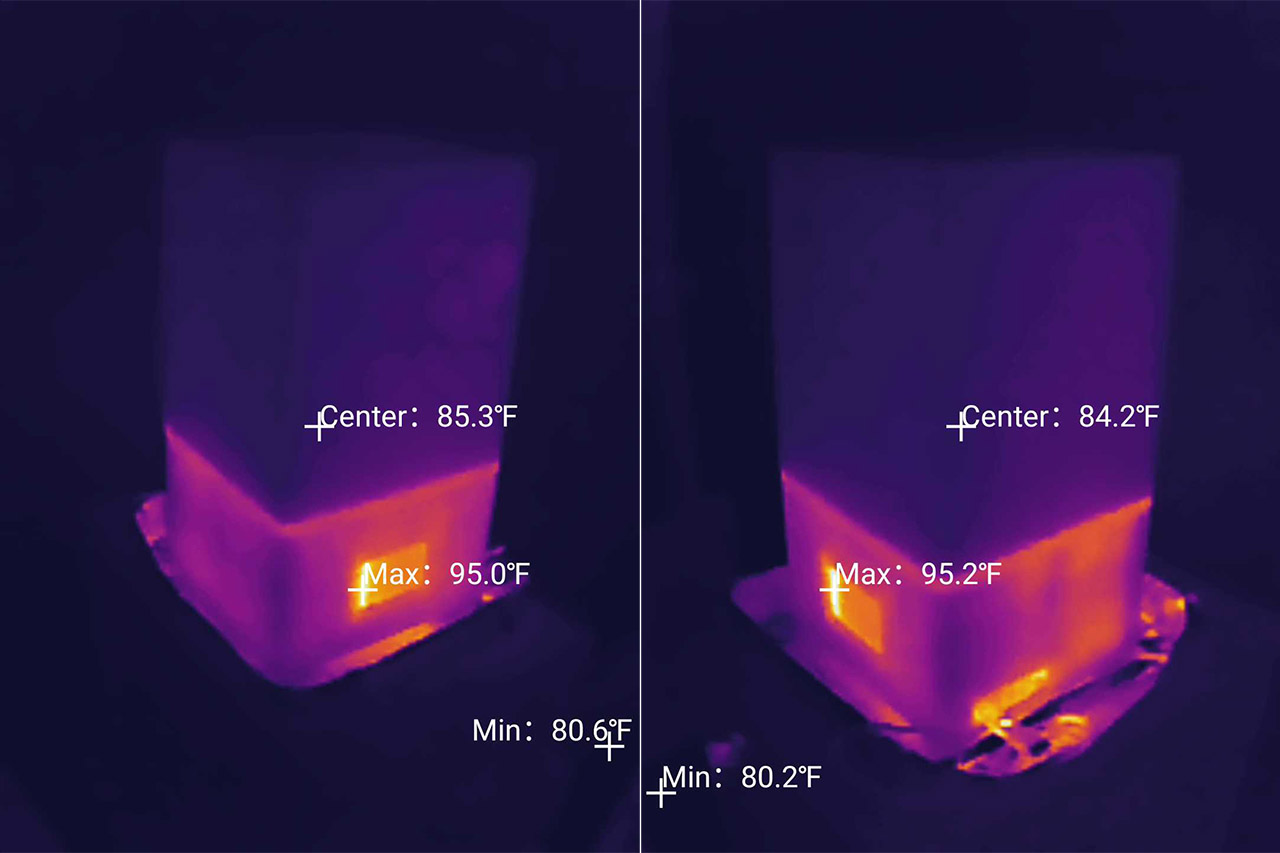
I have mentioned in the intro that the DLP technology ensures far less energy consumption than the alternatives and it has also allowed the Elegoo Mars 4 to opt for a fanless design. There are a couple of ventilation areas on the rear side of the base, but I have actually opened the device and can confirm that there is no fan. And the 3D printer does not get that hot while operating – I checked it with a thermal camera – and the major advantage is that the Elegoo Mars 4 DLP is significantly quieter than (M)SLA printers.
On the right side of the Elegoo Mars 4 DLP, there is a small area which has a USB port for connecting a flash drive (there is one in the package), an On/Off switch and the 12V power connector. On the front of the 3D printer, there is a somewhat small screen, but the icons are big enough and yes, we’re dealing with a touch-screen display which does work decently well.
The Display
The Elegoo Mars 4 DLP has a 3.5-inch touch screen display and, while it seems the same as on the Mars 3, there are some differences in terms of software, mainly the icons design and layout. After powering up the 3D printer, you’ll be able to choose between Tool, System and to head straight to the Print.
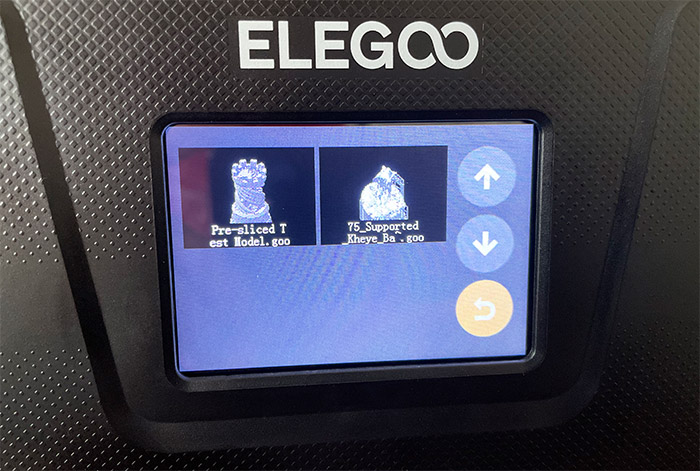
Under Tool, you can adjust the build platform height manually, change the Exposure type, Set Z to 0 and change the Focus (there’s a typo there). The System area is where you can read some Info about the device (only between Chinese and English) and get the necessary info for contacting Elegoo in case of a problem. Under Print, you can choose between the models that are available on the flash drive.
Elegoo Mars 4 DLP Teardown
You didn’t really believe I would stop at only checking the visible components from the top screen, did you? No, I had to see if there are some fans and check some other components, so I detached the front section (with the display) after removing the screws that held it into place. And then, I took out the screws that held the top part, allowing me to detach it along with the Z-Axis section.
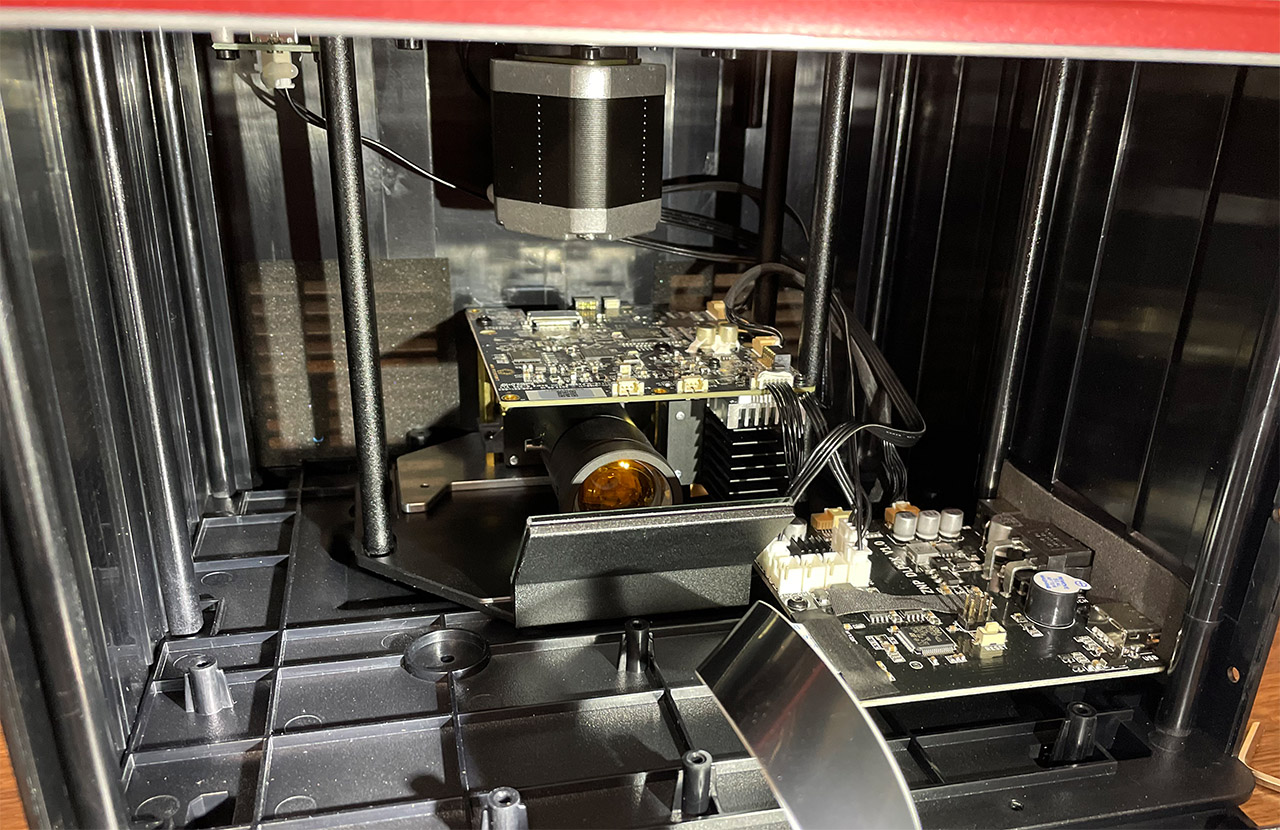
This way, I could clearly see the Texas Instruments DLPC1438 DLP 3D print controller (for 0.3-inch 3.6-megapixel DMDs), the ARM STM32F401 microcontroller running at 84MHz, the GigaDevice GD32E230 ARM Cortex-M23 32-bit MCU and the Altera EP4CE15M9C7N FPGA.
Installation and Precautions when Printing with Resin
As with other resin 3D printers, the installation process is ridiculously simple because almost everything comes already put into place. The plate needs to be attached, obviously, and you do need to remove the stickers underneath the resin tank. Power up the Elegoo Mars 4 DLP, add the flash drive and we should be ready to add resin. I got the gray resin from Elegoo and all I had to do is pour it into the tank, making sure not to go above the Max limit icon.
If you have never used a resin printer, know that things are very different than when using a filament 3D printer and that’s mostly because resin is toxic to both the environment and humans, so it does need special handling. Which is why you should use the gloves, the mask and the air purifier from the box. I suggest you use better masks since these are a bit superficial, but always handle resin with gloves – it’s not a bad idea to use glasses as well in case either resin or alcohol splashes towards your face.
And it is entirely possible since I have had trouble getting some models from the plate with ease – it always ends up with splashes everywhere. The way you can clean the resin tank, the plate and the models are with isopropyl alcohol (99%). Ideally, you would have two containers, one for the initial submersion where the alcohol gets dirty quicker due to all the resin. Then, use a second plastic container with isopropyl alcohol for the last cleaning (it should be cleaner).
The models will most likely have supports that need to be removed after the isopropyl alcohol bath – you can use a cable snip if there are some stubborn ones, but if done right after taking the model from the 3D printer, the supports should be easy to remove even by hand alone. Then, the models need to be given time to cure – you can leave them outside if it’s sunny or just use a curing station (it does cost a bit though).
Another precaution that I take is to put an aluminum tray underneath the printer itself, so, if some resin drops from the plate when I detach it from the Z-Axis, it does not damage the table. I have mentioned that I had some trouble detaching certain models from the plate and I think that’s because the scrapper is not really that sharp, so I always end up scratching the plate which in turn leads to more difficult-to-remove models as time goes on. Also, make sure that the UV-protective cover is always in place to avoid any accidental curing from the sun.

Is the air purifier useful?
If you have to print models in a small space where there is limited airflow, the small air purifier will help, but I do suggest going for a proper, large purifier to remove the toxic fumes. I know that Elegoo has made available some mini purifiers which had an inner battery and the user would just leave them inside the enclosure (underneath the UV-protective cover), but the air purifier that I got in the package is a bit different.
It has a USB-A connector, so you can attach it to the side of the Elegoo Mars 4 DLP, but there are a couple of problems. One is that it may not be powerful enough to handle an entire room (which is why within the enclosure is better) and secondly, the device does not stay connected to the side of the 3D printer since it’s too long. Which is why you need to make a support for it – you can print a piece.
What about the carbon filter? Can it be easily replaced? You can get a filter from Elegoo or you can just get an universal one that can be cut to fit the air purifier.
The Software
The Elegoo Mars 4 DLP comes with a dedicated software called the Voxeldance Tango, an alternative to Chitubox and yes, while the latter is open-source (and free), the former does require the purchase of a serial number. The good news is that we do have the Elegoo Mars 4 DLP unit and it’s possible to use the serial number from the Info section (from under Settings) to activate the software (just follow the steps from the user manual).
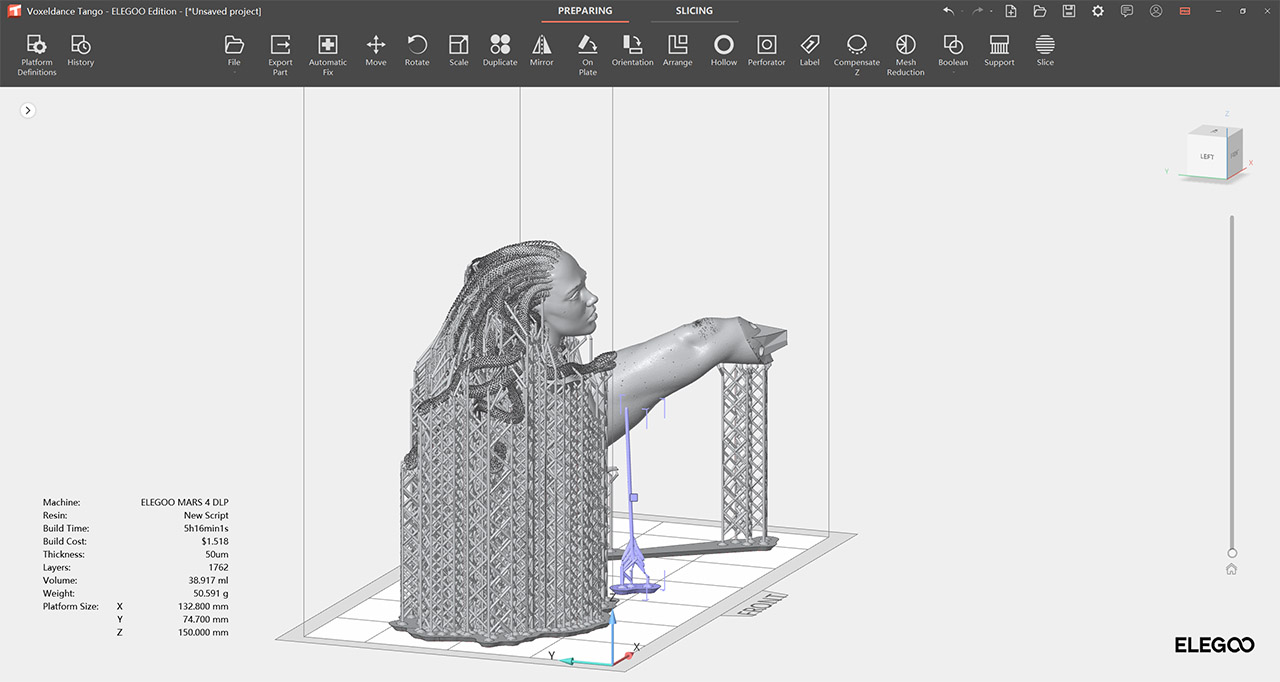
Afterwards, it’s advisable to set the correct parameters for the Elegoo Mars 4 DLP and to so, just click on Platform Definitions > Printer > ELEGOO MARS 4 DLP. You can also choose the parameters suitable for the Resin you’re using. At this point, you can go right ahead and add models – you can move them around, rotate them, duplicate, scale, just do anything as long as the model/s remain within the printable area. It’s also incredibly important to add more than one model at a time, just fill the platform completely (don’t overlap though).
And that’s because height is the most time-consuming part, while the horizontal size does not matter. So, to cut the time of printing, just fill the platform as much as you can to print them at the same time. Be aware that the software will usually ask to correct a newly added model and it’s wise to let it do its thing. But understand that it will eat up all the RAM if the model is complex – for example, I added the head of the Medusa model and the Voxeldance Tango took 28GB of RAM (out of 32GB) to finish fixing it in about an hour.

The software also does allow the option to hollow a model and perforate it, to ensure that the extra resin will go out. And there is also the option to add supports. I admit that I am lazy and prefer to print models that have the supports already added, but know that the option to add them is there if you need it. Lastly, after the models are ready, just click on Slice to let it do its thing. Save the model and put it on the flash drive to be printed.
The Printing Performance
After pouring resin in the tray, I decided to print the model that was already on the flash drive. It’s called the Test Rook and it does have some very interesting patterns, such as the inner stairway and the two seemingly frail strings that go around each other.
I honestly have found no fault in this model – the stairs look perfect, so does the spiraling lines and the top-side ‘bricks’ are rectangular and don’t differ in size. I did have some trouble detaching the model from the plate, so I guess some sort of base that can be easily detached would be welcomed. This model felt a bit too easy to print, so I reused the AnyCubic stress cube which is far more complicated and things got a bit more interesting.
That’s because while it seemingly is perfect, there were some imperfections if I looked closer. There is a corner that’s very slightly more protruded and we don’t always get a perfect straight line, there are some minor deviations. This doesn’t mean that it’s a bad print because it’s not. When I tested the Anycubic Photon Mono 4K, I thought that the test cube was great, but putting it next to the one printed by the Elegoo Mars 4 DLP, I could see that it had some trouble keeping the cube straight. Now let’s move to more interesting models. I usually use the models from DMStash.com and I got one from them once again.
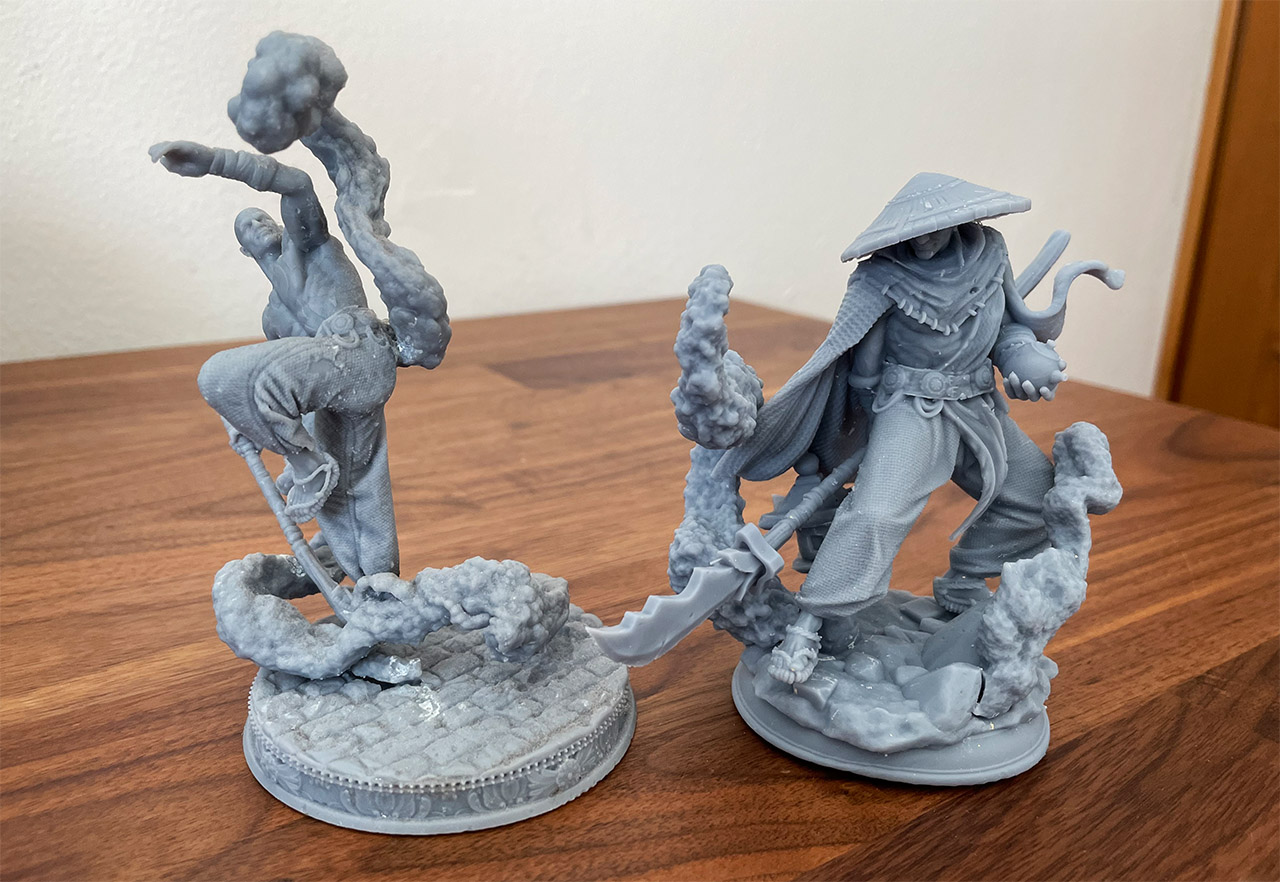
I got a different version of the Seer and I did not make the same mistake as when I tested the Anycubic Photon Mono 4K – I did not add any unnecessary supports. And it turned out really good. The supports come off easily as long as you take them out right away, and, as you can see, there is a very good amount of detail. I chose this specific model because there are lots of small and intricate patterns, and from what I saw, the Elegoo Mars 4 DLP handled them without breaking a sweat. I have printed another version of the Seer with the Photon 4K, so is this print better? Honestly, I don’t see a difference in terms of clarity and detail, but the Elegoo Mars 4 DLP seems softer (the better anti-aliasing in action).
Another interesting aspect is that the printing time was always shorter at the printer level than what the software would predict. But, if I was to compare with the AnyCubic Photon Mono 4K, the time was pretty much the same – perhaps the Mars 4 was a tad bit faster, like 10% but not more. While we got a good idea about what to expect from the 3D printer, I felt that it just wasn’t enough, so I decided to print another model which I think is really awesome. It’s called “The hunt for Medusa” and due to my lazyness (again), I didn’t want to cut the tree part, so I just shrunk everything to 60%.
I suppose this remains one of the weaknesses of a DLP printer, the size, but if you have the time, you can just cut the model in more pieces and glue them together. Then again, this does add more risk for unwanted gaps. So, let’s see how the model ended up being. I think it turned out really good. The resin was strong enough as to not break the main model when removing the supports (You see the head and all those snakes? It took me about an hour to take out all the supports..) and, just like with the previous model, the anti-aliasing does a great job, while not taking away anything from the sharpness of the object.
I do need to mention that I had to pause mid-print to add more resin and this didn’t have any impact on how the model got printed. But you can see the gaps, so what happened? It’s not abnormal to get these gaps when printing multiple pieces (which is why I prefer a large portion of the piece in one go), but it happens often with resin printers. The good news is that these can be covered either with the same resin or using a gap filler like GreenStuff. I also noticed some errors at some contact points which I had to fix with a cable clipper, but after checking out the digital model itself, I realized that it was printed properly.
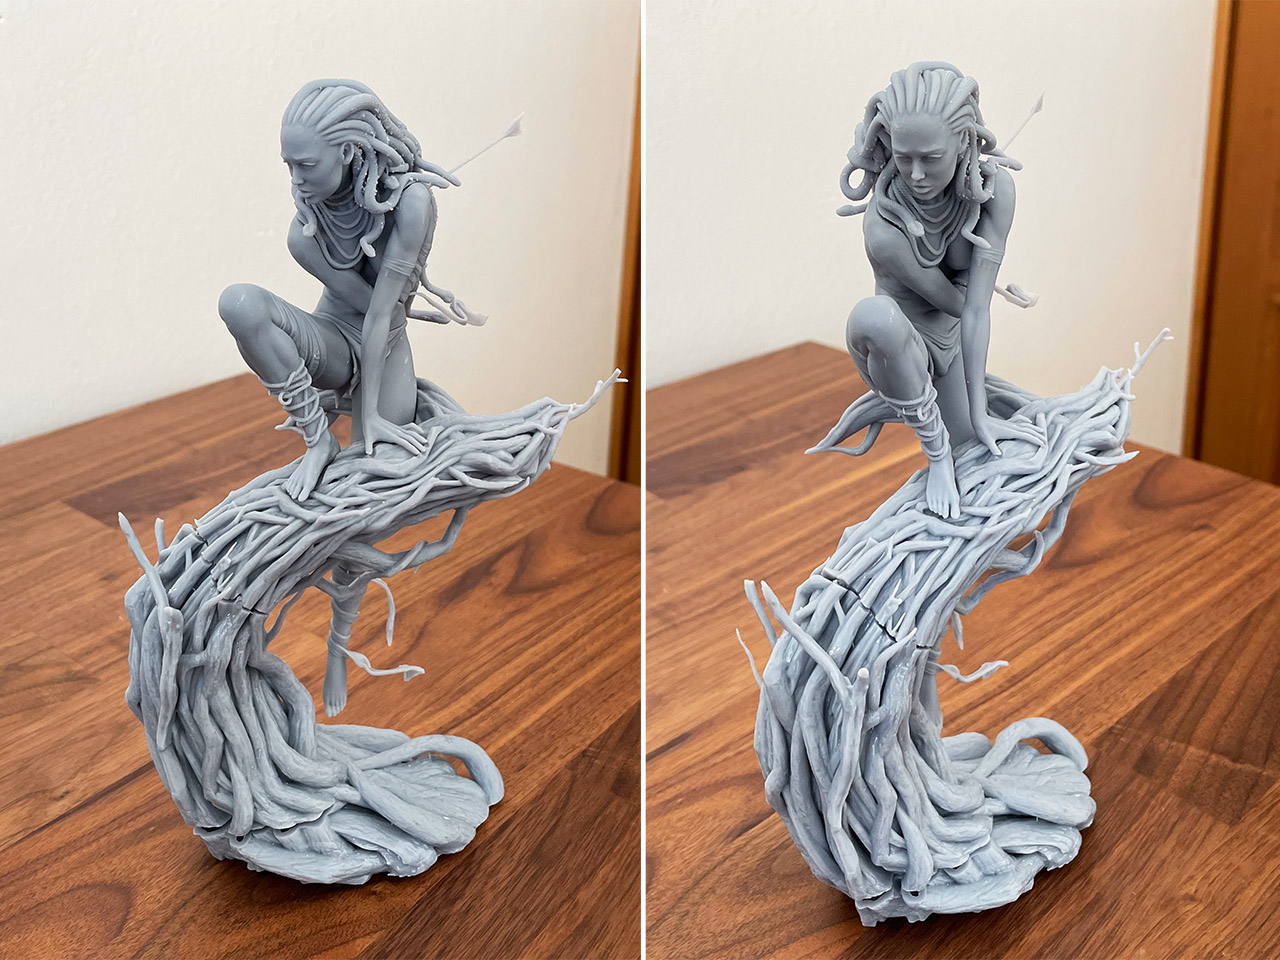
The issue was with the sliced model. As you will see on the tree branch, there is a weird crack and not because I connected to parts together (badly), no, this happened for a different reason. It’s because the model was empty and there were no drainage holes. Yeah, my lazyness finally bit me in the arse. So, before printing a model, even if it has supports and it’s already divided into parts, check it out to see if it has any of these issues. That’s why I usually get models from reputable websites (such as DMStash), while the ‘The Hunt for Medusa’ was from a different site.
The Conclusion
The question on everyone’s mind is whether DLP is worth it and if the other MSLA Mars 4 printers won’t offer a better value for money. And the answer is that it depends on what you’re going to use the Elegoo Mars 4 DLP for. The combination between the smoothness of the models and the ability to retain the details and the sharpness cannot be matched by non-DLP printers in the same price range. So, people that need very precise, yet fairly small models will be happy with this printer (either hobby models or even in the dentistry or other medical fields).
There is also the very important added benefit in terms of power consumption (18W is ridiculously low) and that the main components will last for way longer than those on MSLA 3D printers. So, overall, it’s a high quality entry-level printer that will get the job done. If you need something else from a resin 3D printer, then the Mars 4 series has a multitude of alternatives.
Elegoo Mars 4 DLP
-
Pros
- The printed models are both smooth and detailed.
- Very low power consumption when compared to MSLA.
- It's very quiet (fanless design).
- The display is useful and easy to use.
- The DLP technology.
Cons
- The printing area is a bit small.
Mark is a graduate in Computer Science, having gathered valuable experience over the years working in IT as a programmer. Mark is also the main tech writer for MBReviews.com, covering not only his passion, the networking devices, but also other cool electronic gadgets that you may find useful for your every day life.