
The Evvr in-wall relay switch is a sort of niche device which has a simple purpose, but a very meaningful one. Since it’s essentially an actuator, it can allow you to turn on or off the light in your home from an app. And it can also automate other devices, such as ceiling fans or, as the manufacturer advertised, it can be integrated well with curtains, ventilation systems and even door locks.
| Evvr In-Wall Relay Switch | |
|---|---|
| Evvr.io | Check Product |
But yes, the main idea is to make your lights smart without actually purchasing smart bulbs. This comes with some advantages and a few disadvantages. You can automate multiple lights at once, so it’s a cheaper option than to purchase more than one smart bulbs and you get to use the Evvr in-wall relay switch with an existing smart home ecosystem.
Obviously, the idea is to have other HomeKit devices or, if you go with ZigBee or Z-WAVE, you should have a hub and some other compatible devices. Not obligatory, but it would make sense from a financial point of view. And I can’t tell you enough how much I have grown to despise some of the apps that come with some IoT devices. They require constant Internet access, there are now ads in the interface and other annoyances.
The disadvantages of going for the Evvr in-wall relay switch solution are that the lights won’t move through different colors, nor will they be dimmable. And there’s also the installation aspect which may spook some people since it requires playing with the wires (a professional may be required for installation). Still, it’s a very interesting alternative to some of the smart devices on the market, so let’s put it to the test.
Design and Build Quality
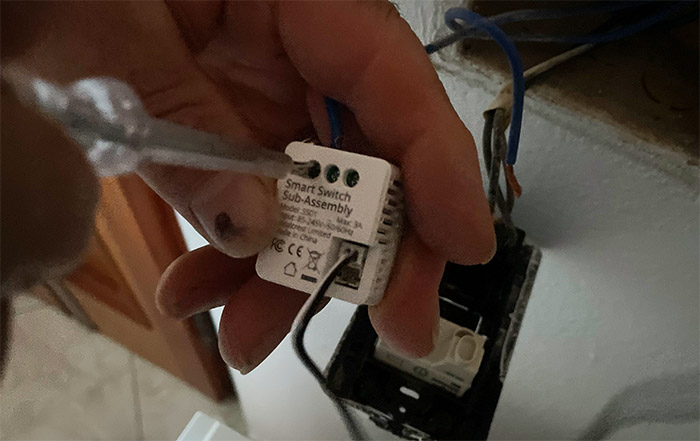
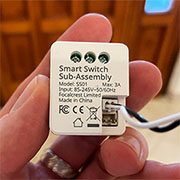
The in-wall relays are not something new on the market, far from it, but a lot of people avoid them because they’re traditionally large and are very difficult to install, especially if you have multiple switches next to each other. So, what Evvr did was to split the relay into two separate pieces, one is a smart switch sub-assembly and the other is the smart relay. The former goes into the single or double-gang box (behind your switch) and the latter, the relay itself needs to be connected next to the device that will turn on or off.
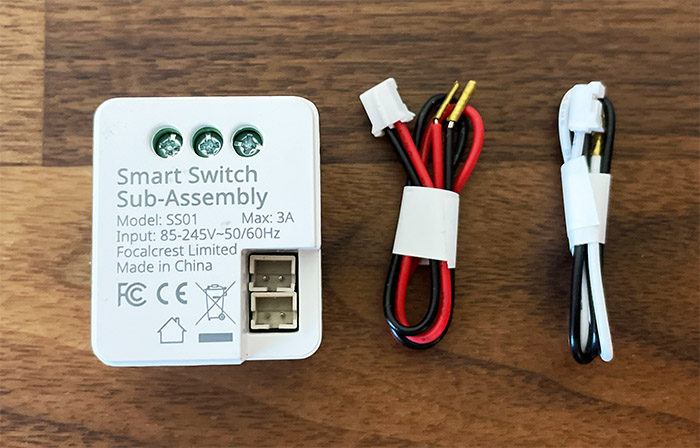
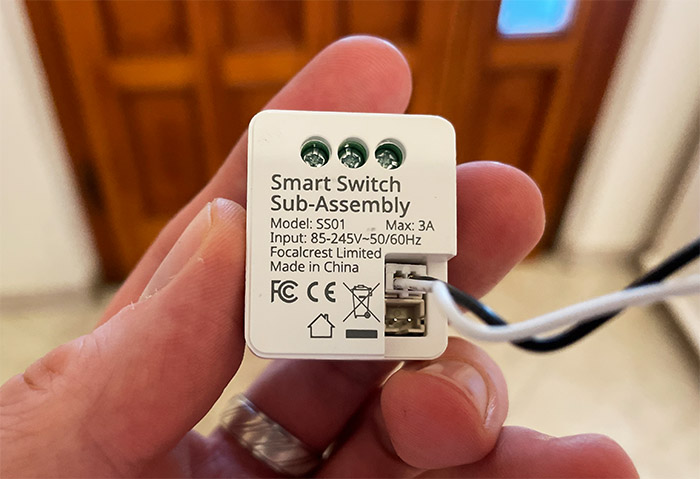
In my case, since I want to automate a light fixture, it goes next to the light bulb, connected directly to it. The Evvr smart switch sub-assembly measures about 1.32 x 1.11 x 0.68 inches (or 3.3 x 2.8 x 1.7 cm) which should make it easier to insert into the box. I say easier because single or double-gang boxes are crowded already with wires. The sub-assembly is made of plastic and, design-wise, it has the look of most other parts that are specific to electrical wiring works.
It’s covered by a white matte finish and, on one side, there are three fastening screws for the wires that you need to insert from the top. There’s the L icon for the live wire power input, followed by the L1 and L2 power output for the live wire. Underneath the fastening screws there is a section where you need to insert two wires (SW1 and SW2) and they’re for the external switch control for load.
On the other side of the sub-assembly, you can peel off the plastic layer and glue the device inside the electrical wall switch box. The second part of the Evvr in-wall relay switch is the smart relay which is far larger than the sub-assembly and more heavy. The device measures 2.34 x 1.55 x 0.83 inches (or 5.9 x 3.9 x 2.1 cm) and it’s also a rectangular piece of plastic covered by a white matte finish.
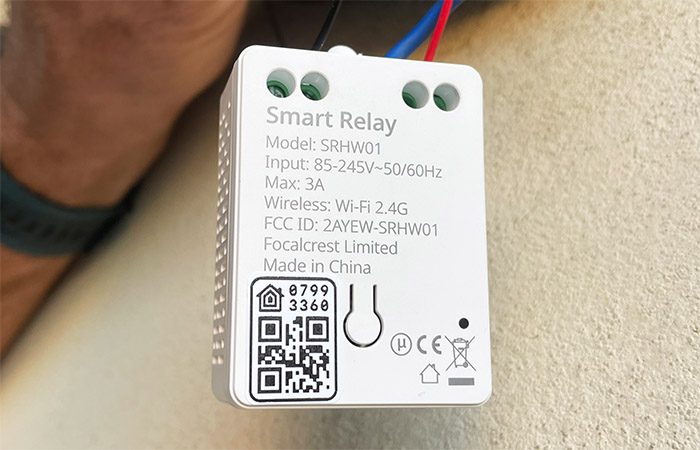
I have noticed that similarly to the sub-assembly, there are a few holes on the sides for ventilation and there is also a double-sided tape which, this time, is not already attached to the case. That’s because you can mount the smart relay in two ways. Either using the aforementioned double-sided tape or by using the single screw provided in the box. There is a place at the top of the Evvr smart relay where you need to insert it. Also at the top, there are four connection ports labeled accordingly.
The first two are for the neutral wire, while the last two ports are for the power input for the live wire (L) and for the output for load (OUT). On the rear side, you will see the four fastening screws for the four connection ports and further down, there is both a Reset button and an LED. You need to press and hold the Reset button for 5 seconds in order to return the Evvr in-wall relay switch to its factory default settings.
The LED will shine blue if the relay is connected to the WiFi and there is a HomeKit connection and it will glow red in case it failed to connect to either of them. The LED will flash red if the Evvr in-wall relay switch is connected to the HomeKit, but not the WiFi and it will flash red quickly twice at a time if the relay is connected only to the WiFi.
Note: The title was necessary since no other person bothered (at the moment of writing) to add photos to show how they ‘tested’ the in-wall relay switch.
The Hardware Installation
Before moving forward, know that the Evvr in-wall relay switch is one of the few such devices that does not rely on the neutral wire. Also, despite being a two-part device, you don’t really need to install the sub-assembly if you don’t want to, but it’s encouraged since this way, when turning off the lights from the switch, the WiFi connection is not interrupted. And I know that this is a common occurrence with the smart bulbs.
Turn it off and, if the smart bulb is from an obscure brand, you may need to redo the entire installation process. That being said, I decided to install the Evvr smart switch sub-assembly first to the light switch of an external flush-mount light fixture that I keep forgetting to turn off. To do so, I had to turn off the power in the building, take out the switch cover and then remove the two screws. This way, I could see where I had to place the sub-assembly.
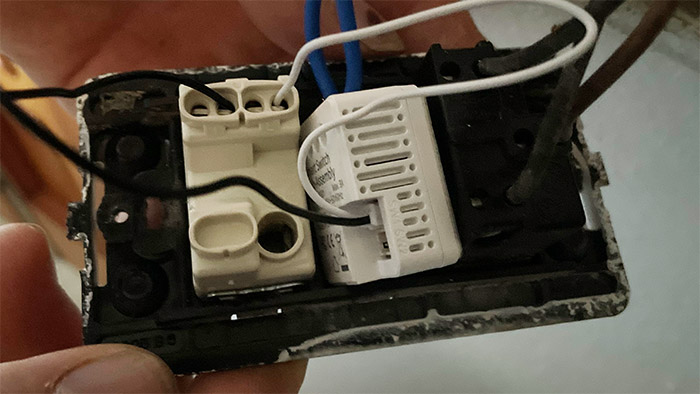
I was lucky that I had a three-way gang switch, but I was using only the left and right ones, so the Evvr sub-assembly could easily slip in. Before doing so, I took one of the panel connector wires and inserted it into the SW1 external switch control for load. Then, I detached the two wires from the switch and connected the live wire to the L connector at the top. Next, I took the neutral wire and inserted it into the L1 connector at the top.
The panel connector wire that I mentioned earlier has two wires, so I connected them to the light switch that I took out the wall. I was lucky enough to not need to use the glue tape, but you may need to re-adjust the wires and attach the sub-assembly to the inner walls of the box to be able to close the switch back.
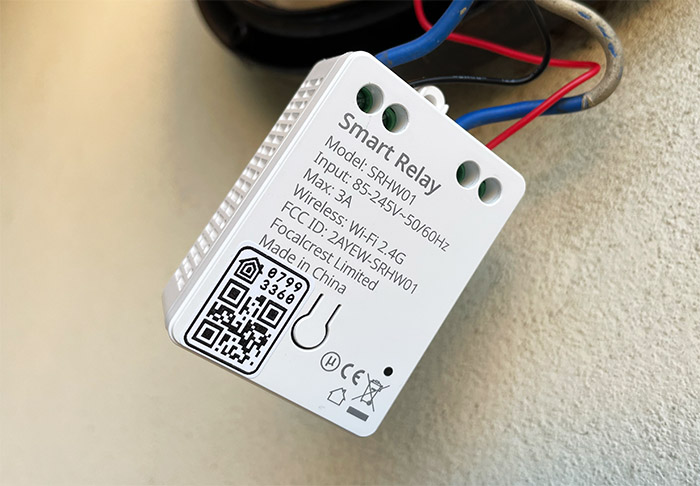
That’s about it for this step, so let’s move to the installation of the Evvr smart relay. In my case, I had to remove the cover of the light fixture and detach the two wires that went to the light bulb (still with the power turned off). Then, I connected the live wire to the L connector at the top and the neutral wire to the first N connector.
I needed two additional wires (I simply scavenged the remaining panel connector wire) so that I connected one to the OUT connector on the smart relay to the bulb. And I used another wire to connect the remaining N port to the bulb.
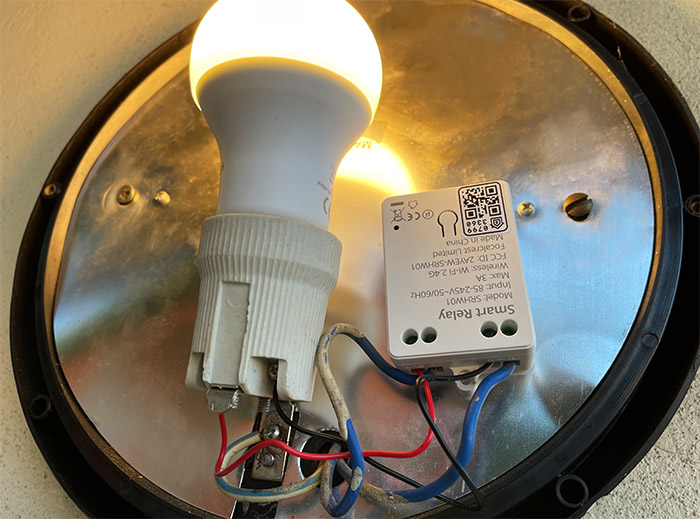
Lastly, I used the double-sided tape to attach the Evvr smart relay to the light fixture. Don’t close it yet because we are not done. No, now it’s time to perform the software installation.
The Software Installation
After finishing the hardware installation, don’t close up the light fixture because you need to press the Reset button for a brief second in order to enable the pairing mode. Since my model was compatible with HomeKit, I opened the Apple Home app and clicked on the Plus icon.
From the list, I selected Add Accessory and then I scanned the QR code that’s on the Evvr in-wall relay switch. Then I clicked Add to Home, selected the location and the name of the Evvr smart relay. These are pretty much all the steps and the Evvr in-wall relay switch was present on the homepage of the app.
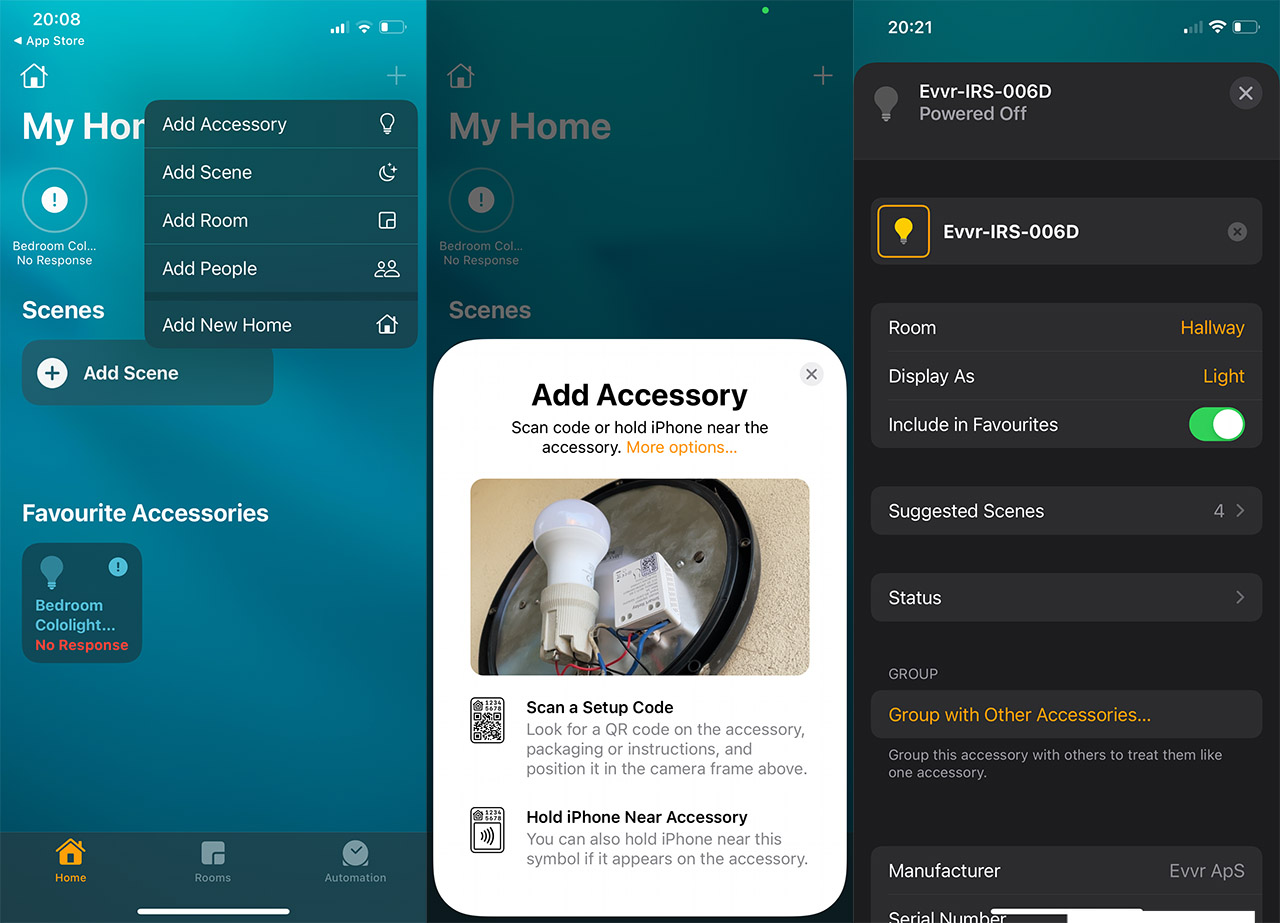
Tapping on it would turn on or off the light. At this point, I finished the hardware installation (put the light fixture back together) and was ready to add some scenes. I only had the iPhone available, so there weren’t that many options and I would have liked to create a schedule for when the light will turn on or off, but Apple is being Apple, so I needed a dedicated hub or an iPad to act as the hub. In any case, the installation was a success and the Evvr in-wall relay switch worked perfectly fine.
Should you consider using the Evvr In-Wall Relay Switch?
It depends on what’s your current setup and your aim is. If you do have an Apple Home ecosystem or a Zigbee/Z-Wave network of IoT devices, then the Evvr in-wall relay switch will fit right in with incredible ease. The two-part device is well-thought and allows for an easy installation, so, the possibility to not be forced to use a third-party smart home app was very appealing to me.
Furthermore, the range of the WiFi was very good, easily going through thick external walls. It’s true that the fancy features such as dimming the light or changing the color is not available, but if you never used such features (which lose their novelty fast), the Evvr in-wall relay switch is an excellent choice.
Evvr in-wall relay switch
-
Pros
- The two-part device makes it easier to install than other smart relays
- The instructions are clear
- Can work with light bulbs or other devices that can be controlled via an actuator
- The WiFi signal is good
Cons
- Perhaps the only downside is that a lot of people will need a professional to install the Evvr smart relay
Mark is a graduate in Computer Science, having gathered valuable experience over the years working in IT as a programmer. Mark is also the main tech writer for MBReviews.com, covering not only his passion, the networking devices, but also other cool electronic gadgets that you may find useful for your every day life.