
The FS S3910-24TS is the mid-range Ethernet switch model from the S3910 series, so it is slightly better equipped than the S3910-24TF which I tested a year ago, but below its 48-port sibling. And, as expected, all three models share some fundamental features.
| FS S3910-24TS | |
|---|---|
| FS.COM | Check Product |
One of the most important technology is the ability to stack up to four units at a time, something that you don’t really see in this price range. And I also noticed that the FS S3910-24TS (as well as the 48TS) do have four 10Gbps SFP+ ports which are ideal for long-distance, high bandwidth connections between large networks. Since FS is one of the best manufacturers of inexpensive optical cables and transceivers, it shouldn’t cost too much to use their perfectly compatible modules as well.
But what I was interested to see and wasn’t available on the S3910-24TF, but it’s present on the FS S3910-24TS is the hot-swappable power supplies. This is another feature that’s rarely found on devices in this price range and they ensure that the Ethernet switch will always have an active power source (24/7 as it should be).
I did see that FS has kept some of the advanced routing protocol (BGP and ISIS) out of this series and made it available only for the S5810 switches which makes sense considering that those cost about double than the S3910 devices. That being said, let’s put the FS S3910-24TS to the test and see if it offers enough reasons to go past the entry-level model S3910-24TF.
Design and Build Quality
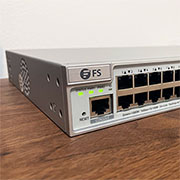
Design-wise, the FS S3910-24TS doesn’t differ that much from the S3910-24TF, both Ethernet switches sporting a large rectangular case made of metal which is covered by a light gray matte finish. The front remains a layer of plastic that covers the metallic case and in terms of size, the FS S3910-24TS measures 17.32 x 9.69 x 1.72 inches (44.0 x 24.6 x 4.3mm) which makes it a bit more compact than the S3910-24TF.
But don’t be fooled, this Ethernet switch is still massive and very heavy, but the good news is that you can easily mount it in a rack (1U) – you do get the mounting ears inside the package. FS didn’t add mounting holes on the bottom of the switch, so you won’t be able to mount it on the wall, but it makes perfect sense considering the weight, the size and the hot-swappable power supplies. Speaking of which, on the rear side of the FS S3910-24TS, you will see the two removable power supplies protected by a piece of polyester foam.
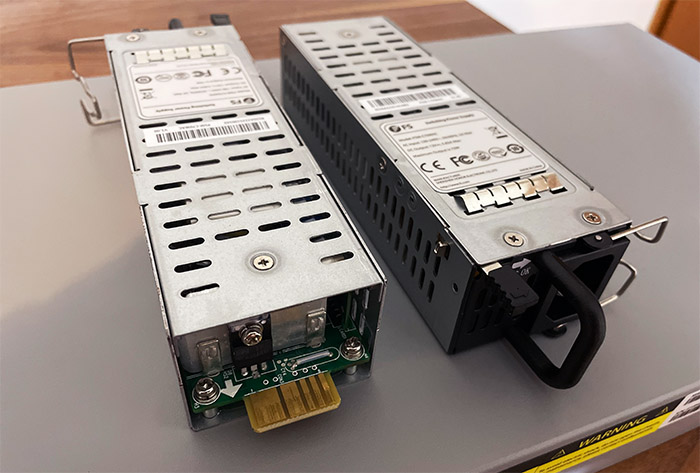
The way you can remove them is by pushing the switch to the right and, using the handle, to gently slide the PSU out. In order to put it back into the slot, you need to slide it back into the connector (it should click into place). If you want to block the cable from getting disconnected (by mistake or by a bad actor), just move the metallic handle over it. It’s worth mentioning that each PSU is made of metal, it feels robust and well ventilated (multiple cut-outs all over the case of the PSU).
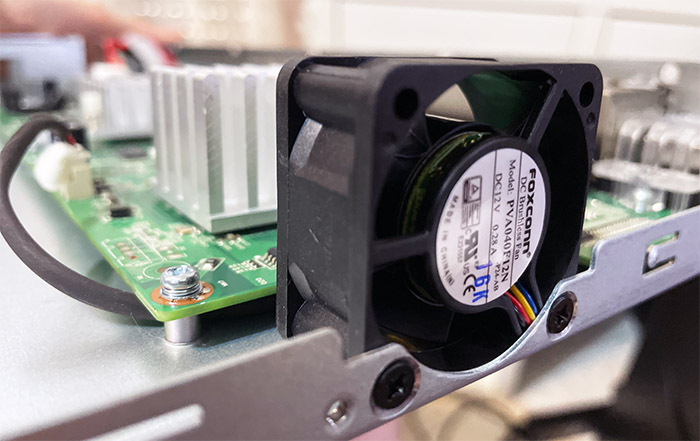
I am fairly sure that there is no universal standard for these hot-pluggable power supplies, so make sure to get a replacement (if needed) from the manufacturer, to match the power requirements of the device. The rear side of the FS S3910-24TS only has the grounding screw, so let’s move to the sides of the switch. On one side, there are some ventilation holes to let the air flow out, while on the other side, there is a fan which pushes the air into the chassis.
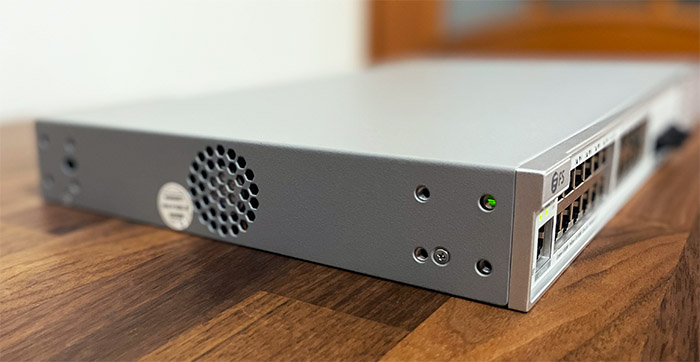
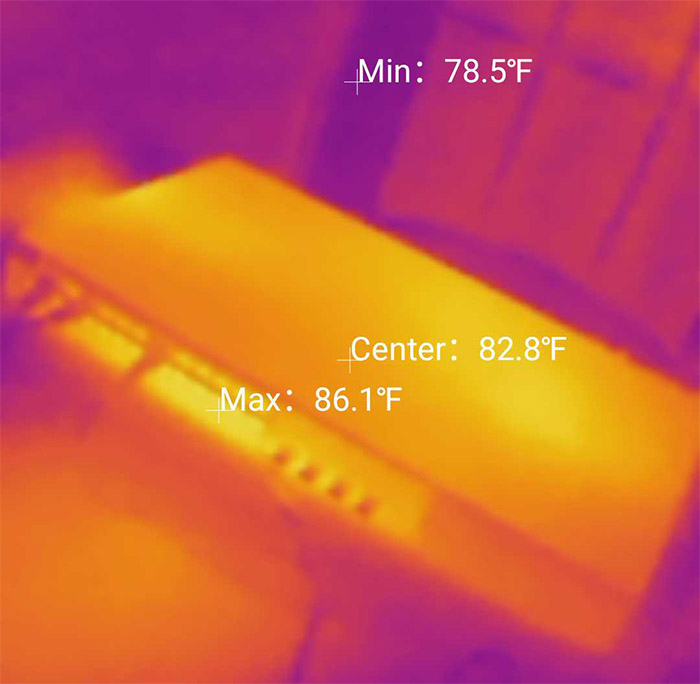
This is an important distinction between it and the S3910-24TF model, since the latter was fanless. It’s a somewhat loud fan that you can replace with a Noctua if it bothers you, but in a closed off rack, it shouldn’t make that much noise. The fan will operate at a lower RPM if the Ethernet switch isn’t under a heavy load and will ramp up the RPMs when necessary (becoming far louder). In terms of heat management, this is a large device, it has a fan and it lacks PoE, so it will barely become warm, even if you run a few stress tests.
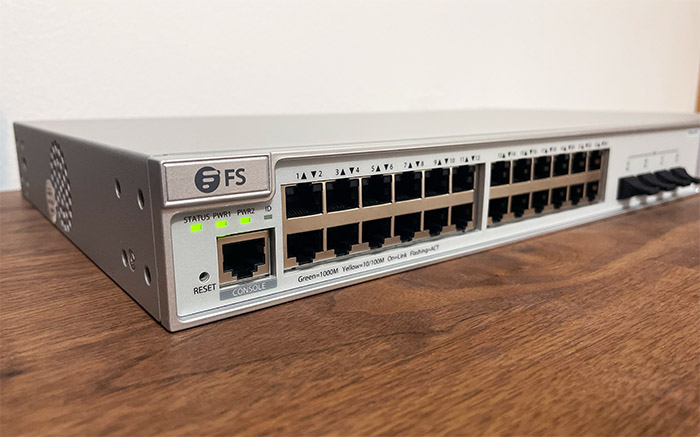
On the front side of the FS S3910-24TS, you will be able to find the ports and the LEDs – the layout is a bit different than on the S3910-24TF because the Console port is slightly more crammed, being surrounded by the recessed Reset button and four LEDs. There’s the Status LED (solid yellow suggests that the internal temperature is slightly elevated and a red LED means that the switch has reached a high temperature or that it’s faulty).
Then, there’s the PWR1 and PWR2 LEDs (solid red means that the PSU is not connected to a power source or that it has experienced some sort of failure) and the ID LED (if it’s solid blue, it means that the Locating function has been enabled). Next to the LEDs, you get two blocks of 12 Gigabit Ethernet ports each (24 in total), followed by four SFP+ slots protected by silicone covers. The SFP+ slots do support up to 10Gbps.
Internal Hardware (FS S3910-24TS Teardown)
If you want to open up the case of the FS S3910-24TS, you need to remove the screws from the rear side and the ones from the sides, but do be aware that one of them is covered by a warranty sticker. This means that if you damage that sticker (and it’s very easy to do so), you may lose the warranty.
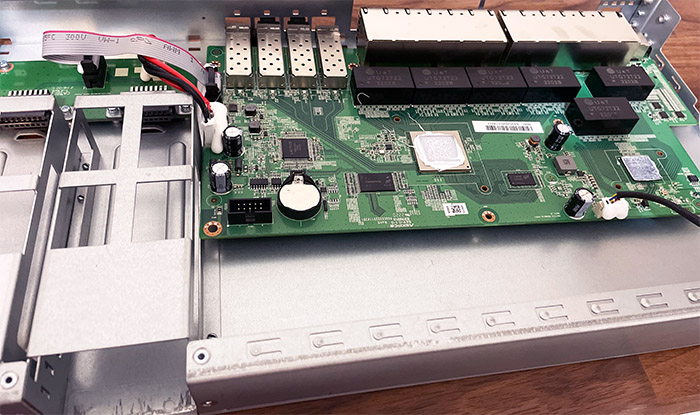
If it doesn’t bother you, move along with the removal of the screws and don’t forget to take out the grounding screw as well. Afterwards, you need to detach the front side because it keeps the metallic case together – use a prying tool. And then, simply slide the top of the case off, revealing the PCB with two heatsinks attached, as well as the slots for the two power supplies with the connectors at the end. The two heatsinks can be removed by disarming the spring-operated pins (you will have to turn the PCB upside down).
And I am very happy to see that FS used proper thermal paste and not that glue thing that they used on the FS S2800S. Before moving to the chips, it’s worth mentioning the fan which is a Foxconn PVA040F12N 40 x 40 x 20mm; it’s fairly easy to change it if it’s too loud since there are two screws and a connector to the PCB (glued, but can be removed).
That being said, I could identify the Lattice LCMX02-640HC Field Programmable Gate Array, the 256MB of NAND flash memory from WP (29F2G08ABAEA) and the 512MB of RAM from Micron Technologies (ICP45 D9SHD). Underneath the two heatsinks, there were a Broadcom B50282C1KFBG octal PHY and a Broadcom BCM56150A0KFSBLG 10/100/1000Mbps Ethernet switch chip. After cleaning up the previous thermal paste (some was spilled on the PCB – cleaned that up too), I added a new layer of paste and put everything back together.
| FS S3150-8T2FP | FS S2800-8T | FS S3150-8T2FP | FS S3410-10TF-P | FS S3910-24TF | |
| Switch Chipset | Broadcom BCM56150A0KFSBLG | Realtek RTL8380M | MIPS32 4KEc CPU | Broadcom BCM53343A0KFSBG | Broadcom BCM56152A0KFSBLG |
| RAM | 512MB Micron ICP45 D9SHD | 128MB Winbond W631GG8NB-12 | 128MB Winbond W631GG8NB-12 | 256MB SKhynix H5TC4G63EFR | 512MB Micron 0ZP45 D9SHD |
| Storage | 256MB WP 29F2G08ABAEA | 16MB Winbond 25Q128JVSQ | 16MB Winbond 24Q128JVSQ | 256MB Micron 29F2G08ABAEA | 256MB NAND Micron 29F2G08ABAEA |
Note: The FS S3910-24TS features a switching capacity of 128Gbps and a forwarding rate of 96Mpps, so it should handle large networks without issues.
Setup and Features
The initial setup process for the FS S3910-24TS follows the exact same steps to what I had to undergo with the S3910-24TF. This means that the network switch has a static IP address set to 192.168.1.1 and you do need to change the settings so that it receives the IP from the router or gateway.
The way I’ve done it is by using a Windows OS machine and I simply set up a static IP address matching the same subnet as the switch (192.168.1.2) and if you’re wondering how this can be done, I have written a more detailed guide when I tested the FS S3910-24TF, so check that out. That being said, afterwards, I entered 192.168.1.2 in the URL and I was greeted by the message that it’s better to switch to HTTPS for better security.
I did just that and then I was asked to enter the default username and password (it’s admin/admin). On the next step, I was asked to change the password (I needed to do it manually with the FS S2800S) and then I could finally see the GUI. It’s identical to what the FS S3910-24TF has to offer, so I did the same to change the IP address to be in the same subnet as the router.
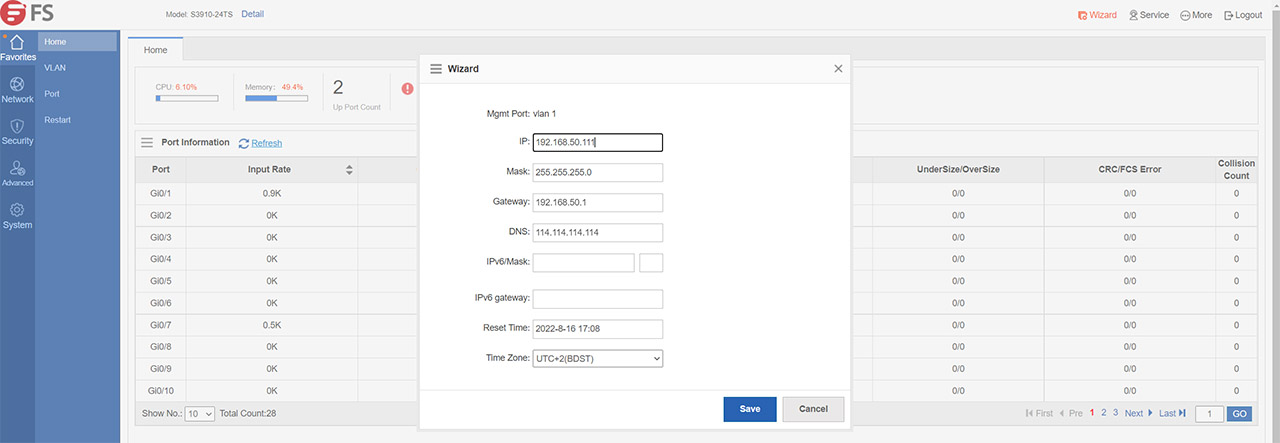
You can see that in the top right corner there’s the Wizard – click on it and a new smaller window will appear in the middle of the screen. Here, enter the Gateway IP address (your router’s IP address) and make sure that the IP address of the switch is changed to match the subnet of the router. It’s also a good idea to set the Time Zone.
Now, you can connect the cable from your router to the switch (it makes no difference if you do it beforehand) and I do suggest that you set a static IP address for the switch on the router side as well. The switch redirected me to the new IP address automatically and I could now explore the interface.
The GUI
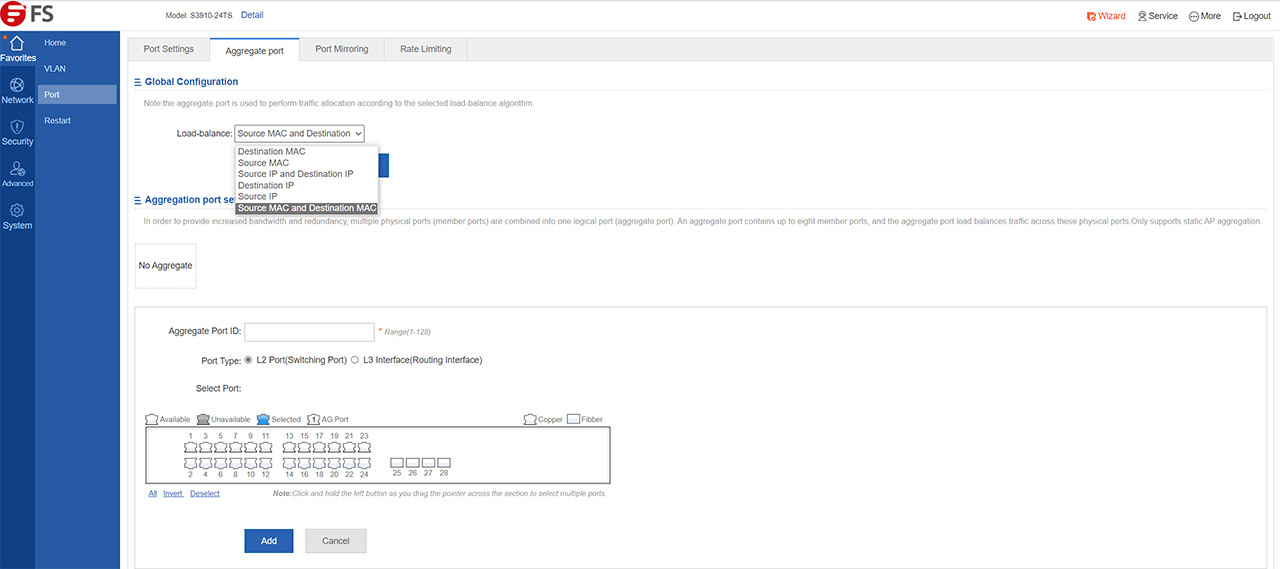
The user interface is the same to what we saw when I tested the FS S3910-24TF, so expect a two-column menu with the main sections being on the left. First, there’s the Favorites tab which shows some status data about the network switch, it allows you to add a VLAN or add multiple VLANs under a Trunk Port. It’s also possible to adjust the settings of each port, including the Port Mode, the Speed and the Working Mode, and here, you can configure the port aggregation, having the option to choose between multiple types of Load balancing types.
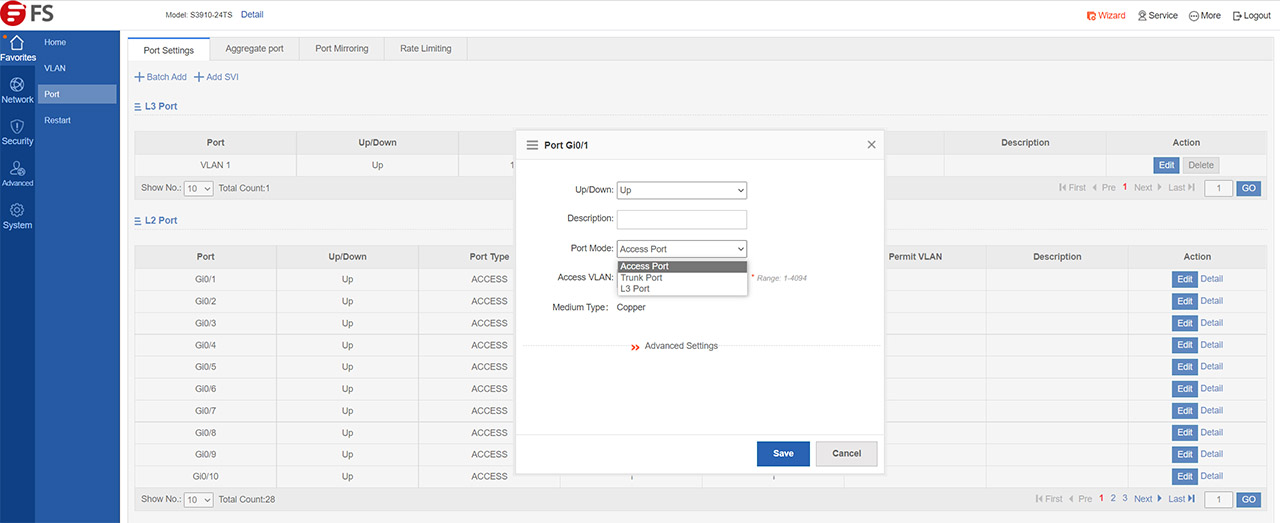
Still under Port settings, you can configure the Port Mirroring and set data rate limits for each port. Under Network, you can set Static Addresses, STP, IGMP Snooping, DHCP Relay and Authentication. You can choose between eportalv1 and v2. Besides the static routers, the network switch also supports RIP and OSPF (OSPFv3 in the case of the IPv6). The Security section includes DHCP Snooping, Gateway Anti-ARP Spoofing, Storm Control, NFPP and IP Source Guard. There’s also Port Security, which blocks any packets that has a source MAC that’s not consistent with the secure address.
I noticed that under Advanced, you can set Port Isolation for IoT devices, enable DHCP and bind MAC address to Dynamic IP address. It’s also possible to set the Access Control List (add permission rules that dictate which type of traffic can enter the network) and the QoS (where you can adjust the Class, the Policy and the Flow settings).
Lastly, there’s the System, where you can change the admin password (but not the username), Upgrade the firmware, check the System Logs and there are some tools to diagnose any issues with the network. There’s Ping, Traceroute and Cable fault detection.
You also get the option to use Web CLI to configure the FS S3910-24TS and the commands are pretty much the same as with the Cisco switches, which is excellent for the systems admins that are comfortable with that ecosystem.
The Performance
FS offers a fairly comprehensive report after they ran the ixia’s IxNetwork tests for a bit over half an hour by using the ixia XGS12. That’s not the type of hardware that I have available to check if I get the same values (it costs tens of thousands of dollars), so I will trust that the results accurately reflect the latency and the throughput.
You can see the results for yourself on the official page for the FS S3910-24TS, but it’s worth mentioning that the average aggregated latency was about 3,700ns, which is very low and the frame loss was 0% when the framesize ranged between 64KB and 1,518KB. I did run some LAN to LAN tests just to see the throughput that a user can see when it’s connected to the FS S3910-24TS and it was 941Mbps from the client to the server; from the server to the client, it was 880Mbps.
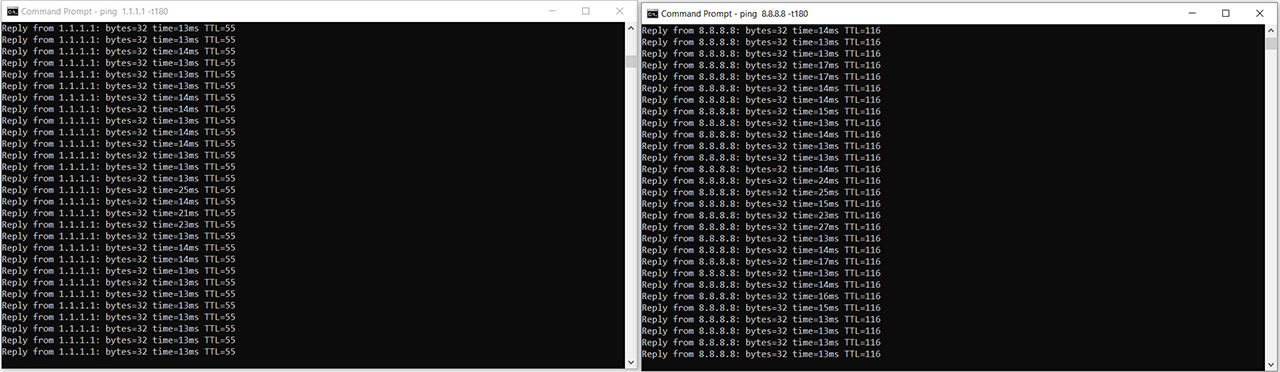
Considering that the FS S3910-24TS has two power supplies, but uses one at a time, I was curious to see if any task you may be running will be affected when the switch moves from one PSU to the other.
So what I did was to ping two websites at the same time (1.1.1.1 and 8.8.8.8) and, while doing so, I disconnected the first PSU, then I reconnected it; after that, I disconnected the secondary PSU and reconnected it. I checked if there was any packet loss or any other weird behavior and I couldn’t see anything out of the ordinary, the switch continued working as if there was no change at the power source level.
The Conclusion
I really liked the FS S3910-24TF because it was designed to handle larger networks and it also supported stacking up to 4 switches, plus the excellent software (especially the Cisco-like CLI). And all of these are present on the FS S3910-24TS as well, but is it that much different from the S3910-24TF to justify the price difference? Although both devices are similar in a lot of ways, there are some fundamental differences as well.
The hot-swappable power supplies can be a game changer for enterprise-level networks and so can the four 10Gbps SFP+ slots which, even if they do raise the price of the device, it will still be below similarly-equipped network switches from the competition. Obviously, if you don’t need these features, the FS S3910-24TF will be the better option, but for the sys admins that do, the FS S3910-24TS is going to be a godsend.
FS S3910-24TS
-
Pros
- Hot-swappable power supplies
- Four 10Gbps SFP+ slots
- The software configuration process is friendly with admins accustomed with Cisco hardware
- Supports 4 units physical stacking
- Runs cool
Cons
- No PoE
- No serial cable in the package
Mark is a graduate in Computer Science, having gathered valuable experience over the years working in IT as a programmer. Mark is also the main tech writer for MBReviews.com, covering not only his passion, the networking devices, but also other cool electronic gadgets that you may find useful for your every day life.