
The HIKMICRO Pocket2 comes as an overall improvement to the first pocket-friendly thermal camera developed by the China-based manufacturer and while I was tempted to say that it’s a direct competitor to the FLIR C5, even the Pocket1 was already better spec’d.
| HIKMICRO Pocket2 | |
|---|---|
| Hikmicrotech.com | Check Product |
| Amazon.com | Check Offer |
| Use code for a discount | |
Indeed, the resolution and the refresh rate were higher, but is that enough to warrant a better experience? Obviously, one of the most important aspects is the sensor accuracy and, from the provided specs, it doesn’t seem to differ that much from the FLIR C5. At the same time, I won’t deny that the 25Hz will ensure a better viewing experience than the ~9Hz of the FLIR thermal camera, same as the extra pixels that will help paint a more accurate image.
What I always liked about the FLIR cameras and I have not seen on the more inexpensive modules that I tested was the overlay mode that they called MSX® technology. The good news is that the HIKMICRO Pocket2 does have a similar technology which manages to blend the images just as well.
Furthermore, the HIKMICRO Pocket2 can connect to the Viewer app in case you want to transfer data directly to your phone, but you always have the option to transfer data directly via the USB-C port. Considering the price tag of the device, the HIKMICRO Pocket2 does seem to punch above its weight, so let’s put it to the test and see how well it performs.
Design and Build Quality
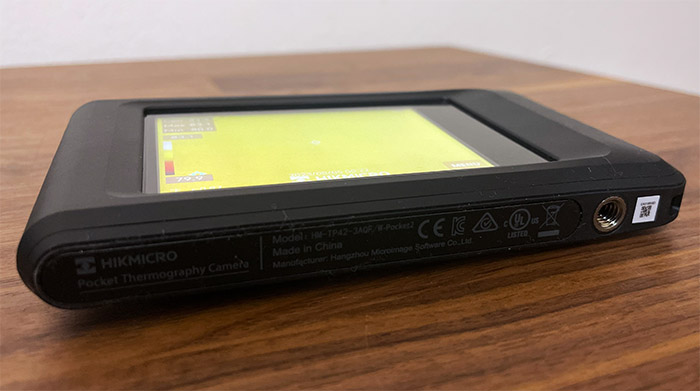
The Pocket series was developed as an alternative to the gun-style thermal cameras which often require a case to be carried around. As the name suggests, the HIKMICRO Pocket2 can indeed be carried in a pocket considering that it measures 5.45 x 3.35 x 0.93 inches (138.5 x 85.2 x 23.6cm), same as the first Pocket camera. It’s a bit wider than my phone, but slightly shorter and even so, it easily slipped into the pocket of my jeans.
The case is entirely made of plastic, but it does have a soft finish all around and I have noticed that the manufacturer has included a silicone pad on the rear panel where your hand will meet the device. The HIKMICRO Pocket2 has its own display, so it doesn’t require the connection to a smartphone and you may wonder why the screen is not centered? It does tie in with the silicone section because HIKMICRO decided to leave some space for your hand to rest and they also ensured easy access to the menu (the display is touch-screen). This is great news for right-handed people and not so much for those that are left-handed. The frame of the thermal camera is fairly thin and that’s the place where you’ll find the buttons and the USB-C port.
At the bottom, the HIKMICRO Pocket2 has a mounting hole for tripods or, if you prefer, you can add a handle to transform the pocket-type thermal camera into a gun-style device. The near corner has a strap support that allows you to add a lanyard. On the left side of the HIKMICRO Pocket2, there’s a USB-C port for charging (this thermal camera is one of the few to provide a USB-A to USB-C cable along a brick) and next to it, I noticed a small LED indicator.
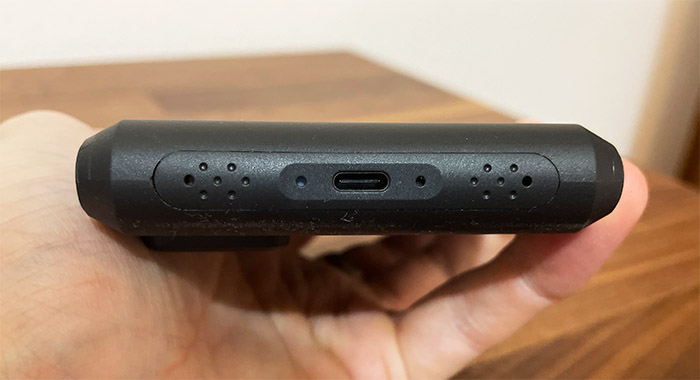
Green means fully charged, while solid red means that the device is charging, in case of an anomaly, the LED will flash red. Yes, there are no indicators for the actual battery percentage, but you can see it on the display. What I found interesting was that above and below the USB-C port, there are some openings for the speaker and the microphone. Why would a thermal camera need them? HIKMICRO says that it’s for audio alerts when there is very high temperature detected by the sensor (if visual is not enough) and the microphone adds sound to the recorded footage.
So, they’re not really mandatory features, but still nice to have. At the top, there is a Power button which needs to be pressed and held to turn on and off the device. And next to it there is a larger Capture button (with a pattern for easier recognition) which will take photos on a single, quick press and, if you want to start recording, just press and hold it. There is a third function, the return to live view interface if you press it in menu mode.
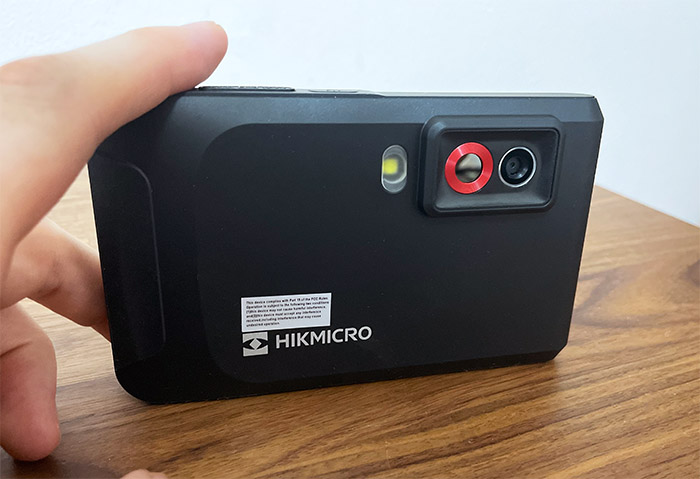
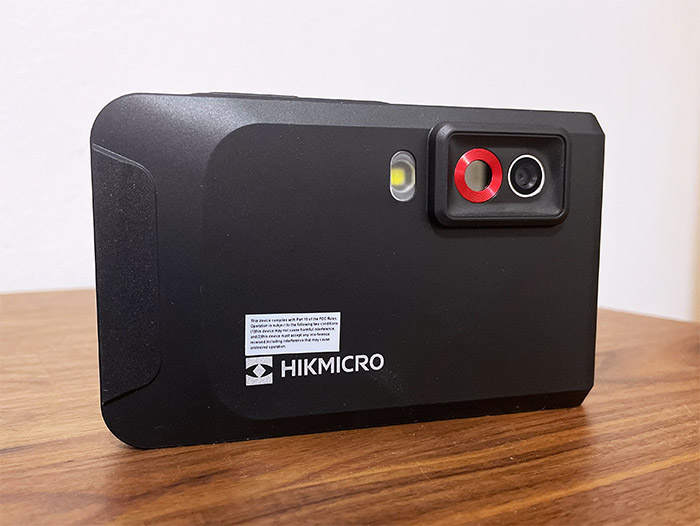
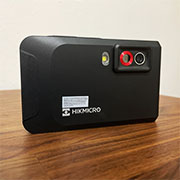
Lastly, you’re going to see the lenses on the rear side and yes, there are two in the slightly elevated portion, one being the thermal lens, the other the optical lens – these two are needed for that cool fusing effect. There is a third element near the lens area which is the flash light.
How rugged is the HIKMICRO Pocket2
I did mention a slightly elevated lens area which is common on smartphones but which can prove to be a weak point in case the device is dropped. The good news is that the HIKMICRO Pocket2 added a raised lip surrounding the lens, so even in case of mechanical shocks, there should be no damage. Furthermore, the entire body of the thermal camera seems to be solid enough to handle a few tumbles to the ground. What about the display, you will ask. It is embedded slightly within the plastic case, so there’s again a protective area surrounding it. Lastly, let’s address the speaker, microphone and USB-C holes.
Will they allow dust and water to enter the enclosure? The HIKMICRO Pocket2 is IP54-rated which means that there is protection against dust ingress (not a perfect sealing) and that the device will not be harmed by water splashes from any direction. So, you’re not going to be able to submerge the thermal camera under water, but it should survive light rain and a dustier environment.
The Display
The HIKMICRO Pocket2 has a 3.5″ LCD display built into the case, so you don’t have to connect the device to a smartphone, the thermal camera is pretty much self sufficient. Some may argue that a third-party display (meaning smartphone) could be better due to the superior color representation and, in case of fusing, you do get a better camera. Additionally, there is no need to worry about the battery since a module such as the Xinfrared T2S+ or the Topdon TC001 will rely on the smartphone’s battery to remain functional.
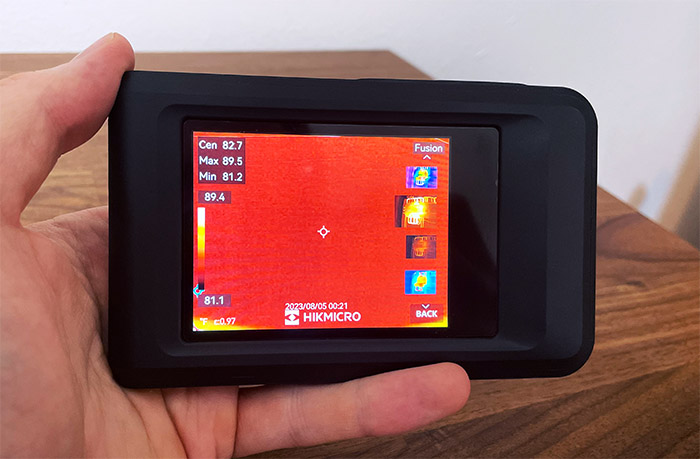
That being said, as long as the developers do a good job at balancing the battery life and the image quality of the display in a self-sufficient thermal camera, then all the advantages of a module are pretty much irrelevant. The display of the HIKMICRO Pocket2 is big enough to offer a clear view of what’s being filmed and the resolution is 640×480 pixels which may not be that much on paper, but I had not trouble identifying every detail in the picture.
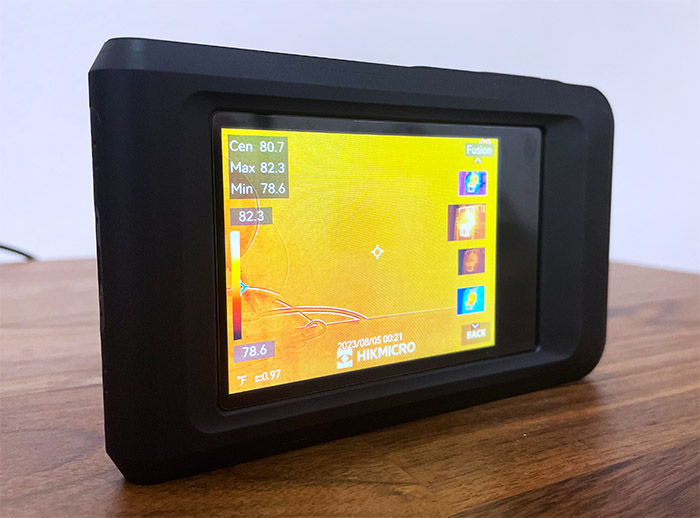
When used without the thermal camera, the normal optical lens doesn’t produce great images, but it doesn’t need to because its role is solely for the blending and fusing modes which work really well as we will see in a minute. By default, the display will show the center, max and min temperature values and you will also notice a small MENU icon on the bottom right to change the color palette, the Measurement, the Image Mode, as well as to play with the Level & Span.
On the right side of the thermal image, there should be three icons which won’t stay long if you’re not touching the screen, but will quickly appear if you slide your finger over the surface of the screen. The first is the Home button followed by the Albums (you can see captured videos and photos) and lastly, there’s the Local Settings.
The Local Settings
First, there’s the Measurement Settings, where you can manually set the Temperature Range, the Emissivity, the Humidity, the Distance and more. Then, there’s the Connections for setting up the WiFi connection, Bluetooth and enable the USB cast screen, in case you want to see the footage on a bigger screen. Another interesting section is the Capture Settings, where I saw that the default image resolution was set to 2MP, but it could be pushed to 8MP – there’s also the possibility to enable Macro mode.
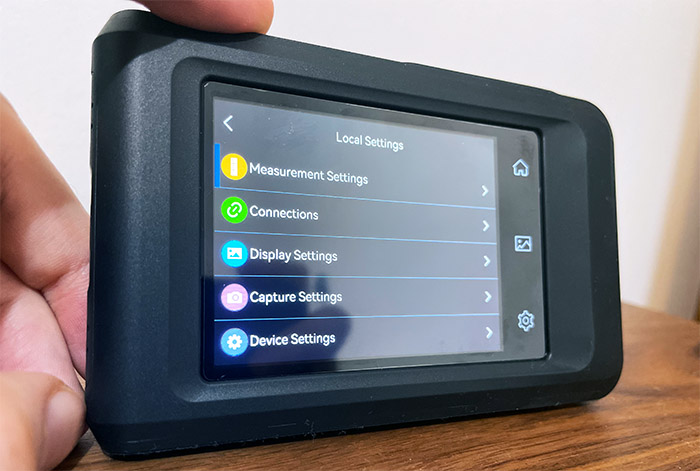
Lastly, I saw that there were some Device Settings available which allow the user to set up the Screen Brightness (I would have liked it to be automatic), change the unit (C, F and K available for temperature), as well as enable/disable the Auto-Rotation – the data will rotate in portrait mode, but not upside down.
The HIKMICRO Pocket2 in action: Quality, clarity and accuracy
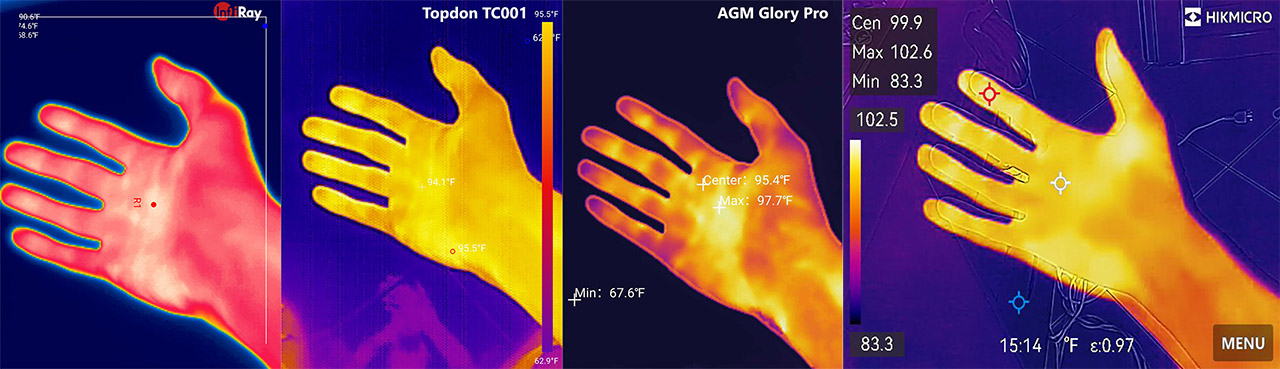
I have tested a few thermal cameras over the last year and the specs of the HIKMICRO Pocket2 are very similar to those of the Xinfrared T2S+, Topdon TC001 and the smartphone AGM Glory Pro (that has a thermal camera built-in). The IR resolution is 256×192 pixels and the refresh rate is 25Hz, leaving behind the similarly-priced FLIR cameras. The specs never tell the full story, so let’s see the HIKMICRO Pocket2 thermal camera in action.
I have made a quick comparison video between the Xinfrared T2S+, Topdon TC001 and the HIKMICRO Pocket2, and, while the Topdon TC001 performed very similarly to the Pocket2, the latter has a bit more detail. That’s without relying on the blending or fuse mode which takes things to a whole other level. Even in its default form, it did show more detail at about 50 feet and let’s not forget that we’re not dealing with a long-distance monocular (like the Teslong). When closer to the subject, it’s a bit more detail-rich, but not by a lot when compared to the other two module-type thermal cameras.
One thing that bothered me with the other thermal cameras was the stuttering caused by the auto-calibration. And that’s also a thing that happens on the HIKMICRO Pocket2. When I changed the scenery, the screen would freeze for a couple of seconds for the calibration to occur. It doesn’t happen as often as on the AGM Glory Pro, but it’s definitely more noticeable than on the Teslong monocular. Next, I wanted to move through the different available modes while checking out the inner circuitry of a laptop.
As you can see, the default thermal camera mode is nothing special, so I enabled what was called Macro in the Settings, but I am not entirely sure it did that much, at least to my naked eye. Things did change after enabling the Blending mode which pretty much shows the actual video with very faint temperature shades around. But you need to keep an eye on the temperature for this mode, while I think that the fusion mode is much better overall. That’s because you get the thermal image mode plus some outlines for the objects in front of the lens.
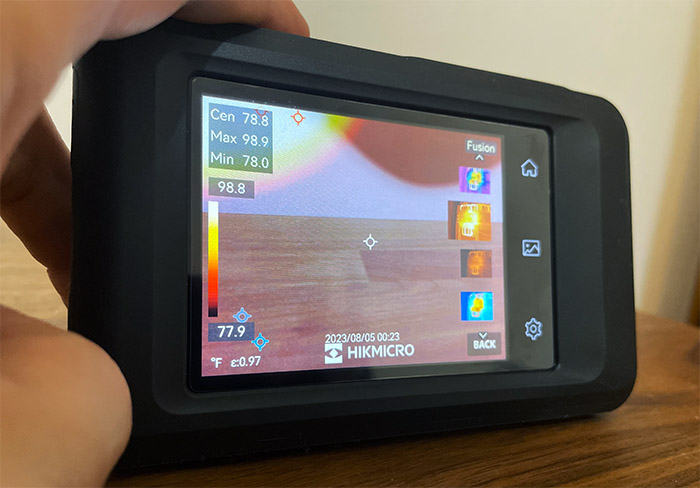
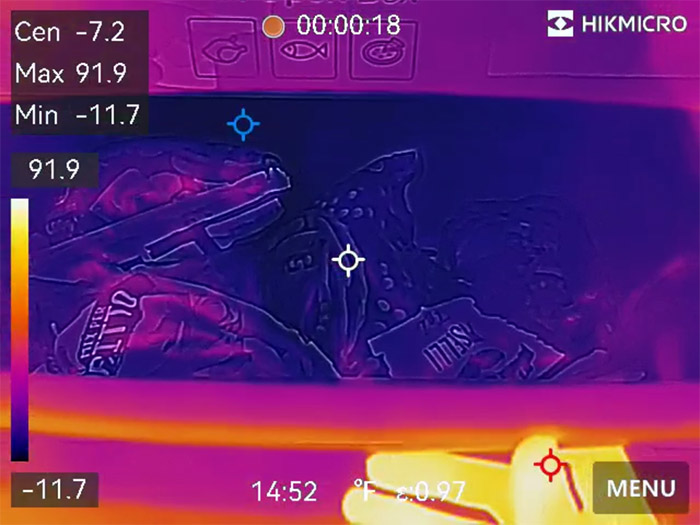
This way, you get a better idea about the temperature, the way it’s diffused around the object and so on. This is something I loved on the FLIR cameras and I definitely prefer to use with the HIKMICRO Pocket2 thermal camera as well. I know that the PiP mode is available, but I am not a fan of having a small window somewhere on the screen, when the fusion mode is available (I mean, come on.). Since it’s summer here, everything is hot and heated, so to get an idea about its cold temperature accuracy, I decided to capture a photo of my freezer (with some vegetables in it).
I kept my hand in front of the lens and checked the temperature shown by the HIKMICRO Pocket2. The freezer is set to -2.2 degrees F (-19 C) and the camera showed an average of -7.2 F (-22 C). The projected accuracy is +/-3.6°F, so there is a certain deviation, but then again, the freezer itself won’t deliver a uniform temperature inside the containers.
The Mobile Application
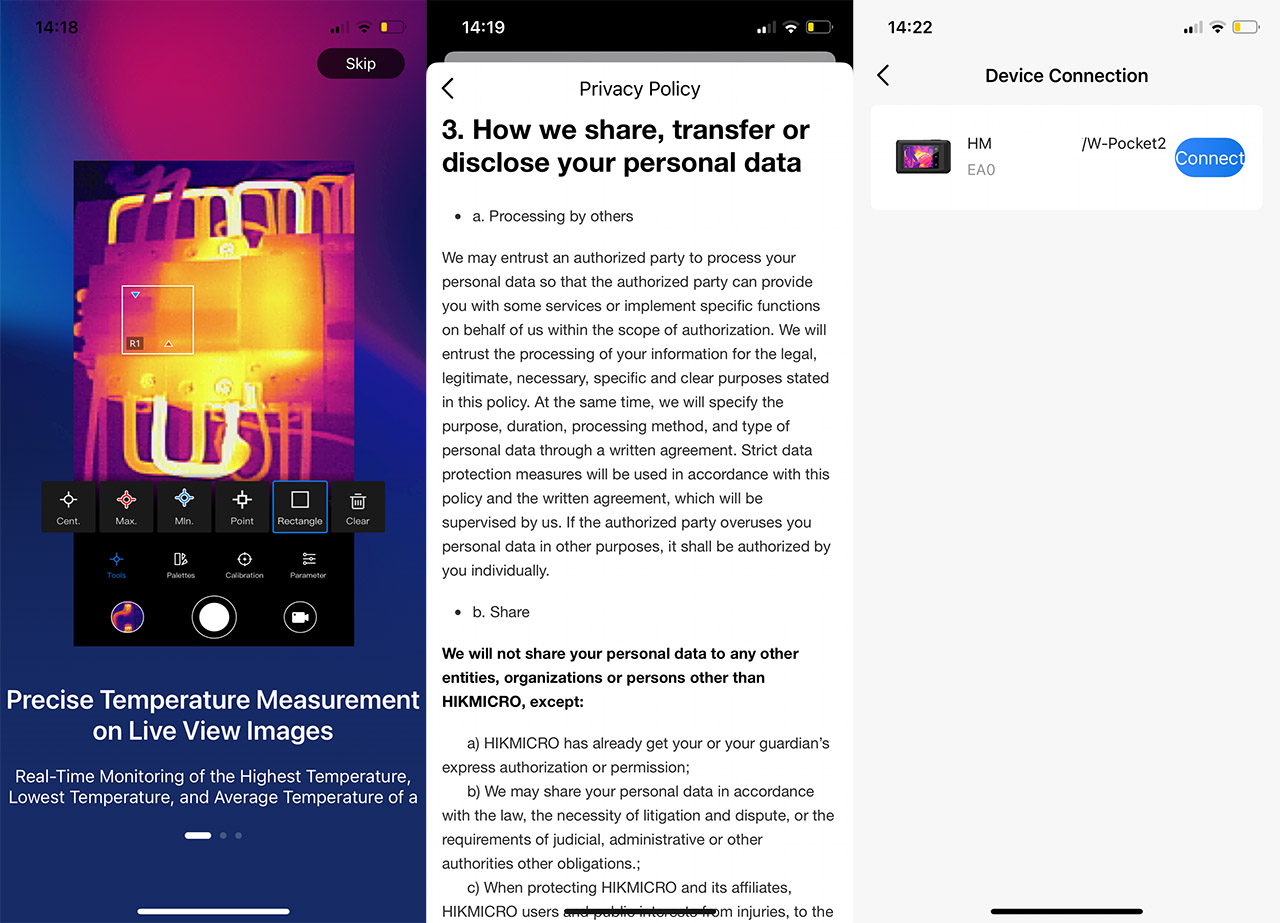
HIKMICRO has made available a mobile application that you can pair with the thermal camera and, while overall, it’s a nice addition, there are a few quirks. Before anything else, it’s necessary to enable WLAN on the thermal camera (from the menu) and connect to a wireless network – 2.4GHz or 5GHz. Then, after installing the Vision app, tap on + and you will be asked to give it permission to detect devices in the network. After saying yes, it will see the HIKMICRO Pocket2 and then you will be asked to access the conditions, as well as the privacy policy.
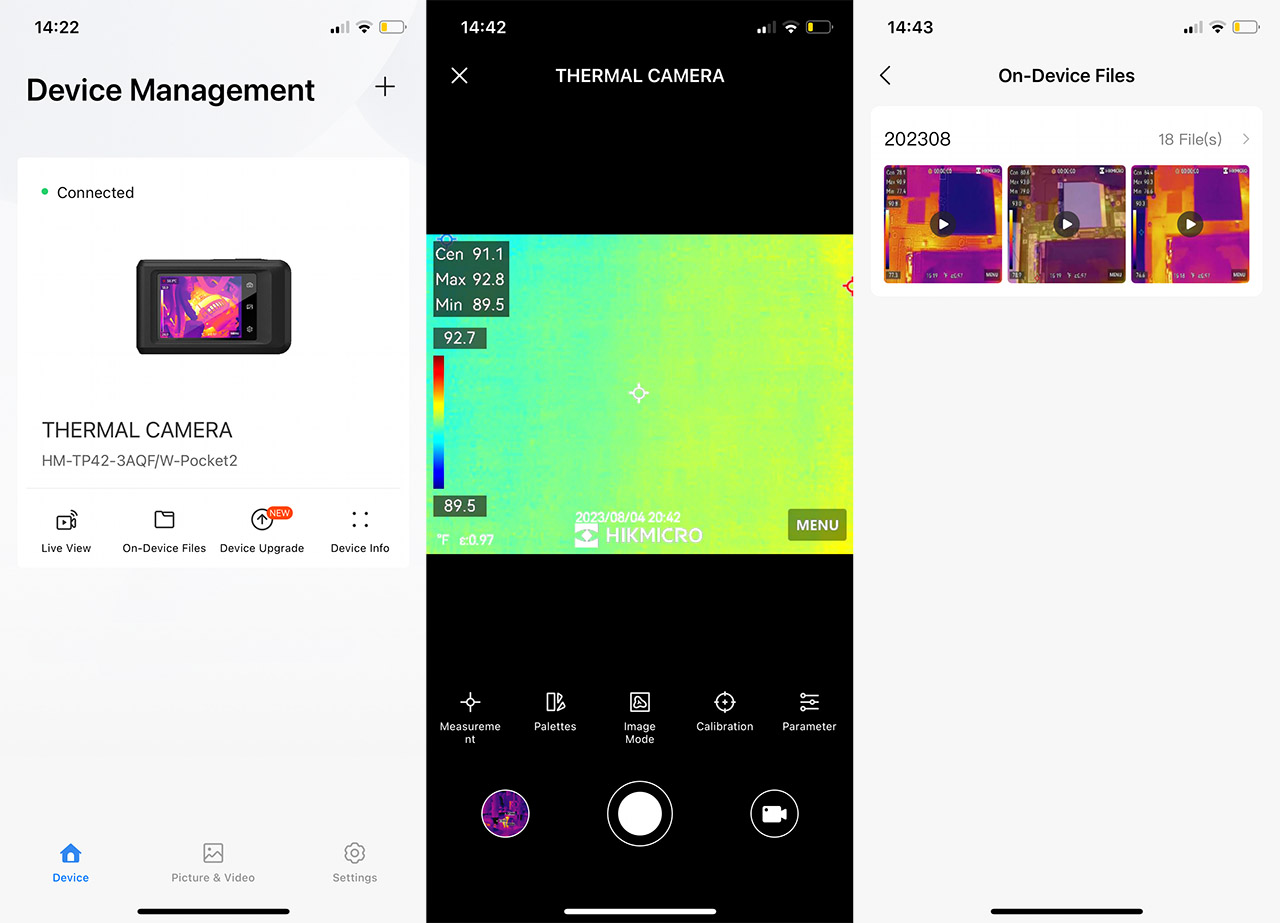
The data collection is pretty standard (just like with most apps, it’s intrusive) and what caught my eye was the location data and some hardware identification data. Additionally, the collected data can be shared with third parties which is again, unfortunately a standard that needs to go away. After that, I was greeted by the homepage and I saw that I could upgrade the firmware. It did take a while to finish and after that, I did check what changes have been made to the HIKMICRO Pocket2 interface.
I saw a wider color palette and that the Blending mode now had percentages, giving more control on how you see the footage. I also saw that the footage from the optical lens and the one from the thermal lens was a bit more in sync. Overall, a welcomed upgrade, but I also immediately experienced a bug. At some point, the color palette went gray and stayed like that until I restarted the phone – didn’t happen again, for now. Let’s talk about the options.
First, there’s the Live View and it’s exactly what it says, a live view of the screen, but it offers very limited control. For example, I mirrored the screen while the menu was opened and I could not close it from the app – it is possible to change the color palette and some other visual adjustments. Next, there’s the On-Device Files where gain access to the gallery and lastly, there are some settings available. I suppose I should also mention that, while you can’t add a microSD card, the inner storage is 16GB – it’s not that big, but you do get the option to move the files to the PC quite easily.
The Battery Life
The manufacturer says that the HIKMICRO Pocket2 will remain operational for about 4 hours on a single charge and it’s pretty much in line with what I saw while testing the camera. This means that you should get plenty of time to inspect a house in its entirety.
The Conclusion
I think that the pocket-sized series has been a success and the HIKMICRO Pocket2 can be considered a very strong competitor to the FLIR line, especially considering the price tag of the device. We get a built-in display, a rugged case that is protected against water and dust ingress, and the image quality is enhanced by the various available modes. The most important one is the Fusion mode which very closely resembles the FLIR MSX tech, followed by the Blending mode which got better due to the latest firmware upgrade. The 25Hz do make a difference and the battery life is also fairly long, so, if you’re in the market for a self-sufficient pocket-friendly thermal camera, then the HIKMICRO Pocket2 is a very good choice.
HIKMICRO Pocket2
-
Pros
- Good image quality
- 25Hz refresh rate
- Multiple modes, from which there's the Fusion mode (similar to the MSX tech from FLIR)
- Compact and rugged exterior
- Built-in display
Cons
- Only 16GB of flash storage
- The Live View on the app is limited in the actual control of the camera.
Mark is a graduate in Computer Science, having gathered valuable experience over the years working in IT as a programmer. Mark is also the main tech writer for MBReviews.com, covering not only his passion, the networking devices, but also other cool electronic gadgets that you may find useful for your every day life.