
The Kaiweets KM601 is an inexpensive smart digital multimeter which is not going to replace the professional gear, but it does offer a substantial amount of features, enough for DIY enthusiasts and I suppose even for people that are renovating their homes.
| Kaiweets KM601 | |
|---|---|
| Kaiweets.com | Check Product |
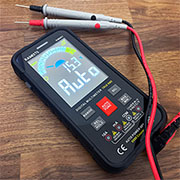
The Kaiweets KM601 is fairly compact (can be handheld) and the main attraction is the large digital display (with a backlight) which covers almost half the front side of the device. The display is colored, and it shows a multitude of values, depending on what exactly you are measuring. And this takes us to the main highlighted feature of the device called the Smart Mode. What this does is to automatically detect what’s being measured and adapt to the suitable range – the display will show the voltage, the resistance, and the continuity.
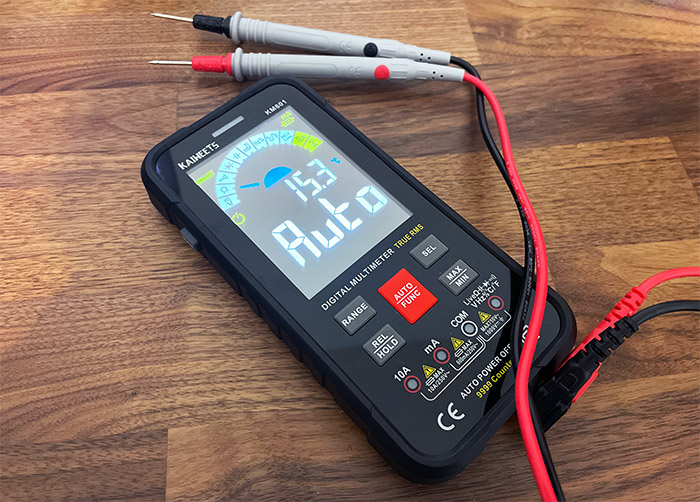
And yes, this includes AC/DC voltage, but there are other parameters that can be measured, such as the temperature, the frequency and the duty cycle. Plus, the NCV function will also detect any live wire without needing to use any wire. Speaking of wires, there are a couple of sharp lead probe wires and a K-type thermocouple for measuring the temperature of an object. There are some other interesting functions, such as the automatic power off (APO) and the flashlight, so let’s put the Kaiweets KM601 to the test and see if it’s worth considering for occasional home repairs or if it’s suitable even in a professional setting.
The Design and Build Quality
Kaiweets KM601 resembles the traditional (let’s call it non-smart) digital multimeter, so it has a rectangular plastic case that measures approximately 6.5 x 4.37 x 2.13 inches (or 16.5 x 11.1 x 5.4cm) and weighs only 1.1lbs which means that it’s very easy to carry around. The usual knob is gone, and it is now replaced with a red Auto/Func button which moves between the Auto and the manual modes. There are four other buttons on the left and right side.
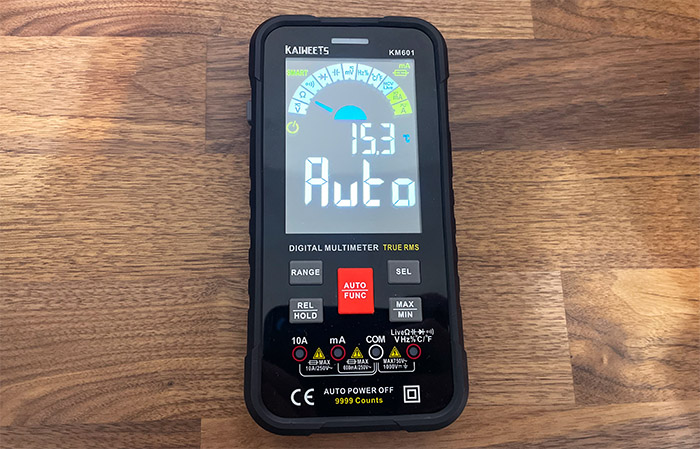
The first is the RANGE button which will work only in manual mode and it’s only valid for mA, voltage and resistance tests; then, there’s the SEL button which toggles between DC and AC readings (in case the Auto mode doesn’t work properly, which should be very rarely). The third button is the REL/HOLD which helps you find any voltage, mA or resistance differences between readings (press HOLD for a couple of seconds to delete any stored data).
The MAX/MIN button will help you set a specific value range and the multimeter will beep if the readings exceed the set values. A unique feature for the Kaiweets KM601 is the four LEDs that can be found underneath the buttons. And their role is to let you know where you need to insert the probes so that you can measure specific values – in manual mode, the LEDs will work as guides for the preset functions. And this is very useful for non-professionals which may feel lost when seeing the four identical ports at the bottom of the device. I know that some have complained that having the jacks at the bottom is an inconvenience when testing certain devices since it’s impossible to leave the multimeter standing.
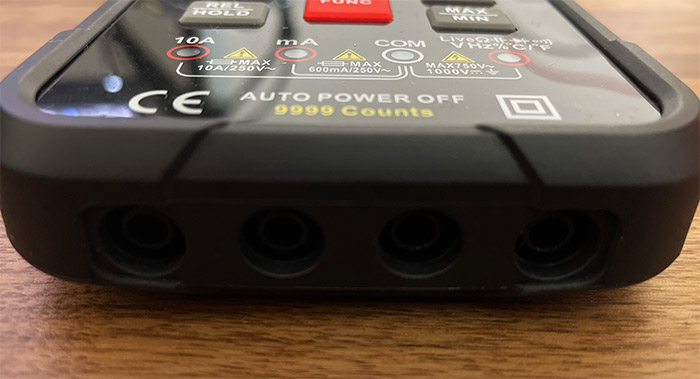
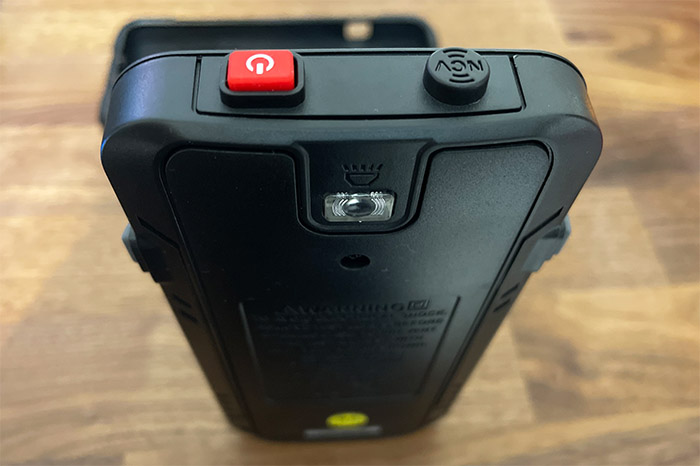
That being said, the first jack is for the 10A, so it’s suitable for current that goes above 200mA and yes, there are ceramic fuses inside the device which are replaceable. But you do need to open up the device to access the two fuses – it’s not a very simple process as you’ll see in the teardown section. Moving forward, we can see that at the top, the Kaiweets KM601 has two buttons, one is for turning on and off the multimeter (the red button), while the other is not a button at all actually. It’s the NCV sensor.
Indeed, the Kaiweets KM601 can detect an active outlet without any wires, and this is where the manufacturer has stored the sensor. Moving to the sides, there is an APO button (Automatic Power Off) which, once enabled, it will ensure that the meter turns off if the device has been unused for 15 minutes – before turning off, the Kaiweets KM601 will beep 5 times. On the other side of the frame, the multimeter has a button for turning on the flashlight which is reasonably bright.
Before moving forward and talk about the display, let’s have a closer look at the design of the multimeter. The device is surprisingly similar to a rugged smartphone, and it even has a silicone cover which you do need to remove to access the battery tray. And it’s not that easy to do so since there is a screw that you need to remove, but it’s not something that needs to be done often and yes, you do get the batteries in the package, two sets actually!
The Display (What’s being measured?)
After turning on the Kaiweets KM601’s display, the mode will already be set to Auto and a dial will move between three icons: Voltage, Resistance and Continuity. This is what’s going to be covered by the smart mode, but you can go farther than that by accessing the manual mode. The next icons will be the Diode, the Capacitance, mV voltage (DC and AC), the Frequency, the Temperature, the Non-contact AC voltage, the mA current and the AC/DC current.
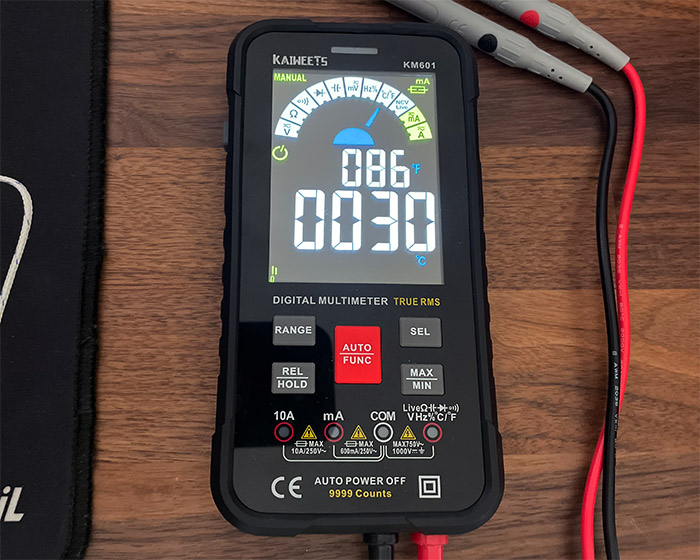
The temperature is also displayed on the display, and it’s set to Celsius, but it is possible to check in Fahrenheit by moving the dial to the suitable icon. And the way to do it is by pressing the Auto/Func button until the desired icon is reached. Also, know that moving through all the available functions will show dedicated icons and values which is pretty neat. The display is surprisingly bright, so it’s very easy to read even if it’s very sunny outside. And it’s not just a black and white screen, but there is a touch of color which does help with the overall look of the multimeter.
What’s inside the Kaiweets KM601 (Teardown)
I have mentioned that you need to remove the silicone cover and take out the single screw to access the battery area, but you need to go further if you wish to replace the fuses. There are four screws that need to be removed and then using a prying tool, it should be fairly easy to detach the bottom section of the Kaiweets KM601.
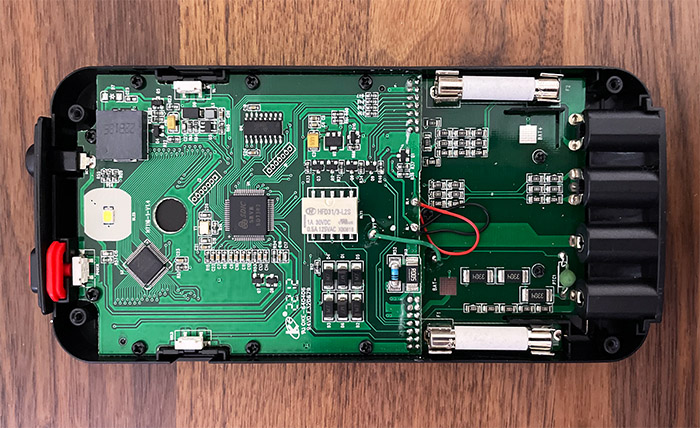
Doing so, I was able to see the two fuses as well as the main PCB components. I could identify the 24-bit ADC SDIC SD7502 SoC with 16K Bytes of OTP memory, the Titan Micro TM1729 LQFP-64 LCD driver and the LP SD8107 IC buffer.
The Kaiweets KM601 in action
I am not going to go over the full spectrum of functions that the Kaiweets KM601 has to offer, but to the main ones which most users will most likely use. So, the first thing I checked is how well the NCV detection actually worked.
The idea behind this function is that the sensor should be able to tell you if a power outlet is live or not. As you can see from the video, I did have to get fairly close to the socket, but the Kaiweets KM601 was able to accurately tell that it was live. Afterwards, I decided to check the voltage, so I inserted the two probes that came along in the package and relied on the Auto mode to show me the right values. As you can see, the Kaiweets KM601 was able to quickly detect what values I needed to see and it’s also decently accurate since the voltage should be approximately 230V (yes, this test was conducted in Europe, so no 110V).
I also wanted to see the Duty (frequency), so I switched to the manual mode and then I pressed the Auto button several times until reaching the right icon. This way, I could see that the frequency is 50Hz which, again, is the expected value. Afterwards, I was curious about the temperature probe, so I attached it to the multimeter and I chose a fairly warm area on my display as seen with the thermal camera (an AGM Glory Pro).
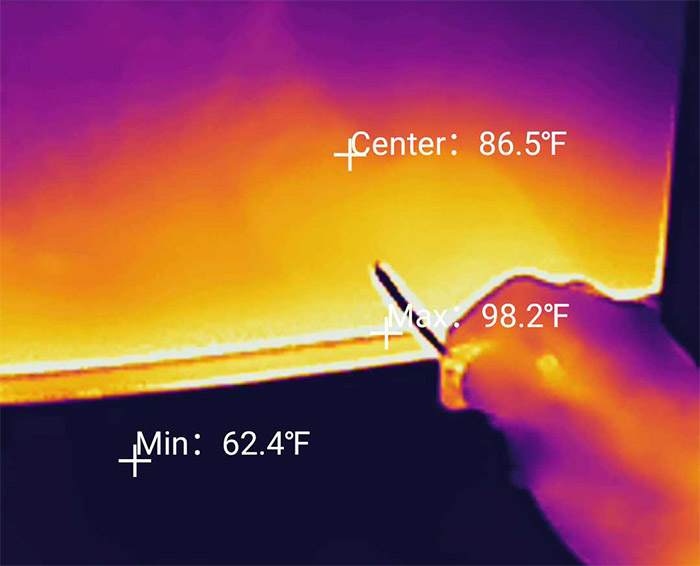
The Kaiweets KM601 is somewhat accurate, less so than the thermal camera, but I suspect the probe will do far better when it’s surrounded by the same temperature, not partially touching a surface. Lastly, I decided to check the Continuity test, so I touched the probes which prompted the multimeter to let out a continuous beep.
The Conclusion
The Kaiweets KM601 is clearly one of the better entry-level multimeters out there, offering a large colored display with a backlight, lots of measurements and the auto mode works really well. There are some quirks here and there, but overall, it’s clearly a very competent device for the money.
Kaiweets KM601
-
Pros
- Backlit colored display
- Lots of functions
- The auto mode works really well
- Four LEDs to help the non-professionals
- Is battery powered
Cons
- The slots are positioned at the bottom
Mark is a graduate in Computer Science, having gathered valuable experience over the years working in IT as a programmer. Mark is also the main tech writer for MBReviews.com, covering not only his passion, the networking devices, but also other cool electronic gadgets that you may find useful for your every day life.