
The pcWRT is the second wireless router from the US-based manufacturer which comes as a significant upgrade over its predecessor in terms of hardware: the first device was a single band AC300-class router (stuck on the 802.11n standard), while the second gen pcWRT is a dual-band 802.11ac AC1200-class router that can better take advantage of the OpenWRT-based software.
The pcWRT (also known as the Peace router or the Parental Control router) is a little bit different than the other AC1200-class routers available on the market in the sense that its main focus is towards delivering a comprehensive way for the user to control every aspect of the Internet traffic that goes through all the connected devices, as well as monitoring the connection initiated by the clients from your network (mainly, by using the OpenDNS Family Shield or the Norton ConnectSafe variants).
Surely, almost every other wireless router features some form of Parental Controls (some are basic, others more advanced), but the pcWRT goes a few steps forward and allows the user to block ads globally on every connected device, block proxies, VPNs and the TOR browser (even if installed on a USB flash drive), set filters and schedules and a lot more. Surely, all these will sound great for any parent that is concerned that their children may access websites not suitable for their age, but at the same time, a high degree of customization usually indicates a less user friendly interface. That being said, let’s have a look and see how does the pcWRT fare in terms of wireless performance and if it has managed to deliver a balanced user experience.
UPDATE 03.18.2020: Although it has been two years since I tested the pcWRT router, it seems like the manufacturer has been continuously supporting its devices and it recently released a significant firmware update to include one of the most comprehensive support for the VPN technology. This way you can choose between using OpenVPN, StrongSWAN (IKEv2) or WireGuard, each having its advantages depending on the type of network that you’re running.
Design
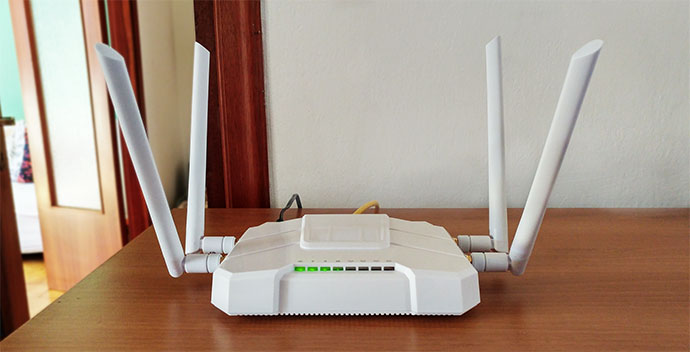
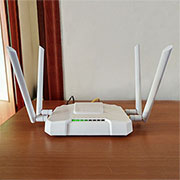
The advent of the WiFi mesh systems with their Applesque designs have made a permanent mark into how the audience perceives the networking hardware and it has ensured that these once ominous and industrial-looking devices can be living room friendly (and not hidden in a cabinet). Surely, this has also created a more clear demarcation line between the traditional router (which is usually more feature-rich, but it is often seen as more difficult to configure) and the WiFi mesh systems that seem to value simplicity and user-friendliness above a large number of features and because of that these devices usually end up with a more limited amount of configuration available. The pcWRT has preferred the traditional design, so it sports a rectangular body with four antennas rising from around the case (two on the left and two on the right) thus giving the router an arachnoid shape.
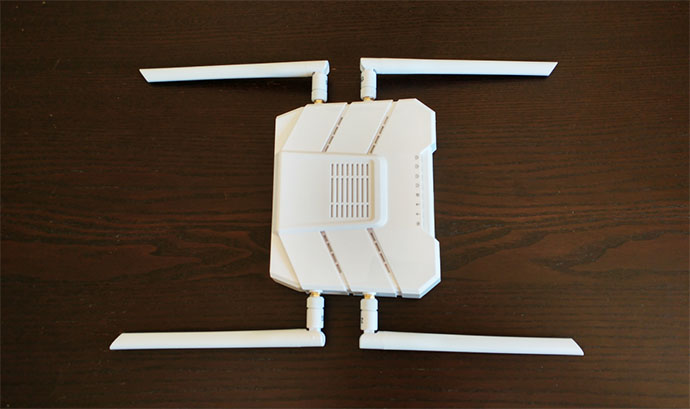
The case itself is covered by both a glossy and matte finish (since it is white, you won’t be able to see any fingerprints) and there are various canals and ventilation holes on the top area, as well as on the bottom. Compared to the other router available on the market, the pcWRT falls into the small form factor category, its dimensions being 6.3 x 5.1 x 1.3 inches (without the antennas) and its weight, 0.77 lbs, so it won’t occupy more space than needed from your desk – if you lack the necessary space, then the pcWRT can be mounted on the wall using the two holes from the bottom. Considering the somewhat unconventional positioning of the antennas, I think that this is the default position that the manufacturer had in mind and it’s also enforced by the fact that the device lacks any silicone (or rubber) feet, so it is a bit slippery, especially when you connect all the ports.
Since the heat management is extremely important for any electronic device, the pcWRT has taken some steps to ensure that the router won’t overheat by covering the top and bottom sides with some ventilation holes. Because of that the device ran at a reasonable temperature, but I did notice that when I put some stress on the router, I could feel some hots spots on the bottom, near the info label (here, you can see the IP and the MAC address).
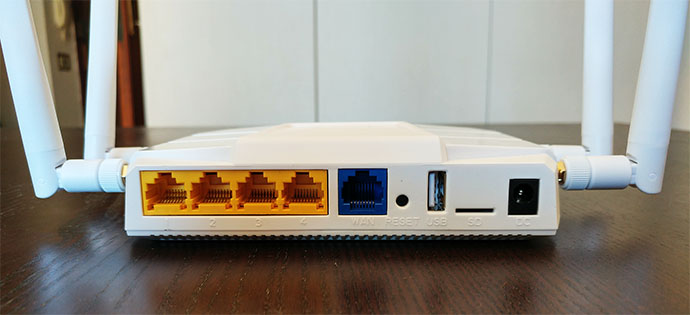
Similarly to almost all traditional wireless routers, the pcWRT rejected the single-LED approach (which is unintuitive and simply annoying) and it has kept the array of LED indicators that are positioned on the front area (with the labels printed on top of the device): from the left, there’s a Power LED, a 2.4GHz and a 5GHz LED (that flash when the data is being sent/received), a WAN (Internet) LED and four LED for each of Ethernet port. On the rear side of the router, you’ll be able to find four Gigabit Ethernet ports (a very welcomed improvement over the first gen Fast Ethernet ports), a WAN port, a recessed Reset button (press and hold it for 10 seconds to return the router to factory default settings), a USB 2.0 port, an SD card reader (a welcomed addition that seems to emerge more often with the newest routers) and a Power connector. I also have noticed that each set of two omni-directional antennas is labelled accordingly (2.4 and 5GHz) and that the connectors differ: male for the 2.4GHz antennas and female connectors for the 5GHz antennas.
Hardware
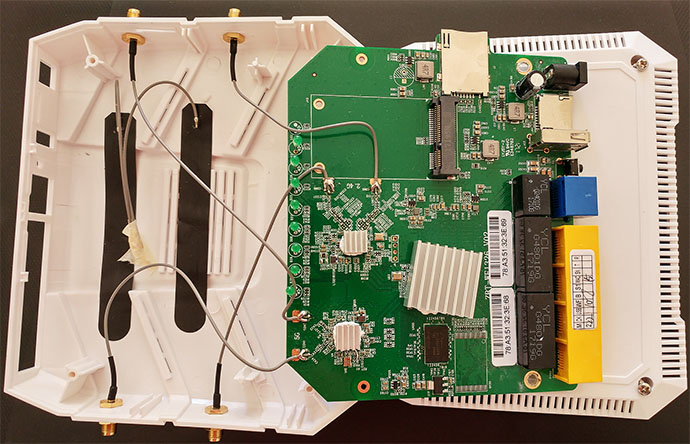
Once I opened the case, I noticed that almost all the important chips are covered by a small heat sink (and with thermal paste), so I couldn’t find out what specific pieces were inside the pcWRT. Still, I could make out what appears to be 4Gb CMOS DDR3 SDRAM SK Hynix H57Q4G63AFR-PBC along with 2x YCL G4801DG 1719G and one YCL G2401DG 1710G Ethernet connectors and transformers.
Note: The pcWRT is an AC1200-class router, so it features a maximum theoretical data transfer rate of 300 Mbps using the 2.4GHz band and a maximum theoretical data transfer rate of 900 Mbps using the 5GHz band.
pcWRT: Software and Features
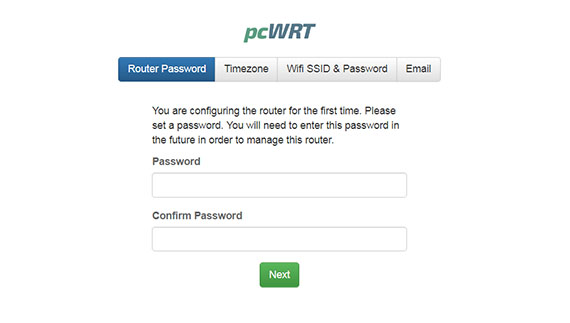
The pcWRT offers only one way to run the initial configuration wizard: by using the web-based interface since, at the moment of writing, it lacks a mobile app (despite this, you can still monitor your network remotely using the dedicated Cloud services). To start the quick setup process, you need to connect the pcWRT to a power source and to a modem, open a browser page and go to 192.168.10.1 to access the interface. From here on, you’ll need to set a new Router Password, select the correct TimeZone, insert the WiFi SSIDs and Password for each of the two bands and lastly, insert a valid email. This four steps will give you access to the full pcWRT interface where you’ll need to configure the network settings if you want access to the Internet. To do so, to go to Settings, Internet, choose the suitable Protocol (in my case it was PPPoE) and insert the ISP provided user name and password.
Note: The router that I’m using has the pcWRT TORONTO-AC v1.27.1 v2.0.5 firmware version – there is rollback available!
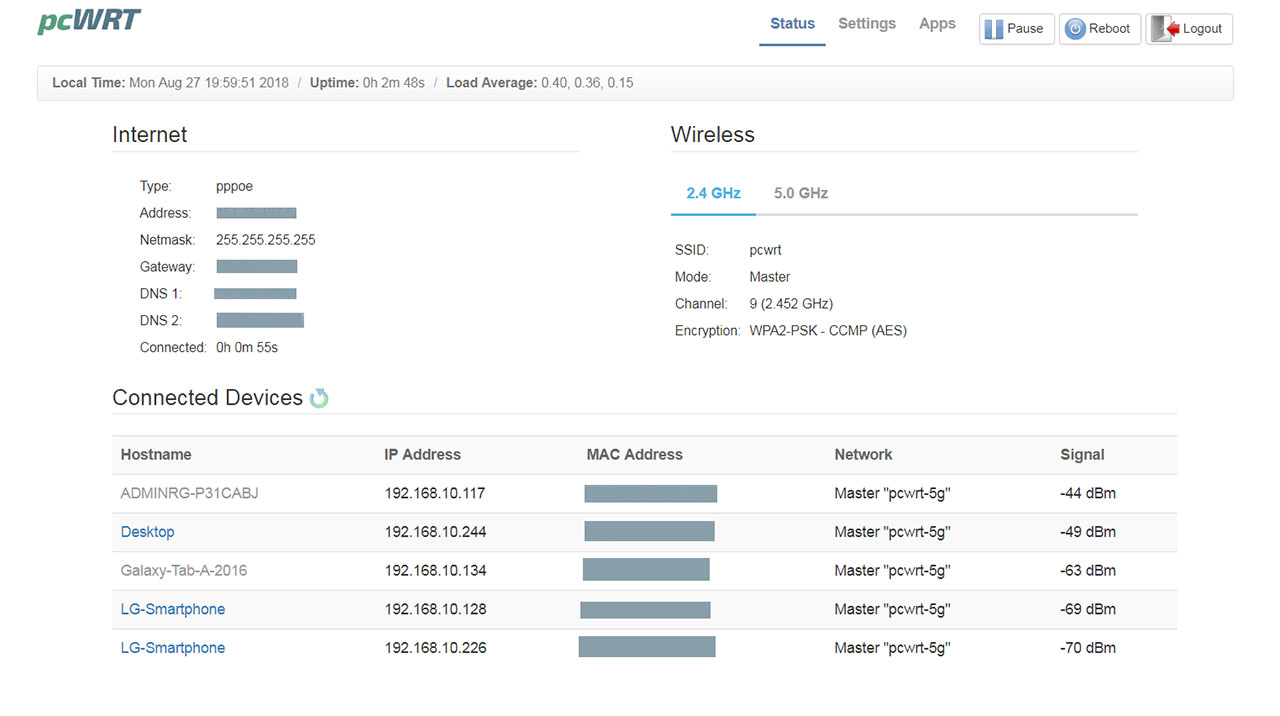
The UI lacks any fancy tabs or futuristic design, but the sections are laid out properly, so it’s pretty easy to navigate without being assaulted by lots of options and settings. The first page that you’re going to see is the Status page which shows some details about the Internet connection, the two Wireless networks and all the Connected Devices, each displaying the IP and MAC address, as well as the SSID to which they’re connected and the Signal strength. You will also notice that every connected device has a Hostname which, when clicked, it allows you to change it to something more easily identifiable.
It is advisable to do so with every connected device because it is a requirement if you want to use the Parental Controls on each of them. The next section consists of the Settings, where you can see five separate tabs: Internet, Network, Wireless, Cloud and System. The Cloud allows you to set a user name and password in order to register for a Remote Management account, so you can access your home network from anywhere in the world (where there’s an Internet connection) – you can also bind a specific port in case you are connected behind a different router.
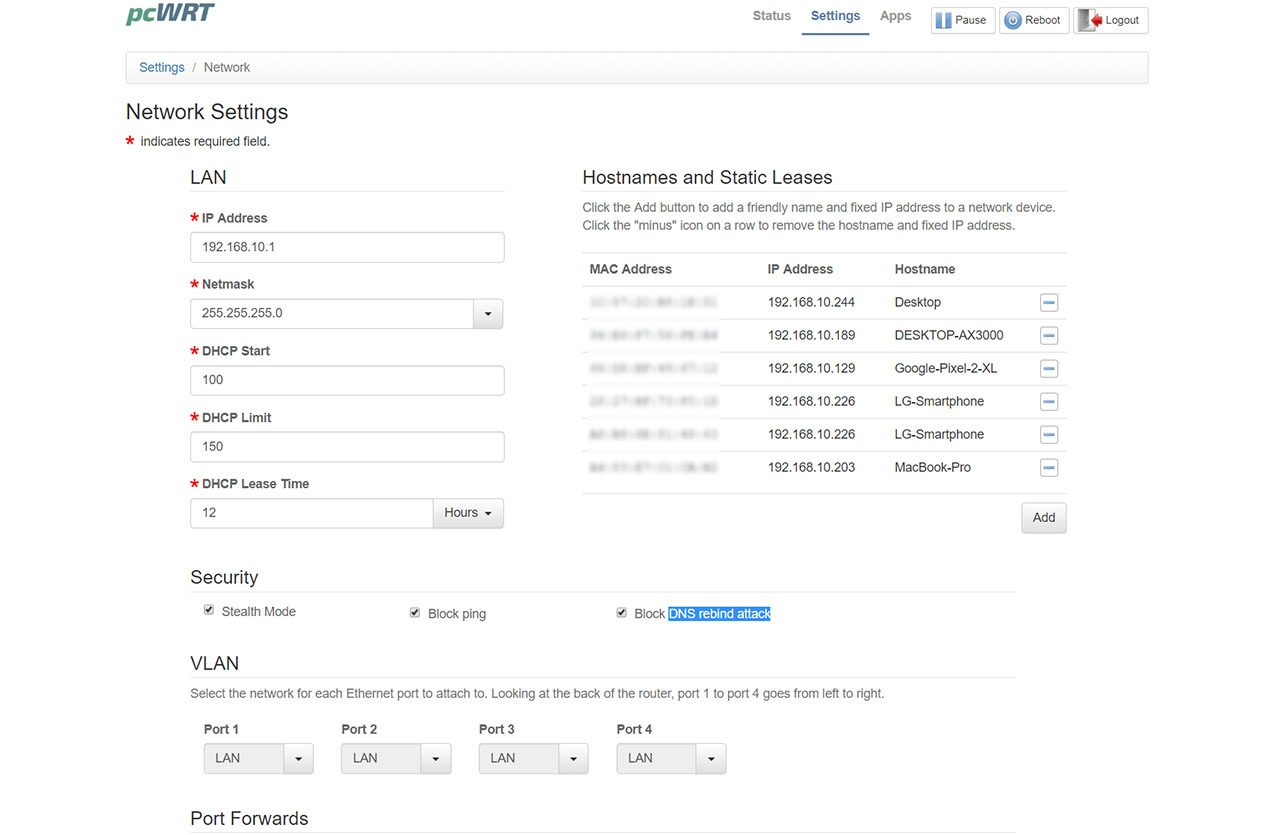
The Internet Settings allows you to set up your Internet connection (you can choose between Static address, DHCP client, Unmanaged, PPP, PPtp, PPPoE and PPPoATM), while the Network settings offer a lot more advanced settings, such as setting a DHCP Start, Limit and Lease Time (under LAN), Enable Stealth Mode, Block ping (both of these options should isolate your router from responding to any outside attempt of detection) and Block DNS rebind attack (under Security), add Port Forwards and Static Routes and configure a VLAN (this is extremely important if you use any smart IoT device that requires a constant connection through a specific a port in order to communicate with the manufacturer servers – therefore making the entire network vulnerable); in this section, you can also view any devices you have named and remove them (it just removes the name and it allows you to rename them again, if you want).
If you visit the System page, you can configure some General options (such as the NTP servers or the TimeZone), add a host name to IP addresses manually, insert SSH Keys, enable Notifications, Restore the router to Factory default settings, perform a Backup or Restore a Backup; you can also update to the latest Firmware.
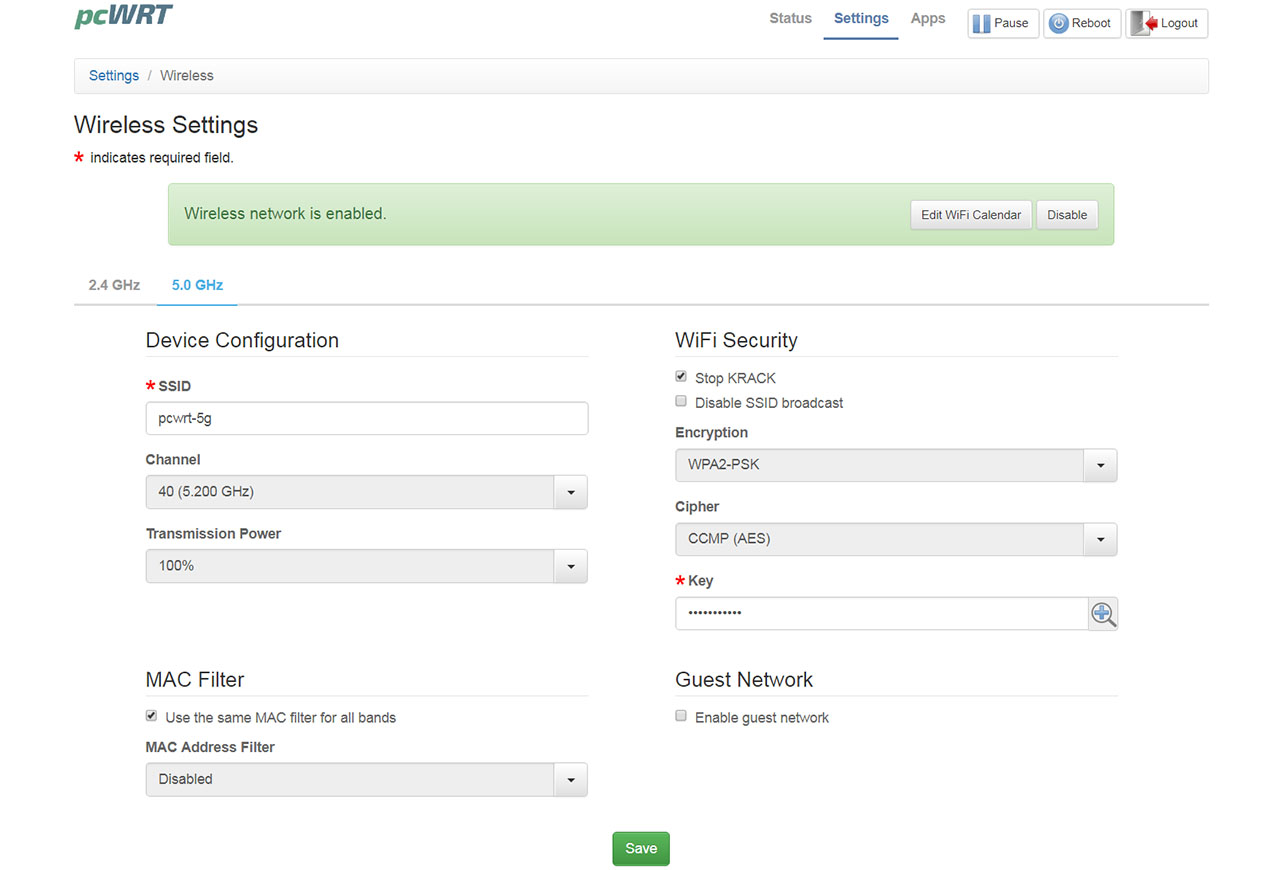
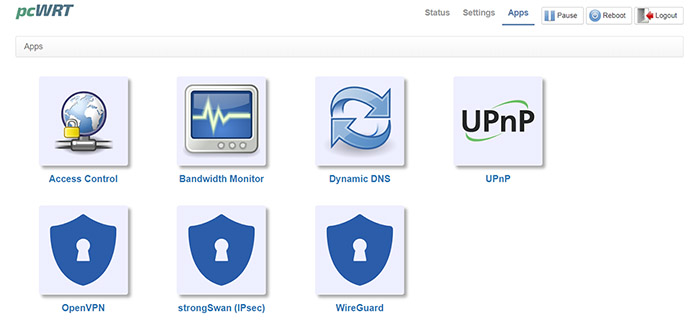
The Wireless Settings allows you to change the SSID or Key, select the Channel and the Transmission Power, enable MAC Address Filter, change the Encryption, Disable the SSID broadcast, enable Stop Krack and enable the Guest Network. The third main section is the Apps which consists of the four old sub-sections: Access Control, Bandwidth Monitor, Dynamic DNS and UPnP, as well as three new tabs: OpenVPN, strongSwan (IPsec) and WireGuard. One of the most important aspect of this router (and its raison d’etre) is the Access Control which allows the user to create a personalized configuration for how the clients (usually devices used by kids) get access to the Internet.
Considering the fact that the main audience is going to be parents that most likely won’t have advanced technical knowledge, they may be intimidated by lots of options and settings which may or my not mean something to them and that’s why having simple preset modes with various degrees of access limitation and security could be better for the general public.
Still, even if it didn’t go the minimalist route, the Access Control section should be reasonably clear for most users, regardless if they’re tech-savvy or not: you’re going to see three main areas, the first is the Messages, where you can see the default message that will appear on your browser when you try to access a blocked URL or a closed site (you can change these messages), the second area is the Proxy Server, which allows you to Enable authenticating proxy server. This is a more advanced feature that’s suitable for when you and another user (a child) share the same computer, so, in case you don’t want to be limited by the Parental Controls, you can create a proxy user and link it to a different Profile and configure the browser to use the authenticating proxy you’ve just created – once again, this is not necessary for the regular user, but it is a great feature to have in case you do need it. The third area is the Profiles which has a Default user profile and it allows you to create a new one for every device (or set of devices) – I would leave the Default profile with unlimited access and set it for the devices that you use (the admin) and create a new profile for your kids.

To do so, you will be asked to select the preferred DNS Servers: you can choose between the System Default (basically uses the DNS servers that can be seen on the Status page), the OpenDNS Family Shield (so far, this seems to be the most suitable option), CleanBrowsing Family Filter (there is also the Safe variant available), Yandex Family, CloudFlare DNS, QUAD9, Google Public DNS or Custom Setting – it used to have support for the Norton ConnectSafe, but the DNS has been since shut down, so it’s no longer available. On the right side, you can choose to enable Ad Block (it does a really great job at blocking ads on every connected devices, yes, even on Android mobile devices!), enable the Access Control (this should be a default if you want to use the Parental Controls), enable Safe search (it uses the child-safe search for Google and Bing), Block literal IP addresses (useful if your child tries to access a website by its IP address and not by the domain name), Block proxy, VPN and TOR.
The last section has been really interesting because I know that a lot of parents have a lot of trouble keeping their children from bypassing the Parental Control since the kids either use a portable version of TOR put on a USB flash drive or use unblocking websites. The pcWRT has done a great job at blocking the access to TOR (both installed or portable), I could not access forbidden websites even if I changed the DNS servers locally (DNS overriding blocking is always enabled) and I did check some popular unblocking pages and I got the same message every time: The requested URL is blocked on this network. So yes, your children will have to accept that some websites are out-of-bound on your home network. Furthermore, the Access Control page also allows you to add Blocked URLs and Allowed URLs manually (if you have an URL that may fall into some categories that are blocked, but you need to access it regardless) and you can also create schedules for the Internet access using the Calendars: either manually insert the hours when the devices that use that specific profile can access the Internet using the Text section or by dragging the label in the Graphics tab.
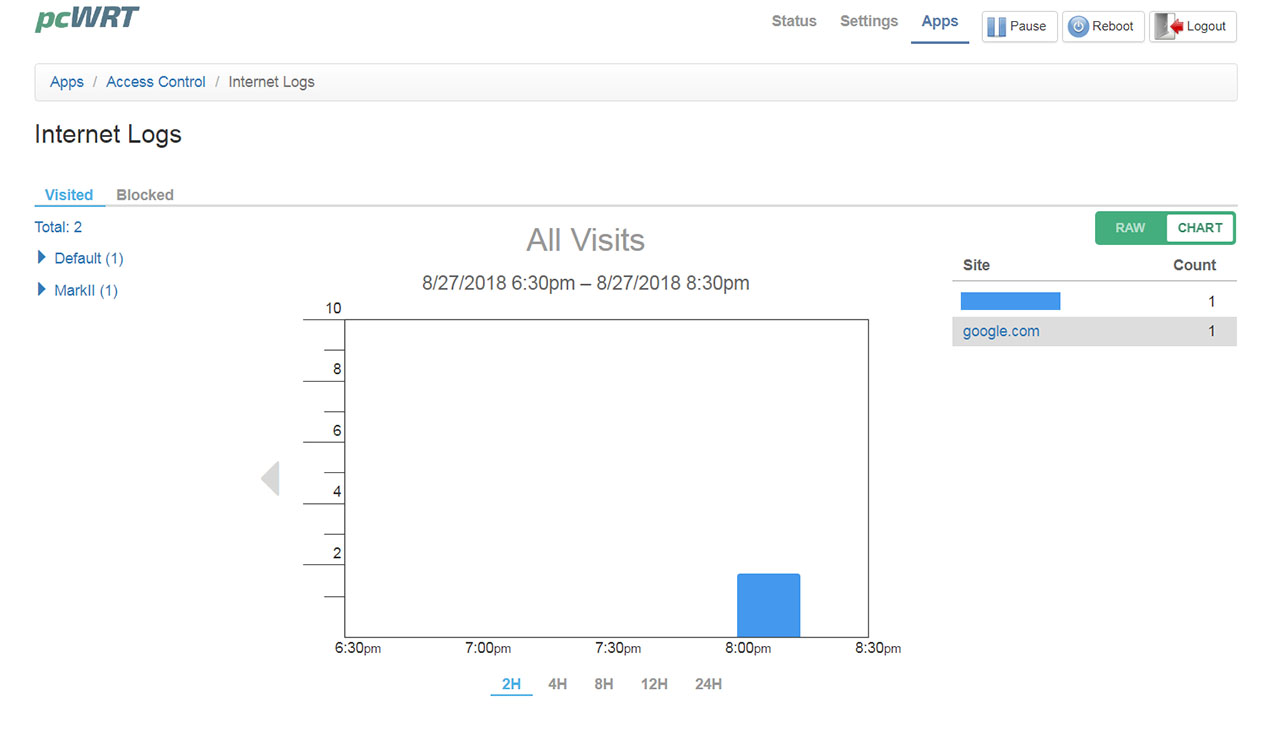
The most important step after you have set the profile is to add Devices (on the bottom right) – you will be able to add only the devices that have been given a name in the Status page (that we discussed previously). When you’re done, click Save and the Profile settings should be applied to all the devices in a matter of seconds. Also on the Access Control page, near the title, you’ll notice the View Logs link which, when clicked will summon a graphical view of the Internet logs either in Raw format or in Chart: here, you can see all the websites you have visited, the Domain Details, the user that accessed the specific website, the port used, the time of the visit and all the blocked websites that the users tried to access – this is a fantastic tool to get a comprehensive view of all the network activities, as well as all the connections to the Internet (this includes traffic from the IoT devices – which is usually an interesting read).
Besides the Access Control, the user can also visit the Bandwidth Monitor, which shows the Total Download and Upload by each devices up to 24 hours, configure the Dynamic DNS or configure the UPnP Settings.
Note: It’s worth mentioning that unlike other similar Parental Controls devices (or wireless routers that have a similar set of options), the pcWRT does not require a monthly subscription.
The major update consists of the addition of OpenVPN, StrongSWAN (IKEv2) and WireGuard and this is a big deal not only because OpenVPN is so well supported and is now popping up on far more expensive hardware, but also because WireGuard is getting more widespread and it does seem to be better than OpenVPN in terms of speed and security. Why go with three options instead of one you may ask, well, first of all, there are never too many options and secondly, if one protocol gets blocked by some firewall, you can just use another one. It is well known that the VPNs are very taxing on the router hardware and one of the few to maintain a reasonable throughput is the RT-AC86U, but is the pcWRT hardware enough? Unfortunately, you will see a severe degradation when using OpenVPN – it seems like both the IKEv2 and especially WireGuard will help deliver a better throughput.
Note: The manufacturer has added detailed guides on how to set up each of the three available VPNs.
Performance
In order to test the wireless performance of the pcWRT, I took two computers, one is a laptop which gets connected to the router using a 1Gbps cable (it will act as the server), while the second computer is equipped with an Asus PCE-AC68 WiFi adapter (it will act as the client). This way, I could test the wireless speed performance of the router at various spots inside the home (from the client to the server and vice-versa).
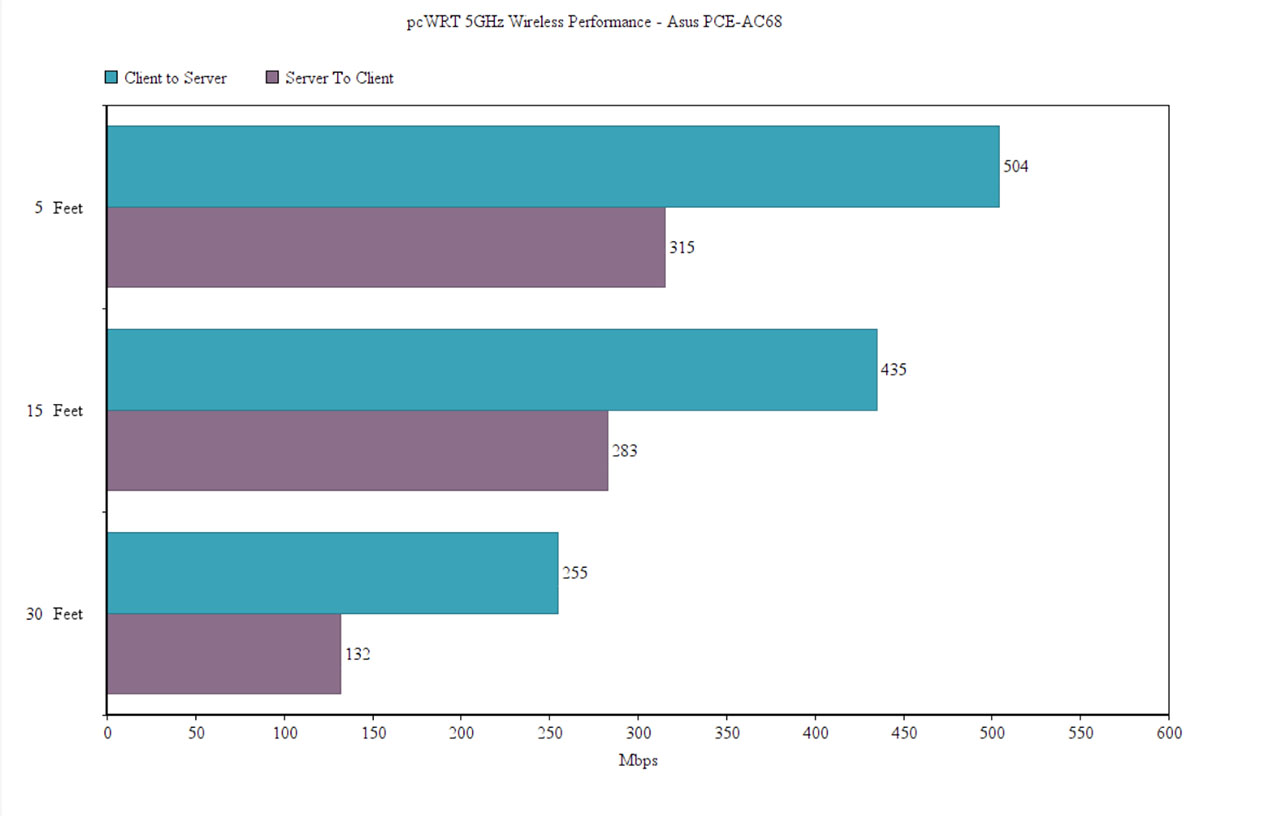
First, I connected both clients to the 5GHz network (using the 802.11ac standard), I set the channel to 40 and disabled any additional applications to reduce the overhead: testing the performance from the client to the server, I managed to measure an average of 504 Mbps, 5 feet away from the router, while at 15 feet, the speed went slightly down to 435 Mbps, but it did experience a steeper dive to 255 Mbps at 30 feet. From the server to the client, things were a bit different as I was able to measure an average of 315 Mbps, while at 15 feet, the speed remained more consistent and I could measure an average of 283 Mbps, but at 30 feet, once again, the signal dropped considerably and the speed went down to an average of 132 Mbps.
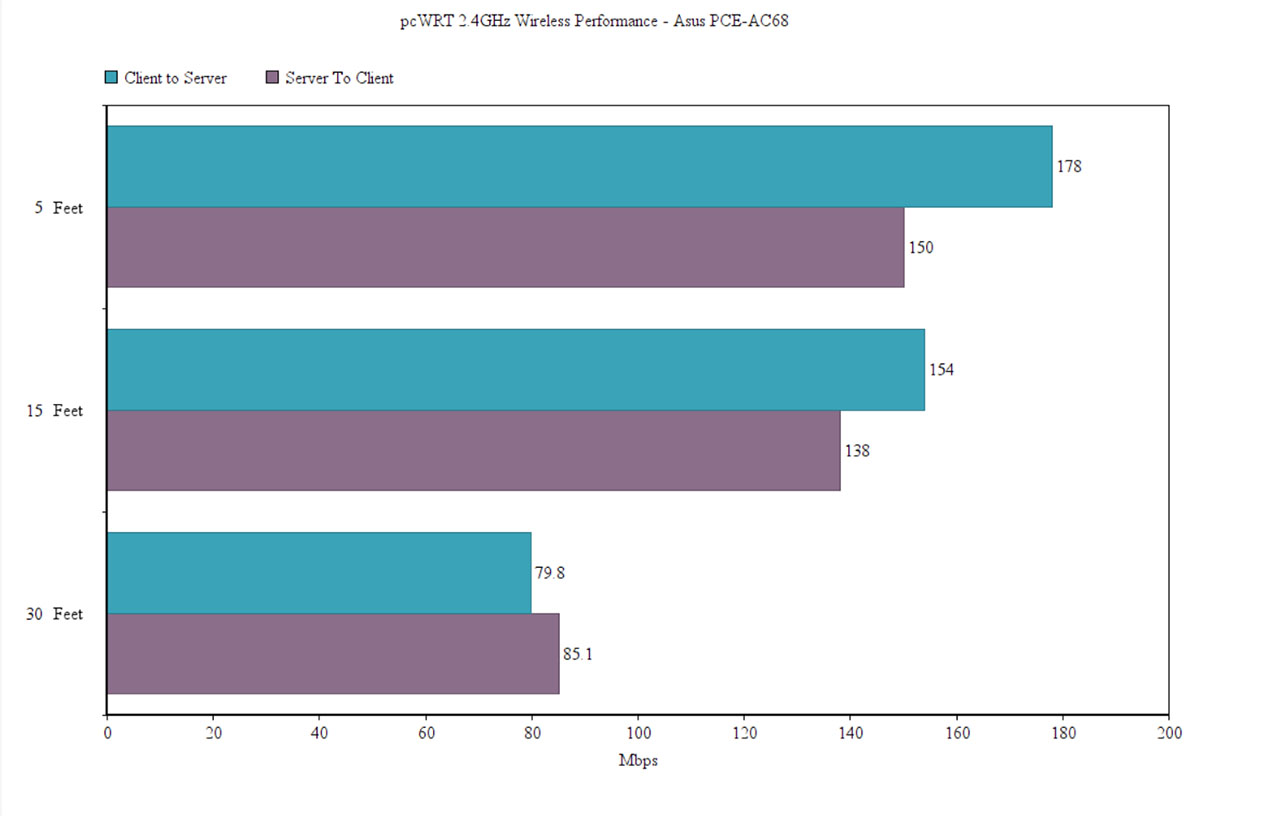
Next, I connected the clients to the 2.4GHz network (the 802.11n standard) and I set the channel to 6: on the first step, I tested the speed performance from the client to the server and I measured an average of 178 Mbps at 5 feet and an average of 154 Mbps at 15 feet; at 30 feet, the speed went down to 79.8 Mbps. On the next step, I tested the server to client performance and I measured an average of 150 Mbps at 5 feet, while at 15 feet, the speed went slightly down to 138 Mbps; at 30 feet, I measured an average of 85.1 Mbps.
The pcWRT doesn’t use some of the more common 802.11ac Wave 2 advanced features, such as the MU-MIMO technology, the BeamForming or the addition of 160 MHz channels, but considering the price point, the above-average wireless performance and the targeted audience, the pcWRT doesn’t really need to in its current form (there is a limited amount of devices that can take advantage of those technologies, anyway).
Conclusion
The pcWRT was created to cater the needs of the parents that require a reliable way to control their children’s access to the Internet and it does its job perfectly – you get a high degree of customization and a very low chance that your children will be able to bypass the filters (unless they’re really tech-savvy, at which point, there’s not much that you can really do). Add the more-than-decent wireless performance, the protection from the dangers of the IoT devices and the reasonable price tag and we get a well-balanced device. Sure enough, it’s not perfect and some things can be made better with future instalments: such as the mildly complicated configuration process for the regular user and, perhaps the traditional arachnoid look (especially when put next the less powerful, but better designed devices from the competition, such as the Circle with Disney), but I’m just being picky at this point.
pcWRT
Pros
- Solid, Comprehensive Parental Controls
- OpenVPN, StrongSWAN (IKEv2) and WireGuard
- Good Wireless Performance
- Offers A High Degree Of Customization
- Fast Set up Process
Cons
- It Can Seem Intimidating For The Parents That Lack Technical Knowledge
- The USB Port Is Not Enabled
Mark is a graduate in Computer Science, having gathered valuable experience over the years working in IT as a programmer. Mark is also the main tech writer for MBReviews.com, covering not only his passion, the networking devices, but also other cool electronic gadgets that you may find useful for your every day life.