
Ever since the not-for-profit Foundation made available the more powerful RPi 4 models, I knew that a Raspberry Pi router was only around the corner and here it is, in the form of the Mini Router from Seeed. It is, of course, a slightly stripped-down version of the RPi 4 B and, being a Compute Module, it does need a carrier board.
| Seeed Mini Router | |
|---|---|
| SeeedStudio.com | Check Product |
This does mean that there is room for upgrades, so you can use whichever type of carrier board you like (the Mini Router will offer a couple of Gigabit Ethernet ports and two USB 3.0 ports). There is WiFi, although Seeed does not mention it in the characteristics list and yes, it uses both the 2.4GHz and the 5GHz radio bands, as well as Bluetooth. I would still suggest using an external wireless access point if you need to give WiFi access to your devices. It’s interesting to see that the Mini Router comes with OpenWRT already installed, so it wants to mimic the role of security gateways more so than the usual wireless router.
And truth be told, you can get a decent WiFi 6 router for a similar price tag to the Mini Router. At the same time, the point of a Raspberry Pi router is to provide a better software flexibility and a more modular hardware at a decent price tag. But things can get very complicated very quickly especially if the manufacturer has no prior experience with networking devices. So, let’s check the Mini Router to see if Seeed Studios has managed to build a decently performing Raspberry Pi router or if it’s wiser to keep using the (usually) closed-source popular routers.
Design and Build Quality
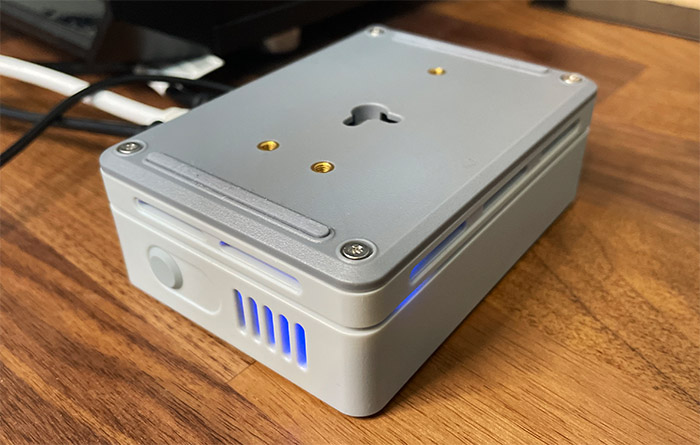
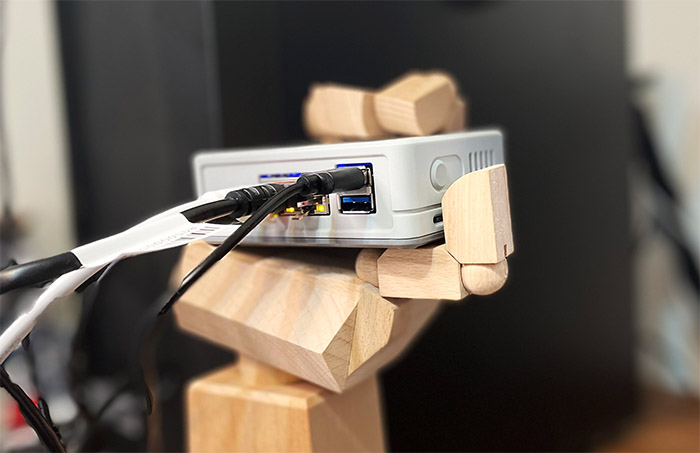
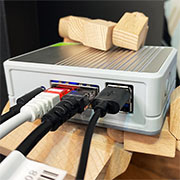
The Seeed Mini Router is without a doubt one of the most compact networking devices that I have seen so far and, at its 3.0 x 2.5 x 0.8 inches (7.5 x 6.4 x 2.1 cm), it’s more closely sized to the portable mini routers. And the design is also closely related to them considering that we’re dealing with a rectangular case mostly made of plastic with the exception of the metallic top which has the role of moving the heat outwards from the chips.
I have opened the case and I did see that the focus was towards conducting the heat only from the Broadcom BCM2711 SoC to the top of the case.
There are some ventilation cut-outs on the sides and towards the bottom which are fairly efficient for the heat management. A fan could have been an interesting choice, such as the 52PI Ice Tower and I’m sure people that like customizing their devices will rejoice at the prospect, while the rest of the users simply want a functional networking device. Still, be aware that the BCM2711 will start throttling to keep the temperature below 185 degrees F (85 degrees C). In terms of positioning, due to the small footprint, you have the option to put the Mini Router anywhere in your room and I did like that it’s fairly heavy (weighs 1.5oz), ensuring that it sits into place when there are multiple cables connected at the same time.
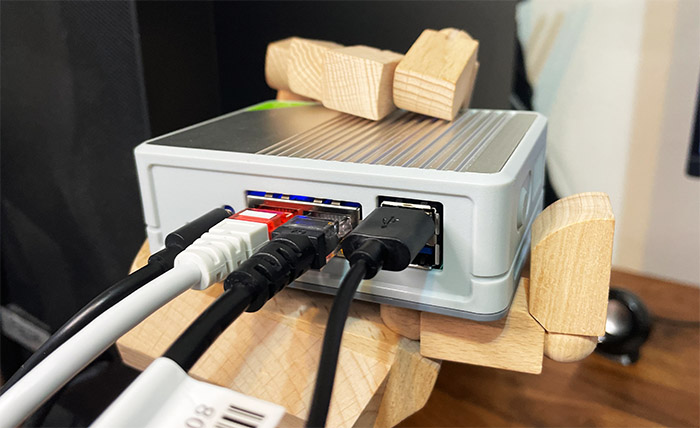
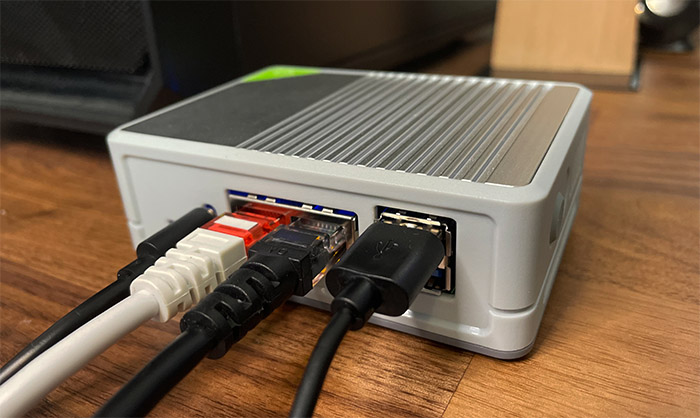
Additionally, there are two silicone feet that also help with keeping the device into place – even so, depending on the type of cables, it may still move around due to its small size. In terms of ports, there are two Gigabit Ethernet ports which can be configured from the software and there are also two USB type-A ports which can be used to add external storage devices. Furthermore, I saw a USB-C port to which you can connect the provided power cable and it is a bit weirdly positioned, so it is possible to break if you’re not careful when connecting or disconnecting the power cable. There’s also a micro HDMI port which is something that you don’t usually find on routers, so it’s a unique characteristic gifted by the RPi ecosystem (it does support 4K resolution and up to 60Hz refresh rate).
Funny enough, there is also a hidden Reset button which can’t be accessed from outside the case, you will need to open up the Mini Router and reset it from there. Lastly, I need to mention the presence of the microSD card slot which should allow the user to load an external OS, but, apparently SD card boot is not supported with the eMMC CM4. So, if you need to make any changes, it needs to be done from within the software itself which is sensible, if it works properly. And I have encountered lots of bugs while trying to do so, but it’s fixable.
Internal Hardware
The tear-down process of the Seeed Mini Router is incredibly simple, as expected. After removing the four screws, I could see the Raspberry Pi CM4 that is attached to a carrier board which, in turn is also connected to a third board that has no circuits and it is there only as a means to keep the carrier board from touching the bottom of the plastic case. This way, I could identify the main components from the Compute Module 4.
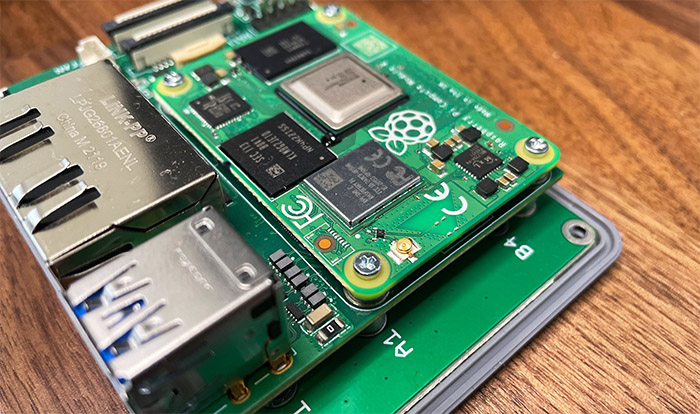
First, there’s the quad-core Broadcom BCM2711 2711ZPKFSB06C0T SoC (Cortex-A72 ARM v8 64-bit) clocked at 1.5GHz, then there’s 32GB eMMC 5.1 of storage from Samsung (SEC 113 B041 KLMBG2JETD), 4GB of RAM from Samsung (SEC 107 K4FBE3D), a Broadcom BCM54210PE switch chip and a MXL7704-P4 five output Universal PMIC. The Compute Module 4 does come with a wireless module which is based on the single-chip Cypress CYW43455 and yes, there are two bands, the 2.4GHz IEEE 802.11a/b/g/n and the 5GHz IEEE 802.11 b/g/n/ac. Additionally, there is support for Bluetooth 5.0 and BLE. It was interesting to see that besides the onboard antenna, there is an external antenna available which can be used for improving the WiFi connection.
| Seeed Mini Router | |
| CPU | quad-core 1.5GHz Broadcom BCM2711 |
| RAM | 4GB Samsung SEC 107 K4FBE3D) |
| Storage | 32GB eMMC Samsung SEC 113 B041 KLMBG2JETD |
| Switch | Broadcom BCM54210PE |
| 5GHz Radio | Cypress CYW43455 802.11a/n/ac |
| 2.4GHz Radio | Cypress CYW43455 802.11b/g/n |
Going forward to the two Ethernet ports, it seems that the left one is connected to the aforementioned BCM54210PE PHY from the CM4, while the second one relies on a Gigabit Ethernet Bridge. To be more specific, the port is connected to the LAN7800 USB 3.0 to GbE controller, with the USB 3.0 interface being extended from the PCIe interface found on the CM4. This is not really the ideal way of doing things since it needlessly goes through the USB controller, adding more overhead and most likely having an impact on the bandwidth. They’re not really coerced to go this route considering that I saw a different approach on the DFRobot (which had the LAN directly attached to the PCIe), which is another Pi router and, currently, perhaps the only proper competitor to the Seeed Mini Router.
Software and Configuration
The Seeed Mini Router comes with the OpenWRT software pre-installed, so you don’t have to go through the trouble of flashing the image on a microSD card and installing it on the device yourself. I know most users will appreciate this approach and truth be told, this needs to be the norm with any device that wants to compete with the existing routers on the market. So, after taking the Mini Router from the package, you need to connect the power cable and wait until the inner LEDs shine through the openings of the case.
Now it is a good time to take two Ethernet cables (there is none provided in the box) and connect one to your modem and the other to a client device (laptop, PC). You should see the two LEDs for each port light up (the first will flash when data is transmitted) and, to access the GUI, enter the default IP address (192.168.2.1) in the URL of any browser. You will then be greeted by a page that requires the username and password – leave everything by default: root and no password. And then you will be asked to change the password.
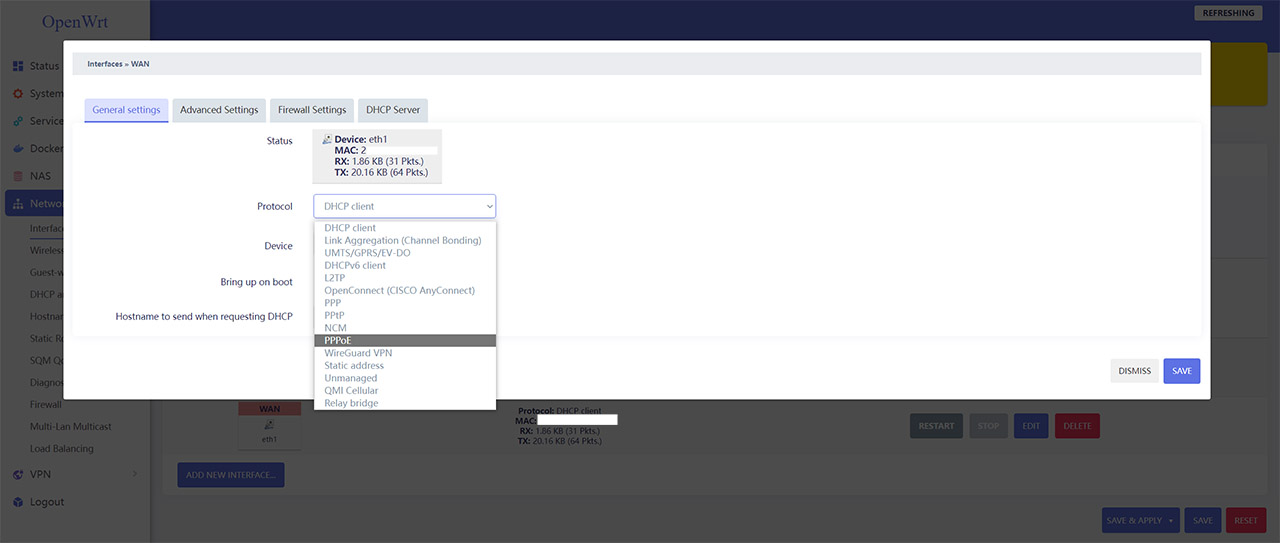
I was unable to make any changes to the configuration until I set up the Interfaces and, after going to Network > Interfaces, OpenWRT auto-configured the type of connections to the ports and I got the Docker, the LAN with a static address, the VPN0 and WAN which got assigned the eth1 port. I clicked on edit on the last one and I saw that it was set as DHCP by default, so I changed it to PPPoE – after adding the ISP-provided credentials, I gained access to the Internet. Next, I went to System > Administration > Router Password and added a strong password for the root account. Of course, besides the LuCI web interface, you can use SSH to both log into OpenWRT and to configure it, but, once again, this is an article from the optics of the fairly regular user, with only some technical know-how.
I won’t go into too much detail about the OpenWRT (since it is very feature-rich and warrants a separate article), but it’s worth mentioning that the GUI will allow you to check the Status of the network, set up a VPN connection (N2N v2 and SoftEther) and, under System, you can see and add new Software packages, configure the behavior of the LEDs, generate a Backup and more.
There is a huge number of Software packages available and I have seen something similar on the Synology routers, and it was an interesting way to add various functions that would not otherwise be possible to have on a regular router.
Under Services, there are a few commonly found features, but most of them, you will not find on the usual wireless router from the market. Sure, there’s DDNS, Bandwidth Monitor, File Assistant and Network Shares, but, OpenWRT will also offer you the V2Ray VPN, the option to schedule when to slow down external HDDs, to run the Nps, the MWAN3 Helper, the ShairPlay and more. The NAS section is far more comprehensive than the storage settings from other routers and it will include Rclone and qBittorent. And under Network, you can configure the Interfaces, set up the Wireless network/s, as well as the Guest WiFi, set Static Routes, configure the Smart Queue Management, the Firewall and, if you like to go more in-depth you get the option to set the Multi-LAN Multicast and Load Balancing. Lastly, it’s worth mentioning the Docker and it allows you to run various available containers.
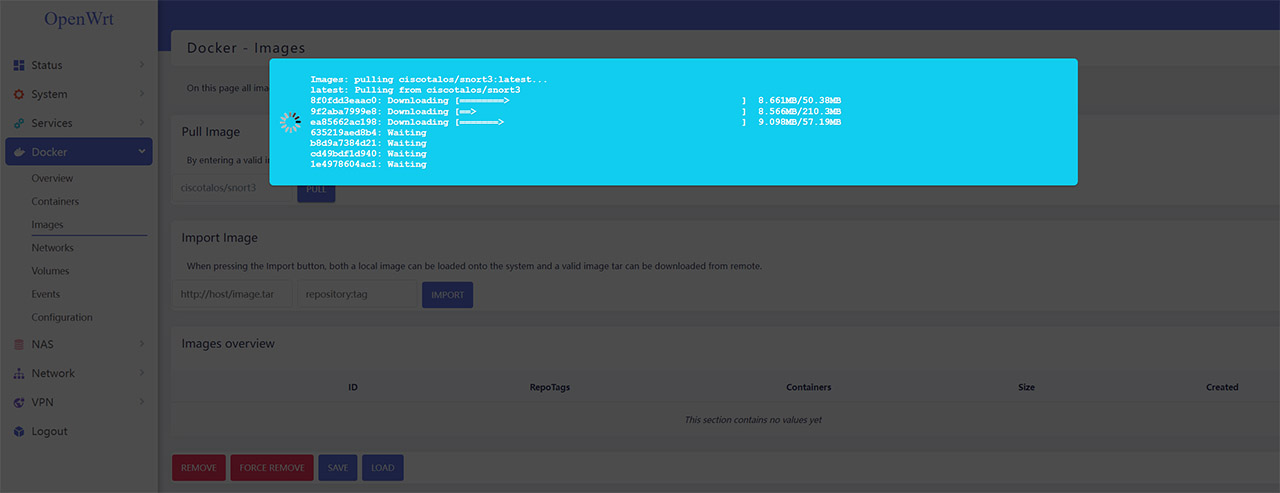
Of course, the OpenWRT has a way vaster number of applications available and yes, the hardware is more than enough to handle a large number of programs. For example, if you want to use SNORT then go to Docker > Images and enter ciscotalos/snort3 in the Pull Image section and click on Pull. Wait until the download is complete and then you need to go into Container and add a new one for the SNORT image.
Testing and Performance
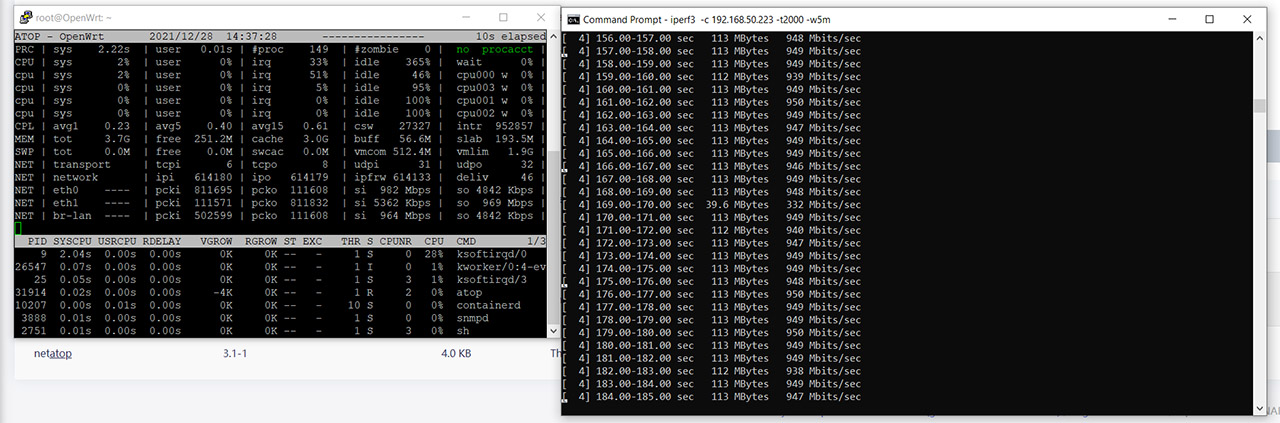
I know that Jeff Geerling tested the Seeed Mini router a few months ago and had some trouble with it since it wouldn’t go close to 1Gbps, so I decided to run a similar throughput test to see if the manufacturer has made any significant changes since then. For this test, I used two computers, one directly connected to the LAN port of the Mini Router (I chose to use the right Ethernet port) and the other was connected to an Asus RT-AX82U router which, in turn was connected to the Seeed router. This way, upstream, I saw that the Mini Router did really well and in the 1-hour-long graph, you can see that there are occasional hiccups, but the throughput remained close to 1Gbps for the most part, amounting to an average of 941Mbps.

Downstream, the performance was very similar, which means that I saw an average of 943Mbps. So yes, Seeed has made some improvements to the way the Mini Router works, despite a fairly strange board design choice. I did not have a Gigabit Internet connection available when I tested the router, so I decided to rely on the atop utility (as Jeff did) to check if the improvements were only on the surface, to rig the iperf test. Atop shows that the CPU is not overloaded and most of the time, it will sit below 10%. There are some occasional spikes that can go slightly above 30%, which will also coincide to a slight drop in throughput, so things seem to have truly improved.
On the next step, I wanted to check the wireless performance as well and, after going to Network > Wireless, I saw that the Mini Router uses what it calls the Generic MAC80211 802.11nac radio (the actual chip is Cypress CYW43455).
After quickly setting up a new wireless network (80MHz, 5GHz), I merrily checked the list of available WiFi networks on my PC. And.. my OpenWRT network was nowhere to be found. I went back to the GUI and surprise, the ‘Device is not active’ message pops up. I reboot the Mini Router and check again: all was good, so I went to the list and once again, the SSID was not broadcasted.
A few minutes later and the radio falls back on its face. After a few minutes that turned into hours of installing various packages, nothing seems to work, so yes, the built-in WiFi is unusable and even if by some magic someone does make it work, it is very unstable and the dreaded message that the ‘Device is not active’ is going to pop up at least once a day. And that’s not good for a router. There is the better option of adding an external access point and if you want WiFi with the Mini Router, you don’t really have a choice at this point (perhaps with future firmware releases, things will get better with OpenWRT). After this misadventure, I decided to try and check the storage performance of the Mini Router and I connected an external drive (the WD My Passport SSD) to one of the USB ports.
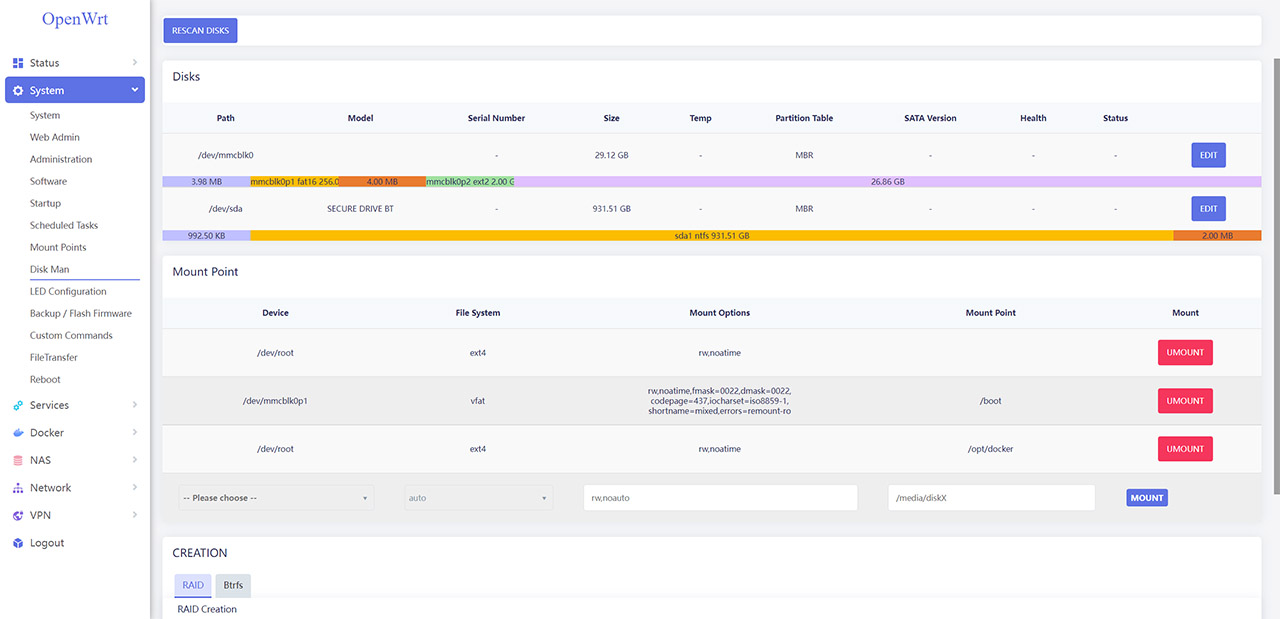
I checked the Mount Points and I got an error (here we go again), but I could see that the disk was indeed mounted on the Disk Man section – I also checked using SSH (Putty) which again, confirmed that everything was in order. I quickly set up a Shared Directory (under Service > Network Shares) and left the test for the next day. That was a bad move because in the morning, OpenWRT refused to allow me to make any changes to the Shared Directory, continuously giving me ‘Unspecified error’ when trying to save. So I went again the SSH route and tried to change the directory and it worked, once. Because after rebooting, the ‘uci show sambashare’ did not work anymore. After running e2fsck, I was finally able to mount the drive and see it in the Network section. I quickly moved a 3GB multimedia folder between the Mini Router and a computer. The write speed was 32MBps (it started great, at about 100MBps, but quickly feel after a few seconds) and the read speed was a constant 28MBps.
Conclusion
The Seeed Mini Router is an ambitious little device which definitely has the potential to replace the security gateways and even the mainstream router if you’re willing to use an external wireless access point along with it. I did like that the throughput can reach close to 1Gbps (which was an issue a few months ago – it has been fixed since then) and the OpenWRT does have lots and lots of options that you can use. You can also install new packages for extra features. But, I need to mention that I have also encountered a lot of bugs, some so severe that broke essential features, such as the Samba server. Nothing that can’t be fixed, but it just shows that the Mini Router, despite having some interesting approaches (the pre-installed firmware) is still fairly difficult to use and requires quite a bit technical know-how. So most users will still be intimidated by a Raspberry Pi router and for good reason – it’s still too complicated. But, if tinkering with devices is your passion, then you should definitely give the Seeed Mini Router a chance.
Seeed Mini Router
-
Pros
- Close-to-Gigabit LAN performance
- Compact case
- Two USB ports
- Decent USB storage performance
- OpenWRT
Cons
- I have encountered lots of bugs
- Couldn't make use of WiFi
- Can't easily access the Reset button
Mark is a graduate in Computer Science, having gathered valuable experience over the years working in IT as a programmer. Mark is also the main tech writer for MBReviews.com, covering not only his passion, the networking devices, but also other cool electronic gadgets that you may find useful for your every day life.