
The Selpic P1 is advertised as being the world’s most portable handheld printer and no, I’m not talking about a rectangular backpack-friendly polaroid printer, instead, the P1 is designed to print various shapes and fonts on pretty much any type of surface and the device itself is not larger than a highlighter. Of course, this is not the first manufacturer to make such a bold claim and many portable printers have issues with leaving smudges behind (especially when printed on hard surfaces), but this is not Selpic’s first rodeo with this type of devices and both its previous models, the S1 and the S1 Plus relied on a quick drying ink to make sure that you can’t wipe the print with your bare finger. And indeed, it worked really well on its predecessors, so the Selpic P1 uses the same approach to make sure that the ink quickly adheres to the surface and doesn’t smudge.
Furthermore, I am quite surprised that Selpic managed to keep the P1 so compact (the S1 is many times larger) and the manufacturer says that you should be able to print non-stop for about 3 hours before the internal battery gives up and yes, the cartridges are proprietary (it’s the standard practice in this industry). There is no multi-color cartridge though since, at their size, it’s going to be one color per ink cartridge – since it’s smaller, I assume it’s going to cost less than the ones available for the S1 and S1+.
That being said, there really aren’t many devices of this type on the market (it’s no wonder that it got such traction on Indiegogo), so let’s have a look and see if the Selpic P1 indeed works as advertised and if it can be considered one of the pioneers of a new niche of products.
Design and Build Quality
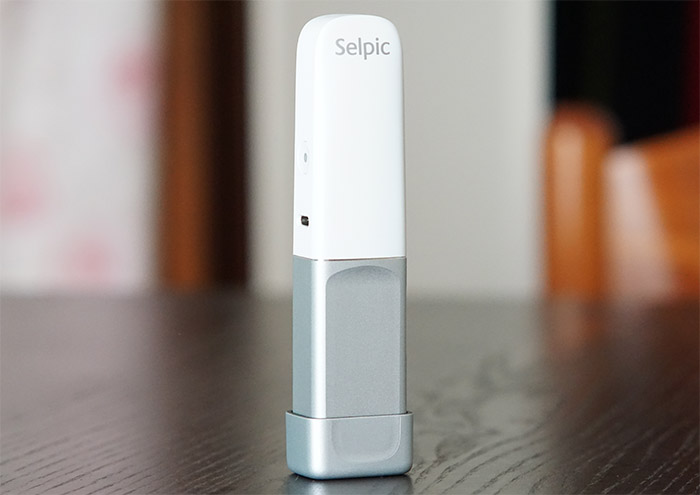
The Selpic S1 and S1 Plus were small plastic boxes that you would move on a specific surface with the help of four guiding wheels and the concept is very similar on the Selpic P1 as well, but the case has suffered some major transformations. Instead of the rectangular body that could fit in your palm (it measured 1.5 x 4.3 x 4.7 inches), the P1 is far more compact, measuring only 5.12 x 1.22 x 0.94 inches (height x length x width), so it’s not taller than a pencil and its shape closely resembles that of a highlighting marker. And Selpic has achieved the intended result since this type of design will allow you to easily move the device just like you would with a pencil (you may need s steady hand if the surface is uneven). But is it truly the world’s most portable handheld printer? It may very well be, but let’s not forget that there are other similarly-designed devices that seem to function in the same manner (the Evebot PrintPen) which are just as compact as the Selpic P1.
So, it may not be the smallest, but it’s definitely very comfortable to hold thanks to its rounded corners and weight (it weighs 0.4 lbs) and due to the way it was designed, it can definitely be carried in the pocket of your jeans or in a backpack, next to your other gadgets. To keep it lightweight, Selpic used plastic for the top half of the device and a fairly light metallic shell for the bottom side of the P1, so the heaviest part is towards the tip, as it should be for a batter maneuverability (the cap is also made of plastic). The color combo for the Selpic P1 that I got to test is white and light gray, but you should also be able to get the black and dark gray model. On the plastic section (which is covered by a white matte finish), you will be able to find the Power button and a USB Type-C charging port. To power on the device, you will need to push and hold the Power button for about 3 seconds and wait for the embedded LED to turn green; this LED will also flash red two times every few seconds when the battery is low and the LED will start flashing green when you start moving the P1 in order to print something.
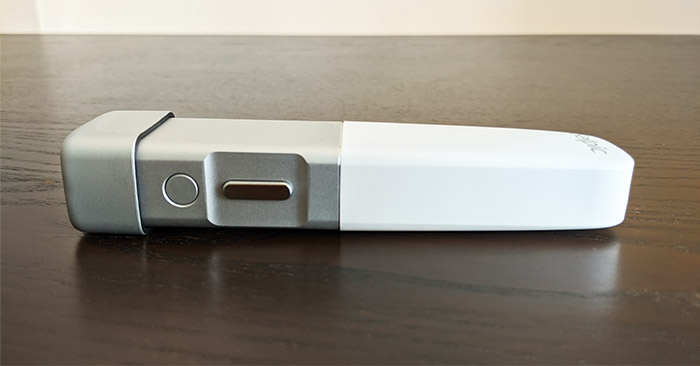
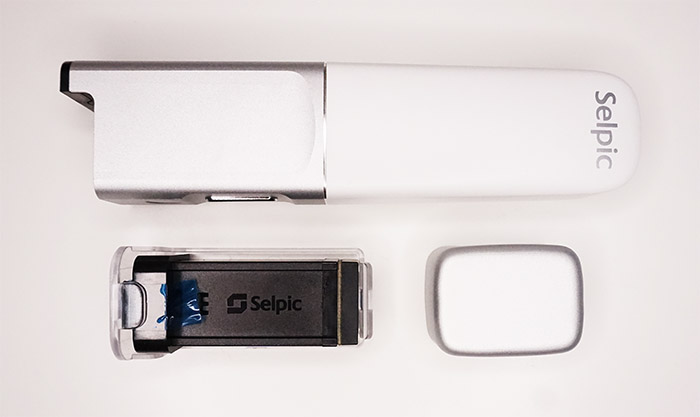
The metallic section of the device has a thin Print button (that you need to press once and let go before starting rolling the printer) and underneath it, there’s a circular locking button which you need to press when you want to change the cartridge. Speaking of which, inside the box, I got a single cartridge with black ink and it was carefully packaged, relying on a piece of transparent plastic to protect the sensible printing extremity. There isn’t anything special that you need to do to insert it into the Selpic P1 case: simply remove any wrapping and slide it into the dedicated slot. Afterwards, to protect the printing head and to not unintentionally smear any objects, put the plastic cap. Similarly to the base on the S1 and S1+, the cap attaches magnetically and helps keep the Selpic P1 vertically (be aware that it can only be attached in a certain way – there is a canal dedicated for the wheel). The printing head is not very complicated since there’s a sort of film that will let the ink flow through in a certain pattern and next to it, there’s a rubber wheel which, when moved, it will send a signal to the device that it’s time to move to a new character.
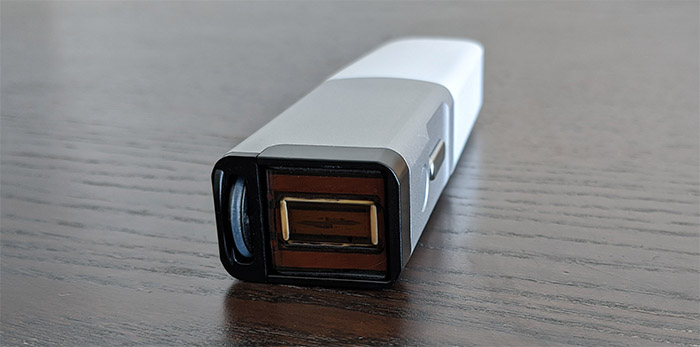
Note: The Selpic P1 features 600 x 600 DPI, it’s equipped with 300 nozzles (the nozzle spacing is 0.002 inches and each nozzle can eject 18 million drops per second).
The App and the Performance
I know that some devices such as the Handjet rely on a built-in screen to choose the pattern that’s going to be printed, but the Selpic P1 wasn’t really built for heavy industrial use, so it’s going to rely on an app to allow you to customize the text or image. The app is called Selpic handy printer (available on the App Store and on Google Play) and, after installing and running it, it will simply require your email address (to Log into the app). Afterwards, it will ask you what type of device you have (I chose the P1 icon) and it will also ask for your location; next, you will be able to Configure the network which requires that you power on the Selpic P1, wait for it to be detected by the app (keep it close to your mobile device) and then enter the password to the WiFi network (it has to be the 2.4GHz SSID). And that’s about it, you can now see the app interface which has a very simple look, featuring the editor on the top half of the screen and on the bottom, there are the instruments (the battery level can be seen on the top left corner which is very useful considering that you can’t otherwise know the exact amount of battery left).
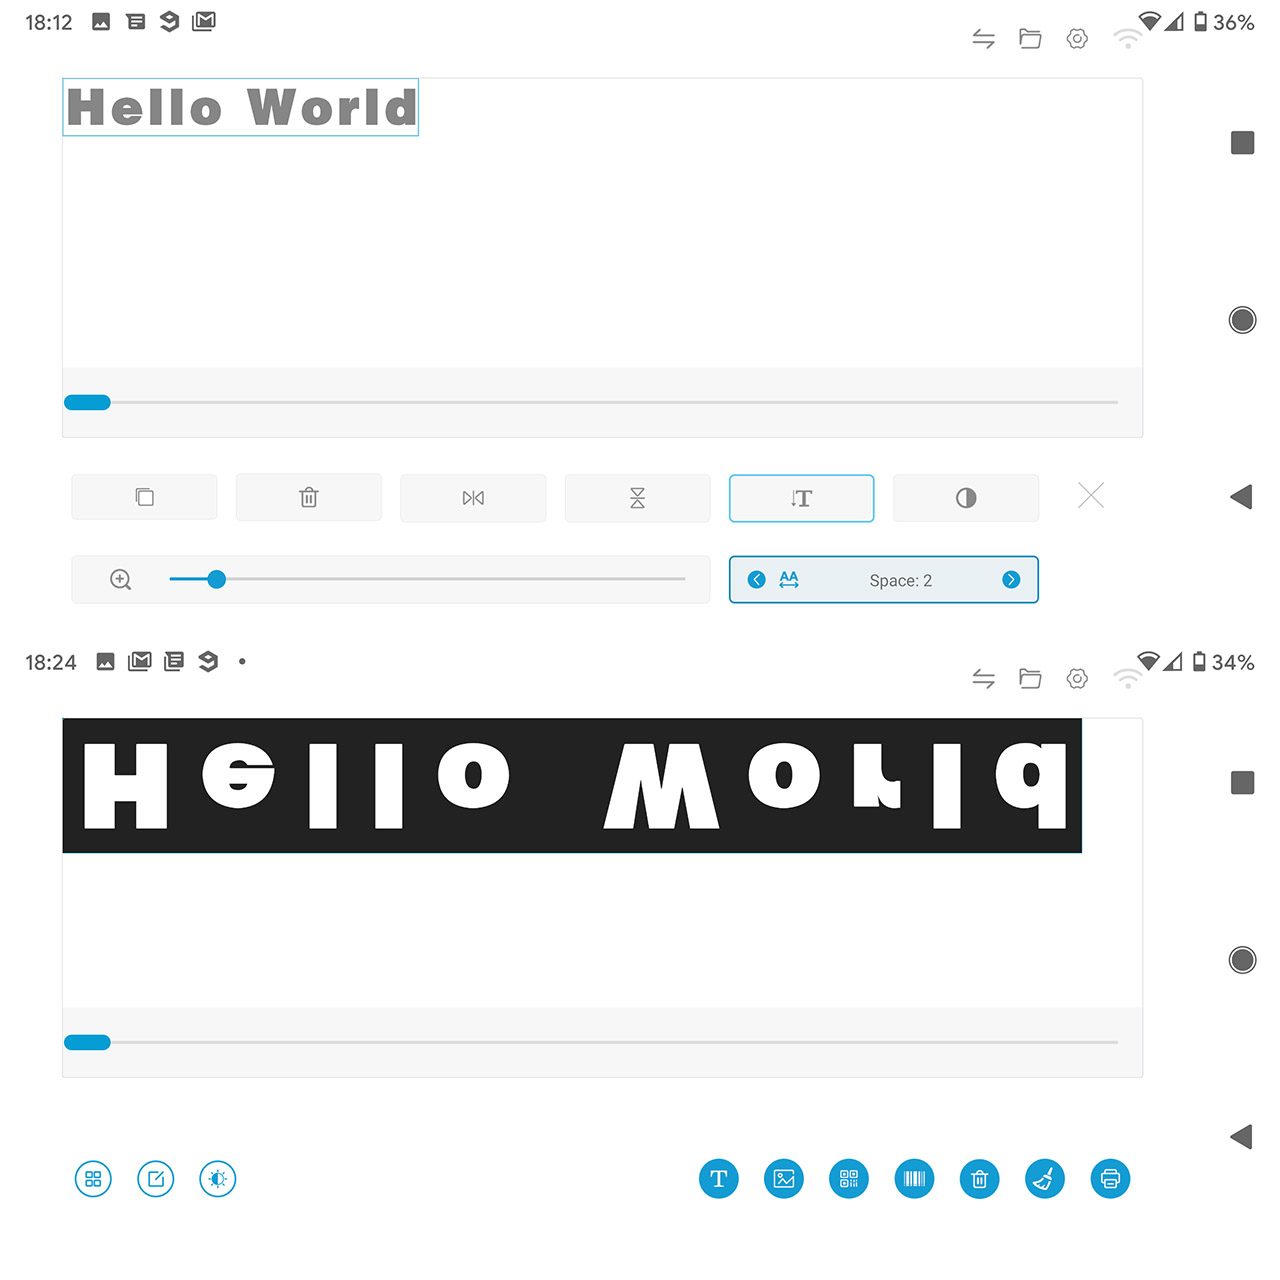
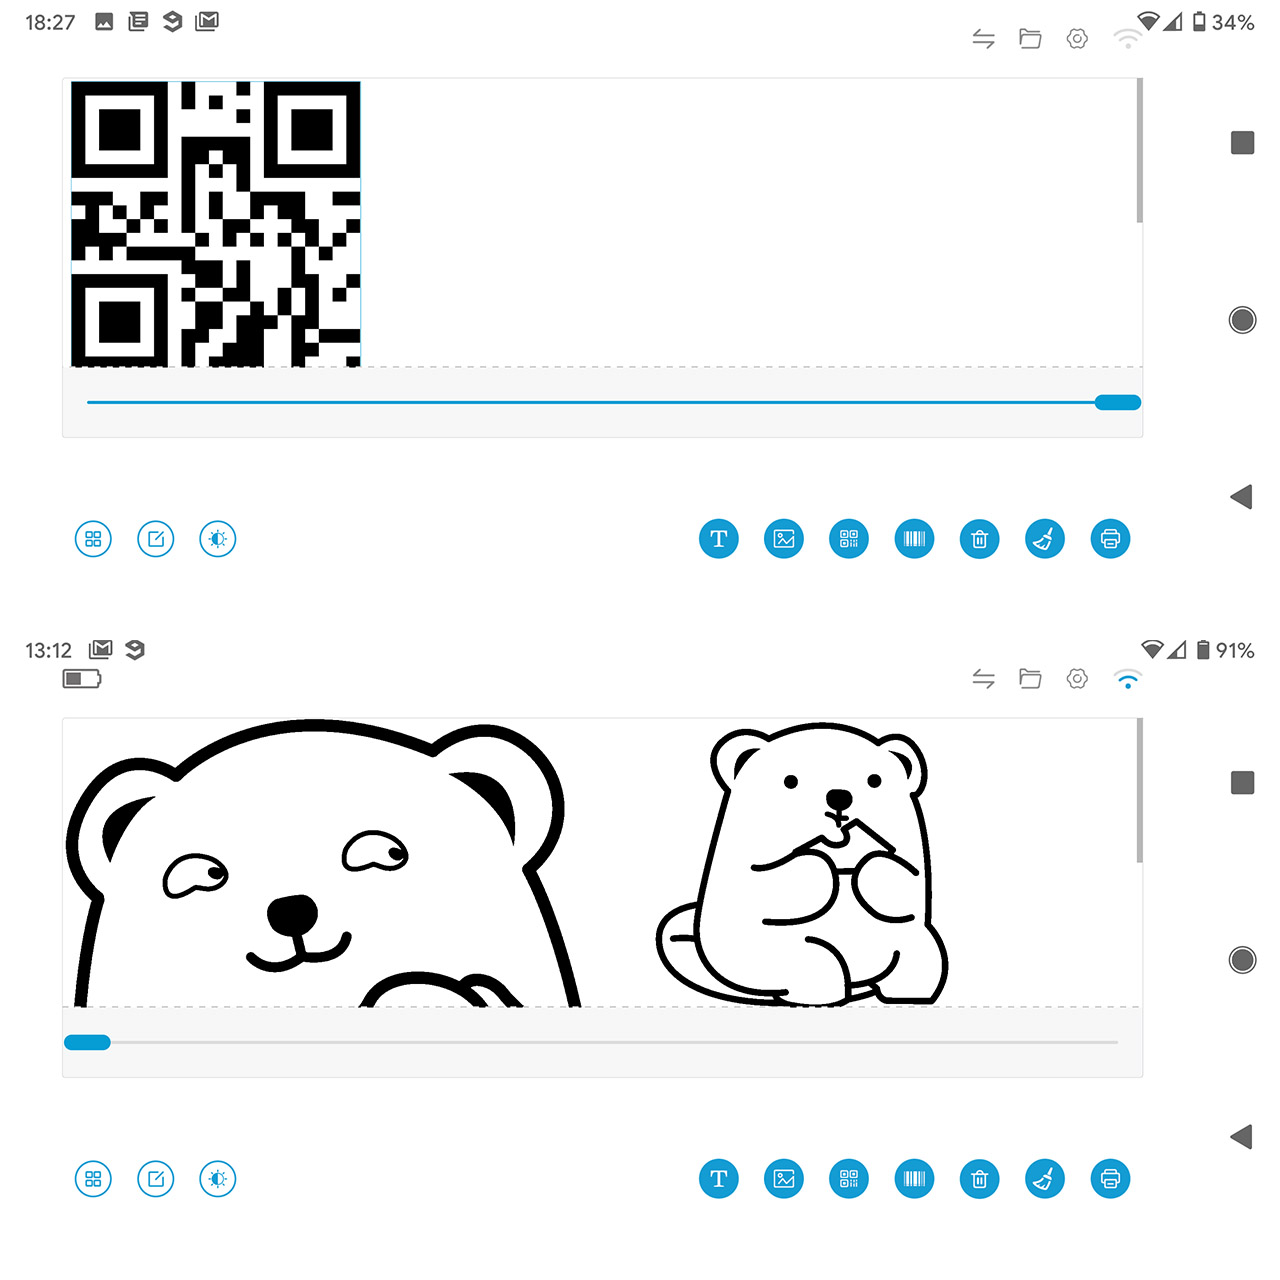
You can immediately start writing some text by clicking on the right T icon and, as you write, you get the option to choose the Font and the style of the letters and after clicking Done, you can continue customizing the text by tapping on the first icon on the left (the three squares) which will summon a new set of options: Copy, Delete, Invert horizontally, Invert vertically, set the Spacing (the space between the letters), Reverse the colors and lastly, you can increase the size of the text (or image). Returning to the main page, the second icon edits the text, while the third will change the color intensity. On the bottom right side, besides the Text editor, there is also the Image editor and here, you get to see a few sets of default images (cute emojis) that you can use for your backpack, notebooks or laptop and yes, you can definitely use the photos that you got stored in your phone. Be aware that the photo will become a more basic version itself and it’s going to be the white and black (or the color of the ink from your cartridge) – even so, it’s quite fun printing your face on various objects. And yes, you can also directly take a photo and port it into the application (the process is then going to be the same as with the images from the gallery).
Besides the text and the image editor, you can also create QR codes with a certain message or link and even bar codes if you intend to use it in a more industrial environment. And I’m not saying that it won’t be able to keep up for industrial work (I think devices such as those from Handjet may be more suitable, although the price tag is far above the Selpic P1), but I do see it more as a tool for entertainment and for people that are very creative and want to personalize their stuff.
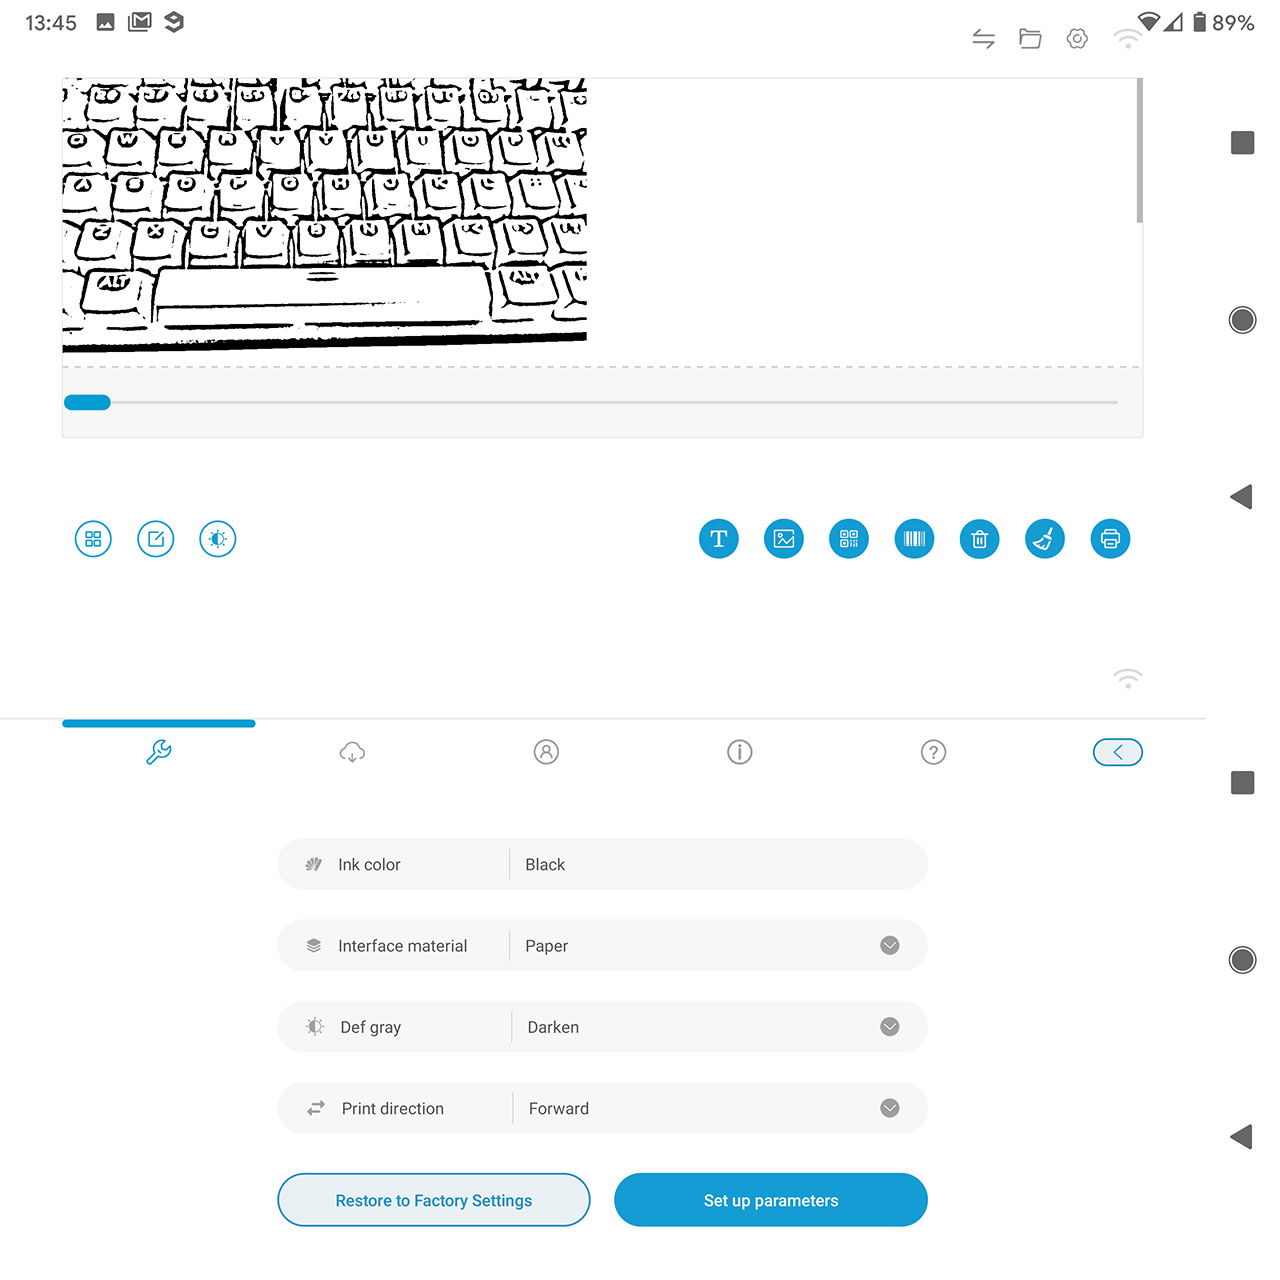
When you’re done creating your artwork, you can then simply tap on the print icon (from the right corner) and wait until the portable printer receives it; then you can slide the Selpic P1 on the desired surface (it’s worth noting that although rare, I did see that the printer would lose the connection to the router and then it would automatically reconnect after a few seconds). Before moving on with testing the device on various types of materials, it’s worth checking out the Settings which can be accessed by tapping the gear icon from the top right corner. This way, you get to see the current available color, you can set the Interface material (you should change it accordingly to get the best performance), you can also adjust the color intensity and the printing direction (it can go forward or in reverse).
Next to these settings, you can also check for updates (make sure to keep it to the latest firmware update especially since it’s a new device and some bugs may creep in), you can change the email address, you can check the current firmware version and I really like that Selpic has included a comprehensive guide which was needed considering that the user manual only shows some basic installation info. Even so, I like that the entire process is far from complicated and no matter your familiarity with a text editor, you should be able to create some cool patterns.
That being said, let’s see how the Selpic P1 performs on various surfaces.
Testing the Selpic P1 on various surfaces
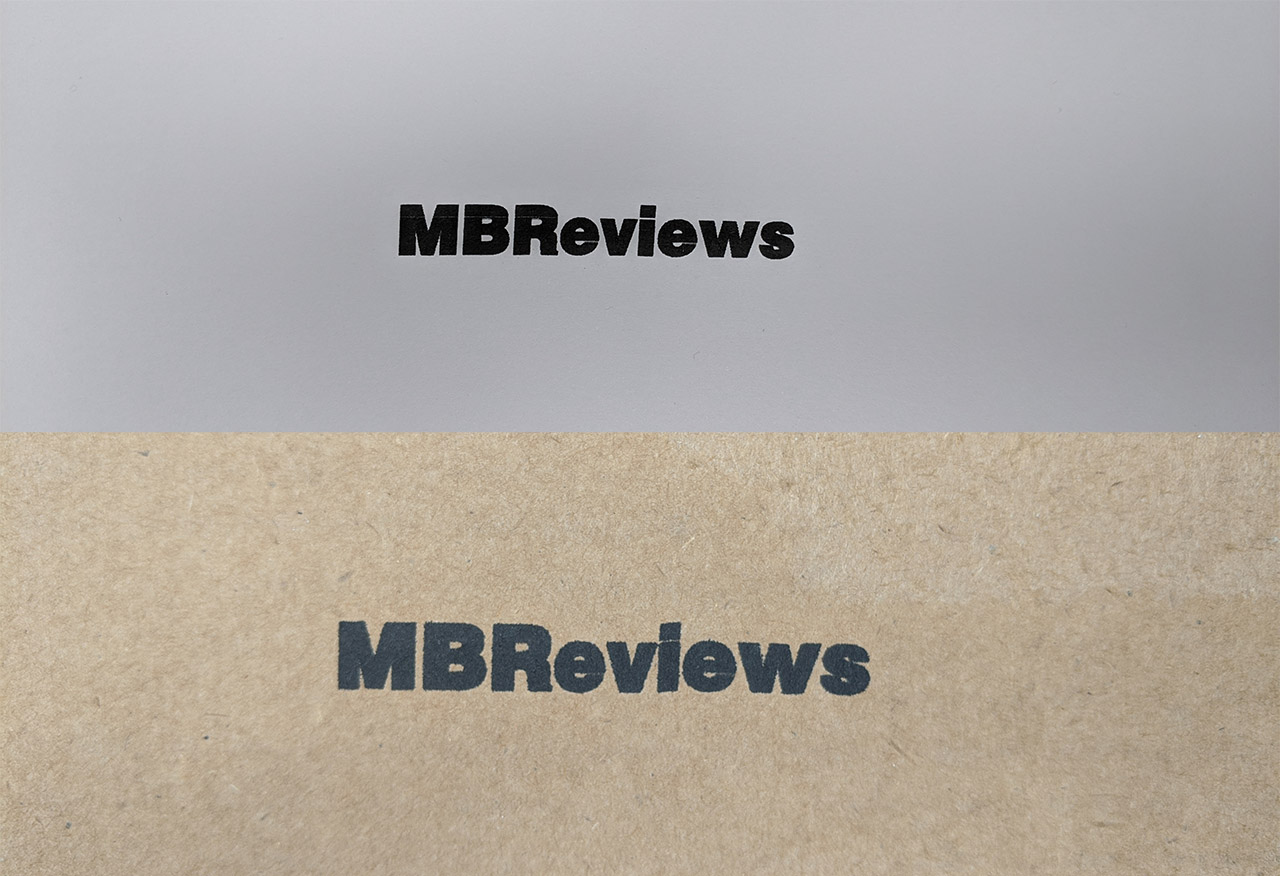
The easiest material to print on will be paper and, as can be seen from the photos, the portable printer works perfectly fine, there are no smudges and the ink quickly dries; furthermore, the letters are clearly visible and perfectly divided. Next, I chose cardboard and not the highly compressed type, but the porous kind. Once again, the printer did a wonderful job at printing MBReviews, the letter are properly spaced, there is no bleeding and it’s quite similar to the experience with the paper (looking very very closely, I did see some very slight bleeding, but it’s barely noticeable).
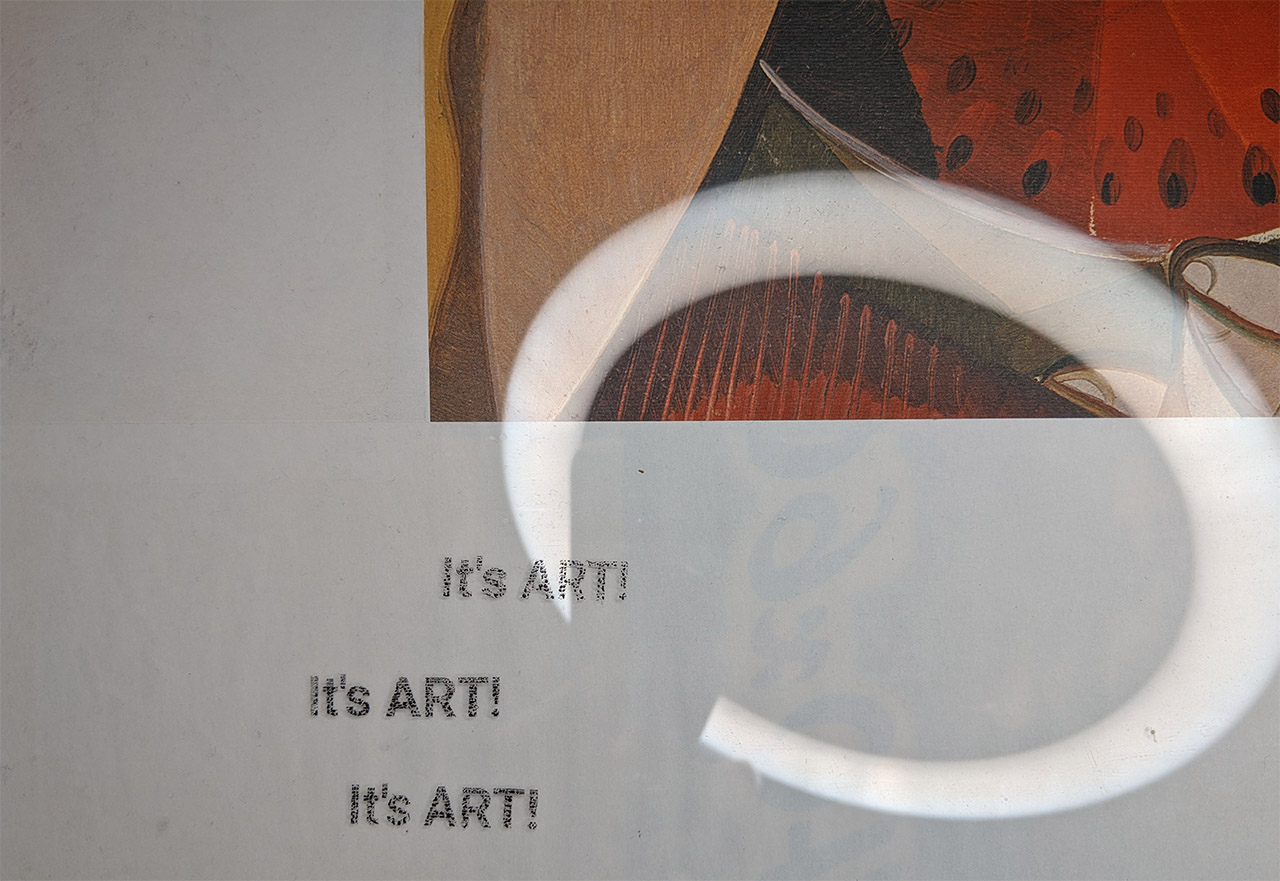
One of the more difficult surfaces is going to be glass and I chose a flat surface to see how the Selpic P1 behaves (i also set the Interface material to glass in the app): as you can see from the photo, the P1 can definitely print letters and images on it, but the consistency is not the same as on the paper or cardboard; also, be aware that you need to wait a bit more for the ink to dry since it can be smudged afterwards on this type of glossy surface.
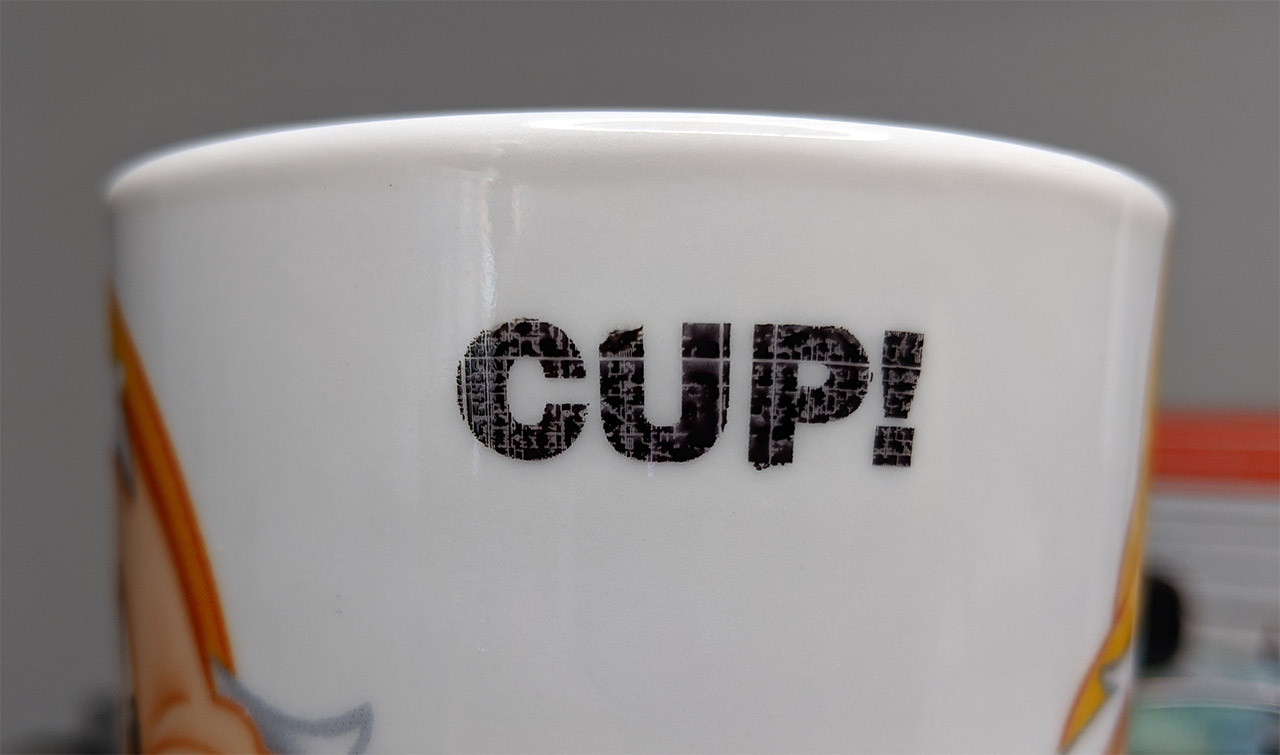
Afterwards, I printed a text on a ceramic cup and again, the performance was good: the consistency again suffers a bit, but the letters are well defined. Since the cup was also glossy, the ink can be smudged even after a few minutes have passed.
The plastic can be tricky as well since the porous type will let the ink to properly adhere, but on a phone’s glossy back panel, despite properly printing the letters, you can again smudge the design afterwards (the manufacturer has also included some alcohol cotton wipes to help you remove any unwanted print).
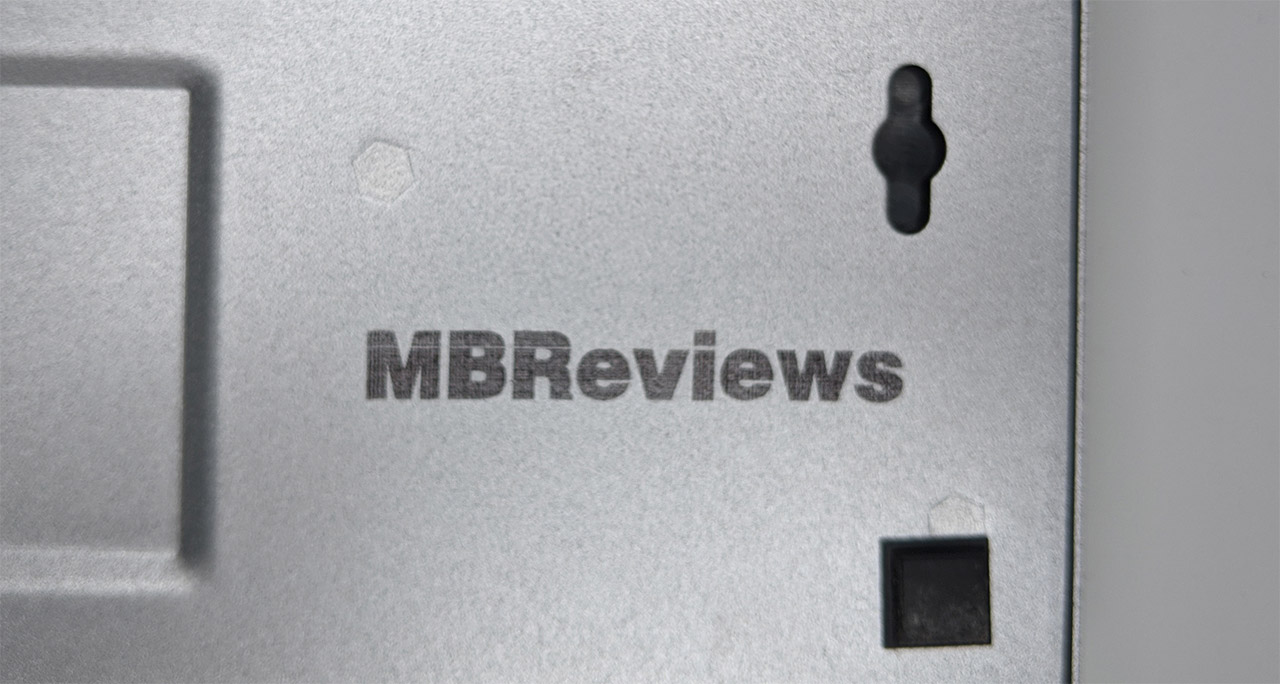
Also, it’s worth mentioning that going on curved objects is going to be very difficult to keep the pattern straight (it was far easier on the Selpic S1, but that’s the compromise needed to get a far more portable device). I also decided to use the P1 on a metallic surface and the ink adhered properly to the material (no smudges), the letters were well defined and overall, I was pleased on how it turned out.
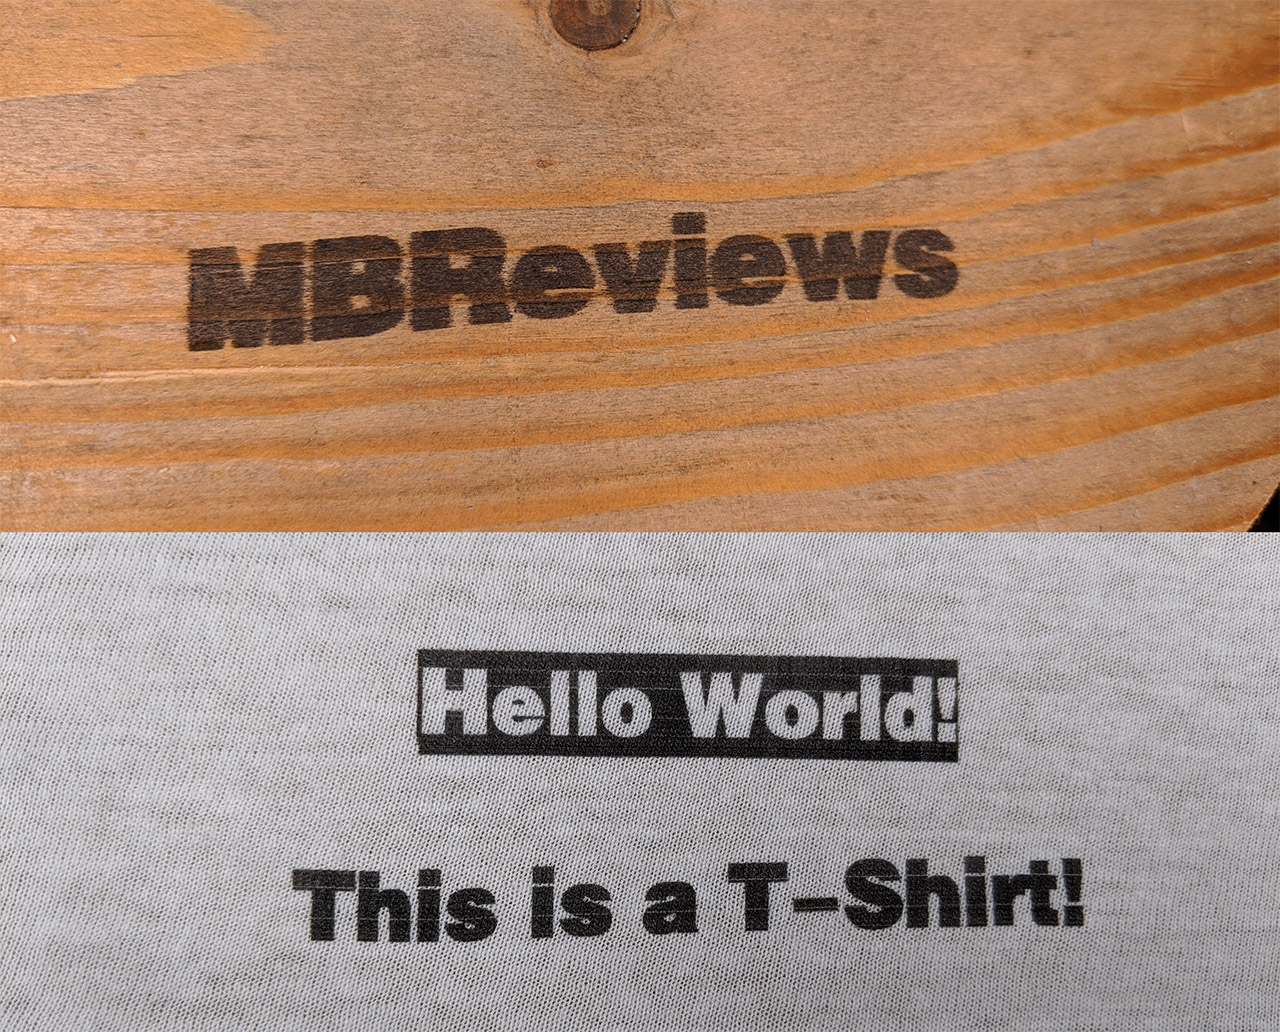
Moving on, I also printed the logo on some wooden bench and the P1 performed wonderfully as well and, since the manufacturer advertises that the P1 can also be used on textiles, I gave it a try on a T-Shirt and, as you can see, the result is almost as good as on the paper (no smudges and no ink bleeding).
In the app, there is a mode for leather, but, since I don’t have anything made of leather, I could not test the Selpic P1 on this type of material. One other interesting feature supported by the app is that you can print multiple lines one after the other and it works really well with text, but I did struggle quite a bit with an image since I needed to know exactly where I started the top part and how tall the half image currently is – like I said before, if you intend to use it for printing multiple lines of text, it works great. Furthermore, the cartridge seems to last a long time and the battery didn’t really go to 3 hours, but two hours is a safe bet.
Conclusion
The ones that would benefit the most from this type of device are those creative people that want to personalize all their stuff and the good news is that the Selpic P1 is incredibly easy to use. The app is very intuitive and constantly updated by the manufacturer, editing the text and the videos is easy (it supports custom images) and the device itself is lightweight enough to make you feel like you are using a highlighter and not a portable printer. While testing the P1, I noticed that it works great with certain materials (mostly those a bit more porous, such as paper, wood and textile – it also works great on metal), while the ink can be smudged from glossy surfaces (such as glass, ceramics and plastic) so keep this in mind if you want to undergo certain projects using the P1. Other than that, I do think that we will see more and more of this type of devices entering the market very soon and the Selpic P1 is definitely interesting enough to pave the way for this new type of tech niche.
Selpic P1
-
Pros
- Very portable and lightweight
- Can print on a large variety of materials
- Supports custom images
- The app is easy to use
- The ink cartridges seem to hold for a long time
Cons
- Sometimes the app disconnects from the router (although it usually quickly reconnects)
- The ink can be removed with your bare finger if printed on a glossy surface
Mark is a graduate in Computer Science, having gathered valuable experience over the years working in IT as a programmer. Mark is also the main tech writer for MBReviews.com, covering not only his passion, the networking devices, but also other cool electronic gadgets that you may find useful for your every day life.