
As its name suggests, the TerraMaster D2 Clone was build to offer the possibility to thoroughly copy either an HDD or a SSD to another disk as quick as possible and, when not using this function, it will work great as a storage unit.
That sounds a lot like those docking stations that could also copy HDDs and yes, the D2 Clone works in a similar fashion which, I know, may not seems as exciting as a NAS or any other similar storage devices, but it’s a very useful product nonetheless. Indeed, the D2 Clone promises to clone your drives at a relatively high speed (up to 550MBps using SSDs and up to 200MBps using HDDs) and yes, it’s not at the level of a Thunderbolt 3 connection but, considering the price tag, it’s a fair performance.
Furthermore, unlike those docking stations that keep the HDDs exposed, the TerraMaster D2 Clone will have the drives protected by a fully metallic enclosure which looks almost identical to the F2-210 NAS that I tested about a year ago. Clearly, there are no NAS functions here and there is no software that you can use with the storage drives, but the D2 Clone will still provide access to the HDD/SSD content (it will function as a DAS – Direct Attached Storage). That being said, I think it will be interesting checking out the cloning speed of some HDDs, as well as the overall performance of the TerraMaster D2 Clone, so let’s have a closer look at it.
Design and Build Quality
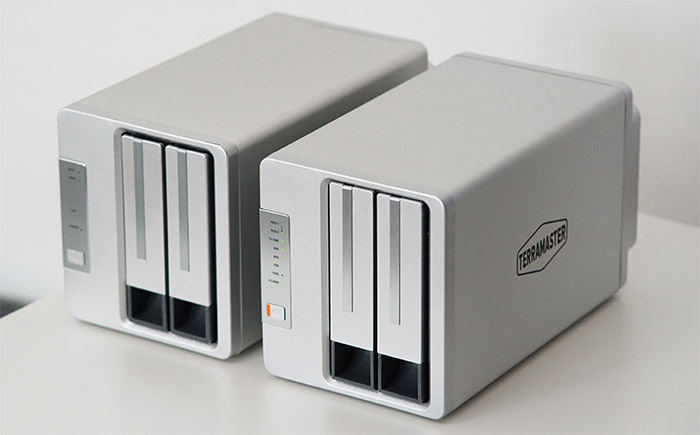
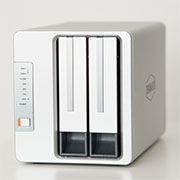
Despite mostly competing against the HDD docking stations with cloning abilities, the TerraMaster D2 Clone is built very differently and it’s actually almost identical to the F2-210 NAS. I put the two next to each other and there’s the same metallic shell that goes around the device with the front and rear sides made out of plastic. And yes, both the metal and the plastic are light gray, although the D2 Clone seems to have an even lighter accent – looking on the sides of the DAS I could also see that the manufacturer has slightly changed the logo. In terms of size, the D2 Clone measures 8.93 x 4.68 x 5.23 inches (22.7 x 11.9 x 13.3 cm) and, with all that metal, it’s expected to have a bit of weight to it and indeed, it does weigh about 2.86 lbs, revealing that once again, it’s pretty much identical to the F2-210. Sure enough, it will take a bit more space than the usual docking stations, but you do gain a far better built device which looks and feels premium.
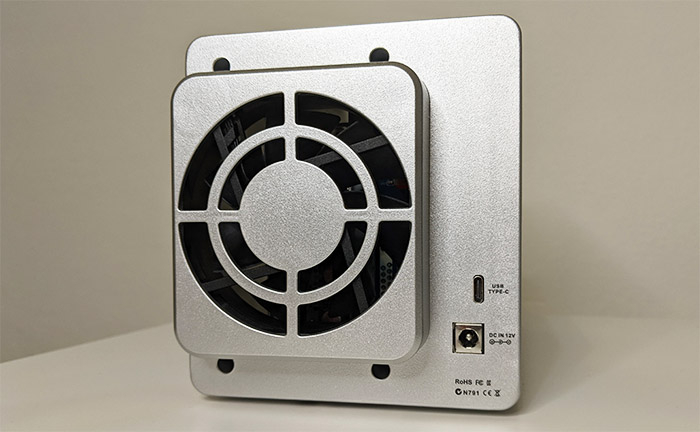
And ruggedness is usually a forgotten factor when it comes to inexpensive electronic device, so kudos to TerraMaster for building a robust device. On the rear side of the device, you will see a rectangular protrusion with some cut-outs to allow the air to flow within the case guided by the fan. That’s right, the D2 Clone does have a rear-mounted fan (80x80x25mm – Snowfan YY8025L12S DC 12V 0,14A EP) which only activates when you run the cloning process or when you connect the DAS to a PC, so, when the D2 Clone is idle, there is absolutely no noise. Perhaps they could have gotten away with a passive cooling system, but I don’t mind the extra help with the heat management, especially since the fan is decently silent even when it runs, so it shouldn’t disturb anyone in the room. And, in case it becomes defective (it happens), it’s very easy to replace – there is a single connector to the PCB. You could hear some noise if you have installed some specific types of HDDs (even though most are a bit noisy, especially when data is written), while SSDs should be completely silent.
TerraMaster has also kept the multiple cut-outs from the bottom side, along with the four silicone feet to keep the case slightly elevated, which will also help a great deal with the heat management – truth be told, these type of devices rarely get hot and yes, the D2 Clone has kept a low temperature while I was testing it. Still on the rear side, the TerraMaster D2 Clone has a power port (12V) and a USB Type-C port. I noticed that it’s a bit difficult inserting the power adapter into the DC port (it would enter after I properly pushed it) and that the Type-C port is USB 3.1 Gen 1.
This means that the speeds are capped at an effective rate of 500MBps (5Gbps data signaling rate) which may not look that much considering that there are some Thunderbolt 3 enclosures available, but let’s not forget that the D2 Clone is currently compatible only with HDDs and SATA SSDs (3.5″ and 2.5″), so it should be enough for both regular data transfer and the cloning process.
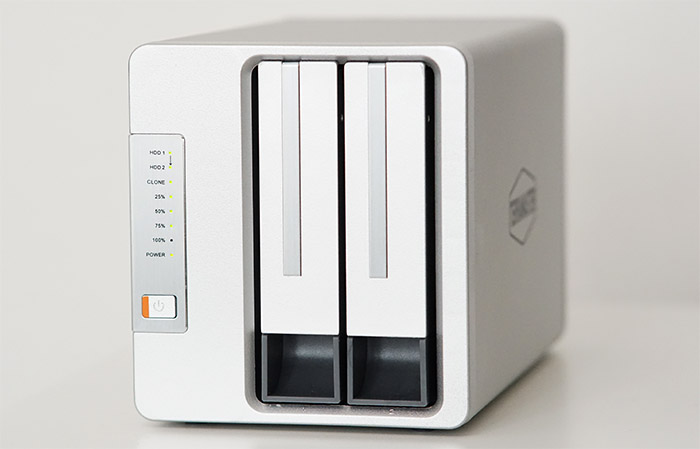
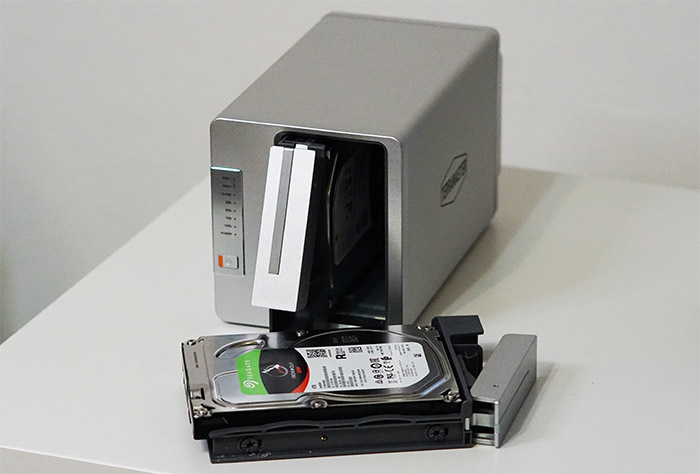
On the front side, there are two bays for HDDs (or SSDs) which can be opened by inserting your finger underneath the gray section and pulling the tray out – the bay should then easily slide out and allow you to add new drives. If you have used a TerraMaster NAS, the process will be the same, so it’s not plug and play, and you will have to use some screws to mount an HDD or a SSD (there is a screwdriver in the package, which is always a welcomed addition). Since these bays looked so similar to the ones on the F2-210, I decided to check if they’re compatible and I wasn’t really surprised to see that indeed, you can swap them between a TerraMaster NAS and the D2 Clone – quite useful if you have both types of devices since it removes the time it would take to unmount and mount the storage drives.
On the left side of the bays, there is a metallic piece with some holes for the LEDs and the Power button – short press to turn the DAS on, long press to turn it off and short press it twice to start the cloning process (you will have to press it again in the span of 10 seconds to confirm that you want to clone a drive).
The first two LEDs will turn on when you add HDDs/SSDs (supports hot-swapping), followed by Clone (in case the process fails, the HDD LED will start flashing orange) and four LEDs for each 25% required to finish the cloning of a drive; lastly, there’s the Power LED.
Internal Hardware
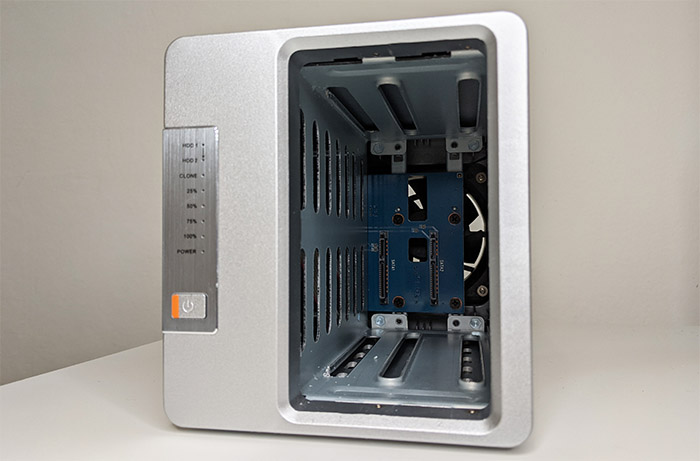
Considering that the TerraMaster D2 Clone is built almost identical to the F2-210, the tear-down process is going to be the same, so, before anything else, make sure to remove the two drive enclosures (it will expose the internal SATA connectors) and the four screws from the rear side of the device – be aware that opening the case will most likely lead to warranty termination. You can now have a look at the fan, as well as disconnect it from the main board. When compared to the F2-210, there’s clearly less stuff going on, but it’s to be expected considering that the D2 Clone serves a different, more simple purpose.
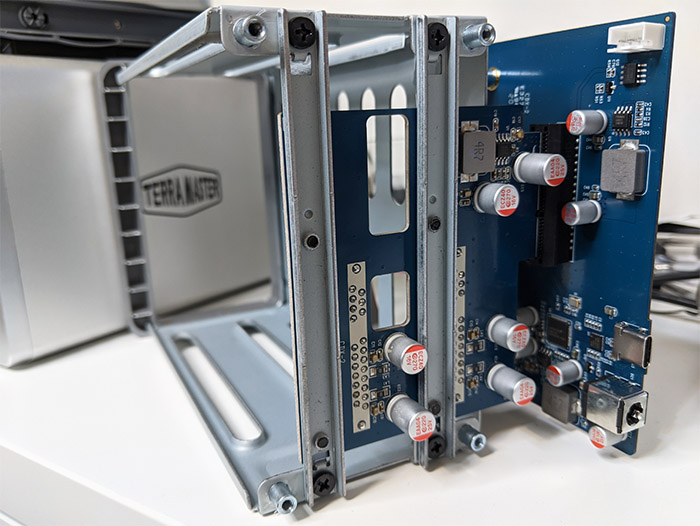
That being said, I was able to identify an Asmedia ASM1156 (B2VP6637A1 1936) single chip solution that has the role to bridge the USB 3.0 to the SATA interface and there was also an ASM1543 BOYR71 chip (also from Asmedia) that’s useful for the USB 3.1 type-C multiplexer; I also saw a Fiti FR9809 integrated DC converter. When I removed the metallic shell, I noticed that the manufacturer has added a fairly large pad to keep the circuitry from touching the external shell.
Features and Performance
TerraMaster says that the D2 Clone is not only built for cloning the data from a drive to another, but you should also be able to read and write them if you connect the DAS to a computer, be it a Windows machine or a MacOS computer. So, I took the usual duo of HDDs that I used when I tested the TerraMaster F2-210 NAS and the Synology DS218+: a fairly new 2TB Seagate Ironwolf HDD and an older WD Black 1TB HDD. Since the drives already had some data from when I was testing the NAS, I decided to wipe both of them and start off with a clean slate, so I inserted both into the D2 Clone, took the USB-C to USB-A cable and connected the DAS to a Windows 10 PC. Afterwards, I opened Disk management and first formatted the WD HDD. The problem is that the HDD immediately reverted to raw and refused to be seen by the computer – the LED light on the D2 Clone also started to flash orange, so yes, the HDD was bricked.
It wouldn’t be the first time that this type of enclosure bricks HDDs, so I had to further investigate whether it was the D2 Clone or simply the HDD decided to have its last breath at that point (it was 6-years old, after all). To do so, I simply did the same thing with the 2TB Ironwolf HDD and it did not happen again even after multiple tries, so I assume it was indeed the old age of the HDD. I also got another HDD in order to test the D2 Clone, another Seagate Ironwolf, but with a larger capacity, 4TB. Apparently, when the HDD is brand new and unused, the TerraMaster DAS did not allow me to create a new partition (it appeared write protected), so I had to connect the 4TB Seagate directly to a SATA port from my motherboard; after that the DAS would allow me to both format and give the HDD a letter. But I have noticed a few other weird occurrences. First, I decided to write some data on the 2TB drive in order to fill it up and check the cloning process and, after a few hundred GB, I decided to put the PC in sleep mode.
The next morning, after checking out the content of the HDD, all the data was gone, the drive only had one file that I put there when it was connected directly to the motherboard via a SATA connection. I was unable to reproduce this issue, so I suspect it had something to do with the safe removal of the drive. The drive was also connected to the second bay, so I strongly suggest that you put the main HDD in the first bay and, after you’re done reading or writing data, to safely remove the TerraMaster D2 Clone. Another thing that took me by surprise is that the second HDD would always default to offline and if the drive was left empty, the space would become unallocated. In case there is some data on the second HDD due to running the cloning process, the remaining space (if any) would again become unallocated. And it does make sense considering that the D2 Clone is essentially allowing you to use the rest of the space for pretty much anything else.
But be aware that even if you create a new partition with the remaining storage space, in case you want to clone another HDD, the D2 Clone will fully erase the destination drive before writing the data. Furthermore, make sure that the destination drive will have at least the same capacity as the source drive, before starting the cloning process. That being said, I took the 2TB (Seagate IronWolf) which was filled with mostly video files (between 50MB to 3GB) and inserted it into the source bay, while the destination HDD was the 4TB Seagate IronWolf HDD. The manual says that to start the cloning process, you need to push the Start button twice until the Clone LED starts flashing and then to press it once again to confirm in the span of 10 seconds. If the TerraMaster D2 Clone is still connected to a computer, you will not be able to clone the drive, so you will need to safely remove the device and then disconnect the USB cable. At this point, the HDD LEDs should be solid green and you should be able to start the cloning process.
Pushing 2 TB of data from one HDD to the other took exactly 4 hours which means that the average transfer speed was about 145MBps. The 2TB Seagate IronWolf features an advertised data transfer rate of about 180MBps, while the synthetic benchmarks suggest a better reading speed as will be seen further down; the 4TB HDD will have a slightly elevated transfer rate.
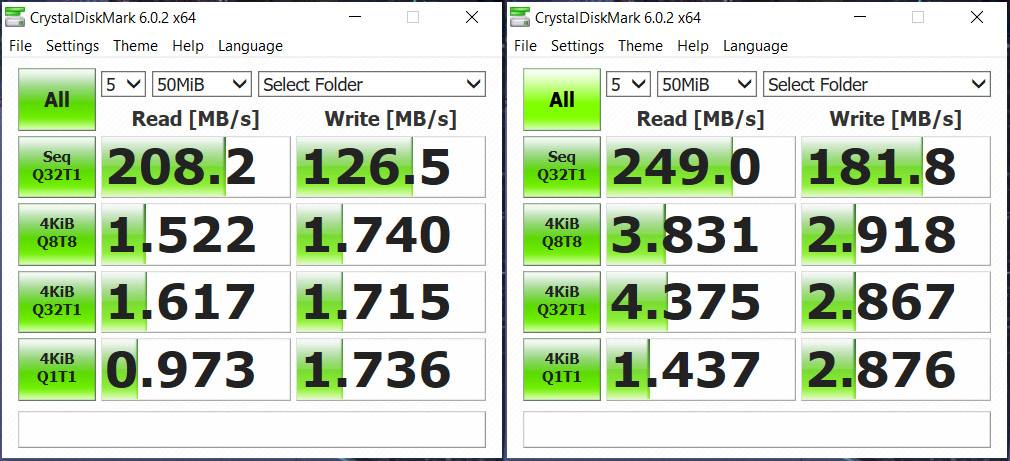
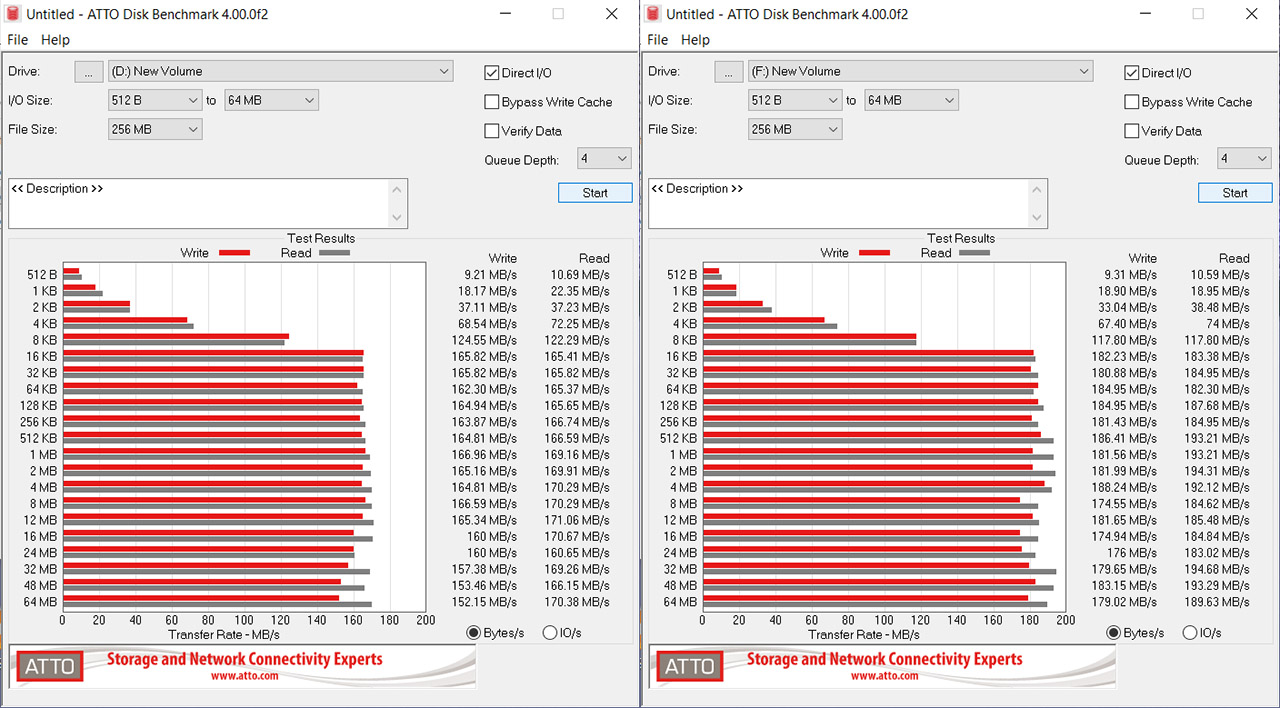
To be more specific, I ran a couple of synthetic benchmarks on the HDDs while the TerraMaster D2 Clone was connected to a laptop (equipped with a USB-C Gen 2 port to ensure the best performance). The two tools were CrystalDiskMark 6 and ATTO, and, as you can see, the 2TB HDD is a bit slower than the 4TB Seagate IronWolf, something that was expected. This means that the 145MBps is a perfectly fine performance (it will of course heavily depend on the type of files that are being transferred). The interesting thing is that regardless whether you want to copy 1MB of data or the full 2TB, the time will always remain the same, 4 hours, if you’re using the same HDDs as me.
Conclusion
The TerraMaster D2 Clone isn’t an overly complex device and was built to perform a simple task, that of reliably cloning either an HDD or a SSD. I have managed to transfer data from my computer to the HDDs quite fast and the cloning process was done in a timely manner, but you will want to perform this operation when the disk is full (the process is going to take the same time regardless of the used storage). There are a few quirks that may take you by surprise, but make sure to check out the user manual since it does cover pretty much everything. Lastly, the D2 Clone is most definitely the most rugged DAS that I have seen on the market and, considering that the performance is good, it’s worth taking into consideration if you need this type of device.
TerraMaster D2 Clone
-
Pros
- Built in a rugged manner
- The fan is silent
- Compatible with both SSDs and HDDs (2.5" and 3.5")
- Supports hot-swapping
Cons
- There are some quirks that are not immediately obvious, so carefully read the user manual
- The trays don't always enter smoothly
- USB-C 3.1 Gen 1
Mark is a graduate in Computer Science, having gathered valuable experience over the years working in IT as a programmer. Mark is also the main tech writer for MBReviews.com, covering not only his passion, the networking devices, but also other cool electronic gadgets that you may find useful for your every day life.