
The TerraMaster F2-210 is an entry-level two-bay NAS which targets the budget-conscious users that want to experience the flexibility and the advantages that a network attached storage can bring to their network (including the ability to expand their storage, to create a reliable back-up solution and the possibility to set up a personal cloud storage to stream media towards all the connected devices), but which aren’t really ready to pay big bucks and go with the more powerful and more expensive solutions.
Considering that the F2-210 supports only up to 32 (16TB on each drive), it’s hardly suitable for SMBs, so it’s the home users that will get the most out of this NAS, but, despite covering the budget-friendly segment, TerraMaster still has a tough competition to beat on every level, so let’s have a closer look at the F2-210 and see if it’s a reliable alternative to the popular devices from Synology and QNAP.
Note: If two HDDs/SSDs are not enough, the 210 series also includes a 4-bay NAS which has double the RAM (there are also more powerful TerraMaster NAS devices, which includes even Thunderbolt 3 solutions).
Design and Internal Hardware
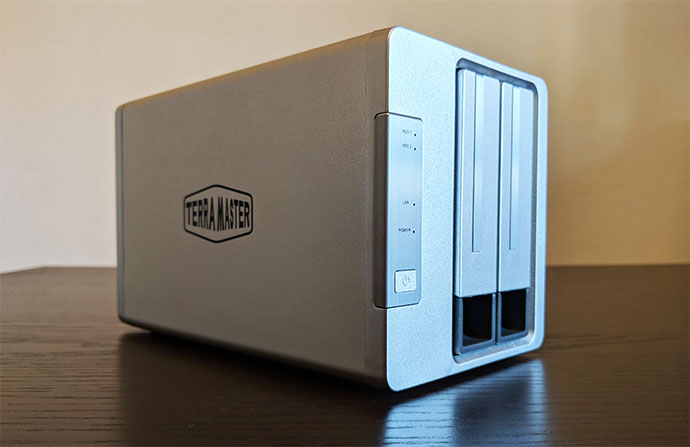
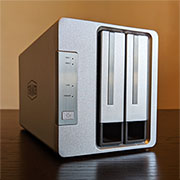
The network attached storage devices have been for a long time exclusive to the enterprise market mostly due to the cost and, as with every technology, once it becomes cheaper, it is ported to the consumer market at an affordable price. But, even if the NAS can now be a part of the home network, it still has kept a relatively industrial look mainly because it needed a functional design. Still, the manufacturers strove to make their devices more visually pleasant by downsizing them to a more compact design and, in some cases by adopting a more minimalist look (as preached by Apple). TerraMaster has designed almost all its NAS devices in the same manner, so it’s actually hard to tell its Home, SMB and SOHO series apart, all featuring am aluminum rectangular box (with the front and back surface made of plastic) covered by a silver matte finish (does not retain fingerprints) with the TerraMaster logo printed on both the left and the right side.
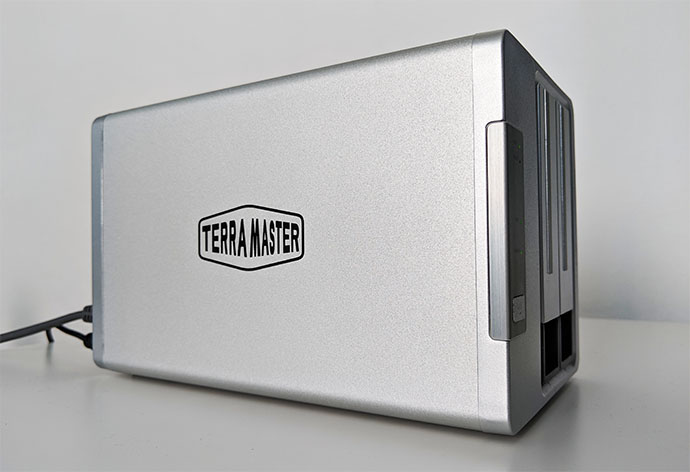
Since it’s a two-bay NAS, the F2-210 is among the smallest devices from TerraMaster, measuring 8.93 x 4.68 x 5.23 inches, so it will take some space from your desk and, considering that it needs to be well ventilated (mostly because of the internal fan), you can’t put it in a drawer and forget about it. The cut-out areas for the internal cooling fan are located on a protruded rectangular area on the rear side of the NAS (the fan measures 3.14 x 3.14 x 0.98) and, similarly to its siblings from the other TerraMaster series, its speed can be set to automatic or can be manually adjusted from the TOS software.
Even when data was being transferred over longer periods of time, the fan managed to keep the case reasonably cool and it also was relatively quiet even when it was at maximum speed (most of the time, the fan runs completely silent). Next to the fan area, to the right side, there are two USB 3.0 ports (host), which can be used to connect the NAS to a computer or to another storage device (the manufacturer claims that it will also connect to an external USB wireless adapter).
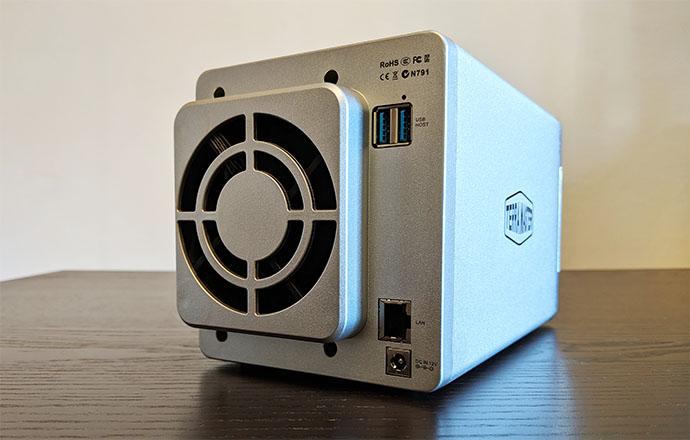
Further down, TerraMaster has added a Gigabit Ethernet RJ45 port to connect the F2-210 to your router and therefore, to the network (the port comes with two LEDs, the first showing the type of connection – can be 100 or 1,000Mbps and the second will blink to indicate that data is being transmitted) and there’s also a DC-In 12V power connector to which you can connect the provided power brick. On the front side, there are no ports, but a simple metallic plate embedded within the plastic where you’ll be able to see four LED indicators: two LEDs for the first and second HDD (after you connect an HDD or SSD, the LED may stay red for a bit or go directly to flashing blue which will indicate that the drives are initialized; after that, the LEDs will turn solid green), one LED for the LAN connection and one LED to show the status of the Power.
Underneath the LEDs, there’s a small rectangular Power button (to turn on or off the device don’t press it continuously, just once and wait a bit until the action gets registered by the NAS).
A bit to the right, there two enclosures where you can install either 2.5 or 3.5-inch HDDs or SSDs. To remove an enclosure, you need to pull the plastic tray (on the front, there is a hole to the lower part that you need to use to grab the plastic) and afterwards, you can attach your drive using the suitable screws (TerraMaster has added screws suitable for both 2.5 and 3.5 drives, as well as a Phillips screwdriver); lastly simply push the HDD/SDD attached to the tray into the SATA III bridge.
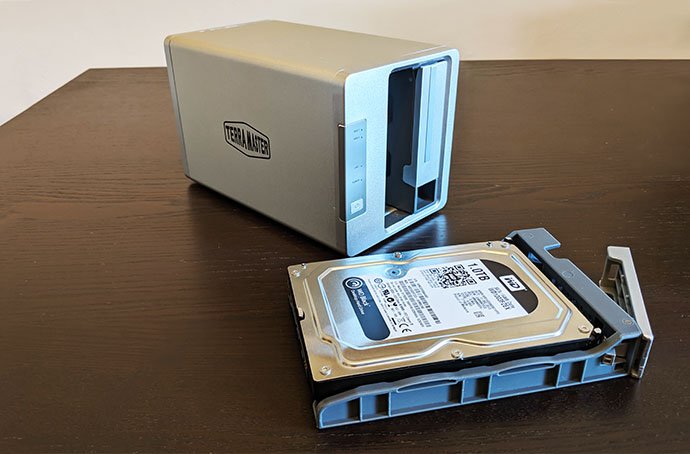
This means that the process is not Plug and Play, but neither is on other brands which also focus on the entry-level market: for example, one of its direct competitors, the Synology DiskStation DS218j also requires that you install your HDD/SSDs using screws and, unlike the F2-210, it doesn’t support hot-swapping. On the bottom of the case, there are four silicone feet to keep the device from budging (the F2-210 also weighs approximately 3.0 lbs without any storage installed which helps keeping the NAS in place) and there are also lots of cut-outs to facilitate a proper airflow.
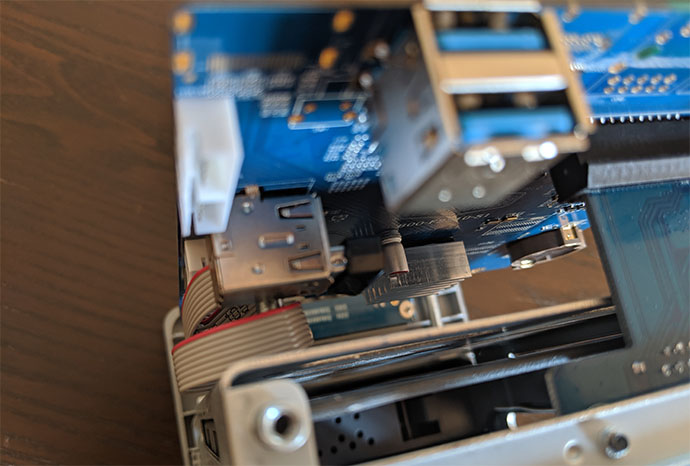
In terms of internal hardware, the TerraMaster F2-210 is equipped with a quad-core Realtek RTD1296 processor clocked at 1.4GHz (ARM V8 64-bit) and 1GB of RAM which, unfortunately cannot be upgraded – when compared to the Synology DiskStation DS218j, they’re similarly equipped, but TerraMaster has a slight advantage at the processor level (Synology has equipped its entry-level NAS with a dual-core 1.3GHz Marvell Armada 385 88F6820).
Note: Be aware that any HDD or SSD that you plan to install into the NAS will have its data erased when the TOS software gets installed.
Software
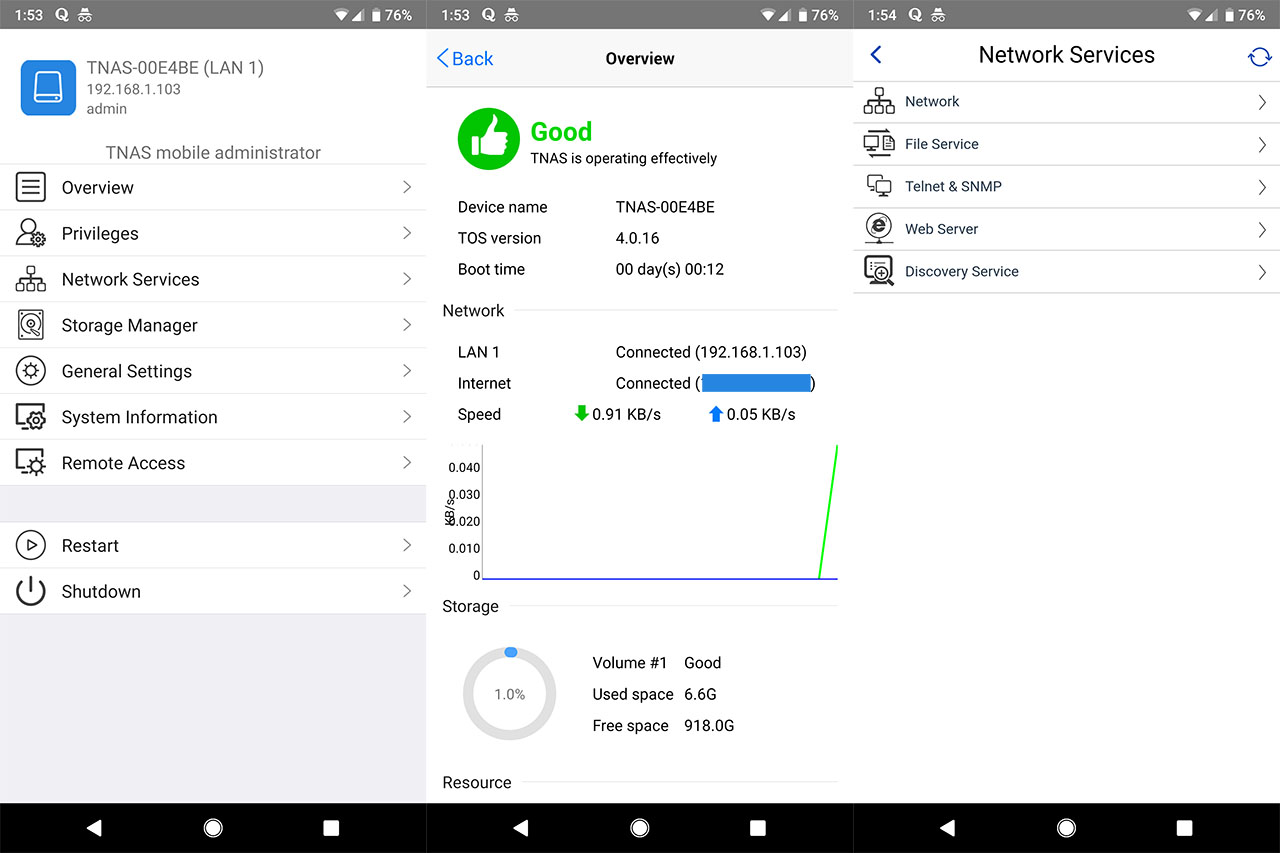
Considering that the NAS devices work in a similar manner to full-fledged computers, you can expect the manufacturers to develop comprehensive operating systems and the TerraMaster F2-210 features the TOS software to help you monitor and configure all the NAS device’s functions. To access it, you first need to download the TNAS PC App from the official website (will work on MacOS, Windows OS and Linux) and install it; afterwards, a windows will pop up which will automatically search for any connected TerraMaster NAS on the network. This is the point where you will need to have the F2-210 prepared: before turning it on, connect the 2.5/3.5 inch HDDs or the 2.5-inch SATA SSDs and next, connect the power cable to the NAS, as well as the Ethernet cable (which will go to the router) and then turn the NAS on.
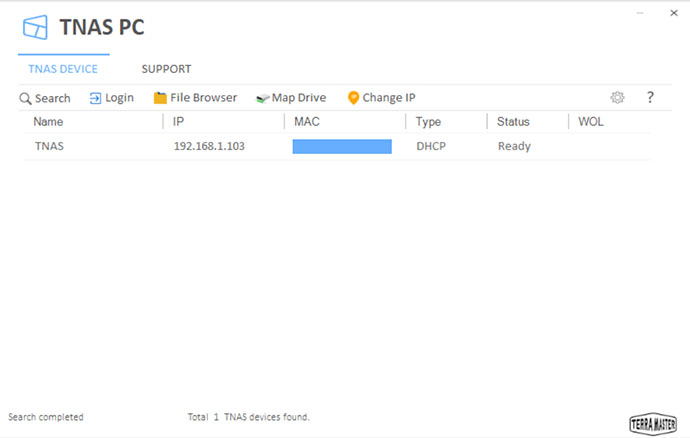
At this point, the Power and LAN LEDs should turn solid green and, in my case, the HDD LEDs went from flashing green (for about 3 seconds) to solid green, which means that the drive was ready to use. After this is done, go back to the TerraMaster software (which runs on your computer) and click Search: this should immediately show the available TNAS, with its IP and MAC address, the Type, the Status and the WOL (Wake Up, Setup, Delete).
The small TNAS PC window will also allow you to write or browse the data on your NAS using the File Browser, MAP the Drive or Change its IP. To access the advanced settings from the TOS, click Login which will automatically open a new browser window and will begin the initialization process (only the first time you use the NAS). The software will analyze the connected HDD or SSD and, if everything is fine, it will automatically download and install the TOS on it (at this point, any data that’s on the drive will be erased). If you’re a tech-savvy person, you don’t necessarily need to install the small TNAS utility (which works similarly to the ZON software from Zyxel), but simply identify the IP address of the NAS and insert it in the URL of your browser to get the installation going.
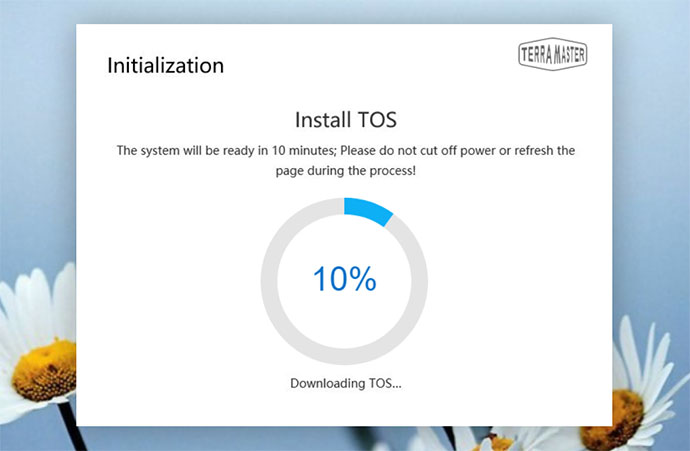
After TOS has been installed on your drive, you’ll be guided through inserting a new password, an email to which you will receive an activation code and lastly, you will be able to select the RAID level (the drive will format afterwards). And that’s it, you can now explore the TOS.
The operating system main window is very similar to the Windows OS Desktop (and bares a very close resemblance to the Synology NAS OS), with the application icons positioned vertically on the left side and, to access any of them, you need to double-click the icon which will summon a separate window on the Desktop and a small link in the taskbar (the colorful background pictures are a nice touch as well). Similarly to the Windows OS and Synology OS, you can open multiple windows which can be moved around, maximized or minimized and each opened window can be quickly accessed from the taskbar (you can also right click in the desktop to create new folders or files, to change the background image and more).
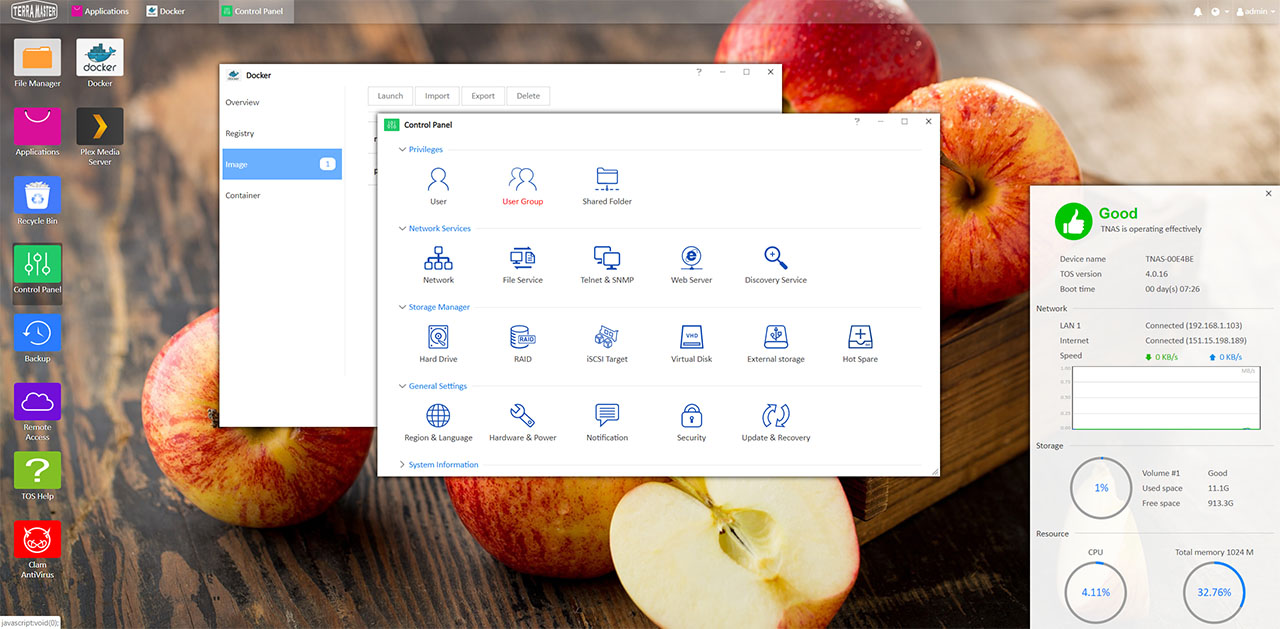
On the right side of the Desktop, the TOS will display a semi-transparent window which contains some status info about the TNAS, the Internet speed, the storage and the used resources (very similar to Synology). The first icon (from the right) is the File Manager, where you can view the files and folder from your storage devices, as well as upload, download, archive data (and more); the second icon is the Applications, which are grouped by Development Tools, Utilities, Security, Business, Backup and Multimedia. Among the available apps, there’s Python3 (great for system integration), WordPress, Joomla and phpBB for websites development or phpMyAdmin and MySQL Server (MariaDB) for hosting a MySQL database on your NAS.
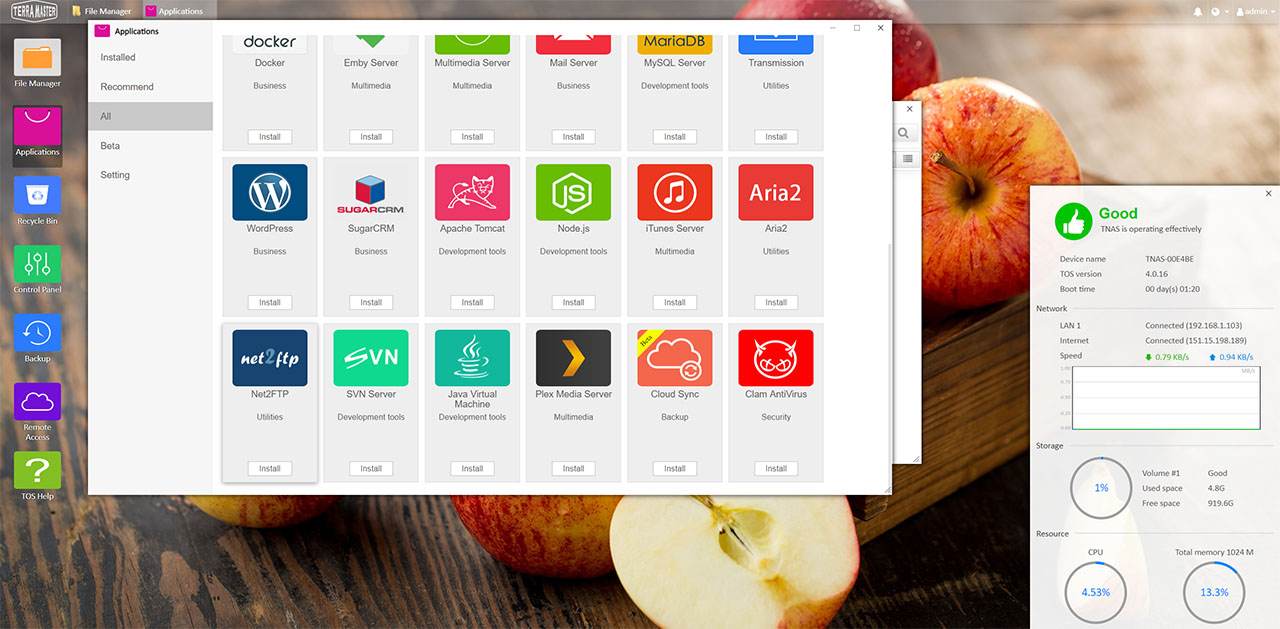
There’s also the open-source Clam Antivirus which is decent for detecting malware and viruses, and, of course, there’s the Multimedia Server, the iTunes Server and the Plex Media Server to easily share multimedia data across your devices on the LAN. The next icon is the Recycle Bin (has the same function as on the Windows or Mac OS) and further down, there’s the Control Panel where you can configure most of the important aspects of the TNAS. Under Privileges, you can view existing users or create new ones; you can also create User groups, where some users can modify the data created by those in the same group and, under the Shared Folder, you get to choose between public and appdata as your shared folders or you can create new shared folders.
Under Network Services, you can set the name and port of the NAS, view the current LAN connection or configure any detected WiFi adapter; you can also configure the File Service (Windows, MAC, FTP or NFS), set up the Telnet/SSH and SNMP connections, enable and configure the Web Server and the Virtual Host or Enable UPnP discovery service (you can read more about the UPnP and if it’s safe here).
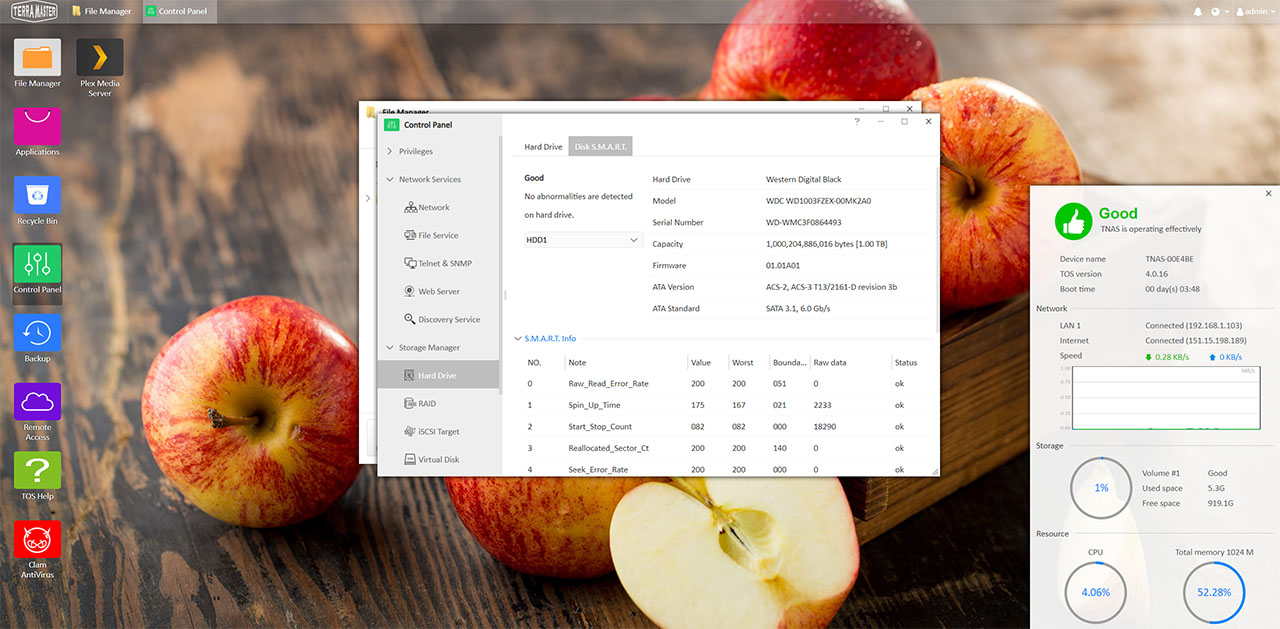
Under Storage Manager, you can view any connected Hard Drives (and view diagnostic info at Disk S.M.A.R.T – you can also scan for bad sectors), view the RAID volume (the TNAS supports Single, JBOD, RAID 0, RAID 1), enable the iSCSI Target (the server storage space will be seen as local disks), enable the Virtual Disk (allows you to connect to the iSCSI targets in order for your storage to be seen as virtual disks), view any connected External storage (view and modify data from your external storage devices – you can also format the disks or Safe Eject them) and configure the Hot Spare (a very important part of a NAS and consists of a spare drive which is set as failover, so in case a drive fails, it replaces it, therefore protecting the storage pool).
Under General Settings, you can set the Region and Language, the Hardware and Power (here, you can select the Fan speed and after what period of inactivity the Hard drive will go to sleep), configure the Alert Notification and the STMP Server, set the Security parameters (configure the SSL Certificate, create Firewall TCP, UDP and ICMP rules or Enable Automatic Block to prevent an IP address to login after too many attempts) and you can also perform Software Update, Backup & Restore or Restore the device to Factory Default settings.
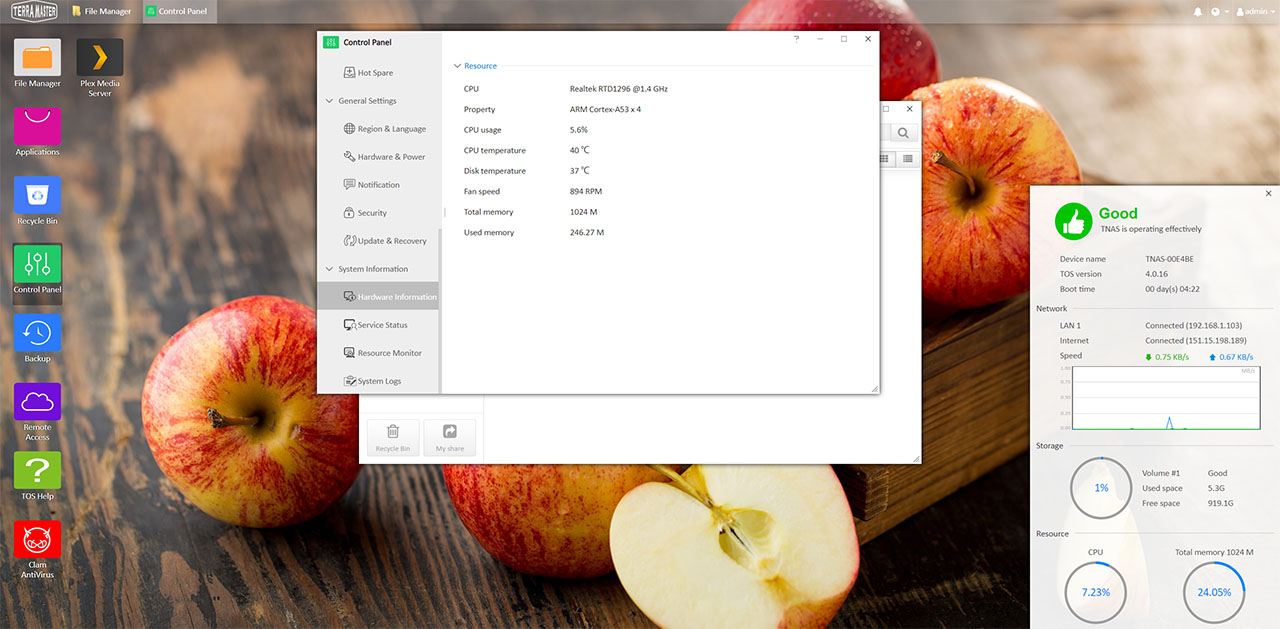
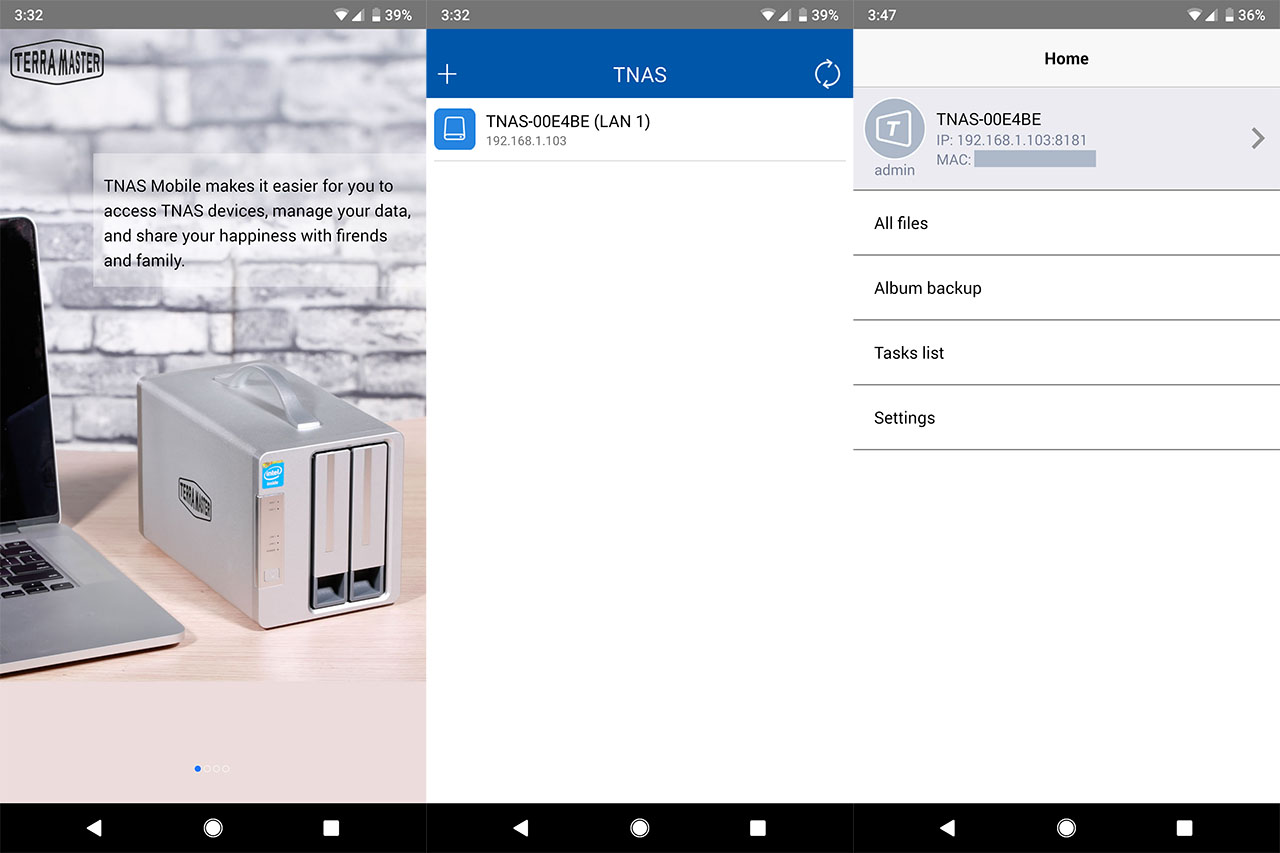
Lastly, still under Control Panel, you can also view the Hardware Info, the Service Status, the Resource Monitor and the System Logs as part of the System Information section. Underneath the Control Panel, there’s the Backup section, where you can enable the Rsync server (synchronizes data files between multiple servers without relying on FTP), Rsync Backup (allows you to create new backup tasks), you can also configure the Time Machine, Back up data To USB (select a source, destination and method) and Back up data to TNAS. Further down, there’s the Remote Access section (TNAS.online and DDNS) and the TOS Help. To test the TNAS.online, I decided to install the TNAS mobile app and, since my phone uses the Android OS, I could not find the app in the Play Store, so I had to download it from the official website – the good news is that after I installed the app and logged into the account, I could access the storage from my LAN even when I wasn’t connected to the router (using the mobile application, you can also adjust pretty much every aspect of the TNAS in the same manner as you would if you used the web-based UI).
Overall, the interface felt really polished and everything was well laid out, so even the beginners can understand how to configure their NAS. Some of the early complains were that there weren’t enough apps available and it seems that TerraMaster has added enough of them to satisfy any home user and even some SMBs (the MySQL server is a very nice addition).
Performance
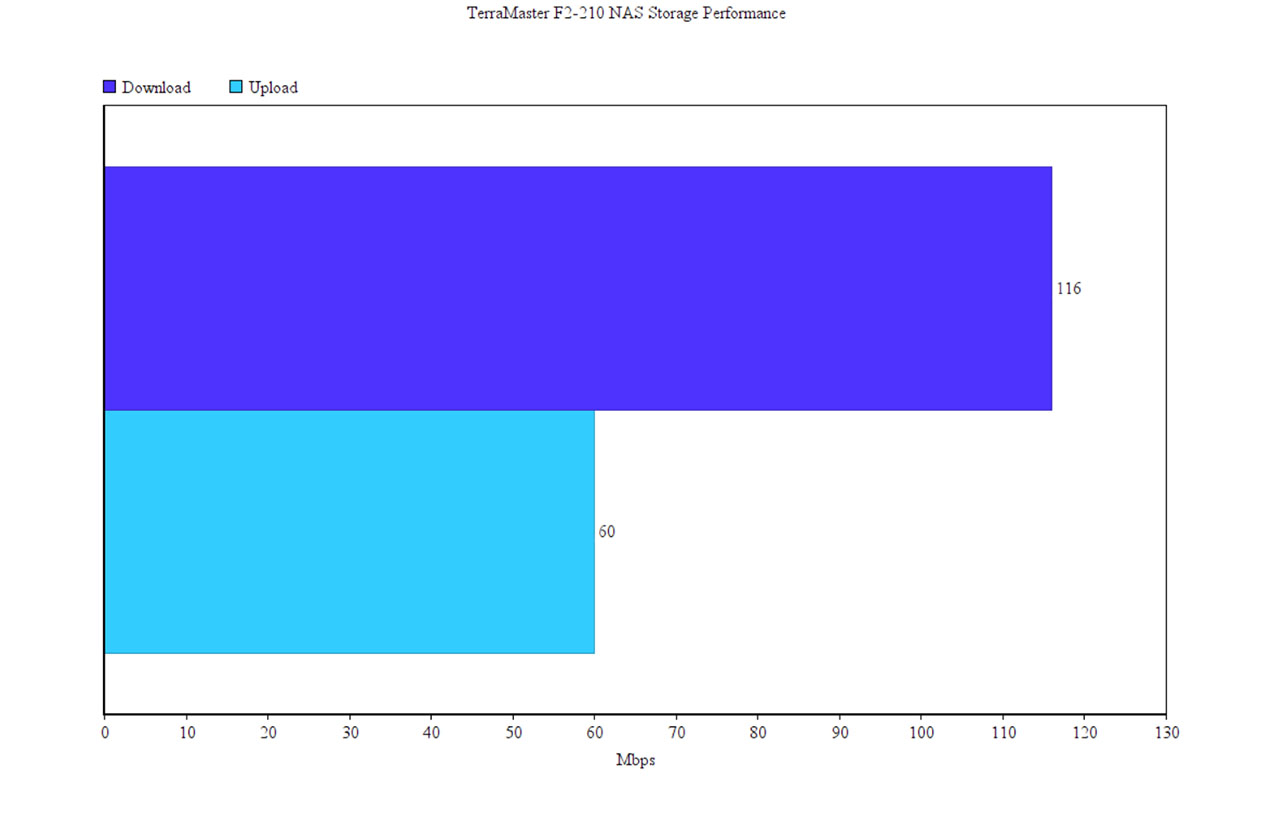
The TerraMaster F2-210 features a maximum single volume of 108TB and a maximum internal raw storage capacity of 32TB (2x 16TB), but, at the moment of testing, I only had a single 1TB WD Caviar Black HDD available and I also used a Samsung T5 external SSD (250GB) to test the performance of the NAS. Using the 1TB HDD, I decided to move a 3GB multimedia folder from my Desktop PC (connected via an Ethernet cable to the router, same as the TNAS) and, the average uploading speed was about 60 MBps and the average downloading speed was about 116 MBps (when the HDD was directly connected to the computer, I measured an average of 117 MBps on the upload test and an average of 178 MBps on the download test – which was done with the same folder – the difference is understandable considering the 1 Gbps cable limitation and the overhead).
Next, I decided to run the CrystalDiskMark 6 synthetic benchmark and, as the results show, I got an average reading speed of 62.0 MBps (sequential) and an average writing speed of 45.0 MBps (sequential) – as opposed to the results that I got when directly connected to the Desktop PC: 192 MBps reading speed and 186 MBps writing speed.
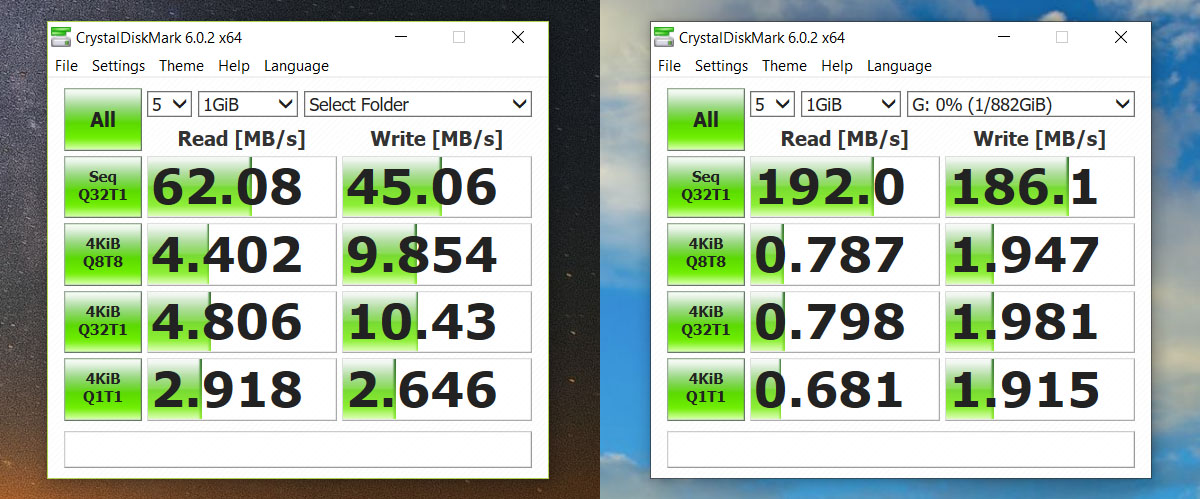
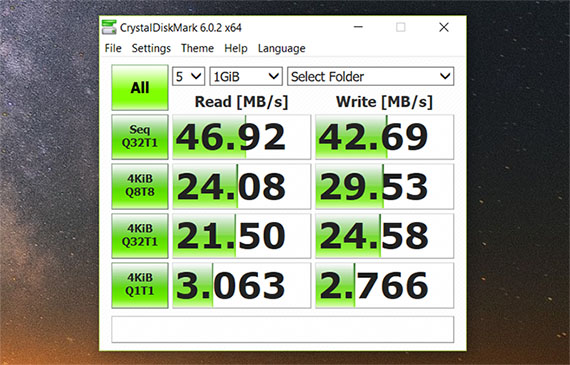
It’s interesting to see that the 4KiB (Q8T8, Q32T1 and Q1T1) were better when the HDD was connected to the TNAS. On the next step, I decided to connect an external SSD, specifically the Samsung T5 (250GB) using the USB 3.0 port and, once again, I ran the CrystalDiskMark 6 synthetic benchmark: the read test showed 46.92 MBps (sequential), 24.08 MBps (4KB Q8T8), 21.5 MBps (4KB Q32T1) and 3.06 MBps (4K Q1T1); the write test showed 42.69 MBps (sequential), 29.53 MBps (4KB Q8T8), 24.58 MBps (4KB Q32T1) and 2.76 MBps (4K Q1T1).
One thing that I noticed when I connected the external SSD is that it was immediately discovered by the TNAS, but something that I found a bit annoying was the time that it took to delete a file or folder (it took about 30 seconds for a 5 GB file).
Conclusion
The TerraMaster F2-210 was built to cater to the needs of those people that want to have a centralized storage system in their homes which can be accessed by every other connected device in the network and it does so by offering a decent storage performance, a compact, sturdy case and a surprisingly well built operating system with lots of available applications, including some advanced ones (the TOS is still not at the level of Synology’s OS, but the developers are clearly eager to get there). There are some shortcomings, such as the inability to upgrade the RAM or the 32TB maximum raw storage capacity (the longevity of the company is also a factor that needs to be taken into consideration), but, when compared to other entry-level NAS devices, the F2-210 is clearly one of the most attractive solutions available on the market right now.
TerraMaster F2-210 NAS
Pros
- The TOS is user-friendly and easy to navigate
- A decent amount of apps, from which some advanced ones (MySQL Server)
- Decent Storage Performance
- Supports Hot Swapping
- Supports RAID
Cons
- The RAM can't be expanded
- Not Plug and Play
Mark is a graduate in Computer Science, having gathered valuable experience over the years working in IT as a programmer. Mark is also the main tech writer for MBReviews.com, covering not only his passion, the networking devices, but also other cool electronic gadgets that you may find useful for your every day life.