
If you were wondering whether it’s possible to turn an old PC into a router, know that it’s very much possible and there are also more than one ways to achieve it. The open-source pfSense which is based off FreeBSD is one of the most popular ways to transform a computer into a router and there is also VyOS which has a helpful community behind it due to Ubiquiti’s EdgeOS (both it and VyOS are forked from Vyatta). Of course, let’s not forget RouterOS from Miktrotik or Sophos, but what all these software have in common is that they’re commercial-grade, so, if you expected the same type of configuration as on a consumer-based router, well, it’s going to require a bit more technical knowledge, especially if you intend to run some more advanced features. Don’t let that discourage you though, since building your own router will help you learn a lot more about how networking works and you will also get the option to configure pretty every aspect of your router.
The general consensus is that you should use a desktop PC with some expansion slots available since a computer doesn’t (usually) have more than one Ethernet port and, if you intend to add some wired client devices to the network, you will need at least an additional LAN port. That’s not always the case and you may only have an old laptop available that you can use to turn it into a router and no, it will not be compatible with any expansion cards, but there are some USB to Ethernet adapters available that you can use for the LAN port (depending on your USB ports, you may even get close to 1Gbps). And this takes us to the first step on turning your laptop into a router and that’s preparing and understanding the hardware.
1. Preparing the hardware
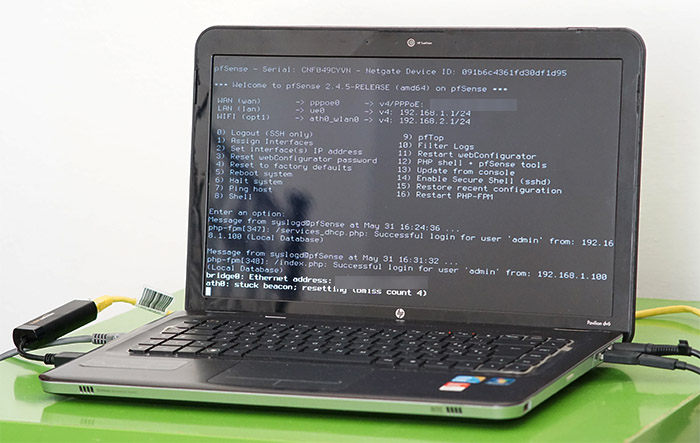
The router is a very basic computer that is especially designed in a manner to move the data between multiple computer networks, so any laptop or desktop PC that was released the last 10 or even 15 years ago should have no trouble running any software that would turn it into a networking router; most would actually be seriously overkill. Like I said before, it would be ideal to use a desktop PC (mini-ATX should be perfect), but for this guide, I only have an HP Pavilion dv6 laptop available, so that’s what I’m going to use.
The specs are the following:
- Intel i5 M460 CPU clocked at 2.5GHz;
- 4 GB of RAM;
- 500 GB of storage (HDD);
- Atheros AR5B95 WiFi card;
- RealTek PCIe GBE controller.
The processor is far more than what we’re ever going to need (but, the more power, the better), same as the 4GB of RAM or the ridiculous amount of storage (it’s better to allocate only a part of it for the router software). The Atheros AR5B95 WiFi card is a bit old and does not support the 802.11ac WiFi standard (only the a/b/g/n), nor the 5GHz band, so, unless I am going to use a wireless access point, the wireless clients will have to connect only to the 2.4GHz network (the advantage is that the large majority of wireless devices can still only connect to the 2.4GHz band). The usual consumer-type router has a power consumption of about 10W (such as the Asus RT-AC86U), while a commercial-level router, such as the DrayTek Vigor2926 will require a lot more, going up to about 29W. A laptop will need a bit more and the model that I use can go up to 90W, so take that into account before deciding if it’s worth building your own router since it’s going to have to work 24/7.
I know that some users say that a laptop can take advantage of its battery and remain active even after the power brick has been removed (which is obvious), but I have three old laptops around and all three (from different brands) require a continuous connection to a power outlet (the batteries are toasted), so, unless you have a fairly new laptop to use for this project, I wouldn’t get my hopes up on relying on the battery as a built-in UPS for the DYI router. One major problem when using a laptop for this type of project is that it has one Ethernet port available and no way to expand it by relying on the expansion slots as you would with a desktop computer.
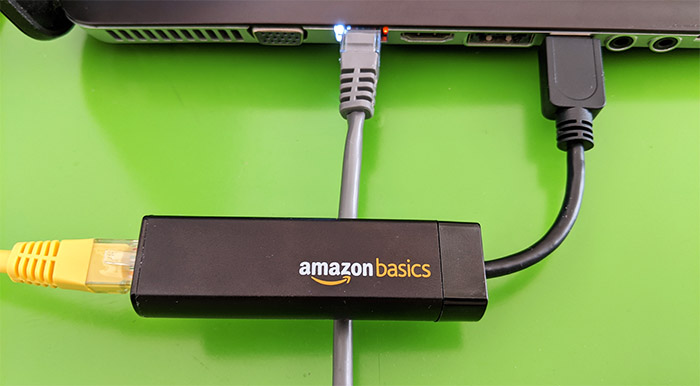
I did find a workaround by using a USB to Ethernet adapter which should give me at least one LAN port available. I used the model named AmazonBasics which is a USB 3.0 to Gigabit Ethernet and, even if my laptop is quite old (about 8 years, I think), it has some USB 3.0 ports available, so the LAN port is not going to be limited to 100Mbps (the dreaded Fast Ethernet) – it’s ideal to connect the adapter now, so the software can detect it while it installs.
Lastly, since CDs are no longer in trend, you’re going to have a USB driver available to add the desired software for creating a router and yes, I am going to use pfSense for this guide which has an easy to use GUI (I may explore other options in the future).
2. Preparing the software (pfSense)
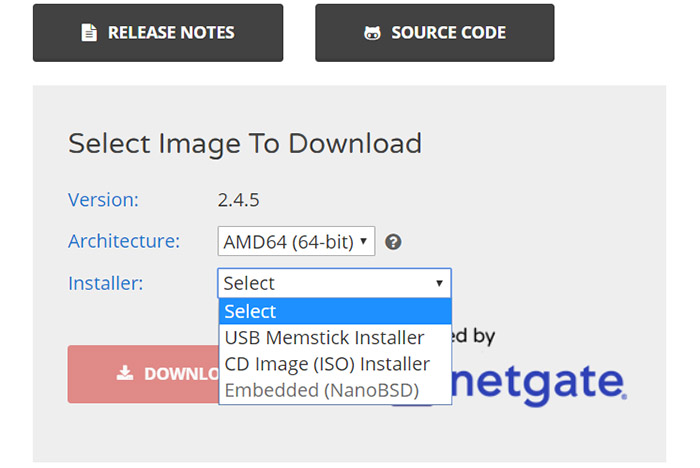
The first thing that you need to do is download pfSense and then put it on a bootable USB drive and to do so, you need to go to pfSense.org, click Download and under Latest Stable Version, you can identify the version (in my case, it was 2.4.5), followed by Architecture and Mirror. Under Architecture, you can select Netgate ADI (if you have a Netgate appliance, which we don’t) or AMD64 which is suitable for both AMD and Intel 64bit, so this is the option that we’re going to choose; under Installer, select USB Memstick Installer and under Console, either select Serial (for USB ports or RS-232) or VGA (if you rely on the VGA or HDMI output) – for a generic USB dongle, select Serial. Lastly, choose the Mirror location (the closest to you) and click on Download.
After the files are downloaded, use 7-zip (or an alternative software) to unzip the image and then select a tool to create a bootable USB drive. I chose Balena Etcher since I have been using it for a while to install various distros on Raspberry Pi devices and the process of adding pfSense is quite simple: run Etcher, select the image (the files that you downloaded and unzipped), select the drive (make sure that it has been previously formatted) and then click on Flash. After it finishes writing the image, Etcher will automatically unmount the drive which can now be inserted in a USB port on the laptop (that is going to use as a router).
3. Install pfSense on a laptop
If your laptop storage drive is already empty, then simply insert the USB drive into any port and wait for the computer to start the installation process but, if you have any other OS already installed that you want to keep, you need to boot into BIOS (it depends on each laptop brand – in my case it was to press ESC, but in most cases it’s pressing obsessively F11) and select the USB dongle as the boot drive. At this point, you will see the main pfSense menu followed by some processes that will run for a few seconds until you will be asked to Accept that you are not allowed to make any commercial distribution (pfSense is free to use, so, if it helped you, you could also donate to the developers – it’s up to you).
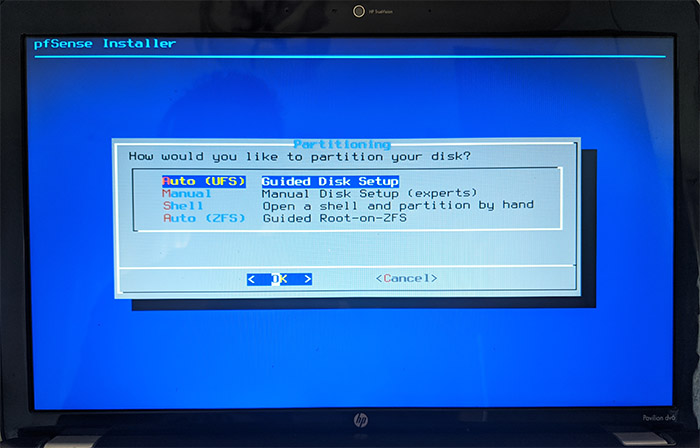
Afterwards, you can choose between three options: Install pfSense, launch the Rescue Shell or Recover the config.xml – choose the first and then, at the Keymap Selection, just keep it at Default. Next, at the Partitioning section, you get four options: Auto, Manual, Shell or Auto (ZFS) – I went with the Auto (Guided Disk Setup) which will then ask whether you want to use the entire disk or create a small partition out of the free available space.
I do have a 500GB HDD available, but it would be a waste to use it for pfSense (I left it for other applications), so I decided to install pfSense on a SSD (it doesn’t have to be too big, since pfSense doesn’t need too much storage – 32GB should be more than enough). After selecting which drive you wish to install, you will be taken to the Partition Scheme, where you should keep the default (MBR DOS Partitions) and then you get to review all the settings before clicking on Finish and start writing the software on the drive. Wait a few minutes and the process should be finished (you will be asked whether you want to make any final modifications using shell). Reboot and this is where the fun begins. First, you will be asked whether you want to set up VLANs now and for now, we will say no (they can still be configured later) and secondly, you will need to Enter the WAN interface name and I selected the built-in Gigabit Ethernet port – you can find the valid interfaces only a few lines up.
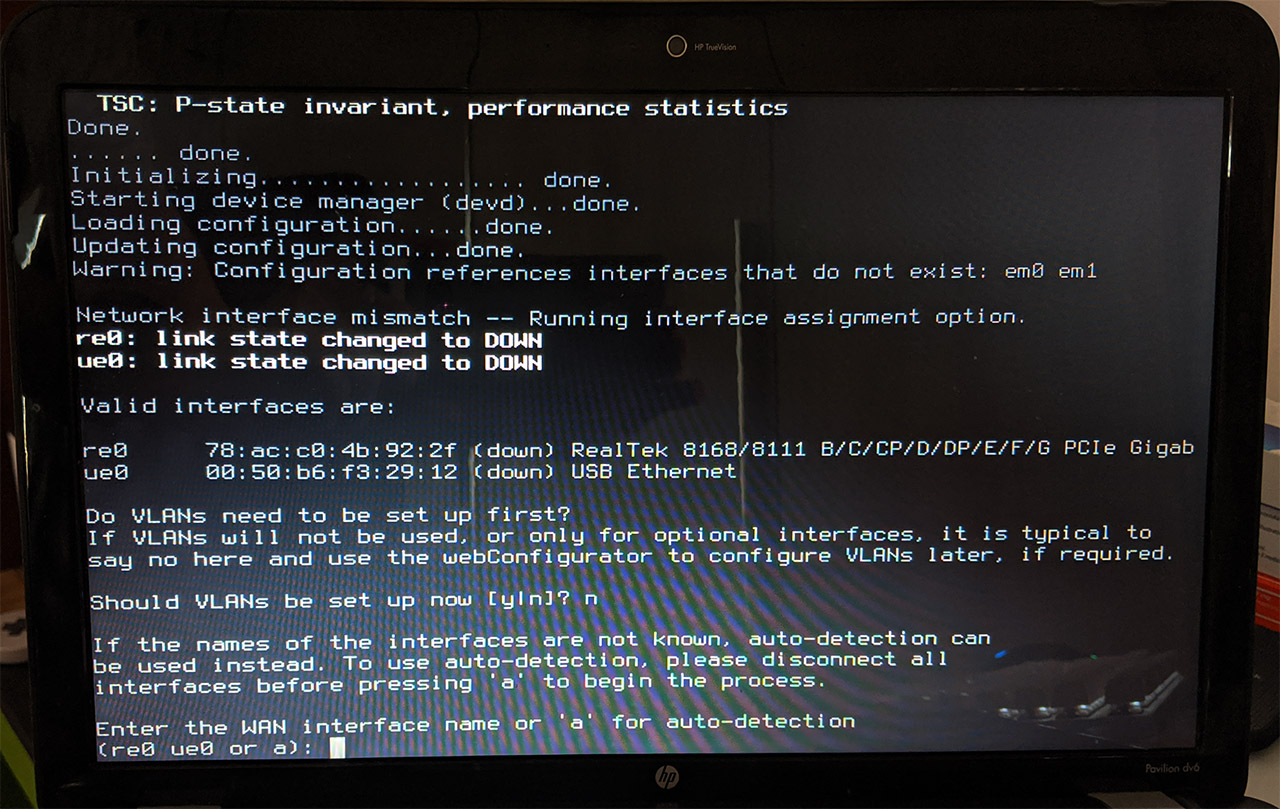
Afterwards, you need to enter the LAN interface name (I chose the USB to Ethernet adapter); confirm the changes and move on. Now, you will be able to see the configuration menu, as well as the LAN IP address (by default, it should be 192.168.1.1).
My laptop will turn off the display after I close the lid and pfSense will continue to function just fine (while also consuming less power) and I know that some laptops have a key combination to turn off the display (FN+ an F button) or, if everything else fails, you could go into BIOS and set a timeout for the monitor after it detects a certain period of inactivity.
4. Configuring pfSense
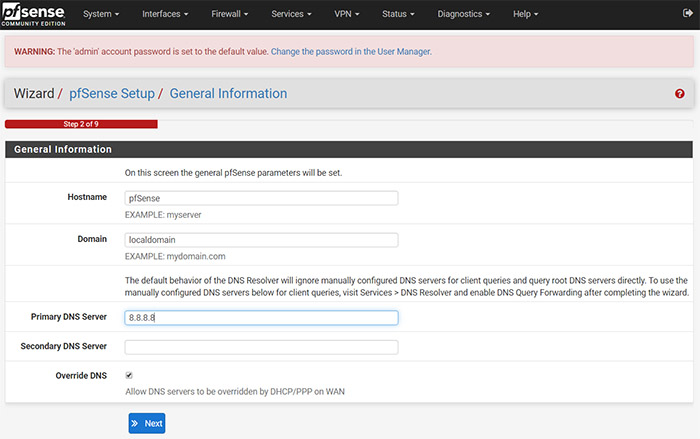
At this point, take two Ethernet cables and use one to connect the WAN port (the one that you set on the pfSense laptop) to the modem and the other to connect the LAN port to a computer, so you can access the GUI. After you’ve hooked a client device to the pfSense router, open a browser and enter the LAN IP that was previously set during the configuration (by default, it should be 192.168.1.1). This will open the user interface where you will have to Sign In using the default username and password (it’s admin / pfsense) and the Wizard will kick in to allow you to adjust the General Info: the Hostname and the Domain (I kept them as default since it’s going to be a local config, but you can enter any owned working businesses domain as well), the DNS server (I used 8.8.8.8 – Google’s OpenDNS) and I kept the Override DNS as enabled (useful if I will receive a DNS if the WAN port is going to be set to DHCP).
Next, we can set the Time server hostname and the Timezone (set it to where you currently live) and then we got to the WAN Interface configuration page.
Here, you can select the WAN interface type and, in my case, it was PPPoE, so I went to the PPPoE configuration area and I inserted the Username and Password given by the ISP – everything else was left as default, including the blocking of RFC1918 private networks (to block private networks from entering via WAN since we are connecting directly to the ISP) and the bogon networks (to prevent spoofing).
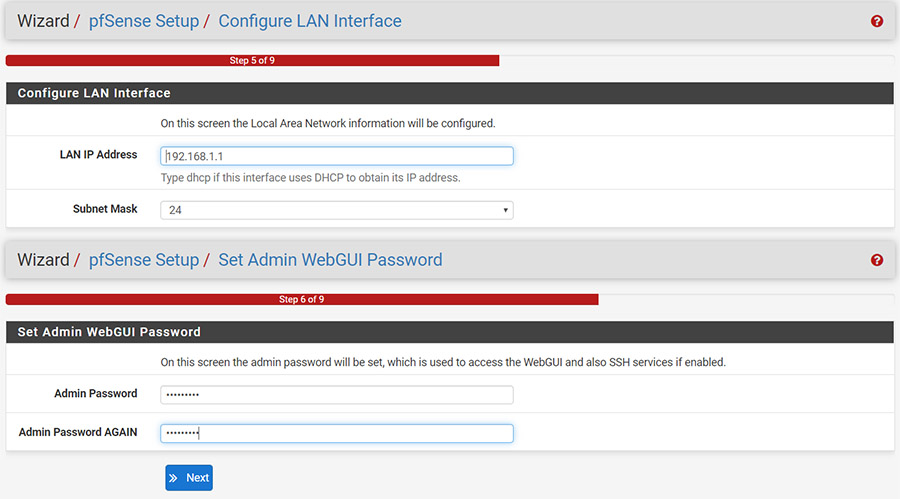
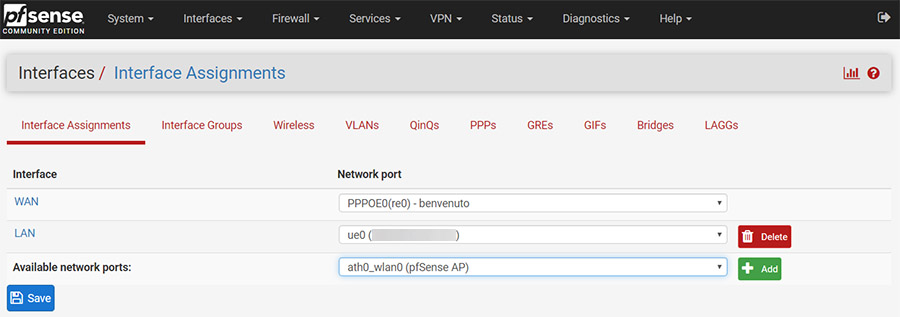
Afterwards, you can change the LAN IP address (I left it as 192.168.1.1) and the Subnet Mask (I left it as 24 – it means 255.255.255.0) and lastly, modify the Admin Password (do not leave it as default!). Click Reload and wait for the settings to be applied. Now that we get access to the main Dashboard, there should be two sections, one with the System Information (which includes hardware stats, the internal temperature of the laptop, the pfSense version and whether the MDS Mitigation is active) and the other will show the Interfaces (it will display the WAN and LAN that we just configured). Since the laptop does have wireless capabilities, it’s time to enable it from the software and to do so, you need to go to Interfaces and click on Assignments.
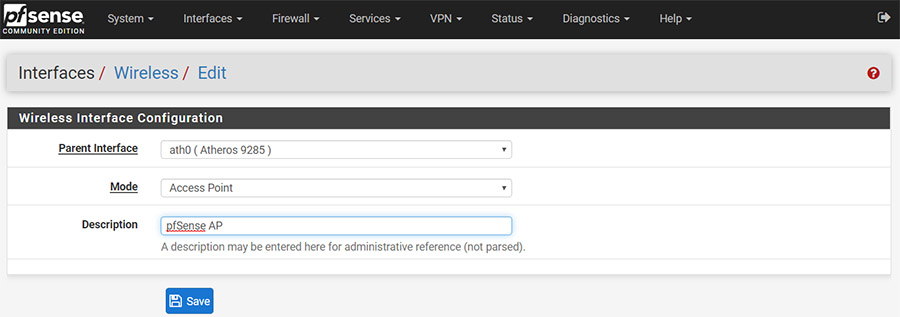
This will summon a menu from which you need to click on Wireless and then on Add. Under Wireless Interface Configuration, select the preferred Parent Interface (I only have available the Atheros 9285 WiFi card), the Mode (select Access Point) and give it a description, if you want. Click Save and go to the Interface Assignments and, from the Available network ports, select the newly created WLAN and click on Add.
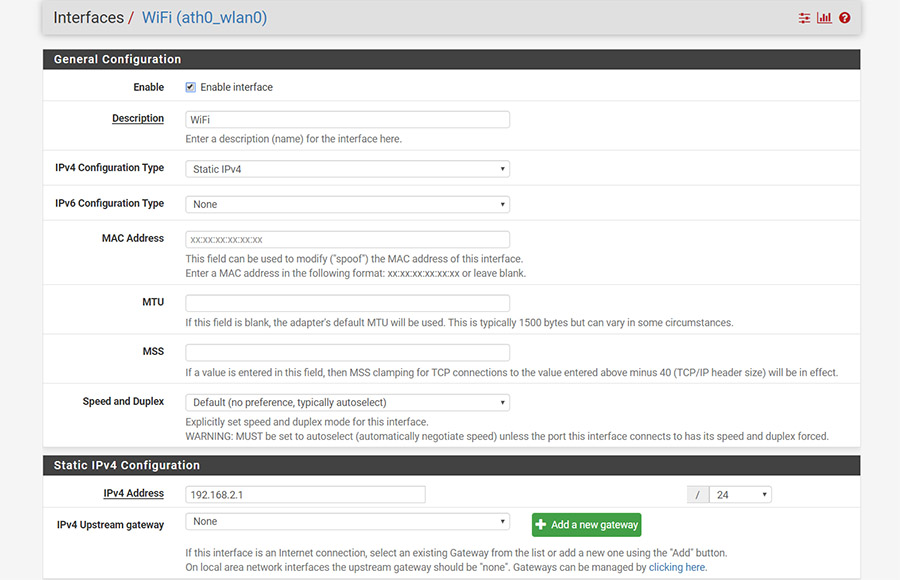
To adjust its setting, click on Interfaces (from the top menu), select the WLAN interface (should be called OPT1 or something similar) and, from the General Configuration, Enable the interface. Afterwards, you can change the Description (enter WiFi or whatever you like) and, at the IPv4 Configuration Type, set it to Static IP and then put it in a different subnet – for example, set the Static IP address to 192.168.2.1/24. Under Common Wireless Configuration, I set the Standard to the 802.11ng and the Channel needs to be set in a manner as to not be affected by nearby networks, so use a WiFi analyzer tool to check out the best one (don’t leave it to Auto).
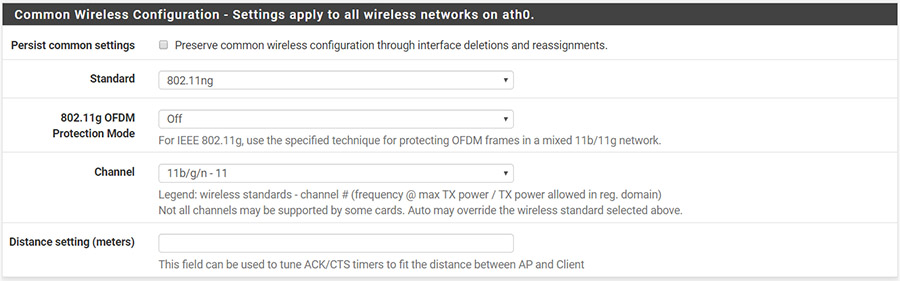
Next, there’s the Regulatory Settings section which should be compiled accordingly to your location, so it doesn’t go against the rules in your region and then under Network-Specific Wireless Configuration, the Mode will be set as Access Point, enter the SSID (the name of your wireless network), the Minimum wireless standard (I went with 802.11n since I don’t have any legacy devices around, but make sure to check whether there are older devices that need to be connected before selecting the same as me) and, since I put the 802.11n as the minimum standard, I will have to also Enable the WME (Wireless QoS). At the next section, check Enable WPA, enter the WiFi Pre-Shared Key (the password that needs to be entered to access the wireless network), leave the WPA mode as default (WPA2), as well as the other options in this section.
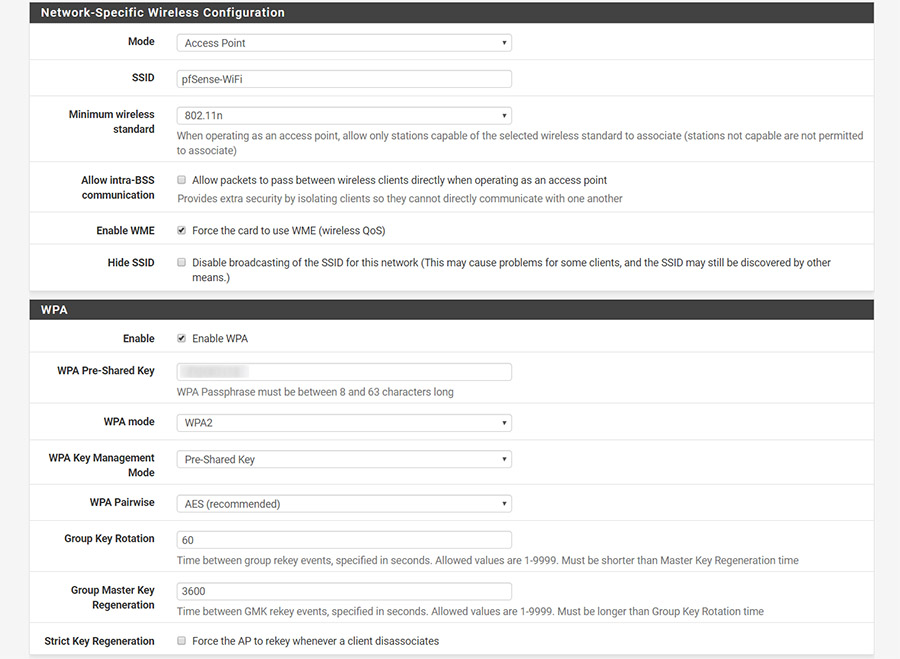
The 802.1x RADIUS Options are reserved for organizations with larger number of clients so, we’ll just leave it disabled and on the next section, I only enabled the Block bogon networks. After that’s done click Save and Apply. This should be enough, but I noticed that I has problems connecting any wireless clients.
To try and solve it, I realized that the device would not receive an IP, so I had went to Services > DHCP Server and selected WiFi, where I Enabled the DHCP server on the WiFi interface and set an IP range (something like 192.168.2.10 to 192.168.2.254). The device would now connect and receive an IP, but there was no Internet – I did try bridging the LAN with the WiFi to no avail and that’s when I realized that I got the dreaded ‘stuck beacon’ error which simply means that there is a lack of compatibility between pfSense and the Atheros WiFi card (some driver issue), so I took out an external wireless access point which immediately solved the problem. This shows that even though you have a WiFi card in your laptop/desktop computer, you may not be able to take advantage of it using pfSense.
If you don’t need anything more from a router, you can stop here without worrying too much about security, since even in its current state, pfSense has some security measures that run by default, but, if you want additional common (or more advanced) features, then you need to go to System > Package Manager and check the Available Packages list (which is very extensive). Some cool packages are iperf which you can run to check the network throughput (as well as loss and jitter), the Service_Watchdog which checks for services that have stopped and restarts them and there’s snort which is a great tool for preventing and detecting any intrusions (IDS/IPS) – some of the newer routers such as the Asus RT-AC86U or the Synology RT2600ac have some lighter implementation of IDS/IPS, so yes, this package is a must have. Suricata is another package that you can install since it’s an IDS, IPS and Monitoring engine by OISF, so, similarly to snort, will ensure that your network stays secure (and the hardware of a computer will ensure that it will handle it without problems).
Mark is a graduate in Computer Science, having gathered valuable experience over the years working in IT as a programmer. Mark is also the main tech writer for MBReviews.com, covering not only his passion, the networking devices, but also other cool electronic gadgets that you may find useful for your every day life.