
Lastly, the Eero WiFi supports the BeamForming technology, which means that if you have compatible client devices, the signal will focus towards them, improving the throughput and limiting the interference. In order to test the Eero WiFi system, I took two computers and connected one to the main Eero unit via a cable (the device will work as the server) and the other computer (which is equipped with an ASUS PCE-AC88 wireless adapter) is going to be connected to the WiFi network. The WiFi network cannot be separated into a 2.4GHz SSID and a 5GHz SSID, so the wireless client is going to be connected the available network (the 2.4GHz network will be conducted with a client that supports only the old WiFi standard).
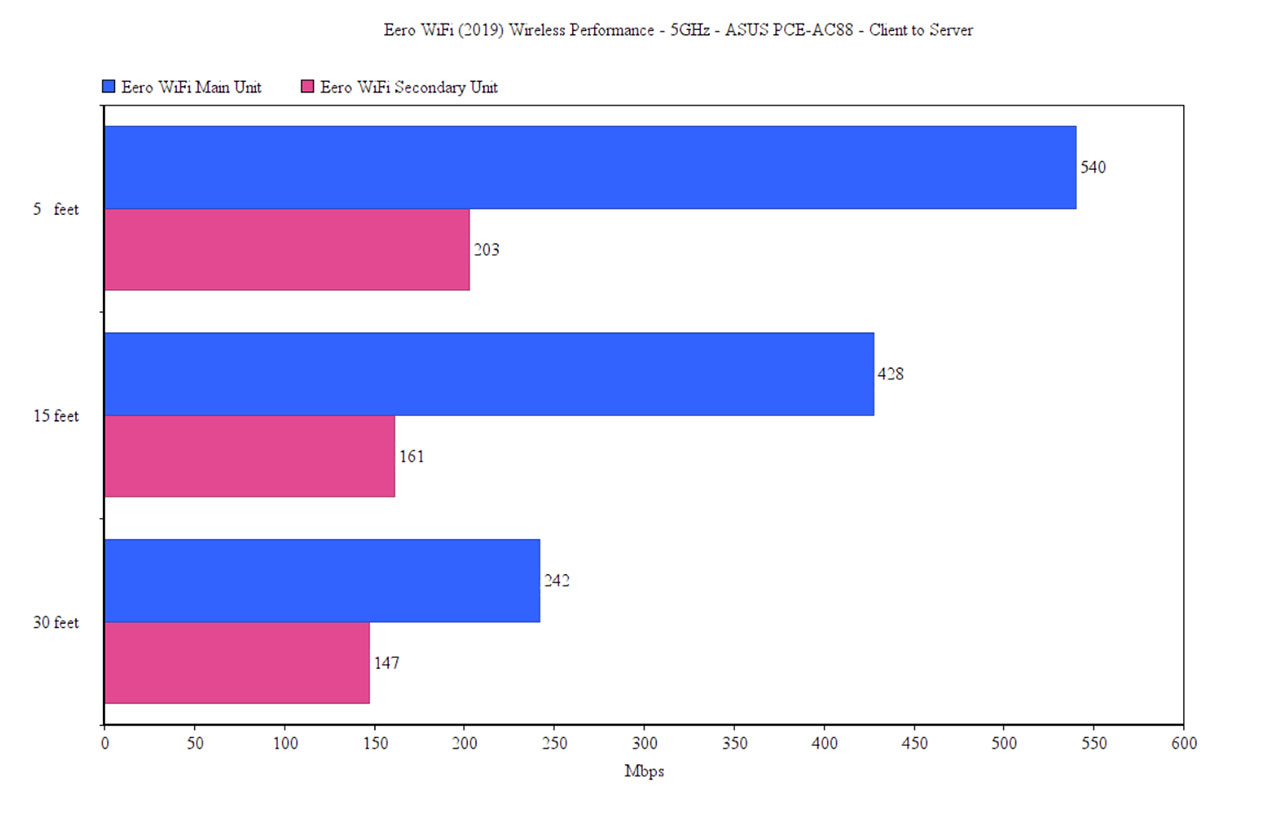
That being said, on the 5GHz network (and a single Eero WiFi node), from the client to the server, I measured an average of 540 Mbps at 5 feet and, at 15 feet, I got around 428 Mbps; at 30 feet, I measured an average of 242 Mbps. From the server to the client, about 5 feet away from the router, I measured an average of 288 Mbps and, at 15 feet, the speed decreased slightly to 272 Mbps; at 30 feet, I measured an average of 201 Mbps. Afterwards, I added the second Eero WiFi at about 35 feet from the main unit and, again, I connected the wireless client to the network.
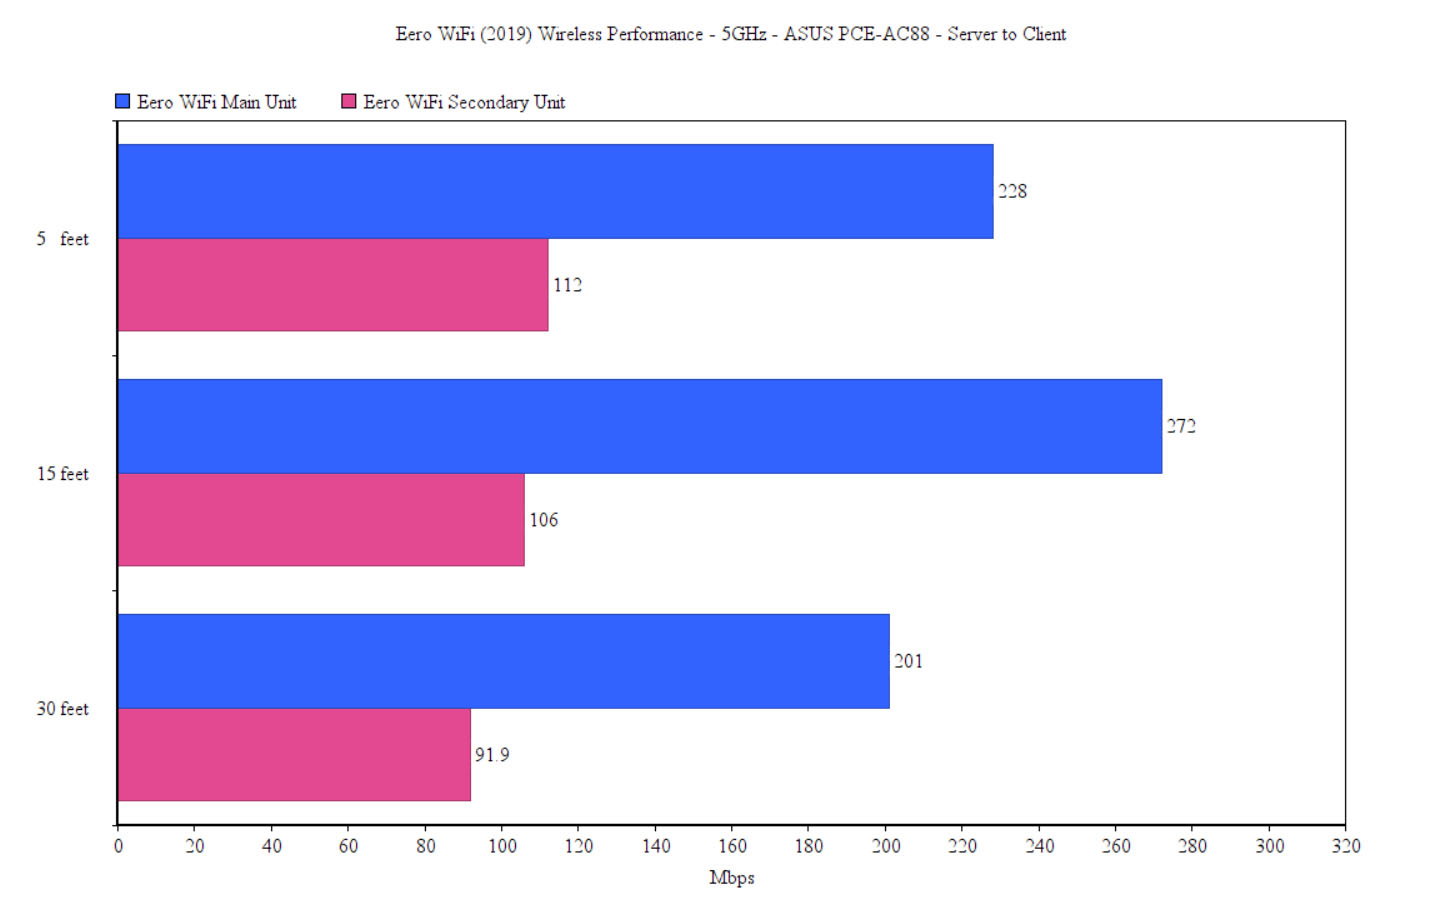
This way, from the client to the server, at 5 feet, I managed to measure an average of 203 Mbps and, at 15 feet, I got an average of 161 Mbps; at 30 feet, I measured around 147 Mbps. From the server to the client, at 5 feet, I measured an average of 122 Mbps, while at 15 feet, I got around 106 Mbps; at 30 feet, I measured an average of 91.9 Mbps. As you can see, the lack of a third radio does have an impact, but the throughput is still more than decent in most use cases – also, I had two units for testing, not the usual three that come into the standard package. To conclude the wireless testing, I took a computer that’s compatible only with a 2.4GHz network (802.11n standard) and, while it was connected to the main unit, I measured the throughput from the client to the server: at 5 feet, I measured an average of 167 Mbps, while at 15 feet, I got around 150 Mbps and, at 30 feet, I measured an average of 109 Mbps.
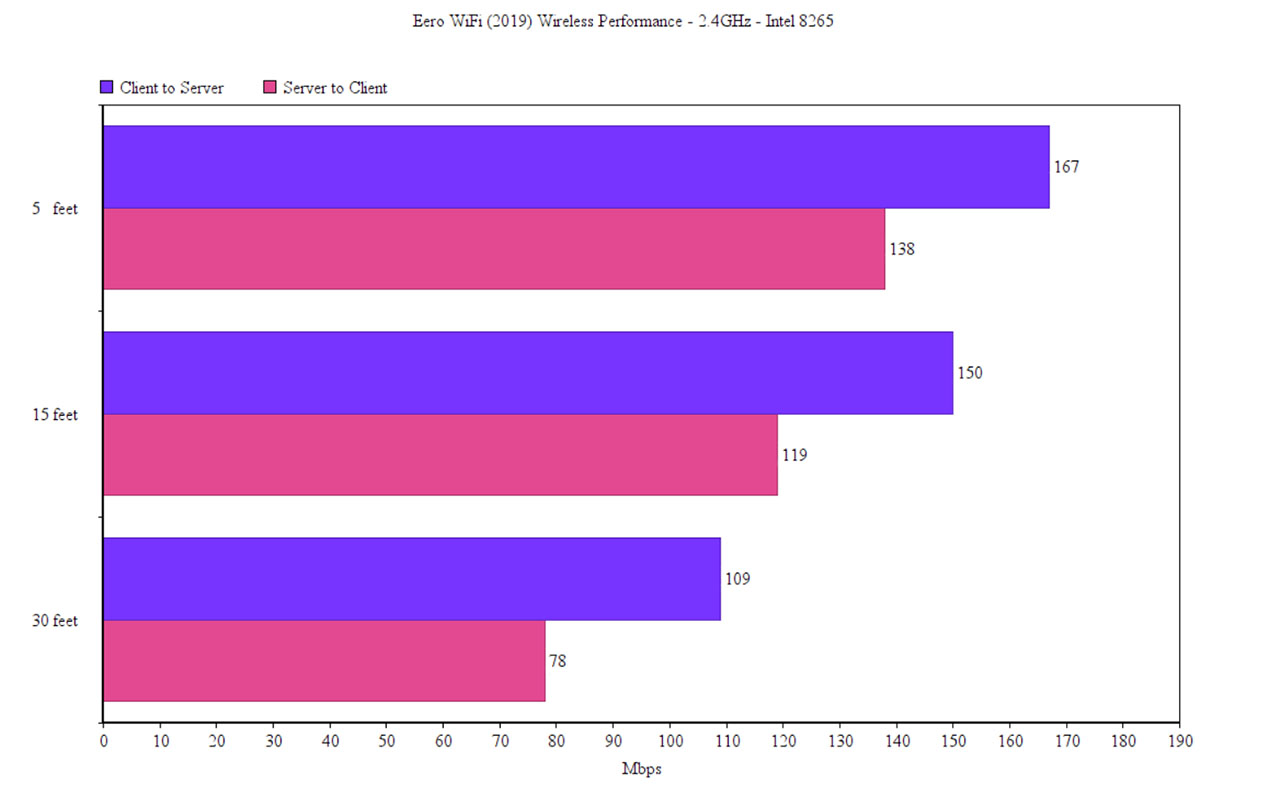
From the server to the client, I measured about 138 Mbps at 5 feet and, at 15 feet, I measured an average of 119 Mbps; at 30 feet, the speed went down to around 78 Mbps. As for the LAN to LAN performance, I connected the two computers to one of the Eero WiFi nodes and, from the client to the server, I measured an average of 950 Mbps, while from the server to the client, I measured an average of 898 Mbps.
Setup and Interface
Eero was one of the first manufacturers to push a fully functional WiFi mesh system on the market and one of the first to remove the web-based interface in favor of the mobile-only app. The Eero WiFi has maintained this tradition, so the monitoring and the configuration of the network will be done via the mobile app called Eero. The hardware installation is similar to the any other WiFi system: choose a unit to be the main one and connect it to the modem (choose any of the two Ethernet ports) and then power it using the provided USB-C cable.

Afterwards, download the app and then you will have to create a new account (it does require a mobile number which I found intrusive) after which you can start the configuration process: select the type of Eero device that you want to set up as the gateway, plug it to the modem and then wait for the app to detect it (via Bluetooth). Next, select the location of the new Eero WiFi, Create a new network (SSID and password) and, if you want to add other Eero nodes, the app will ask for more details about your house in order to let you know later whether the location that you chose for the secondary device is suitable. Lastly, you will be asked if you want to add the Security and Privacy in one package.
This security package does require a monthly fee and will add new functions, such as Safe Filtering (blocks unwanted content), ad blocking, weekly insights and more (on the basic plan, there’s also eero Secure+ that includes Antivirus, a VPN, as well as a password manager). I’m not a fan of these additional services that require a fee, especially when some of them were a standard a few years ago and, while I do see the value the Antivirus can bring, a much more valuable system would have been the Intrusion Prevention and Detection systems, as can be seen on the Synology RT2600ac, but I doubt the Eero WiFi hardware would support it.
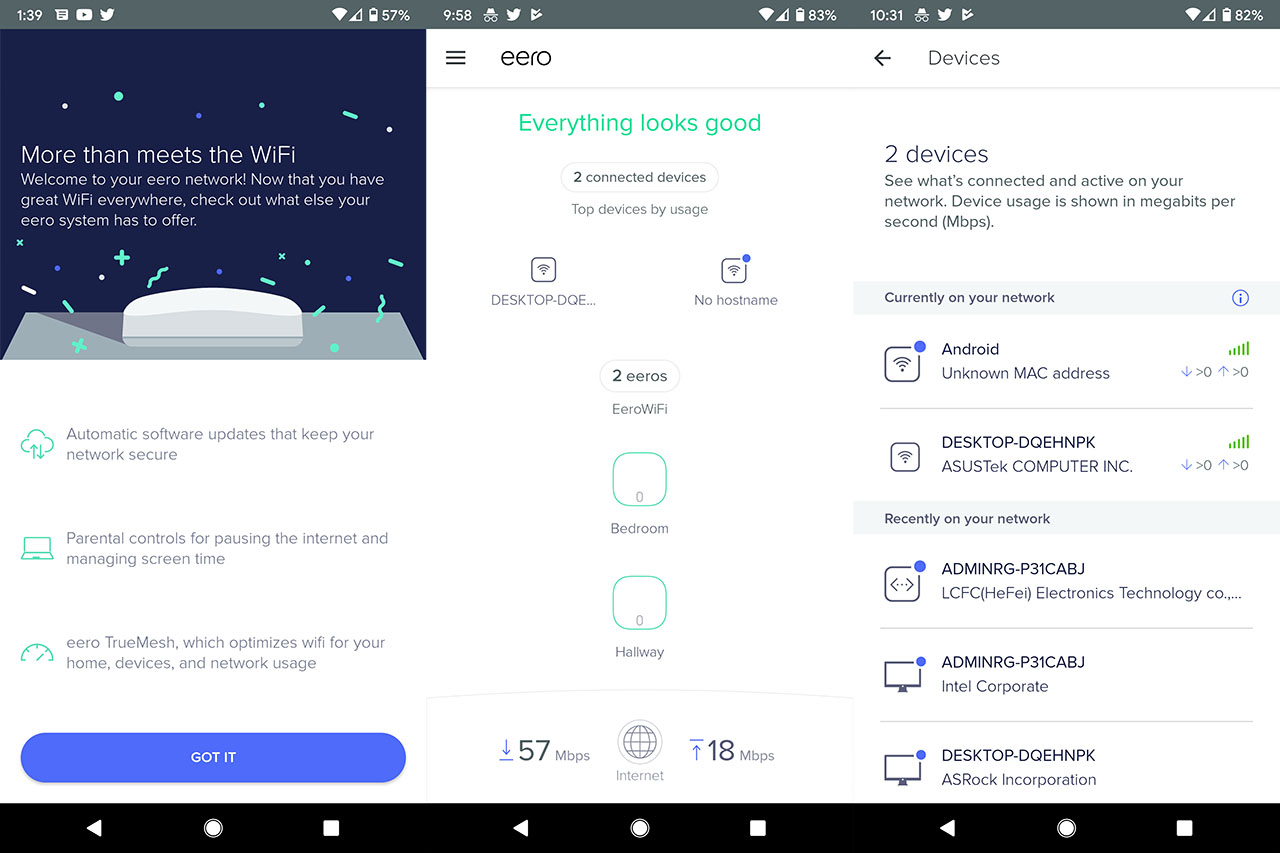
The app user interface is the same as with the Eero Home and Pro WiFi systems, with a dashboard (Home) that displays the status of the connection, the number of connected devices (and their names underneath for easy access), the number of Eero devices added to the mesh network, as well as the locations and the tested Internet speed. If you tap on the Clients, it will display a list of all currently and the previously connected devices and you can also tap on any client to see some detailed individual info, such as the used band (2.4 or 5GHz), the node that it’s connected to, the IP and MAC address; you can also block this device from the network or add it to a Profile (family filters).
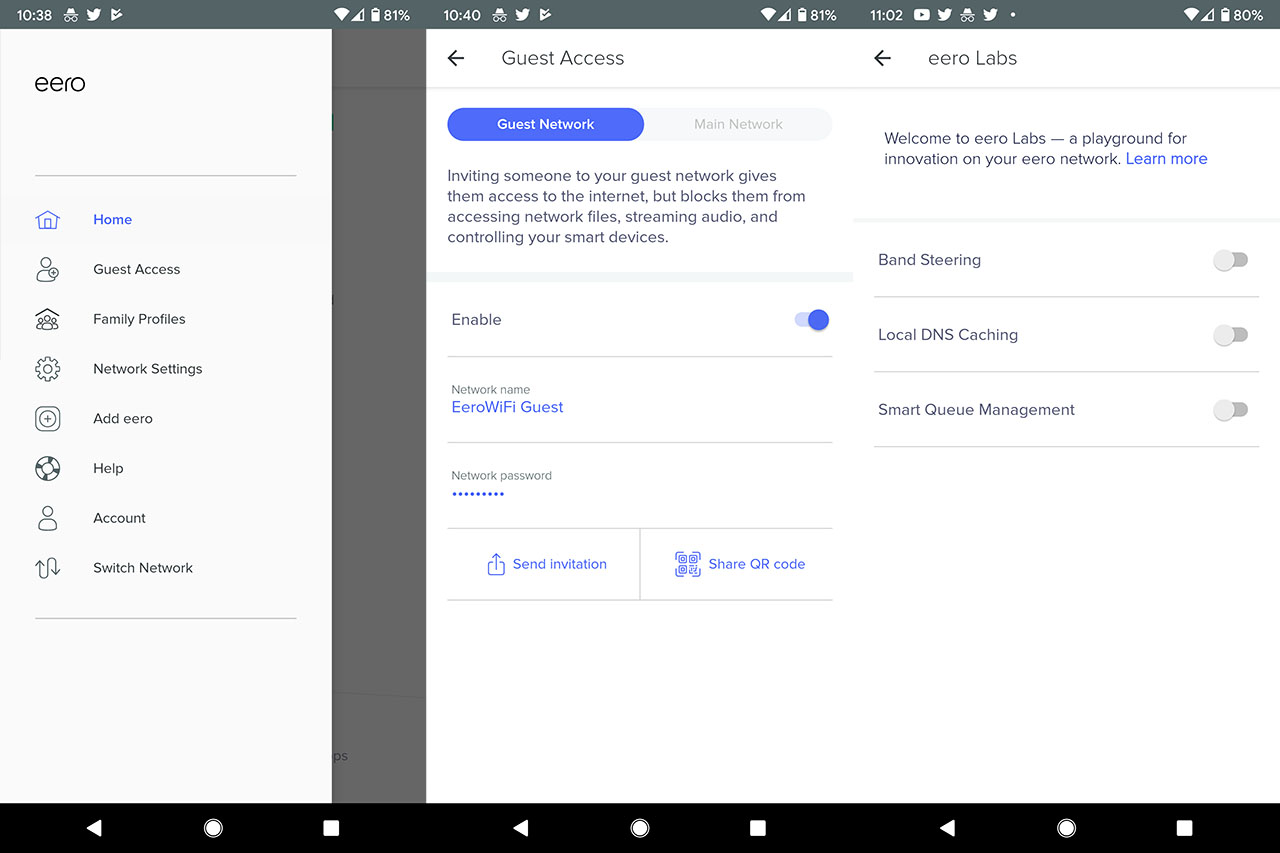
If you return to the Home section and tap on any Eero unit, it will display the Status of the device, the Connection details (the node will have a Wireless connection and the gateway a Wired connection), the number of Connected Devices, the Location, the LED light status (tap on it to turn it on or off), the IP address, the OS version and some other Details (you can also Restart the unit or Remove it from the network). Besides the Home area, you can access other sections by tapping on the three horizontal lines from the top left corners which will also allow you to configure the Guest Access (you get the option to Send an invitation or Share the QR code), the Family Profiles (create Profiles that can be associated to your devices, allowing you to Set a scheduled pause or stop the connection to the Internet at any time) and the Network Settings, which include adjusting the Notifications, turning on IPv6, updating the software and more, but you can also go to the Advanced Settings to modify the Internet Connection, configure the DNS< DHCP and NAT, the Firewall Rules, UPnP and more. One very interesting section is the eero Labs, where you can enable features that are still considered in beta stage: Band Steering, Local DNS Cashing and Smart Queue management.
Underneath the Network Settings, you can easily Add a new eero unit, visit the Help section, configure the Account or Switch the Network (in case you have more Eero WiFi systems that you want to keep separate: the Eero WiFi is compatible with both first gen and second gen devices).
Note: Eero has been recently acquired by Amazon, so, it’s important to understand whether the retail giant does any type of tracking. For now, Eero says that it doesn’t tracking any user data.
Conclusion
The Eero WiFi (2019) is a well-made dual-band WiFi system, offering an intuitive and reliable application, a good wireless performance and the small case of each unit is an attractive alternative to the likes of Google WiFi, but did we actually need another second gen Eero WiFi system? The tri-band Eero and the Beacons units were a fantastic combination for most homes, but the lack of Ethernet ports (on the secondary units) wasn’t the most inspired decision, so the Eero WiFi 2019 fixes this and at a far lower cost.
Eero WiFi 2019
Pros
- Good wireless performance
- The Eero units are small and compact
- Ethernet backhaul
- Mesh technology + MU-MIMO
- Easy to set up
Cons
- No WPA3
- No WiFi6 features
- The Parental Controls are very basic
- No web-based UI
Mark is a graduate in Computer Science, having gathered valuable experience over the years working in IT as a programmer. Mark is also the main tech writer for MBReviews.com, covering not only his passion, the networking devices, but also other cool electronic gadgets that you may find useful for your every day life.