
The Elemake smart fingerprint door lock with deadbolt was designed to fully replace the traditional deadbolt in an attempt to both simplify the user’s access and improve the security of their home. And just like the Wyze smart lock, it’s one of those budget-friendly solutions that disrupt the market and make you wonder why should you pay more for the same experience.
| Elemake Smart Door Lock | |
|---|---|
| Elemakelocks.com | Check Product |
| Amazon.com | Check Offer |
Indeed, the Elemake smart fingerprint door lock with deadbolt adds the option to lock or unlock the door with your fingerprint, a PIN code, RF card and even via an app (although the support is there, I would advise against connecting it to smart assistant). And, as a last case scenario, the smart lock can also be operated using keys, like a traditional deadlock would. The device is also made of zinc alloy and it’s designed to survive outdoor conditions, which is pretty much mandatory for this type of smart locks.
So, all that sounds great, but are there any compromises? Not really, it offers a very similar feature set as the more expensive devices, such as the Ultraloq U-Bolt Pro WiFi, but at a lower price tag. Do bear in mind the consequences of using a smart lock and that’s the required continuous connection to the Internet and the app that will collect data, but, unless you have some hacker burglar in your neighborhood, then a device such as the Elemake smart fingerprint door lock with deadbolt can be a surprisingly effective burglar deterrent.
Design and Build Quality
The Elemake smart fingerprint door lock with deadbolt comes as a complete replacement for your existing deadbolt lock, so inside the package, there are quite a few pieces that need to be put together.
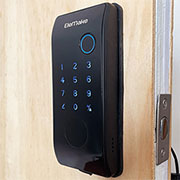
Outer Escutcheon
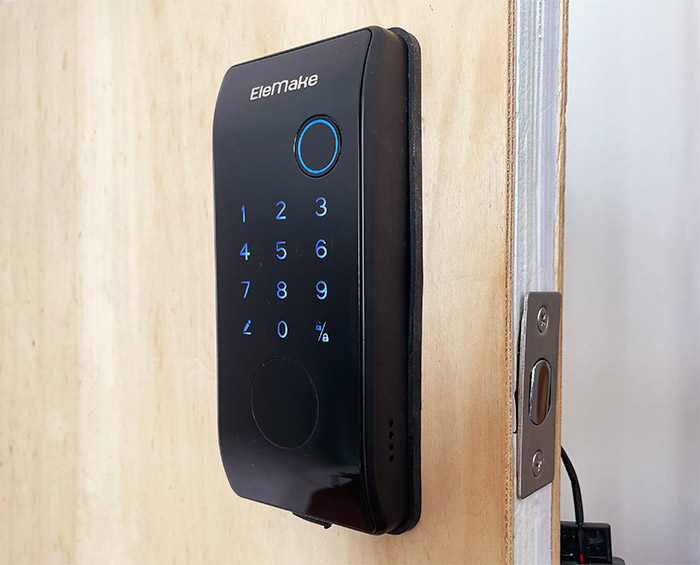
First, there’s the outer escutcheon that measures 5.5 x 2.3 x 0.8 inches and which is mostly made of metal (the frame and some of the inner parts), but the access panel is made of plastic (covered by a black glossy finish, a veritable fingerprint magnet). Within this plastic panel, there is the fingerprint sensor and it’s very easy to identify since it has an LED ring that surrounds it.
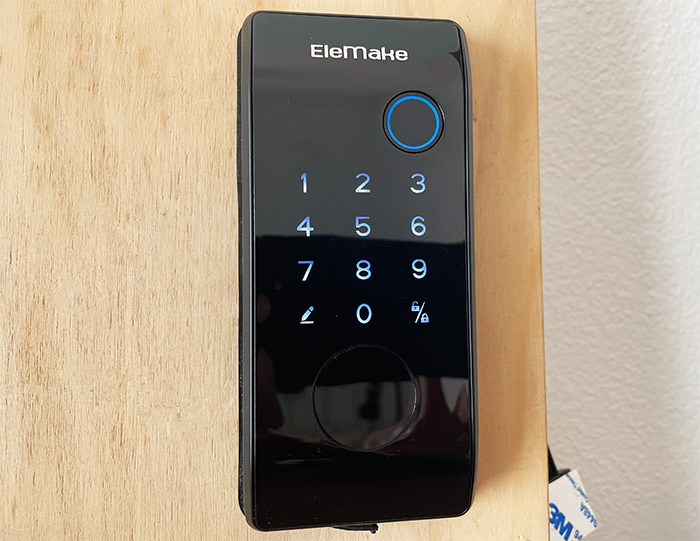
Underneath it, Elemake has included the touchscreen panel for the security code and yes, this was the reason why the manufacturer had to rely on plastic for this front panel. A bit lower, you will notice that there is a circular cover and the way to remove it is by using the small suction cup which can be found on the provided keychain. This cover is magnetic and it hides the area where you can insert the keys in case the electronic parts have failed, such as when the battery is completely dead. The cover is magnetic and if you slam the door a bit harder, it will easily fall of the unit, so the suction cup is not really necessary – it’s also a bit too easy to lose that cover.
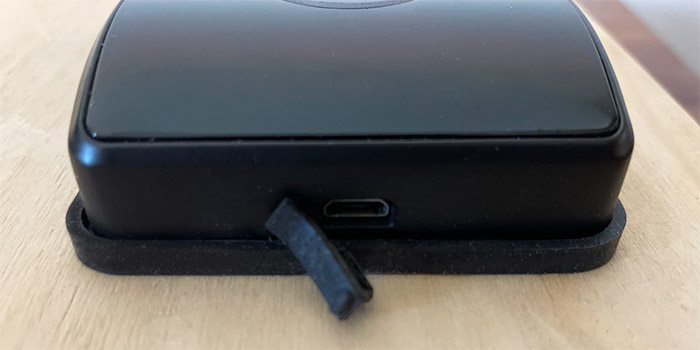
Still, the manufacturer has added an additional way to make the Elemake smart fingerprint door lock functional again, and it’s by powering it up using a microUSB cable and a powerbank or any other power source. This means that there is a tiny battery inside the outer escutcheon, and I admit that I would have liked USB-C, but it’s still nice that we do have this option available. The manufacturer says that the smart lock is IP65-rated, so it should withstand both water sprays and dust ingress into the enclosure and I had a look around the unit to see if there were any openings.
There is a cover over the microUSB port and I noticed an opening on the side, but it seems to be for the speaker, so no water can get from that side. There is also a silicone seal where the outer escutcheon gets in contact with the door, so make sure that you install it correctly. I think that includes the stability screw which I suppose it can be seen as optional, but it may help keep the unit watertight – we will see if it’s truly needed in the ‘Installation’ section.
Inner Escutcheon
The manufacturers didn’t cut any corners when building the inside escutcheon, so it’s pretty much all-metal. And yes, that includes the battery section cover as well, a design decision that’s not very common. The unit measures 6.5 x 2.7 x 1.1 inches, so it does go a bit higher than the outer unit and it also means that the smart lock is not really compatible with doors that have handles. Then again, there is an Elemake smart lock and door handle available to accommodate the users that do have a different system.
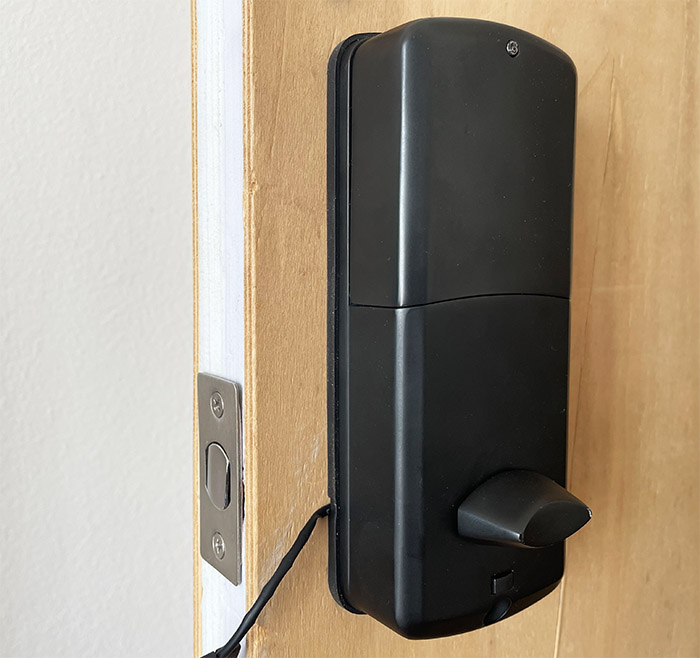
The main element is, obviously the locking mechanism (both left and right handed – horizontal and vertical positioning) and next to it, there’s the Reset button. To return the device to its default settings, remove the batteries, hold the Reset button, put the batteries back while still holding the button and then after about 30 seconds, a voice prompt should say that the reset has been successful. To access the batteries slot, you need to push the small button above the locking mechanism and, once you do, the cover will just pop out. The manufacturer does not provide the four needed batteries, so you will have to purchase them yourself.
This section is also water and dust resistant, so you don’t have to worry about it experiencing weather damage, plus the all-metal build ensure that it will also survive mechanical shocks.
There is a silicone seal where it gets in contact with the metallic bracket so again, make sure that it’s properly aligned so no water or dust will enter the enclosure.
The Bolt and other components
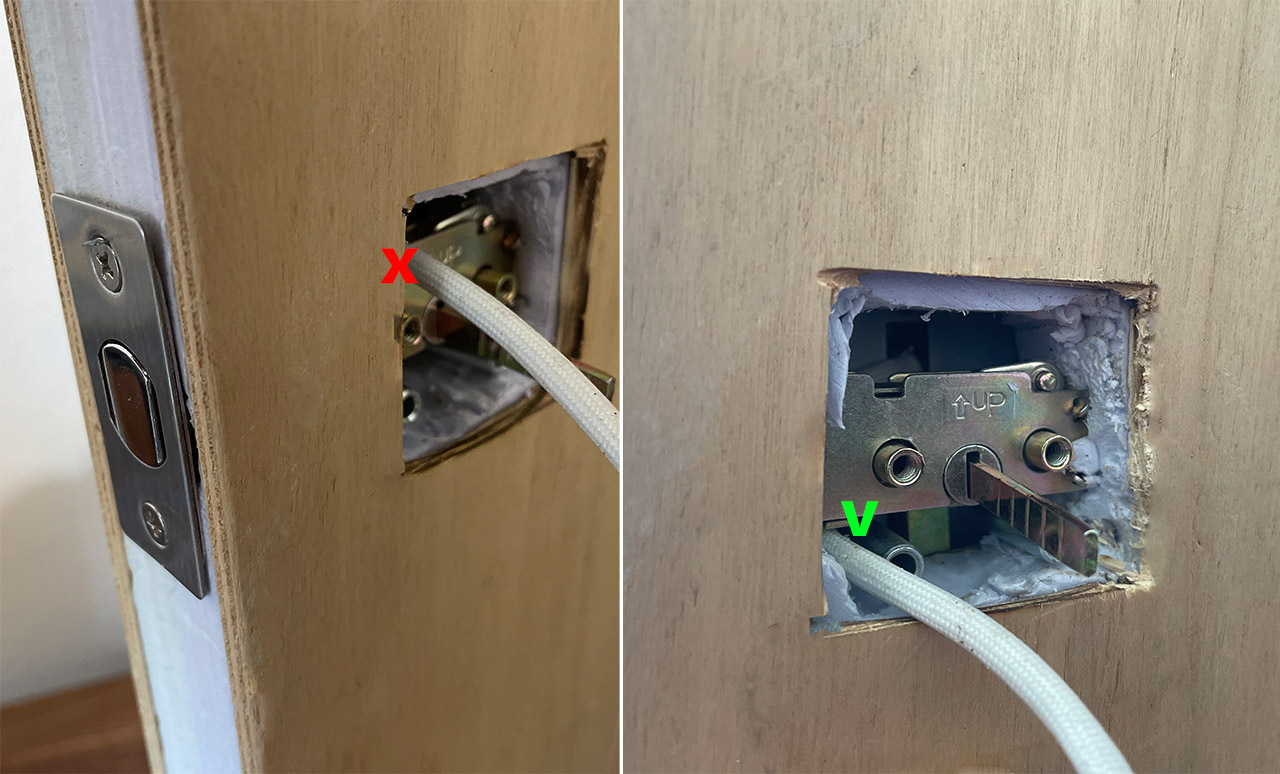
The bolt is designed in a traditional manner, so nothing electronic about it – everything is metallic and feels solid. The bolt does have beveled edges and, by default, it can fit into a 2-3/8″ (6cm) backset, but it is possible to extend it up to 2-3/4″ (7cm). The way to do it is by pressing down the latch and then rotating the cylinder and retracting it (or pushing it back, if it’s too long). Another important component is the door position sensor which is connected by a cable to the interior escutcheon.
I am not really a fan of this approach because it’s an extra piece which hangs and can easily get damaged – I do hope that the manufacturer will include it within a next iteration of the Elemake smart door lock. Lastly, I need to mention another component, the smart gateway which again, in my opinion, it should have been an integrated part of the smart lock, but I digress. The gateway is small, made of plastic and it has four silicone feet to stay unmoved. It can be powered via a USB-C cable (there is one in the enclosure) and there are two LEDs at the top, as well as a button on the side.
The LEDs will flash red and blue when the device is ready to be paired (broadcasts Bluetooth signal) and will become solid red and blue after it’s connected to the mobile app. The button needs to be used to re-start the pairing process in case the blue LED turns off.
Installing the Elemake Smart Fingerprint Door Lock With Deadbolt
For this specific test, I decided to not use an actual door, but put together something that resembles one. That being said, I inserted the bolt and since I designed the size of the hole, it didn’t have to be extended (but it is possible, as I said in the previous section). Then, using two of the four screws in the package (the user manual named them J), I attached the bolt to the faux door panel (make sure that the UP sign is pointing upwards).
Then, I took the outside escutcheon and inserted the pins into the bold section, making sure that the cable safely runs to the other side (I ran it below). After that, I took the bracket and using the three identical screws (named H in the manual), I attached it to the outer unit. I also made sure that cable is safely prepared to be connected to the inner side of the Elemake smart deadbolt. There is an optional threaded tube which could offer additional stabilization to the smart lock, but it does require drilling a hole into the door.
So, unless you already have one drilled, I suggest you don’t install it, especially if you intend to change locks with a new non-smart one – you just get an extra hole in the door. I did ask whether this would have an impact on the weatherproofing aspect of the device and after having it installed, I can attest that it sits properly attached and no water or dust can enter the enclosure.

Now it’s time to install the interior escutcheon. Before actually mounting it, ensure that the locking mechanism is positioned properly (for left or right handed people) and then make sure to connect the door position sensor, as well as the outside unit cable. it’s a bit annoying that I had to pull a good portion of the cable to connect it to the board, but then it’s necessary to push it back into the outer unit in order to mount the interior part. There is a small hole into the silicone seal that allows you to guide the sensor cable out from underneath the unit – make sure not to strangle it.
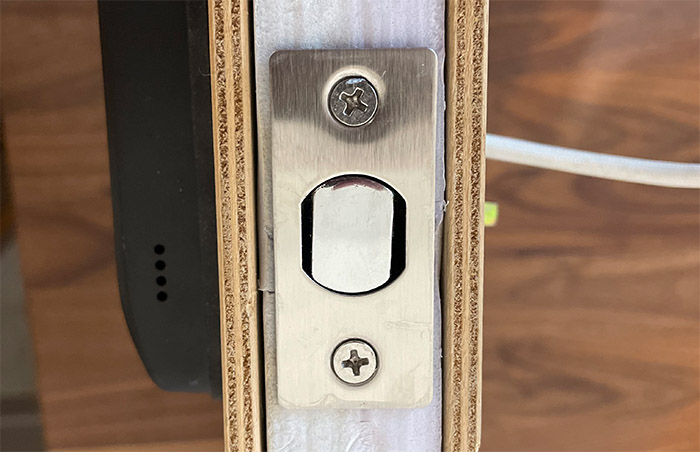
Test that the key and the locking mechanism work (if it’s blocked, it’s more likely due to not adjusting it for left or right-handed use) and afterwards, you should install the striker plate and the box, but do be aware that the former is very fragile and will easily bend, while the latter is made of plastic. I suggest you get a sturdier one from a third-party manufacturer.
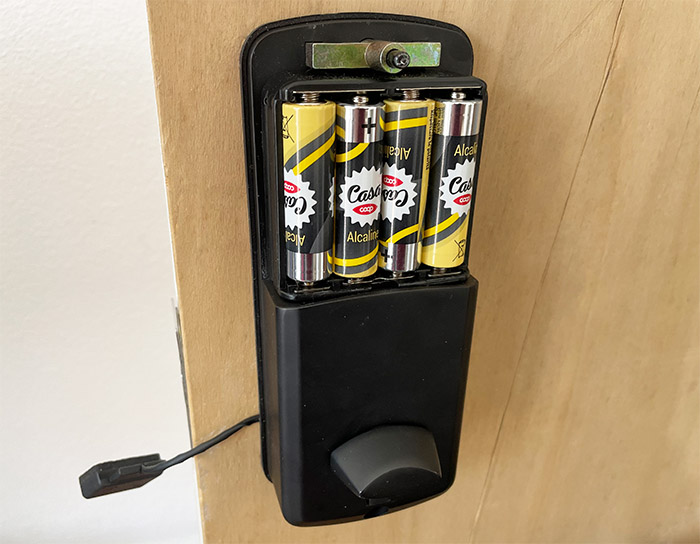
You should also install the contact part of the door position sensor, so that the smart lock will be able to react to the door being opened or closed. At this point, I connected the four batteries and the outer unit made a faint beep to confirm that it’s now powered up.
The App Installation
By default, Elemake offers the option to connect to the app (Smart Life) via Bluetooth and the communication between the smart lock and the app would remain through Bluetooth. But, considering the limited range and the susceptibility to interference, the manufacturer has still decided to add a optional gateway so that the connection is done via WiFi and yes, it only supports the old 2.4GHz radio band. That being said, I first decided to see the pairing process via Bluetooth only and it was a very simple process.
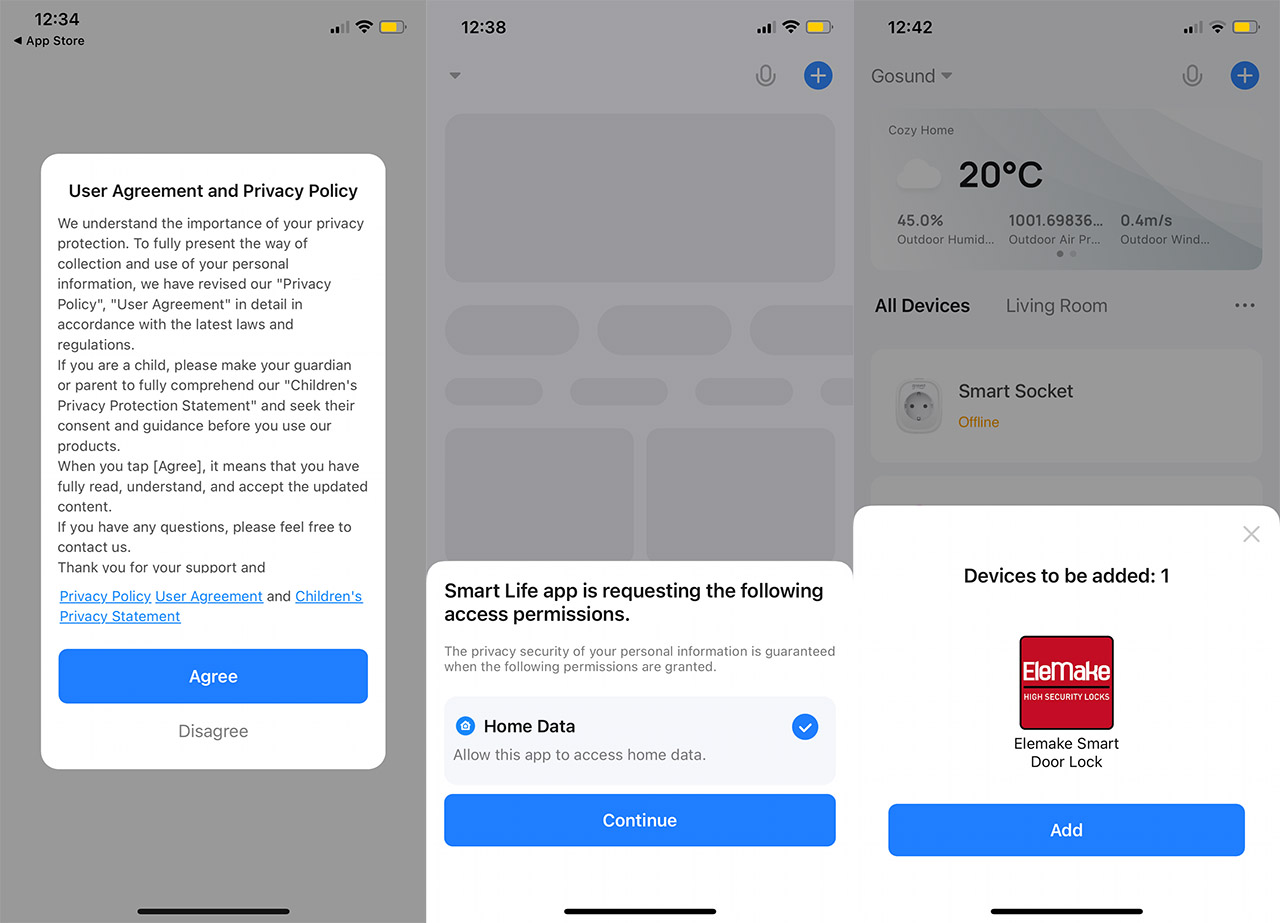
The app that you need to install is called Smart Life and it does require the creation of an account and for the user to accept its privacy policy. The collected data includes geo location data, mobile device data, such as IP address and other network-related info. And yes, some of the collected data will be used for marketing purposes plus the data can be shared with subsidiaries, as well as third parties if there’s any change to the structure of the company (merger, sale, transfer and so on). To start the process, I had to tap on the touch-sensitive area of the Elemake smart door lock so that the LEDs for the numbers would light up and then the Smart Life app automatically saw the Elemake Smart Door Lock (as long as Bluetooth is enabled on the phone as well).
Elemake Smart Door Lock
-
Pros
- Excellent build quality
- Multiple ways to lock/unlock the door - fingerprint, card, PIN, voice, app and keys
- Inner battery for when the batteries get depleted
- IP65-rated
- Fairly easy to install
Cons
- The cover for the keyhole can easily fall out when the door is slammed
- The striker plate is fragile
- I would have liked for the gateway and the door position sensor to be an integrated part of the device
Mark is a graduate in Computer Science, having gathered valuable experience over the years working in IT as a programmer. Mark is also the main tech writer for MBReviews.com, covering not only his passion, the networking devices, but also other cool electronic gadgets that you may find useful for your every day life.