
The Formovie Dice is a mini projector developed in partnership with Xiaomi with a special focus towards portability, while also trying to maintain a good image quality. I have tested a similarly sized projector a few months ago, the XGIMI Halo Plus and I have noticed that the Formovie Dice shares quite a few characteristics with it.
| Formovie Dice Mini Projector | |
|---|---|
| Formovie.com | Check Product |
There’s 4-point automatic keystone correction and autofocus, and it’s amazing just how often I see these two technologies on more budget-friendly projectors (a couple of years ago, only $1,000+ projectors used to offer them). There’s an inner 16,000mAh battery which will allow for some outdoor movie watching sessions (when camping) and, if the advertisement is true, it seems we are dealing with a native 1080p projector, while the Halo Plus would simulate this resolution (the end result is pretty much the same though).
The advertised brightness is 700 lumen, which is a bit below the 900 ANSI lumen of the Halo Plus, but should still be plenty powerful for watching a movie during the night – there aren’t many projectors that will work semi-decent during the day (if any). Additionally, I saw that the manufacturer has included support for HDR 10, but the refresh rate only goes up to 60Hz. Furthermore, I saw that there is DTS and Dolby support on the dual 10W speakers (not Harman Kardon). That being said, let’s put the Formovie Dice to the test and see if it’s better than its competitors.
Note: Some of you may wonder if the Formovie Dice is the same device as the Wemax Dice and the answer is yes, they’re the same. I checked the FCC ID and confirmed that both use the same chipsets and even the design is identical. The Dice is also identical (on the inside) to the Mi Smart Compact Projector 2 as shown by the installation wizard.
The Design and Build Quality
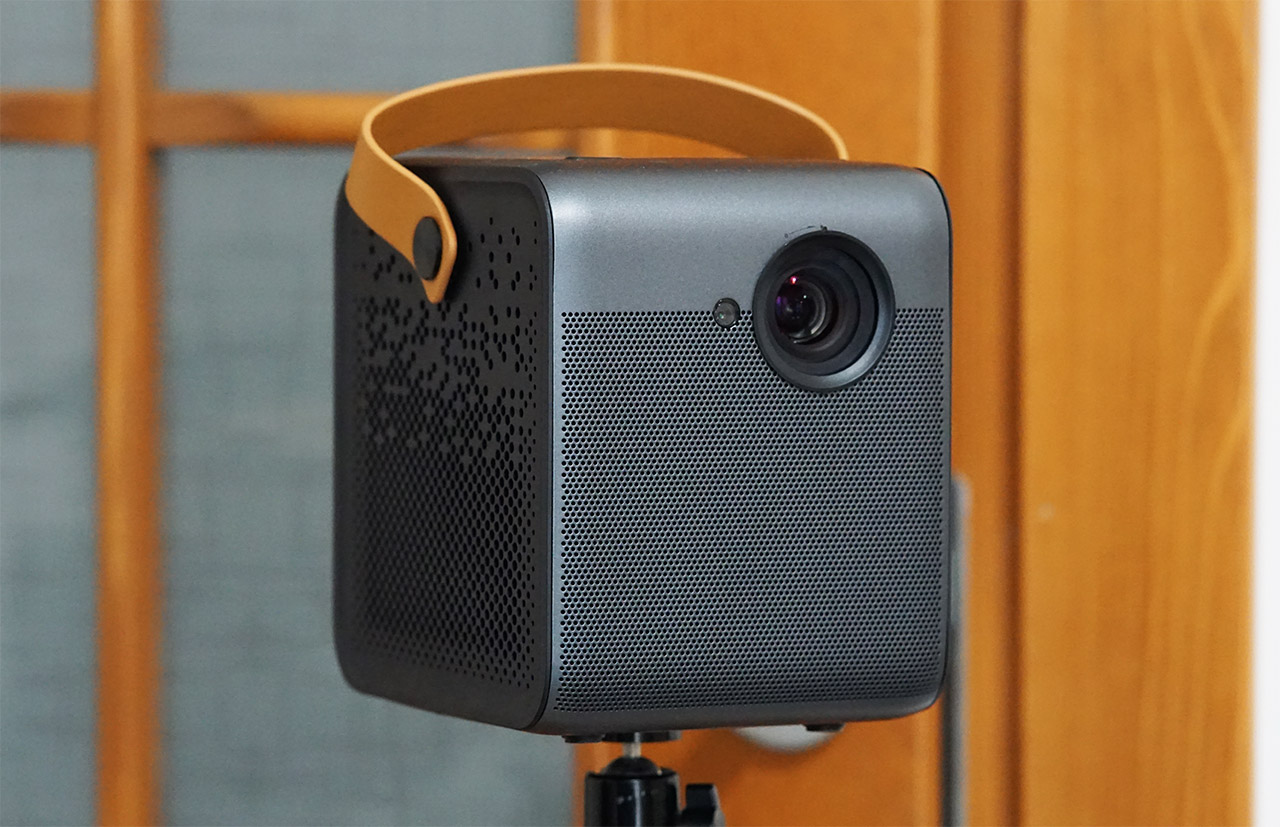
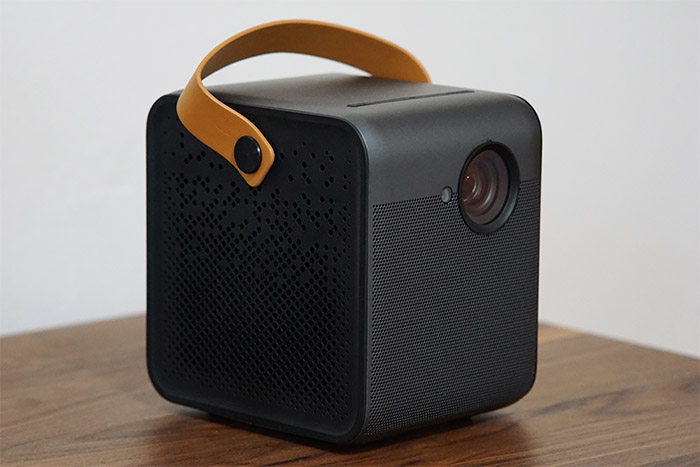
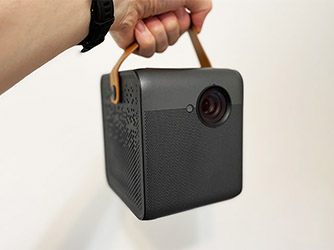
I was impressed by how small the Halo Plus was, but after taking the Formovie Dice out of the package, I realized that it’s possible to make the projector even more compact than that. At 6.1 x 4.9 x 6.3 inches (or 15.5 × 12.5 × 6.0cm), the Formovie Dice is the smallest projector that I have tested so far and, because the manufacturer decided to use a metallic shell, it does have some weight to itself (4.9lbs or 2.2kg).
It’s not heavy or anything of the sorts, but it does feel ‘fuller’ than some other projectors I have tested (Philbeam S1). I have mentioned the metallic shell, but the Formovie Dice has some plastic bits as well covering the sides of the projector. And it is interesting to see the flexible aluminum that they used to go vertically across the case and then to fix it into place with lots of screws (at the bottom of the Dice). There are some punctured holes in the metallic portion of the case plus there’s the dark gray matte finish which makes the Formovie Dice look very similar to the Halo Plus.
There are some ventilation holes on the sides as well to help with the heat management and yes, there is an inner fan to blow all the hot air out, as on all projectors on the market. But it’s not very loud and you won’t really notice it unless you’re watching some very quiet scenes. I did check inside the projector and I saw that there were lots of heatsinks to help move the heat out, but is this system effective at keeping the temperature in check?
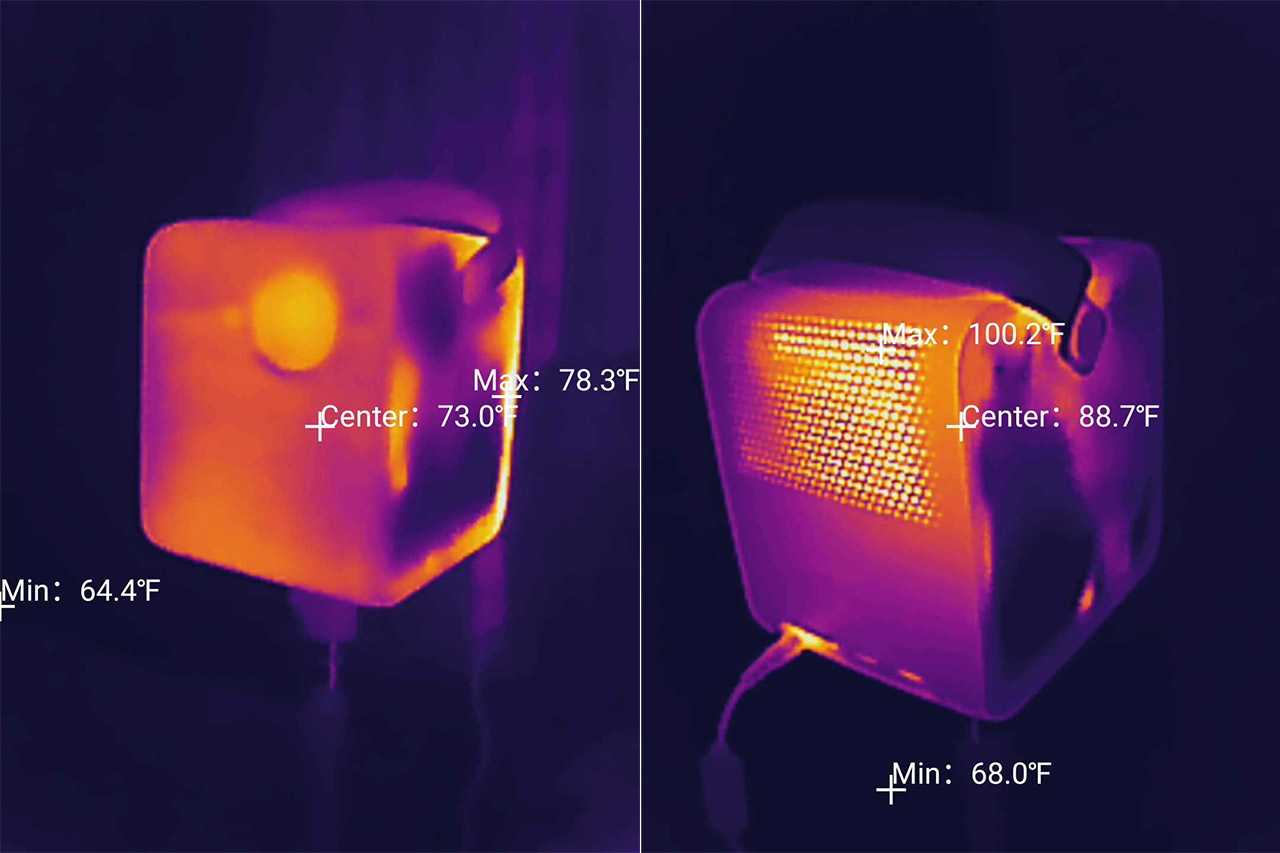
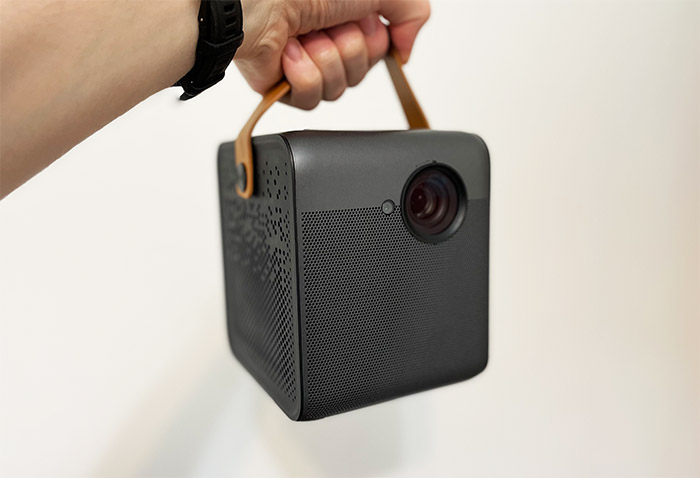
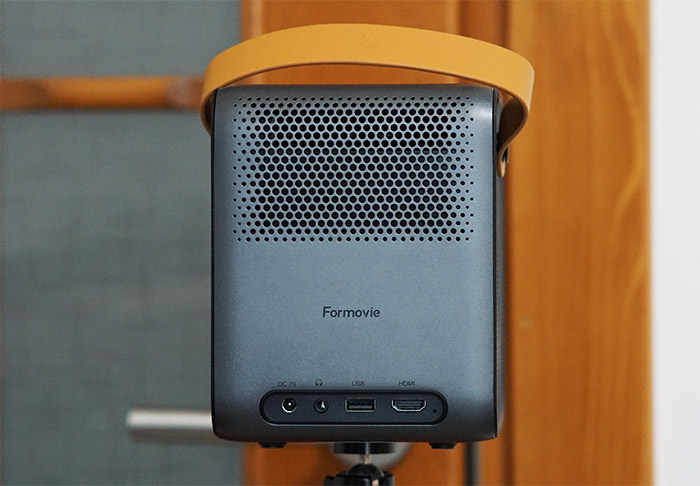
I have added a thermal photo so you can see for yourself just how hot the Formovie Dice can get while it’s projecting movies or videos. One cool design element that you’ll immediately notice is the brown leather handle that will help move the Formovie Dice projector around and, at the bottom, there are four silicone feet to keep the device into place – not that it would move anyway since the weight will keep it steady even if there are a few cables connected to the rear side.
And there aren’t really that many ports, one’s the Power connector followed by the 3.5mm jack to attach a speaker system and then there’s the USB port. Lastly, the Formovie Dice relies on a HDMI 2.0 port if you want to connect it to a PC. If you don’t like keeping the projector on a table or shelf, you can attach it to a tripod using the dedicated hole at the bottom. I am accustomed to have some sort of control over the projector by using the buttons that are usually positioned at the top of the unit. So, in case something happens with the remote, I can still use the device up to a certain degree.
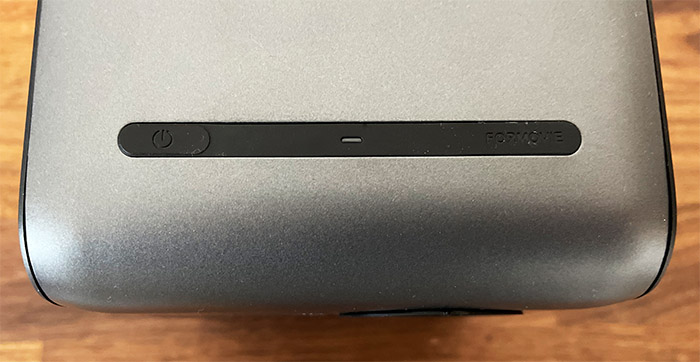
The engineers behind the Formovie Dice considered this to be a bad idea so they only added a Power button and an LED to show that the device is powered up. I, of course, am not very fond of this weird design decision and I am sure other users as well. The last area of interest is the front of the Formovie Dice where rests the lens and next to it, the camera that’s used for both auto-focus and keystone correction.
I know that ETOE E3 Pro also has auto keystone correction but they went with a different approach (ToF) and it was less accurate than on the Halo Plus, so it’s excellent that Formovie Dice went with a camera instead. The punctured area underneath the lens hides one of the speakers – the other speaker points on the other side of the projector.
Formovie Dice Teardown
Unlike other projectors, the Formovie Dice has the FCC ID page filled by clear photos of its components, so I didn’t have to open up the device to check them myself. And I am really not a fan of doing so due to their overly complicated design to cram everything in a small case. That being said, the two plastic sides need to be removed first thus exposing the two 10W speakers, the fairly large fan and the multiple heatsinks.
And, after going deeper, these are the components that I was able to identify: a quad-core 1.5GHz Amlogic T962X-H CPU (ARM Cortex-A53), the i-Chips IP00C788 warping and edge-blending chip and the single-core ZYNQ XC72020 (ARM Cortex-A9) SoC. Then, I saw the two DLPC3437 chips from Texa Instruments that drive the DLP3310 (0.33″ DMD), so all that true Full HD was just fluff.
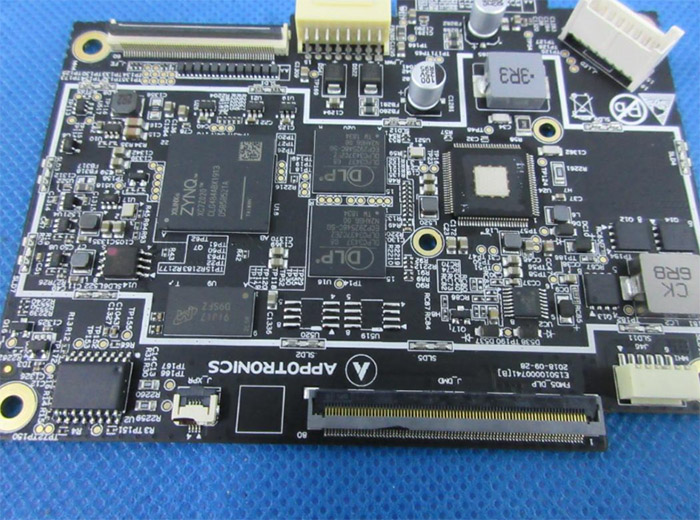
This chip has a native resolution of 768 pixels which is then ‘upscaled’ using XRP to reach the 1080p. It’s not a bad technology since I have seen it in action on both the Halo Plus and the Horizon Pro, but it’s not native 1080p. The last components that I could identify were the 16GB of eMMC storage from Samsung (SEC831 KLMAG1JETD) and 4x 512MB (2GB in total) of RAM from Samsung (SEC940 K4B4G1646E). So yes, if you check out the specs of the Wemax Dice, they’re exactly the same.
How does the Formovie Dice achieve 1080p?
As I mentioned in the previous section, the Formovie Dice does some XRP magic to achieve perceived 1080p and I guess the advertised DLP tech was a dead giveaway. To get a bit more technical, the lens shifts half of a pitch between pixels in a manner as to appear that the resolution is double than it actually is (the FPGA doubles the pixels by using an actuator) – all this info and more can be seen here on the Texas Instruments official website.
They’re the ones that developed the DLP tech to begin with and I have also seen it in action on the XGIMI Halo Plus (the same identical approach as on the Formovie Dice) and on the Horizon Pro, where the resolution would be scaled to 2160p from 1080p. Since the human brain can be tricked into believing that it sees 1080p instead of the real 720p, does it matter that the Formovie Dice isn’t a native 1080p projector? Obviously, some details will be lost, but, if it can produce a similar image to the more expensive Halo Plus, then the quality should be very good.
I have checked out the pricing for good native 1080p projectors (Epson 1060) and they can go for double the price of the Dice.
The Remote Control
I really like these small, minimalist remote controls that work so well with Android TV and the Formovie Dice offers one of the most compact remotes that I have seen on a projector. But the layout seemed very familiar, too familiar.
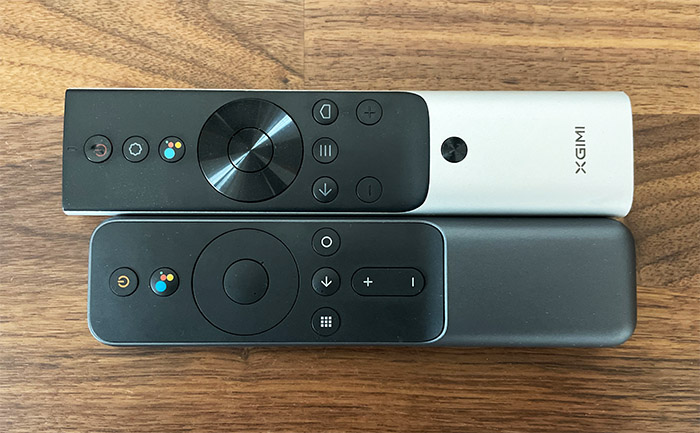
It’s almost identical to the one from the Horizon Pro remote – I will put side by side comparison, so you don’t have to take my word on it. The Power button sits at the top followed by the Google Assistant (press it to enable voice control) and then there’s the DPad. Although not as smooth as on the Horizon Pro, it does have a raised OK button so it’s pretty intuitive to use. It’s also made of plastic, just like the entire remote control – you don’t get metal at this price point. Underneath the D-Pad, there’s the App interface button followed by the Back and Home buttons. Lower down rest the volume buttons. As anticipated, there are no batteries in the package and the remote control does communicate with the projector via Bluetooth.
Installation and Software Experience
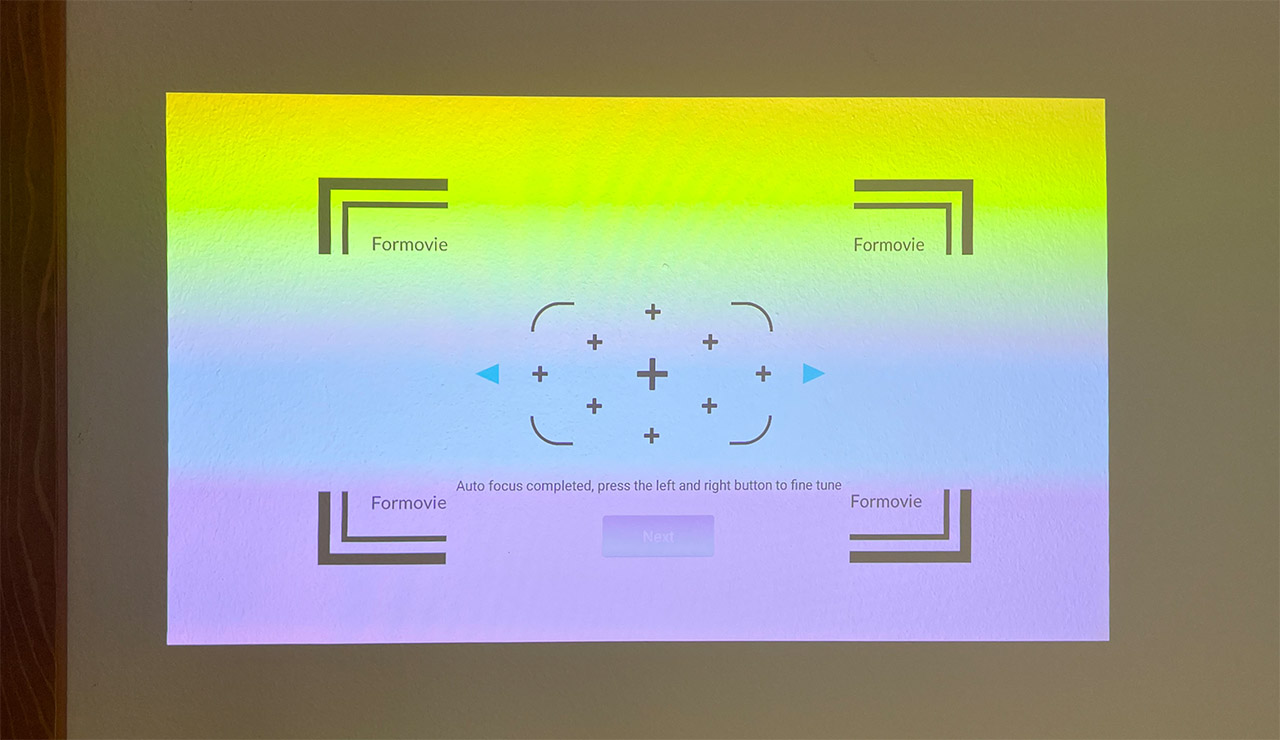
After powering on the Formovie Dice I was asked to press a couple of buttons on the remote to pair it to the projector and afterwards, the autofocus came into action, followed by the option to manually adjust the keystones. Then follows the Android TV installation wizard.
Select the language, connect the projector to the Internet (there is support for 5GHz, 802.11ac), sign into an account, accept the mandatory data collection, let Google know your location (say No), let it give you personalized results (again, better to refuse) and then the MiProjM05 was ready to be used. That was not a typo, it’s what it said at the end of the installation process and which gave away that the Formovie Dice is the same projector as the Xiaomi Mi one. Moving on, I could see the Android 9 GUI which was the standard about a couple of years back – at least it does have the Android security patch of July 2022 installed.
Navigating the interface was fairly smooth thanks to the 2GB of RAM, but I did see a slight delay when moving between tabs. No freezes or stutters, just the occasional perceptible delay. Using YouTube was smooth overall, I could skip forward and move backwards on a video with no stutters and then I wanted to see Prime since it’s usually the least optimized app on Android TV. I couldn’t find it and if I think about it, neither was Netflix and other mainstream apps. There was TikTok, Disney+ and Apple TV, TED talks and RedBull TV? Anyway, I eventually found the Prime Video and, after signing in, I could navigate its interface.
There was a slight, but noticeable delay when moving between tabs, but it was better than I expected. Furthermore, while playing a movie, I could easily skip to the preferred scene (yes, through that weird cluttered mess of scenes that Amazon has implemented when skipping forward). What about Netflix? It’s missing! Yes, just like on the XGIMI projectors, you will have to install Netflix manually but I couldn’t use the same workaround. I installed the DesktopManager app, but no app appeared, so it has to be installed using the .apk method which is very un-intuitive and will limit the video streaming to 720p. This is a big minus.
The Automatic Adjustments
It’s immediately obvious that the autofocus works really well when moving the projector, but it does require slightly ampler movements than on the Halo Plus. What confused me was the auto keystone correction.
I moved the projector at various angles, but the auto-keystone correction just didn’t engage. I turned the projector on and off again, and nothing. I then went to the Settings menu > Projector > Keystone Correction to make sure that the Auto mode was enabled (it was) and I also checked the Keystone Correction section. I clicked on Reset and to my surprise, the perspective projected image got worse. Wait a minute, so the autokeystone correction worked all this time, it just wasn’t very good.
And I did confirm that this was indeed the case after I moved the projector at far ampler angles – as you can see from the video, there are some corrections, just not enough to put the image properly in the center.
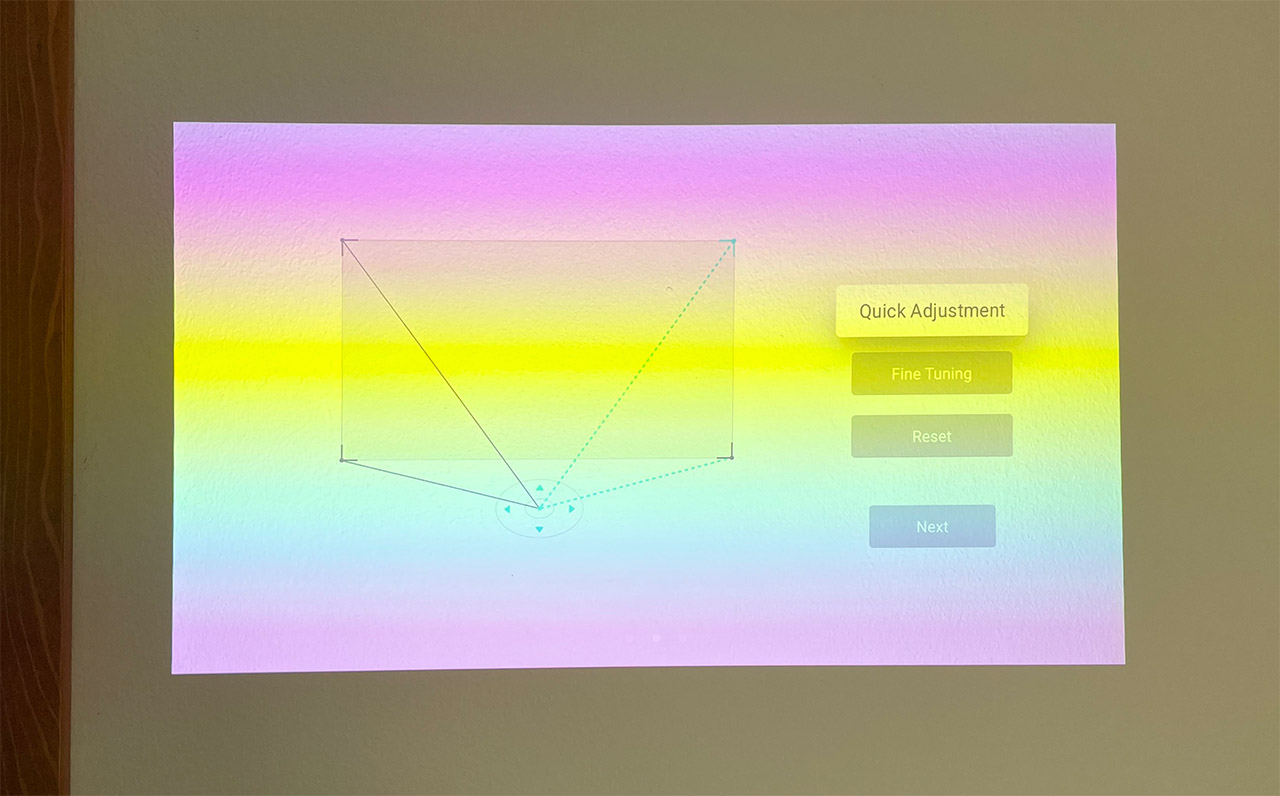
As an alternative, if you have a look at the Halo Plus, you can see how it micromanages every movement plus there’s the object avoidance system which is also missing from the Formovie Dice. As a conclusion, ignore the so called autokeystone correction and go directly to the manual settings – if only the manufacturer would have at least added a dedicated button on the remote. Can this be fixed from the software? I am very confident that the Formovie Dice has all the elements it needs to make autokeystone correction work properly (camera, motor), so yes, a software update can indeed fix it.
The Image Quality
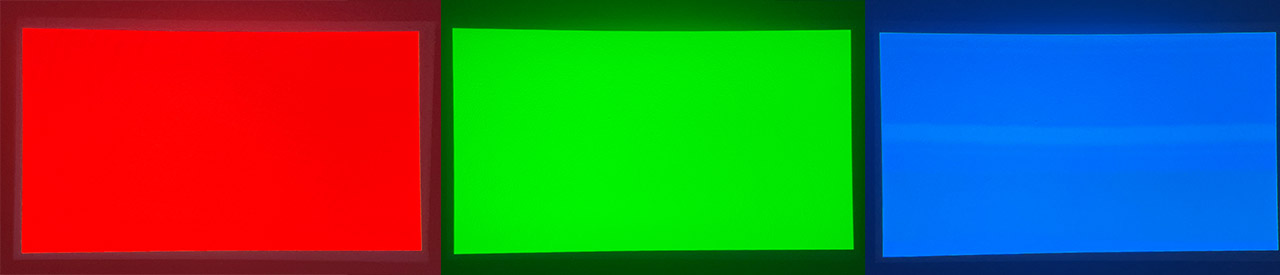
The first thing that I usually check when testing a projector is the color uniformity, so I connected a USB drive to the Formovie Dice port and I displayed some images, each showing a color or shade. I started with white and I was already aware how bright the projector was, but displaying a full white image enhances that visual experience. As you can see from the photo, it’s very uniform across the edges, but you also get a glimpse of that rainbow effect that’s a characteristic to this type of projectors.
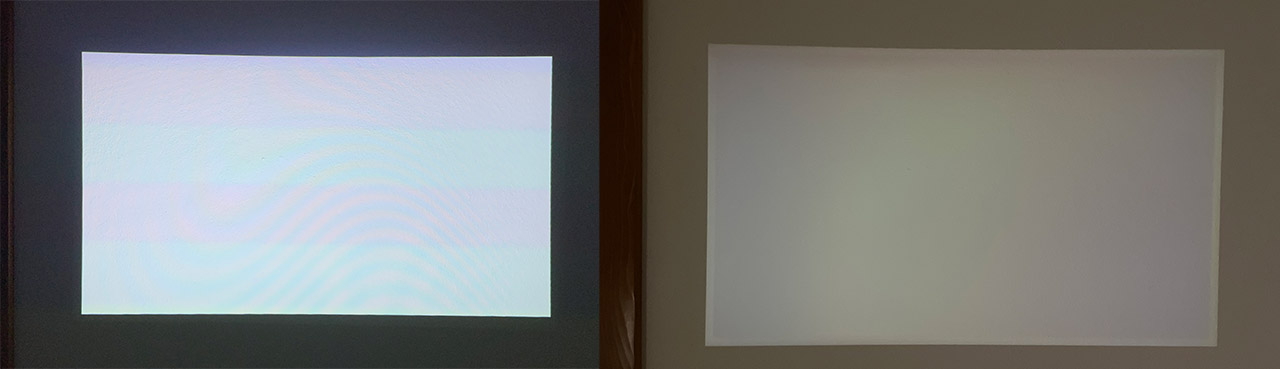
Only the camera captures it, you won’t see it with your naked eye. I then moved to black which is the bane of all inexpensive projectors (and TVs alike). And it’s actually not bad at all. There were no smudges or shadows to creep into the projected area, although I suppose I saw a slight variation in brightness on the left side. This is more noticeable on camera, so I guess the rainbow effect strikes once more!
Seriously now, the black representation is very good, better than on the XGIMI projectors. Moving on to the red, blue and green images and the uniformity is excellent, no shadows or distortions.
Moving forward, I decided to check out some YouTube videos, something that can enhance the projector’s abilities and what other video than the Amazing Beauty 12K HDR 60fps Dolby Vision? One can dream about the time when budget-friendly projectors will output 12K. Snapping back to reality, I decided to check the viewing angles which should be perfect on a projector, and they were.
But what interested me the most was if the crispness of the image would remain if I got very close to the projected area. As you can see it was excellent, the color reproduction is good, there is a healthy amount of details and I suppose it does rise to the expectations that I had after testing the Halo Plus.
The manufacturer says that the projected area should be between 60 and 120 inches and I agree, although I think the sweetspot is about 70-80 feet away. Now let’s check some movies.
Formovie Dice
-
Pros
- Very good image quality
- Compact and portable (has a leather handle)
- 16,000mAh battery offers about 3 hours of continuous footage
- Good audio quality
- Autofocus works well
Cons
- The auto keystone correction is a bit finicky
- Netflix needs to be installed separately
- Not enough controls on the projector itself (you can only rely on the remote)
Mark is a graduate in Computer Science, having gathered valuable experience over the years working in IT as a programmer. Mark is also the main tech writer for MBReviews.com, covering not only his passion, the networking devices, but also other cool electronic gadgets that you may find useful for your every day life.
Seeing the features and capabilities, the projector looks impressive to me but I am not comfortable with this square-shape design. And I agree that it is not good for the Netfix related things. However, most projectors are not very good for the Netfix content because it is a copyrighted channel.