
The HeimVision Assure B1 is a ambitious new camera from the China-based manufacturer and the device was developed relying on a successful Indiegogo campaign (the people seems to have liked the project considering that it achieved its goal in ten hours).
From the get-go, I have noticed that the Assure B1 took some inspiration from the Netgear Arlo Pro, but mostly in regards to the base station, since the camera modules are designed in a completely different manner – and they’re also in a far different price bracket. At the same time, the Assure B1 is still built to be mounted outdoors, it supports two-way audio, it has a fairly large field of view (goes up to 130 degrees) and most importantly, it can capture live footage at the 2K Full HD resolution. Most manufacturers of security cameras are still shy about going above 1080p while keeping the price tag affordable, so it’s understandable why so many people have backed this project.
It seems that HeimVision went a few steps forward and has also added the Human Figure Detection feature (apparently using the PIR sensor, but we’ll see how it works a bit later), color night vision (I have seen this technology with the Argus 3 and on the Annke NC400) and there’s also a spotlight to discourage any potential trespassers or to have a clear view of your surroundings even in pitch dark. That being said, the HeimVision Assure B1 seems to have most of the newer technologies, but I also noticed that the camera unit relies on AAA batteries, so I’m curious to see how this translates in daily real-life use.
Design and Build Quality
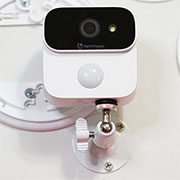
After you open the package, you will notice that the HeimVision Assure B1 consists of two devices, one is the base station and the other is the camera module. Both are made of plastic and both are covered by a white matte finish, something that’s very common nowadays for indoor and outdoor surveillance cameras. So, yes, the Assure B1 camera unit has a very minimalist design, sporting a rectangular case (unlike the usual bullet or dome-shaped outdoor-suitable cameras) and the manufacturer even went as far as making the front panel relatively unique. Indeed, instead of the circular lens that used to sit in the middle, the 2K Ultra HD lens not sits within a narrow black glossy section covering the top half of the front section, while the bottom half is claimed entirely by the motion detection sensor – there’s the expected plastic bulge.
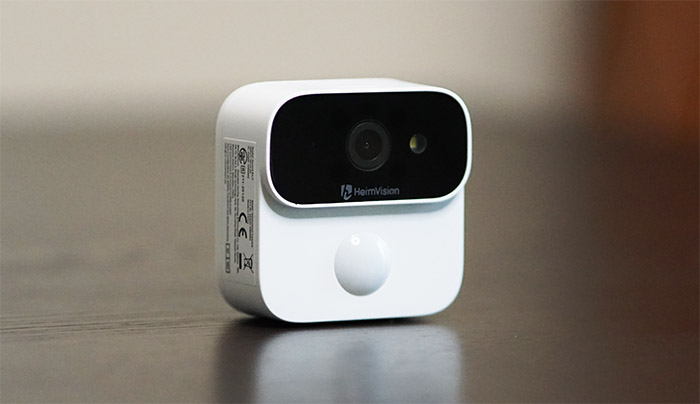
The camera module case measures 2.75 x 2.75 x 1.57 inches (7.0 x 7.0 x 4.0 cm), so it won’t really attract that much attention, but, similarly to the Annke NC400, it will rely on the built-in spotlight to make itself noticed by any potential trespasser.
The manufacturer says that the Assure B1 is built to withstand the elements, so it can be mounted outdoors and, considering that it’s IP65-rated, it means that the device is dust-proof and will survive water projected towards the enclosure at a moderate pressure (such as the case with normal storms – which is why you shouldn’t keep the camera completely in the open). I was able to find out that the temperature range at which The Assure B1 will remain operational goes from as low as -4°F up to 122°F, which is expected considering the type of materials used for the camera unit. On the front of the Assure B1 camera, there are four IR LEDs surrounding the lens and above it, there is a status LED (will light blue when the camera is enabled).
Furthermore, there is a microphone on the left and a spotlight to the right. The microphone can be paired with the speaker (from the left side of the device) in order to be able to speak with people in the vicinity of the camera. At the top, there is a Pair button which you will need to press three time to pair the camera module to the base station.
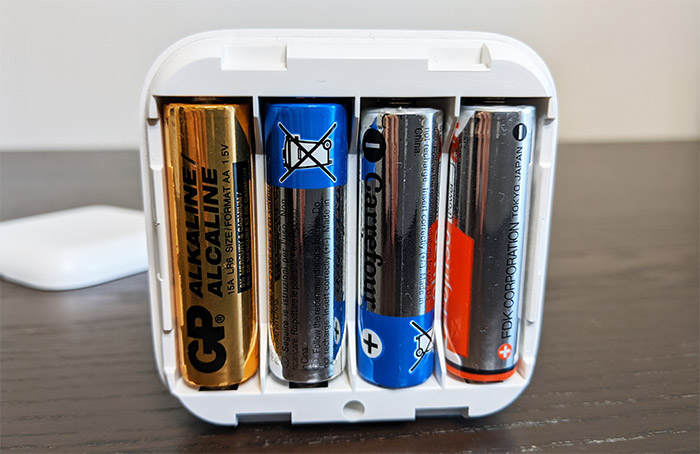
You may have noticed immediately that the rear cover can be removed and will reveal four slots for the AAA batteries – you will have to buy your own, since there aren’t any in the package. The manufacturer suggests that it’s best to use rechargeable ones and there is a microUSB slot at the bottom (covered by a silicone piece) to help you quickly recharge them. HeimVision said that you can also purchase a small solar panel (like the one that I saw with the Reolink Argus 3) to recharge the batteries. Most modern cameras have a built-in battery that can be recharged, so I am not really a fan of this approach which seems to have been the norm a few years ago.
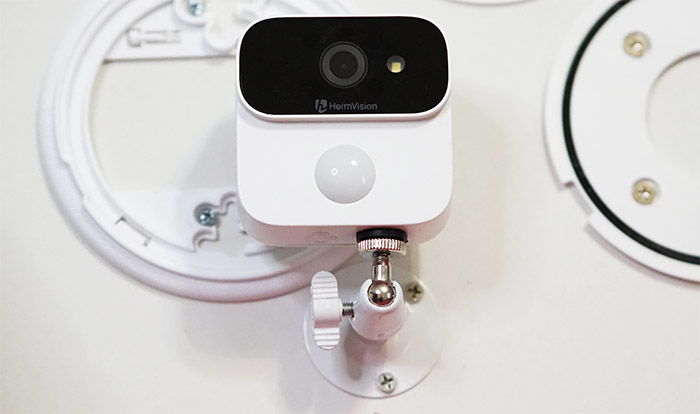
You should also make sure to properly close the cover after inserting the batteries since water can get in otherwise and reach the internal circuitry – yes, there’s a silicone bad to prevent it, but it can get damaged after periodic opening and closing of the back panel. HeimVision has added a metallic stand that you can use to mount the camera on a wall (there are three screws in the package that you can use) and you can adjust it at pretty much any angle – just make sure to fix it into place using the side screw.
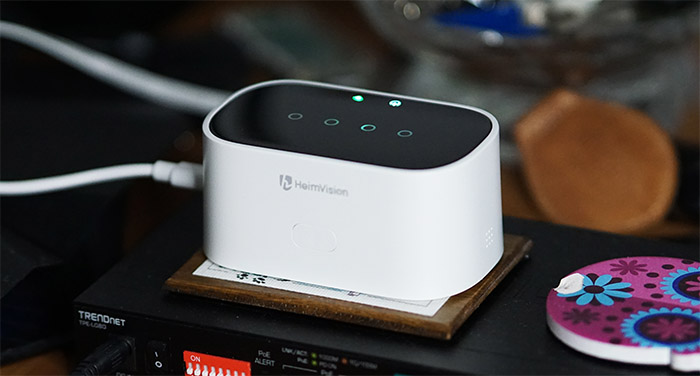
The base station is not suitable for outdoor conditions and will most likely end up next to your router since it has an Ethernet port for a wired connection and a microUSB port for receiving power. Next to the Ethernet port, there is a microSD card slot that supports up to 128GB which is great for a single camera, but will most likely fall short in case you pair four Assure B1 cameras. That’s right, you can pair up to 4 cameras to one base and you will see the connection status on the glossy black top, where there are four LEDs – one for each connected camera.
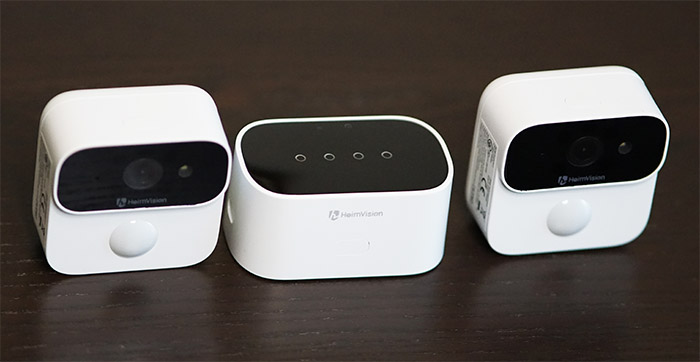
Furthermore, there are two other LEDs, one for Power and the other for WiFi (will become green when the base broadcasts the WiFi SSID). The base station (or hub) measures 3.5 x 2.2 x 1.5 inches (9.0 x 5.6 x 4.0 cm) and weighs only 2.82 ounces (80g), but it will stay in place even after you connect all the cables thanks to the silicone band from the bottom. On the front of the base station, there’s the Pair button that you will need to use to connect the camera units.
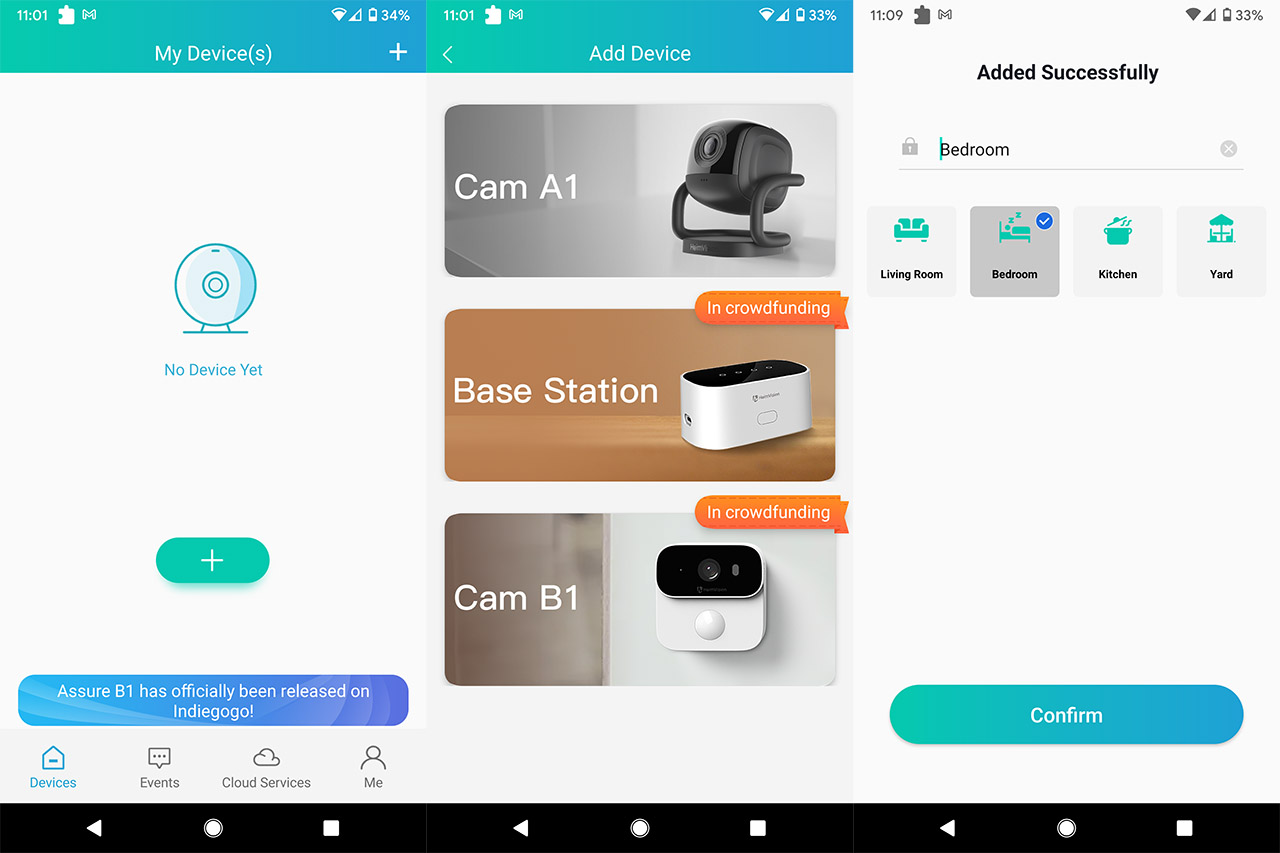
Setup and Functionality
As I said before, every package will contain a base unit and a camera module, and even if the hub can be paired to a maximum of 4 cameras, you can’t purchase them separately. The HeimVision Assure B1 can be configured and the video can be viewed using the HeimSmart app which is compatible with both Android and iOS mobile devices, so you will have to install it and then give it access to the necessary services. Next, it will require that you register a new account (doesn’t require a phone number, which is nice) and then, you will be greeted by the app’s main page which will be pretty much empty. At this point, you need to tap on the Plus sign, select Base Station from the menu and then follow the in-app instructions to connect it to the router. This means that you will need to power on the base station using one of the two provided microUSB cables and to connect it to your router using an Ethernet cable. The power and the WiFi LEDs should now be active to show that everything is working properly with the hub; you need to make sure that the mobile device is connected to the router to which you attached the base station (apparently, the Assure B1 will only work with the 2.4GHz network).
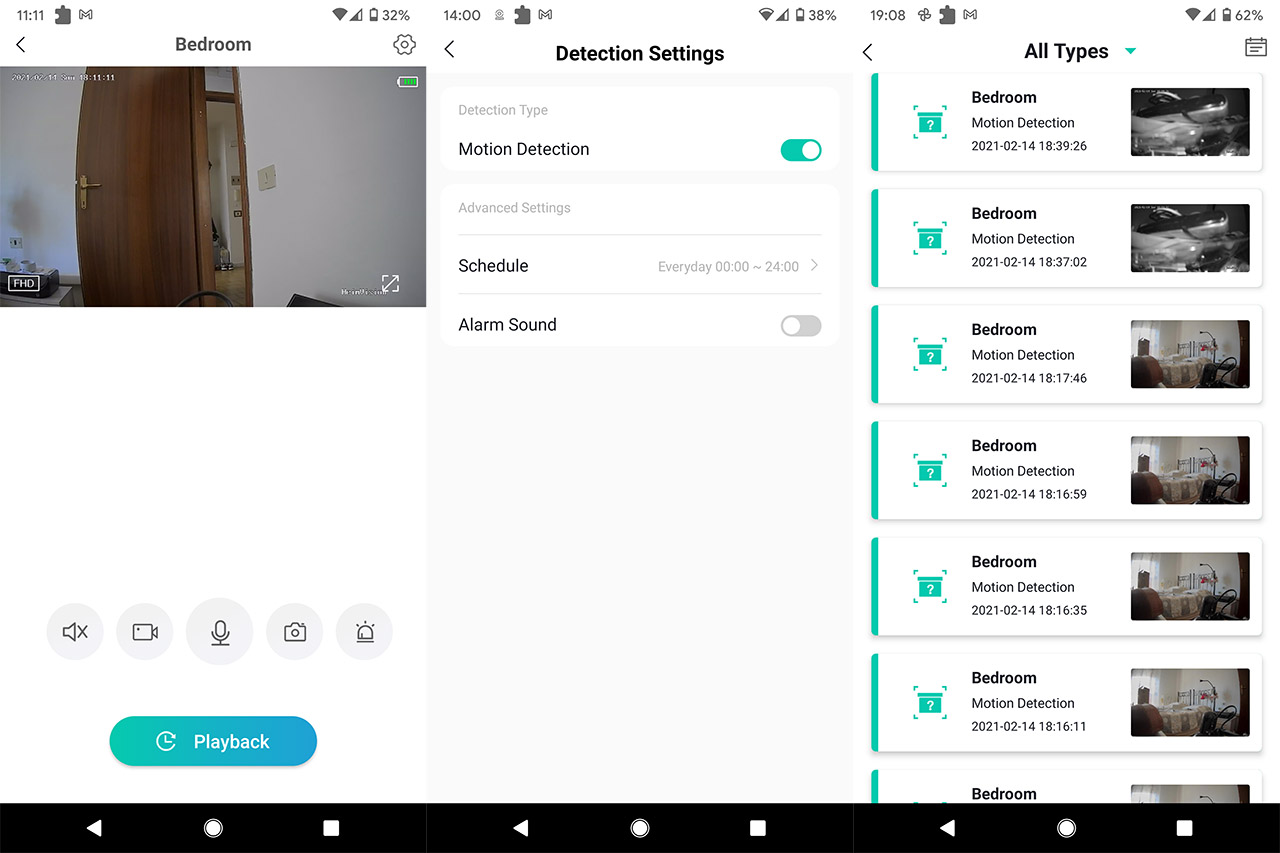
The app should be able to detect the base station and now it’s time to prepare the camera unit. To do so, take four batteries and insert them into the dedicated slots, close the back cover and you should wait for the speaker to say that the camera is ready to be paired (be warned that it will continue to say it until the batteries run out…). Press the Pair button on the camera three times, wait for the voice prompt that the device has entered the Pairing Mode and then press the Pair button on the base station three time. The hub should make a high pitched sound and the camera unit should say that the pairing has been successful. The app will afterwards require for you to either choose a location or enter a custom name and you should now be able to view the live footage. On the bottom left side, there is the possibility to switch between HD and FHD (every time I open the app, it seems that it always defaults to HD, which I found a bit annoying) and on the top right of the footage window, you can see the remaining battery life – you can also view the live video on full-screen mode.
Towards the bottom, there are several quick action icons: from the left, there’s the Mute icon (press it if you want to listen to what is detected by the camera’s mike), the Record icon, the Talk icon (tap it if you want to talk though the camera’s speaker – to spook an intruder), the Image Capture icon and the videos captured when the Motion Detection sensor was triggered. Underneath these icons, there’s the Playback option, which accesses either the microSD card for any captured videos or the Cloud. At the moment of writing, you get three months of free Cloud storage, but even after this period, the rates aren’t that bad and you do get unlimited storage for your videos.
Image Quality
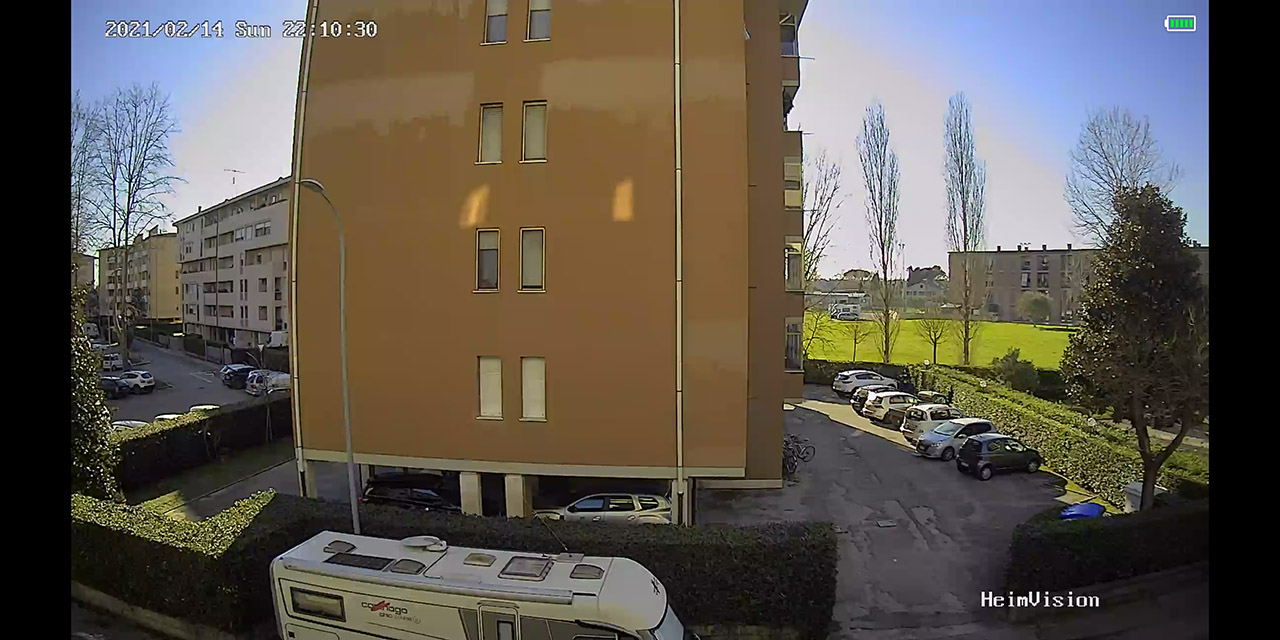
I used a Pixel 2 XL to check out the footage and, after I set it to FHD (the maximum available at the moment of writing – no UHD available yet?), the images were sharp enough, with accurate colors when the objects of interest weren’t farther than about 30 feet. As with other cameras, I do like to check out how far this clarity holds, so I usually point the camera towards objects as far as 200 feet away. During the day, as you can see from the captured photos, the HeimVision Assure B1 did decently well since you can see the type of cars and when people move around, but some details are still lost. And things get a bit more problematic if the sun shines in front of the lens since it heavily penalizes the clarity of the footage – for this reason make sure to position it where the sun will not hit it directly. During the night, you get two options, either view the footage in black and white or in color. The black and white video was alright, although the clarity disappears if you want to film farther than 30-40 feet – it reminded me of the performance of the Annke C500 which suffered a bit due to the small number of IR LEDs, which I also think it’s the case with the Assure B1.
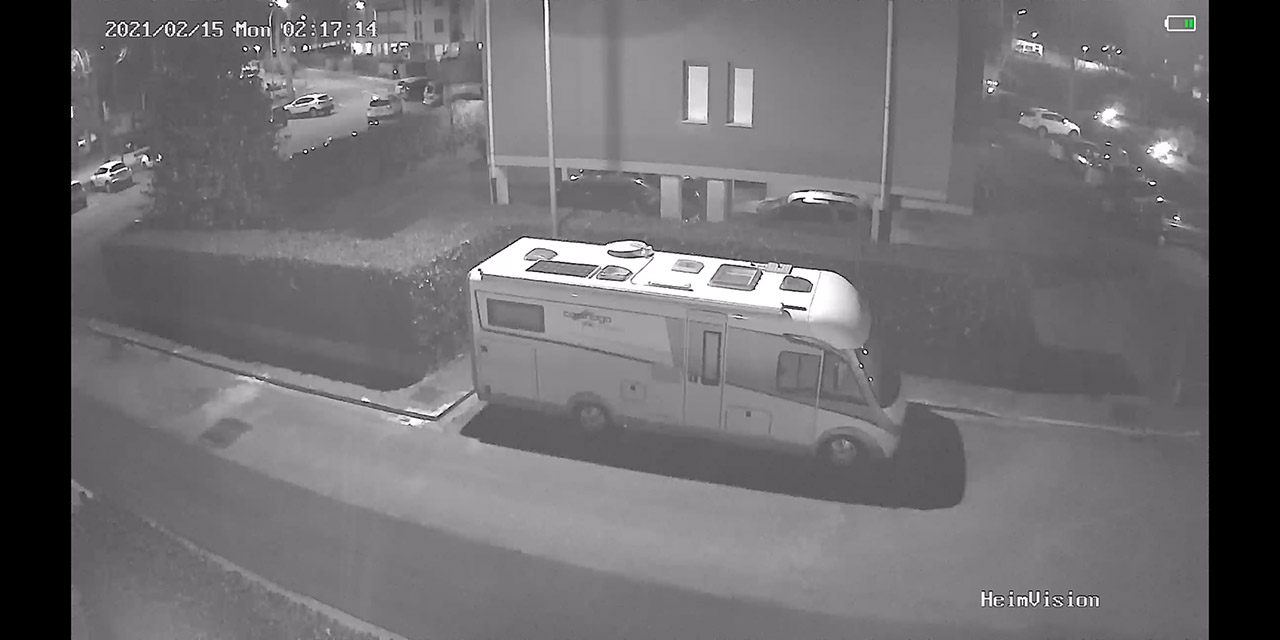
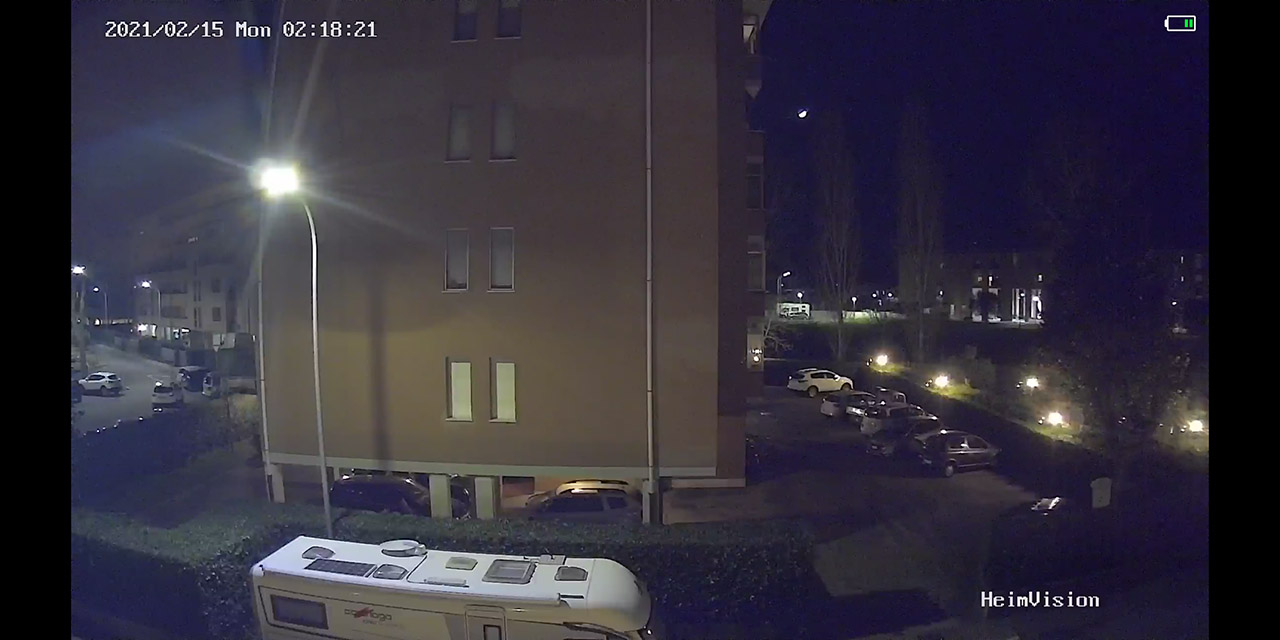
The good news is that if you enable the spotlight, things dramatically change for the better. Indeed, the objects are clearer and the light sources aren’t overblown, and, while it’s not at the same level of the NC400, it’s definitely next to other cameras that rely on a spotlight for night vision – devices such as Reolink Argus 3. The problem is that the batteries will run out a lot quicker if the spotlight is active for too long – which is why a combination between a solar panel and rechargeable batteries may be for the best. HeimVision has advertised that the camera has 130 degrees FoV and it’s true, the Assure B1 is able to cover a far larger area than most of its competitors.
Other Features
Besides the night vision, the camera also relies on a motion detection sensor to let you know when some movement has been detected. I know that HeimVision says that there is human recognition as well, but I have checked the app and, for now it doesn’t seem to be available, but I suspect it will be added to the application soon enough. That being said, the sensor was very accurate on detecting movement even at 30 feet, but I would have liked to able to set trigger areas in order to reduce the number of false alarms and a way to increase or decrease the sensitivity is also welcomed – I do assume that it’s going to be added on an app update. One thing that I have not yet mentioned is that the maximum supported distance between the hub and one camera is 100 feet and it’s an accurate number when in the open, but even after three walls (and closed doors), the footage remained unaffected at FHD image quality after I positioned the camera 40 feet away from the hub. There is also a Notifications system in place, so you quickly get alerted when the motion detection sensor gets triggered.
I saw that the notification to my smartphone would arrive as fast a 1 second after the triggering event or as slow as 5 seconds – when in the same network (it will take a few seconds more when you’re connecting remotely, but the notification would always arrive within 10 seconds).
Note: The HeimVision Assure B1 works with Amazon Alexa which is great if you want to have a proper smart home, but make sure that you have all the necessary protection put in place against network intruders (it’s ideal to put the camera on a separate network) – also be aware that the integration with any smart assistant means that some data is sent towards the manufacturer’s server.
Conclusion
Battery powered outdoor cameras are always tricky since they’re entirely dependent on the charge of the batteries (a spotlight can be quite taxing). Of course, you should be able to freely take advantage of all the HeimVision Assure B1 features by using the solar panel + rechargeable batteries combo, but I doubt that many users will got his route. Even so, there are so many attractive features built into the Assure B1 that you simply can’t ignore it at its current price point. You get fully functional colored night vision, a good motion detection (+ relatively quick notification), Cloud subscription and microSD card support and the app works well – and I do suspect more features are going to be added down the road (the human detection is currently missing). Of course, there are devices that have polished a lot more some of the aforementioned features, but there is clearly a place for the HeimVision Assure B1 on the market and I do look forward to see the direction that the manufacturer will take with this new device.
HeimVision Assure B1
-
Pros
- Good color night vision performance
- Spotlight
- Two-way communication
- The hub supports up to four cameras
- Support for rechargeable batteries and solar panels
Cons
- No way to adjust the Motion Sensor sensibility
- The reliance on AAA batteries
- Some of the features aren't yet activated
- The image quality is not that good at greater distances
Mark is a graduate in Computer Science, having gathered valuable experience over the years working in IT as a programmer. Mark is also the main tech writer for MBReviews.com, covering not only his passion, the networking devices, but also other cool electronic gadgets that you may find useful for your every day life.