
The Reolink Argus 3 is the third generation of outdoors-suitable battery-operated cameras and the people have grown very fond of this series due to the quick installation, the excellent image quality and the simple, yet comprehensive set of features. The Argus 3 doesn’t change any of the basics, but it does add some interesting new elements to both improve some of the shortcomings of the previous model, as well as to give it an edge over its competitors.
| Reolink Argus 3 | |
|---|---|
| Reolink.com | Check Product |
You get an integrated spotlight that’s triggered by motion, there’s a horn and, while the battery is non-removable (unlike its predecessor), you do get the option to keep the camera fully charged using a small solar panel.
Coincidentally (not really), Netgear has also recently released the Arlo Pro 3 which has a very similar set of features, but the Reolink Argus 3 has intentionally omitted some of the smart capabilities, such as the support for the smart home assistants (Alexa, Google or HomeKit) and there are cameras that will go as far as adding face recognition within their feature-set (of course, from Google).
And there is a point when we have to stop and ask ourselves whether we need that much reliance on tech; sure, security is important, but sometimes, less is more (especially when it hurts your privacy). And that’s exactly what the Reolink Argus 3 is all about so, considering it comes at an affordable price, let’s have a closer look at this seemingly well-rounded camera.
Design and Build Quality
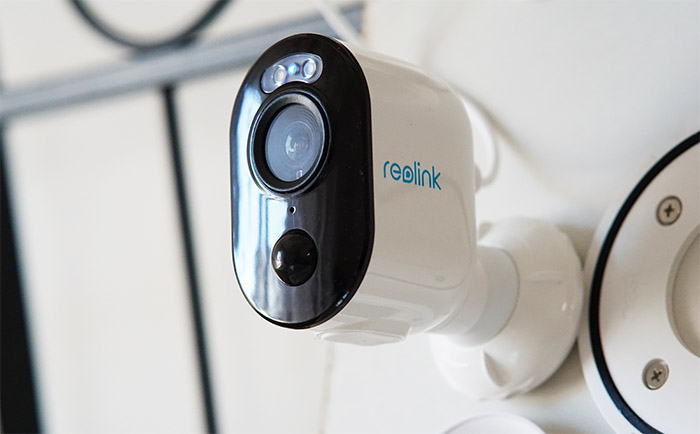
If you check out the previous two generations, you’ll realize that the design of the Reolink Argus 3 isn’t really a natural evolution from its predecessors and it looks like it took some inspiration from the Netgear Arlo Pro 3. And that’s not really a bad thing considering that the plastic case now looks more modern, while also keeping that unobtrusive nature. So, we’re dealing with a pea-shaped case covered by a white glossy finish (with the exception of the front section) and no, none of its compactness has been sacrificed, since the Argus 3 measures 4.8 x 3.5 x 2.2 inches (12.1 x 9.0 x 5.6 cm). After a closer inspection, I realized that, besides the speaker grills (which don’t allow internal access), the camera has no other cut-outs or exposed opening, so it’s properly sealed and this confirms that the Reolink Argus 3 is built to withstand the elements.
And indeed, the device is IP65 rated, so it should be fully protected against dust ingress, as well as against powerful jets of water (which is usually the case during heavy storms). I would still avoid keeping the camera fully in the open (such as on a pole in a field) since it doesn’t have any protection against lightning which can quickly ruin the device.
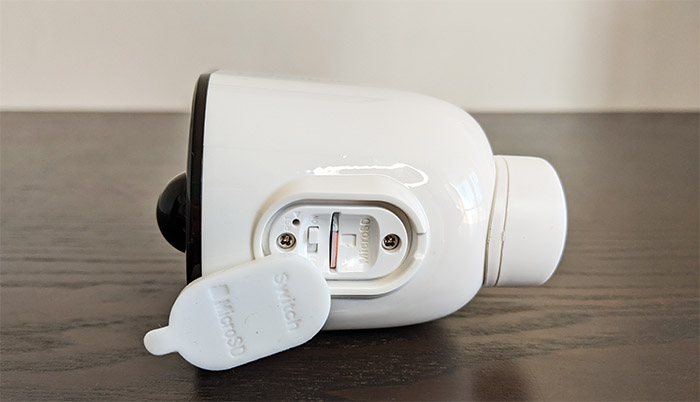
The working temperature is similar to the previous two models, which means that it should remain operational when the temperature drops down to 14 degrees and up to 131 degrees F (the same as on the RLC-511 and the RLC-522). I did say that there are no exposed openings, but there are a couple of silicone covers, one on the rear side, which covers the microUSB port and the other on the bottom to protect the On/Off switch, the microSD card slot and the Reset button (it’s recessed – press and hold it for a few seconds until you hear the prompt “Factory reset succeeded”). I am not a fan of the microUSB port since it’s time to fully move on to the type-C and the microSD card is still capped at 64GB – the good news is that with the new RLC-810A and the RLC-510A, Reolink has finally upped the capacity to 256 GB.
Well, it’s not like the microSD is the only storage option available since you can also rely on the subscription based Cloud storage (there is a free plan which provides 1GB of space for one camera and the videos are kept for 7 days). Next to the microUSB, there is the speaker which is very loud and yes, there is also a microphone, so you can engage in a two-way conversation (or scare off any trespasser).
Reolink has reinvented the way it powers the Argus camera with every generation, the first model being reliant on replaceable batteries and the second had a rechargeable battery which could be removed from the socket, so you wouldn’t have to take the entire device off the wall.
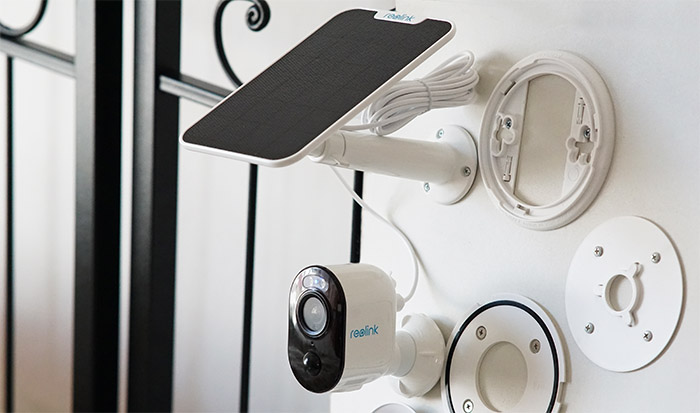
The Argus 3 has the same battery as its predecessor (there are actually two batteries inside), but the difference is that you can’t remove it and recharge it separately. Instead, you need to remove the camera completely. Before frowning, know that Reolink has thought of a couple of ways to make this process painless. The best way to keep the Argus 3 fully charged is to purchase the dedicated solar panel (it’s very cheap) which will directly connect to the camera and ensure that the battery is always charged – the solar panel supports a max voltage of 6V and a max power of 2.3W.
There is a fairly long cable that you need to connect to the back of the Argus 3 and the solar panel has a metallic stand which is long enough to allow you to mount it pretty much anywhere you want.
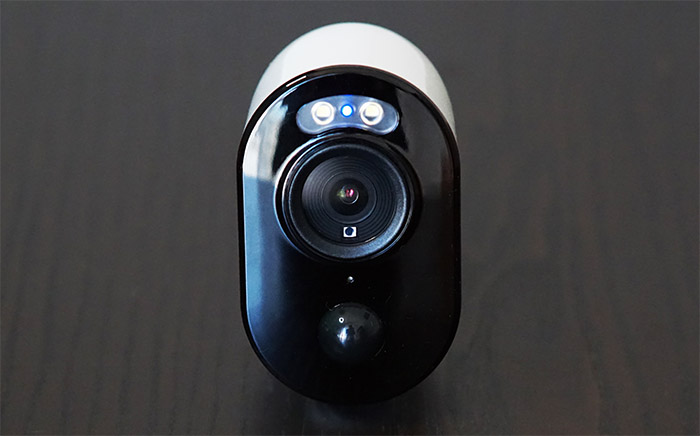
The second option is to rely on the magnetic mounting bracket which comes into the package and consists of a main plastic base with a circular magnet pointing upwards and a smaller section (also magnetic) that you need to screw into the camera case – the magnets are very powerful, so you don’t have to worry that it may fall. Besides the magnetic bracket, there is a normal mounting bracket that you can use to permanently attach the Argus 3 to the wall (ideally, when you’re using the solar panel). The front panel of the camera is occupied by the spotlight and the status LED (it will be solid red when the WiFi connection has failed and solid blue when the connection has succeeded – flashing red or blue indicates that the camera is in stand-by mode) which sit above the fairly large lens (2-megapixel) and the Daylight sensor, while further down, there is a built-in microphone and the PIR motion sensor.
Note: Reolink has also added a loop strap in the box for the users that may want to attach the camera to a tree or pole.
Setup and Functionality
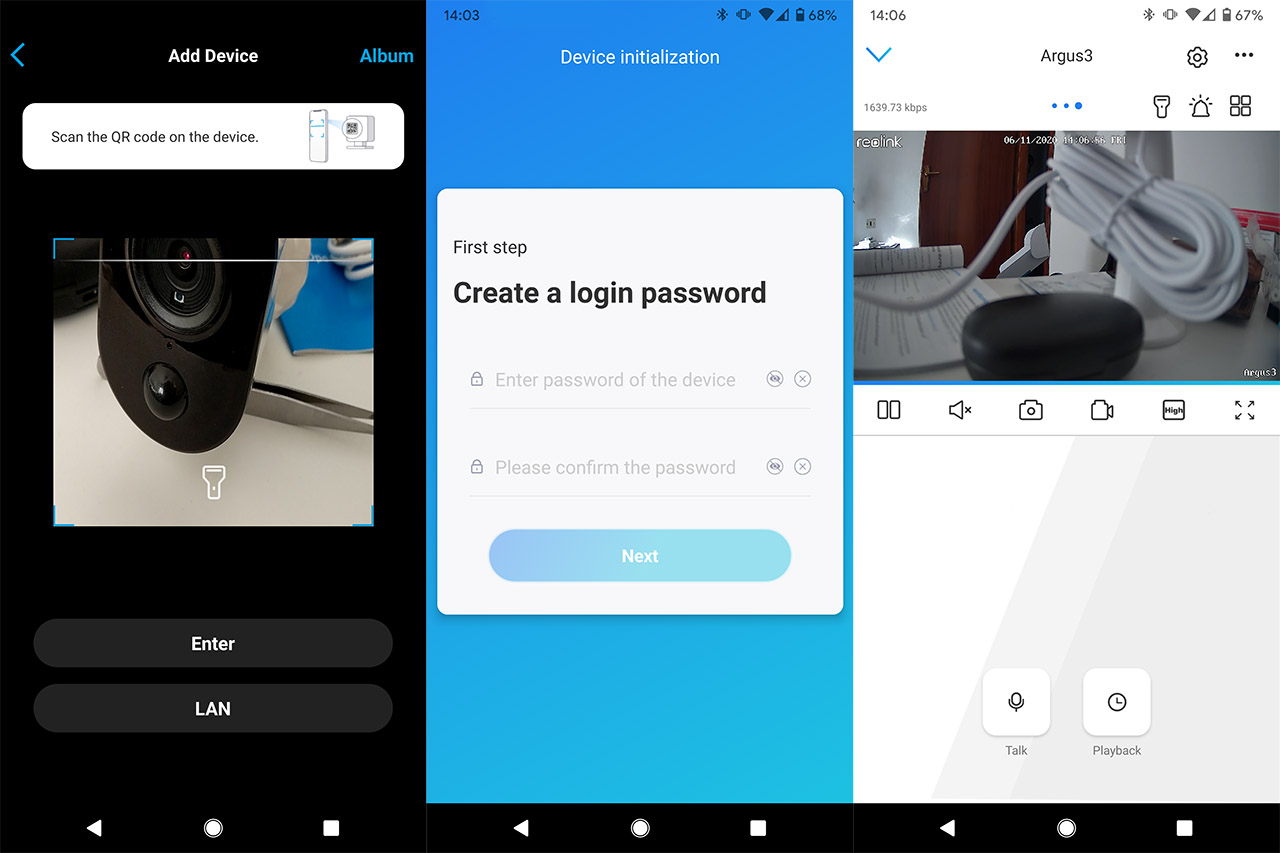
After you have mounted the camera (and, if available, you’ve connected it to the solar panel), it’s time to flip the switch from the bottom of the Argus 3 to On and start listening to the message that will persuade you to install the Reolink app over and over. After you’ve installed the app (compatible with both iOS and Android), tap the Plus sign and, when prompted, scan the QR code from the rear side of the camera. Immediately after, the app will ask whether you have the WiFi configured – unless you have already used the app for other WiFi Reolink camera (such as the E1 Pro or the E1 Zoom), you’ll have to select the SSID and insert the password. Be aware that the Argus 3 will work only with the 2.4GHz network, so choose accordingly. After that’s done, the app will ask that you scan a QR code from the mobile device using the camera – keep it at about 8 inches from the screen and it should instantly work. Lastly, create a login password (no, you cannot change the default username) and give the camera a name; you will then be able to see some “Sensor Precautions” guide and gain access to the full user interface. I have tested a few other Reolink device, both suitable for mounting outdoors (such as the RLC-520 or the RLC-511) and for indoors (the E1 Pro) and the app is the same for all cameras, with minor variations depending on the model and the features.
In the case of the Argus 3, the main window will display the live footage in the upper half of the screen, where you’ll also be able to see the current bitrate, enable the torch, trigger the siren or change the view to see more than one connected cameras. Underneath the live video, there are the usual set of quick action tabs: Pause/Start, Mute, take a photo, start the video recording, set the video quality or see it in full screen. The footage quality can be set to Fluent or 1080p and, while the latter will definitely offer a far better image quality, you will also experience some latency, depending on your WiFi connection. For example, while I was about 25 feet away from the router, the lag was about 2 seconds when the camera was set to the max video quality.
Image Quality
The image quality is good, especially considering that we’re dealing with a 2-megapixel sensor and yes, the maximum resolution is 1080p. I know that almost all other Reolink cameras have moved towards 4 or 5-megapixel sensors and the resolution is usually better (there’s also the SuperHD feature), so why is the Argus 3 limited to 1080p, while one of its main competitors went with the 2K resolution? Well, first of all, it’s the price tag, since the camera is more affordable than some of its main competitors (at the moment of writing, about half the price of a single Arlo Pro 3 unit) and secondly, it’s to preserve the battery life. I have tested another battery-operated camera about a year ago, the Meco Eleverde and it kept the resolution to 1080p for the very same reason. That being said, during the day, the camera performs very well, the details are all there, the colors are vibrant, but I would avoid positioning it where the sun may shine directly towards it since it can create blind spots.
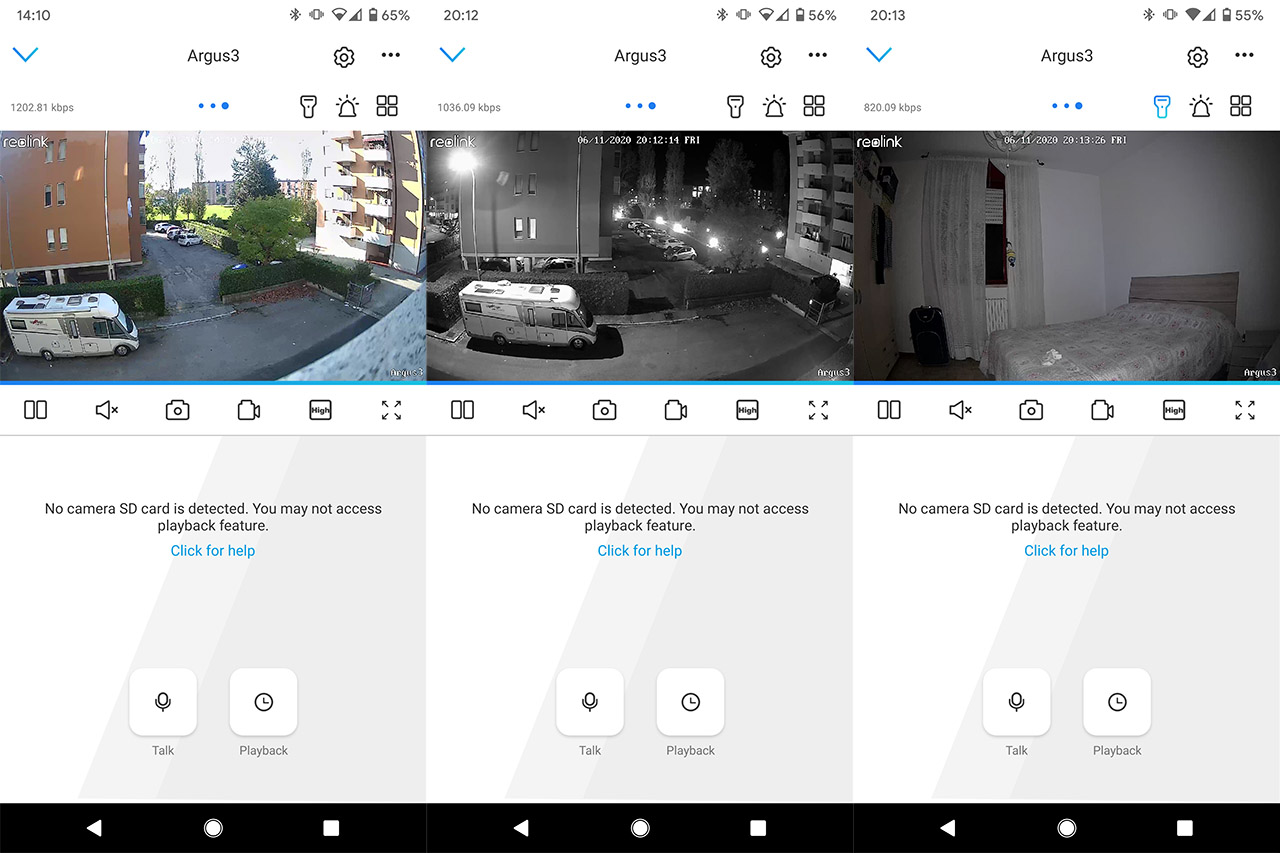
During the night, the footage was very similar to other Reolink cameras, so again, the image is clear and detailed (the IR is doing a great job in this case), but you also get the option to enable the spotlight and add some color to the video.
Since it’s a fairly powerful light that shines towards the targeted area, the image will get clearer during the night (the colors will help you better distinguish the objects) and I liked that the footage doesn’t get washed out (the light is fairly uniform). It’s also worth mentioning that the Argus 3 has a wide field of view, going up to 120 degrees, which is far wider than all other outdoor-suitable Reolink cameras (such as RLC-511 or RLC-520).
Other Features
If we return to the main window, there are a couple of tabs that need to be mentioned, the first is Talk where you can enable the two-way communication, as well as set the Earphone mode (for when you use headphones) or set the volume. The second is Playback where you can check any recorded footage captured either when the motion sensor has been triggered or due to a scheduled event. To configure the way the Reolink Argus 3 functions, you need to tap on the cogwheel icon from the top right corner which will open the Settings. Here, you can see the Battery life (you can also view the running time over the last 4 weeks), the WiFi network to which it’s connected and adjust the Display settings: includes changing the resolution, the frame rate and the max bitrate (can go up to 2,048kbps), as well as the refresh rate, adding a watermark or the Privacy Mask (to ensure the privacy of your neighbors, for example). Under Display, you can set the PIR Motion Sensor and, by default, it’s set to 80 (High) which should be fine for detecting movement up to 33 feet – it worked great even at 50+ feet. In case the area of interest is not farther than 20 feet, Reolink suggests that you should find the sweet spot between 51 and 80. Lastly, if you need to monitor a very close area (no more than 13 feet), then it’s suggested to keep the sensitivity below 50.
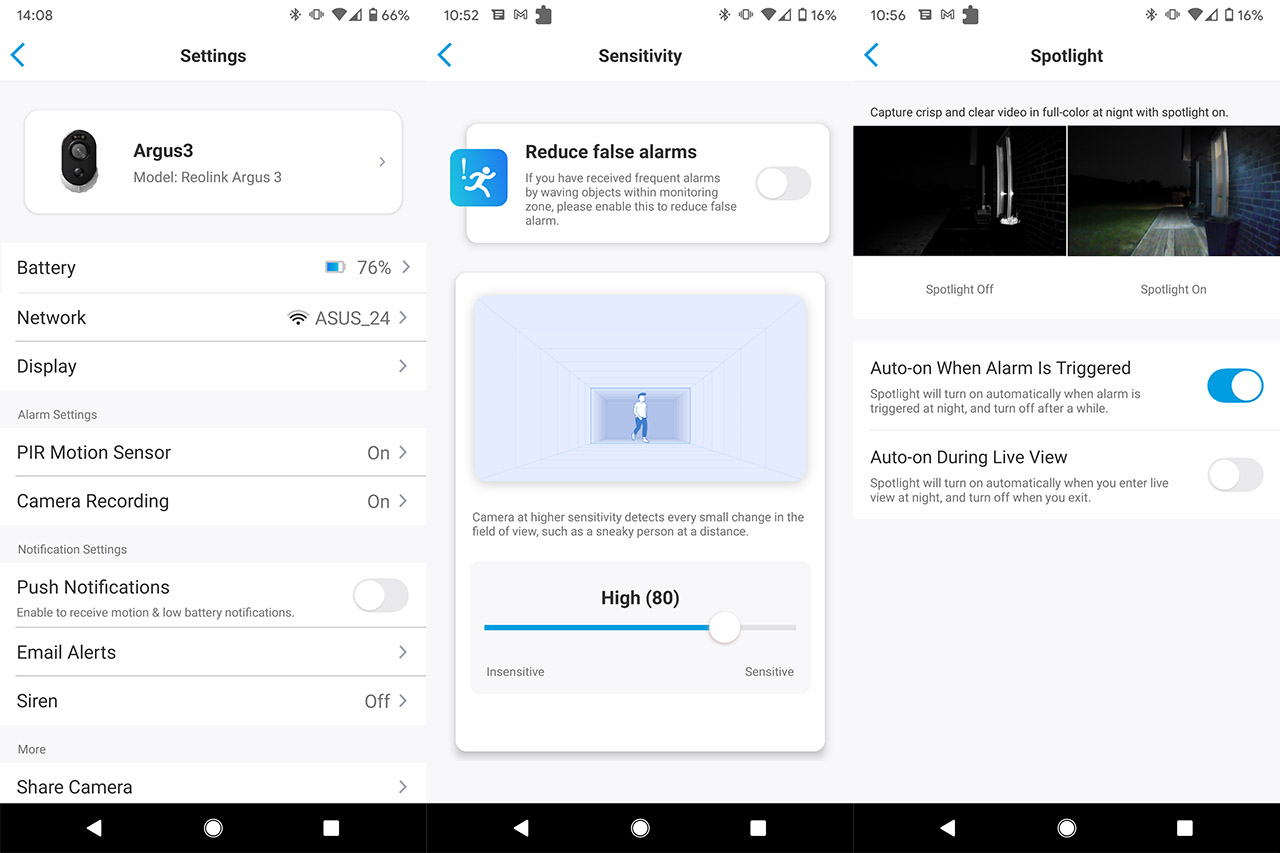
I noticed that the app also allows you to enable the ‘Reduce false alarms’ feature which I’m not entirely sure what it does, but I assume it automatically reduces the sensitivity of the motion detection sensor. Still on the Settings page, you can configure the Camera Recording and here you will see a very interesting feature, the Post-Motion Recording Duration. You can set it to 8, 15 or 30 seconds and it’s very useful since the camera continues to record the footage even after the triggering event has stopped. The app will also allow you to enable Push Notifications (which are surprisingly fast), Email Alerts, enable the Siren, set the Spotlight (to turn on when the alarm is triggered or when you check the footage during the night).
Conclusion
In a market that continuously pushes unnecessary and most often intrusive smart features, the Reolink Argus 3 is a breath of fresh air, offering a compact case that can withstand the elements, a good image quality, a reliable motion sensor, a loud siren and the spotlight which is useful for both scaring off any potential trespassers, as well as to get a better view of your surroundings during the night. There also multiple ways to recharge the battery and, of course, my favorite is using the inexpensive solar panel (that needs to be purchased separately). Yes, it’s very close to the Netgear Arlo Pro 3 in both design and functionality, but, considering that you get a similar set of features for a lot less money, it’s definitely a great solution for the budget-constrained users.
Reolink Argus 3
-
Pros
- Good video quality
- Multiple mounting options
- Has a spotlight + siren
- The app is easy to use
- The non-removable battery can be charged using the optional solar panel
Cons
- has support for microSD cards up to 64GB
- MicroUSB port instead of the newer USB-C
Mark is a graduate in Computer Science, having gathered valuable experience over the years working in IT as a programmer. Mark is also the main tech writer for MBReviews.com, covering not only his passion, the networking devices, but also other cool electronic gadgets that you may find useful for your every day life.