
The Reolink RLC-520A is a rugged outdoor camera that relies on the built-in smart motion detection technology to accurately detect people, while ignoring moving vehicles or cloud shadows and, thanks to the on-board image processing, there is no need for server access. Which is great privacy-wise and it’s something that companies think about a lot less nowadays.
| Reolink RLC-520A | |
|---|---|
| Amazon.com | Check Product |
| Reolink.com | Check Product |
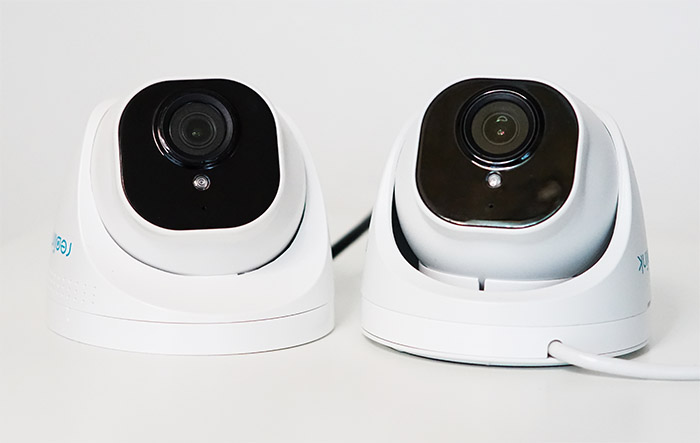
Furthermore, the RLC-520A also relies on the 5-megapixel sensor and the 2560 x 1920 (Super HD) resolution to give you a crystal clear look not only during the day, but also during the night (the IR vision can go up to 100 feet before some noise creeps in). And if that sounds an awful lot like the Reolink RLC-510A, well, it’s because they’re essentially the same device, but with a different skin.
Unsurprisingly, the Reolink RLC-520A shares the same design with the RLC-520 since it’s supposed to be a replacement for the older series.
But the RLC-520A went a step further and it’s more rugged than the RLC-520 and the aforementioned smart motion detection is not a gimmick, it actually works as intended since I have already tested it on the RLC-510A. Whether you’ll need it or not, that’s another matter since it’s obviously going to be more useful on a crowded street, but it’s still good to see that Reolink has added a fresh and useful technology. That being said, let’s have a closer look at the RLC-520A (inside and out) and see if it offers everything that you may need in a security camera.
Design and Build Quality
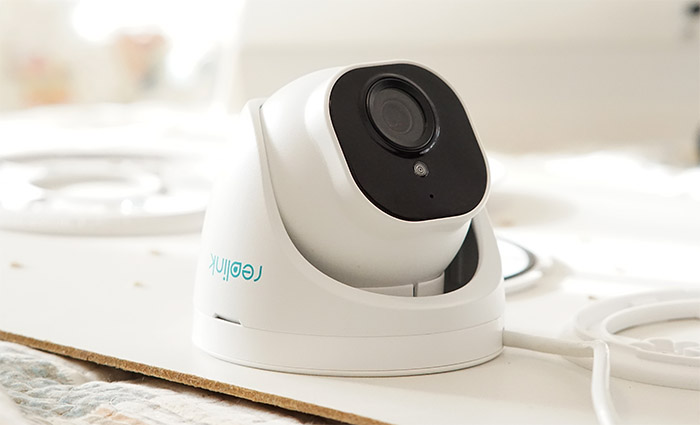
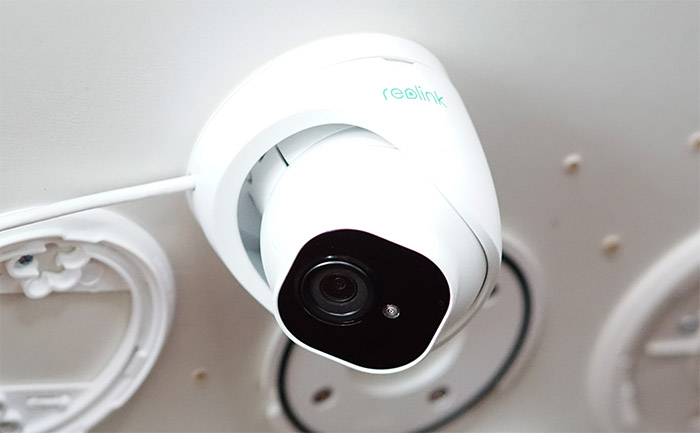
After taking the Reolink RLC-520A from the package, I immediately thought that the manufacturer simply recycled the case of the RLC-520, but at a closer inspection I realized that while they look similar, there are some notable differences between the two models. The RCL-520 has a metallic main body (zinc or magnesium alloy), while the base was made of a hard plastic – and yes, the circular camera section would be manually adjusted within this base. The RLC-520A does have the same design approach, so the main camera body is also circular and still made out of a metal alloy, but the base is no longer plastic and instead, it seems to be made of the same metallic material. Since it’s not wise to scratch the main camera body to the base, I noticed that Reolink has added a few pads inside the metallic shell and the circular section stands and moves on a plastic piece.
All these additional elements have made the RLC-520A a bit taller than the RLC-520, but, at its 4.13 x 3.74 inches (10.5 x 9.5 cm), it won’t really matter that much, especially since it will most likely end up being mounted outdoors. I am not entirely sure whether the extra-ruggedness was truly needed, but it’s definitely a welcomed addition. The IP66 rating is still there, so the camera will survive in case it’s targeted by powerful jets of water (powerful storms) and it’s also dust-proof. I doubt that you can put the RLC-520A on a pole, so it’s far more protected against lightning strikes than other devices, but I would still take all the necessary precautions to make sure your camera will survive a lightning storm (add some surge protectors).
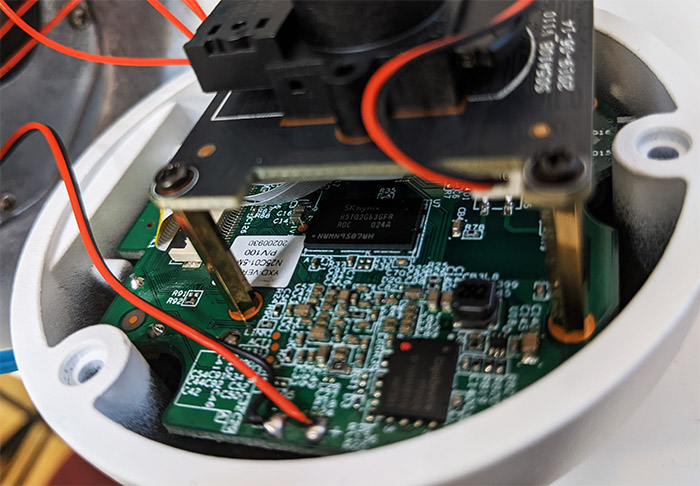
Furthermore, the RLC-520A will remain functional when the temperature is above 14°F and underneath 131°F, which is the same as all other Reolink models (good in most cases, but the harsh winters in some parts of Canada may prove to be a bit too much). I have been taking about the similarities with the RLC-510A, but to actually confirm it, I had to open up the case. To do so, I had to remove the screws from the rear side of the camera and carefully detach the front part in order to expose the singe PCB with all its components – incidentally, there was some dust stuck between the front glass and the lens that I got to remove (the quality control missed it). I could identify a Novatek NT98523MBG SoC, 256 MB of RAM from SK Hynix (H5TQ2G63GFR) and 128MB of flash from GigaDevice (FP2024 5F1GQ4UBY1G) which confirms that indeed, the Reolink RLC-520A is the same as the RLC-510A from the internal hardware point of view.
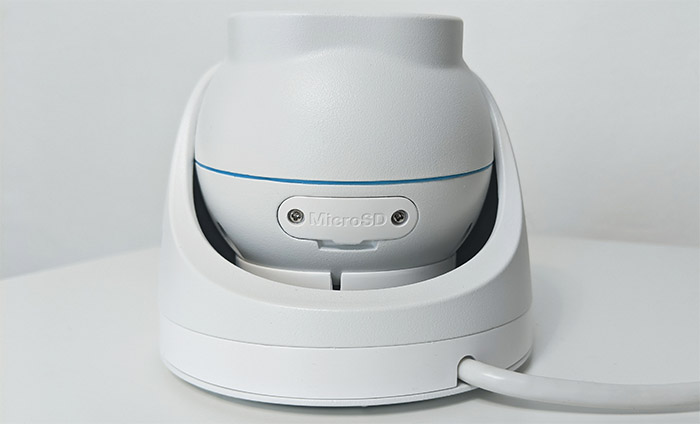
It’s worth mentioning that the RLC-520A is going to get warm to hot while functioning. On the front side, within the glossy black section, Reolink has added a high-definition fixed-focal f=4.0mm lens (5-megapixel) along with 18 Pcs IR LEDs, a daylight sensor (which enables or disables the night vision) and a microphone. The mike is very useful if you want to add some sound to your footage and understand better what’s going on outside, but, since there is no built-in speaker, you won’t be able to have a two-way conversation (or scare a trespasser). If you push the main camera body to point upwards, it will reveal a slot for a microSD card and to access it, you need to remove the two screws that hold the small cover – yes, similarly to the RLC-510A, there is now support for microSD with the capacity up to 256GB. This way, you get to store up to 97.1 hours of footage.
I have noticed that the permanently-attached cable that is guided from the back of the camera through the base is now white (instead of the usual black) which will look better on the wall and yes, it still divided into three extremities. One holds the Reset button which you need to press and hold for 10 seconds to return the camera to its factory settings. The second extremity allows you to connect an Ethernet cable and, if the cable is connected to a PoE switch or injector, you don’t have to use the third extremity, where you can insert a Power adapter. The RLC-520A supports PoE 802.3af (48V Active).
Hardware Installation and Setup
The Reolink RLC-520A can be installed in the same manner as any other dome-shaped camera – pick a spot on the ceiling (or wall), drill a few holes to put the bracket, feed the cable/s through if you replace another camera (or let the cable hang on the wall) and then rotate the RLC-520A into the mounting bracket. If you don’t have a PoE adapter or switch, you will have to rely on a power adapter and unfortunately there isn’t one in the box, so you’ll need to purchase a separate one, but since it’s so convenient to just have a single cable for both power and data transfer, I’d say it’s worth investing in a PoE switch, especially if you have more than one PoE camera that needs to be installed. Regardless of the way you choose to power the camera, you will still need to connect it to your router using an Ethernet cable and I noticed that Reolink has added a waterproof lid kit to keep out water and dust, but be aware that it can only go over the cable before it’s cramped (not that great, but it’s better than nothing).
Since there is no Power LED anywhere on the case or a speaker, you’ll know that the camera receives power after the case starts getting warm and at that point, you should install the Reolink app on your mobile device (Android or iOS). Then simply tap on the plus sign and you will summon a page that will ask to scan the QR code from your camera (you’ll find it on one side of the base) – in case you already have other Reolink cameras installed, simply tap on the arrow down icon from the top left corner and again, tap on the plus sign. After detecting the camera, the app will initialize it and then, it will ask that you create a new login password (use a long password), to name your device and that’s all, you can now freely navigate the app.
Reolink RLC-520A
-
Pros
- The smart motion detection is accurate
- Very good image quality at the max available resolution
- Support for 256GB microSD cards
- Rugged + IP66-rated
- Intuitive app
Cons
- Some slight, but still noticeable lag at max image quality
Mark is a graduate in Computer Science, having gathered valuable experience over the years working in IT as a programmer. Mark is also the main tech writer for MBReviews.com, covering not only his passion, the networking devices, but also other cool electronic gadgets that you may find useful for your every day life.