
The SwitchBot Lock is a unique approach to the smart lock concept which, instead of requiring the complete or partial replacement of an existing traditional dead-bolt lock, it is designed to complement the lock in the least invasive manner possible.
| SwitchBot Lock | |
|---|---|
| Switch-bot.com | Check Offer |
| Amazon.com | Check Offer |
This means that while before, the people that could enjoy using smart locks were the home owners, it’s now possible to convert a traditional lock into a smart one by using some double-sided tape and an app. Obviously, the SwitchBot Lock itself needs to be mounted on the deadbolt lock as well. So yes, it’s entirely possible for people that rent an apartment or house to make these non-invasive works, especially if the landlord doesn’t want you to make any alterations to the home.
This is a clear advantage that SwitchBot has over the other established brands, but is the SwitchBot Lock actually better or at least just as good as its main competitors? It does have an app for locking and unlocking the door, but you can also use a smartwatch and even a keypad to unlock it. There’s also the auto-lock function which locks the door after a certain amount of time has passed (for people that often forget to lock their doors) and, apparently you can also use Alexa or Google Home assistants to control the smart lock.
If you’re not that fond of the SwitchBot-only ecosystem, it is possible to use Home Assistant to control IoT devices from third parties at the same time. I do think that there will be some compromises in terms of looks, but let’s put the SwitchBot Lock to the test and see what’s it all about.
Design and Build Quality
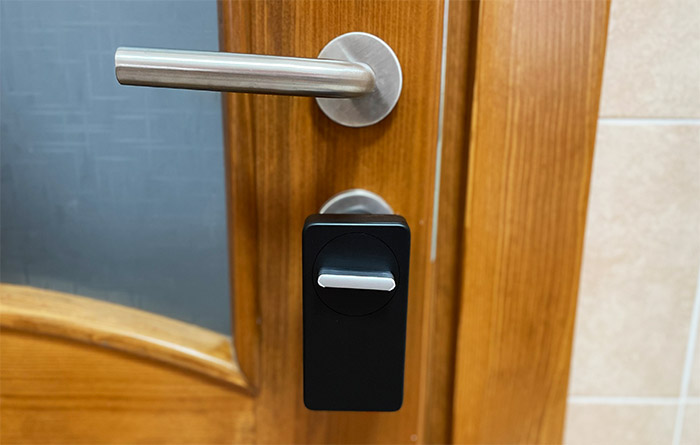
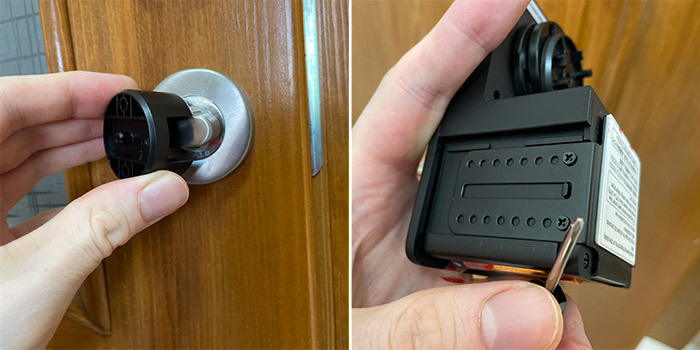
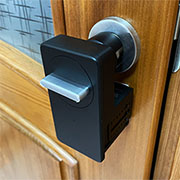
As I already mentioned in the intro, the SwitchBot Lock is a unique smart lock with an unconventional design approach. I know that some smart locks completely replace the lock on your door, other just partially, but the SwitchBot Lock doesn’t require any changes to the existing lock since it simply goes over it. Indeed, the smart lock has a dedicated area that can be adjusted to cover the deadbolt mechanism and, using a motor, it will rotate it to lock or unlock the door.
For this reason, I mentioned that there are some compromises in terms of looks because the SwitchBot Lock is large and not that aesthetically pleasing, despite doing its best. At 4.4 x 2.9 x 2.3 inches (or 11.2 x 7.3 x 5.9 cm), the SwitchBot Lock will not mimic the looks of a traditional lock.
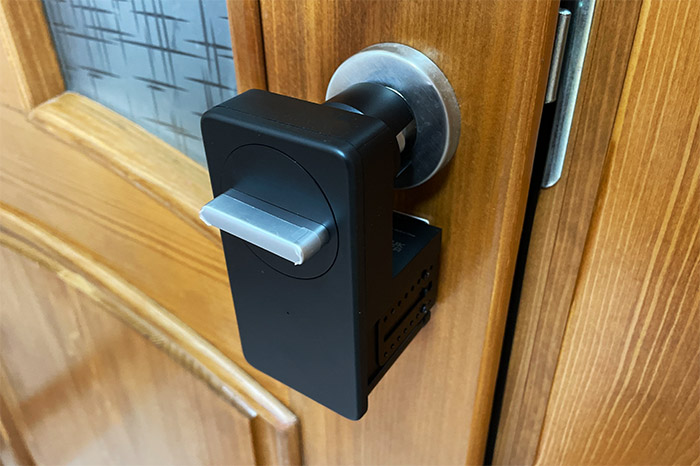
Not at all and that’s because of its depth since it’s not actually larger than a normal nightlatch lock. Depending on the type of deadbolt, the SwitchBot Lock may end up quite a few inches away from the door. That’s thanks to the adjustable unit stand. In most cases, the unit will sit flush with the door lock, but, if it needs to be extended a bit, then, you do need to open up the top cover of the SwitchBot Lock and adjust the stand accordingly using the two screws.
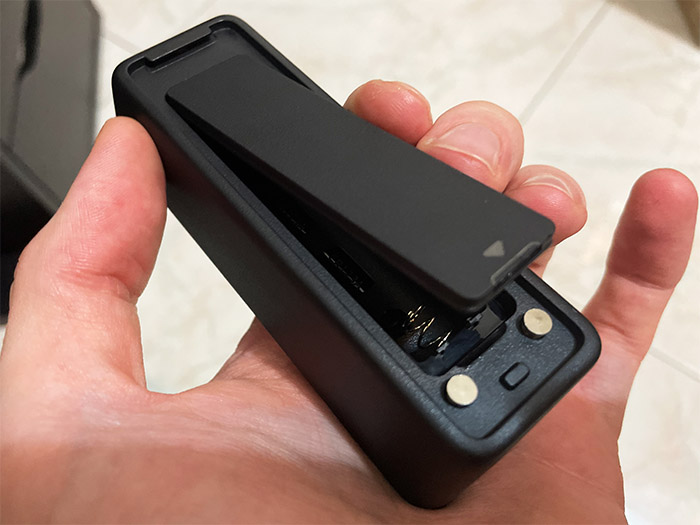
It does take away a bit from the potential plug and play approach, but it’s comforting to know that the smart lock can accommodate pretty much any type of deadbolts. The enclosure of the device is made of plastic and so is the case cover that can be removed to expose the adjustable unit stand and the batteries slot. And they’re already installed, but, to power on the device, you need to take out the plastic layer that breaks the contact with the batteries.
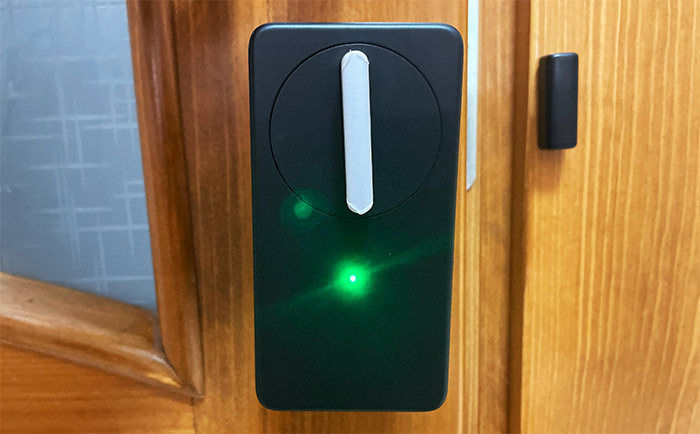
Inside this section, there’s also the motor and, on the other side of the stand, there’s a small LED that kind of shows the status of the SwitchBot Lock. Flashing blue means that the device is ready to be paired, while steady green means that the smart lock is successfully locked or unlocked. Steady red shows that the battery is low or that there is unusual activity (some error?). So yes, you will need to check the app for the proper status of the device, unless you memorize what each color means.
Underneath the LED, there is the thumbturn which is also made of plastic and it’s colored gray (while the rest of the device is matte black). And on the other side of the SwitchBot Lock, there is the thumbturn adapter. If the adapter that’s already installed is not the suitable size, then it’s possible to replace it with one of the other two available adapters. To detach it, simply pull it out (only a bit of force is required).
The SwitchBot Keypad
You can use the SwitchBot Lock without the keypad, but it’s a suitable alternative to relying only on the app. And there are two variants available, one is the base model keypad and then there’s the KeyPad Touch that has a fingerprint reader embedded into the case.
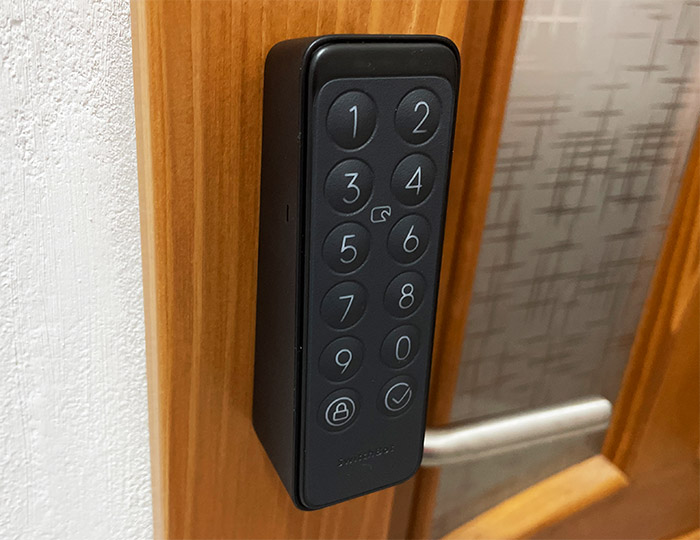
I have the base model, without the fingerprint reader and it’s a rectangular device made of plastic, covered by a black matte finish. It measures about 4.4 x 1.5 x 1.4 inches (or 11.2 x 3.8 x 3.6 cm) and the buttons are properly aligned, so it’s easy to press them. I need to mention that the manufacturer went with an interesting leather-like finish on the buttons area which feels nice to the touch (the keypad being at an angle is also a nice design choice).
Since the SwitchBot Keypad will most likely end up outdoors, it does need to be weatherproof, right? Indeed and the device is IP65-rated. This means that dust won’t enter the enclosure, nor should water. I have checked the rear panel where you insert the batteries and there is a seal which should prevent any water or dust ingress. Also, the device will remain operational even if the temperature goes down to -13 degrees F and up to 150 F (-25 C to 66 C), so it will survive even the harsher winters and insanely hot summers.
Before adding the two batteries (which can be found in the package), the Keypad didn’t really inspire confidence since it felt a bit flimsy. But gaining some weight from the batteries does make it seem a bit more balanced. Don’t forget that the SwitchBot Lock and Keypad combo is still one of the most inexpensive on the market. That being said, the keypad has LEDs underneath every button and icon and all will light up green when a key is pressed.
Above the buttons, there are three LEDs, one with the lock and other with the unlock icon, while in the middle, there’s the indicator light. This indicator flashes green (and there’s also a beep) when the door has been successfully locked or unlocked and will flash red in case it has been unsuccessful. In case you insert a wrong code five times, the indicator will flash red twice and the backlight will also flash twice, followed by two beeps.
Also, besides the numbered keys, there’s a lock and an OK button, as well as a light sensor at the top and an NFC sensor in the middle. You may have noticed that the manufacturer has added a card inside the box which has an NFC chip inside – it can be used to bypass the code and unlock the door.

The Installation Process
As the user manual says, the first steps involve cleaning up the area where the SwitchBot Lock will be installed and to select the suitable thumbturn for the deadbolt. In my case, it was the middle-sized thumbturn which I promptly attached to the main unit and then, I re-positioned the SwitchBot Lock to see if I needed to adjust the stand. And, as you can see, it was indeed necessary. To do so, I removed the top cover and, using the screwdriver (from the package), I was able to remove the four screws and move the stand forward.
This way, I realized that I only needed to adjust it one spot, so I put the screws back. Then, I checked if the double-tape would adhere to the wood in its entirety and it would not. So, I had to take the screws back again and add another spot. Afterwards, it’s best to keep the three axis (circular things that move around) aligned to each other.
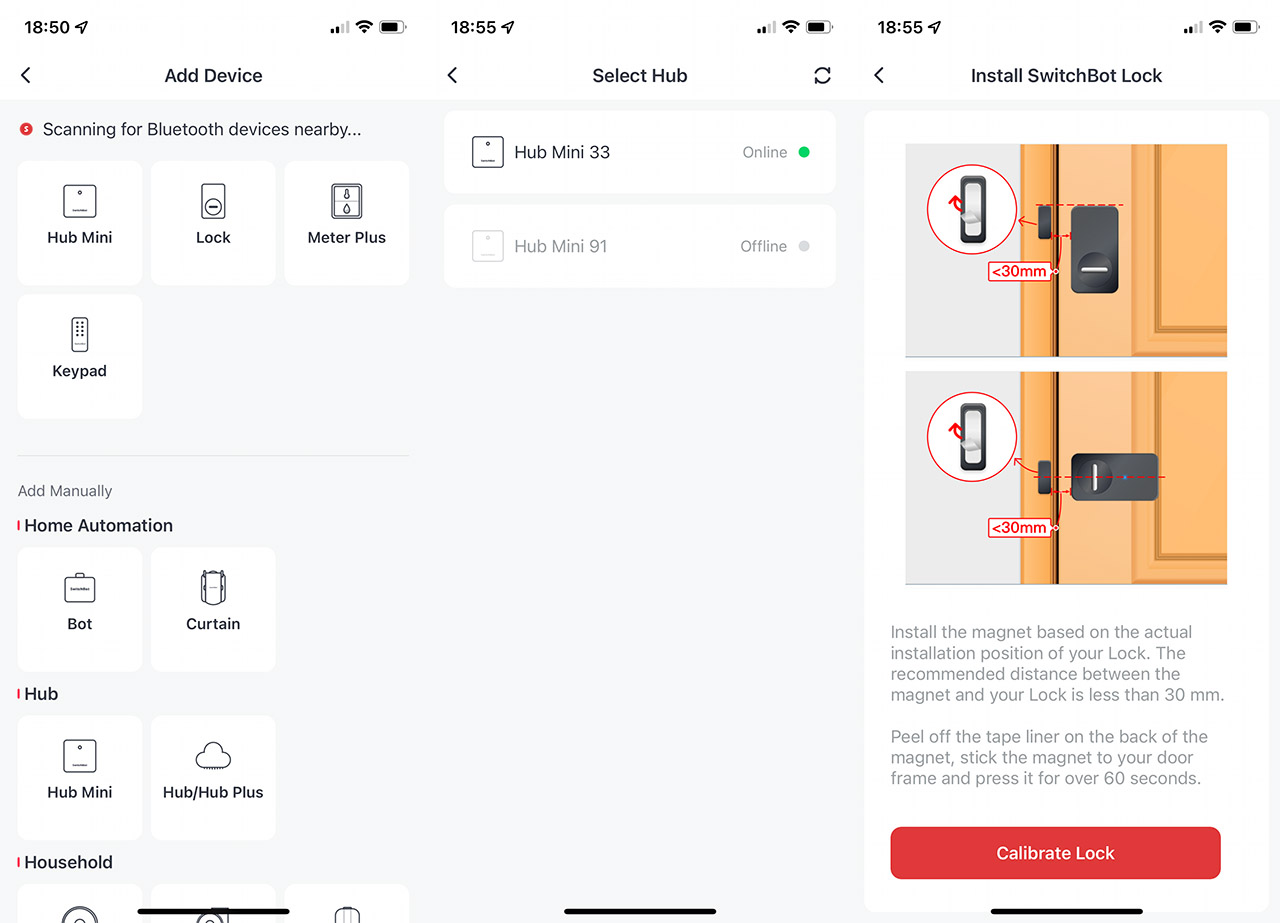
Then, I glued the SwitchBot Lock unit to the door and moved to the next step. I noticed that there was a magnet inside the package which wasn’t really in any of the installation steps from the user manual. The idea is to position the magnet at less than 1.2 inches (3cm) at the same height as the SwitchBot Lock unit since this way, the app will let you know if the door is open or closed. It’s the same principle to the entry sensors that you need to attach to the frame of the windows and doors when installing a security system.

In case you’re sure this is a permanent spot for the device, you don’t need to use the double-sided tape, you can peel it off and instead drill two holes and attach the SwitchBot Lock with two screws. Now it’s a good time to install the batteries (take out the plastic piece that blocks them) and then the LED should start blinking blue. Then, you need to install the app which requires location permission (for reasons) and then, from the main page, tap on Plus and wait for the Bluetooth ‘to see’ the nearby devices (unless you want to add them manually).
Tapping on the lock will allow you to see the name and supposedly pick the Room (still can’t pick it – couldn’t with other SwitchBot devices either) and then I was asked if I wanted to pair it to a SwitchBot Hub. I did have one available, so I selected Next (there’s the option to skip it) and then we can finally start the calibration process. As I already said, you need to attach the magnet next to the SwitchBot Lock (about 1.2 inches away) and then simply follow the steps to lock and unlock the door until the device functions properly.
Since I do have the SwitchBot KeyPad available, I decided to install it as well and I went the double-sided tape route again. As you will see, in the package, there is a mounting bracket that you can attach to a flat surface using either two screws or by relying on a double-sided tape, in case you’re not allowed to drill holes inside the wall or door frame. Position the keypad bracket at no more than 16 feet (4 meters) from the SwitchBot Lock and afterwards, simply slide the keypad into place.
SwitchBot Lock
-
Pros
- It's the least invasive way to retrofit your lock
- The app is simple to use
- Pretty much no delay until the device locks or unlocks the door
- Multiple ways to operate the unit - app, keypad, NFC card
- Can be used with Alexa and Google Home
Cons
- The app requires constant Internet access
- The design may not be on all people's taste
Mark is a graduate in Computer Science, having gathered valuable experience over the years working in IT as a programmer. Mark is also the main tech writer for MBReviews.com, covering not only his passion, the networking devices, but also other cool electronic gadgets that you may find useful for your every day life.