
The X-Sense Home Security kit is a very budget-friendly security system suitable for smaller apartments, where you usually don’t have more than 4 windows and where the WiFi connection can easily reach all corners of your home. And that’s because there is a nicely designed base station (with a built-in battery to protect you from intentional or accidental power outages) and all its accessories get connected to it wirelessly.
Yes, I know that the manufacturer advertises 1.25 miles on the Spread Spectrum tech, but this remains to be tested in a house with multiple thick concrete walls (such as my own). I was a bit surprised to see that X-Sense created their first security system, but I suppose it was a somehow natural transition after they developed so many WiFi smoke detectors.
At the same time, this does mean that the system still has room to grow and new features may still be added (such as the Amazon Alexa support which was added later) – I also like that you can also add smoke detectors to the system.
It’s interesting to see how the DIY security systems market is flourishing, so there are some notable competitors from Abode and SimpliSafe, which are also in a similar price bracket. And this does mean that X-Sense has entered a fairly competitive niche and it does need to get it right the first time, especially since we’re dealing with devices that should ensure the security of our homes. Without further ado, let’s put the X-Sense Home Security System to the test and see whether they have earned their place as a reliable piece of technology.
The Design and Build Quality
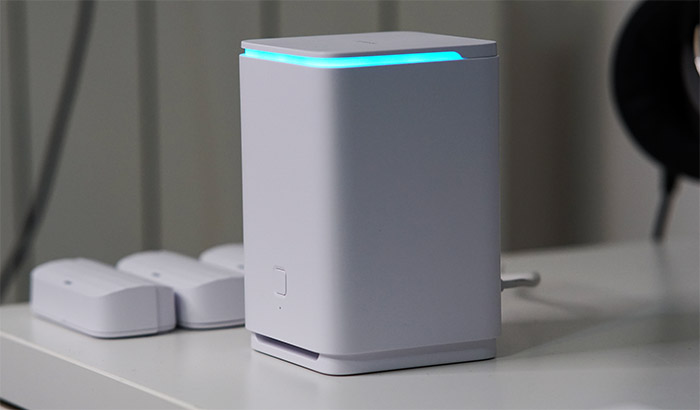
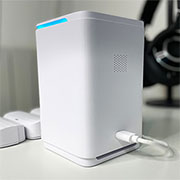
There is a more basic model which has fewer satellite devices (two window sensors and one motion detector), but the system that I got had two additional entry sensors and one other motion detector. The base station is the same for both configurations and it’s a fairly compact plastic case (it measures 5.1 x 3.2 x 3.2 inches or 12.9 x 8.2 x 8.2 cm) covered by a white matte finish. There are no sharp angles, everything is nice and curved and, while the top leaves space for the LED to shine through, I noticed that at the bottom, there is a built-in stand with some empty space, so I was wondering what’s that all about.
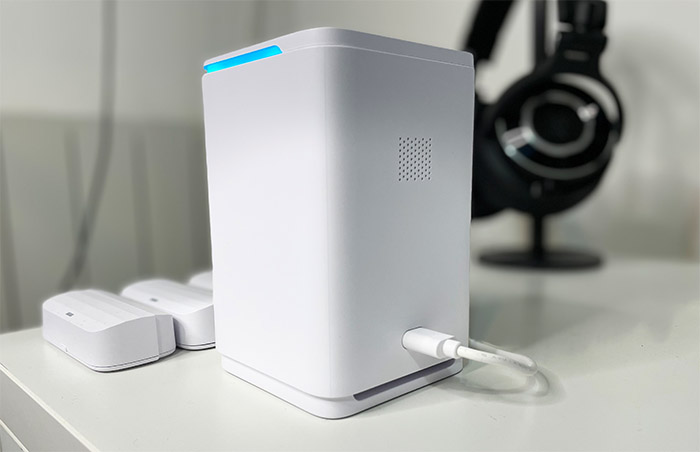
It seems that the manufacturer has positioned the speaker so that it points downwards and the base platform has the role to amplify and move the sound to the sides. And it’s loud. It can reach 105dB, so yes, you’re going to hear it and so will your neighbors. I also saw that there was what resembled a speaker grill on the rear side, above the USB-C connector, so I thought to check what’s inside the case.
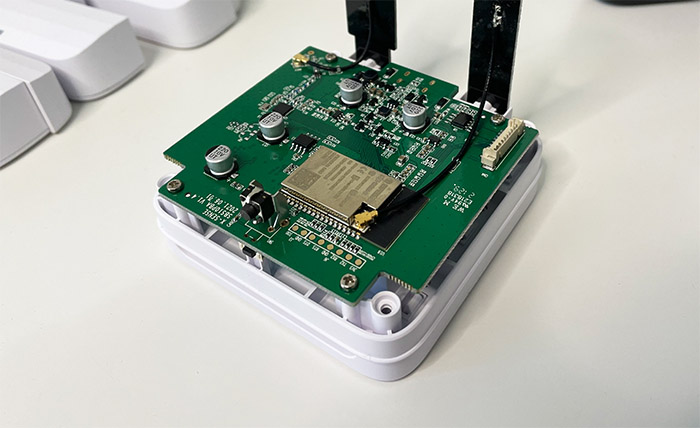
I opened the device by removing the four screws on the bottom and I could slide the top cover with ease. It seems that the aforementioned cut-outs are for ventilation purposes and the speaker does indeed sit at the bottom.
There are two antennas connected to the board and the batteries are (surprisingly) at the top of the case, underneath the LED light. On the front of the base station, there are two buttons, a fairly big rectangular one that has the role of starting the pairing process with the router, to silence a triggered alarm or to turn the device completely off (doing so will also disable the battery backup). The other button is in a recessed position and its role is to reset the device to the default factory settings. The top-placed LED will shine red if an alarm has been triggered, it will become green when the base station is in pairing mode and will become blue after a successful connection to the WiFi. If the base station can’t connect to the router WiFi, then the LED will be yellow.
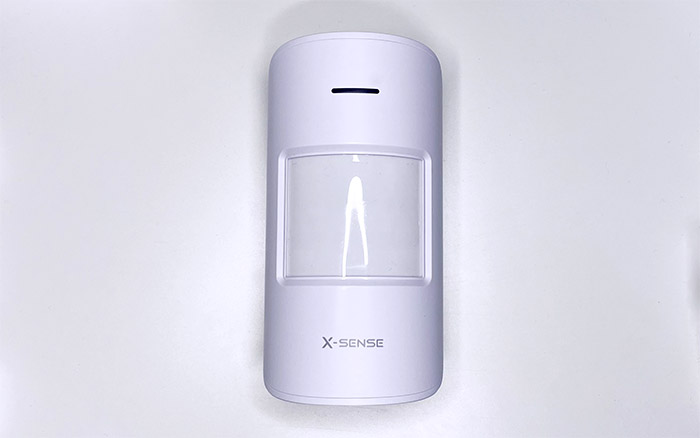
The single LED with colors is not really the most reliable system out there, but then again, red means bad (alarm) and blue means everything is working fine. So it kind of makes sense. As satellite devices, there’s the motion sensor which is battery powered and yes, you do get the batteries in the package. The sensor is fairly big and it does have the pairing/test button underneath the cover; you can install the device to the wall using the provided screws (or you can simply use the provided tapes to glue it to the wall – useful if you’re in a rental). The entry sensor is also battery operated and it consists of two pieces that are magnetic.
This time, the pairing switch is on the side and the battery compartment is underneath the bracket. Design-wise the satellite devices aren’t that special-looking and they shouldn’t. They’re covered by a white matte finish, so they’re not trying to attract anyone’s attention, but simply blend in with the wall.
Note: X-Sense also provides a small remote control which can be used to Arm, Disarm the alarm, let the system know you’re home or send an SOS signal.
The Installation
The first device that needs to be added to your WiFi network is the base station so go ahead and power it on – just connect it to a power source. Then, the LED should start flashing green; now is a good time to download and install the X-Sense Home Security app (works on both iOS and Android).
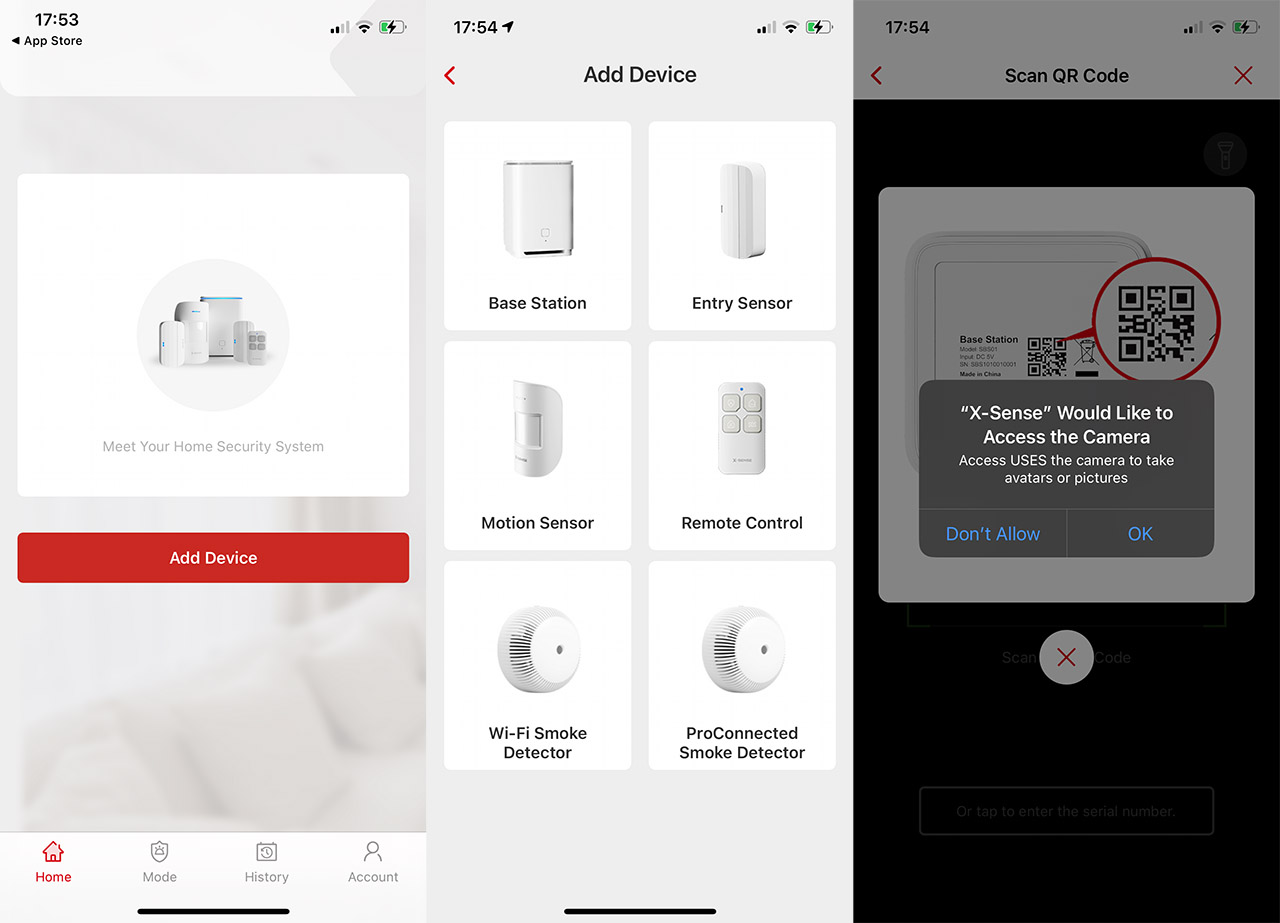
You will have to create an account (it does require your email) and, after activating it, you should be able to start adding devices. First, select the Base and then, you will need to allow the app to access your camera in order to be able to scan the QR code from the bottom of the device. Afterwards, you will have to create a new Home and select the location of the base station. Lastly, select a 2.4GHz network (it will be detected by default) and wait until the base pairs to your router. It says that you should be in the range of the router, so it’s not necessary to be very near to it (in my case, it was about 30 feet away and it worked just fine). On the next step, you can add a motion detector and to do so, you do need to insert a battery and then head over to the app.
Here, press on the plus sign and select the Motion Sensor. The process is very similar to the base station, so you also need to scan the QR code and then press the Reset button until the LED starts flashing. It should now be connected to the base station and confirmed by the voice notification. You will need to go to a very similar process with the Entry Sensor, so go ahead and select it from the list, scan the QR code, add the battery and click the Reset switch until you see the LED flashing.
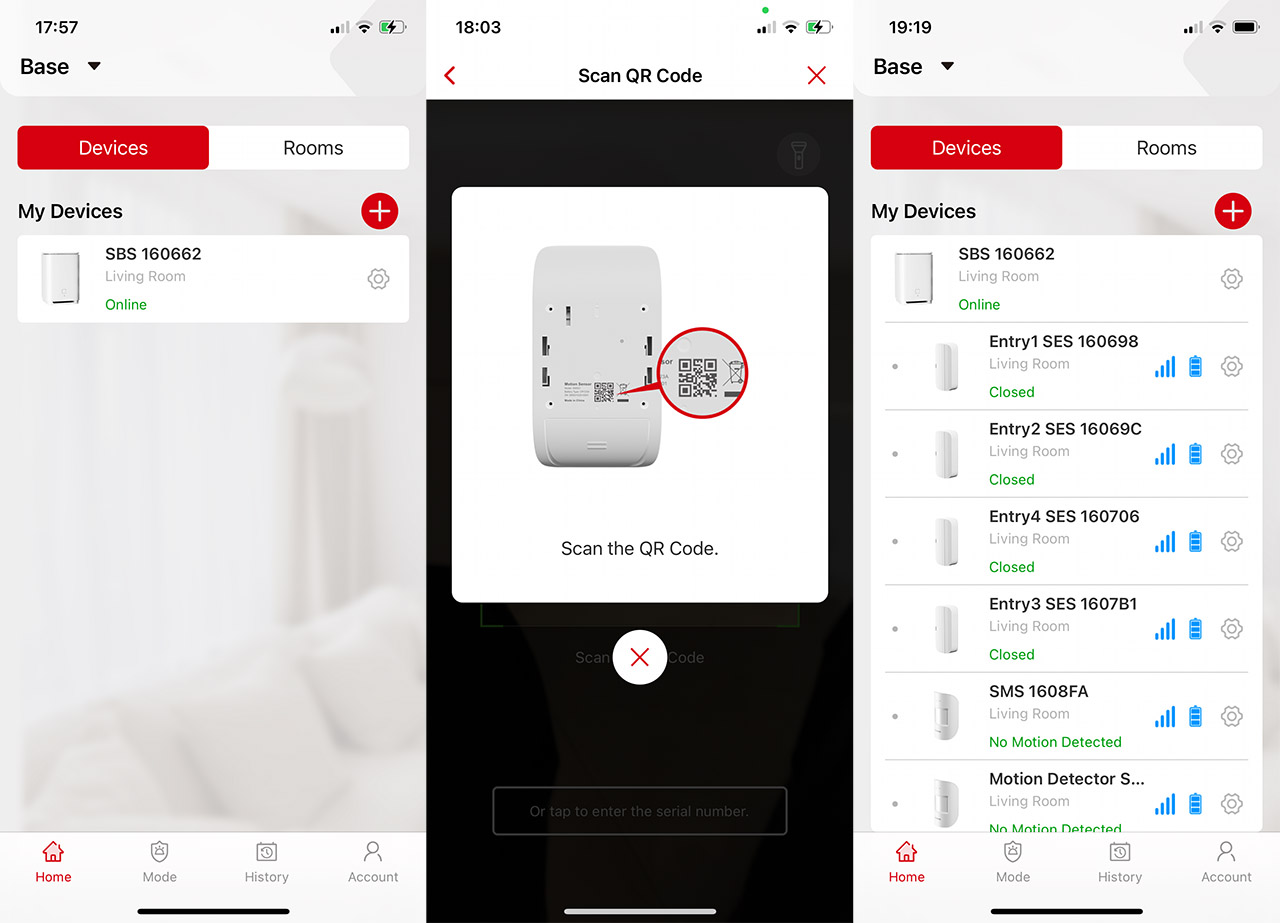
Then, wait for the voice confirmation and the sensor should appear in the app and it should show the accurate state (Open or Closed). We do also have a remote control and again, the process follows very similar steps: scan the QR code and this time, you will have to press the Arm and Disarm buttons at the same time until the LED starts flashing. Then it should quickly be added to the app – I noticed that my remote control had very little battery left, so I decided to change it. There is a single screw on the bottom – remove it to be able to change the CR2032 battery.
The App
The mobile application is very easy to use and understand which is a great plus for a company that (now) focuses on security. The main window shows the devices that you have paired to the app, including the base station and, each device will show its current status. This status can and will change in real-time (well, with a delay of a few seconds) depending on whether the sensors detect motion or if the magnetic pieces are opened (for the entry sensor).
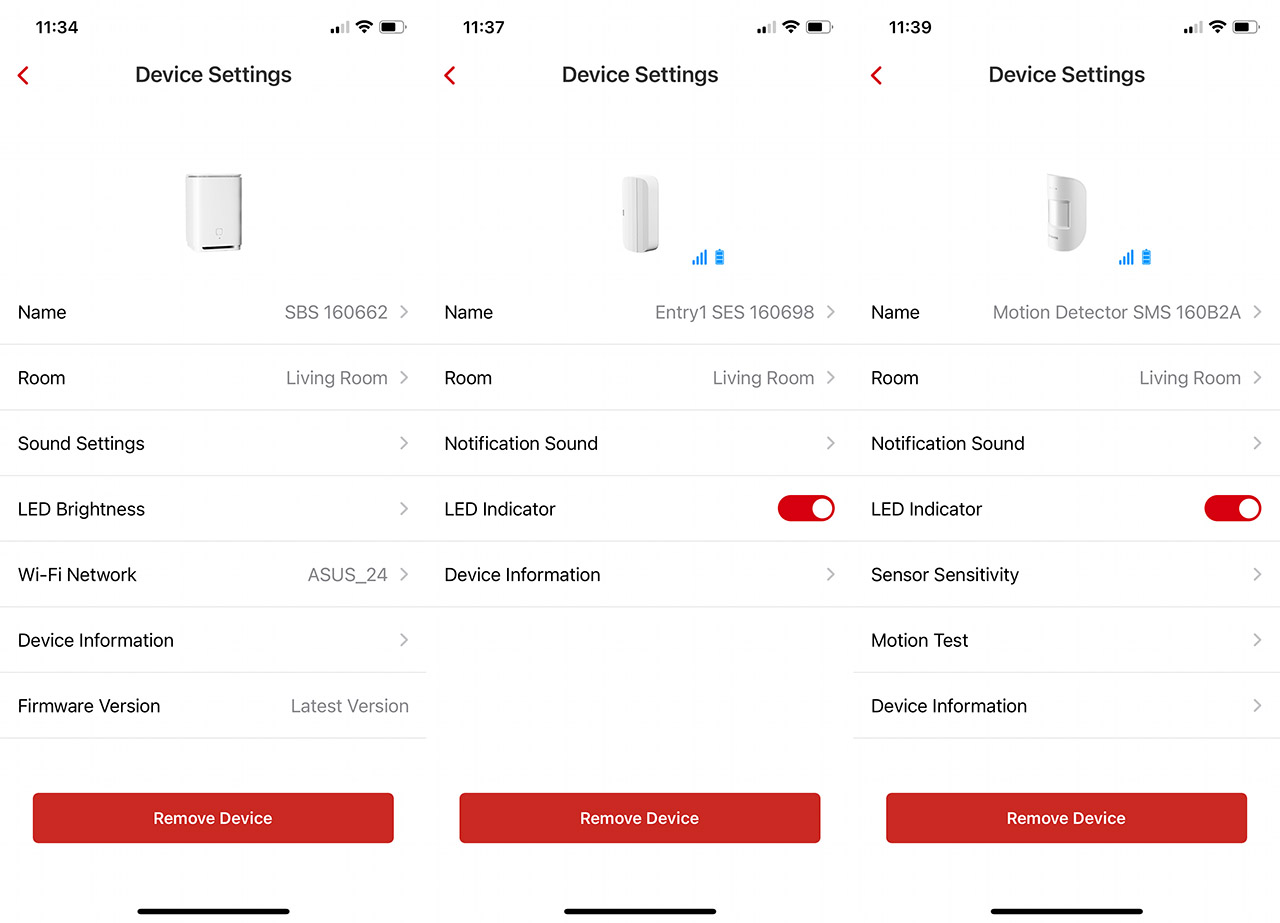
You can tap on any device to check more info and adjust some settings. For example, the Base Station will allow you to change the LED Brightness and the Voice Volume, as well as the Alarm Volume – you can select between three tones, but be aware that there will be a quick sound test at the end, so don’t get startled. The Entry sensors allow you to enable or disable the LED indicator and either keep them silent or add a sound when the alarm is triggered. This is great for letting the trespassers know that an alarm has been triggered and that it’s better to back off quickly.
The Motion Detection sensors can also have a Tone added to the speaker before the actual horn will be enabled. You can also enable or disable the LED and set the Sensitivity. If the area of interest is not very far, then a lower sensitivity is good, but, if you want to cover a far larger area, such as a long hallway, then you can raise the sensitivity. Lastly, you can run a Motion Test to get a better idea where and how to properly position the motion sensor.

The app will also allow you to view the devices by rooms, you can select between the three available modes: Disarm, Home and Away or view the History (logs for when the alarm has been triggered). There is a new feature that has been recently added and that’s the support for Amazon Alexa which means that by linking to the Amazon account, you get to control the way the system will function using voice commands.
The Performance
I have been a part of the beta testers, so I saw the growing pains that were necessary to create the X-Sense Home Security, but I think the current state of the system is really balanced. I know that the app had some issues with the connection between the base station and the sensors, the range would sometimes be weirdly short and there were other hiccups, so I put every part of the system to the test. The first is the base and it seems that it has no issue with being far away from the router. As long as there’s a reliable connection to your WiFi, the base station LED will stay solid blue and properly communicate with your sensors.
As for the entry sensors, I have added a quick video that showcases just how reactive it is and yes, I was very close to the base station. I moved it way farther to see if the reaction time is just as fast (somewhere around one second). Four walls away (including a thicker load-bearing wall), it didn’t make any difference and not even the signal was affected. So the 1.25 mile range is very realistic – I couldn’t get the signal to drop even a single bar in a fairly old and fairly large concrete house, so that says a lot.
The motion detection sensors can be a bit of a pain is they’re installed incorrectly. Ideally, you should place the sensor about 6.5 feet above the floor either on the wall or in a corner (don’t put it at a weird angle, just make sure it faces the area you’re interested in). Additionally, be aware that both the sun and a fireplace can interfere with the accuracy of the sensor. In my tests, keeping the sensitivity to the lowest level (1), the alarm would trigger if I was moving at about 6.5 feet in front of the device (2 meters). The sensitivity gets even better the higher you set the level. So yes, the last couple of weeks of testing revealed that the base station does not randomly disconnect from the router and the sensors all worked as intended which is great.
But, I was curious about the frequency at which the devices inter-connect. While X-Sense did not disclose the frequency range that it uses for the connection between the secondary devices to the base station, I did find that they do rely on the ASR6505 LoRa Front End Module chip which supports a frequency between 150 and 960MHz. So I can’t be sure whether they use the dreaded 433.92MHz frequency which, as the LockPickingLawyer from YouTube said, it’s incredibly easy to interfere with. And no, there is no interference detection built into the system which would have been a nice, if not kind of a mandatory feature to have.
The Conclusion
The X-Sense Home security system is not a high-end feature-packed system that supports a Cloud connection and has a subscription, but it is a fairly simple, yet very much functional security system suitable for a smaller home. Especially if you’re paying rent since you don’t need to drill any holes to have everything set up. In my tests, everything worked perfectly, the app would quickly detect any changes and the sensors were very reactive and had a good range. Like I said, it’s fairly bare-bones, but very easy to use (yes, the manufacturer had just added support for Amazon Alexa, which can be seen as a plus), so, for the price tag, it’s definitely worth checking out.
X-Sense Home
-
Pros
- Good connection between the base and the sensors
- The app is reactive
- Very easy to set up
- Support for Amazon Alexa
Cons
- The motion sensors aren't very compact
- Doesn't have interference detection
Mark is a graduate in Computer Science, having gathered valuable experience over the years working in IT as a programmer. Mark is also the main tech writer for MBReviews.com, covering not only his passion, the networking devices, but also other cool electronic gadgets that you may find useful for your every day life.