
The Zyxel NSW100-10P is a PoE Ethernet switch which was built specifically to take full advantage of the Zyxel Nebula management interface and to work alongside other compatible devices (such as gateways, wireless access points or other Ethernet switches). Zyxel has also made available the GS1920 hybrid Ethernet switches series (which includes the GS1920-10HP) that can fully integrate within the Zyxel Cloud environment for remotely managing and monitoring multiple sites, but, if you didn’t care for the Cloud functionalities, the GS1920 Ethernet switches would work perfectly fine in stand-alone mode, offering pretty much the same features (minus the remote control).
The Zyxel NSW100-10P can also be managed outside the Nebula Control Center, but, when compared to the GS1920-10HP, the stand-alone mode only offers the bare minimum in terms of configuration – the switch was made to work with the Nebula Cloud.
I have fully explored the Zyxel Nebula Control Center using the NGS50 security gateway, the GS1920-8HP Ethernet switch and the NWA1123-AC HD wireless access point and the platform has gotten better over time (some new features have been added), so let’s add a new member to the network, the NSW100-10P, and see if a Cloud-only Ethernet switch is going to be the superior solution for your SMB network instead of a hybrid Ethernet switch.
Note: Besides the NSW100-10P, the series also includes the non-PoE 10-port NSW100-10, the non-PoE NSW100-28 and the NSW100-28P which supports PoE.
Design
The Ethernet switch is one of the few networking devices that hasn’t really managed to properly enter the consumer market and, although some steps have been made by various manufacturers, such as Ubiquiti (with its EdgeSwitch ES-8XP) or Netgear (with the ‘gaming-focused’ S8000), the switch stubbornly remains a fairly large metallic box and that’s for a good reason. There is a low chance that the regular home user will need a 5+-port switch, but the SMB and enterprise market use switches with a high number of ports on a regular basis and they need to be mounted on a rack to maintain a clean and efficient work place.
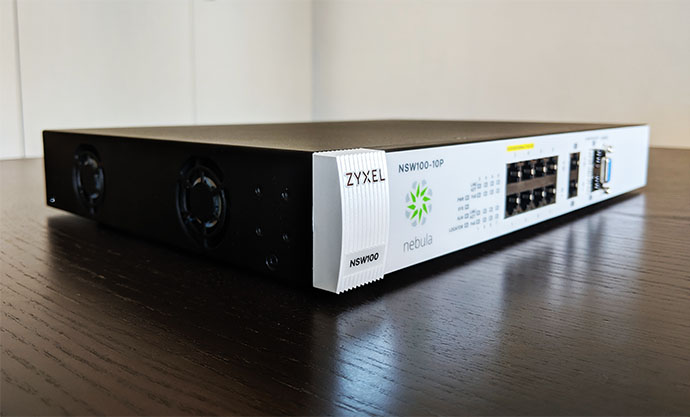
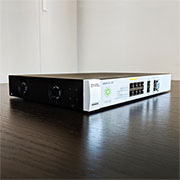
So, it’s no surprise that the Zyxel NSW100-10P has adhered to the function over form rectangular box design, but, unlike the GS1920-8HP, it’s a lot less compact, measuring 12.99 x 9.07 x 1.75 inches (almost identical to the Open Mesh S8, which is another Cloud-managed switch). There are two ways to keep the switch at a more compact size: to use a power brick (instead of the internal PSU) and to have a low PoE budget, but neither are ideal in business environment.
This does mean that it’s going to be a bit more difficult to justify keeping it on your desk and, considering that it also have a couple of fans, it is better to either rack-mount it or attach it to the bottom of your desk (there is a mounting kit in the package and, if you insist on keeping it on the desk, Zyxel does have your back and it has added four silicone feet to attach at the bottom of the case on the designated areas – they’re carved in the metal). The case is almost entirely covered by a black matte finish (it doesn’t get easily covered in smudges), while the front area does bear some similarities to the NGS50, featuring the same glossy white surface and the white plastic protrusion to accommodate the Zyxel logo and name.
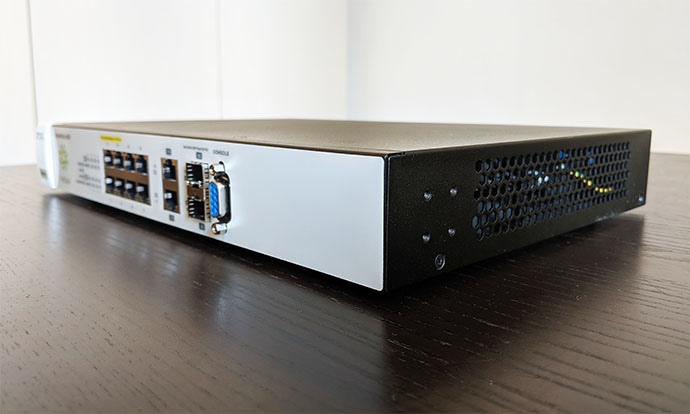
The top and bottom sides of the Ethernet switch are completely devoid of any ventilation cut-out, so, in case you do want to go with the under desk mounting (if you don’t have a rack), then you don’t have to worry about obstructing the airflow. You do have to make sure you don’t cover the left and right area because Zyxel has positioned lots of ventilation holes on the right side (along with four mounting holes) and, on the other side, there are two cut-out areas for the ventilation fans (besides the other set of mounting holes).
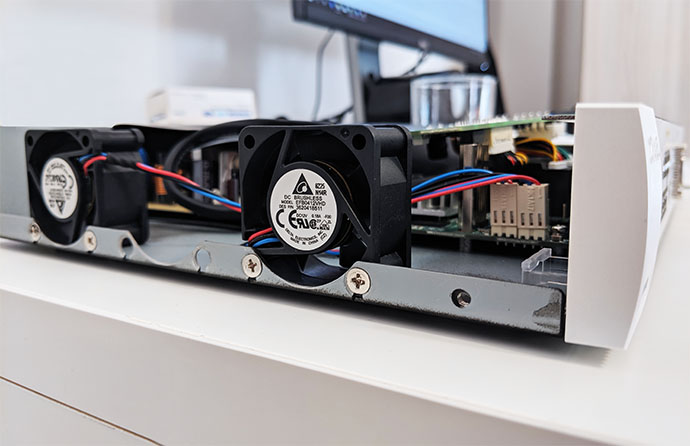
I know that Zyxel decided to go with a fanless case when it built the GS1920-8HP, so why was it necessary for the NSW100-10P to have not one, but two ventilation fans? While I do appreciate the compact case of the GS1920-8HP, it usually ran a bit hot, especially when put under stress, something that won’t happen because of the larger case of the NSW100-10P and the couple of fans; furthermore, the total PoE budget for the NSW100-10P is 180W which is superior to the 130W offered by the GS1920-8HP. The problem with using fans is that they’re rarely quiet and, unless the manufacturer has set a certain temperature level after which the fans will turn on, you’ll always going to hear at least a faint buzz.
The ventilation fans on the NSW100-10P will function the entire time the switch is connected to a power source and they’re actually really loud at the beginning (when it starts up), but they gradually get more quiet (over the span of about 25 seconds) and will remain audible for the rest of the duration (although not at an annoying level – unless you prefer hearing white noise while you sleep, I would advise against installing it in the bedroom).
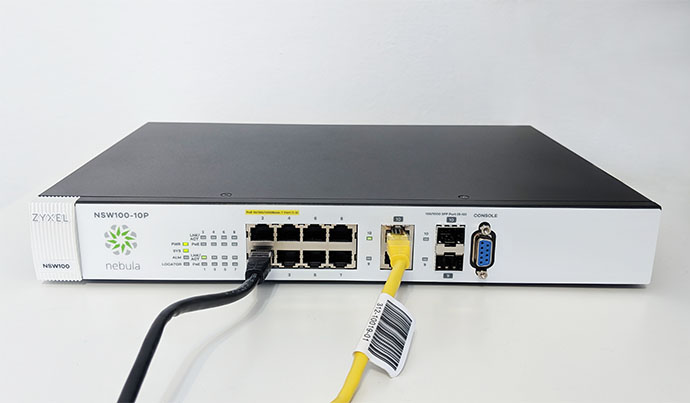
The back of the Ethernet switch doesn’t have any ports or connectors, except for the AC Input port (the PSU is internal), so it’s the front side that’s fully populated with all the ports and LEDS: from the left, there are four main LEDs positioned vertically, one for the Power (a solid green PWR LED indicates that the device is powered on), the second for the SYStem (solid green indicates that the system is working properly and that it’s ready to be connected to the Nebula Control Center; flashing green shows that the switch is either rebooting or running self-diagnostic tests and, if the SYS LED blinks green along with the ALM LED which will blink red, it means that the Ethernet switch can’t connect to the NCC), the third is for the ALM (by default, this LED is turned off to show that everything is fine, but, if it becomes solid red, then it means that the system has encountered a hardware failure) and the fourth LED shows the status of the Locator (when you are configuring the Ethernet switch, the LED will flash blue for about 30 minutes to help you locate the device in the rack).
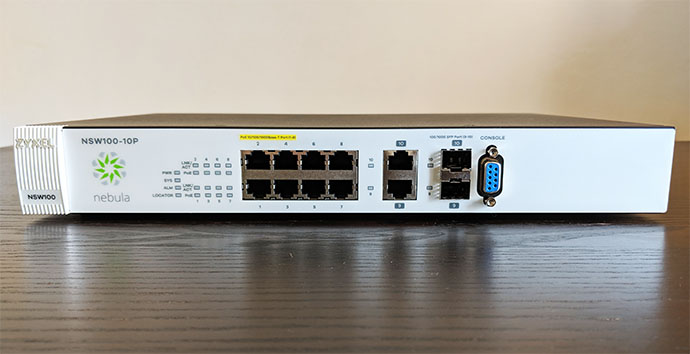
Next to these LEDs, there are two blocks of indicators, so each of the eight PoE ports has two LEDs, one showing the status of the Link/Activity (flashing green shows that data is being transmitted and the connection has been made at 1000Mbps; flashing amber also shows that data is transmitted, but the connection has been made at either 10 or 100 Mbps) and the other shows the status of the PoE (a green LED indicates that the power supplied meets the 802.3at standard, while an amber LED will show that the power supplied meets the 802.3af standard). Next to the block of LEDs, there are eight PoE Gigabit LAN ports (positioned in two horizontal sets) and further to the right, there are two non-PoE Gigabit LAN ports (each with one LED which, when it’s green, it shows that there is a connection at 1000 Mbps and, when it’s amber, it shows a connection at 100 Mbps). Lastly, there are two 100/1000Mbps SFP ports (you can add two transceivers for fiber optic connectors) and a 9-pin console port (useful to run a terminal emulation).
Hardware
After I opened the case, I noticed that Zyxel has divided the NSW100-10P into two main sections, one for the internal PSU, while the other is for the switch functionality (I found it interesting that the manufacturer has connected two separate PCBs one on top of the other). Since a large section of the bottom PCB was covered by a heat sink (which was soldered to the board), I could only identify a Broadcom BCM59111KMLG ZA1819 Power Over Ethernet Controller 802.3at, 128 MB DDR3 RAM NANYA 1842 NT5CC64M16GP-D1 (clocked at 800MHz), a RealTek RTL8231 QFC chip, LM5574 switching regulators, a 32F100 C8T67 GQ25G 1893 STMicroelectronics ARM micro-controller, a GS5014B LF 1851M 1000 Base-T magnetic module and a couple of PG4P809RANY LF 1834D 1000 Base-T quad port magnetic modules.
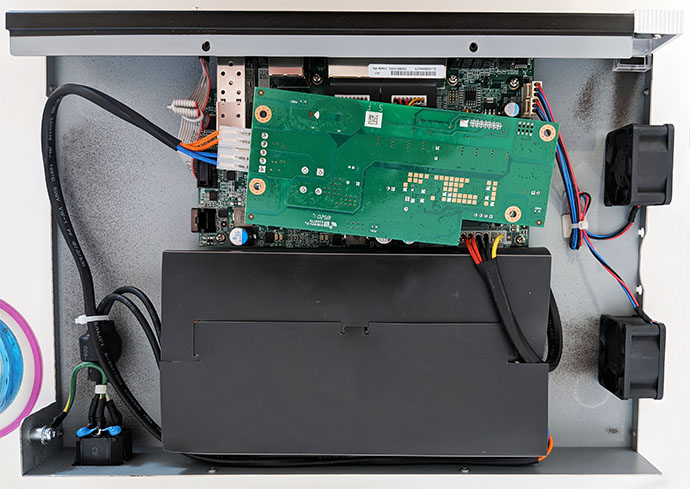
Note: The Zyxel NSW100-10P features a switching capacity of 20 Gbps, a forwarding rate of 15 Mbps, 16K MAC address table (the same as the ZyXel GS1920-8HP) and a packet buffer of 448KB.
Setup and Features
Similarly to an unmanaged Ethernet switch, the hardware installation is quite simple and all you have to do is connect the power cable to the back of the device and to a power socket (the switch doesn’t have an On/Off button, so it will power on immediately) and then take an Ethernet cable and connect one end to any of the ten available Gigabit LAN ports and the other end to a router/gateway or another switch (if you’re looking to cascade them). Afterwards, you got two choices: either explore the stand-alone mode or directly register the Ethernet switch to the Nebula Control Center. For now, I chose the former, so I had to identify the IP address of the Zyxel NSW100-10P and there are at least two ways to do this.
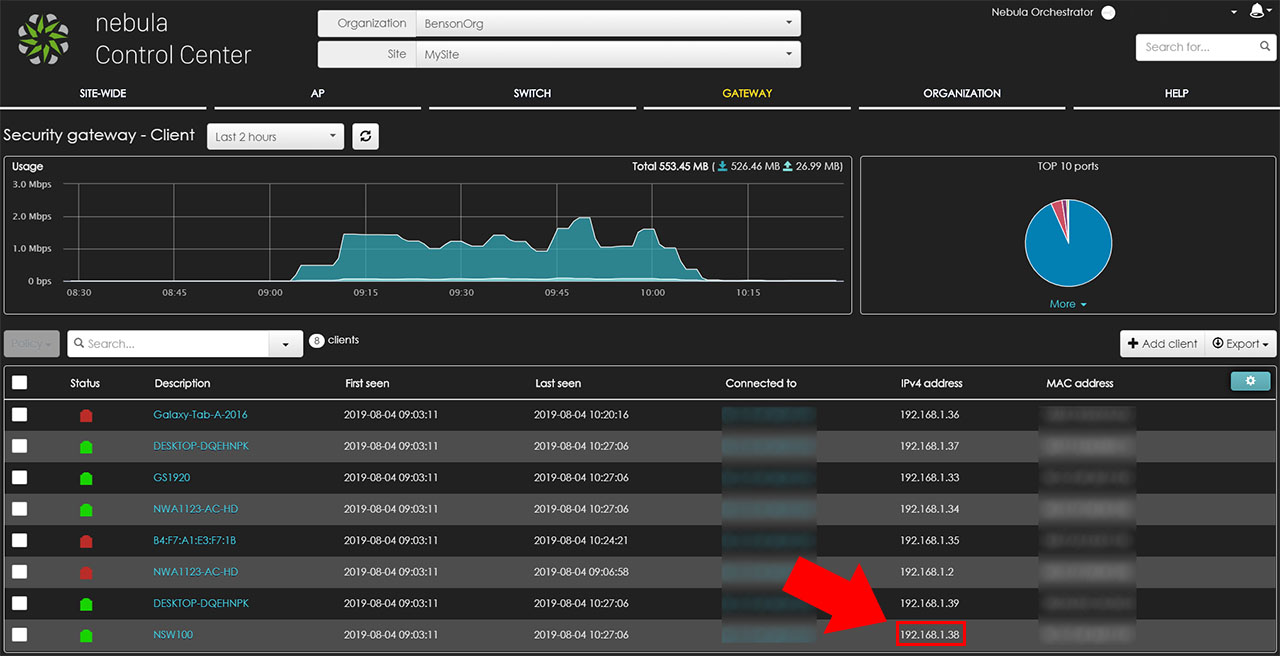
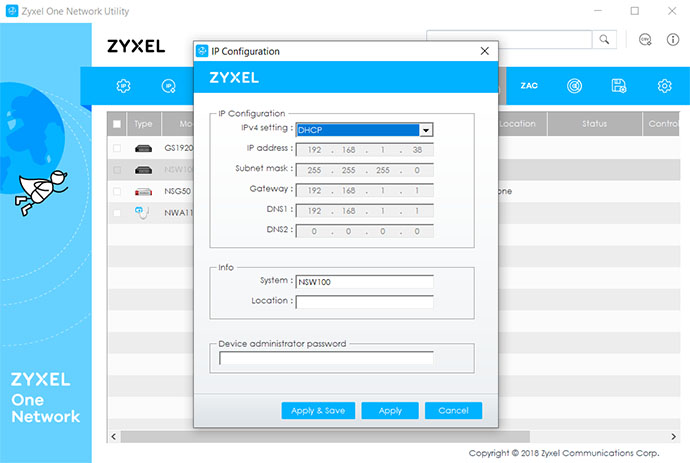
You can view the client list on your router (if you’re using an NSG gateway, click on the Gateway from the main menu, then choose Monitor and click on Client: here, you should be able to identify the switch – just check for NSW100 on the description) or you can use the ZON utility, which will immediately display all the connected Zyxel devices, each with its own set of tags (the better option if the switch IP is set to static and has ‘chosen’ to be the same as your router – in this case, select the switch, click on IP Configuration and change the IPv4 Setting to DHCP). After you got the IP address, simply insert it in any web browser and, when prompted, enter admin/1234 for the username and password.
After accessing the stand-alone user interface, you will immediately notice that it’s not going to offer too many configuration options (similarly to the stand-alone UI of the NGS50), but you do get to see some status info about the device, the IP Address and there are some Quick Links to the Diagnostic section (to run Ping or Trace Route tests), the Tech Support options (you can download log files and go to the Maintenance section to upgrade the firmware, restore, backup, erase, save the configuration or reboot the system) and the VLAN Configuration (Static VLAN and VLAN Port Setup). On the left side of the main page (the Status window), there’s the Basic Setting which includes the System Info (displays the CPU and Memory utilization and the Hardware monitor), the IP Setup (DHCP or Static) and the Port Setup (you can select the Speed/Duplex type and set the 802.1p Priority).
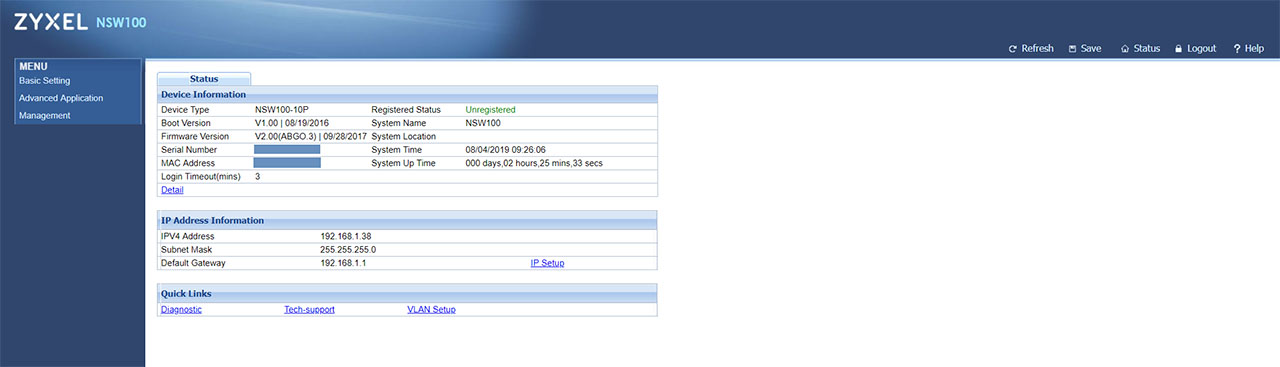
The 802.1p standard is important to provide a solid QoS system (including dynamic multicast filtering and traffic prioritization). Underneath the Basic Setting, Zyxel has added the Advanced Application section which allows you to configure the VLAN and further down, there’s the Management section, where you can access the Maintenance and the Diagnostic areas (we already talked a bit about these areas on the Status section since they’re part of the Quick Links). And that’s pretty much all the standalone UI can offer, so let’s register the Zyxel NSW100-10P to the Nebula Control Center – and yes, there are two ways to do it.
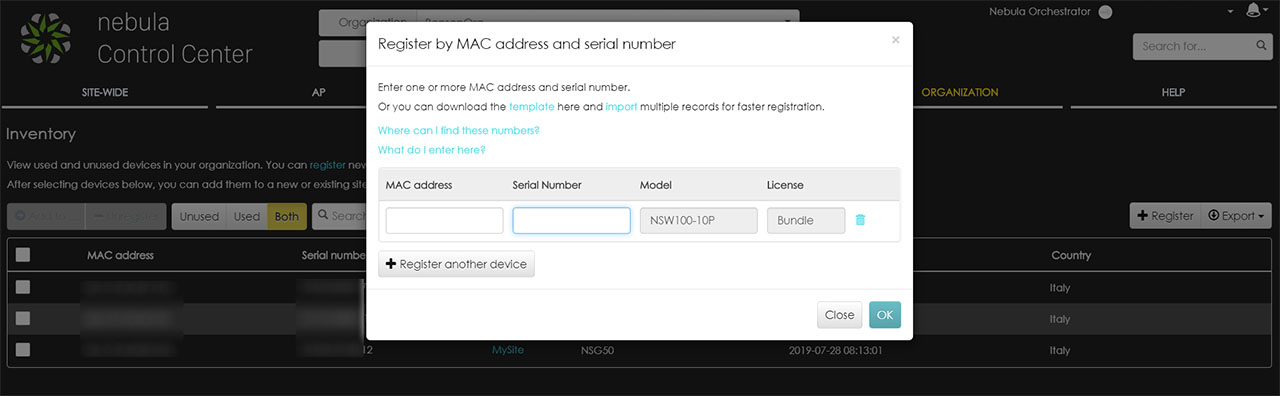
Specifically, you can use the Nebula app or the web-based interface – for now, I chose the latter and to access the NCC (Nebula Control Center), I had to enter https://nebula.zyxel.com in the URL, which took me to the login/register page where I could enter the username/password to access the interface or I could create a new Nebula account (where I could create a new Organization and Site). Thankfully, I already had a Nebula account, so I could immediately enter the UI, but, to add the new switch, I accessed the Organization option from the horizontal menu, followed by the Inventory (from the Config group). Here, I could see all the registered Zyxel devices and, if I clicked on ‘+Register’, it would summon a small window where I had to enter the MAC address and the Serial Number of the device (both can be found on the label from the bottom of the device); after doing so, I clicked OK and I could see in the list.
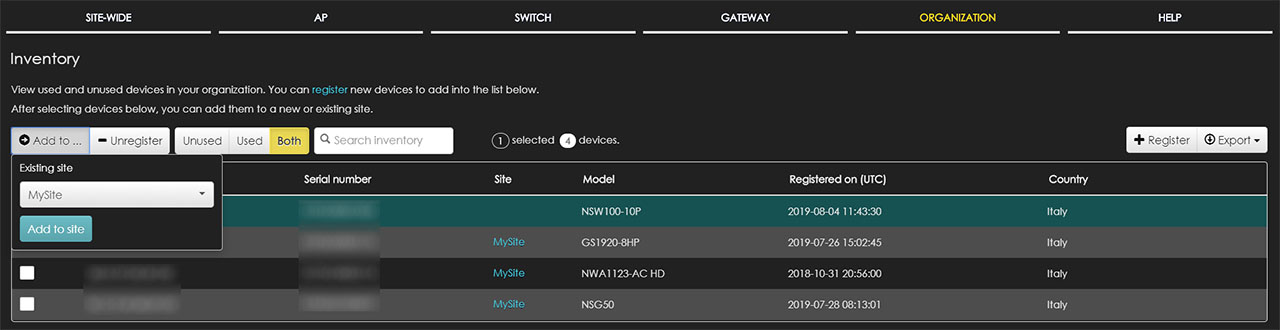
But, that’s not all, because the device needs to be added to the current Site, so I had to select the Ethernet switch, I clicked the “Add to” button and I selected the Site. And that’s it, I could immediately go to the Switch section and, under Monitor, I could see it in the list of registered switches. If you click on the Zyxel NSW100-10P, it will take you to a new window, where you’ll be able to see the Status of the device and the current Configuration, the location on the Map (you can also add a Photo) and underneath, there’s the Ports area with a graphical representation of each port and to configure them, you need to click on Configure ports button.
Zyxel NSW100-10P
Pros
- Seamless integration within the Nebula Control Center
- Nebula app (iOS and Android OS)
- Feature-rich (includes advanced enterprise-level features)
- 180W PoE power budget
- The case remains cool thanks to the dual fans
Cons
- There is no Power On/Off button
- The NCC has a bit of a learning curve
Mark is a graduate in Computer Science, having gathered valuable experience over the years working in IT as a programmer. Mark is also the main tech writer for MBReviews.com, covering not only his passion, the networking devices, but also other cool electronic gadgets that you may find useful for your every day life.