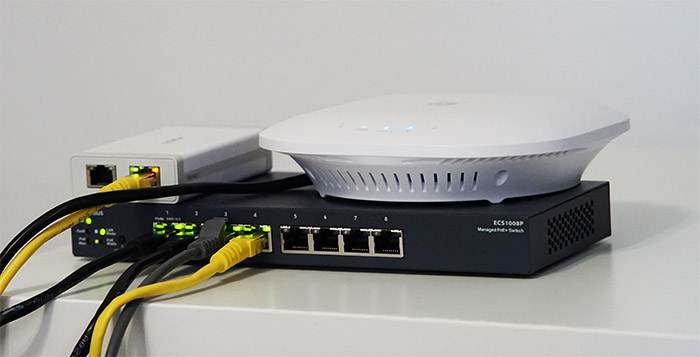
The EnGenius ECS1008P is the entry-level model from the new Cloud managed Ethernet switch and, if you have noticed immediately the similarities with the EWS2908P, well, it’s because they’re pretty much the same device minus the support for the Cloud management platform. And this improvement should not be taken lightly considering that besides offering a comprehensive on-premises software, you also gain the ability to deploy larger networks on various sites and easily manage them remotely using the license-free EnGenius Cloud.
| EnGenius ECS1008P | |
|---|---|
| EnGeniusTech.com | Check Product |
I’ve had a glimpse at how the Cloud management platform functions when I tested the SkyKey (along with a non-Cloud EAP1250 wireless access point) and EnGenius has done a good job in both design and functionality, rivaling both the Omada from TP-Link and the Zyxel Cloud platform.
The main targeted audience is, of course the SMBs (those that are just getting started and need a more accessible device), but the eight ports and the lack of SFP slots does suggest that the consumer market is also taken into consideration, especially those users that have multiple PoE cameras and perhaps some wireless access points that can draw their power directly from the switch (it does provide a budget of up to 55W). That being said, let’s have a closer look at the ultra-compact ECS1008P and see if you should consider investing in the EnGenius equipment and build your networks around its Cloud environment.
Design
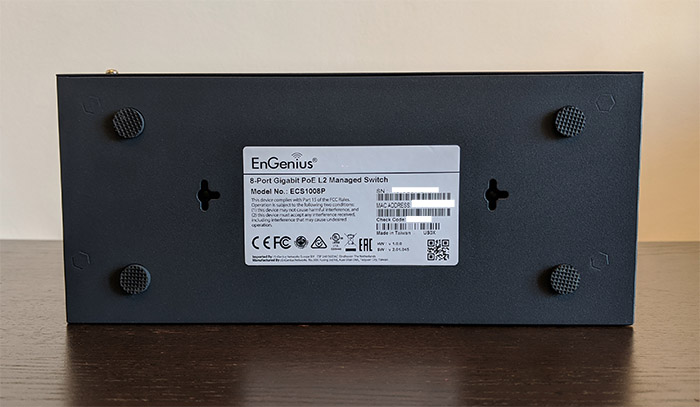
It was not long ago that even when offering only 8 ports, the Ethernet switch was a large piece of networking equipment, ready to be inserted into a rack, but, when I tested the TRENDnet TPE-LG80, I was impressed by how compact it was even for an unmanaged long range Ethernet switch and it seems that EnGenius has accomplished an even more impressive feat, rendering the ECS1008P managed switch just as compact. At its 9.44 x 4.13 x 1.06 inches LxWxH (which is identical to both the TRENDnet TPE-LG80 and the EWS2908P, a purely on-premise model), it does seem an attractive option in a crowded office, but the reduced size does mean that it’s not possible to insert it into a rack (unless you use a tray) and, instead, the only available option seems to be to mount it on the wall using the couple of dedicated holes found on the bottom of the device.
The Ethernet switch is completely made out of metal, even the front side, and it doesn’t have any design element to make it stand out in any way: it’s a simple rectangular device covered by a dark blue matte finish. I’ve recently also had a look at the hybrid switch Zyxel GS1920-8HP and it was significantly larger, while also being managed and offering 8 ports (+2), as well as the PoE functionality. The reason why the EnGenius ECS1008P is that much smaller is because the PoE budget is only 55W (when compared to the 130W of the Zyxel switch) and the PSU is internal, while EnGenius has provided the ECS1008P with an external power brick.
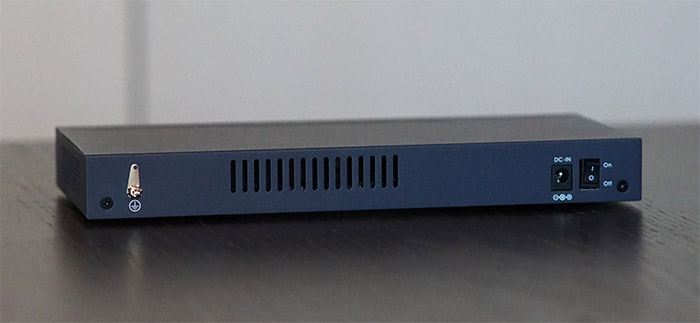
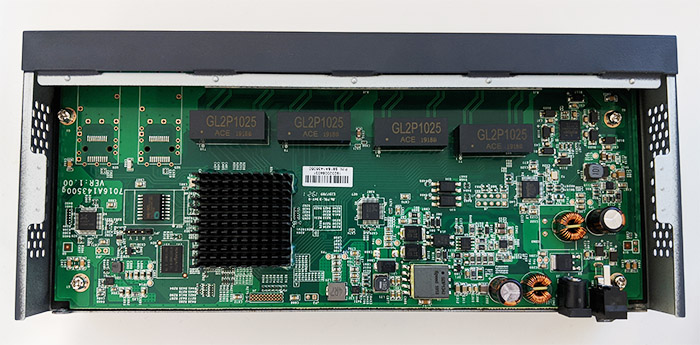
One similarity with the GS1920-8HP is that both Ethernet switches rely on passive cooling (the Zyxel switch does get hot most of the time) and, in order for the EnGenius ECS1008P to maintain a proper internal temperature, the manufacturer has added two set of ventilation grills on the sides and one on the rear side of the device (after I opened the switch, I also noticed that there is a huge heat sink attached to the processor). The ECS1008P switch is not only very compact, it’s also reasonably lightweight for a slab of metal, weighing 1.36 lbs – on the bottom side, you will see four faint circles embedded into the case and it’s where you should attach the silicone pads provided in the package to make sure that the device won’t move around in case you decide to keep it on the desk.
Besides the four feet, on the bottom of the EnGenius ECS1008P, there’s also an info label as well as two mounting holes for attaching the switch on the wall. I saw that EnGenius took the decision to put the DC-In Power port on the rear side of the Ethernet switch and, while it’s quite common to do so, I did find the front-facing Power port on the TRENDnet TEP-LG80 a lot more convenient – the rear-pointed Power port on the ECS1008P can prove to be an advantage only if you decided to mount the switch on the wall or next to a desk, otherwise, it’s actually going to be an inconvenience if you put it in a tray in a rack. Other than that, I did like that it has added an On/Off switch (next to the Power port) and a ground screw set.
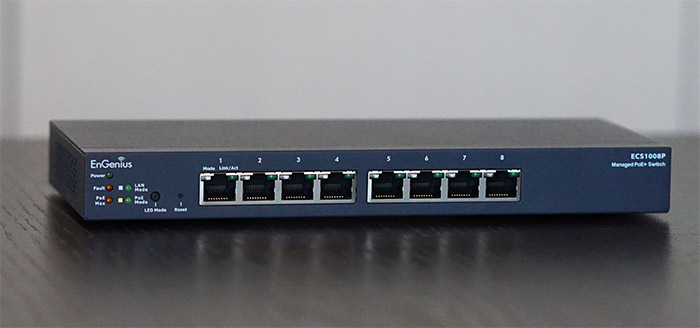
The front of the switch is a lot more populated and, starting from the left, there’s the LED area: a Power LED (solid green means that the device is powered on), a Fault LED (by default, when everything is functioning right, the LED will remain turned off, but, in case of an error, the LED will turn solid red), a PoE Max LED (the LED turns off and becomes solid red only when the PoE budget has been exceeded – it means that you can’t power any other additional PoE device), a LAN Mode LED (turns solid green when the LAN Mode is activated) and a PoE Mode LED (solid green means that the PoE mode is active).
Next to the block of LEDs, there are two buttons, one for activating the LED Mode (switches between LAN and PoE modes) and the other is the Reset button (it’s recessed, so you need to use a pin to return the device to factory default settings). Further to the right, there are eight Gigabit Ethernet ports (that support 802.3af PoE – the global maximum budget is 55W), each with its own couple of LEDs: one for the Mode (when the link is established at 10/100 Mbps, the LED will become solid amber and, when the link is established at 1,000 Mbps, then the LED will become solid green) and the other for the Link/ACTivity (the LED will flash green when there is data transmission).
EnGenius ECS1008P: Internal Hardware
After I opened the top of the case (which is very easily done by removing the two screws from the rear end of the switch), I noticed a large heat sink that I couldn’t remove (well, more like wouldn’t, since it’s glued to the board), but, apart from that, I could see a Broadcom BCM59121B0KMLG (WE1850) Power Over Ethernet Controller 8 Channel 802.3at (PoE+), a Nuvoton WO516lDEARM microcontroller, 32MB NOR flash memory (Macronix MXIC MX25L25645GMI-08G), 256 MB of RAM (NANYA1714 NT5CC256M8IN-DI), four GL2P1025 ACE 19188 transformers and a couple of RealTek RTL8231 ICE5282 GJ08 chips.
Note: The EnGenius ECS1008P features a switching capacity of 16Gbps, 8K MAC address table, 9K Jumbo frame and a maximum of 256 multicast group.
Setup and Features
In order to install the EnGenius ECS1008P, you will need an Ethernet cable (there is none provided in the package) to connect the switch to your router (or another switch, if you wish to cascade them) and, of, course, you will have to attach the power cord and turn the switch to On. You can now start adding devices (that support PoE or not) in a plug-and-play manner, but, since we’re dealing with a managed device, it’s advisable to see what the UI has to offer (before connecting it to the Cloud).
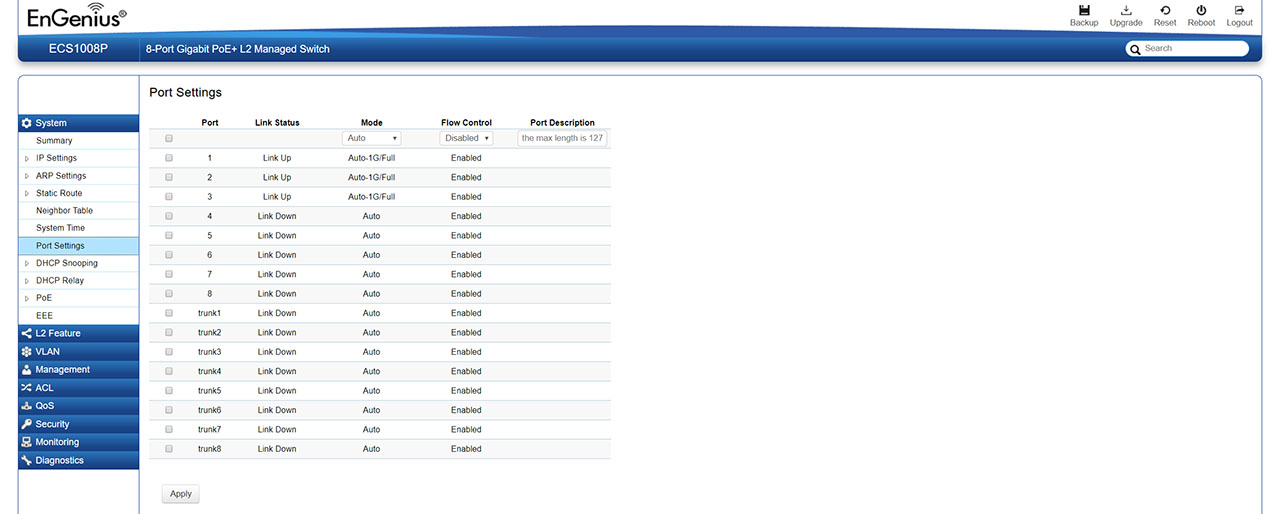
To access the local interface, you’ll need to find the IP address provided by the router (the easiest way is by logging into the router and checking the client list) and enter it into the browser URL. After doing so, it will ask for the username and password (it’s admin and password) and you will immediately be sent to the browser-based interface. Here, the main menu is positioned vertically on the left and the first section is the System, which displays some info about the device (in Summary), followed by the IP Settings (IPv4 and IPv6 Management and Network, as well as the DNS Servers config), the ARP Settings, the Static Route, the Port Settings (where you can change the Mode, the Flow Control and see the status of the Link), the DHCP Snooping (includes creating a Binding list, set which port/trunk is Trusted, enable DHCP Snooping on a VLAN and more), view the current consumed power and set a lower PoE budget, set a specific PoE priority for some ports and more.
Underneath the System, there’s the L2 Feature, where you can configure the Link Aggregation (includes Port Trunking – Static or LACP), the Mirror Settings (forwards copies of incoming or outgoing packets towards a monitoring port), the Spanning Tree Protocol (RSTP, MST, CIST and STP Port Settings), LLDP Settings, IGMP Snooping, Multicast Filtering and more. Further down, there’s the VLAN section where you can assign ports on the 802.1Q settings (there’s also PVID and Voice VLAN), followed by the Management section, where you can view the System Information, add new users, set one of the two available partitions as the active one (the second partition is set for Backup) and configure the SNMP.
The next section is the Access Control List (where you can create rules that can block the access to specific resources), the QoS, where you can select the Trust Mode (802.1p and/or DSCP) as well as the Scheduling Method (WRR or Strict Priority), configure the CoS and DSCP Mapping (the Advanced Mode includes Class and Policy Mapping) and there’s also the Bandwidth Control (set an Ingress and Egress rate) and the Storm Control (allows you to control the receive rate of unicast, multicast or broadcast packets, preventing any disruptions caused by unicast, multicast or broadcast storms on a port). Another important section is Security, which offers 802.1X port-based access control (includes RADIUS Server and Port Isolation) and DoS, followed by the Monitoring section (shows Port Statistics, RMON and Logs) and Diagnostics (Cable Diagnostics, Ping Test, IPv6 Ping Test and Trace Route).
It’s clear that the local interface is feature-rich, offering more than enough if you don’t want to connect it to the EnGenius servers, but, considering that this is a Cloud-managed switch (and you may also want to manage a larger number of APs), let’s try and pair it to the Cloud management platform. To do so, you need to register a new account on the http://cloud.engenius.ai (or log into an existing one) and then either create a new Organization or use the default one. You will be immediately taken to the Inventory window, where you should be able to Register a new Device (from the top right corner): it can be done manually or by scanning the QR code using the EnGenius Mobile APP. Of course, using the application is the easier method, but, since we’re in the browser-based UI, I chose to insert the Serial Number and then I clicked on Register.
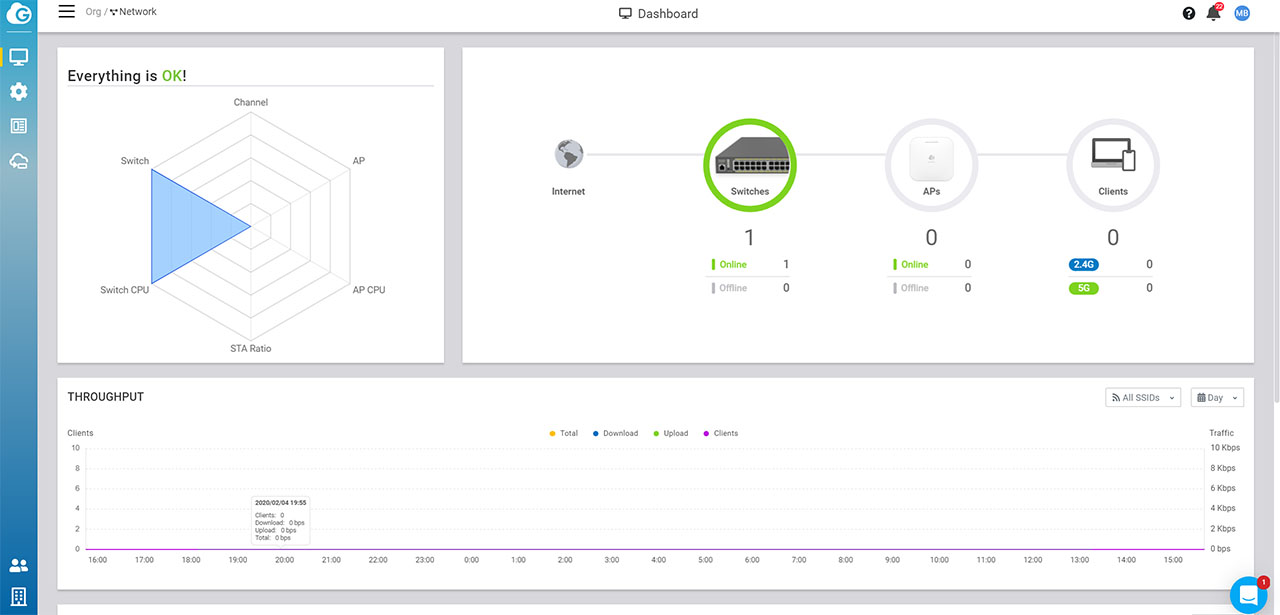
Afterwards, you should be able to see the switch in the Inventory list and, again, from the top right corner, click Assign to Network and select the preferred network for your switch. Now, we can go to the Dashboard (click on the monitor icon) to see that the device is indeed now a part of the Switches list. Unlike the local interface, which had all the options easy to access and in the same place, the Cloud management platform feels a lot more user-friendly, but the options are a bit fragmented. If you click on the Switches (from the Dashboard), you will be taken to a list of all connected switches and, to see some Details about a specific device, you need to move the mouse over the switch in the list and click on Details from underneath the ‘Last Update’ section.
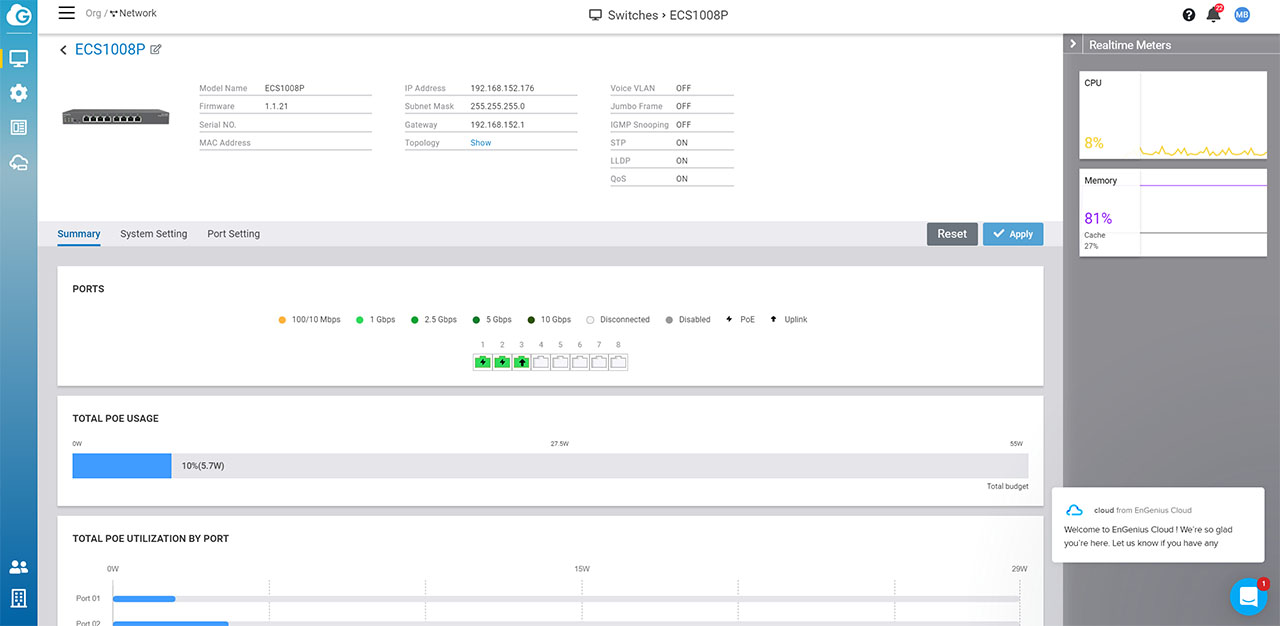
This way, you’ll be taken to a dedicated window for the ECS1008P, where you will be able to see some info about the switch, with a couple of Realtime Meters on the right (CPU and Memory), while underneath, there are three separate sections: Summary (displays the Ports, the total PoE usage, the PoE use by port, the IP config and the VLAN), the System Setting (enable and configure the Spanning Tree Protocol, LLDP, Voice VLAN, QoS, IGMP Snooping and Jumbo Frames) and the Port Setting (you get to configure every port – disable/enable it, set the Speed/Duplex, the PoE priority, enable Flow Control, QoS and more).
Leaving the Manage section (the monitor icon), go to Configure (the cogwheel) to Update the Firmware, view the remote Sys Log, configure the Switch Alert Settings (which type of notifications you will receive), add a VLAN or change the Switch Settings. The latter is very similar to the set of settings that you’re going to see if you go to the individual switch, but here, all the changes that you make will apply globally, to all registered Ethernet switches.
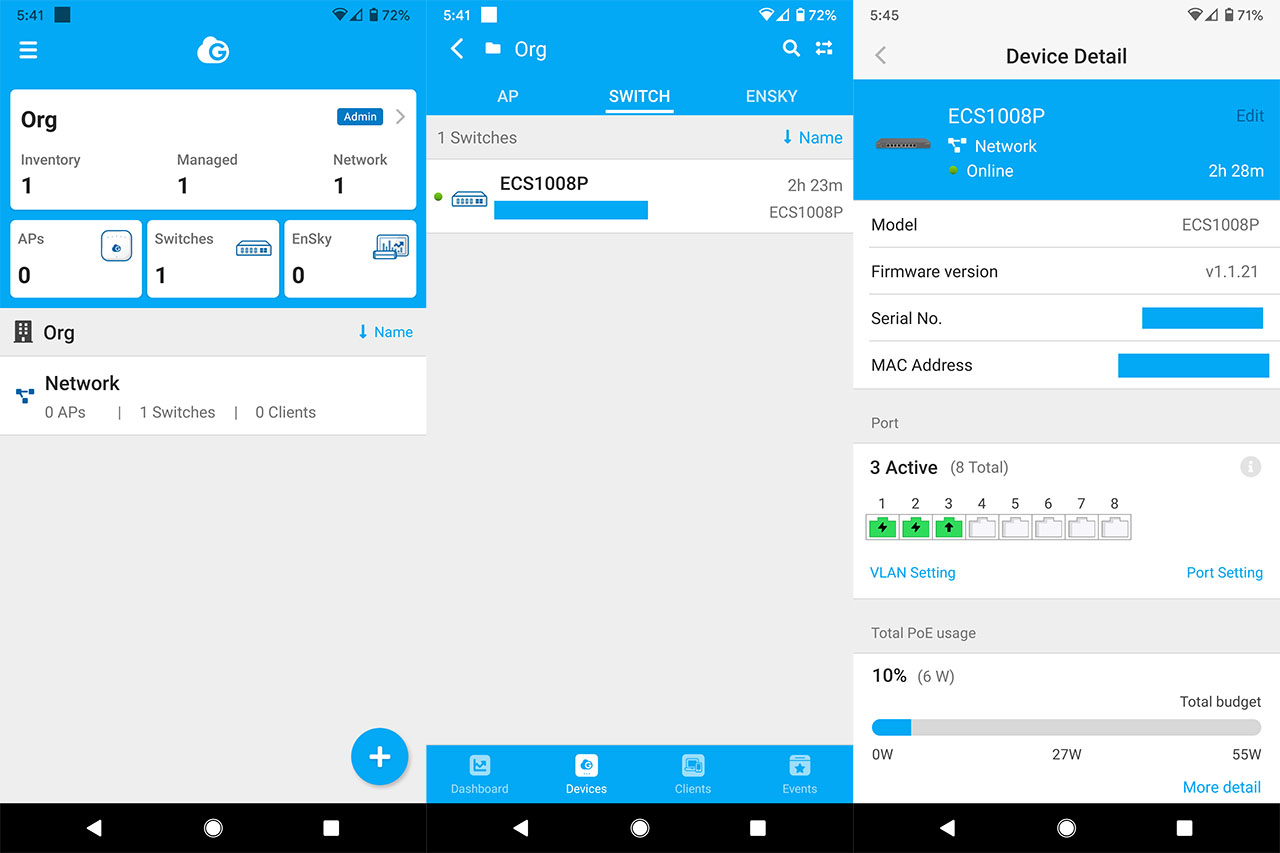
The mobile application has a lot of elements in common with the browser-based UI, but there are also some clear differences, such as the EnSky section that appears on the Org Dashboard (if you read the SkyKey review, I did have to go from the app to the web-based UI and vice versa to see all available options), but the Switches section opens up the same list of registered devices and, when opening the individual switch settings, it will show a similar set of features as on the browser-based UI (including some info about the device, the number of active ports, VLAN and Port Setting, the Total budget and more).
Of course, it’s less flexible than the browser-based interface, but, if you don’t have immediate access to a computer and need to make some urgent changes to a network, the mobile app will offer some degree of configuration. To see the LAN to LAN performance of the Ethernet switch, I decided to connect two computers via cable to the ECS1008P and I measured an average the throughput of 950 Mbps from the client to the server and an average of 908 Mbps from the server to the client.
Conclusion
The EnGenius ECS1008P and the entire Cloud-based Ethernet switches series aims at expanding the reach of the Taiwanese manufacturer and persuading more people towards its subscription-free Cloud management platform and it’s working since the software can rival what its competitors have to offer and the hardware itself is decent, especially for an entry-level device (it’s very compact and with an acceptable heat management).
I am not a fan of devices that can be managed purely via Cloud (such as some solutions from Open Mesh) since the manufacturer can take a different direction and you may end up with some expensive unsupported equipment. But, the ECS1008P is feature-packed even as a stand-alone model, so I wouldn’t worry about that much (especially since I doubt that neither the manufacturers, nor the SMBs will move away from the convenience of a Cloud platform anytime soon).

Mark is a graduate in Computer Science, having gathered valuable experience over the years working in IT as a programmer. Mark is also the main tech writer for MBReviews.com, covering not only his passion, the networking devices, but also other cool electronic gadgets that you may find useful for your every day life.

