
The last decade has seen a significant shift towards the adoption of affordable solutions for larger and more complex networks, especially regarding the SMB market, in an attempt to mimic the large enterprise networks at a fraction of the cost. One of the first to have disrupted the market was Ubiquiti which has been the go-to manufacturer of affordable networking equipment for a long time due to its easy-to-use UniFi controller, but this has also opened the way for other manufacturers to offer even better solutions for businesses of various sizes, especially since UniFi’s services have gotten a lot more expensive. And this brings us to EnGenius which has recently unveiled its SkyKey On-Premises network controller with Cloud Management that, similarly to the Ubiquiti Cloud Key, it’s a Software-Defined Networking device built to run the ezMaster management software, therefore supporting up to 100 EnGenius access points or Ethernet switches.
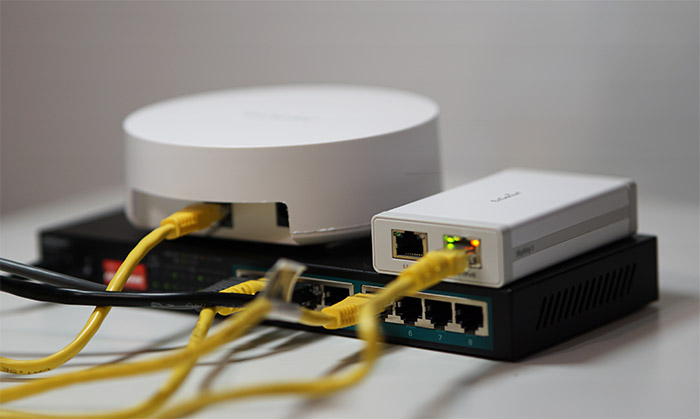
Of course, ezMaster can also be installed on a local server or on AWS EC2, a solution which has gotten very popular, but from the price-to-performance ratio, in this case, it can be better to rely on your own equipment and the SkyKey is quite powerful, offering both on-premises and subscription-free cloud network management, it does work as a low-power Plug-and-Play solution and it’s surprisingly affordable. I have already taken a look at some other available Cloud management platforms, such as the UniFi from Ubiquiti, Omada from TP-Link or Nebula from Zyxel and, to test the SkyKey with ezMaster, I will use the compact EnGenius EAP1250, an AC1300 wireless access point that supports both MU-MIMO and BeamForming to improve the client connection (WiFi5).
Design and Hardware
Just like with most SMB-suitable networking devices, the function takes priority over the form, so the network controllers aren’t the most eye-catching products and, instead, the focus is towards performance and compactness. That being said, the EnGenius SkyKey doesn’t differ that much from a PoE adapter in terms of look, sporting a very compact case made completely from plastic mostly covered by a white matte finish; furthermore, the front and the rear sides are more gray, as well as the lateral bands, so, unlike some other network controllers, the SkyKey doesn’t look unapologetically plain (for a networking device, that is).

Its size does indeed rival that of the UniFi network controller, measuring 0.90 x 2.32 x 3.93 inches (and weighing 0.17 lbs) – it is only slightly thicker and taller than the UniFi controller at its 0.85 x 1.71 x 4.80 inches, but even so, it won’t get in your way since it can be attached magnetically to any metallic case (as usually found with the PoE switches). The device can also be kept on a flat surface and it will stay in place thanks to the couple of silicone feet attached on the bottom side; there is also the possibility of mounting the SkyKey on the wall (you can use the screws provided in the package).
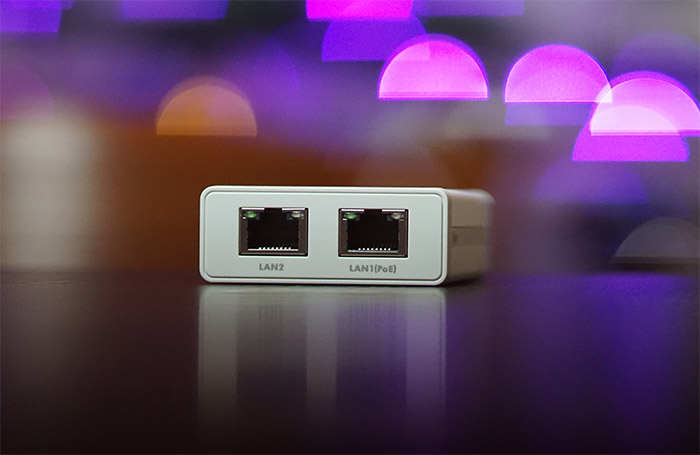
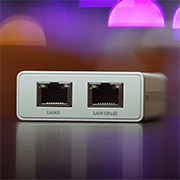
On the front side of the EnGenius SkyKey, there are two Gigabit Ethernet ports, one marked as LAN1 (PoE) and the other as LAN2. Both can be used to connect the device to Ethernet switches or access points, but, if you don’t want to bother with a DC adapter, it’s better to take advantage of the LAN1 PoE port (802.3af/at) and power up the SkyKey via either a PoE Ethernet switch or a PoE adapter. On the back side of the controller, there is a Power connector which can be used to power up the device without PoE, but you need to know that EnGenius did not add any cable in the package, so you will have to purchase a separate 12V DC cable, as well as any Ethernet cables that you may need.
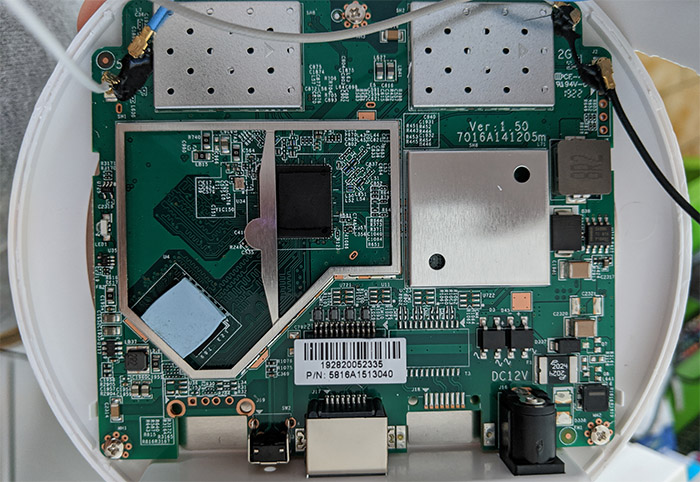
Next to the Power port, there’s a recessed Reset button (press and hold it for 10 seconds to return the device to factory default settings) and a microSD slot that can be used to add an SD card, where you should be able to back up any configuration of the SkyKey. Other than that, there no LEDs to show the status of the device, except for the dual LEDs for the Gigabit ports, one for showing the connection type and the other for the Link/Activity. EnGenius says that the SkyKey is a potent computer and, while its size may not show it, it is actually equipped with a a Qualcomm IPQ4019 chipset (quad-core ARM Cortex-A7 processor clocked at 717MHz), 1GB of RAM (DDR3) and 4GB of eMMC storage memory.
There isn’t much else to say about the SkyKey, so let’s have a closer look at the EnGenius EAP1250. I have had the opportunity to test the Ubiquiti UAP-AC-PRO, the TP-Link EAP245, the Open Mesh A60, the Zyxel NAP303 (and more) and the EnGenius EAP1250 is the most compact out of them all, measuring no more than 1.47 x 5.2 inches (Height x Diameter).
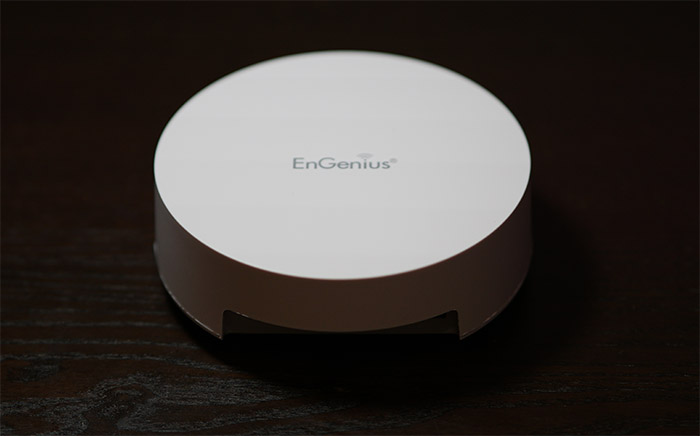
Furthermore, the access point featuring a circular plastic case covered by a white matte finish and it seems that EnGenius really took seriously the minimalist trend considering that besides the EnGenius logo on the top of the device, there is no other design element to capture your attention, everything being white and plain. This unobtrusive design approach is something to be praised considering that the device will most likely end up on the ceiling, but there is one uninspired decision from EnGenius regarding the ports positioning.
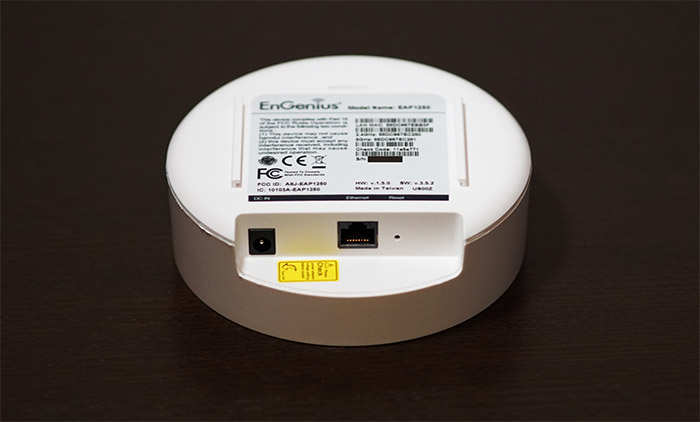
Specifically, on the bottom side of the wireless access point, there’s a small, dedicated area where you can find a Power port, a Gigabit Ethernet LAN port (it supports the 802.3af/at PoE standard) and a recessed Reset button (press and hold it for at least 10 seconds to return the device to factory default settings). The problem is that when you connect either the DC cable and/or an Ethernet cable, the connector will stick out further than the body of the EAP1250, so, unless you use white cables, it will become obvious on the ceiling or wall.
But this can only be considered a minor issue since the device is smaller than your average smoke detector (it closely resembles a Google WiFi mesh node) and, considering that there is no large LED ring or array of indicators, it will most likely go unnoticed (although the installation is still not as clean as I would have liked). But there is one small LED on the side of the device which has the role of showing the status of the AP: when the EAP1250 is powered on, the LED will be green and, when the access point is ready to be configured, it’s going to become yellow; if the device is connected to the Internet, then the LED will become blue and, if it’s disconnected from the Internet, then the LED will become solid red. Considering its small, compact size and the fact that there are no ventilation cut-outs, I was expecting that the device will at least get a bit warm while functioning and indeed, when I tested the EAP1250, it did have a higher temperature all around the case.
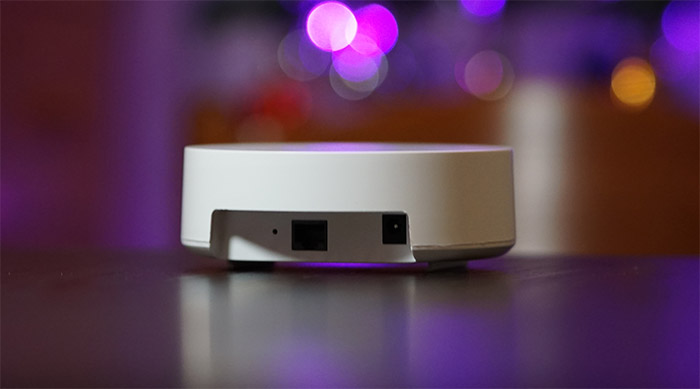
If you turn the wireless access point upside down, you’ll be able to see the info label that covers most of the bottom surface and there are also a couple of plastic sliding guides that can be used to attach the device to one of the two brackets provided in the package (15/16 inches and 9/16 inches). Since it lacks any bottom-placed silicone feet, the EnGenius EAP1250 was not designed to be kept on a flat surface, so, just like the UAP-AC-PRO it will sit better mounted on a wall or ceiling (otherwise, it can easily slide of the table).
Note: Inside the case, EnGenius has equipped the EnTurbo EAP1250 wireless access point with a quad-core Qualcomm® IPQ4018 (ARM Cortex A7 clocked at 717 MHz), two dual band 7016A1596004 V1.00 antennas and 128 MB of RAM (NANYA 1840 NT5CC128M16JR-EK DDR3).
Setup and Features
EnGenius says that the SkyKey is a Plug-and-Play solution, so, to get it running, all you have to do is connect it to an Ethernet switch (the manufacturer says that it’s best to use an EnGenius Management switch for proper IP assignment, but I had no problem using a TRENDnet TPE-LG80 unmanaged PoE switch) and then connect the switch to a router or directly to a computer. I connected the TPE-LG80 to an AmpliFi HD GE WiFi system and, to check for its IP address, I logged into the app, checked for the Clients tab (from the bottom) and, once I saw the SkyKeyI device, I clicked on the Client Details to see the IP address of the controller.
The next step was to enter it in a web-browser’s URL section and, at the ezMaster Login window, enter admin for the User Name and password for the Password. Afterwards, you’ll be asked to enter an e-mail address, to immediately change the Admin Password and to Update to the latest firmware (if available).
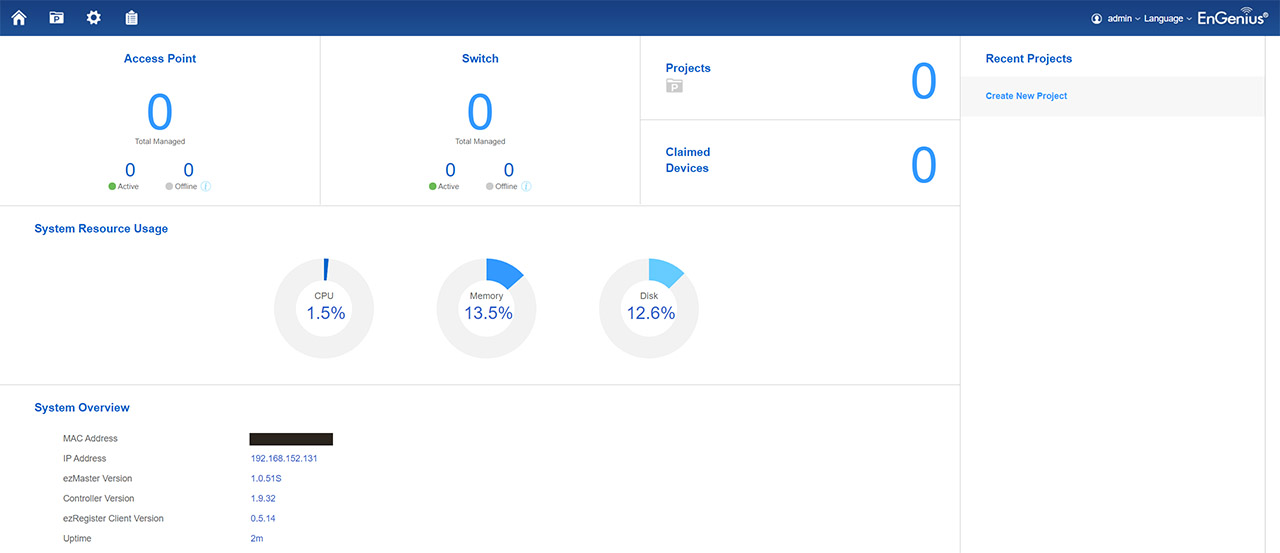
At this point, you will be able to navigate the local user interface, the first window being the Home, where you can see the number of managed Access Points and Switches, the current Projects, the Claimed Devices, as well as the System Resource Usage (CPU, Memory and Disk) and the System Overview. In order to add the EnGenius EAP1250, you need to create a New Project (give it a Name and a Description) and, after doing so, a new horizontal menu will appear with its set of options, allowing you to quickly add any connected device by taking you directly to the Device Config (a part of the Device Management group of settings).
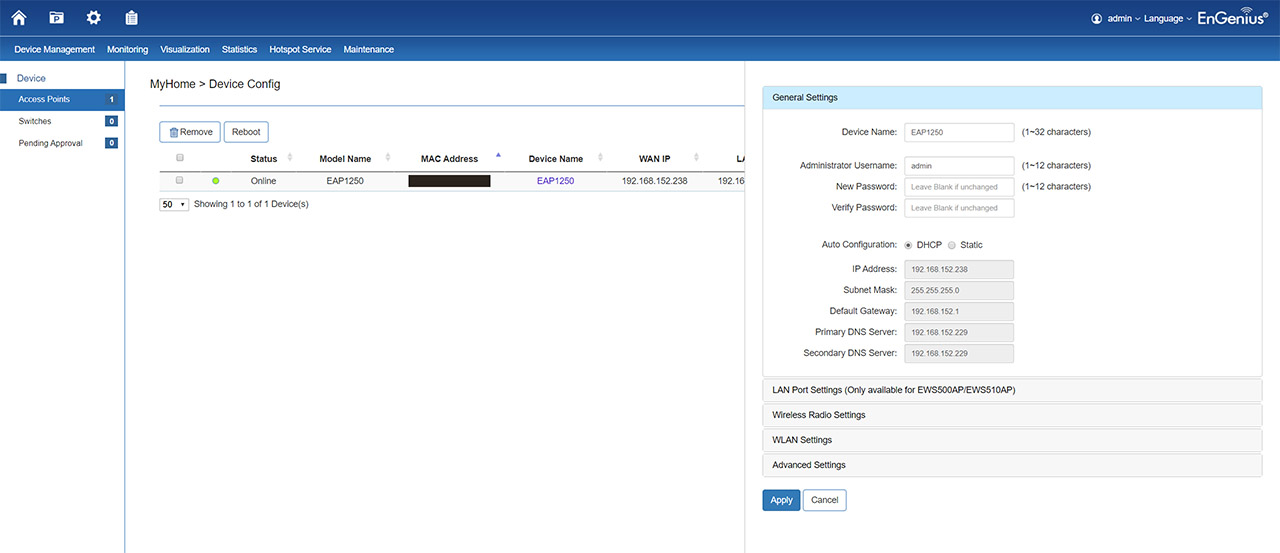
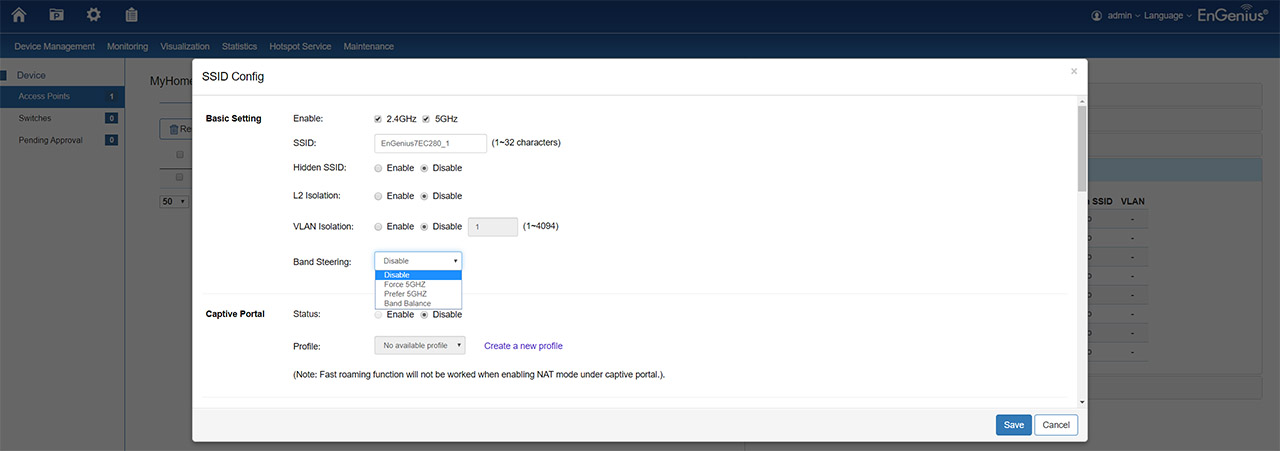
The EnGenius EAP1250 will appear in the Pending Approval section and, in order to adopt it, you need to tick the checkbox next to the Device Type and click Add. After the process has been successful, you should be able to see the new device under the Access Points section and, if you click on the Device Name (EAP1250), it will open a new section on the right (reminds me of both the UniFi and the Cloudtrax from Open Mesh), where you will be able to change some General Settings (includes choosing between DHCP and Static), to adjust the Wireless Radio Settings (you can adjust the Channel Mode, the Transmit Power, the Data Rate and set a Client Limit), configure the current SSIDs under the WLAN Settings (includes enabling L2 Isolation for blocking the communication between wired and wireless clients, VLAN Isolation for IoT security, Band Steering for decongesting the network and the Captive Portal) and adjust the Advanced Settings (include the LED Control, the RSSI Threshold and the Management VLAN) – it’s important to know that when you apply any settings to the AP, you won’t be able to access that dedicated small window.
Besides the Access Points section, ezMaster also allows you to manage Ethernet Switches and I do expect that EnGenius will also add the means to configure and manage gateways as well. Under the Device Management, you can also see a simplified version of the Home window under Summary, as well as create AP groups which makes it a lot easier to push a certain configuration only towards a few access points that are adopted in the controller.
Considering that most manufacturers offer the possibility to create a mesh network when there are more than one wireless access points on a site, it can pretty much be viewed as a mandatory feature (there are some exceptions, such as TRENDnet as seen with the TEW-825DAP or Linksys as seen with its LAPAC1750C). EnGenius also supports this technology and it can be configured by going to Mesh (still under Device Management), where you can create a new Mesh Profile (here, you have to select the Mesh Band – either 2.4GHz or 5GHz) and add new APs to the Node List; there are also some Diagnostic Tools available, such as Ping, Traceroute, Throughput or Isolated Node.
The Mesh configuration is clearly not as straight forward as with other systems, where this feature doesn’t require more than a single click to enable it (such as the case of the Ubiquiti UAP-AC-PRO or Zyxel NAP303). Besides the Device Management, you can also view the Active Clients (each with its own list of tags – there is also the option to Kick a client), check for any Rogue APs, check the Topology View (when using a switch), as well as Map, Floor Plan or Mesh View and you can also check some Statistics about your Clients and Access Points.
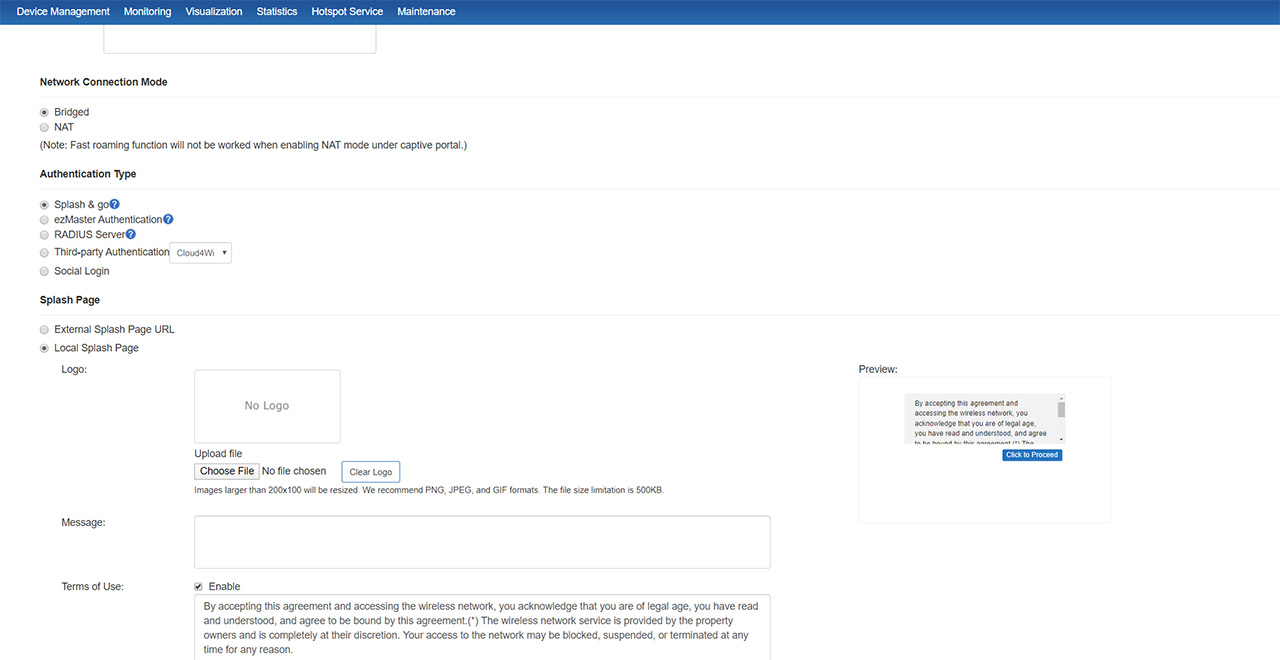
In case you install some EnGenius access points inside a hotel, a restaurant or any other site that may require client authentication, then the Captive Portal is a vital part and using the SkyKey controller, you do get the option to configure it from under the Hotspot Service: you can choose the Network Connection Mode (Bridged or NAT, the latter disabling the fast roaming function), select the Authentication Type (Splash and go, ezMaster Authentication, RADIUS server, Cloud4WI or Social Login), select the type of Splash Page (if it’s local, you do get to set a message, the terms of use, the public port and the logo), the Redirection URL, set the User Session Timeout and Enable the Walled Garden (there doesn’t seem to be any integrated payment option at the moment).
Also under the Hotspot Service, you can configure the Guest Network and, under Maintenance, you do get the option to run Bulk Updates and see the AP Remote Log. This is pretty much all you can do under a project, but there are other two areas of interest, the Device Inventory and the Global Settings. The latter allows the user to modify the Admin Account and the Default Port for the ezMaster, view the Event and Client Logs, set Email Alerts, add the Server IP and Port for the ezMaster Remote Log, Backup/Restore, Reset/reboot ezMaster and enable the Remote Access from EnGenius Cloud. You can also enable Background Scanning (for detecting Rogue APs), enable auto TX power on any radio, run a Connectivity test or update ezMaster.
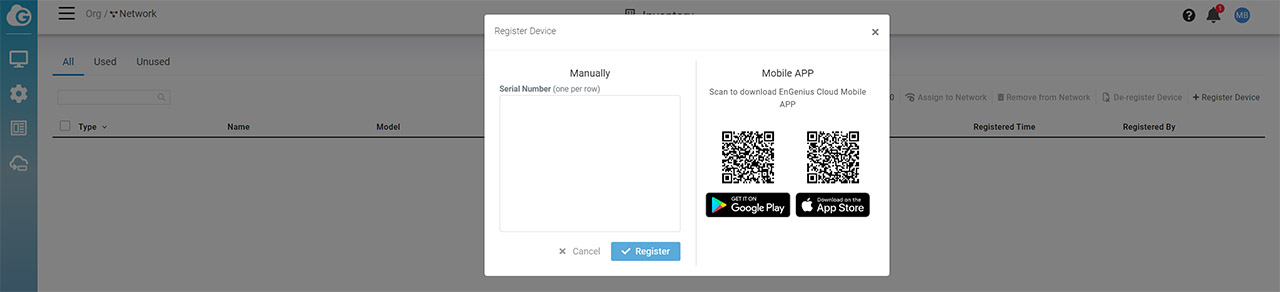
We have explored the On-Premise aspect of ezMaster with the SkyKey, but, if you wish to register the SkyKey management platform on the EnGenius Cloud, then you need to create a new account by going to http://cloud.engenius.ai and, after logging in, you can use the default Organization (or create a new one) which will take you to the Inventory section where, on the top right corner, you need to click on Register Device to add a compatible EnGenius product. At this point, you get two options, to either Manually enter the Serial Number or via the Mobile App, so, for curiosity’s sake, I decided to install the EnGenius Cloud Mobile App on a Pixel 2 XL and, after logging into the EnGenius Cloud platform, I was greeted by a simple Dashboard, with the default Organization displaying the number of Managed devices, the number of Networks, APs, Switches and EnSky devices, while further down, there will be a blue Plus sign which, when pressed, it will allow the addition new devices.
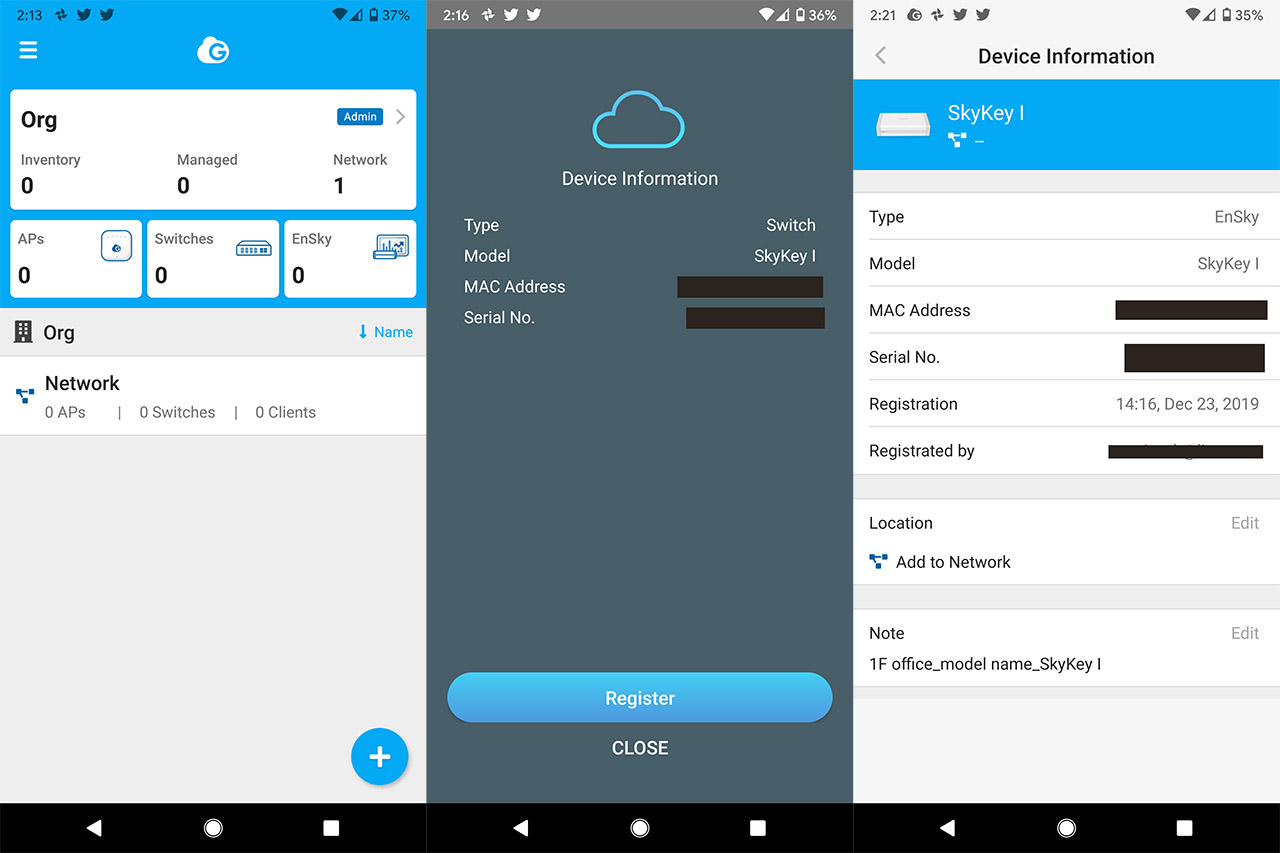
The first one is going to be the SkyKey I, (the process is ridiculously simple: point the camera at the QR code form the bottom of the device) and afterwards, I tried the same with the EAP1250 access point, but it lacks a QR code and the app said that the device doesn’t exist. The reason for this is because the EAP1250 is not a Cloud AP, so I left it like that for now and I headed to the Inventory section (from the three-line menu on the top left corner) where I could see the SkyKey I. And here is where things get very weird because, I expected to be able to add it to the network from the app by tapping on it (it will show various info about the device) and then simply clicking on the Add to Network option.
EnGenius SkyKey with EnTurbo EAP1250 Access Point
-
Pros
- Both the SkyKey and the EAP1250 AP are incredibly compact
- Both On-Premises and Cloud-based management
- ezMaster offers lots of features
- The SkyKey is magnetic (can be attached to a rack or Ethernet switch)
- The wireless performance of EnGenius EAP1250 is above its league
Cons
- I needed to use both the mobile app and the web-based UI to register the SkyKey and add it to the network
- The EAP1250 has only one Ethernet port
- No Ethernet cables in the package
Mark is a graduate in Computer Science, having gathered valuable experience over the years working in IT as a programmer. Mark is also the main tech writer for MBReviews.com, covering not only his passion, the networking devices, but also other cool electronic gadgets that you may find useful for your every day life.