
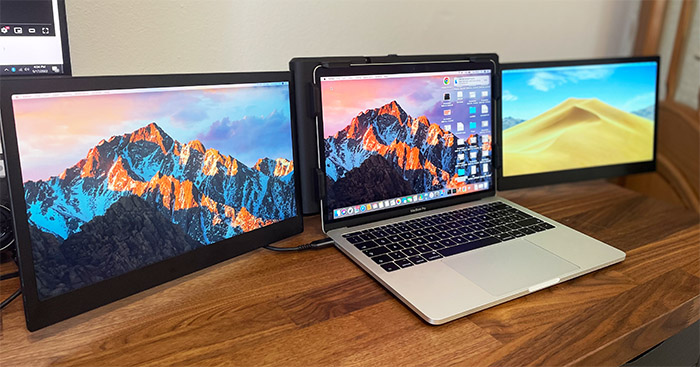
The Kwumsy P2 Pro is challenging the dual-monitor concept by bringing to life the possibility to have a tri-monitor setup while working on a laptop. And yes, the PC monitors have grown in size and it’s very easy to have two or more on your desk, but this has not really been the case with laptops for a very long time.
| Kwumsy P2 Pro | |
|---|---|
| Kwumsy.com | Check Product |
| Amazon.com | Check Offer |
I admit I was impressed by the option to have one additional monitor available when traveling, but two more is an impressive achievement if done right. Indeed, lots of start-ups have great ideas, but the idea on paper and the actual product sometimes look very different.
For example, I really liked the idea behind the Duex Plus, but the build quality wasn’t very good (despite the fairly expensive price tag), so does the Kwumsy P2 Pro suffer from the same issues? At the first glance, the device seemed robust enough, despite having multiple moving parts and there are more than one ways to power the monitors up, so that’s a welcomed bonus.
Additionally, it does offer the 1080p resolution, 60Hz and 16:9 aspect ratio, as well as 220cd/m3 in terms of brightness. But the manufacturer also mentioned the compatibility with M1 chips. And the reason they did so is because Apple’s in-house chip from the new MacBooks have native support for only one monitor.
To go around this issue, Kwumsy came up with a nifty trick which would allow the user to make full use of the additional two monitors (relies on a microSD card already inserted into the tri-monitor system). That being said, let’s put the Kwumsy P2 Pro to the test and see if behind the cool concept, there also a good execution.
The Design and Build Quality
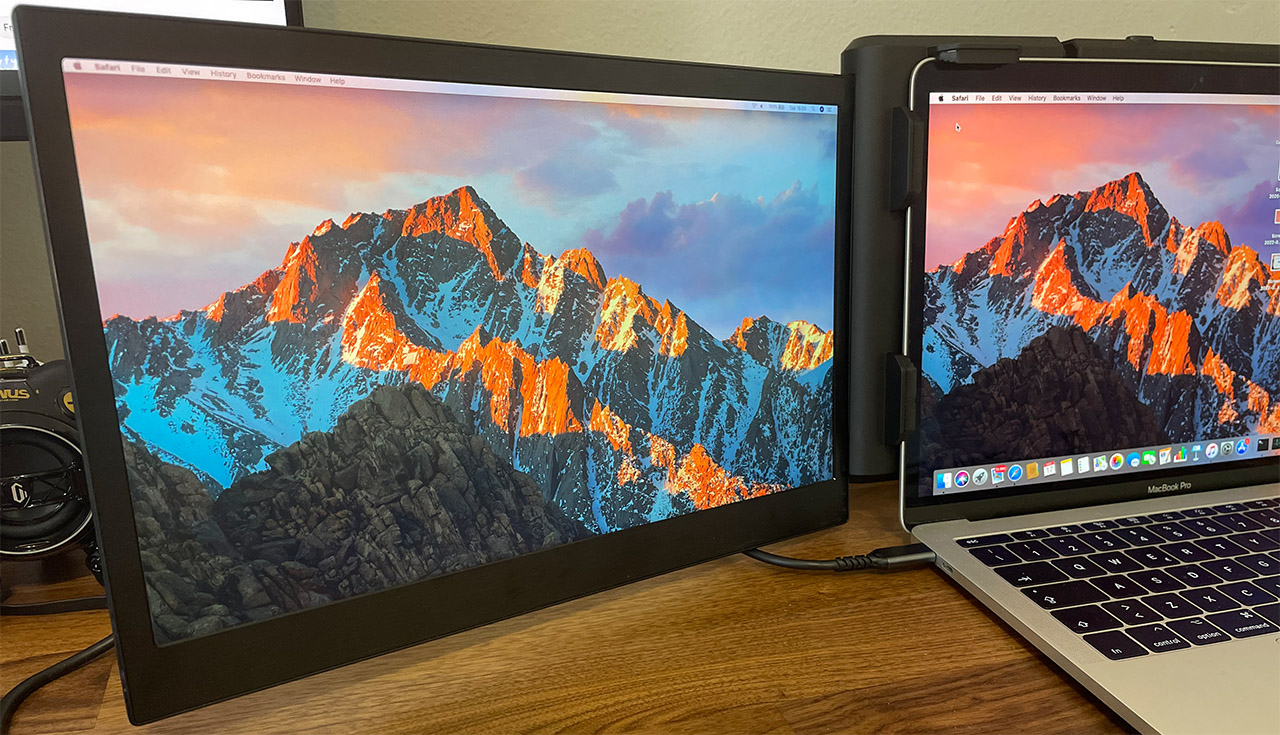
Before anything else, know that we’re dealing with two 13.3-inch monitors, so they should sit nicely next to my 13-inch MacBook Pro. But, the entire system is neither small, nor lightweight. After opening up the package, I was greeted by a faux leather case which looked really nice and made carrying the Kwumsy P2 Pro around much easier.
And, while you could keep it next to your laptop, I do suggest you put it separately, preferably inside its own case mostly to prevent any damage being done to the tri-monitor system. But don’t get me wrong, it doesn’t feel fragile at all. The central part is made of plastic with a brushed aluminum plate on the outer side and both monitors also have brushed aluminum on the front and rear side, while the frame is made of plastic.
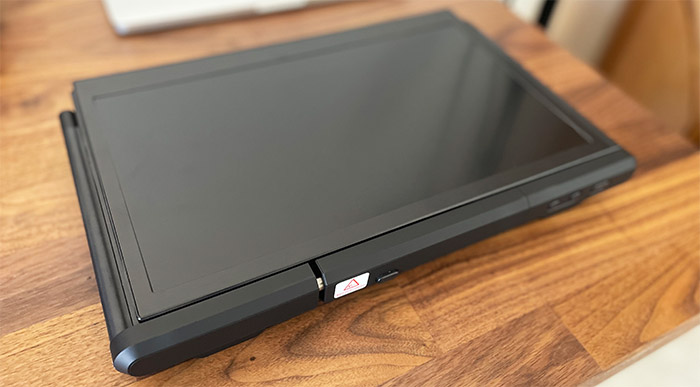
Add the glass panels and the weight starts to add up, reaching up to about 3lbs. It’s not really that much heavier than most laptops around, but when carrying both the portable computer and the Kwumsy Pro P2 in the same bag, it’s going to make a difference. Then again, this is the burden of triple-monitor convenience. In terms of size, the Kwumsy Pro P2 measures 13.4 x 8.5 x 1.6 inches (or 34.1 x 21.7 x 4.0cm), when completely folded, so it won’t occupy that much from your bag.
But, be aware that when fully opened, it gains three times the length, so it will occupy pretty much the entirety of your desk. I did like that there were no creaks and the movement of the monitors was smooth. At the same time, know that the movement is limited to 207 degrees which may seem a lot on the paper, but it’s actually just enough so that the monitors sit next to the laptop’s own monitor.
At the top of the Kwumsy P2 Pro, there are four buttons, the first is the Power button (press and hold it for 2 seconds to power on or off the monitors) followed by the Up and Down keys to navigate through the OSD menu. Lastly, there’s the Lock switch that, when pressed, it will fully stretch the holder to allow you to put the system over the laptop’s monitor.
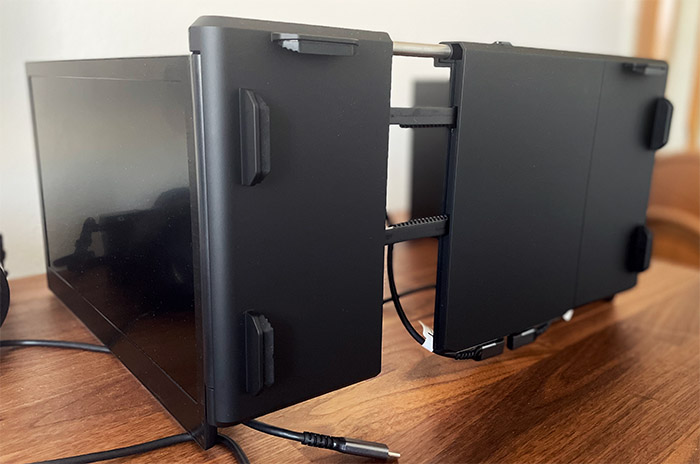
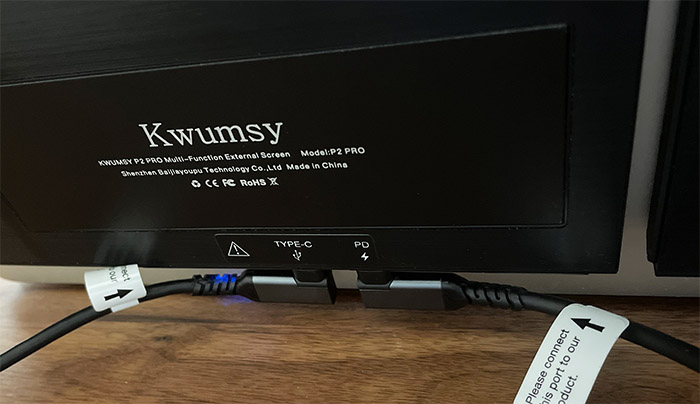
The areas of contact do have some soft rubber padding to ensure that the Kwumsy P2 Pro won’t scratch the laptop. To ensure that the triple-monitor system will not push the laptop monitor forward or backwards (due to its weight), there is an adjustable leg on the rear panel that can be locked into place. And thanks to the silicone coating at the end, it ensures that the Kwumsy P2 Pro will sit into place – so far, it has stoically kept the three monitors in the same position. On the bottom of the monitor, there are three ports.
In the middle, there’s the USB-C port for both data transfer and charging, as well as a secondary USB-C port solely for Power Delivery, in case your laptop doesn’t have support for the first type of USB-C port data communication. A bit on the side, there is a microSD card slot and there is already an SD card inside that holds the necessary drivers for making it work with M1 chips.
The Installation Process of the Kwumsy P2 Pro
The hardware installation process is actually not that complicated, even if may seem so. The first step is to take the device out of the case and then to connect the cable (or cables) to the bottom ports.
This should be done now because it’s going to be more difficult afterwards. Most modern laptops will need a single cable from the USB-C port (not the PD one), but if your laptop is a bit older, then you can use the secondary port as well to keep the Kwumsy P2 Pro powered up (there is a power brick inside the package, which I think it’s awesome).
The next step is to open wide the monitors and to press the Holder switch. After the spring-operated holder is open, put the middle section of the system around the monitor of your laptop and then simply close the holder. It should move back with ease. Connect the USB-C cable and that’s pretty much it for the hardware installation. But we’re not really done with the software installation aspect.
If you’re on a MacBook, then check out the NO NAME removable disk and search for the MacOS folder suitable to the version that you’re currently running (in my case, I was using the 10.14 Mojave). Then, simply install the necessary drives – you will be asked if you want to restart the laptop and you should do so.
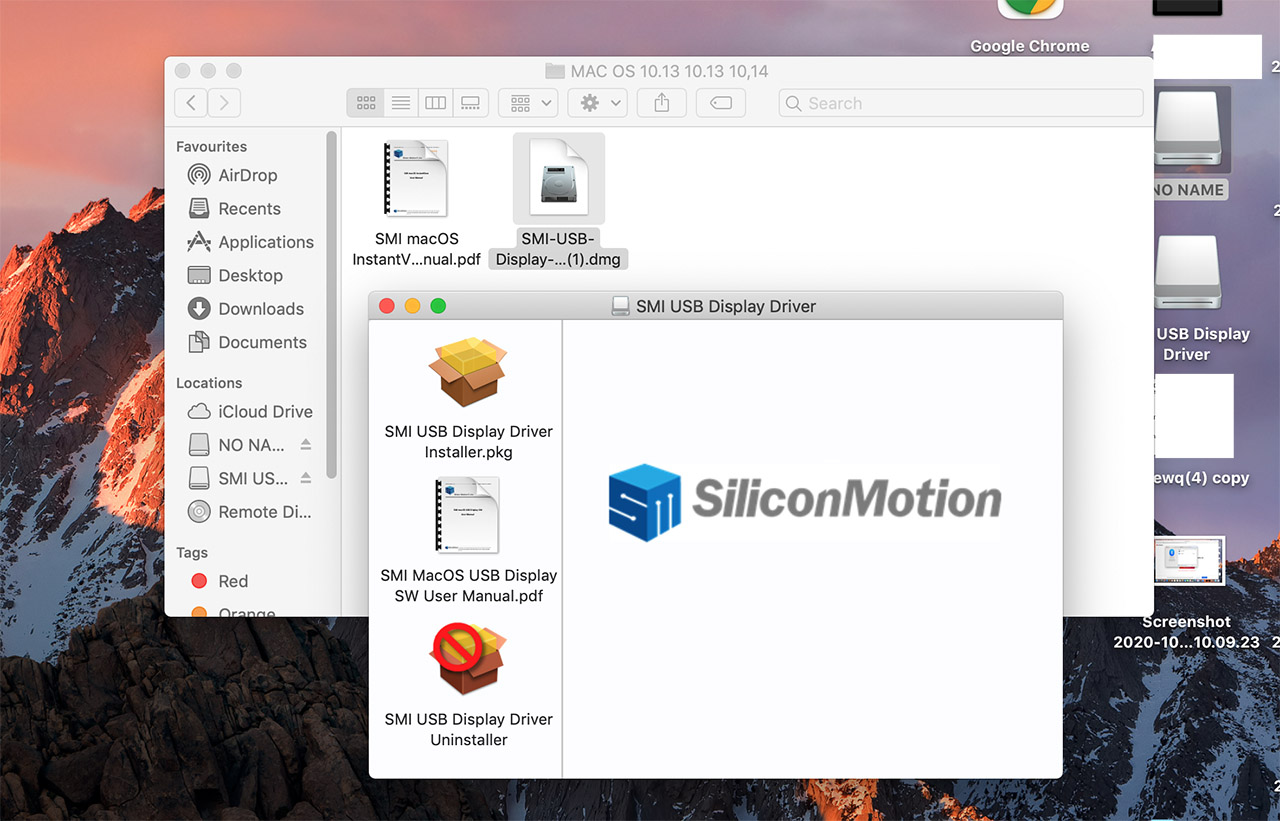
After that, all three monitors should light up and you will be able to navigate between them. But, in my case at least, I saw that the order was wrong, so I headed to the System Preference > Monitors and simply put the monitors in the correct order. When the Kwumsy P2 Pro was connected to a Windows machine, the drivers were installed automatically and all I had to do is plug into the USB-C cable and wait a few seconds. That was all.
The Controls
I though that Kwumsy would have some trouble with personalizing the OSD settings for each monitor, but the team managed to pull it off admirably. To access the OSD menu on the left monitor press the Down button and to access it on the right monitor press the Up button.
Then, to navigate through it, press Up and Down, and the Power button enter or exit a certain setting. You are able to adjust the Brightness, the Contrast, enable the ECO mode, enable the DCR (Dynamic Contrast Ratio), change the Sharpness of the text, the Hue, the Saturation and the Backlight.

There is also the possibility to change the Color temperature (it’s sRGB by default), the language and the OSD position, as well as some Image-related settings. What I didn’t like is that there was no dedicated Back button, but other than that, it’s a pretty straight-forward experience.
The Display Quality
As I already mentioned, both monitors use 13.3-inches IPS panels and have a 1080p resolution which is pretty much the standard with portable monitors. The pixel density is about 165ppi which is fine considering the size of the monitors and you should not be able to see individual pixels. The 13-inch MacBook Pro that sat in the middle has a great panel and I can confidently use it for photo editing.
So, when looking at the two monitors on the side, there was a significant downgrade in image quality (even the resolution is lower since the MacBook features a 1440p panel). So, I thought it would be best to compare them to my older Lenovo Y520, a 1080p 15.6-inch laptop.
The Y520 is not a champion in terms of image quality, but it’s alright for gaming (at 60Hz) and some light photo editing, even if the colors aren’t that accurate. From the getgo, I noticed that the color temperature of the Kwumsy P2 Pro panels is far warmer than the Y520 and the whites are a bit greenish.
There is a good amount of detail, with the black levels being somewhat deep, but that greenish tone does overlap over pretty much the entire spectrum of colors. So, I decided to try and calibrate the panels a bit. I did get a slightly better image by pushing the Brightness down to 50% (while before I was trying to match it to the MacBook Pro), the Contrast to 50%, the Sharpness to 2 and the Hue to 40.
The Saturation was set to 55 and the Backlight to 50 (I noticed that above this value, there wasn’t any change in the brightness). I think this way, I got a deeper black and the whites were a bit more accurate, although still plagued by a darker (greenish) tone. Now let’s talk about the brightness.
Neither of the panels is particularly bright and, if you want to push it to 100%, the colors get severely inaccurate. The manufacturer promises up to 220cd/m3 and it was obviously not reaching those levels, not while using a single cable. So, I took the secondary cable and connected the Kwumsy Pro P2 to a power socket. And this changed things quite a bit. I immediately saw a slight bump into the brightness, so I went and adjusted the Backlight (which was previously anemic) and would you look at that! We now have a properly bright panel.
The whites are better (still a very light green tone there), the blacks are deeper and overall, it’s like dealing with another monitor altogether. Obviously, don’t expect the MacBook levels of clarity or color accuracy, but I do think it’s not that far off from the monitor of my Lenovo Y520. I actually think that the side viewing angles are better since there was no color shift and the reflections had less of an impact.
And yes, the panels are matte, not glossy. Before moving forward, I checked the input lag and it was excellent since there was no difference between the laptop monitor (Y520) and the Kwumsy P2 Pro. The advertised response time is 25ms, but it actually goes a bit higher (somewhere in the 28ms GTG), so it’s in line with other portable monitors such as Lepow or the Mobile Pixels Duex Plus.
This means that competitive gaming is not the strongest suit of the Kwumsy P2 Pro, but it will work decently well with other types of games.
What’s the power consumption?
The portable monitors are very efficient in terms of power consumption and one single monitor would usually go up to 5W only. So, I expected to see about 10W with two monitors. I took a multi-meter which I connected to a laptop and then using a single cable, I powered on the Kwumsy P2 Pro.
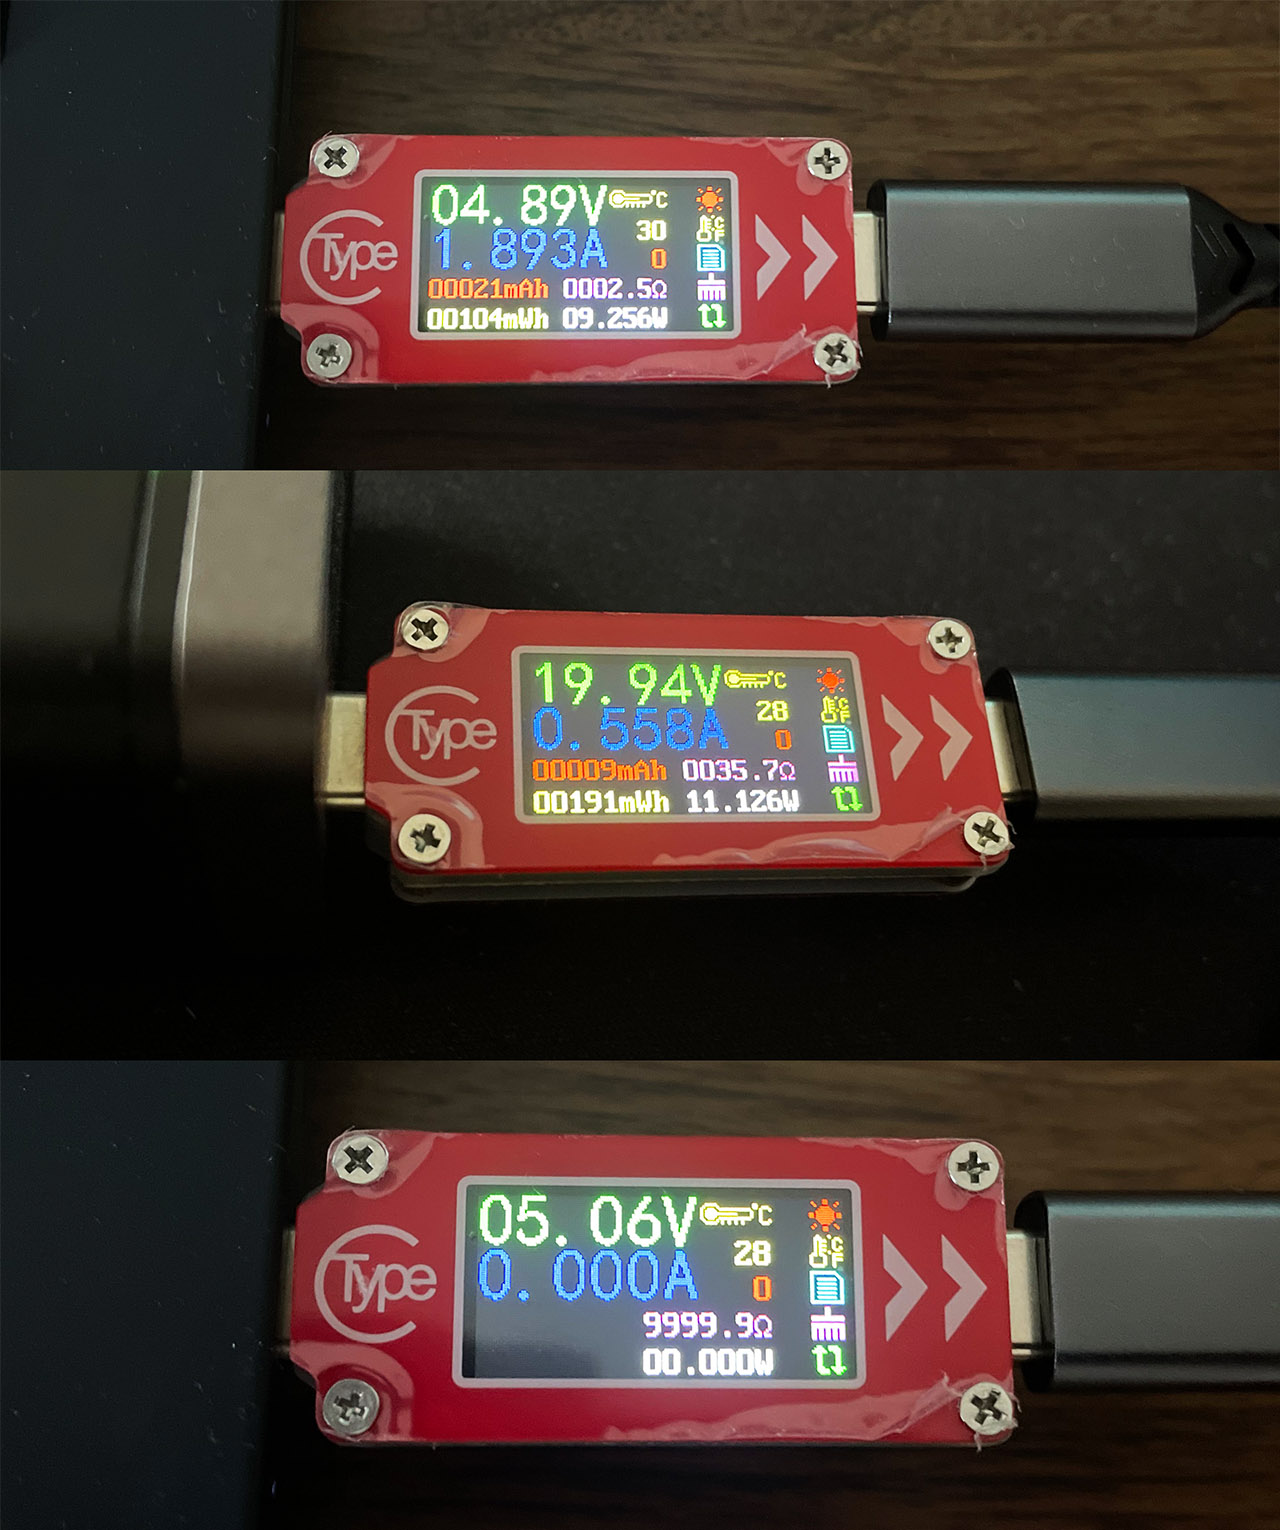
The small tool showed that the average power consumption was about 9W, which is good, but know that it will quickly deplete the battery of a 13-inch MacBook Pro. It depends on the brightness level, but the laptop would last for less than two hours with the additional two monitors. I was also curious what happens when the second cable is used to power on the tri-monitor setup.
It seems that the power delivery goes close to zero and the power consumption from the power socket goes to about 11W, so it’s not that much more than what it gets from the laptop. Which is why I suggest that you use the second PD cable when possible since it will preserve the battery life of your laptop.
Conclusion
I am very excited to see all these energy-efficient portable monitors coming into the mainstream and, while I was already impressed by the dual-monitor systems, I think that the tri-monitor systems make a lot more sense. I say this not only because you get more screen-estate (obviously), but I do think that the devices are more balanced and less unstable with screens on both sides.
Sure enough, the Kwumsy P2 Pro is a bit heavy, but the manufacturer has made it fairly easy to transport the device. And there are multiple ways to connect it to your laptop. But, if you rely on a single cable, then the image quality is not going to be that great – add another cable and you do get a decent pair of displays. I think the targeted audience is the people that have to do a lot of remote work and the extra screens will make their lives better, so yes, if you’re among the people that need this kind of system, do give the Kwumsy P2 Pro a chance.
Kwumsy P2 Pro
-
Pros
- Two additional monitors to your laptop
- Multiple ways to connect it to the laptop
- Stable and solid with smaller laptops (ideally 13-inch)
- Decent power consumption
- Can work with M1 chips
Cons
- Gets a bit wobbly with 15-inch+ laptops
- The image quality is not that great unless you connect the system to a proper power source
Mark is a graduate in Computer Science, having gathered valuable experience over the years working in IT as a programmer. Mark is also the main tech writer for MBReviews.com, covering not only his passion, the networking devices, but also other cool electronic gadgets that you may find useful for your every day life.