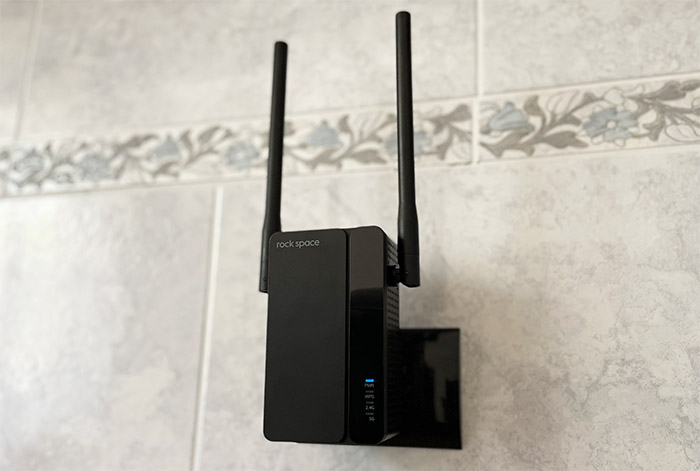
If you remember that cute, small AC1200 WiFi extender from Rock Space, then know that the manufacturer has made available the Rock Space AX1800 extender which makes use of the WiFi 6 technology to, hopefully provide a better wireless performance.
| Rock Space AX1800 | |
|---|---|
| RockSpaceWorld.com | Check Product |
| Amazon.com | Check Product |
And it does need it considering that the WiFi extenders are never champions at keeping the bandwidth use at acceptable levels. That’s simply due to their nature because the extender needs to communicate with the clients back and forth, as well as with the router, so, in most cases, you’re left with less than half of the available bandwidth.
Then again, you do get to cover an area where the WiFi signal just couldn’t reach, so it’s a compromise that many people are willing to make. But, since the Rock Space AX1800 does have some WiFi 6 features, could it perform better, especially in denser networks? The WiFi 6 extender does support OFDMA and I am fairly sure that it’s only on the 5GHz band (but I will open up the device to be sure).
This alone will do wonders in dense networks, but Rock Space has also added support for MU-MIMO (2×2) which is a standard feature nowadays and I was surprised to see that it’s possible to use WPA3 for encryption, which is excellent for security. In case the repeater mode is just not enough, the Rock Space AX1800 WiFi extender does have an AP mode available (for a wired backhaul). That being said, the Rock Space AX1800 does look promising, especially considering the price tag, so let’s put it to the test.
Design and Build Quality
The Rock Space AX1800 WiFi 6 extender is a fairly big networking device, far bigger than most other WiFi 5 extenders (including the AC1200 from Rock Space). So yes, at its 4.72 x 2.76 inches (or 12.0 x 7.0cm) without the antennas (which add about 1.2 inches in width and 2.7 in height), the Rock Space AX1800 will occupy any other adjacent socket.
Sure, the (plastic) case is covered by a black matte finish, but you’re going to notice it since it’s pretty much half a router attached to the wall. The two antennas on the sides are pretty large and they can be moved around to about 340 degrees, but they’re attached to the body of the WiFi extender, so you can’t replace them.
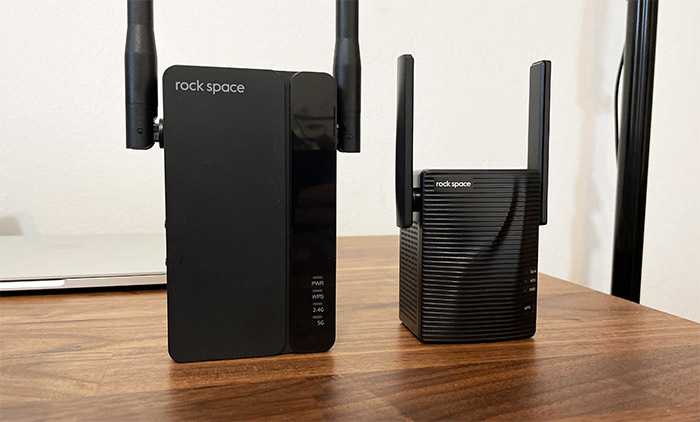
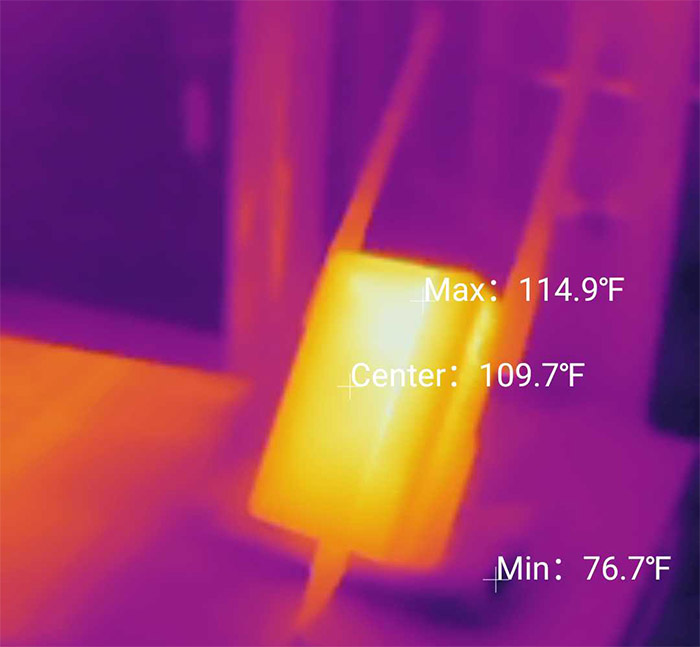
And I suppose it could have been nice to be able to add some higher gain antennas, especially when we’re dealing with a device that supposedly should eliminate WiFi dead spots. The cost of the device would have been higher, I think. In any case, I noticed that there are lots of ventilation holes which suggest that the manufacturer did take the heat management seriously. Inside the case, there is a fairly large heatsink that should push the heat out, but is it effective?
Up to a certain point, yes, since the device doesn’t get hot to the touch, but it gets heated up quite a bit when it’s transferring data. I did not notice any throttling even if I kept it on a heavy load for about 10 hours.
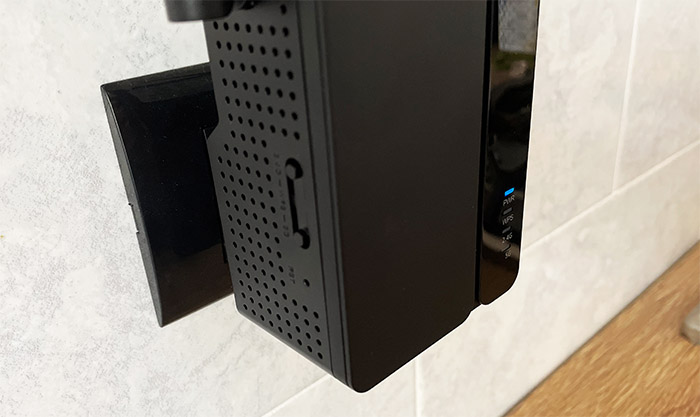
On the front side of the device, there is a glossy portion where there are four LEDs, the first will light up to let you know that you powered the device and the last two LEDs will light up to let you know that you have extended wither the 2.4GHz or the 5GHz network (and the signal strength). The second LED is for the WPS process and yes, this is a way to pair the Rock Space AX1800 to your router. Not the most secure protocol out there, but it is pretty much the standard way with these type of devices.
I do need to mention that you can pair the WiFi extender without using WPS, as you will see in the following sections. On the left side of the device, there are two buttons which will enable the WPS, one for extending the 2.4GHz band and the other for the 5GHz band (the signal broadcasting will take place for 2 minutes).
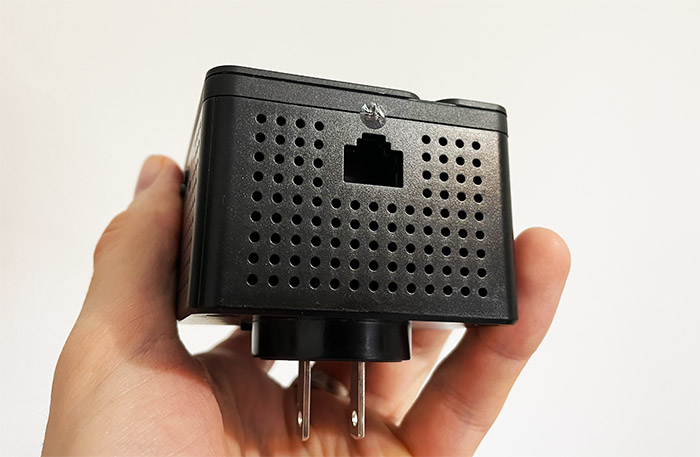
Also here, you’ll be able to find a recessed Reset button that, when pressed and held for 5 seconds, it will return the device to the factory default settings. On the rear side of the Rock Space AX1800, there is a circular hole where you can insert the provided plug (depending on the country you’re in). And you need to rotate it into place, but the process is not a pleasant one. That’s because you need to use some metal rod to push it into place.
And don’t even think about ever removing it – funny that there is a release clamp. Most of my power sockets are on the side, so I wrongfully assumed that I could rotate the plug to make it sit vertically (instead of the default horizontal position).
But no, there will be no metal contact if you do so. Lastly, on the bottom of the Rock Space AX1800, there is a single Ethernet port and it’s Gigabit. This port is useful to either make a cabled connection to your router or for adding client devices to the network.
Internal Hardware: Rock Space AX1800 WiFi 6 Extender Teardown
I admit I panicked a bit when I saw those black covers which I assumed were made of plastic, but the good news is that Rock Space took mercy on me and they’re actually made of silicone. So, it’s easy to take them out and remove the screws underneath. I noticed that there is what seems to be a warranty seal, but it was made of transparent plastic, so it would not tear.
I was then able to detach the front cover which exposed one side of the PCB where I could identify the 16MB of NOR flash from XMC (QH128AH16). Afterwards, I removed the screws that held the PCB into place and the two antenna connectors, and then I took the entire board out.
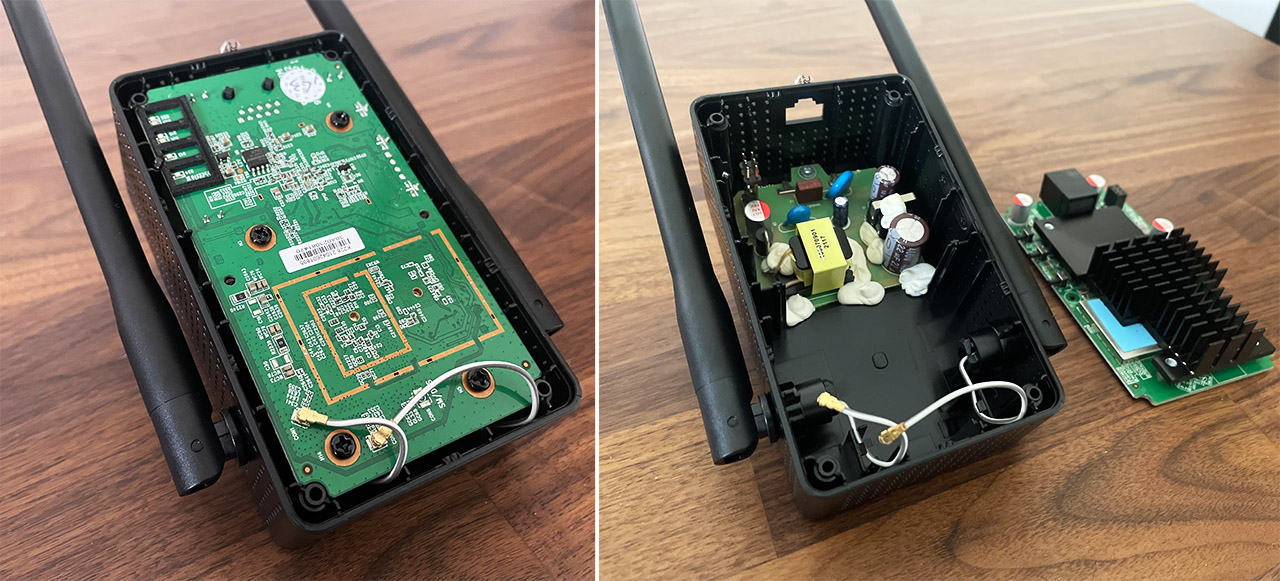
As you can see, there are some circuits for the power input remaining inside the case, but we’re interested in the small PCB that we took out. There is a heatsink that covers the board almost entirely, so I took it out and, after removing the two aluminum covers, I could identify the dual-core Mediatek MT7621DAT chip clocked at 880MHz and there seem to be 128MB of RAM integrated with the SoC.
As for the WiFi, this is a dual-band WiFi extender, so there’s the Mediatek MT7975DN 802.11b/g/n/ax 2×2:2 chip for the 2.4GHz radio band and the Mediatek MT7905DAN 802.11a/b/g/n/ac/ax 2×2:2 chip for the 5GHz radio band. The Rock Space AX1800 appears to use the same main components as the ASUS RT-AX1800S and the Mercusys MR70X.
| Rock Space AX1800 | |
| CPU | dual-core 880MHz Mediatek MT7621DAT |
| RAM | 128MB Mediatek MT7621DAT |
| Storage | 16MB NOR XMC QH128AH16 |
| Switch | Mediatek MT7621DAT |
| 5GHz Radio | Mediatek MT7905DAN 802.11a/b/g/n/ac/ax 2×2:2 |
| 2.4GHz Radio | Mediatek MT7975DN 802.11b/g/n/ax 2×2:2 |
But I just couldn’t miss the chance to see if the Rock Space AX1800 is also the same device as the Tenda A27, just like the AC1200 extender was identical to the one from Tenda. So I headed to the FCC ID site and checked the teardown photos. What I saw was that while Rock Space went with the Mediatek platform, Tenda preferred using Broadcom, so they’re entirely two different devices.
Features
More likely the most important technology that became available with the WiFi 6 standard (802.11ax) is the OFDMA (stands for Orthogonal Frequency-Division Multiple Access). And it will shine in denser networks, where the channel bandwidth is divided into smaller resource units (RU), therefore increasing the efficiency of the network.
But only WiFi 6 client devices can actually make use of this tech and the manufacturers very rarely add it to the 2.4GHz radio. Of course, OFDMA is only available on the 5GHz with the Rock Space AX1800 WiFi 6 extender as well, which is not really surprising considering the price tag. Another feature that the manufacturers like to push forward is the MU-MIMO technology which should help serve more than one device at a time (instead of relying on the round-robin technique).
It is somewhat effective, but you do need multiple compatible client devices and sure, there are more smartphones and laptops that can use this tech, but it’s usually implemented into its most basic form. I noticed that Rock Space has mentioned the support for WPA3 which is excellent for security purposes, but you do need to have it enabled on the router as well, since I saw no way to enable it on the separate networks generated by the WiFi 6 extender.
Setup and the Management GUI
I am not fond of the WPS method, so the best way to start the setup process is by connecting the Rock Space AX1800 to a power outlet and, as soon as it starts broadcasting its two SSIDs, to connect to either from a client device (PC or smartphone).
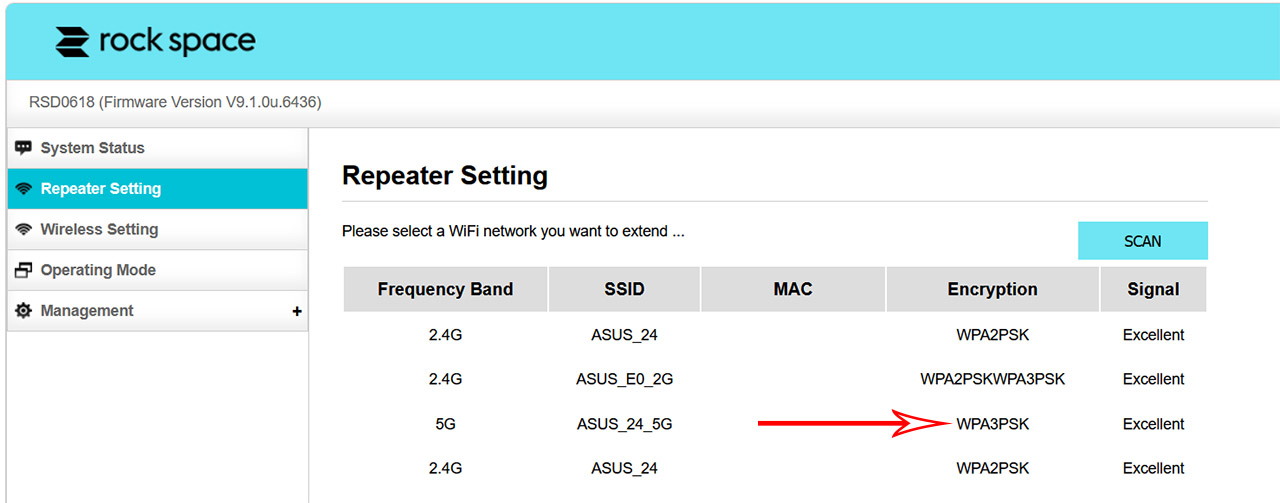
Immediately after doing so, it automatically opened a page in my browser where I was asked to change the password (not the admin username though). The next step is to Scan the area for any available WiFi networks and extending one of them. I selected one of the SSID from an Asus router and, after inserting the passkey, I had to wait a few seconds until the extender restarted and started broadcasting the new SSIDs.
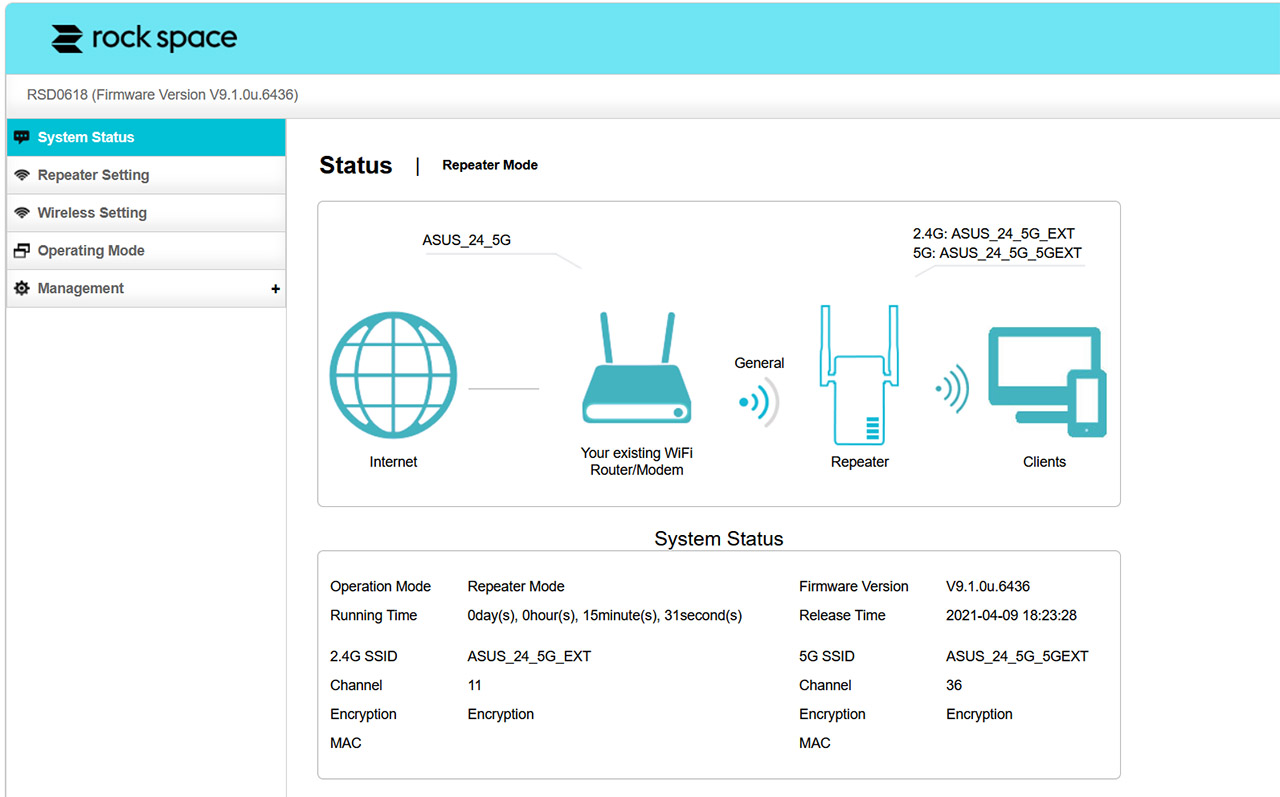
The last step is to connect to the new WiFi network and refresh the page on the browser to gain access to the user interface. As you can see, we do get a System Status diagram, which shows the WiFi network that’s being extended and the two WiFi networks produced by the Rock Space AX1800. And yes, you can connect to either since both will offer Internet access.
Underneath the graphical representation of your network, there is some System Status info to let you know the channel that the repeater is using or the encryption. And I found it amusing that the Encryption was ‘encryption’ which is correct I suppose, but not very useful.
Also the channel for the extended network is the same as on the router which is not good for interference, but I know that some WiFi repeaters do have the option to switch it to other channels. Unfortunately this is not the case with the Rock Space AX1800. The other SSID did have a different channel, so there’s some small silver lining.
The next area is the Repeater Settings where you essentially can just repeat another signal. Then, there’s the Wireless Setting which is a bit disappointing since all you can do is change the SSID and password (no channel selection, no encryption change) and the Operating Mode does allow you to switch to AP Mode if you want to use the Rock Space AX1800 as an access point (to connect it to the router via an Ethernet cable).
Lastly, there’s the Management where you can change the password, set a reboot schedule, reset the device or upgrade the firmware. But I did notice that the last available update is from a year ago and I hope the reason why it’s so old is because there was nothing to improve since then.
Extending the 5GHz Radio Band – Wireless Test
It’s obvious that the wireless performance is going to be very much dependent on the router that you’re using and I wanted to see the true potential of the Rock Space AX1800. So I took out one of the most powerful router that I still have, the RT-AX86U (I could have used the RT-AX88U as well, but I was lazy) and, if you check the results that I got when I tested it, it got very close to 1Gbps on the 80MHz channel bandwidth.
This means that the RockSpace AX1800 WiFi extender should not be held back by the router in any way. I mentioned the 80MHz channel bandwidth because the WiFi 6 extender does not support 160MHz and it also didn’t like DFS channels. I made sure to keep 40 feet between the router and the Rock Space AX1800 extender at all times (the LED remained green), while the first client device was moved at various distances from the extender, but not closer to the router (imagine a straight line, first there’s the router, then the WiFi 6 extender and then the client devices).
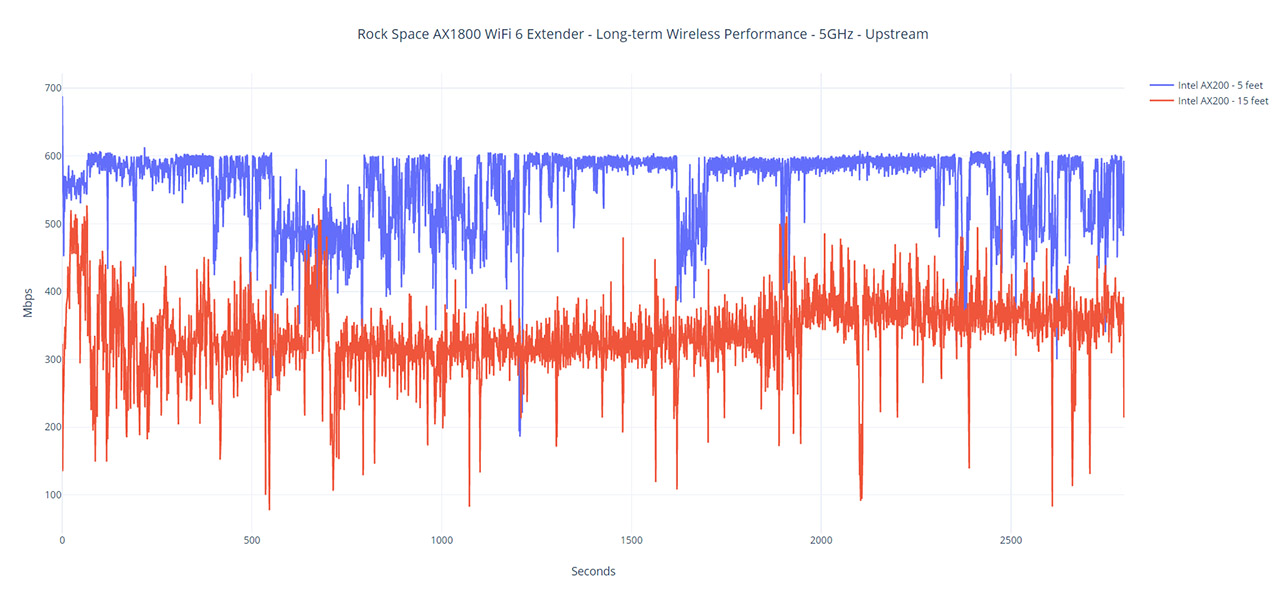
At this point, I extended the 5GHz network and the extender created two separate networks, a 5GHz one and a 2.4GHz network. I initially thought that maybe the Rock Space AX1800 is actually extending both bands and uses one for the backhaul traffic and the client communication, and the other is free for the client devices. But, after switching to WPA3 encryption on the 5GHz band (to see if the Rock Space AX1800 actually supports it and it does), I realized that the device is truly extending only a single band at a time.

Mark is a graduate in Computer Science, having gathered valuable experience over the years working in IT as a programmer. Mark is also the main tech writer for MBReviews.com, covering not only his passion, the networking devices, but also other cool electronic gadgets that you may find useful for your every day life.

