
Mikrotik recently released the NetMetal ac2 and, while it seems to be just as rugged as its predecessor (the NetMetal 5SHP), there is now a more powerful quad-core CPU, as well as concurrent dual-band support out of the box (a feature that should have been the standard for a long time). When I say that the Mikrotik NetMetal ac2 is rugged, I mean it. The wireless access point features a whole-metal body (divided into three parts) and it is IP66 certified to withstand most outdoor conditions; and no there aren’t many enclosures of this kind in the outdoor WAP market.
| Mikrotik NetMetal ac2 | |
|---|---|
| Amazon.co.uk | Check Product |
Besides being more than able to withstand the elements, the NetMetal ac2 comes with RouterOS (as all Mikrotik devices do) and it’s a very flexible software, but very difficult to immediately get into. Yes, there are lots of guides and a massive support group of enthusiastic users, but this still doesn’t take away from the fact that it has a steep learning curve.
It’s also worth mentioning that the wireless access point does not come with antennas and you will have to purchase them separately (the high-gain ones should be the preferred choice). That being said, since more and more people want to cover larger areas with WiFi (and I am talking about miles of coverage), it’s worth taking a closer look at the Mikrotik NetMetal ac2 and see what improvements it brings over the last gen and whether it’s a suitable solution for your needs.
Design and Build Quality
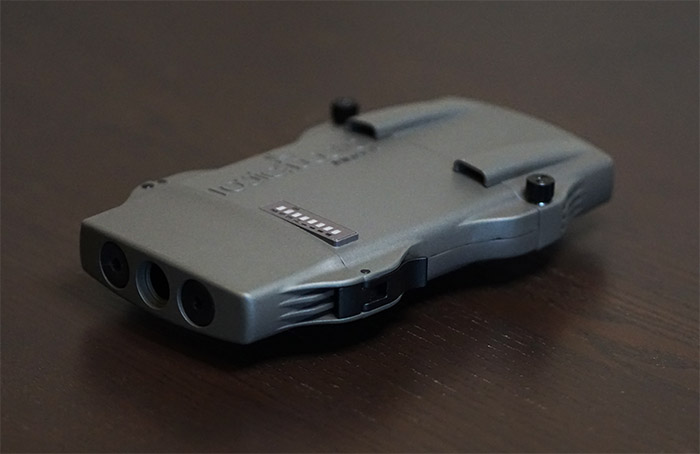
The NetMetal series has always been known for its rugged metallic exterior and the latest NetMetal ac2 is built in the same manner, featuring a rectangular case completely made of metal with some protrusions on the lateral sides for the hinges that keep the three parts together. Indeed, the main body of the outdoor access point is in the middle, while the other two sections are removable (only one can be taken off completely) to expose the ports and the antenna connectors. Like I said in the intro, Mikrotik did not add any antennas inside the package, so you will have to purchase a couple of them (preferably long range), unless you want to use the access point for connecting devices no farther than 20-30 feet. The design is pretty much identical to the NetMetal ac or the 5SHP and, while the logic behind it was why fix what’s not broken, I am a bit confused about the antenna cover. You can remove it by unscrewing two print-operated screws (ensuring that you’re not going to lose them), but, after you connect the antennas, this cover serves no purpose at all.
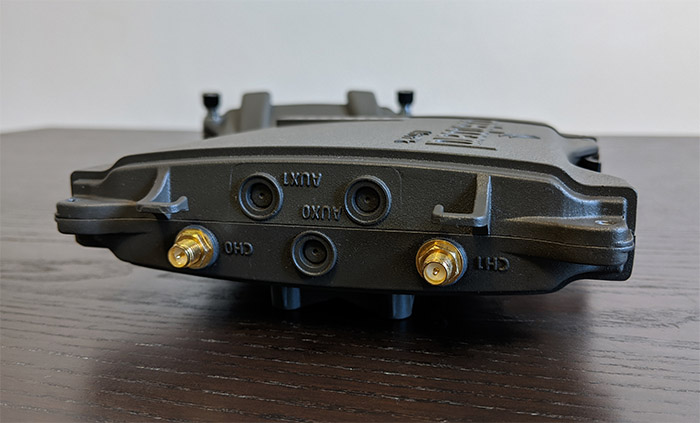
Perhaps the manufacturer thought about the transportation of the device (which is kind of useful?). It’s worth noting that besides the two antenna connectors, there are three AUX zones that, in case you want to use them (for attaching a modem), you’ll have to drill holes into the case. That being said, despite being fully metallic, the Mikrotik NetMetal ac2 is surprisingly lightweight, weighing only 1.85 lbs and, as for size, it’s not the most compact device, but it is an outdoor-suitable access point, so its 5.63 x 9.72 x 1.88 inches shouldn’t cause any problems when mounting the device on the wall or on a pole. Mikrotik had made it easy to attach the access point to a pole due to the dedicated area on the rear side: this area protrudes outwards with four screw holes on each extremity and it also has a canal for the pole. Inside the package, there is an adjustable metallic ring and a rectangular mounting plate to help you mount the device.
If you remove the cover from the other side of the antennas, you’ll gain access to the ports area: from the left, there’s a 12-7V DC power port (and yes, there’s a power adapter in the package) followed by a Reset button and an SFP port. If you hold the Reset button for 5 seconds during boot, it will reset the RouterOS configuration, but, holding the button for 5 seconds more, it will make the AP to search for a CAPsMAN server; keep holding the button for another 5 seconds if you want the NetMetal ac2 to look for Netinstall servers.
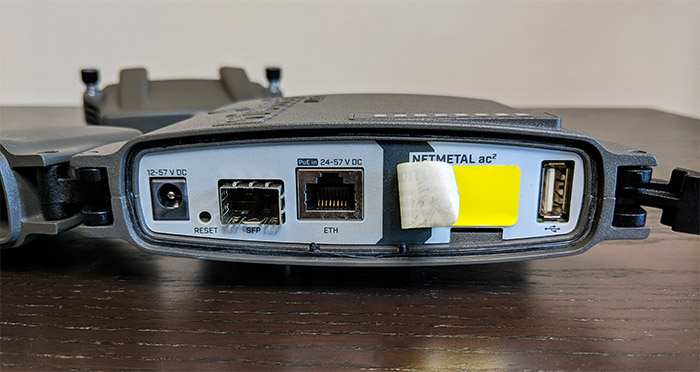
The SPF port is useful for a fiber connection and next to it, there’s a PoE-in Ethernet port (25-57V DC) which can be connected to a 802.3af/at PoE adapter or Ethernet switch. The good news is that Mikrotik has included a small PoE adapter into the box which is great if you don’t have a compatible PoE switch available. Be aware that underneath the yellow tape (that warns you to connect the antennas before powering on the device), there’s a small microSIM slot and further to the right, there’s a USB Type-A port which is useful for adding a USB drive or a 3G/4G modem.
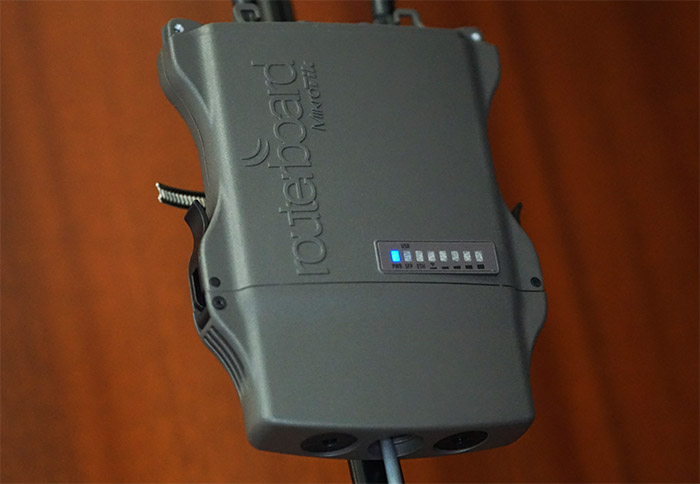
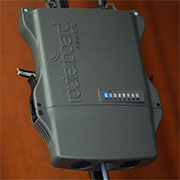
The cover for the ports has three circular openings for the cables that are going to be fed to the NetMetal ac2 and Mikrotik suggests to use shielded CAT6 for the best performance. On the front of the access point, next to the protruded routerboard Mikrotik logo, there is a rectangular area with eight LEDs. The first three LEDs will show you the status of the PWR (solid blue means that the AP is powered on), the USR/SFP (if you connect a fiber cable, the LED will turn solid green) and the ETH (it will get solid green if you connect a Ethernet cable); the last five LEDs will show you the signal strength. I emphasized a lot that the NetMetal ac2 is a rugged outdoor wireless access point and indeed, there is the IP66 certification, suggesting that the enclosure will survive against dust ingress, as well as against powerful water sprays.
This means that it can be mounted outdoors and not worry about powerful storms – be aware that this type of equipment is vulnerable to lightning strikes and yes, there is a grounding screw on the body of the NetMetal ac2, but you should really invest in some overhead deflectors as well.
As for extreme temperatures, the outdoor access point should remain operational even when the temperature is as low as -40 degrees F or as high as 158 degrees F. Since there are no cut-outs, I was a bit worries about the heat management, but, when testing the NetMetal ac2, I noticed that the device would get a bit warm near the top half and nothing more.
Internal Hardware
The teardown process is made quite simple since Mikrotik relied on some screws to keep the device together, but be aware that the IP66 rating was achieved due to a seal which surrounds the main enclosure of the wireless access point. For this reason, I would advise against opening the device since the seal may get damaged (or improperly re-added) which can end up with the access point getting damaged by bad weather.
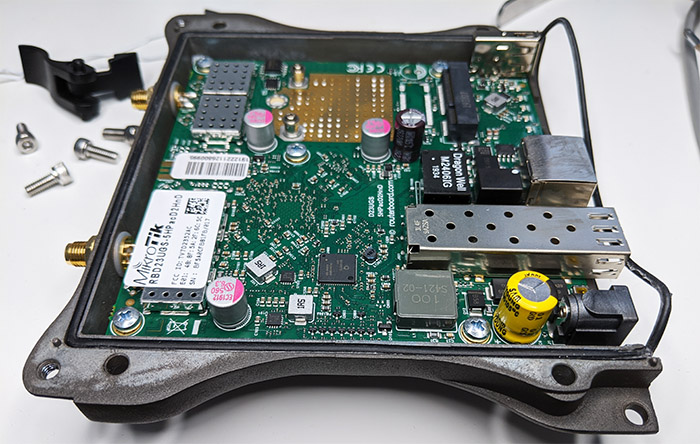
That being said, I was able to identify a quad-core Qualcomm IPQ4019 NE933FNV SoC (built on the ARM 32bit architecture), 256MB of RAM from Nanya (1935 NT5CC128M16JR-EK), 16MB of flash memory from Winbond (25Q128JVSM), a Qualcomm QCA8072 PK941BPP dual-Ethernet Phy controller and a Dragon Well M2406IG 1934 Ethernet transformer. Furthermore, for the wireless performance, the NetMetal ac2 relies on the IPQ4019 SoC.
The outdoor access point features a maximum theoretical data transfer rate of 300Mbps on the 2.4GHz band and a maximum theoretical data transfer rate of 867Mbps on the 5GHz radio band, which means that the device is an AC1200-class wireless access point.
Installation
The hardware installation on a pole is straight-forward, requiring the use of the hose clamp (provided in the package) and a screwdriver to properly attach the access point. It isn’t immediately obvious how you could mount the device on a wall, but there is a DIN rail mount (K-27) which could prove to be useful in this scenario and it will also work great if you want to attach the WAP on the back of a large antenna. One aspect that you should take into consideration is that the NetMetal ac2 should be installed with the antennas pointing upwards (otherwise, the ports area can be compromised by bad weather) – I would have liked if there were some seals going around the cable/s to ensure that no water or dust can enter into the ports enclosure.

To power up the device, you could use a power cable and then an Ethernet cable to connect the access point to a router, but, considering that Mikrotik went the extra mile and added a PoE adapter, it would be a shame not to give this awesome technology a try. That being said, you will need to connect the provided power adapter to the PoE injector and then take the built-in Ethernet cable and insert it into your router. Afterwards, take a long CAT 6 shielded cable and insert one end into the PoE out end of the PoE adapter and the other end into the Ethernet port on the access point. At this point, the PWR LED should turn solid blue and you should now be able to access the RouterOS – and yes, you do need the IP address. I had access to the router’s UI, so I only had to search the NetMetal ac2 into the connected clients list, but, in case you don’t know the IP address, Mikrotik has made available the Winbox tool to help you quickly access the RouterOS interface.
RouterOS
The RouterOS is a beast of a software and there are may types of configurations available for both home and especially enterprise use, well, mostly for SMBs since these are clearly the main target audience. After accessing the GUI, you will be immediately taken to the Quick Set page, where you can adjust the Wireless settings – it includes setting the Mode (yes, the NetMetal ac2 can also work as a Router), the band, the channel width, the security, the encryption and the country (make sure to select the correct one to ensure that the access point will function without breaking any local regulations). If you’re unfamiliar with RouterOS (and have mostly worked with home-suitable routers), the available options for each setting will seem overly complicated, but that’s the point that Mikrotik is trying to make: you get the freedom to adjust pretty much anything. But that also means that you will need to constantly consult the manual or the online guides to understand what each feature does (therefore the steep learning curve).
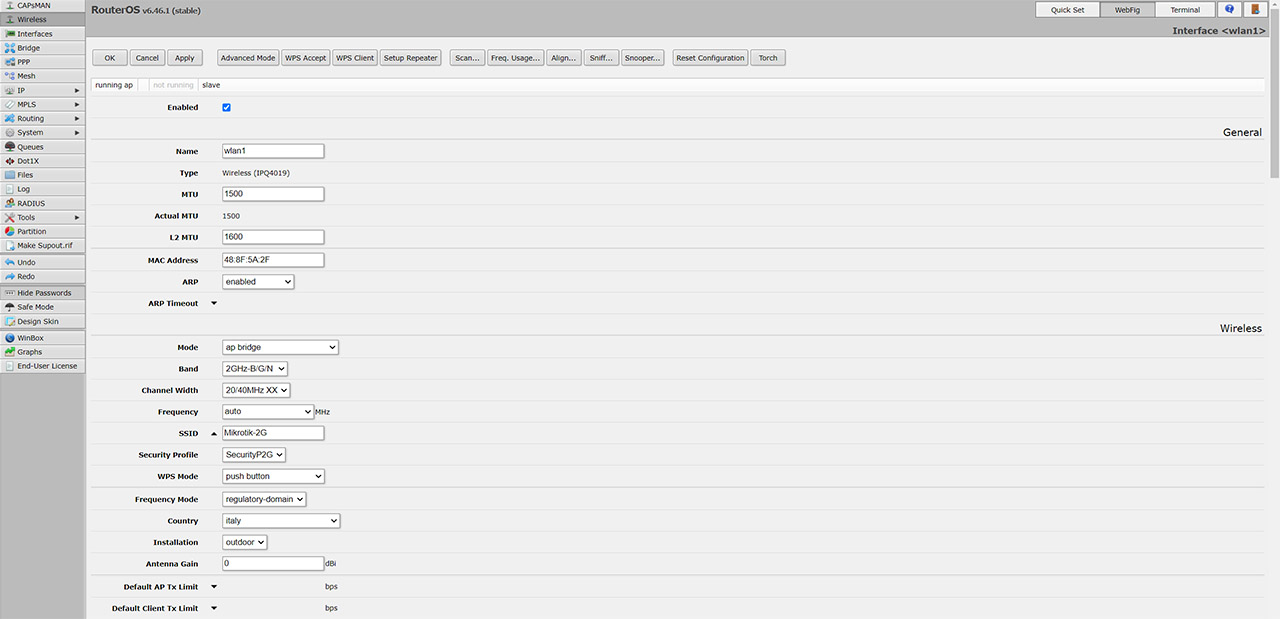
The default configuration is WISP AP, but, is you click on the top right corner, you can select CAP, CPE, Home AP Dual, Home Mesh, PTP Bridge AP or PTP Bridge CPE. Selecting any of these options will load up the suggested configuration, therefore making the process more simple. Well, kind of, since a few important settings need to be made in the WebFig (the second main option, after the Quick Set and next to the Terminal). The WebFig can seem like your regular AP controller or consumer web-based interface, but if you click on any feature, you’ll be assaulted by a myriad of options. The first feature from the vertical menu on the left is the CAPsMAN (controlled access point system manager) and the point of this tool is to unify multiple CAP access points under a single controller, allowing the administrator to configure a group of APs on a specific site at the same time. The next section is Wireless and here, you’ll be able to see the status of the two WLANs: click on any of them to access the settings.
Mikrotik NetMetal ac2
-
Pros
- Rugged all-metal case
- RouterOS is very flexible and allows multiple types of configurations
- The app is useful for newcomers
- Supports PoE
- Has a PoE adapter in the box
Cons
- RouterOS requires a steep learning curve
- There are no antennas in the package
Mark is a graduate in Computer Science, having gathered valuable experience over the years working in IT as a programmer. Mark is also the main tech writer for MBReviews.com, covering not only his passion, the networking devices, but also other cool electronic gadgets that you may find useful for your every day life.