
Since the security cameras have gotten quite affordable, a lot more people are now interested to keep their home and surroundings under surveillance and yes, indoor cameras are important to check on your kids, but outdoors is where a proper surveillance system can make a difference. And it’s not only about catching people in the act, but to actively discourage any potential trespassers from stealing stuff from your property (such as your packages). As expected, you do have lots of options available, but the Reolink RLC-522 has managed to catch my eye due to its zooming capability.
| Reolink RLC-522 | |
|---|---|
| Reolink.com | Check Product |
This should prove to be quite useful outdoors and indeed, the camera is built to withstand a harsher weather and it also relies on PoE to significantly simplify the installation process.
The RLC-522 also has a 5-megapixel sensor to deliver an excellent image quality (2560×1920 resolution), the night vision seems to go up to 100 feet, there is motion detection, an intuitive app and multiple ways to store the footage (including the support for the proprietary Reolink NVR).
I have tested a couple of Reolink cameras before (the E1 Zoom and the E1 Pro) and the image quality was great, but an outdoor camera needs to be able to cover a larger field of view and to withstand the elements, so let’s check out the RLC-522 and see how it behaves when installed outside.
Note: Inside the package, besides the Reolink RLC-522 camera, there are four screws for mounting it on a wall or ceiling, an Ethernet cable, a user manual and a waterproof lid kit to protect the cable connectors from outdoor conditions.
Design and Build Quality
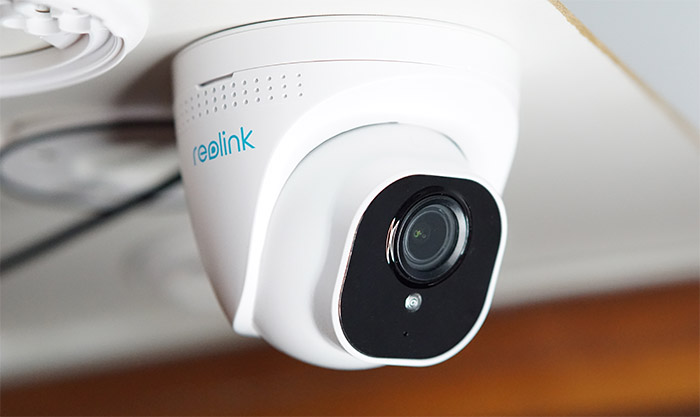
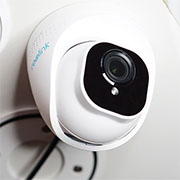
Unlike the RLC-511 which was clearly designed to be positioned outside, the RLC-522 is a bit more subtle in this regard, featuring a dome-type case which will work great when positioned on the ceiling, so it’s more protected from storms, snow and yes, even birds. And this unobtrusive nature is pretty much the main advantage of the dome cameras over the bullet type ones. The Reolink RLC-522 is completely covered by a white matte finish with the stand made from plastic and the main body of the camera seems to be made of zinc alloy. After opening up the case, I realized that the manufacturer not only used zinc for making the camera tougher but also for offering a better material for heat dissipation. It’s also worth mentioning that the RLC-522 is equipped with a Novatek NT98515MBG chipset and I also spotted a Ruimeng MS41929 JC9JZ1 integrated circuit chip on the lens PCB (there are two of them inter-connected).
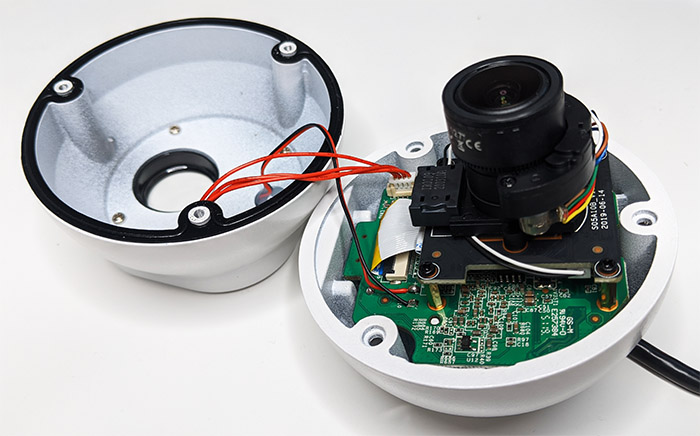
So yes, as I previously anticipated, the Reolink RLC-522 is indeed equipped in the same manner as the E1 Zoom – not that surprising since both cameras support 3x zoom. When disassembling the camera, I realized that the plastic base is just for holding the circular zinc body, so any adjustments that you want to make to the viewing angle need to be made manually (yes, you cannot pan or tilt the camera from the app). The good news is that all those cut-outs and openings won’t take away from the device’s resistance to the elements, since the main alloy body of the RLC-522 is fully insulated. The Reolink RLC-522 is advertised as being IP66-rated which suggests that the camera is fully protected against dust ingress (and any other finer particles) and it should also survive even when powerful jets of water are directed towards the enclosure (such as a heavier rains). The working temperature is between 14°F and 131°F, so a freezing winter with very low temperatures may prove to be a bit too much for the camera (you should have no problems with other types of harsh weather).
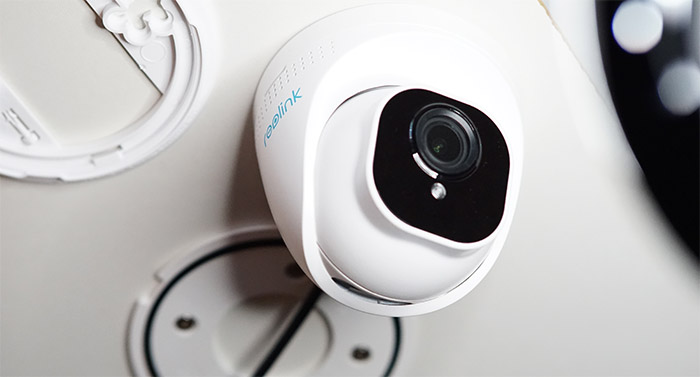
The circular main body has a rectangular area especially dedicated for the lens (which features a viewing angle between 48 to 94 degrees). This area protrudes outwards and has a black glossy finish that hides the 18pcs infrared LEDs which only illuminate when the brightness sensor is triggered by low light conditions. There is also a small microphone and the 12 mm lens, but I realized that there is no speaker so, unlike the E1 series, there is no support for the two-way communication and the microphone is only going to be great for recording sound along with the video.

The device itself has the usual proportions of a dome camera, measuring 4.14 x 3.66 inches (10.53 x 9.3 cm) and it weighs 12.3 ounces (350 grams), so it does have a bit of weight to it. But this helps give it a more premium feel and the good news is that the plastic is very solid and doesn’t creak. From the bottom of the RL-522, you can detach the mounting bracket (move it clockwise) which allows you to position the cable in any way you want (for example, it can go straight through the ceiling).
At the end of the cable, it gets divided into three extremities, one suitable for connecting to an Ethernet cable (if you want to power the camera using the PoE technology), the other for using a regular power cable (12V 2A – and no, the cord is not provided into the package) and lastly, the third extremity has a Reset button which, when pressed for about 10 seconds, will return the camera to its default factory settings. As for storage options, you won’t immediately see the card slot, but if you move the camera body around a bit, you will notice that there is a plastic cover tightly attached using a couple of screws.
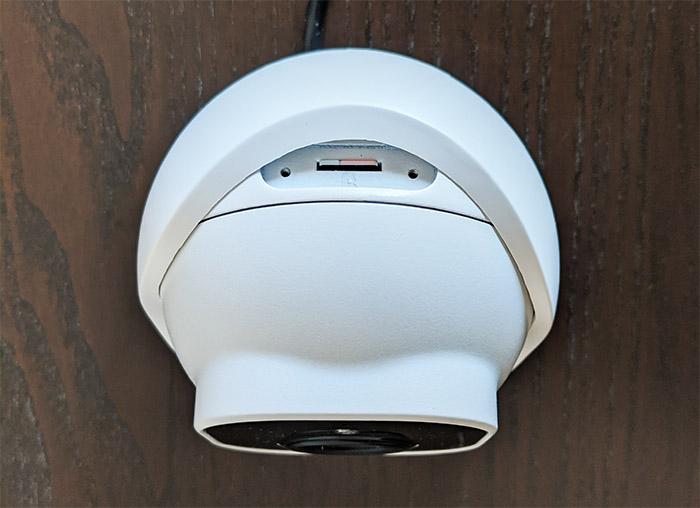
Rotate the spherical section around to get full access to the cover screws and, after removing them, you will be able to easily insert a microSD card (it supports up to 64GB, a limitation that I’m not really fond of since it can quickly get filled when continuously recording the footage). The RLC-511 has a small cowling to reduce the sun glare, while the RLC-522 does not (the nature of its construction), but I doubt you will deal with this issue if the camera is installed on the ceiling.
Note: The RLC-522 does get a bit hot while functioning.
Hardware Installation and Setup
Ideally, you should install the Reolink RLC-522 on the ceiling (or any similar surface), but, you can also mount it on a wall and in both cases, the cable can be fed either through the middle (directly from the ceiling) or using the small canal to simply attach it to the exterior of a wall. As I said before, you have multiple ways available to power on the camera and the traditional means is by using a power adapter, but, since this is a PoE camera, so you should use an Ethernet cable to both power the device and send data forward and backwards. I noticed that inside the package, the manufacturer added a waterproof lid that you can use to keep the Ethernet cable safe from water or dust. The problem is that you can’t insert a cable that’s already crimped since there’s only space for the Ethernet cable itself (so the lid has to be used on the bare cable, before using the crimping tool). The RLC-522 supports PoE 802.3af and will work with 48V active adapters which are a bit more expensive, but you can also rely on a PoE switch.
In case you’re going with a PoE adapter, make sure to insert the cables properly: one Ethernet cable should go from the router (any LAN port) to the LAN port on the PoE adapter and another Ethernet cable should go from the camera to the PoE port that can be found on the adapter. If you decide to use a PoE switch, then things get decisively more simple since you can use any PoE port available. After powering on the RLC-522, you should hear the zooming sound for a few seconds and then you can download and install the Reolink mobile app (available on iOS and Android OS).
Reolink RLC-522
-
Pros
- Excellent video quality
- 3x zoom
- Good motion detection
- Is dust and waterproof (IP66)
- Makes use of the PoE technology
Cons
- Supports cards only up to 64GB
- The case gets a bit hot
- No automatic pan or tilt
Mark is a graduate in Computer Science, having gathered valuable experience over the years working in IT as a programmer. Mark is also the main tech writer for MBReviews.com, covering not only his passion, the networking devices, but also other cool electronic gadgets that you may find useful for your every day life.