
Switching to the first WiFi 5 client device, the laptop equipped with an 8265 WiFi adapter, I saw an average of 686Mbps upstream and 311Mbps downstream (5 feet). It was interesting to see that the WiFi 5 client reached a bit farther and even at 70 feet (-84dB attenuation), I could see an average of 151Mbps up and 36.2MBps downstream which was actually decent for most applications.
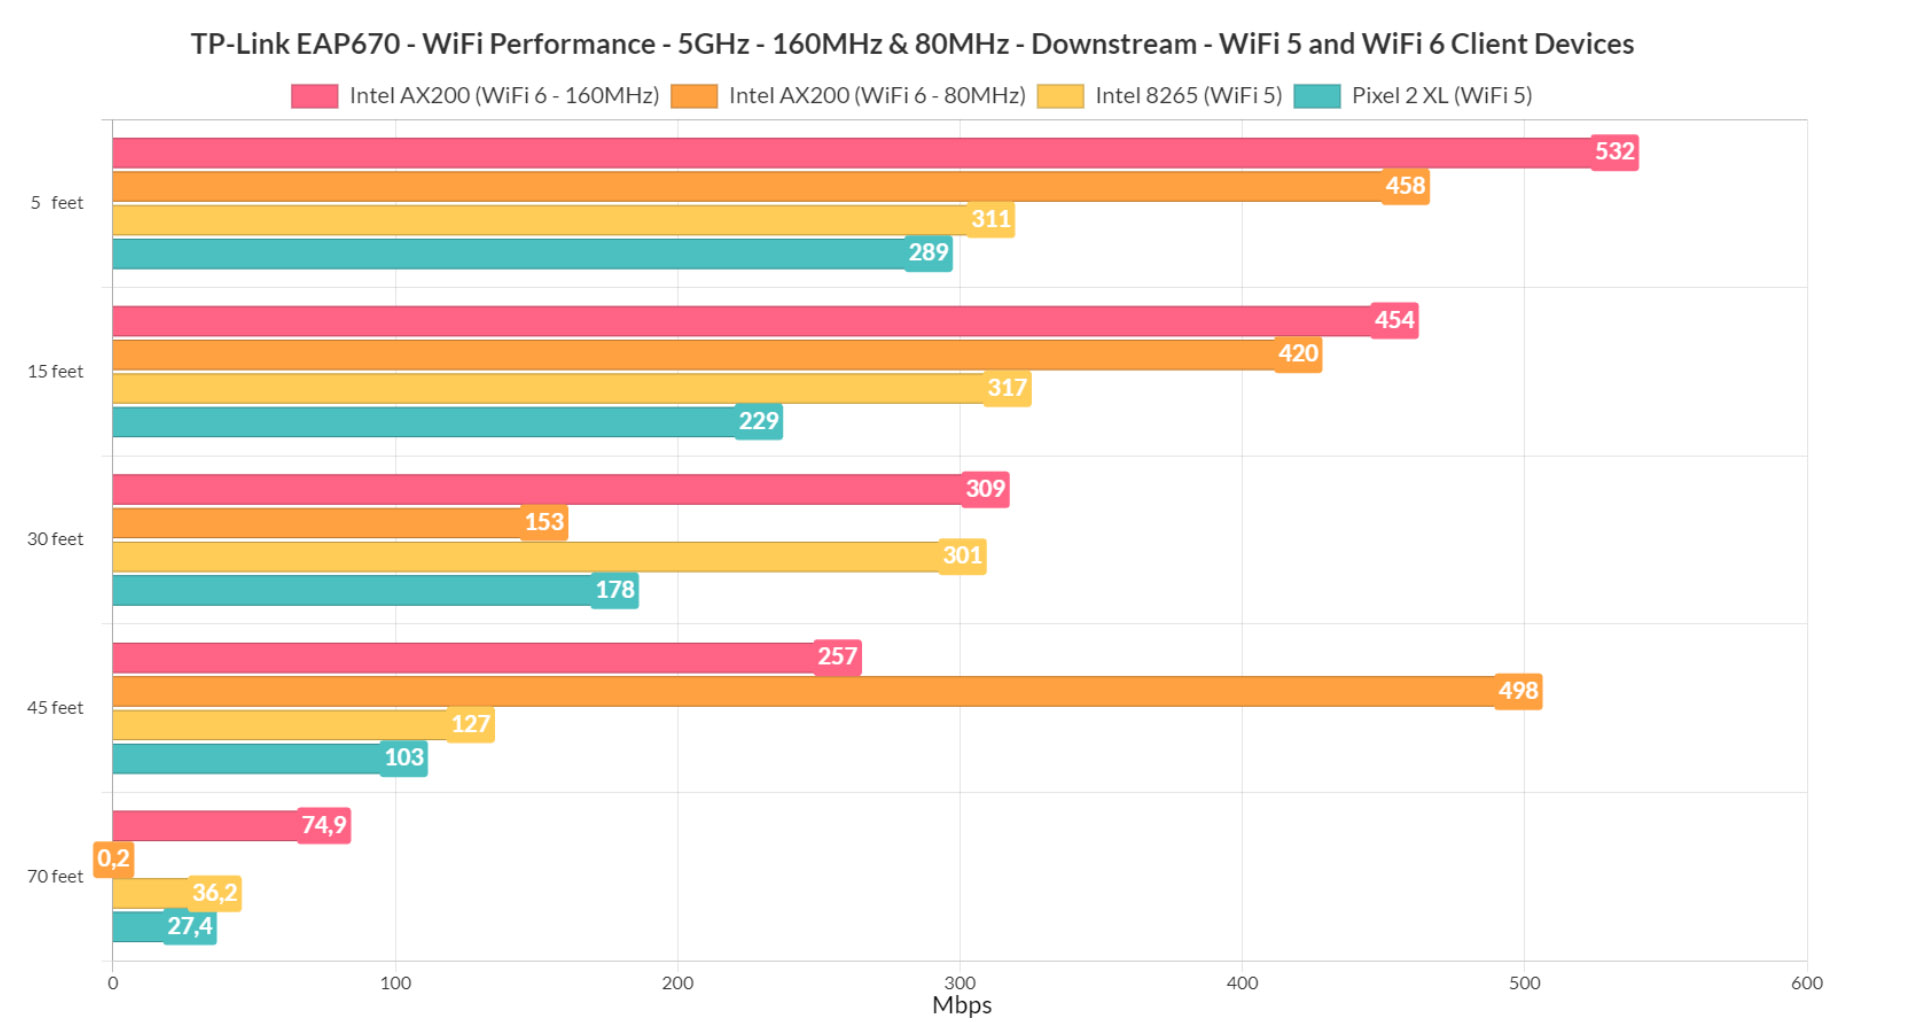
Lastly, I connected the Pixel 2 XL client device (also WiFi 5) and the performance is nothing to brag about. At 5 feet, upstream, the phone managed to reach 366Mbps and downstream, it was 289Mbps. At 70 feet, I saw -73dB attenuation and the throughput was 33Mbps upstream and 27.4Mbps downstream. Not that great, but still usable.
Wireless Test (2.4GHz)
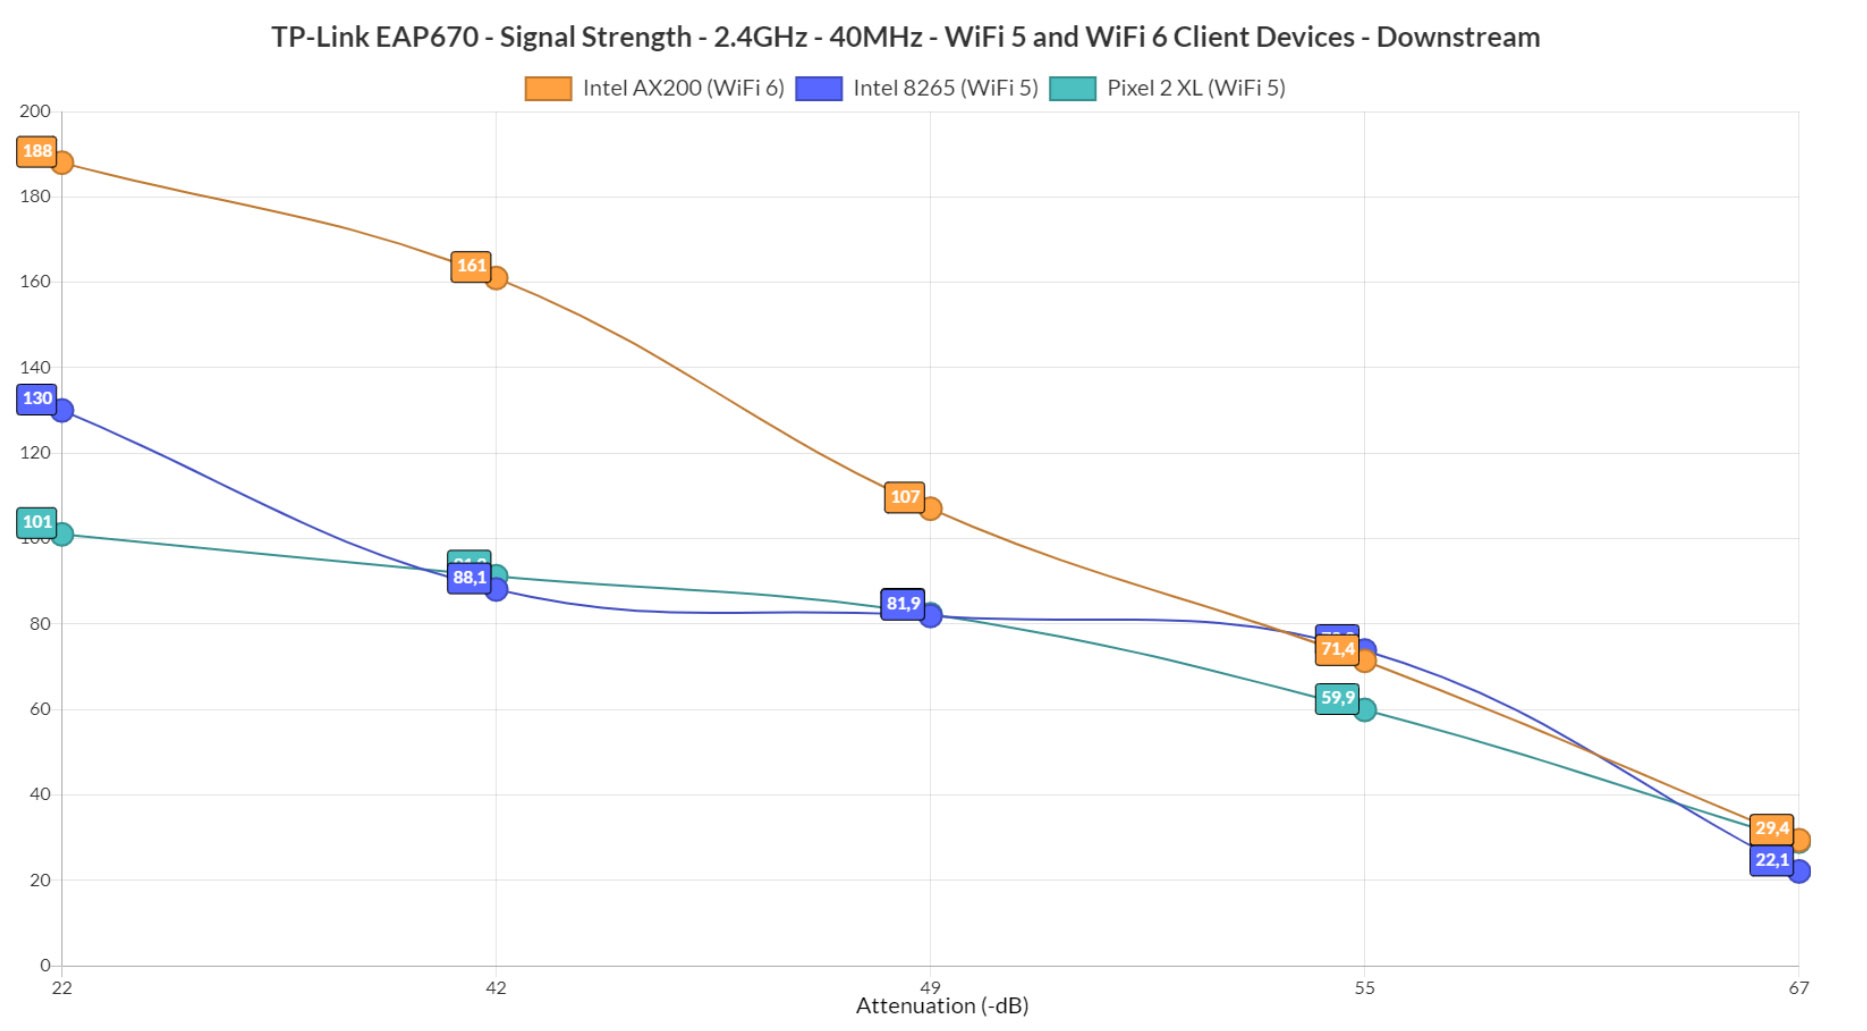
The use of two antennas did have an impact on the performance since the TP-Link EAP670 does not reach the same highs as the EAP660 HD, but it’s still a decent throughput. The attenuation also has a bit less impact than expected.
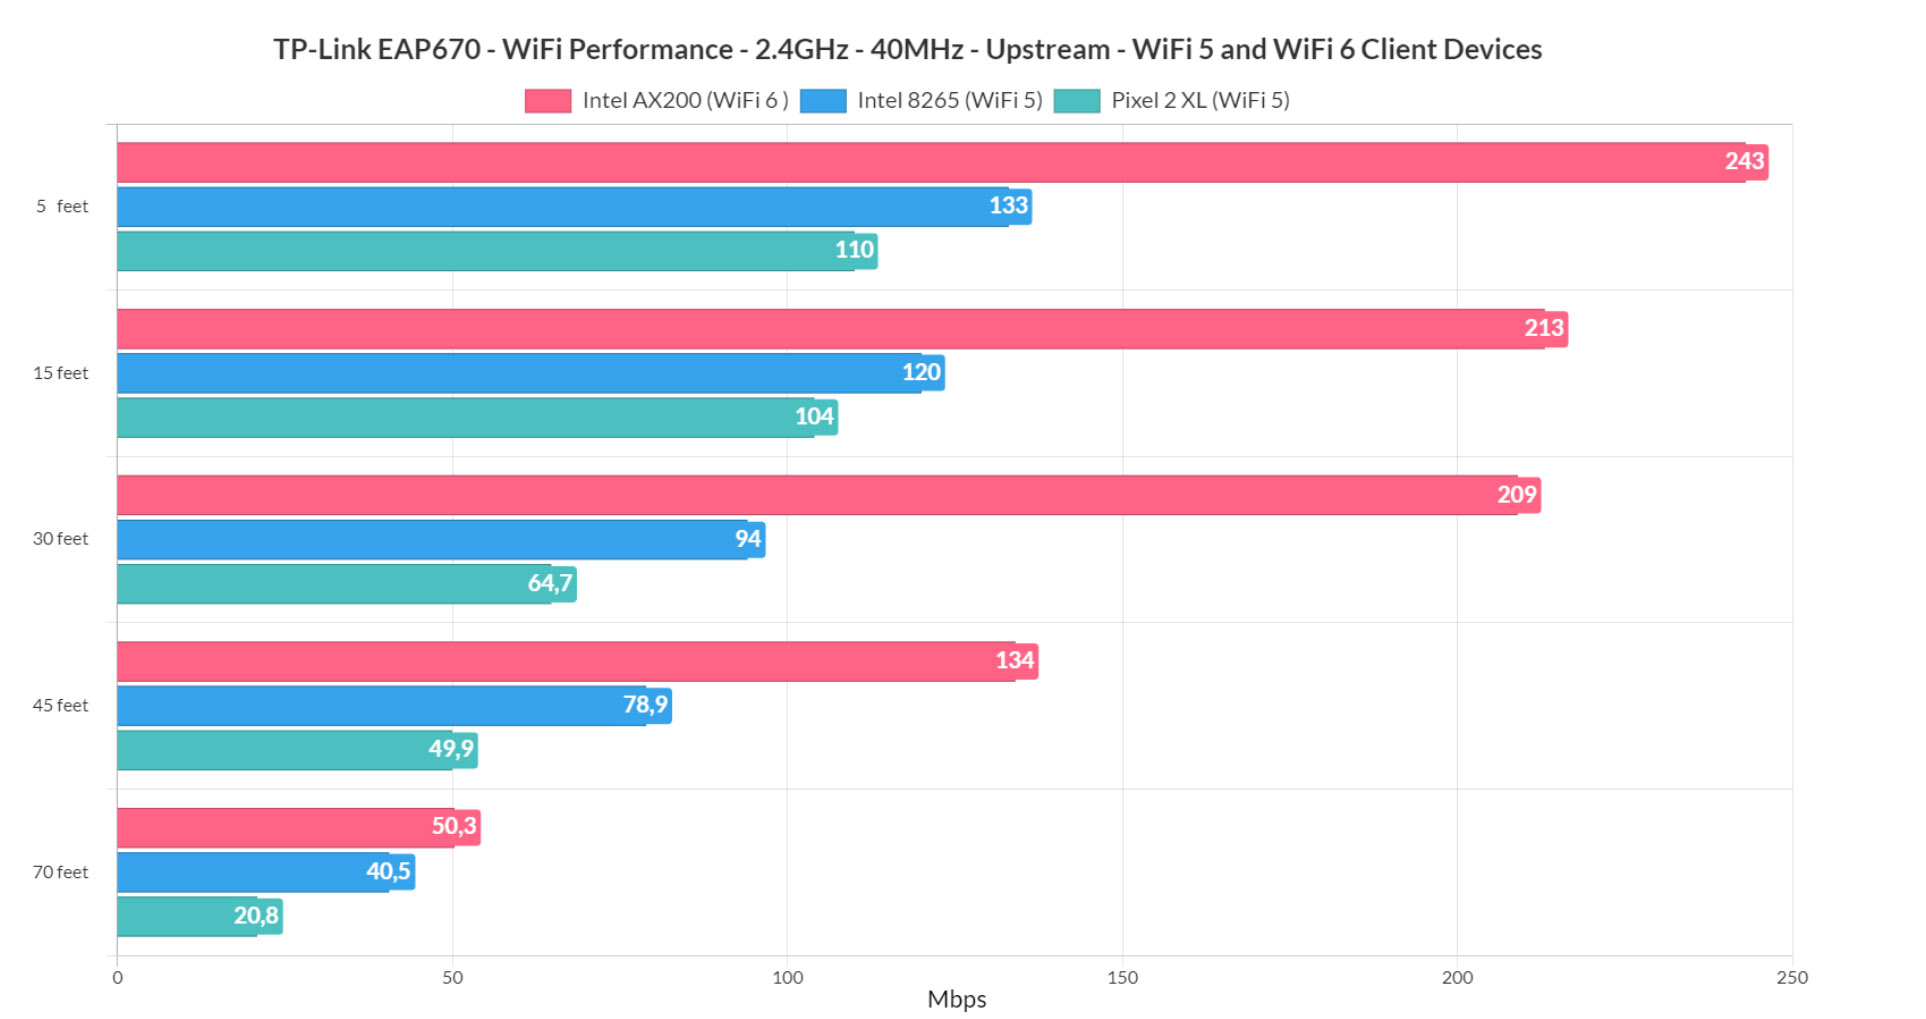
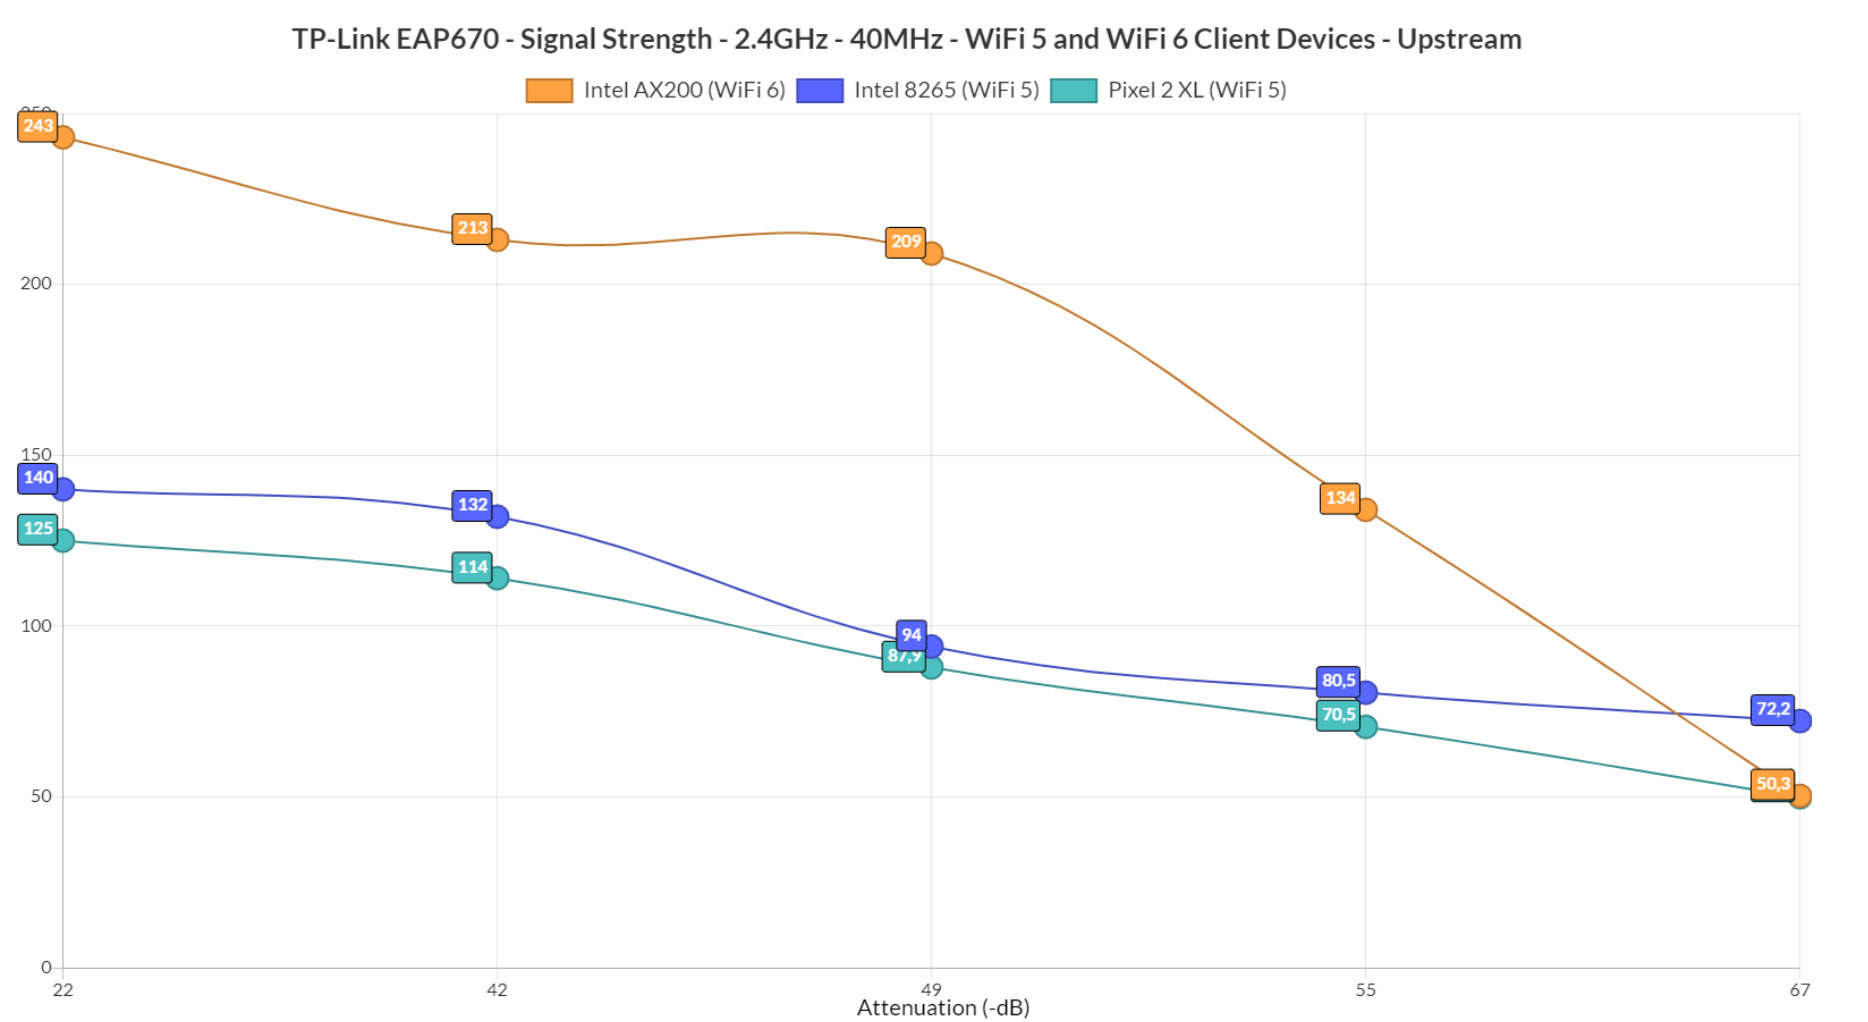
That being said, using the AX200 client device (WiFi 6), I measured an average of 243Mbps at 5 feet, upstream and an average of 188Mbps downstream. Going to 70 feet, you still get an average of 50.3Mbps up and 29.4Mbps downstream. Next, I moved to the first WiFi 5 client device (Intel 8265) and, at 5 feet, I measured an average of 133Mbps up and 114Mbps downstream. At 70 feet (-75dB), I saw an average of 40.5Mbps upstream and 12.4Mbps downstream – still more than enough for your smart devices.
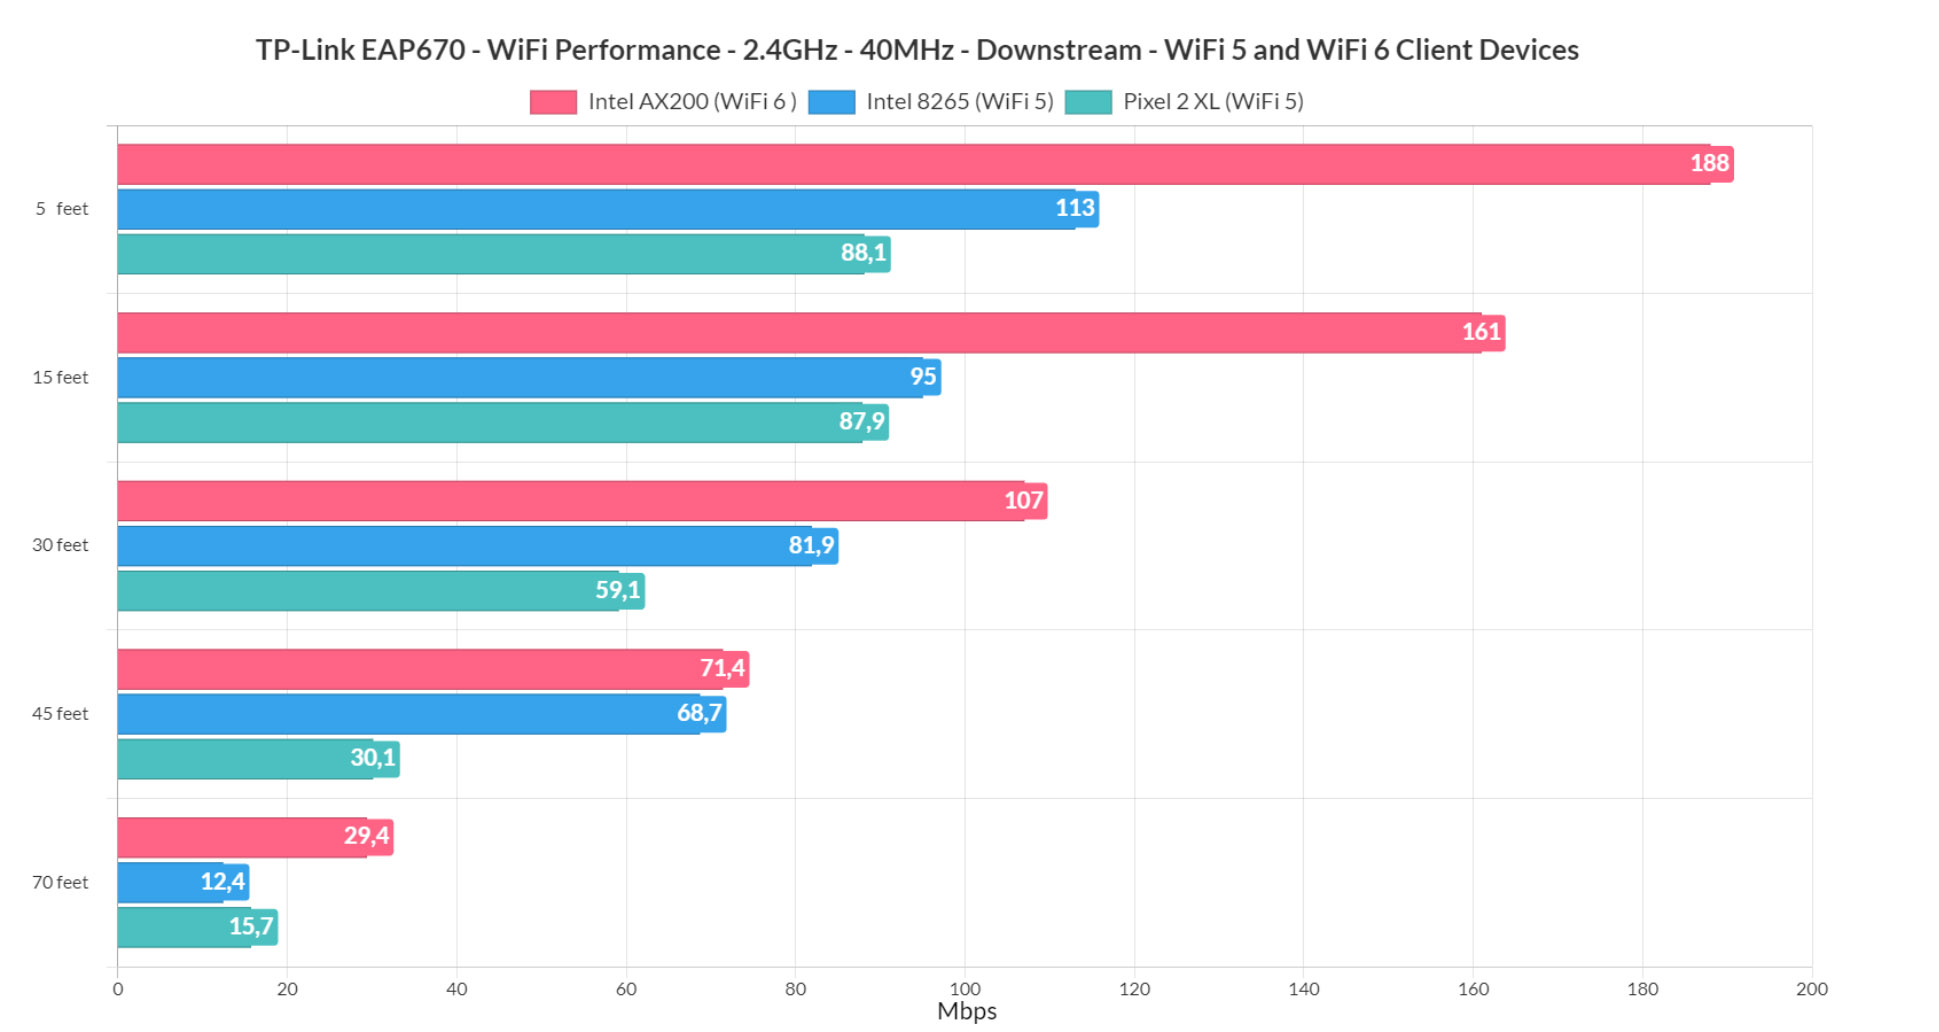
Then, there’s the Pixel 2 XL (WiFi 5) which was able to reach up to 110Mbps up and 88.1Mbps down at 5 feet and, going to the 70 feet point (-79dB attenuation), I saw an average of 20.8Mbps upstream and an average of 15.7Mbps downstream.
Setup and Software
Standalone Mode
TP-Link does offer a very comprehensive stand-alone mode and it can be accessed by inserting the IP address received from the router in the URL of your browser. The default credentials are admin / admin and you’ll be requested to enter a new username and password, and then, after setting up the WiFi networks, you can access the GUI. And it’s very similar to what you see on TP-Link routers. There are four main sections at the top, the first being the Status.
And here, you can check some general details about the Device itself, the Wireless networks, as well as the Client devices (it’s possible to set a Rate Limit or even Block the device entirely). Next, there’s the Wireless section where you get some fairly in-depth options that you can adjust for both available radio bands.
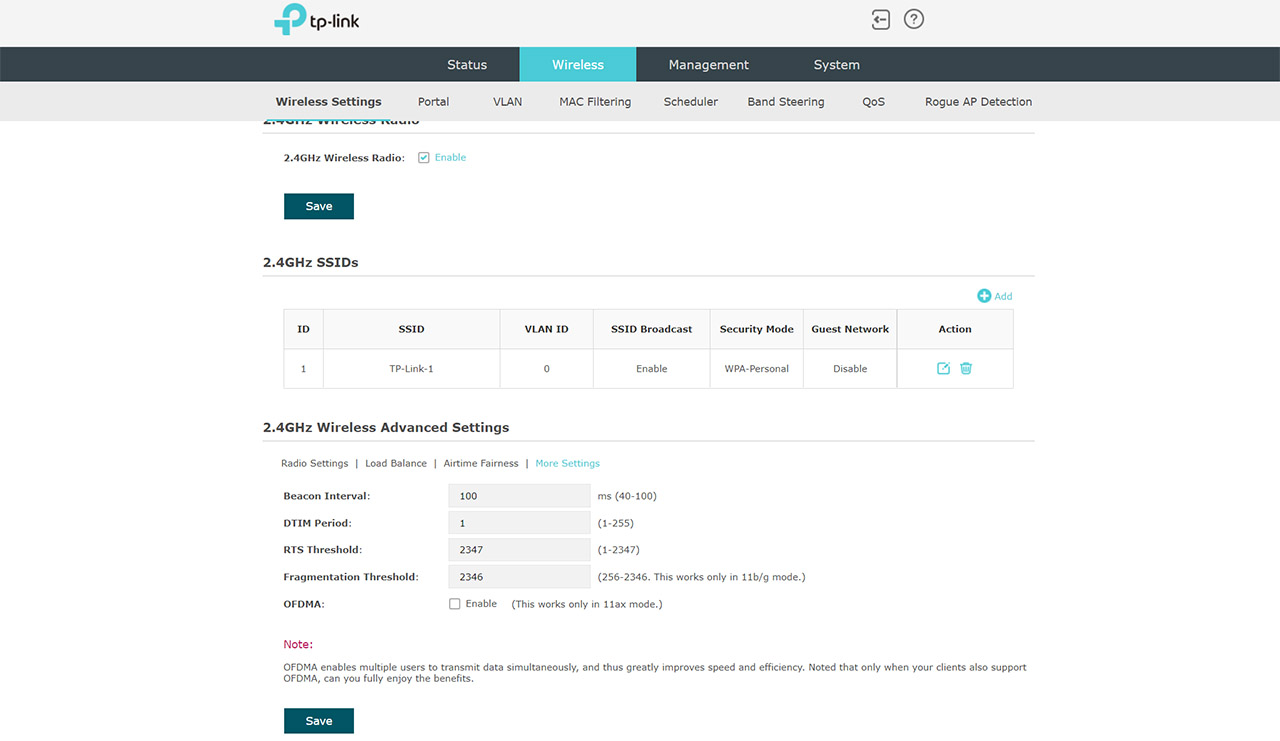
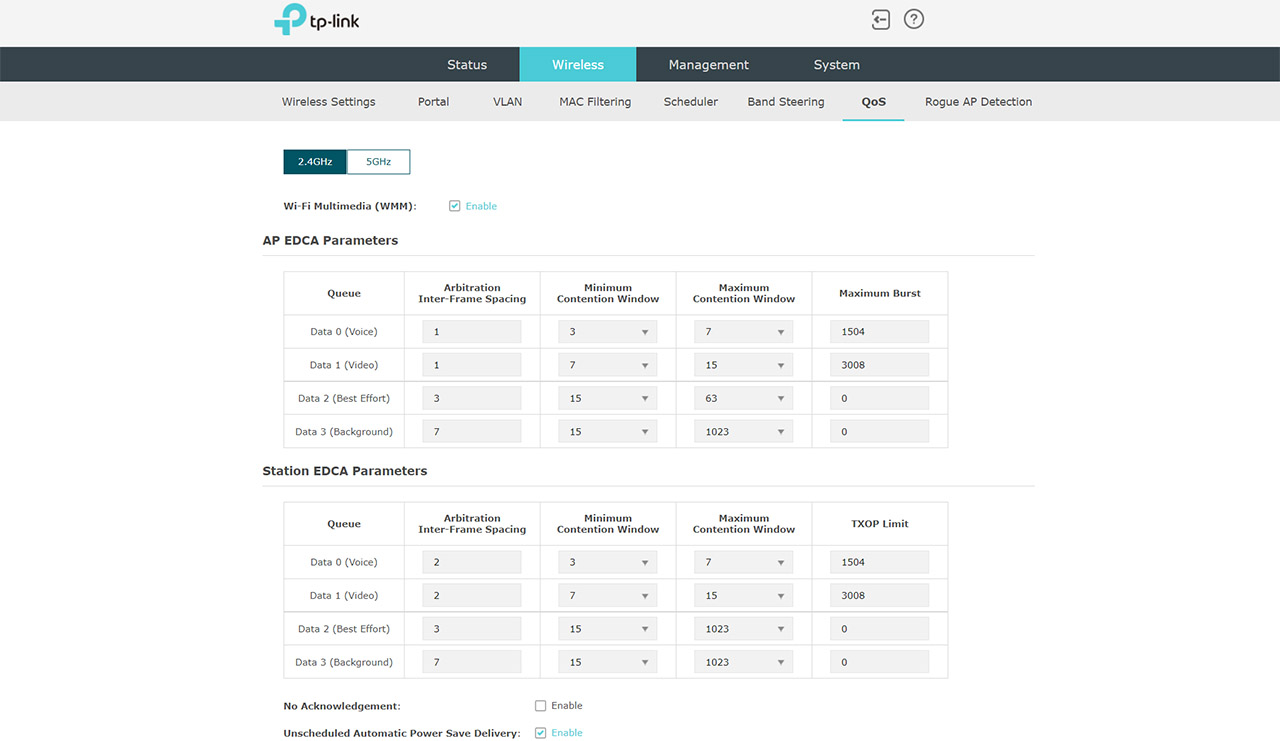
It includes adjusting the Tx Power, the Airtime Fairness (I would advise against enabling it), set Load Balancing between multiple APs, as well as set the Beacon Interval or enable OFDMA (it’s turned off by default). Other settings include setting up a Portal (support Local Password and External RADIUS Server authentication), VLAN, MAC Filtering, Band Steering, QoS and Rogue AP Detection. The last setting is not really on the same level as on the EnGenius ECW230S or the ECW220S, but it’s still plenty useful for detecting bad actors.
The next main section is the Management where you can check the System Log, set the Web Server, SSH, SNMP, control the LED and more. Lastly, the TP-Link EAP670 standalone mode offers the System settings where it’s possible to update the firmware, set the admin account, the controller options and more.
The Omada SDN
Since I still have the OC200 hardware controller, I used it to access the Omada SDN and to adopt the TP-Link EAP670. While the OC200 was connected to the same switch as the AP, I could see the EAP670 in the Devices section showing the Pending status, so all I had to do is click on it and choose Adopt.
A few seconds later, the right-sided window will be populated with various info about this specific access point. I have very recently tested the Ubiquiti U6-Pro and the similarities between Omada and UniFi are striking. That being said, you can see some general info about the AP, the LAN, the Uplink and the Radios. Then, there’s the Client section where you can see a lot of detailed info about the connected device and, if you’re meshing the TP-Link EAP670, then the Mesh section will also display some status info.
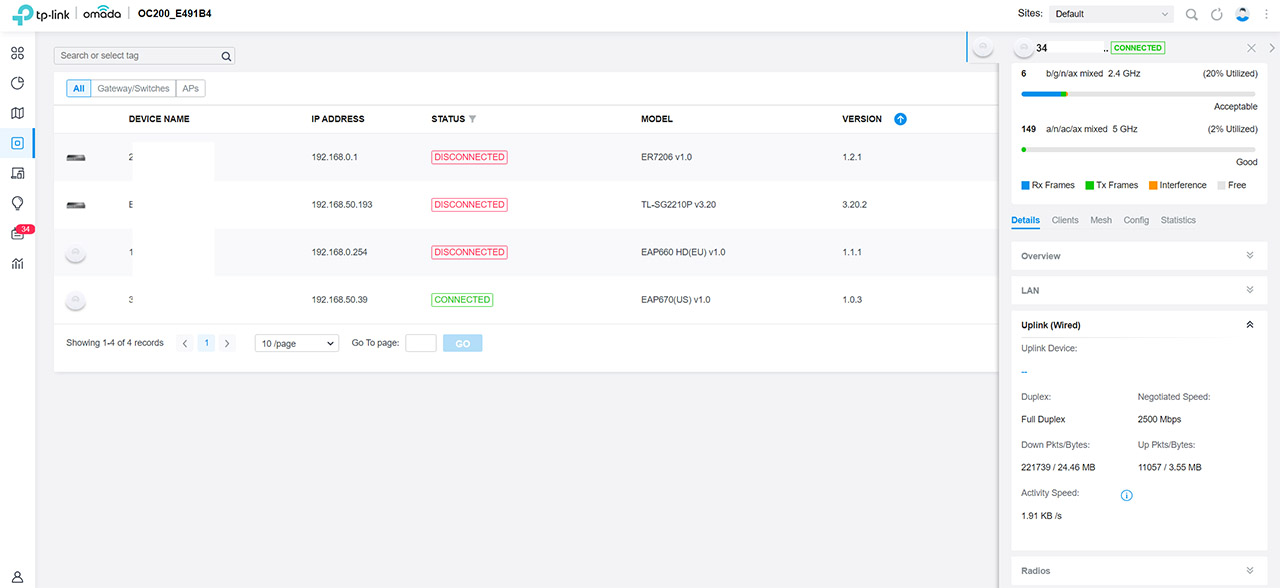
Under Config, it’s possible to set a Fallback IP, change some basic Radios settings, enable VLAN and, under Advanced, it’s possible to enable OFDMA, QoS and more. Lastly, I could upgrade the firmware, start the Force Provision function or Move the AP to another Site. The Omada SDN does have some global settings that get applied to any newly added access point to this specific network and they can be accessed by clicking the cogwheel icon.
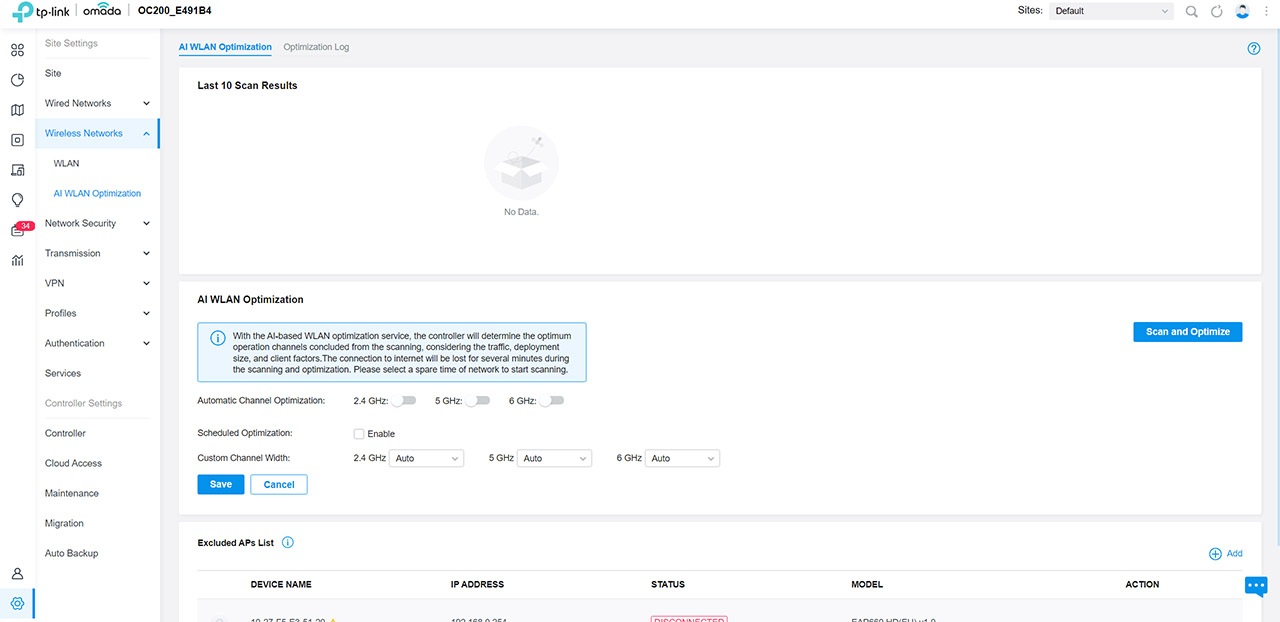
What we’re interested in is the Wireless Network section where it’s possible to configure the WiFi network/s and there are some proper advanced settings including the option to enable 802.11r (for roaming) and MAC Filtering. I saw that similarly to Ubiquiti, TP-Link has also added an AI WLAN Optimization which can be scheduled and it’s a very important aspect considering that neighboring WiFi networks always change, so the values need to be adjusted accordingly.
Another important set of settings can be found under Authentication and here is where you can create Portals (for hotels, hospitals or airports) and I saw that there is the possibility to use the MAC-Based Authentication and configure the RADIUS Profile.
The Conclusion
So, is the TP-Link EAP670 just a better equipped EAP660 HD? Well, kind of. The 160MHz channel bandwidth does allow for some phenomenal speeds if you’re able to keep the interference low, otherwise, the WiFi performance is somewhat similar to the EAP660 HD (on the 80MHz). Downstream, it wasn’t as potent though. As for the 2.4GHz, there is a slight downgrade which can be clearly experienced, although nothing dramatic.
Other than that, the access point offers a comprehensive standalone mode and the possibility to be adopted into the Omada ecosystem, plus it doesn’t cost that much, going straight for Ubiquiti’s market share. Should you consider it? Yes, it’s a solid WiFi 6 access point with a good performance.
TP-Link EAP670
-
Pros
- 2.5GbE port + really good WiFi performance on the 5GHz with WiFi 6 client devices
- Can be used with Omada SDN (also has a comprehensive interface)
- Can be a part of a mesh network
- Supports PoE
- Comes with a power adapter
Cons
- The AP has a very large case
- Some additional in-depth options for the APs in the controller would be welcomed
Mark is a graduate in Computer Science, having gathered valuable experience over the years working in IT as a programmer. Mark is also the main tech writer for MBReviews.com, covering not only his passion, the networking devices, but also other cool electronic gadgets that you may find useful for your every day life.